1
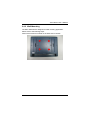
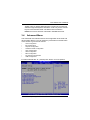
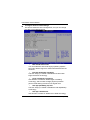
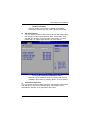
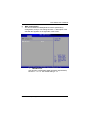
GOT-5840T-830 All-in-One 8.4” SVGA TFT Fanless Touch Panel Computer with Intel® AtomTM N270 Processor Onboard User’s Manual Disclaimers This manual has been carefully checked and believed to contain accurate information. AXIOMTEK Co., Ltd. assumes no responsibility for any infringements of patents or any third party’s rights, and any liability arising from such use. AXIOMTEK does not warrant or assume any legal liability or responsibility for the accuracy, completeness or usefulness of any information in this document. AXIOMTEK does not make any commitment to update the information in this manual. AXIOMTEK reserves the right to change or revise this document and/or product at any time without notice. No part of this document may be reproduced, stored in a retrieval system, or transmitted, in any form or by any means, electronic, mechanical, photocopying, recording, or otherwise, without the prior written permission of AXIOMTEK Co., Ltd. ©Copyright 2009 AXIOMTEK Co., Ltd. All Rights Reserved August 2009, Version A2 Printed in Taiwan ii Safety Approvals CE Marking FCC Class A FCC Compliance This equipment has been tested in compliance with the limits for a Class A digital device, pursuant to Part 15 of the FCC Rules. These limits are meant to provide reasonable protection against harmful interference in a residential installation. If not installed and used in accordance with proper instructions, this equipment might generate or radiate radio frequency energy and cause harmful interference to radio communications. However, there is no guarantee that interference will not occur in a particular installation. If this equipment does cause harmful interference to radio or television reception, which can be determined by turning the equipment off and on, the user is encouraged to try to correct the interference by one or more of the following methods: 1. Reorient or relocate the receiving antenna. 2. Increase the separation between the equipment and receiver. 3. Connect the equipment to another outlet of a circuit that doesn’t connect with the receiver. 4. Consult the dealer or an experienced radio/TV technician for help. Shielded interface cables must be used in order to comply with the emission limits. iii Safety Precautions Before getting started, please read the following important safety precautions. 1. 2. 3. 4. 5. 6. 7. 8. iv The GOT-5840T-830 does not come equipped with an operating system. An operating system must be loaded first before installing any software into the computer. Be sure to ground yourself to prevent static charge when installing the internal components. Use a grounding wrist strap and place all electronic components in any staticshielded devices. Most electronic components are sensitive to static electrical charge. Disconnect the power cord from the GOT-5840T-830 before any installation. Be sure both the system and external devices are turned OFF. A sudden surge of power could ruin sensitive components that the GOT-5840T-830 must be properly grounded. The brightness of the flat panel display will be getting weaker as a result of frequent usage. However, the operating period varies depending on the application environment. Turn OFF the system power before cleaning. Clean the system using a cloth only. Do not spray any liquid cleaner directly onto the screen. The GOT-5840T-830 may come with or w/o a touchscreen. Although the touchscreen is chemical resistant, it is recommended that you spray the liquid cleaner on a cloth first before wiping the screen. In case your system comes without the touchscreen, you must follow the same procedure and not spray any cleaner on the flat panel directly. Avoid using sharp objects to operate the touchscreen. Scratches on the touchscreen may cause malfunction or internal failure to the touchscreen. The flat panel display is not susceptible to shock or vibration. When assembling the GOT-5840T-830, make sure it is securely installed. Do not open the system’s back cover. If opening the cover for maintenance is a must, only a trained technician is allowed to do so. Integrated circuits on computer boards are sensitive to static electricity. To avoid damaging chips from electrostatic discharge, observe the following precautions: z z Before handling a board or integrated circuit, touch an unpainted portion of the system unit chassis for a few seconds. This will help to discharge any static electricity on your body. When handling boards and components, wear a wristgrounding strap, available from most electronic component stores. Trademarks Acknowledgments AXIOMTEK is a trademark of AXIOMTEK Co., Ltd. IBM, PC/AT, PS/2, VGA are trademarks of International Business Machines Corporation. ® Intel and Atom™ are registered trademarks of Intel Corporation. MS-DOS, Microsoft C and Quick BASIC are trademarks of Microsoft Corporation. VIA is a trademark of VIA Technologies, Inc. SST is a trademark of Silicon Storage Technology, Inc. UMC is a trademark of United Microelectronics Corporation. Other brand names and trademarks are the properties and registered brands of their respective owners. v Table of Contents Disclaimers ....................................................................................ii Safety Approvals .......................................................................... iii Safety Precautions .......................................................................iv CHAPTER 1 INTRODUCTION ......................................................... 1 1.1 General Description .................................................... 1 1.2 Specifications.............................................................. 2 1.2.1 Main CPU Board ......................................................... 2 1.2.2 I/O System .................................................................. 3 1.2.3 System Specification .................................................. 3 1.3 Dimensions ................................................................. 5 1.4 I/O Outlets................................................................... 7 1.5 Packing List................................................................. 8 CHAPTER 2 HARDWARE INSTALLATION .................................... 9 2.1 CF card Installation ..................................................... 9 2.2 Serial Ports Interface ................................................ 11 2.3 Ethernet .................................................................... 13 2.4 Mountings – Panel/Wall/Desktop/VESA ................... 14 2.4.1 Panel Mounting ......................................................... 14 2.4.2 Wall-Mounting ........................................................... 15 2.4.3 Desktop-Mounting..................................................... 16 2.4.4 VESA-ARM Mounting ............................................... 18 2.5 DRAM Installation ..................................................... 20 2.6 Wireless LAN Card Installation ................................. 22 CHAPTER 3 AMI BIOS SETUP UTILITY ....................................... 25 3.1 Starting...................................................................... 25 3.2 Navigation Keys ........................................................ 25 3.3 Main Menu ................................................................ 26 3.4 Advanced Menu ........................................................ 27 3.5 PCI PnP Menu .......................................................... 41 3.6 Boot Menu................................................................. 44 3.7 Security Menu ........................................................... 49 3.8 Chipset Menu............................................................ 51 3.9 Exit Menu .................................................................. 56 CHAPTER 4 DRIVERS INSTALLATION ....................................... 58 4.1 System ...................................................................... 58 vi 4.2 4.2.1 4.2.2 4.3 4.3.1 4.3.2 Touch Screen............................................................ 59 Specification.............................................................. 59 Driver Installation- Windows XP ............................... 59 Embedded O.S. ........................................................ 62 Windows XP Embedded ........................................... 62 Windows CE.NET 6.0 ............................................... 63 vii MEMO viii GOT-5840T User’s Manual CHAPTER 1 INTRODUCTION This chapter contains general information and detailed specifications of the GOT-5840T-830. Chapter 1 includes the following sections: 1.1 General Description Specification Dimensions I/O Outlets Package List General Description The GOT-5840T-830 is a fan-less and compact-size touch panel computer, equipped with a 8.4” TFT LCD display and low power consumption Intel ○R AtomTM N270 1.6GHz processor with FSB ® ® 533MHz. The GOT-5840T-830 supports Windows XP, Windows ® CE.NET and Windows XP embedded. The panel computer is able to install a CompactFlash™ card and provide a Mini card socket for wireless module. Its excellent ID and friendly user interface make it a professional yet easy-to-use panel computer. The GOT-5840T-830 is an ideal for space-limited applications in factory automation, machine maker operating systems, building automation, and more. z ¾ GOT-5840T-830: 8.4” TFT SVGA Fanless Touch Panel Computer Reliable and Stable Design The GOT-5840T-830 adopts a fanless cooling system and a Introduction 1 GOT-5840T User’s Manual CompactFlash™ card, which makes it suitable for vibration environments. Embedded O.S. Supported ¾ ® The GOT-5840T-830 not only supports Windows XP, but also ® supports embedded OS, such as Windows CE.NET, and ® Windows XP embedded. For storage device, the GOT-5840T830 supports CompactFlash™ card. Industrial-grade Product Design ¾ The GOT-5840T-830 has an incredible design to be used in different industrial environments. z The front bezel meets the IP65/NEMA4 standard. z For connecting other devices, the GOT-5840T-830 also features several interfaces: USB, Ethernet, and RS-232/422/485. 1.2 Specifications 1.2.1 Main CPU Board CPU z Intel○R AtomTM N270 1.6GHz processor with FSB 533MHz onboard z System Chipset 945GSE + ICH7M BIOS z America Megatrends BIOS System Memory z 2 One 200-pin DDR2 SO-DIMM socket Maximum memory up to 2GB Introduction GOT-5840T User’s Manual 1.2.2 I/O System z Standard I/O One RS-232 and one RS-232/422/485 Two USB 2.0 z Ethernet One RTL81111b Gigabit Ethernet z Audio One Line-out z Expansion One Mini card z Storage One socket for CF card z Power connector GOT-5840T-830: 10VDC to 30VDC with phoenix power connector GOT-5840T-830-J: External 60W AC Adapter with screw type connector 1.2.3 System Specification z 8.4” TFT LCD z Heat Dispensing Design z Net Weight 1.3 Kgs (2.87 lb) z Dimension (Main Body Size) 251x205x 44.6mm z Operation Temperature 0℃ to 45℃ z Relative Humidity 10% to 90% @ 40℃, Non-Condensing Introduction 3 GOT-5840T User’s Manual z Vibration 5 to 500 Hz, 2.0 G random for CF card z Power input 10~30VDC with phoenix power connector External 60W AC Adapter — Power Input: 90VAC to 264VAC — Power Output: 12VDC, Max. 5A NOTE All specifications and images are subject to change without notice. NOTE If the operation temperature is higher than 35℃, the wide temperature DRAM and HDD are recommended to be used on the device. 4 Introduction GOT-5840T User’s Manual 1.3 Dimensions This diagram shows you dimensions and outlines of the GOT-5840T830. Introduction 5 GOT-5840T User’s Manual 6 Introduction GOT-5840T User’s Manual 1.4 I/O Outlets Please refer to the following illustration for I/O locations of the GOT5840T-830. No 1 POWER SWITCH (ATX) 2 Power Input connector (phoenix type) 2.1 Introduction Function Power Input connector (screw type) 3 COM 1 (RS-232/422/485) 4 COM 2 (RS-232) 5 VGA 6 ETHERNET (RJ-45) 7 USB 2.0 X 2 8 AUDIO (LINE-OUT) 7 GOT-5840T User’s Manual 1.5 Packing List When you receive the GOT-5840T-830, the bundled package should contain the following items: z z z z z z z GOT-5840T-830 x 1 Panel Mount Kit x 6 Driver CD x1 Wall-Mount Kit x1 Desktop Stand Kit (optional) VESA ARM (optional) Power Adapter & power cord (for GOT-5840T-830-J) If you can not find the package or any items are missing, please contact AXIOMTEK distributors immediately. 8 Introduction GOT-5840T User’s Manual CHAPTER 2 HARDWARE INSTALLATION The GOT-5840T-830 provides rich I/O ports and flexible expansions for you to meet different demand, for example, CF card. The chapter will show you how to install the hardware. It includes: 2.1 CompactFlash™ Card Serial Port Ethernet Mounting Way Dram Wireless LAN Card CF card Installation The GOT-5840T-830 provides one CF socket for users to install CompactFlash™ card. Please refer to the following instructions for installation: Step 1 Turn off the system, and unplug the power cord. Hardware Installation 9 GOT-5840T User’s Manual Step 2 Find out the cover on the side of the system. Step 3 Locate the CompactFlash the socket. 10 TM socket, and insert the card into Hardware Installation GOT-5840T User’s Manual 2.2 Serial Ports Interface The GOT-5840T-830 has two onboard serial ports, COM1 (RS-232/ 422/ 485) and COM2 (RS-232). The following table shows you the pin assignments of this connector: Pin Signal Pin Signal 1 Data Carrier Detect (DCD) 6 Data Set Ready (DSR) 2 Receive Data (RXD) 7 Request To Send (RTS) 3 Transmit Data (TXD) 8 Clear To Send (CTS) 4 Data Terminal Ready (DTR) 9 Ring Indicator (RI) 5 Ground (GND) In addition, COM1 can be set for RS-232/422/485 by jumper. The jump setting is listed as below: COM1 JP11 JP12 JP13 RS-232 (default) 3-5, 4-6 3-5, 4-6 1-2 RS-422 1-3, 2-4 1-3, 2-4 3-4, 7-8 RS-485 1-3, 2-4 1-3, 2-4 5-6, 7-8 Hardware Installation 11 GOT-5840T User’s Manual When COM1 is set to RS-422 or RS-485, the pin assignments are listed below: Pin # 12 Signal Name RS-422 RS-485 1 TX- DATA- 2 TX+ DATA+ 3 RX+ No connector 4 RX- No connector 5 6 No connector No connector No connector No connector 7 No connector No connector 8 No connector No connector 9 GND GND Hardware Installation GOT-5840T User’s Manual 2.3 Ethernet The GOT-5840T-830 is equipped with a high performance Plug and Play Ethernet interface, full compliant with IEEE 802.3 standard, and can be connected with a RJ-45 LAN connector. Please refer to detailed pin assignment list below: Pin Signal 1 TX+ (Data transmission positive 2 TX- (Data transmission negative) 3 Rx+(Data reception positive) 4 RJ45 termination 5 RJ45 termination 6 Rx- (Data reception negative) 7 RJ45 termination 8 RJ45 termination Hardware Installation 1 2 3 4 5 6 7 8 RJ-45 13 GOT-5840T User’s Manual 2.4 Mountings – Panel/Wall/Desktop/VESA There are several mounting ways for the GOT-5840T-830, Panel, Wall, Desktop and VESA mountings. 2.4.1 Panel Mounting The GOT-5840T-830 is designed for panel mount application. A set of standard mounting kit are bundled with the system package that you can use it to mount the GOT-5840T-830. 14 Hardware Installation GOT-5840T User’s Manual 2.4.2 Wall-Mounting The GOT-5840T-830 is designed for Wall mounting application. Please refer to the following steps: Find out the screws as marked on the back side of chassis. Hardware Installation 15 GOT-5840T User’s Manual 2.4.3 Desktop-Mounting The GOT-5840T-830 is designed for desktop mounting application. Please refer to the following steps: Step 1 16 Find out the screws as marked on the back side of chassis. Hardware Installation GOT-5840T User’s Manual Step 2 Assemble the desktop stand to the chassis, and fix the screws. Hardware Installation 17 GOT-5840T User’s Manual 2.4.4 VESA-ARM Mounting Step 1 Find out the screws as marked on the back side of chassis. Step 2 Assemble the VESA-ARM to the back side of the chassis, and fix the screws. 18 Hardware Installation GOT-5840T User’s Manual Step 3 VESA mounting Installation completed. Hardware Installation 19 GOT-5840T User’s Manual 2.5 DRAM Installation The GOT-5840T-830 provides one 200-pin DDR2 SO-DIMM socket that support system memory up to 2GB. Please follow steps below to install the memory modules: 1. Unscrew six screws to remove the rear chassis. 2. Find the SO-DIMM socket on mainboard (SBC87830). 20 Hardware Installation GOT-5840T User’s Manual 3. Push down latches on each side of the SO-DIMM socket. 4. Install the memory module into the socket and push it firmly down until it is fully seated. The socket latches are levered upwards and clipped on to the edges of the SO-DIMM socket. Hardware Installation 21 GOT-5840T User’s Manual 2.6 Wireless LAN Card Installation The GOT-5840T-830 provides one Mini card socket for user to install one wireless LAN card. When installing the wireless LAN card, refer to the following instructions and illustration: 1. Open the back cover and find mainboard (SBC87830). 2. The socket latches are clipped on to the edges of the Mini card socket. Install wireless LAN card to the socket. 22 Hardware Installation GOT-5840T User’s Manual 3. Find the built-in Antenna cable which is tied with other cables on the top of the device. Connect antenna cable to MAIN connector on wireless LAN card. 4. There are two connectors on wireless LAN card. One is MAIN, and the other is auxiliary. Connect antenna cable to MAIN connector on wireless LAN card. Hardware Installation 23 GOT-5840T User’s Manual MEMO 24 Hardware Installation GOT-5840T User’s Manual CHAPTER 3 AMI BIOS SETUP UTILITY This chapter provides users with detailed description how to set up basic system configuration through the AMI BIOS setup utility. 3.1 Starting To enter the setup screens, follow the steps below: 1. 2. Turn on the computer and press the <Del> key immediately. After you press the <Delete> key, the main BIOS setup menu displays. You can access the other setup screens from the main BIOS setup menu, such as the Chipset and Power menus. 3.2 Navigation Keys The BIOS setup/utility uses a key-based navigation system called hot keys. Most of the BIOS setup utility hot keys can be used at any time during the setup navigation process. These keys include <F1>, <F10>, <Enter>, <ESC>, <Arrow> keys, and so on. Note Some of navigation keys differ from one screen to another. Å Left/Right The Left and Right <Arrow> keys allow you to select a setup screen. ÇÈ Up/Down The Up and Down <Arrow> keys allow you to select a setup screen or sub-screen. +− Plus/Minus The Plus and Minus <Arrow> keys allow you to change the field value of a particular setup item. Tab The <Tab> key allows you to select setup fields. F1 The <F1> key allows you to display the General Help screen. AMI BIOS Setup Utility 25 GOT-5840T User’s Manual F10 The <F10> key allows you to save any changes you have made and exit Setup. Press the <F10> key to save your changes. Esc The <Esc> key allows you to discard any changes you have made and exit the Setup. Press the <Esc> key to exit the setup without saving your changes. Enter 3.3 The <Enter> key allows you to display or change the setup option listed for a particular setup item. The <Enter> key can also allow you to display the setup sub- screens. Main Menu When you first enter the Setup Utility, you will enter the Main setup screen. You can always return to the Main setup screen by selecting the Main tab. There are two Main Setup options. They are described in this section. The Main BIOS Setup screen is shown below. System Time/Date Use this option to change the system time and date. Highlight z 26 AMI BIOS Setup Utility GOT-5840T User’s Manual System Time or System Date using the <Arrow> keys. Enter new values through the keyboard. Press the <Tab> key or the <Arrow> keys to move between fields. The date must be entered in MM/DD/YY format. The time is entered in HH:MM:SS format. 3.4 Advanced Menu The Advanced menu allows users to set configuration of the CPU and other system devices. You can select any of the items in the left frame of the screen to go to the sub menus: y y y y y y y y y CPU Configuration IDE Configuration SuperIO Configuration Hardware Health Configuration ACPI Configuration APM Configuration MPS Configuration PCI Express Configuration USB Configuration For items marked with “f”, please press <Enter> for more options. AMI BIOS Setup Utility 27 GOT-5840T User’s Manual Configure advanced CPU settings This screen shows the CPU Configuration, and you can change the value of the selected option. z ¾ Max CPUID Value Limit You can enable this item to let legacy operating systems boot even without support for CPUs with extended CPU ID functions. ¾ Execute-Disable Bit Capability This item helps you enable or disable the No-Execution Page Protection Technology. ¾ Hyper Threading Technology Use this item to enable or disable Hyper-Threading Technology, which makes a single physical processor perform multi-tasking function as two logical ones. ¾ Intel (R) SpeedStep (tm) tech This item helps you enable or disable the Intel SpeedStep Technology. ¾ Intel (R) C-STATE tech Use this item to enable or disable the C-State technology. 28 AMI BIOS Setup Utility GOT-5840T User’s Manual ¾ Enhanced C-States This item allows you to enable or disable any available enhanced C-states (C1E, C2E, C3E, C4E and Hard C4E). z IDE Configuration You can use this screen to select options for the IDE Configuration, and change the value of the selected option. A description of the selected item appears on the right side of the screen. For items marked with “f”, please press <Enter> for more options. ¾ Primary/Secondary/Third IDE Master/Slave Select one of the hard disk drives to configure IDE devices installed in the system by pressing <Enter> for more options. SuperIO Configuration You can use this screen to select options for the SuperIO Configuration, and change the value of the selected option. A description of the selected item appears on the right side of the screen. z AMI BIOS Setup Utility 29 GOT-5840T User’s Manual ¾ Serial Port1 Address This item specifies the base I/O port address and Interrupt Request address of serial port 1. The Optimal setting is 3F8/IRQ4. The Fail-Safe default setting is 3F8. ¾ Serial Port1 IRQ This item specifies the IRQ used by the serial port 1. ¾ Serial Port2 Address This item specifies the base I/O port address and Interrupt Request address of serial port 2. The Optimal setting is 2F8/IRQ3. The Fail-Safe setting is 2F8. ¾ Serial Port2 IRQ This item specifies the IRQ used by the serial port 2. ¾ Serial Port3 Address This item specifies the base I/O port address and Interrupt Request address of serial port 3. ¾ Serial Port3 IRQ This item specifies the IRQ used by the serial port 3. 30 AMI BIOS Setup Utility GOT-5840T User’s Manual ¾ Serial Port4 Address This item specifies the base I/O port address and Interrupt Request address of serial port 4. ¾ Serial Port4 IRQ This item specifies the IRQ used by the serial port 4. AMI BIOS Setup Utility 31 GOT-5840T User’s Manual Hardware Health Configuration This screen shows the Hardware Health Configuration, and a description of the selected item appears on the right side of the screen. z ¾ System Temperature/CPU Temperature These items display the temperature of CPU and System, Vcore, etc. 32 AMI BIOS Setup Utility GOT-5840T User’s Manual z ACPI Settings You can use this screen to select options for the ACPI Settings, and change the value of the selected option. A description of the selected item appears on the right side of the screen. AMI BIOS Setup Utility 33 GOT-5840T User’s Manual APM Configuration You can use this screen to select options for the APM Configuration, and change the value of the selected option. A description of the selected item appears on the right side of the screen. z ¾ Power Management/APM Set this item to allow Power Management/APM support. The default setting is Enabled. Disabled Set this item to prevent the chipset power management and APM (Advanced Power Management) features. Enabled Set this item to allow the chipset power management and APM (Advanced Power Management) features. This is the default setting. ¾ Video Power Down Mode This option specifies the Power State that the video subsystem enters when the BIOS places it in a power saving state after the specified period of display inactivity has 34 AMI BIOS Setup Utility GOT-5840T User’s Manual expired. The default setting is Suspend. Disabled This setting prevents the BIOS from initiating any power saving modes concerned with the video display or monitor. Suspend This option places the monitor into suspend mode after the specified period of display inactivity has expired. This means the monitor is not off. The screen will appear blacked out. The standards do not cite specific power ratings because they vary from monitor to monitor, but this setting use less power than Standby mode. This is the default setting. ¾ Hard Disk Drive Power Down Mode This option specifies the power conserving state that the hard disk drive enters after the specified period of hard drive inactivity has expired. The default setting is Suspend. Disabled This setting prevents hard disk drive power down mode. Suspend This option cuts the power to the hard disk drives during a system suspend. This is the default setting. ¾ Suspend Time Out (Minute) This option specifies the length of time the system waits before it enters suspend mode. The default setting is Disabled. Disabled 1 Min 4 Min 10 Min This setting prevents the system from entering suspend mode. This is the default setting. Set this item to allow the computer system to enter suspend mode after being inactive for 1 minute. Set this item to allow the computer system to enter suspend mode after being inactive for 4 minutes. Set this item to allow the computer system to enter suspend mode after being inactive for 10 minutes. ¾ Throttle Slow Clock Ratio Use this item to specify the speed of the system clock when running the power saving states. ¾ Power Button Mode This option specifies how the externally mounted power AMI BIOS Setup Utility 35 GOT-5840T User’s Manual button on the front of the computer chassis is used. The default setting is On/Off. On/Off Pushing the power button turns the computer on or off. This is the default setting. This is the default setting. Suspend Pushing the power button places the computer in Suspend mode or Full On power mode. *** Advanced Resume Event Controls *** ¾ Resume On Ring This item enables or disables the function of Resume On Ring that resumes the system through incoming calls. ¾ Resume On RTC Alarm You can set “Resume On RTC Alarm” item to enabled and key in Data/time to power on system. 36 AMI BIOS Setup Utility GOT-5840T User’s Manual z MPS Configuration This screen shows the MPS (Multi Processor Specification) Configuration, and you can change its value. A description of the selected item appears on the right side of the screen. ¾ MPS Revision Use this item to select MPS (Multi Processor Specification) Revision 1.1 or 1.4. The default setting is 1.4. AMI BIOS Setup Utility 37 GOT-5840T User’s Manual PCI Express Configuration This screen shows the PCI Express Configuration, and you can change its value. A description of the selected item appears on the right side of the screen. z ¾ Active State Power-Management Use this item to enable or disable the function of Active State Power-Management to provide you with lower power consumption. The default setting is Disabled. 38 AMI BIOS Setup Utility GOT-5840T User’s Manual ¾ SB PCIE Ports Configuration Scroll to this item and press <Enter> to view the SB PCIE Ports Configuration sub menu, which contains several options for your configuration. AMI BIOS Setup Utility 39 GOT-5840T User’s Manual USB Configuration You can use this screen to select options for the USB Configuration, and change the value of the selected option. A description of the selected item appears on the right side of the screen. z ¾ Legacy USB Support Use this item to enable or disable support for USB device on legacy operating system. The default setting is Enabled. ¾ USB 2.0 Controller Mode Use this item to configure the USB 2.0 controller. The default setting is HiSpeed. ¾ BIOS EHCI Hand-Off Enabling this item provide the support for operating systems without an EHCI hand-off feature. The default setting is Enabled. 40 AMI BIOS Setup Utility GOT-5840T User’s Manual 3.5 PCI PnP Menu The PCI PnP menu allows users to change the advanced settings for PCI/PnP devices. (1) AMI BIOS Setup Utility 41 GOT-5840T User’s Manual (2) ¾ Clear NVRAM Use this item to clear the data in the NVRAM (CMOS). Here are the options for your selection, No and Yes. ¾ Plug & Play O/S When the setting is No, Use this item to configure all the devices in the system. When the setting is Yes and if you install a Plug and Play operating system, the operating system configures the Plug and Play devices not required for boot. The default setting is No. ¾ PCI Latency Timer This item controls how long a PCI device can hold the PCI bus before another takes over. The longer the latency, the longer the PCI device can retain control of the bus before handing it over to another PCI device. There are several options for your selection. ¾ Allocate IRQ to PCI VGA This item allows BIOS to choose an IRQ to assign for the PCI VGA card. Here are the options for your selection, No 42 AMI BIOS Setup Utility GOT-5840T User’s Manual and Yes. ¾ Palette Snooping Some old graphic controllers need to “snoop” on the VGA palette, and then map it to their display as a way to provide boot information and VGA compatibility. This item allows such snooping to take place. Here are the options for your selection, Disabled and Enabled. ¾ PCI IDE BusMaster This item is a toggle for the built-in driver that allows the onboard IDE controller to perform DMA (Direct Memory Access) transfer. Here are the options for your selection, Disabled and Enabled. ¾ OffBoard PCI/ISA IDE Card This item is for any other non-onboard PCI/ISA IDE controller adapter. There are several options for your selection. ¾ IRQ3/4/5/7/9/10/11/14/15 These items will allow you to assign each system interrupt a type, depending on the type of device using the interrupt. The option “Available” means the IRQ is going to assign automatically. Here are the options for your selection, Available and Reserved. ¾ DMA Channel 0/1/3/5/6/7 These items will allow you to assign each DMA channel a type, depending on the type of device using the channel. The option “Available” means the channel is going to assign automatically. Here are the options for your selection, Available and Reserved. AMI BIOS Setup Utility 43 GOT-5840T User’s Manual 3.6 Boot Menu The Boot menu allows users to change boot options of the system. You can select any of the items in the left frame of the screen to go to the sub menus: y y Boot Settings Configuration Boot Device Priority Removable Drives y y Lan Boot Settings Configuration For items marked with “f”, please press <Enter> for more options. 44 AMI BIOS Setup Utility GOT-5840T User’s Manual z Boot Settings Configuration ¾ Quick Boot Enabling this item lets the BIOS skip some power on self tests (POST). The default setting is Enabled. ¾ Quiet Boot Disabled Enabled Set this item to allow the computer system to display the POST messages. Set this item to allow the computer system to display the OEM logo. This is the default setting. ¾ AddOn ROM Display Mode This item selects the display mode for option ROM. The default setting is Force BIOS. ¾ Boot Num-Lock Use this item to select the power-on state for the NumLock. The default setting is On. PS/2 Mouse Support This item determines if the BIOS should reserve IRQ12 for the PS/2 mouse or allow other devices to make use of this ¾ AMI BIOS Setup Utility 45 GOT-5840T User’s Manual IRQ. Here are the options for your selection, Auto, Enabled and Disabled. ¾ Wait For ‘F1’ If Error If this item is enabled, the system waits for the F1 key to be pressed when error occurs. The default setting is Enabled. ¾ Hit ‘DEL’ Message Display If this item is enabled, the system displays the message “Press DEL to run Setup” during POST. The default setting is Enabled. Boot Device Priority The Boot Device Priority screen specifies the the boot device priority sequence from the available devices. z 46 AMI BIOS Setup Utility GOT-5840T User’s Manual z Removable Drives Use this screen to view the removable drives in the system. The BIOS will attempt to arrange the removable drive boot sequence automatically. You can also change the booting sequence. AMI BIOS Setup Utility 47 GOT-5840T User’s Manual Lan Boot Settings Configuration The Lan Boot Settings Configuration can enable or disable Lan Boot ROM to allow the system boot on LAN. z 48 AMI BIOS Setup Utility GOT-5840T User’s Manual 3.7 Security Menu The Security menu allows users to change the security settings for the system. ¾ Supervisor Password This item indicates whether a supervisor password has been set. If the password has been installed, Installed displays. If not, Not Installed displays. ¾ User Password This item indicates whether a user password has been set. If the password has been installed, Installed displays. If not, Not Installed displays. ¾ Change Supervisor Password Select this option and press <Enter> to access the sub menu. You can use the sub menu to change the supervisor password. ¾ Change User Password Select this option and press <Enter> to access the sub AMI BIOS Setup Utility 49 GOT-5840T User’s Manual menu. You can use the sub menu to change the user password. ¾ Boot Sector Virus Protection This option is near the bottom of the Security Setup screen. The default setting is Disabled. Disabled Enabled 50 Set this item to prevent the Boot Sector Virus Protection. This is the default setting. Select Enabled to enable boot sector protection. It displays a warning when any program (or virus) issues a Disk Format command or attempts to write to the boot sector of the hard disk drive. If enabled, the following appears when a write is attempted to the boot sector. You may have to type N several times to prevent the boot sector write. Boot Sector Write! Possible VIRUS: Continue (Y/N)? _ The following appears after any attempt to format any cylinder, head, or sector of any hard disk drive via the BIOS INT 13 Hard disk drive Service: Format!!! Possible VIRUS: Continue (Y/N)? AMI BIOS Setup Utility GOT-5840T User’s Manual 3.8 Chipset Menu The Chipset menu allows users to change the advanced chipset settings. You can select any of the items in the left frame of the screen to go to the sub menus: y y North Bridge Configuration South Bridge Configuration For items marked with “f”, please press <Enter> for more options. AMI BIOS Setup Utility 51 GOT-5840T User’s Manual North Bridge Configuration z ¾ DRAM Frequency This item allows you to control the Memory Clock. ¾ Configure DRAM Timing by SPD This item can enable or disable DRAM timing by SPD (Serial Presence Detect) device, which is a small EEPROM chip on the memory module, containing important information about the module speed, size, addressing mode and various parameters. ¾ Boot Graphic Adapter Priority This item allows you to select the graphics controller as the primary boot device. ¾ Internal Graphics Mode Select This item allows you to select the amount of system memory used by the internal graphics device. ¾ Video Function Configuration Press <Enter> for the sub-menu for setting up video function. 52 AMI BIOS Setup Utility GOT-5840T User’s Manual AMI BIOS Setup Utility 53 GOT-5840T User’s Manual South Bridge Configuration z (1) 54 AMI BIOS Setup Utility GOT-5840T User’s Manual (2) ¾ USB Function This item allows you to enable or disable USB function. ¾ USB 2.0 Controller This item allows you to enable or disable the USB 2.0 controller. ¾ Audio Controller This item allows you to enable or disable the audio support. ¾ SLP_S4# Min. Assertion Width This item allows you to set the SLP_S4# Assertion Width. ¾ Restore on AC Power Loss This item can control how the PC will behave once power is restored following a power outage, or other unexpected shutdown. ¾ PCIE Port Configuration AMI BIOS Setup Utility 55 GOT-5840T User’s Manual This item allows you to set or disable the PCI Express Ports. 3.9 Exit Menu The Exit menu allows users to load your system configuration with optimal or failsafe default values. ¾ Save Changes and Exit When you have completed the system configuration changes, select this option to leave Setup and reboot the computer so the new system configuration parameters can take effect. Select Save Changes and Exit from the Exit menu and press <Enter>. Select Ok to save changes and exit. ¾ Discard Changes and Exit Select this option to quit Setup without making any permanent changes to the system configuration. Select Discard Changes and Exit from the Exit menu and press <Enter>. Select Ok to discard changes and exit. ¾ 56 Discard Changes AMI BIOS Setup Utility GOT-5840T User’s Manual Use this item to abandon all changes. ¾ Load Optimal Defaults It automatically sets all Setup options to a complete set of default settings when you select this option. The Optimal settings are designed for maximum system performance, but may not work best for all computer applications. In particular, do not use the Optimal Setup options if your computer is experiencing system configuration problems. Select Load Optimal Defaults from the Exit menu and press <Enter>. ¾ Load Fail-Safe Defaults It automatically sets all Setup options to a complete set of default settings when you select this option. The Fail-Safe settings are designed for maximum system stability, but not maximum performance. Select the Fail-Safe Setup options if your computer is experiencing system configuration problems. Select Load Fail-Safe Defaults from the Exit menu and press <Enter>. Select Ok to load Fail-Safe defaults. AMI BIOS Setup Utility 57 GOT-5840T User’s Manual CHAPTER 4 DRIVERS INSTALLATION 4.1 System GOT-5840T-830 supports Windows 2000/XP. To facilitate the installation of system driver, please carefully read the instructions in this chapter before start installing. 1. Insert Driver CD and select the “\Drivers”. 2. Select all files and follow the installing procedure. 58 Installation of Drivers GOT-5840T User’s Manual 4.2 Touch Screen The GOT-5840T-830 uses the 5-wire analog resistve. There are the specification and driver installation which are listed below. 4.2.1 Specification Touch Screen 5-wire Analog Resistive type Touch Screen Controller PenMount 6000 USB Touch Screen Controller IC Communications USB interface Baud Rate 19200 baud rate fixed Resolution 1024 x 1024 (10 bit A/D converter inside) Power Input 5V Power Consumption Active: 24.6mA / Idle Mode: 13.4mA 4.2.2 Driver Installation- Windows XP The GOT-5840T-830 provides a touch screen driver that users can install it under the operating system Windows XP. To facilitate installation of the touch screen driver, you should read the instructions in this chapter carefully before you attempt installation. 1. Insert Driver CD and follow the path to select the “\Drivers\Step 5 - Touch”. 2. Follow the installing procedure and press OK. Installation of Drivers 59 GOT-5840T User’s Manual 3. Click Start menu and select “PenMount Utilities”; and then, a “PenMount Control Panel” pops out. 60 Installation of Drivers GOT-5840T User’s Manual 4. Select the “Standard Calibrate” tab. 5. Calibration: To adjust the display with touch panel, click “Calibration” and follow the calibrate point to do calibration; there are five points on screen for calibration. 6. Press OK. Installation of Drivers 61 GOT-5840T User’s Manual 4.3 Embedded O.S. The GOT-5840T provides the Windows XP Embedded and Windows CE.Net 6.0. The O.S. is supported devices which are listed below. 4.3.1 Windows XP Embedded Here are supported onboard devices: Onboard Multi I/O USB PS2 Keyboard and mouse CRT/LCD display(Default 18bits Resolution 800x600) 10/100/1000 base-T Ethernet Compact Flash Onboard Audio Touch Screen PenMount Touch screen Before you can use and calibrate it, here is what you should do: 1. Set up Penmount touch device driver by executing C:\Penmount\ Windows 2000-XP V5.0\setup.exe. When the installation is finished, an icon “PM” appears on the Taskbar. 2. Calibrate Penmount touch by clicking on the “PM” icon, and the go on the calibration 3. Restart the computer. 62 Installation of Drivers GOT-5840T User’s Manual 4.3.2 Windows CE.NET 6.0 Here are supported onboard devices: Onboard Multi I/O USB PS2 Keyboard and mouse CRT/LCD display 10/100/1000 base-T Ethernet Compact Flash Onboard Audio Audio Touch Screen Calibration Touch screen In this image we add PenMount Touch drivers and utilities. It is customized for 800 x 600. Calibration: 1. Click “Calibratyion” on desktop to calibrate touch screen. 2. In the start\programs menu, select “save registry”, thus Calibration data will be saved and effective in next booting. Installation of Drivers 63