1
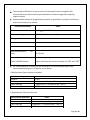
STANDARD OPERATING PROCEDURE No: METH 011 Version: 1 No of pages 8 Date: 05-062011 Title: Soil mineralogy analysis using Bruker D2 PHASER Diffractometer System I. SCOPE AND APPLICATION The determination of the types and relative amounts of the minerals present in soil (soil mineralogy) is determined routinely because of its strong influence on soil behavior, its use in soil classification, and its relevance to soil genetic process¬es. ICRAF Soil-Plant Spectral Diagnostic Laboratory uses X-ray diffraction (XRD) technique for qualitative and quantitative assessment of minerals in soils. XRD is the most powerful technique used for analysis of minerals and offers mineral phase’s identification and quantification. It takes two types of approaches namely (1) Clay fraction approach; clay fractions are physically separated from the rest of the rock or material and made into an orientated layer of clay supported by a substrate and (2) Whole rock approach; sample is prepared into a random powder which helps in analysis of total amounts and identification of non clay minerals present. These analyses provide information about the clay minerals present in a sample and also the abundance. This SOP describes the analysis of soil and rock samples for mineral analysis. It can be applied to all types of soil samples. XRD has a wide range of applications in geology, material science, environmental science, chemistry, forensic science, and the pharmaceutical industry, among others. In Agriculture it has application in qualitative and quantitative analysis of actual minerals in top soils and sub soils, in classification of soils in terms of weatherable and nutrient rich minerals to measure soil fertility potential and use of mineralogical data in pedo-transfer functions to directly predict soil functional properties. II. RELATED SOPS a. PRP 003 Soil sample preparation and handling b. III. PRINCIPLE Powder diffraction is routinely used as a finger-print identification technique of various solid materials in the laboratory. It is a high-tech, rapid, cheap and non destructive technique for qualitative and quantitative analysis of crystalline compounds; about 95% of all solid materials in the soil are crystalline. When X-rays interact with a crystalline substance or powder, a diffraction pattern called a diffractogram is produced and can be quantified. Information obtained from this patterns include phase composition of a sample, types and nature of crystalline phases (minerals) present, crystal structure, amount of amorphous (OM) content, microstrain, size and orientation of crystallites. XRD has become an indispensable method for materials investigation, characterization and quality control. The angle and intensity of the Page 1 of 10 diffracted beam recorded by a detector forms a diffraction pattern, which provides information about a sample. The diffraction pattern for every phase is as unique as a fingerprint. Phases with the same chemical composition can have drastically different diffraction patterns. Use of the position and relative intensity of a series of peaks is used to match experimental data to the reference patterns in the database such as the Powder Diffraction File (PDF). The PDF contains over 200,000 diffraction patterns of crystalline phases. Modern computers have automated search/match programs that determine what phases are present in a sample by quickly comparing the ds of the unknown to those of known materials in the International Centre for Diffraction Data (ICDD) Powder Diffraction File (PDF). IV. a. b. c. d. e. f. g. h. V. a. b. c. d. e. f. g. h. i. j. k. l. m. n. o. p. q. r. EQUIPMENT A D2 PHASER Diffractometer with appropriate software McCrone micronising mill Weighing balance Centrifuge Oven Ultra-sonic probe Vacuum pump Millipore filtration apparatus vacuum tubing MATERIALS Corundum and quartz standard reference material Standard 55mm sample discs made from PMMA Innovatek cooler fluid glass microscope slides Soft brush Weighing paper PH-indicator strips (non bleeding) weighing paper (4"x4") mortar and pestle 250 µm mesh sieve spatulas carbide or diamond glass scriber or marker pen Squeeze bottle with distilled water, ethanol and hexane lab tissues thermometer Timer 500 ml beakers Stiff brush or stop cork no. 43 Page 2 of 10 s. Uniform set of sedimentation cylinders (measuring cylinders) with internal depth of 340 ± 20 mm and capacity of 1 L. t. Millipore HA, 47-mm, 0.45-micron nominal pore opening cellulose filters u. Desiccators with desiccator shelf v. Tongs w. Hexane x. Ethanol y. Deionised water z. Forceps VI. PROCEDURES a. Sample preparation i. Whole rock approach procedure (randomly oriented powder) Using a loading device for McCone Mill load the forty-eight cylindrical agate grinding elements into the sample cup. This helps produce both line contact blows and planar shearing, in contrast to the random contact blows of a conventional ball mill. Tare the weight of the sample cup with agate elements and weigh in 3 grams of soil sample. Using a wash bottle make to 12 grams with ethanol as a grinding fluid. Cap the cup and mill with a McCrone Mill for 12 minutes. The unique grinding action of the mill rapidly reduces particles to submicrometer sizes and mixes for homogenization required for quantitative and qualitative analytical methods (Approx. 10 µm). A longer milling time lowers the intensity of the peaks. Making the particles too small can cause damage to crystal structure or alteration of phases making it difficult to identify or quantify the actual phases present in the sample. After milling shake the cup just in case milling had stopped a few minutes before and stayed in the milling position. Wash out all the milled soil into a 50 ml centrifuge tube with ethanol making sure to collect as much of it as possible. Turn on the power switch of the centrifuge and press Stop/Open to release the safety latch and allow the cover of the centrifuge to be opened. Place the tubes in the centrifuge. Be sure that the centrifuge is balanced by having opposite tubes filled equally with ethanol; 2, 4, 6, or 8 tubes may be used. Close cover. Centrifuge for 10 minutes at 4000 rpm. 6. Remove tubes from the centrifuge, pry off caps, and pour off the supernatant liquid into the sink. Be careful that the sediment on the bottom of the tubes is not poured off. (NB: we loose a little of the fine clays when decanting, if this is of interest then it would be better to evaporate ethanol in an oven instead of centrifuging. ) Add Hexane to the sample in the ratio of 0.5 ml hexane to 1 g of soil sample. Using a vortex mixture, mix to re-suspend the sample in hexane and then dry at between 80o C to 105o C in an oven for one hour. Page 3 of 10 Using a spatula to loosen any sample that has stuck to the centrifuge bottle, brush the dried material into from the tube to a 250 µm sieve. Brush the powder sample through the sieve into a weighing paper. A plastic stop cork can also be used to push the powder through the sieve. The purpose of the brushing is to obtain a harmonized powder with many crystallites in random orientations. Pour the sieved powder sample into a glass vial and cap. The sample is ready for loading and measurement. ii. Whole rock approach procedure (randomly oriented mounts) Pour a fraction or portion of the randomly prepared samples into the well of a low background sample holder. Tap the holder on a bench or on the side to help fill and properly pack the sample to avoid sample displacement which causes peak shifts. Using a sharp razor, tap the sample surface slowly into either direction pushing excess sample slowly to the end of the well and finally scrapping it off the holder. Repeat this procedure until the well is completely filled and the sample surface flat with excess sample on the disk brushed off. Correct sample height to the lip is critical since error in height will cause peak displacement. After measurement the disc can be off loaded and washed with tap water and then re-used. Concern on trace contamination is not necessary iii. Clay fraction approach Using a motor and pestle pound the soil sample in to smaller particles. 2mm sieved samples can also be used. Scoop approximately one to three spatulas full of the sample into a 500 ml beaker. Top to the 500 ml mark with deionised water. The amount to be soaked is subjective to the amount of clay that will make a thick clay mount on the glass slide. Disperse the sample with the sonic probe for 5 minutes. Rinse off any soil material on the tip of the probe with deionised water into the beaker and dry between samples. Transfer the dispersed sample into a 1 L measuring cylinder; fill to the 20 cm mark with deionised water. Let it soak overnight to allow material to settle. If the samples are emptied into the cylinder half an hour or much earlier in the day, it would be necessary to give the cylinder a shake or stir with a plunger to mix the contents again. According to Stuart’s law spherical particles will settle faster below the 5 cm mark while the clay particles which are platy and less than 2 µm in size will remain suspended between the 5 and 20 cm mark. The following morning, using a siphon tube siphon the suspension from the interval above the 5 cm mark into a 500 ml bottle for storage until mounting as an oriented aggregate. Remember to rinse out the siphon tube with deionised water between samples to prevent Page 4 of 10 cross-sample contamination. The siphon tube is customed to only collect suspension above the 5 cm mark. Oriented aggregate mounts are prepared by the filter-peel technique. The oriented aggregate mounts force the clay mineral particles, usually plate-shaped phyllosilicates, to lie flat, allowing the operator to direct the incident X-ray beam down the z axis of the minerals and to record the diagnostic basal diffractions. It is the z axis that shows the extent of dspacing expansion and (or) contraction indicative of certain clay minerals during subsequent treatments. These treatments include: air drying, glycolation with ethylene glycol, heating to 400 C, and heating to 550 C. The material from the randomly oriented powder mount may be used for this analysis. Select glass slides to fit the sample holder and label them with a scriber. Rinse and dry the slides to remove any particles. Assemble the filtration device with the cellulose filter in place. Shake the siphoned clay suspension and pour approximately 20 ml the into the assembled filtration device. Exact amount will depend on the density of the suspension, mineralogy, presence of organics, and grain size of the particles. If the suspension is too thick don’t put so much into the filter. If the filter clogs, use the pipette or a syringe with a needle attached to remove the excess clay suspension from the filtration device. The clay layer on the glass slide should be sufficiently thick (10 mg/cm2) to ensure infinite thickness for X-rays and also production of independent relative peak intensities. As soon as the suspension is completely drawn into the filter, remove the glass funnel and use a single-edge razor or metal spatula or forceps to remove the moist filter from the filtering device. If the clay film on the filter is too dry, wet with deionised water before removing from the filtering device. Place the membrane filter and clay film center-positioned on the glass slide and then quickly and smoothly lightly rolled across the slide to transfer the clay film to the slide. Any hesitation or jerky motion during the transfer may cause rippling of the film and disrupt the preferred orientation. Place the mounts on a cold plate to dry in a few minutes. The mounts are ready for X-ray diffraction analysis. The specimens are subsequently exposed to treatments. Ethylene glycol treatment o Organic liquids, primarily ethylene glycol and glycerol, are extensively used as an auxiliary treatment to expand swelling clays. Whether or not a mineral expands and the amount of expansion can provide essential supplementary information aiding claymineral identification. Swelling clays include smectites (e.g. montmorillonite, nontronite, and beidellite), some mixed-layer clays, and vermiculite. o A vapor treatment is used as it causes fewer disturbances of the sample and less amorphous scattering of X-rays by excess liquid. Page 5 of 10 o Pour ethylene glycol to about 1 cm depth in base of desiccator. o Place oriented aggregate mounts on the shelf of desiccator. Additional shelves may be stacked if necessary. o Place desiccator in oven at 60 to 70 C for about 4 hours or overnight. Longer times will not hurt samples. Do not remove mounts until they are to be run on the X-ray diffractometer. Heat treatments o Heat treatments at various temperatures are commonly used to help identify clay minerals by revealing changes in crystal structure spacings or loss of the structure. Depending on the temperature and the mineral species, these treatments can collapse the structure by dehydration, or in the case of other minerals destroy the crystal structures. NB: some of the changes caused by the heat treatments may be temporary, and partial or complete rehydration may occur during cooling. o Preheat a hot plate to 300oC. o Place the oriented aggregate mount on the hot plate using tongs. Leave sample on the hot plate for not less than one hour at 300o C. o Remove mount by pulling it forward with the wire hook until the edge of the mount can be grasped with the tongs. Do not remove mounts until they are ready to be run on the diffractometer. o X-ray the sample and repeat the above procedure at 550o C. iv. Preparation of reference mineral mixtures Relative intensity ratios (RIR) of pure mineral reference standards are obtained by preparing a 50:50 mixture of a corundum powder and a mineral rock. This results in simulated patterns for use in fitting patterns for quantitative analysis Build a library of relatively pure- reference minerals from handpicked rocks, buying from commercial or private collectors or extract through clay fractionation. Using a motor and pestle or a rock crusher for hard rock’s crush the rocks to smaller particles. Separate on paper the different colours of the sample. It is important to know the colour or the physical characteristic of minerals so that it is easy to identify which part of the rock to pick as sample. Please refer to the minerals of the world book by P. Lof for this clarity. Course impurities in the reference clay mineral standards are removed by dispersing with deionised water. See method for preparing clay oriented mounts. Obtain finer rock particles by pounding in a motor with a pestle. Avoid grinding by circular motion since this may destroy the structure of the minerals. Weigh 1.5 g corundum (Aluminium oxide powder) powder into a weighing boat taking care not to contaminate the corundum in the bottle. This can be done by first weighing all the 1.5 g corundum we need in the weigh boats. Page 6 of 10 Add in 1.5 g of the fine rock sample in the weighing boat containing corundum and mill with a micronizing mill for 12 minutes. Separately, mill the fine rock sample for 12 minutes. Proceed with the method for preparing random powder specimens and mounting Measure the intensities of the two samples for 1 hour as per the correct measurement procedures. See measurement section. b. Sample measurement Samples are placed in the sample holder of the diffractometer. The sample holder is factory aligned so that the goniometer centre coincides with the surface of the sample. The sample holder is mounted with four screws which must not be loosened to avoid the sample holder’s alignment being lost. It also has a spherical handle used to lift the sample holder into measurement position. For inserting the sample o Switch off the high voltage to open the door o Open the instrument door by sliding it up o Drop down the spherical handle of the sample holder lift o Take the sample and insert it into the sample position of the sample holder o Lift the sample back into the sample measurement position by pulling up the spherical handle o Close the instrument door by sliding it down and lock by putting the high voltage on The sliding front door of the instrument is routinely opened to insert and change samples Notes: o Do not forget to lift the sample back to sample measurement position by lifting up the spherical handle o The D2 PHASER difractometer is fitted with fans that provide its interior with fresh cooling air from the environment. When the front door is opened air flows from inside to outside the housing through the front door; hence only solid compressed powders and samples should be inserted into the sample holder to avoid sample being blown into the face or inside the instrument. The data is collected using a measurement procedure that will ensure high peak/background ratios, low sensitivity to sample density variations, and a good counting statistics, while the strongest peaks of 0.334 nm quartz stay within the linearity range of the counter, and the beam stays within the preparation for the lowest 2theta angle, from which the analysis will be performed. These conditions will be met by using a Bruker AXS, D2 phaser diffractometer system operating at 30 kV and 10 mA using Ni-filtered Cu-Kα radiation, at variable rotation of 15o/Min in the angular measurement range of 3 to 75 o 2Theta with an accuracy of 0.02o throughout the measurement range, at 0.5 sec/step to obtain the X-ray diffractogram. Page 7 of 10 The intensity of diffraction of a given mineral in the sample under investigation will continuously be recorded as the sample and detector rotates through their respective angles as a peak Recommended settings for Bragg-Brentano systems to guarantee an optimum resolution at maximum intensity are as follows: Instrument parameter Value Radiation Anode Cu (Cu Generator settings 30 kV, 10mA (recommended) Divergence slit 0.6mm Axial Soller slit module Primary 2.5mm, Secondary 2.5mm Anti scatter screen 1.0mm Monochromatisation filter = 0.154060nm) kβ 0.5 Ni filter 50 detector opening and 0.5% Ni-filter Upper and lower discriminator window at 0.240o and 0.160o Linear LYNXEYE detector For LynxEye detector all reflections are measured in one uninterrupted range. Other recommended settings for Cu radiation are as follows: i) Method name: Quartz reference standard Measurement parameter Rotation Scan type Two Theta (2θ) Time per step (s) Value 15 rpm Locked coupled (Coupled θ/2θ scan) 1 range start 250, increment 0.0040, stop 270 0.500s ii) Method name: Soils and clay scans Measurement parameter Rotation Scan type Two Theta (2θ) Time per step (s) Value 15 rpm Locked coupled (Coupled θ/2θ scan) 1 range start 30, increment 0.0020, stop 750 0.500s Page 8 of 10 Run time 30 minutes iii) Method name: Reference samples scans Measurement parameter Value Rotation 15 rpm Scan type Locked coupled (Coupled θ/2θ scan) Two Theta (2θ) 1 range start 30, increment 0.0020, stop 750 Time per step (s) 3s Run time 3 hours Close door and switch on HV to set generator to 30kV and 10mA. Initialize 2θ and Phi motor using the initialize button on the commander screen. Entervalue for sample rotation in rpm as per methods above and press ‘set’ button to start rotation. Select scan type, scan mode, increment and time as per method being run. Start measurement by pressing the start button. After the measurement is complete save the raw scan file in the appropriate folders of the D2 PHASER computer. c. Shutting Down The Instrument VII. CALCULATIONS The software application used to run the analyzer (?????) automatically stores data acquired during an analysis in comma-delimited ASCII text format for later computation, display, and printing. VIII. QUALITY ASSURANCE/QUALITYCONTROL Reference material: Blanks: Calibration: Duplicates: IX. DATA VALIDATION a. Data Review Check the sample data and QC data to verify that the data to be reported is based on acceptable analyses and meet acceptable limits. Verify that all standard, reagents, and quality control samples have been entered into the appropriate logs. Verify that the results have been entered into the appropriate spread sheet and proof read. Place data in the laboratory database. b. Supervisor Review Page 9 of 10 Check the sample data and QC data to verify that the data to be reported is based on acceptable analyses and meet acceptable limits Verify that the results have been entered into the appropriate spreadsheets correctly. If any errors are found, return data to analytical chemist for corrections. Ensure documentation on printouts (i.e., initials, date, label) is complete. Authorize reporting. X. HEALTH AND SAFETY Personal protection: Safety glasses and protective gloves are recommended whenever reagents or samples are handled. For other precautions and safety procedures, consult the Material Safety Data Sheets (MSDS) for each chemical used. Electrical hazards: Electrical systems must conform to the ICRAF standards. Shock hazards exist inside the instruments. Only an authorized service representative or an individual with training in electronic repair should remove panels or circuit boards where voltages are greater than 20 V. The instruments require a third-wire protective grounding conductor. Three-to-two wire adapters are unsafe for these instruments. Radiation protection: To ensure maximum radiation protection, the S2 Picofox must be operated with the control software ‘SPECTRA’ included in delivery.Only this software guarantees the compliance of the X ray source operation parameters as certified according to anti-radiation precautions. Further ,safety rules and technical installation and information provided in the user manual should adhered to explicitly. XI. REFERENCES XII. APPENDIX Page 10 of 10