1
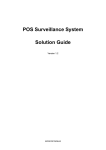
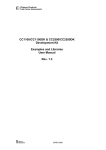
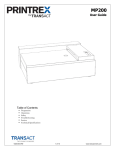
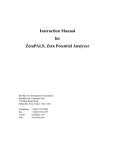
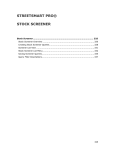
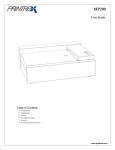
#3004
Installation and Setup
1.
2.
3.
4.
5.
1. Plug the power cord
of the terminal into an
electrical outlet, then into
the electrical input on the
rear of the machine.
2. To turn the terminal
on, use the power switch
located at the rear of the
left side of the terminal,
as shown in figure.
3. After you power on
the terminal wait until the
software has completely
loaded.
4. Once you see the
home screen you can
continue to step 5.
5. Grasp the sides of the
display, then pull and lift
up.
9.
10.
6.
8.
7.
6. The display will
end up in a horizontal
position when completely
open.
7. Grasp blue plastic
lock and slide left until
the metal top opens.
8. Drop the DayMark
and DayMark-approved
labels can be place into
the roll bucket. Labels
come off on the top of
the roll.
9. Thread label stock under label sensor in printer
mechanism as shown.
Leave three or four labels
in front of printer mechanism.
10. Be sure that the sensor is positioned directly
over a label rather than
the web (gap) between
labels.
11.
12.
13.
14.
15.
11. Close printer mechanism cover as shown.
Rotate cover until it
latches securely. Printer
automatically aligns to the
next label.
12. Grasp sides of display and rotate downward until it latches.
13. Label stock may be
torn off by either pulling
upwards or pulling
downwards.
14. Pressing the left
printer feed button or
right on the front of the
display several times will
ensure labels are loaded
correctly.
15. Label stock may be
torn off by either pulling
upwards or pulling downwards.
Printing Labels
1.
1. To print labels navigate to
an item by first selecting the
category of that item from the
category bar along the bottom
of the screen.
2.
2. Within a category, use the arrow
keys to navigate between groups
of items, or tap the appropriate
category as shown between these
arrows.
3.
3. After selecting an item the print menu will appear. On
the right side of the screen is a number pad where
you can enter the desired number of labels. Press CLR
to reset. To print press PRINT LEFT or PRINT RIGHT.
Setup
SETTINGS Button
Press the SETTINGS button to access the setup functions, as shown on the left.
SETTINGS Button
The SETTINGS button produces a menu providing access to terminal set up functions, as shown
on the left. If the system is configured with an Administrative Password the user is prompted to
enter “admin” when the system is not already in Manager Mode.
Adjust Date and Time
This function brings up a screen allowing you to set the current date and time, as shown in the
figure. For the date and time functions, use the arrow keys on the touch screen to set the day,
month, year, hour, and minute.
Also on this screen there is are options for toggling between 12-hour and 24-hour clock formats
(e.g. 1:00 PM versus 13:00), setting the current 12-hour format time to AM or
PM and setting the date format. To save changes press the BACK button and return to the SETUP menu. Pressing the HOME function button cancels data entry and returns to the home screen
without saving.
Terminal Features
The diagram below shows the main external
features of your DayMark 9700 Food Rotation
Terminal.
1. Front Terminal Door: Rotates upward revealing label rolls and
printer mechanisms.
1.
4.
2.
2. Touch Screen Display: Dynamic center portion of display area.
Arranges menu items and categories, as well as supplies navigation for terminal software.
3. Function Buttons: Permanent buttons containing main menu functions.
3.
5.
4. Access Door: Slide down to gain access to USB, Ethernet and
SD Card ports.
5. Right and Left Printer Slot: Labels are dispensed through these
openings.
Touch Screen
9.
8.
7.
10.
1.
2.
3.
4.
5.
6.
7.
1. FEED L: Advances the label roll stock from the left printer slot.
2. FEED R: Advances the label roll stock from the right printer slot.
3. CANCEL PRINT: This button stops the printing of labels.
4. LANGUAGE: Toggles the language used to display food menu items and prompts between the default and the alternate language.
Data entry of alternate language labels is documented under the editing of these labels.
5. HELP: Displays help screen and search function. Within this menu there is contact information for DayMark Tech support as well as
several help topics with instructional walk-throughs.
6. SETTINGS: This menu allows the user to access system preferences like: setting the date and time, display preferences, backup and
restore, system preferences and print settings.
7. HOME: Returns the user to the default state of displaying current item buttons.
8. Item Category Buttons: Category buttons represent a pre-determined list of items. Items within the category will be an identical color to
the category button. Category names are not editable on the touch screen and are pre-configured and sized.
9. Item Buttons: These buttons select individual items, for the purpose of either printing a food safety or nutritional label, or modifying the
contents of these labels. These item names can be modified, and new items can be added.
10.Time and Date Display: The time shown in this bar will be used to generate expiry and shelf life for labels. This display also shows
when the terminal will time out and log out the current user. It is important that this time display is verified and accurate.
11.Slider Bar: Arrow keys allow you to navigate between multiple screens of item buttons within a category.
Touchscreen Calibration
1.
2.
1. Touch the screen and turn on
the power at the same time.
3.
2. You will see a red box with a black dot in the middle.
3. You will be prompted to touch three points at corners of the screen to calibrate it.
HELP Button
The HELP button brings up a SEARCH button, help topics and a LOG OUT button.
1.
1. Help Topics
Currently there are two help options: how to load a label roll and changing the printer mechanism. Touch the GO button next to either of
these options to display the appropriate HELP screen
Help sections for loading label rolls or changing printer mechanisms bring up graphics showing how to perform these operations.
Arrow keys on either side of the graphic allow you to navigate
through the steps. The red X in the upper right hand corner will
close the graphic steps and return you to the main help screen.
Search Function
The DayMark 9700 provides capability to search for specific items within categories by filtering the output displayed based on criteria
entered by the operator. Outlined below are the steps to follow to use the search function and examples of the results.
From the HOME screen, select the “?” button from the bottom of the 9700 screen. This will bring up the HELP Screen where the SEARCH
function is located.
HELP Button
1. From the HELP screen, select the SEARCH button from the
bottom left side of the screen. This will bring up the SEARCH
screen with its virtual keyboard.
4. Once the filter value is entered, select a category group to
display only the products in that group that equal the entered
value. In this example, it was “sauce”.
1.
4.
2. Using the virtual keyboard, enter the value for the product required. In the example, the operator is searching for any items
in the product list with “sauce” in its name.
2.
5. As the message states, to return to normal operation press the
HOME on the bottom of the 9700 screen.
3. Press the DONE button to filter the items that will be displayed.
5.
3.
Save/Load Update/Backup
Backups are used to edit and/or reload specific label configurations, or to recover from hardware errors that may erase the current configuration of your terminal. You will be able to load and restore either (1) a copy of your current system information, or (2) a backup of the
label data file. This will require a USB flash memory stick.
1.
2.
3.
4.
5.
6.
Options include:
1. Save Data File: A copy of your label data file (MenuData.xml) can be applied to a USB stick for backup purposes. This file can also
be edited on your computer.
2. Load Data File: Use this function to load a previously saved or edited (MenuData.xml)file from a USB stick.
3. Update System: Use a previously saved system configuration from a USB stick to update your system.
4. Backup System: Creates a system back up that is then transferred to a USB stick.
5. Copy Log Files to USB. Log data must be copied to a USB prior to powering down the unit otherwise the log data is LOST upon shut down.
6. Back Button: Returns you to the SETTINGS menu.
Note: A clean USB stick is required for a system backup.
Note: Pull down the access door on the right-hand side of the screen to access the port.
After proceeding with the BACKUP or UPDATE operation, a screen
confirming this operation will appear.
For copying menu data files to or loading them from a USB stick,
you will be prompted to use the SAVE or LOAD buttons to complete
the operation.
In the event a USB stick is not inserted before proceeding, an error
message will be generated. Otherwise, the operation will proceed
and then return to the previous menu.
The CANCEL button will cancel this operation and return to the
previous menu.
After proceeding with the BACKUP or UPDATE operation, a screen
confirming this operation will appear.
In the case of a BACKUP operation, you will be prompted to insert
a clean USB stick into the device's USB port as shown above. For
both BACKUP and UPDATE operations, an error message will be
generated if a USB stick is not inserted before proceeding.
For saving or restoring your system configuration to a USB stick,
you will be prompted to use the BACKUP or UPDATE buttons to
complete the operation.
The CANCEL button will cancel this operation and return to the
previous menu.
System Preferences
This menu gives you access to several settings that control permissions and warning settings.
1. Enter ID Required: This setting controls the requirement of a
login prior to use of system functions. Toggle using arrow keys.
2. Label Print Warning At: This setting controls the number of
labels that may be requested before a warning pop up will
display. Use arrow keys to select label quantity.
3. Admin Password: This will display the current administrator
password. To change the password select and replace.
4. Enter Manager On Duty: This setting controls the managers
identification on certain label layouts.
1.
2.
3.
4.
Note: For input of alphanumeric characters you be shown a
keyboard like the one in the figure below. After typing the required
information press the DONE key to save your work, or press the
CANCEL key to revert to the original field contents and return to
the previous screen.
Print Settings
Setup
This menu selection allows you to set print options for specific label
categories. When the Print Button Setup screen is accessed using
the Print Settings button in the Setup screen, the category current
selected in the Main Screen is edited. The last label viewed is used
for the preview. If no label has been viewed the preview is blank.
Select the layout type using the PREV and NEXT buttons. Use the
arrow key to select which (of up to 2) printer these labels will print
to. The DONE button returns you to the Setup Options menu.
Note: The label categories are pre-configured specifically for
your system. Layout choices may include food safety labels and/
or nutrition labels. The former generally use the current system date
and time, plus a shelf life value (programmed and edited via the
MODIFY button of the item print menus), to compute the displayed
expiration date and time.
Note: Make sure the correct label roll stock is loaded for the specified label. Consider printing one or two test labels to verify correct
label roll stock and alignment before printing a large number of
labels.
A sample of this keyboard is shown below. Use the DONE key
to save your input in the original field or CANCEL to return to the
previous screen to retain previous password.
Special characters are available as pop ups beyond their root letter. To access special characters hold the root letter down (approximately 3 seconds) and the special characters list will be displayed.
The following special characters are available:
Note: The PRINT SETUP function is also entered by pressing and
holding the PRINT button on the item printing menus (described in a
subsequent section) for three seconds.
Batch Printing
Batch printing on the 9700 allows you to group items together
from various categories and print them all at once. Each item can
be set to print by a defined default amount. Below are instructions
on how to utilize the Batch Print feature on tyour 9700.
1. Select the “Batch” station from the home screen.
6. Once the batch list is complete, you may set each item’s
default number of labels by pressing the number box or using
the directional arrows.
7. After setting the default number for each item, press “Set as
Defaults” to save your changes.
6.
7.
1.
At this point your Batch is setup and you are ready to print. Choose
print left or print right to print the batch list from the print mechanism
of your choice.
2. Choose a preset batch.
RePan/RePrint
2.
The 9700 has the option of allowing users to Re-Print labels with
the ability to maintain the correct hold/discard times.
The Re-Pan/Reprint Button is an optional button in the print screen.
It is used to change the prep time of the next label(s) printed for
times when re-pan or re-packaging of product occurs. The button
is normally “off” whenever the Print screen is accessed. Pressing
the Re-Pan/Reprint Button causes a Date/Time Entry screen to be
displayed.
3. Choose “Rename Batch” to personalize the batch name.
3.
4. Choose “Add Item to Batch” to begin selecting items.
a. After selecting this option you will be shown the Home Screen.
b. Select a category and choose individual items to add to the Batch.
4.
5. The selected item will now be listed in the batch list. Continue
the previous steps until your batch list is complete.
5.
The User enters the date/time the label being reprinted was
generated and presses OK. When Re-Pan/Reprint is enabled, the
Re-Pan/Reprint button is highlighted and the system calculates
expiration times from the entered date/time, not the current date/
time. Pressing the Re-Pan/Reprint Button again turns the feature off
and all labels are printed normally
TFTP Update Process
The 9700 allows the Menu, Layout, and Batch system files to be
updated using a TFTP process. The Update buttons are used to
download the appropriate XML file update from a TFTP server.
Telephone Technical Support
Live telephone support is available by contacting DayMark at
877.620.8878.
To help us serve you faster, please have the following information
ready when you call:
• The Model Number and Serial Number of the terminal.
• A list of any other peripheral devices attached to the same port
as the terminal.
• What application software, operating system, and network (if
any) you are using.
• What happened and what you were doing when the problem
occurred.
• Unsuccessful steps you have taken prior to calling.
In addition to the Menu, Layout and Batch file update process, the
9700 also allows the user to update any number of system files via
the ‘GET UPDATE PATCH’ button.
Complete 9700 User’s Manual
Visit www.daymarklabels.com to download the complete 9700
User’s Manual.
Warranty Policy
DayMark Warranty Policy
When the Update Patch button is pressed, a screen is displayed
with a number of Patch buttons. Each button is linked to a different
zip file on a TFTP server containing any number of system files.
The zip files are uniquely identified on the TFTP Server using the
payload ID as part of the file name. The design supports up to 36
different zip files.
Pressing a Patch button causes the system to retrieve the linked zip
file from the TFTP server. The system installs the files contained in
the zip file on the 9700 SD Card when the user exits the update
screen. Once a patch has been downloaded the system prevents
any additional patch downloads and the user must extract and
install the patch and reboot the unit. Patch updates can be applied
together with downloaded updates (to the Menu, Layout , or Batch
files); a single prompt is used to confirm with user whether or not to
apply the downloaded files.
Technical and Sales Support
Your terminal is backed by the resources of DayMark Safety, with
dedicated technical support and sales assistance. Here is how we
can help you:
Online Technical Support
Our web site at www.daymarklabels.com is your online portal to
obtaining technical assistance with your 9700 Food Rotation Terminal. Click on the Support link to find support information for your
9700 terminal, including online access to documents, or contact us
via e-mail at [email protected].
ITHACA BRAND PRINTERS, INCLUDING THE ITHACA 9700 FOOD
SAFETY TERMINAL, ARE SOLD TO CUSTOMER SUBJECT TO TRANSACT TECHNOLOGIES INCORPORATED’S MANUFACTURER’S PASSTHROUGH WARRANTY, A COPY OF WHICH IS ATTACHED HERETO;
PROVIDED, HOWEVER, THE SCOPE OF WARRANTY AND CLAIM
PROCEDURE SHALL BE AMENDED AS FOLLOWED:
WARRANTY PERIOD: The standard warranty is one year from the date of
shipment from DAYMARK.
CLAIM PROCEDURE: To make a request or claim for service, a Return Materials Authorization (RMA) Number must be assigned by DAYMARK prior to
the return of the printer. Contact the DAYMARK Technical Support Department
at (877) 620-8878 with the model and serial numbers of the unit needing to
be repaired.
ADDITIONAL COVERAGE: Additional levels of warranty coverage type
and term lengths are available through DAYMARK. Pricing will be quoted
separately.
CONSUMABLES: Use of any labels in the equipment other than those supplied by DAYMARK shall void the warranty.
EXCEPT FOR THE WARRANTIES REFERRED TO ABOVE, TRANSACT AND
DAYMARK DISCLAIM ALL WARRANTIES OF ANY KIND, EITHER EXPRESS
OR IMPLIED, INCLUDING, BUT NOT LIMITED TO, ALL WARRANTIES OF
MERCHANTABILITY AND FITNESS FOR A PARTICULAR PURPOSE.
THE SOLE REMEDIES FOR BREACH OF ANY AND ALL WARRANTIES
AND TRANSACT'S AND DAYMARK’S LIABILITY OF ANY KIND ARISING
FROM ANY CONTRACT FOR SALE OF ANY PRODUCTS OR SERVICES
SHALL BE LIMITED TO THE SPECIFIC REMEDIES PROVIDED HEREIN. IN
NO EVENT SHALL TRANSACT'S OR DAYMARK’S LIABILITY TO CUSTOMER FOR DAMAGES OF ANY NATURE EXCEED THE PURCHASE
PRICE OF THE PRODUCT OR THE PRICE FOR THE SERVICE FROM
WHICH LIABILITY RESULTS.
NEITHER TRANSACT NOR DAYMARK SHALL BE LIABLE FOR ANY
SPECIAL, INCIDENTAL, INDIRECT OR CONSEQUENTIAL DAMAGES
OR FOR THE LOSS OF PROFIT OR REVENUE EVEN IF TRANSACT OR
DAYMARK SHALL HAVE BEEN ADVISED OF THE POSSIBILITY OF SUCH
LOSS OR DAMAGE.
TRANSACT WARRANTY POLICY
TransAct Technologies, Inc. (TRANSACT) warrants this printer to be free
from defects in material and workmanship and will remedy any such defects
according to the terms of this Limited Warranty. This Limited Warranty does
not extend to consumable items, including but not limited to ribbons, inkjet
cartridges, paper rolls, spindles, fuses, keys, power cords, communications
cables (external to the printer), spill resistant covers and any options, attachments, or modifications not installed by TRANSACT.
STANDARD WARRANTY PERIOD
The standard warranty is one (1) year (12mo) from the date of shipment from
TRANSACT’s plant for the Ithaca® Brand Series 70, and the 9700 Food
Safety Terminal.
The standard warranty is two (2) years (24 months) from the date of shipment
from the factory for the Ithaca® Brand POSjet® 1500, BANKjet® 1500,
BANKjet 2500, Series 90PLUS, Series 150, Series 800, Epic 950®, Epic
430®, Epic 630®, Epic 880®, Ithaca® 8000, Ithaca 8040, and the
Ithaca 9000.
TRANSACT’S iTherm™ 280 Printers come with a standard three (3) year
(36mo) from the date of shipment from the factory.
The standard warranty is 90 days from the date of shipment from TRANSACT for the Printrex 980 model printer. The standard warranty is one year
from the date of shipment from TRANSACT for Printrex Brand printers other
than the 980.
PRINTREX CONSUMABLES WARRANTY - TRANSACT warrants that the
thermal print head will be free from defects for Expected Life of the print head
but not more than one (1) year from the date of purchase. The Expected Life
of the print head is considered to be the lesser of, A) fifty (50) kilometers
of delivered media or B) one hundred million (100,000,000) pulses of an
individual print element (approximately 12.7 kilometers of converted printout
for any given print element).
TERMS OF STANDARD WARRANTY
To make a request or claim for service, a Return Materials Authorization
(RMA) Number must be assigned by TRANSACT prior to the return of the
printer. Contact the Technical Support Department at (877) 7ithaca or (607)
257-8901 with the model and serial numbers of the unit needing repair. The
printer must be returned to TRANSACT or an authorized TRANSACT repair
center, shipping prepaid, in the original shipping container and packing materials or in suitable packaging to as to not sustain damage in shipping. See
the unpacking instructions in the Operator’s Guide or Quick Reference Sheet
to correctly repack the printer. TRANSACT does not assume the risk of loss
or damage during transit. If the original shipping container and/or packing
materials are not available, they can be purchased from TRANSACT.
TRANSACT USA will repair (or at its option, replace) at no charge any defective component(s) of the printer. TRANSACT USA and Authorized Repair
Centers will pay the return shipping fee back to the customer at UPS Ground
rates or equivalent within the continental United States. TRANSACT USA
shall pay a maximum $10.00 USD for the return shipping fee for printers
shipped outside of the continental United States under this warranty. Duties
and taxes, if levied, shall be the sole responsibility of the customer.
TRANSACT U.K. will repair (or at its option, replace) at no charge any defective component(s) of the printer. TRANSACT U.K. will pay the return shipping fee back to the customer using TRANSACT’s selected method of transit.
Duties and taxes, if levied, shall be the sole responsibility of the customer.
TRANSACT will furnish all tools, test equipment, parts and labor necessary
to service the printer. Consumable items requested of TRANSACT such as
ribbons, inkjet cartridges, paper rolls, spindles, fuses, keys, power cords,
communications cables or spill resistant covers will be provided for an additional charge (per TRANSACT current pricing schedule ).
No attachments or alterations should be made without prior written consent of TRANSACT. If any such attachment or alteration, in the opinion of
TRANSACT, interferes with the normal and satisfactory operation or maintenance of the printer, TRANSACT may refuse to repair such products. This includes any printers with serial number tags that have been removed, altered,
or in any way made illegible
EXTENDED ONE YEAR WARRANTY
Additional warranty coverage for one year beyond the Standard Warranty Period, as defined above, may only be purchased when the printer is
ordered. Printers covered by the extended warranty must be returned in the
same manner as described above under the Terms of Standard Warranty.
TRANSACT USA will repair (or at its option, replace) at no additional
charge, any defective component(s) of the printer. TRANSACT USA and
Authorized Repair Centers will pay return shipping back to the customer at
UPS Ground rates or equivalent within the continental United States. Shipping
costs for printers located outside the continental United States will be the sole
responsibility of the customer both to and from TRANSACT USA. Duties and
taxes, if levied, shall be the sole responsibility of the customer.
TRANSACT U.K. will repair (or at its option, replace) at no charge any defective component(s) of the printer. TRANSACT U.K. will pay the return shipping fee back to the customer using TRANSACT’s selected method of transit.
Duties and taxes, if levied, shall be the sole responsibility of the customer.
The above Warranties shall not apply if the product has been damaged due
to abuse, misuse, misapplication, accident, shipping damage (due to insufficient or incorrect packing as advised on TRANSACT packing instructions
found in the Operator’s Guide or Quick Reference Sheet), or as a result of
service or modification by any other than an authorized TRANSACT repair
center. NOTE: USE OF MEDIA PRODUCTS (INCLUDING ROLL PAPER,
INSERTED FORMS, TICKETS, OR LABELS) NOT TESTED BY AND APPROVED BY TRANSACT SHALL VOID THE PRODUCT WARRANTY.
THERE ARE NO EXPRESSED WARRANTIES OTHER THAN THOSE ON
THE FACE HEREOF AND DESCRIBED ABOVE. NO WARRANTIES
WHETHER EXPRESSED OR IMPLIED, INCLUDING BUT NOT LIMITED TO,
ANY IMPLIED WARRANTIES OF MERCHANTABILITY OR FITNESS FOR
A PARTICULAR PURPOSE SHALL EXTEND BEYOND THE RESPECTIVE
WARRANTY PERIODS DESCRIBED ABOVE. Some states do not allow
limitations on how long an implied warranty lasts, so the above limitation
may not apply.
TRANSACT SHALL NOT BE RESPONSIBLE OR LIABLE FOR ANY SPECIAL,
INCIDENTAL, OR CONSEQUENTIAL DAMAGES OR LOSSES ARISING
FROM THE USE OF THIS PRODUCT.
This Limited Warranty applies to TRANSACT printers sold in the continental
United States. The warranty for printers purchased outside the continental
United States may vary. Contact your TRANSACT dealer for warranty service
information.
TRANSACT also offers a DEPOT MAINTENANCE AGREEMENT that
extends coverage beyond the warranties described above. The agreement
must be purchased prior to the expiration of either the standard or extended warranty. The terms of the agreement are documented. Details can be
obtained from TRANSACT’s Technical Support Department at (877) 7ithaca
or (607) 257-8901 or from Authorized Distributors.
TRANSACT will from time to time announce the termination of production of
specific products. DEPOT MAINTENANCE AGREEMENTS for discontinued
products will not be sold after the announced production end date.
TRANSACT may, at its option, alter the contents of this policy at any time
without notice. These changes will affect products manufactured after the
effective date of this policy.
This warranty gives you specific legal rights. You may have other rights that
vary from state to state.