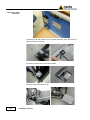
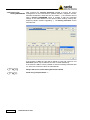
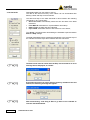
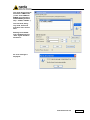
1
NARDA Safety Test Solutions S.r.l. Socio Unico Sales & Support: Via Leonardo da Vinci, 21/23 20090 Segrate (MI) - ITALY Tel.: +39 02 2699871 Fax: +39 02 26998700 Manufacturing Plant: Via Benessea, 29/B 17035 Cisano sul Neva (SV) Tel.: +39 0182 58641 Fax: +39 0182 586400 http://www.narda-sts.it User’s Manual AMS-8060 AREA MONITOR SYSTEM SERIAL NUMBER OF THE INSTRUMENT You can find the serial number on the upper cover of the receiver unit, on the side of the receiver unit baseplate and on the side of the Power Pack. Serial number is in the form: 000XY00000. The first three digits and the two letters are the Serial Number prefix, the last five digits are the Serial Number suffix. The prefix is the same for identical instruments, it changes only when a configuration change is made to the instrument. The suffix is different for each instrument. Document AMS8060EN-21009-3.66 – Copyright © NARDA 2007 NOTE: If the instrument is used in any other way than as described in this Users Manual, it may become unsafe Before using this product, the related documentation must be read with great care and fully understood to familiarize with all the safety prescriptions. To ensure the correct use and the maximum safety level, the User shall know all the instructions and recommendations contained in this document. This product is a Safety Class III instrument according to IEC classification and has been designed to meet the requirements of EN61010-1 (Safety Requirements for Electrical Equipment for Measurement, Control and Laboratory Use). In accordance with the IEC classification, the battery charger of this product meets requirements Safety Class II and Installation Category II (having double insulation and able to carry out mono-phase power supply operations).. It complies with the requirements of Pollution Class II (usually only non-conductive pollution). However, occasionally it may become temporarily conductive due to condense on it. The information contained in this document is subject to change without notice. KEY TO THE ELECTRIC AND SAFETY SYMBOLS: You now own a high-quality instrument that will give you many years of reliable service. Nevertheless, even this product will eventually become obsolete. When that time comes, please remember that electronic equipment must be disposed of in accordance with local regulations. This product conforms to the WEEE Directive of the European Union (2002/96/EC) and belongs to Category 9 (Monitoring and Control Instruments). You can return the instrument to us free of charge for proper environment friendly disposal. You can obtain further information from your local Narda Sales Partner or by visiting our website at www.narda-sts.it . Warning, danger of electric shock Earth Read carefully the Operating Manual and its instructions, pay attention to the safety symbols. Unit Earth Connection Earth Protection Equipotential KEY TO THE SYMBOLS USED IN THIS DOCUMENT: The DANGER sign draws attention to a potential risk to a person’s DANGER safety. All the precautions must be fully understood and applied before proceeding. WARNING The WARNING sign draws attention to a potential risk of damage to the apparatus or loss of data. All the precautions must be fully understood and applied before proceeding. CAUTION The CAUTION sign draws attention against unsafe practices for the apparatus functionality. NOTE: II The NOTE draw attention to important information. Note and symbols Contents Safety considerations and instructions ….............……. EC Conformity Certificate…….........................…............. Page VII VIII 1 General information 1.1 Documentation.............................................................. 1.2 Introduction.....................................…………………….. 1.3 Standard accessories.................................................... 1.4 Tri-axial Antennas………………………………………… 1.5 Optional accessories:.......................…......................... 1.6 Main specifications.............................…....................... 1.7 Max acquisition time……………………………………… 1.8 AMS-8060 receiver panel………………..….…………… Page 1-1 1-1 1-2 1-2 1-2 1-3 1-5 1-8 2 Installation and use 2.1 Introduction............................................................….... 2.2 Initial inspection.....................................................….... 2.3 Working environment..........................................…..…. 2.4 Return for repairs...................................................….... 2.5 Cleaning..................................................................…... 2.6 Installation and use.…...............................…………….. 2.6.1 Installation….....................................................….…. 2.6.2 Installation steps…............................................….…. 2.6.2.1 Feet and pole…………………………………………. 2.6.2.2 Solar panel mounting………………………………… 2.6.2.3 Solar panel wiring……………………………………. 2.6.2.4 Receiver unit mounting……………………………… 2.6.2.5 Triaxial antenna………………………………………. 2.6.2.6 SIM card………………………………………………. 2.6.2.7 Power ON…………………………………………….. 2.6.2.8 Radome………………………………………………. 2.6.3 Battery charging…………........….......................….... 2.6.3.1 External power supply…………………………….…. 2.6.4 Fastening the AMS-8060 …………………………..… 2.6.5 Interlock……......................................................…..... 2.7 Modem GSM………………………………………….….. 2.7.1 SIM card………………………………………………… 2.7.2 How to switch the GSM modem on…………….……. 2.7.2.1 Programmed mode………………………………….. 2.7.2.2 Spontaneous mode………………………………….. 2.7.2.3 Automatic mode……………………………………… 2.7.3 Selective unit switching ON/OFF..……………………. 2.8 RF signals of dangerous intensity….......................…... 2.9 Controlling the internal battery...................................... 2.10 Suggestions and checking list to define Area monitor problems………………………………….………..…….. Page 2-1 2-1 2-1 2-1 2-1 2-2 2-3 2-3 2-3 2-4 2-5 2-6 2-7 2-7 2-8 2-8 2-10 2-10 2-12 2-12 2-13 2-13 2-14 2-14 2-14 2-14 2-15 2-15 2-15 2-16 Contents III 3 Instructions for use of the 8060-SW02 control software 3.1 Introduction…………...........................................…........ 3.2 Hardware requirements.............................................….. 3.3 Installation of the software....................................…....... 3.4 Starting the program.........................................…........... 3.4.1 Assigning the serial port……………………………….... 3.4.2 Checking for the Modem……………….……….………. 3.4.3 Entering the terminal Password……………………..…. 3.4.4 Changing a Password…………………………..…..…… 3.4.5 Entering the setting Password…………………………. 3.4.6 Main window……………………………….…………….. 3.4.6.1 Alarm column………………………………………….. 3.4.7 Entering a new station…………………………………… 3.4.8 Removing a station………………………………………. 3.4.9 Editing a station…………………………………………… 3.4.10 Automatic data downloads…………………………….. 3.4.11 Answering……………………………………….….…… 3.4.12 Calling……………………………………………….…… 3.4.13 Auto ASCII File……………………………………….…. 3.4.14 Warning if not called after XX Hour……………….….. 3.4.15 Calendar of measurements………………………….… 3.5 Calling a station.........................................………………. 3.6 Control window............................................................…. 3.7 Description of controls.................................................…. 3.7.1 Alarm.......................................................................….. 3.7.1.1 Notify alarms through………………………………….. 3.7.1.2 Last field………………………………………………… 3.7.1.3 Averaging Period………………………………………. 3.7.1.4 Max Field ALARM Settings…………………………… 3.7.1.5 Battery Section………………………………………… 3.7.1.6 Device section………………………………………….. 3.7.1.7 Over heat……………………………………………….. 3.7.1.8 Case Open……………………………………………… 3.7.2 Schedule for Modem...............................................….. 3.7.3 Schedule for SMS...................................................….. 3.7.4 Rate Settings.........................................................…… 3.7.5 Get DATA..............................................................…… 3.7.6 Examples of error…………………………………..……. 3.7.7 Updating Firmware....................…...........................… 3.7.8 Station Date & Time..............................................…… 3.7.9 Markers.................................................................…… 3.7.9.1 Deleting a Marker……………………………………… 3.8 General commands.................................................…… 3.8.1 Read Station Configuration……………………………... 3.8.2 GPS……………………………………………………….. 3.8.3 Enable setting……………………………………………. 3.8.4 Band analysis…………………………………………….. 3.8.5 Selective Mode Timing………………………………….. 3.8.6 Hang and exit…………………………………………….. 3.9 Downloading data via serial port RS232…………………. 3.9.1 Possible errors…………………………………………… 3.10 Software updates…………………………………….……. IV Contents Page 3-1 3-2 3-3 3-8 3-9 3-10 3-13 3-15 3-16 3-17 3-18 3-19 3-20 3-20 3-21 3-22 3-23 3-23 3-24 3-25 3-27 3-29 3-30 3-33 3-33 3-33 3-34 3-34 3-35 3-35 3-36 3-36 3-37 3-38 3-39 3-40 3-42 3-45 3-47 3-48 3-50 3-51 3-51 3-51 3-52 3-53 3-59 3-59 3-60 3-60 3-60 4 Data presentation 4.1 Introduction......…...............................……...................... 4.2 The Calendar..............................................…................. 4.3 Data window..................................................….........….. 4.4 Main commands.....................................…..…..……....... 4.4.1 File…………………………………………………...…….. 4.4.2 Option…………………………………………...…………. 4.4.3 Trace………………………………………………………. 4.4.4 Marker……………………………………………..………. 4.4.5 Vertical…………………………....………………..……… 4.5 Secondary controls…………………………………..…….. 4.5.1 Save Files……………………………………………..….. 4.5.1.1 Save File in ASCII format……………………………... 4.5.1.2 Data interpretation …………………………………….. 4.5.2 Open Files………………………………………………… 4.5.2.1 Open Autotext file……………………………………… 4.5.2.2 Data evaluation………………………………………… 4.5.3 Print…………………………………………………….…. 4.5.4 ClipBoard…………………………………………………. 4.5.5 Zoom Mode………………………………………………. 4.5.6 Comment…………………………………………………. 4.5.7 Redraw…………………………………………………….. 4.5.8 Setup………………………………………………………. 4.5.8.1 Color Palette…………………………………………….. 4.5.9 Limit………………………………………………………… 4.5.9.1 Screen sample………………………………………….. 4.5.10 Software revision………………………………………... 4.6 Graphical window...........…............................................. 4.7 Status window………………………………………………. 4.8 Data Import Word or Excel………………………………… 4.9 Control Log File……………………………………………… 4.10 Station Log File…….……………………………………… Page 4-1 4-1 4-2 4-3 4-3 4-3 4-4 4-4 4-5 4-6 4-6 4-7 4-8 4-9 4-10 4-11 4-12 4-13 4-14 4-15 4-15 4-15 4-15 4-16 4-16 4-16 4-16 4-17 4-17 4-18 4-19 5 Controls and SMS messages 5.1 Introduction………………………………………..……… 5.2 Command list............................................................... 5.3 Query COMMANDs...................................................... 5.4 Setting COMMANDs.................................................... Page 5-1 5-2 5-4 5-11 6 Accessories 6.1 Introduction…………………………………………..….... 6.2 Packing Instructions…………..............................…..… Page 6-1 6-1 7 Action of the wind into AMS-8060 7.1 Introduction………………………………..……………… 7.2 AMS-8060…………………………..…………………….. Page 7-1 7-2 Contents V Figures Figure 1-1 1-2 1-3 1-4 2-1 2-2 AMS-8060 unit……………………………………….. 3AX-75M-3G Antenna………………………………. 3AX-2 Antenna………………………………………. AMS-8060 receiver unit panel……………………… Station without Radome…………………………….. Slot for the SIM card………………………………… Page 1-1 1-6 1-7 1-8 2-2 2-13 Tables Table 1-1 1-2 1-3 1-4 7-1 Technical specifications of AMS-8060….……….... Settings/Queries of the AMS-8060…........………... Technical specifications of the 3AX-75M-3G……... Technical specifications of the 3AX-2……………... Wind resistance of the AMS-8060 Page 1-3 1-6 1-6 1-7 7-2 Graphes Graphe 1-1 Max acquisition time of AMS-8060 with AVG or RMS and Peak….……………………………………. 1-2 Max acquisition time of AMS-8060 station with AVG or RMS………………... …………….…….…... 7-1 Weight Ballast variation in comparison to the wind speed for AMS-8060………………………………… VI Contents Page 1-5 1-5 7-3 SAFETY RECOMMENDATIONS AND INSTRUCTIONS This product has been designed, produced and tested in Italy, and it left the factory in conditions fully complying with the current safety standards. To maintain it in safe conditions and ensure correct use, these general instructions must be fully understood and applied before the product is used. • When the device must be connected permanently, first provide effective grounding; • If the device must be connected to other equipment or accessories, make sure they are all safely grounded; • In case of devices permanently connected to the power supply, and lacking any fuses or other devices of mains protection, the power line must be equipped with adequate protection commensurate to the consumption of all the devices connected to it; • In case of connection of the device to the power mains, make sure before connection that the voltage selected on the voltage switch and the fuses are adequate for the voltage of the actual mains; • Devices in Safety Class I, equipped with connection to the power mains by means of cord and plug, can only be plugged into a socket equipped with a ground wire; • Any interruption or loosening of the ground wire or of a connecting power cable, inside or outside the device, will cause a potential risk for the safety of the personnel; • Ground connections must not be interrupted intentionally; • To prevent the possible danger of electrocution, do not remove any covers, panels or guards installed on the device, and refer only to NARDA Service Centers if maintenance should be necessary; • To maintain adequate protection from fire hazards, replace fuses only with others of the same type and rating; • Follow the safety regulations and any additional instructions in this manual to prevent accidents and damages. Safety Considerations VII EC Conformity Certificate (in accordance with the directives: EMC 89/336/EEC and low voltage 73/23/EEC) This is to certify that the product: AMS-8060 Area Monitor System Produced by: NARDA S.r.l. Safety Test Solution Via Benessea 29/B 17035 Cisano sul Neva (SV) - ITALY complies with the following European Standards Safety: CEI EN 61010-1 (2001) EMC: EN 61326-1 (2007) This product complies with the requirements of Low Voltage Directive 73/23/EEC, amended by 93/68/EEC, and with Directive EMC 89/336/EEC amended by 92/31/EEC, 93/68/EEC, 93/97/EEC. NARDA S.r.l. VIII EC Conformity 1 – General information 1.1 Documentation This Users Manual contains the following annexes: • A form to return to NARDA with the device when requesting service. • A checklist of the parts included in the shipment. This Users Manual also includes the description of the accessories of the system for distributed frequency selective monitoring of environmental electromagnetic fields. 1.2 Introduction The AMS-8060 system is a revolutionary, accurate and reliable solution for remote and continuous monitoring of electromagnetic fields both in broadband and in frequency selective mode. The AMS-8060 system includes an accurate and sensitive receiver which, being equipped with the proper filters and coupled to the specific broadband, omni-directional antennas, make it possible to measure the contribution to the total field of all the user definable frequency bands. The logging system, combined with a flexible and specifically designed control software allows the user to program each parameter of the station and transfer to a PC all the data saved into the unit. The recorded data can be viewed either as a graph or as a table. In the event of any alarm, such as a threshold setting being exceeded, or any attempt to tamper with the remote unit, or a breakdown of the unit, it is possible to receive on any mobile phone an SMS informing the user of the event. Fig. 1-1 AMS-8060 unit AMS-8060 unit is equipped with solar panel and high capacity back-up batteries. An external power supply is provided for continuous, long term, selective monitoring. Document AMS8060EN-21009-3.66 - © NARDA 2007 General Information 1-1 1.3 Standard accessories The monitoring station is composed by a main measuring/processing unit, GSM modem with GPS module and antenna. An RF transparent radome protects the station from the weather. The measuring unit comes ready to be mounted on its pole and connected to the power pack. The standard solar panel has to be mounted on the support base. The unit must be equipped with a measuring antenna to be selected among the available models. For remote communication it is essential to equip the unit with a SIM card that must be enabled for data communication. Standard accessories included with the 8060 unit are: • • • • • • • • • 1.4 Tri-axial antennas A measuring antenna must be chosen among the following models: • • 1.5 Optional accessories AC/DC power supply/battery charger; RS-232 cable, 2m AMS-8060-SW-02 software disk 2 cable ties Ballast bag Tools kit Certificate of calibration; Operating Manual; Return Form for repair. AMS-8060 3AX 75MHz – 3GHz triaxial antenna AMS-8060 3AX2 (100) 500kHz to 30MHz; 75MHz to 3GHz The following accessories are supplied separately (on charge): • • 8060-MRF 8060-GSM Line Modem for controller PC or station; GSM Modem for PC; The updated AMS-8060-SW-02 software, including the AMS-8060 firmware, is available for downloading on the internet web site www.narda-sts.it or directly from the Narda sales offices. 1-2 General Information 1.6 Main Specifications Tables 1-1 – 1-2 list the specifications of AMS-8060 equipped with a triaxial antenna. TABLE 1-1 Technical Specifications of AMS-8060 Measuring range Frequency range Dynamic range Resolution Sensitivity Unit (read by the PC) Measured field 100kHz – 3 GHz (receiver) 75 MHz – 3 GHz (with AMS-8060 3AX antenna) (100) 500kHz - 30MHz; 75MHz - 3GHz (with AMS-8060 3AX2 antenna) from 0,03 to 300 V/m 0,01 V/m 0,01 V/m (depending on the width of the analyzed frequency band) V/m Instantaneous and average value of the magnetic field vector module (up to 30MHz); Instantaneous and average value of the electric field vector module (75MHz to 3GHz). Measurement/acquisition functions Storing interval Averaging Averaging interval Stand by timing Memory Max acquisition time Data download Functions Daily report LOG file Graph Zoom Zoom range Alarm for E.M. field Clock Messages Sensor Battery management Firmware update Software update 5, 10, 15, 30 sec; 1, 2, 6 min AVG (linear) or RMS (effective value) same as storing interval Programmable over 24 hour in 0.5 hours step. 256 kByte (circular memory first in – first out) 30 days (6 minutes storing interval of 5 bands (see graph) Manual from PC on operator request Automatic managed by the station at predetermined times Automatic managed by the PC at operator call Automatic creation of a TXT after data download AVG, RMS, MAX; daily report via SMS Display and marking of data acquired during GSM modem transmission, Zoom and Marker. Daily sending of minimum battery voltage and maximum field data with time tags. Automatic and manual operations are written in a LOG file. Linear or logarithmic scale Vertical and horizontal Full range, 2, 5, 10, 20, 50 and 100x expansion Exceeding two programmable field thresholds (Warning and Alarm) with automatic notification both of exceeding and returning within the limits. High precision and stability real time internal clock. SMS which can be sent to up to 10 mobile phones simultaneously. Display of model, serial number and calibration date. Automatic download of the battery voltage and energy balance of the last 31 days. remote by PC free, downloadable from NARDA web site: www.narda-sts.it General Information 1-3 General Specifications Internal GSM modem SIM Card Antenna input Interface Protection Software protection Alarms Internal battery Power consumption External power Operating time Recharging time Environment temperature Dimensions Weight Environmental protection 1-4 Dual Band Not included, must be enabled for data communication (CSD, 9600b/s) Type N 50Ω RF connector – Multipolar connector for probe code and data exchange. RS232 with DB9 connector Microswitch for unauthorized case opening notification Dual level Password case opening, internal overheating, low battery, probe and/or receiver malfunction. lead; 12 V, 25 A/h 100 mW with receiver and GSM off. 200 mW with receiver off and GSM on stand by 2 W with receiver off and GSM transmitting. 8 W with receiver on and GSM off or on stand by 24V, 1.25 A > 48 hours with receiver on , without external power supply. < 12 hours with external power supply. -10 / +50°C Station: 260 x 800 mm (diameter x heigh) Base: 600 x 600 x 30 mm (L x D x H) Receiver: 1,9 kg Sensor: 0,5 kg Battery: 6,1 kg Cover: 3,0 kg Total: 11,5 kg Base and pole:12,5 kg Total: 24,0 kg IP54 General Information The device can measure and save data for a long period of time. The following graphs show the internal memory capacity depending on the storing rate, number of frequency bands and “Peak” selection. 1.7 Max acquisition time Acquisition time Time [h] 10000 1000 6 min rate 2 min rate 1 min rate 100 30 sec rate 15 sec rate 10 sec rate 5 sec rate 10 1 1 2 3 4 5 6 7 8 9 10 11 12 13 14 15 16 17 18 19 20 Number of bands Graph 1-1 Max acquisition time of AMS-8060 with AVG or RMS and Peak selected The internal memory can be read at every new data transfer to the central unit, at set times or by remote control. Moreover, when the memory is full, the new data are overwritten on the oldest to ensure availability of the data for the most recent measurement period. Acquisition time Time [h] 10000 1000 6 min rate 2 min rate 1 min rate 100 30 sec rate 15 sec rate 10 sec rate 5 sec rate 10 1 1 2 3 4 5 6 7 8 9 10 11 12 13 14 15 16 17 18 19 20 Number of bands Graph 1-2 Max acquisition time of AMS-8060 with AVG or RMS only General Information 1-5 Settings can be made and the devices can be queried via mobile phone, or via a central control unit consisting of a PC with 8060-SW02 software installed, connected via GSM or line modem. The following table describes the different possibilities TABLE 1-2 Settings/Queries of the AMS-8060 Possible functions Settings Reading status and alarms Reading max value Reading average value Download data Reading of battery Downloading battery related data – last 31 days Reading of internal temperature Spontaneous call MARKER sending Reporting alarms Reporting via SMS of daily maximum SMS 8060 via Modem 8060 via RS232 YES YES YES YES NO YES NO YES NO YES YES YES YES YES YES YES YES YES YES NO YES YES YES NO YES YES YES YES YES YES YES NO NO YES NO NO The AMS-8060 system can operate with different antennas. Two different triaxial models, with the following specifications, have been adopted. TABLE 1-3 Technical specifications of the 3AX-75M-3G ANTENNA for AMS-8060 75 MHz - 3 GHz Frequency range Electric on three axis Detected field 300 V/m single tone Range 200 V/m without restrictions 1000 V/m Overload Stored on internal EEPROM Antenna factor 24 months (suggested) Calibration interval -10 / +50°C Operating temperature 450 x 120 mm Dimensions: (LxD) 450 g Weight: Fig. 1-2 3AX-75M-3G Antenna 1-6 General Information TABLE 1-4 Technical specifications of the 3AX-2 ANTENNA for AMS-8060 Frequency range Sensor type Probe type Antenna factor RF connector Intrinsic noise display in conjunction with the AMS8060 basic unit (measuring a single axis separately) Intrinsic noise display in conjunction with the AMS8060 basic unit (for isotropic result) Measurement range limit (for single CW signal) Max measurement range in conjunction with the AMS8060 basic unit Damage/overload level Operating temperature range Air humidity Weight Dimensions Calibration interval Three-Axis-Antenna, E-Field Three-Axis-Antenna, H-Field 75 MHz to 3 GHz (100) 500 kHz to 30MHz E-Field Antenna H-Field Antenna Triaxial design Scanned axis Individually determined during calibration and saved in the antenna EEPROM Correlated E field is reported for f≤30 MHz N connector 50 Ω 50 μV/m at 900 MHz with 1 kHz RBW 70 μV/m at 2.1GHz with 1kHz RBW 2.5 mV/m at 10MHz with 1kHz RBW 1.5 mV/m at 25MHz with 1kHz RBW 87 μV/m at 900 MHz with 1kHz RBW 120 μV/m at 2.1GHz with 1kHz RBW 1.5 mV/m at 10MHz with 1kHz RBW 1.0 mV/m at 25MHz with 1kHz RBW 300 V/m 1000 V/m for f≤110 MHz 200V/m 200 V/m (without restrictions for total span of 75 MHz -3 GHz) 1000 V/m -10°C to 50°C 3 < 29 g/m (< 93% at +30°C) 770 g 12x18x47 cm (DxLxH) 24 months (recommended) Fig. 1-3 3AX-2 Antenna The 8060-AX2 dual band, triaxial antenna includes a (100) 500 kHz to 30MHz triaxial magnetic field sensor. Computation of electric field, expressed in V/m by the station, is done assuming the measurement is taken in far field condition where the known ratio between magnetic and electric field allows good correlation accuracy. Operator should check distance from field sources to evaluate reliability. General Information 1-7 1.8 AMS-8060 receiver panel Fig. 1-4 AMS-8060 receiver unit panel Legend: 1) GSM antenna 2) SIM card slot 3) GPS antenna connector 4) Status LEDs 5) RS232 serial interface connector 6) Power switch 7) Power supply connector 8) RF input N connector 9) Antenna data and power supply connector 10) Service connector 1-8 General Information 2 – Installation and use 2.1 Introduction This section provides the information necessary to install and use the System for Distributed Frequency Selective Monitoring of Environmental Electromagnetic Fields AMS-8060. It also includes information regarding initial inspection, power requirements, interconnections, working environment, assembly, cleaning, storage and shipment. 2.2 Initial inspection Inspect the package for any possible damage. If the packaging or protective material are damaged, check that the content is complete and that the instrument has not been damaged in any of its electrical or mechanical parts. Check the accessories, referring to the checklist enclosed with the manual. Report any noticed damage to the forwarder and to NARDA. 2.3 Working environment The working conditions for the instrument are as follows: From -10°C to +50°C • Temperature <93% @ 30°C • Relative humidity The instrument should be stored in a clean, dry place free of acids, dust and moisture. The storage environment must have the following specifications: From -20°C to + 70°C • Temperature < 95% • Relative humidity Up to 4000 m (a.s.l.) • Altitude 2.4 Return for repairs 2.5 Cleaning Any part of the instrument, including the battery, can only be replaced by NARDA, therefore, in case of damage to parts and/or malfunctions, contact the NARDA service center. When the instrument has to be returned to NARDA for repairs, please complete the form included in this Users Manual, filling in all the information necessary for the service requested. To reduce the time necessary for the repair, be as specific as possible in describing the malfunction. If the problem only occurs under specific conditions, detail in the best possible way how to reproduce these conditions. Whenever possible, it is preferable to use the original packing for return, making sure to wrap the device in heavy paper or plastic (see section 6 for detailed packaging instructions). In alternative, pack the equipment in a sturdy cardbox with plenty of impact absorbing material all around the equipment, to ensure a tight fit and prevent it from moving inside the box. Take special precautions to protect the solar cells and GSM modem antenna. Seal the package securely and write FRAGILE on the outside to encourage careful handling. Use a clean, soft, dry cloth to clean the instrument and the solar cells. To clean the instrument do not use solvents, acids, cleaning fluid, turpentine, acetone or similar products which could damage it. It is suggested to replace air filter at least once a year or more frequently if needed. 1 Document AMS8060EN-21009-3.66 - © NARDA 2007 Installation and use 2-1 2.6 Installation and use The system for Distributed Frequency Selective Monitoring of Environmental Electromagnetic Fields AMS-8060 consist of a vertical housing with circular shape made of material that is transparent to electromagnetic fields. Within this radome is housed the measuring device, as well as the measuring antenna and the remote communication device. Batteries are located within the power pack on the support base. The power supply system, using high capacity batteries, allows a good operating autonomy thanks to the power consumption that, relatively to the high performances, is kept low. In normal conditions, if continuous operation (24 hours/day selective measurement) is needed, the station should be powered by the mains or by external additional solar panels. AMS-8060 power system includes high quality lead batteries which provide very good performance even in the voltage, current and temperature most severe condition. Nevertheless, as happens in all lead accumulators, capacity is influenced by temperature. Best performance are achieved around 20°C. Fig. 2-1 Station without radome 2-2 Installation and use 2.6.1 Installation The AMS-8060 Field Monitor is designed to operate outdoors, in the vicinity of the electromagnetic fields sources that shall be controlled, and under the most severe environmental conditions. 2.6.2 Installation steps The following is a list of the main steps for correct installation: 2.6.2.1 Feet and pole 1) Screw the four adjustable feet under the support base 2) Remove the bolt from the pole support, place the pole and fasten it to the base using the bolt with nut and washers. 3)Fasten the top support bracket to the solar panel. Installation and use 2-3 2.6.2.2 Solar panel mounting 4) Remove nuts and washers from the base brackets, insert the solar top support bracket on the pole 5) Screw the solar pane to the base brackets. 6) Remove the Power Pack cover 2-4 Installation and use 2.6.2.3 Solar panel wiring 7) Remove the nut from the chock of the solar panel cable 8) Insert the O-ring, thread the cable through the hole in the box and screw the nut to fasten the chock to the Power Pack. 9) Plug the solar panel connector , place the fuse and close the Power Pack box.. Installation and use 2-5 2.6.2.4 Receiver unit mounting 10) Mount the receiver unit on the pole and fasten it by tightening the bracket screws 11) Install the power cable by mounting the chock in the hole of the receiver baseplate 12) Plug the power supply connector to the receiver unit. 13) To avoid water infiltrations fix the cables to the base support as shown in the picture. 2-6 Installation and use 2.6.2.5 Triaxial antenna 14) Plug the antenna data connector looking at the alignment of the two red spot on the data connectors. Carefully connect the antenna output to the receiver RF input. To remove the antenna extract the multipolar connector first holding it by the metallic part, then turn the RF connector ring nut. Do not insert or remove the antenna holding it by the head or by the data cable as serious damage may occur. The AMS-8060 station cannot operate without antenna even when downloading acquired field data. In case the antenna is accidentally removed when station is ON a reset will be required: switch the station OFF, connect the triaxial antenna and switch ON again. 2.6.2.6 SIM card 16) After removing the SIM card PIN number by means of a mobile phone, place it carefully into the SIM card slot of the receiver unit. Gently push the SIM drawer to completely insert it into the slot. Installation and use 2-7 2.6.2.7 Power on 17) Switch the unit ON 2.6.2.8 Radome 18) Remove the screws from the receiver baseplate to allow the radome mounting. Place the radome to align the hole near the inner label (see fig.) to the corresponding one in the receiver baseplate. The anti tampering switch protrudes from the main unit. Be sure to avoid turning the cover as it can damage the switch. 2-8 Installation and use 19) Tighten the four screws to fix the radome. 20) Assembled unit. Installation and use 2-9 2.6.3 Battery charging A complete battery charging should be completed (48 hours) before starting measurements. Remove the Power Pack cover Unplug the power connector coming from the solar panel and connect the provided power supply/battery charger for a complete charge. 2.6.3.1 External power supply Execute the following wiring in the case an external power supply is requested during measurements Disconnect the solar panel (if present) from the Power Pack removing the chock too. 2-10 Installation and use Insert the cable of the external power supply/battery charger through the hole at the side of the Power Pack Screw the bolt to fasten the chock Install the cover of the Power Pack. Run the program 8060-SW02 on the PC control station to complete the setup, referring to the specific chapter in this manual. Correct readings may be conditioned by the nature of the places in which the AMS-8060 field monitor is installed. The field measuring antenna is affected by huge metallic masses or other objects that may reflect the signal, if located in the vicinity of the unit. Whenever possible, it is a good rule to install the unit at some distance from walls, high voltage pylons, buildings and other obstacles that could affect the signals reaching the sensor. Before proceeding to permanent installation, make sure that the point at which the field monitor will be installed is adequately covered by the mobile phone service used for the GSM modem. This can be done using any GSM mobile phone capable of indicating the intensity of the signal coming from the local base radio station of the company chosen for the SIM card. Installation and use 2-11 2.6.4 Fastening the AMS-8060 The receiver base plate can be fastened to the provided pole, or to another one with the same diameter, by means of the provided supporting brackets. Fiber glass poles up to two meters long as well as supporting brackets are available as spare parts. The height of the station from floor can be adjusted cutting the pole to the desired length. Using the supplied pole, whose characteristics have been carefully assessed, is recommended to avoid any alteration of the field to be monitored. Supporting brackets of the same type but fit to fasten the station to different cylindric supports can be used as an alternative. These modes of installation are not recommended, however, as the levels of field measured could be greatly influenced by the distance and by the nature of the support. Considering that it has been designed for outdoor use and the main operations are generally performed remotely by means of an internal GSM modem, the AMS-8060 does not have any control or connection on the outside of the protective case. Some controls and connections are available inside the protective case as listed onward in this manual and can be reached by removing the station radome or the power pack cover. 2.6.5 Interlock 2-12 A microswitch inside the unit is tripped when the radome is removed. It is therefore possible to activate an alarm, to be sent to any mobile phone warning of any attempts to tamper with the device. Installation and use 2.7 GSM Modem The AMS-8060 station is supplied with a GSM modem which allows it to communicate with the controller PC for programming and for the remote collection of the data recorded. To function properly, the GSM modem requires a regular SIM Card enabled for data communication. 2.7.1 SIM CARD The SIM Card to be used must permit the transmission and reception of data calls. The user can choose the most suitable SIM Card to install, depending on the services and costs offered by the different mobile phone Service Providers; it should also be chosen so as to guarantee optimum coverage for the specific zone of installation of the field monitor. Fig. 2-2 Slot for the SIM card The modem for data transfer is housed inside the receiver module beside the antenna connector; the SIM Card has to be inserted in the slot shown in the figure (Press the button to remove the SIM card). Before removing or inserting the SIM Card, switch off the AMS-8060. If you use a rechargeable SIM Card, make sure it is charged. Before using the SIM Card with the AMS-8060, disable the PIN code using the proper function available on any mobile phone. Any time the station is switched on it is necessary to wait for about one minute to complete the initialization process; the leds will light as follows: GPS – (yellow) normally off, short blink during position reading. GSM – Modem ON ( red) CNT – Controller (green) normally blinking SRM – Selective module (red) normally blinking Installation and use 2-13 2.7.2 How to switch the GSM modem on On the AMS-8060 the GSM modem can be switched on in three different ways: 1. Programmed ( the User decides when the modem has to be switched on and for how long). 2. Spontaneous (the AMS-8060 switches the GSM modem on whenever there is an alarm ) 3. Automatic (the AMS-8060 switches the GSM modem on automatically when certain conditions arise) 2.7.2.1 Programmed mode The Programmed mode consists of setting a time for switching the modem on and off and the repetition interval. The parameter “Hours and Minutes” specifies at what time of the day the GSM modem will be switched on and put in Stand-By mode. The “Stand-By” parameter defines for how many hours the GSM modem remains on. The parameter “Every” defines the repetition interval or after how many hours, from the last programmed activation, the GSM modem will switch on again. The parameter “Every” must be a submultiple of 24 ( 1, 2, 3, 4, 6, 8, 12, 24) in order to have every day the same timing. 2.7.2.2 Spontaneous mode In Spontaneous mode, whenever an alarm condition occurs or when the normal conditions are restored (e.g. exceeding the threshold value set for the field intensity or returning below the threshold) the GSM is switched on directly by the AMS-8060 either to make a call or to send an SMS (depending on the settings) to the modem number(s) memorized. Afterwards, the GSM remains on stand-by for 15 minutes. 2.7.2.3 Automatic mode The following conditions turns the GSM modem on independently from the setting: 1. the GSM modem is turned ON for 24 hours any time the station is switched on. 2. If both Stand-By parameters (“Schedule for Modem” and “Schedule for SMS”) are settled to zero the GSM will switch on in stand by mode at 11.00 AM every day and will stay on for 3 hours, otherwise it could not be called at all. 3. GSM modem switches automatically ON, for few seconds, everyday at 07:18 and 19:18 to allow the GPS module to obtain position data. 2-14 Installation and use 2.7.3 Selective unit Switching ON/OFF The selective unit is OFF every time the battery voltage is lower than 11.09 V. After switching OFF for low battery voltage, the selective unit will switch ON, according to the “Selective mode timing”, only when the battery voltage is > 11.97 V. 2.8 RF signals of dangerous intensity The antennas used in the AMS-8060 and the receiver input stage contain highly sensitive elements. Never place the unit in an electrical field higher than the maximum allowed level. The type of the mounted antenna is automatically sensed. No operation is required after the antenna installation or replacement. 2.9 Controlling the internal battery The internal battery is automatically recharged by the solar panel (if connected) or by an external power source. The charge can be checked by remote using the 8060-SW02 program: there is a specific window which displays battery voltage and where a battery alarm can be set, if necessary. The battery status can be read from any mobile phone by sending to the AMS-8060 the SMS message #00?BAT*. The lead batteries with a nominal voltage of 12V can be damaged if left for a long period with voltage below 11,58 V. Below this value chemical processes that could damage them begin. The AMS-8060 batteries apply a technology to reduce this phenomenon. Furthermore the supply circuit disconnect the load (switching the unit off) when the battery voltage is low. Anyway, if not used, the station should be switched off. Battery should be recharged if the station has not to be used for a long period. Any part of the instrument, including the battery, can only be replaced by NARDA, therefore in case of any damages to parts and/or malfunctions, please contact the NARDA Service Center. Installation and use 2-15 2.10 Suggestions and checking list to define Area monitor problems. The following are some recommended check points to be done to insure the proper usage of the Area Monitor: 1. Is the 8060 switched ON? 2. Is the GSM modem Led ON? 3. Is the battery charged correctly? To charge the battery it is not necessary to switch the station on. Battery charging takes about 40 hours. To avoid any battery problem, you can connect the battery charger to the area monitor and call it via RS232 Cable. In this way the area monitor should always respond. 4. Is the GSM modem programmed to be ON during the period you want to call the Area monitor? If not, turn the Area monitor off and ON again. 5. Can you hear the typical noise coming out from the speaker of the modem connected to the PC during the calling process? If not, your modem is probably off or the software is using a different COM port to which the modem is not connected. 6. What kind of messages appear in the bar-status of the SW02 during the calling process? Send this information to NARDA support. 7. What kind of telephone line (dedicated or GSM) are you using to call station from its PC? Try to use the fax machine telephone line. 8. Are you sure that the modem and the telephone line are able to support data calls? 9. Is the modem or the RS232 Cable connected to the correct COM port of the PC? 10. Is the modem correctly installed on PC (hardware and software)? Use diagnostic procedure to verify the correct installation and be sure the modem has all the protocols required for this kind of data communications – low cost modem for internet application only, may not support Area Monitor application. 11. Is the SIM Card in the Area Monitor available for Tx and Rx data communication from mobile to mobile? Has the PIN code been removed? If the communication with the area monitor is successful only by RS232 cable, the problem may lay on the modem or its antenna If the modem of your PC is used as Windows “Fax Printer” peripheral it may be not available for the station. In this case, disabling the setting for the use of the modem in the “Fax Printer” will restore the normal operation. To get a fast response from NARDA support center it is very important to provide always a picture reporting the system setup (storing settings, alarms status, start and stop of the download, etc..) to give a correct description of the conditions under which the area monitor was working during the faulty of the unit. Better if you can also provide the telephone number of the area monitor ( A SIM card allowed for international data calls should be available for remote diagnostic). Remote diagnostic will offer a better understanding of all problems concerning the status of the Area monitor and to eliminate your local communication problems. 2-16 Installation and use 3 – Instructions for use of the 8060-SW02 control software 3.1 Introduction This Chapter provides a guide for the installation and use of the data acquisition and control software 8060-SW02. It also explains the functions available and the configuration details. The procedure for the correct use of the AMS-8060 system is the following: • Install the software on the PC that will be used to control the AMS-8060 system; • Connect the external modem (for fixed line or GSM) if the PC internal one will not be used; • Connect the telephone cable to the external or internal modem; • Make sure the software drives the proper serial port to which the modem is connected; • Click twice on the 8060-SW02 icon to launch the software; • Enter the Terminal PASSWORD for management of Field Monitor; • Enter the Setting PASSWORD which is needed to edit the acquisition parameters of the Field Monitor. This operation can also be done later; • Add the ID’s of unit (name of the unit and phone number of the SIM card installed into the unit) in the list of Field Monitoring Stations which can be managed by the PC; • Call the desired station pressing CALL; • Change the monitoring parameters, if required, after typing the SETTING PASSWORD; • Download the acquired data to the PC as required; • Press Hang&Exit to end the connection; • Display and evaluate the measurement data. Using a GSM Modem make sure the PIN code of the SIM card in use has been removed. The 8060-SW02 software is a control program fully integrated into the System for Distributed Frequency Selective Monitoring of Electromagnetic Field AMS-8060. It allows to access all the remote Field Monitor stations for the remote setting and downloading of acquired data which are shown in graph or table form. 8060-SW02 can be used for saving and printing measured field data and Field Monitor station configuration parameters. Data transfer can be controlled by line modem, GSM modem or serial port of the controller PC. The software is based on the Windows operating system. The software features the following basic functions: • Querying and monitoring all the Field Monitors installed; • Programming different AMS-8060 Field Monitors individually with different acquisition modes; • Querying the Field Monitors at given times; • Communicating via line modem, GSM modem or RS232; • Protecting accesses with different keys at different querying levels; • Controlling and verifying the reliability of the data recorded; • Protecting the data recorded; • Acquisition and display of fields detected, the average and peak values; • Acquisition of the field values between two markers; • Saving and manipulating all the downloaded readings; • Saving graphs and tables representing all the measured data; • Downloading data with automatic generation of a text file .TXT to be used for easy data exchange with any “Office” applications; Document AMS8060EN-21009-3.66 - © NARDA 2007 Instructions for use 3-1 3.2 Hardware requirements To ensure the proper operations of the software, the minimum hardware requirements of the Personal Computer are: • • • • • Pentium processor; at least 16 Mb RAM; at least 10 Mb of space free on your hard disk; modem ; Operating System: Windows 95/98, NT; XP, ME, 2000 or Win7 The modem can be either internal or external or GSM. It must support the fax transmission protocol. If a GSM or PCMCIA GSM modem with SIM Card is used, it must allow to receive and transmit data, not only on fixed phone numbers but also to and from cellular phones. GSM 9600b/s C.S.D. data communication mode is required, check with the Telephone Service Provider to make sure this additional service is available. For proper installation of the modem refer to the instructions of modem manufacturer. The updated AMS-8060 firmware and software is available for downloading on the internet web site www.narda-sts.it or directly from the commercial offices of NARDA. 3-2 Instructions for use 3.3 Installation of the software 8060-SW02 control software shall be installed on the PC using the installation disk supplied with the 8060 System. The installation procedure is as follows: • start the PC with the Windows operating system; • insert the 8060-SW02 disk in the disk drive; • Run the application “Setup8060SW02.exe”. During the installation the program will ask you to confirm the directory where all the files will be loaded. Click OK to confirm the directory suggested C:\8060SW02. You can also type a different name; in Windows 7 the maximum number of characters for the name is 24 (including spaces); a message will appear in case of error. The same procedure will be followed for any future software upgrade. If you select a different folder be sure to select the same one when installing future upgrades. Instructions for use 3-3 The screen will look like the following: Select Next to continue the installation or press Cancel to abort the procedure. If it is decided to abort the installation the following window will appear: 3-4 Instructions for use A window may appear during the installation with a message informing the User that the software could not copy the file SETUP1 (Could not copy SETUP1.exe). To resolve this problem, enter into the WINDOWS directory (e.g. with the Program Manager function) and delete or rename the file with that name that already exists on your PC (the file to be deleted or renamed is not in use and it’s a “waste” of a previous installation of some software). After that it is necessary to restart the installation of the 8060-SW02 software. The installation program needs certain system files to function properly. If these files already exist or are used by the system, it may happen the following message appears: In this case select Ignore and proceed with the installation in order to keep the files existing in the system. The software will ask then for the preferred kind of installation and additional tasks to be performed according to the following pictures: Instructions for use 3-5 Click then the “install” button to proceed with the installation: 3-6 Instructions for use At the end of the installation process the software will inform that the program has been successfully installed with the following message: Click “Finish” to terminate the installation. As the installation is correctly performed, a 8060SW02 icon will be created. You can easily drag it onto the desktop with the mouse. Clicking with the right mouse button it is possible to Rename the icon and change its description. Instructions for use 3-7 3.4 Starting the program 3-8 Click twice on the 8060-SW02 icon to start the software. First a window appears displaying the software release, the presence and the status of the modem, the selected COM port. Instructions for use 3.4.1 Assigning the serial port After startup, the program normally searches the modem to be used to communicate with the Field Monitor on the first available COM port. If your modem (or serial cable in case of local connection) is connected to a different one, the COM port number must be assigned using the following procedure: • Select the icon 8060-SW02 with the right mouse button; • Select Properties; • Add the command COMM=N preceded by a space (in capital letters) at the end of the Destination field where N indicates the serial port to be used; for example, if the 8060 or Modem is connected to port 2, add the command COMM=2. The assigned COM port nr. must be between 1 and 9. • In some operating system the Destination field is enclosed in double quotation marks (“); in this case, the command COMM=N, preceded by a space must be outside as in the example below; • Then confirm by selecting Apply Instructions for use 3-9 3.4.2 Checking for the modem If there is any doubt about the presence of the modem or its working conditions, proceed as follows using the Windows commands (the procedure may differ slightly depending on the operating system used): • on the Start icon, access the system settings and select Control Panel; • on Control Panel, click twice on the icon relative to the MODEM options. That will open a window with the list of the modems installed; • 3-10 Select the modem you are going to use and click “properties” to display details; Instructions for use • The diagnostic section allows to test the modem: The serial port selected must correspond to the value of COMM=N on the Destination line of the icon properties of the software. In the example shown above, for the modem “Standard a 9600 bps” write COMM=2 (in capital letters). Instructions for use 3-11 Preferably, the modem should be connected to a direct phone line (the same connection used for a fax machine). Sometimes, if there is a switchboard system, it may only be possible to place outgoing calls but not to receive incoming calls (where an extension may be needed, etc.). Contact your switchboard operator for guidance. It is possible to connect a GSM modem. Check which port has been assigned to the modem in the control panel. Type this number N in the command string COMM=N If the internal modem/fax - specially in case of Notebook PC – is set as printer “Fax” allowing to send and receive fax directly from Windows applications, it may happens that the serial port on which the modem is installed appears busy and so not available for the program. In such case from the control panel select the folder related to the printers and fax and, right clicking the printer “Fax”, select “Properties”. Open the folder “Peripherals” and, choosing “Properties”, disable the internal modem for fax transmitting and receiving. Remember to re-enable the modified settings in the case the internal modem should be used to receive and send fax. 3-12 Instructions for use 3.4.3 Entering the Terminal PASSWORD Before to access any software functions, the User is requested to enter a Terminal PASSWORD to prevent the improper use of the software by non admitted personnel. The screen looks like this: If the answer is YES, a window will be opened where it is possible to enter the Terminal PASSWORD for the management of the Field Monitors. If the answer is NO, the program will allow to enter the password later. If the answer is YES, the screen looks like this: The User can enter any sequence of alphanumerical characters. We recommend to take a note of the Terminal PASSWORD entered. It will be necessary to install the control software again in the case the password is missing. Instructions for use 3-13 After entering the Password with OK, the software will request confirmation of the password before registering it into the system. The next screen will therefore look like this: At this point, type the same Password again. In case of any mistake, the software will display the following message: After the answer YES it is possible to re-enter the correct password; answering NO the procedure for the assignment of a new password starts over again. 3-14 Instructions for use 3.4.4 Changing a Password If it is necessary to change the Terminal Password, just press function key F10. The software displays the message: If the answer is YES, first enter the old Terminal Password, then enter the new one. If a wrong old Terminal Password is entered, the following message pops up: Press OK and try again. Remember that it will be necessary to reinstall the software in case the password is missing. Instructions for use 3-15 3.4.5 Entering the After entering the Terminal Password needed to ensure the secure Setting PASSWORD management of the Field Monitors (Station identifier, telephone number, automatic downloads, automatic text file creation…), the software asks to enter a Setting PASSWORD which is needed to edit the parameter settings on the Field Monitors to be queried (alarm settings, storing rate, frequency bands, firmware upgrading…). The Setting Password screen looks like this: If the answer is YES, the User will be asked to enter and confirm a new Password (which may be different from the Terminal Password). If the answer is NO, it is also possible to enter this Setting Password later on, at the time of the first call to the Field Monitor. Always take a note of the Setting Password entered. Avoid using null passwords: “” 3-16 Instructions for use 3.4.6 Main window After entering the Passwords, the program displays the main window: The first part of the main window is used to select from the list the Field Monitor to be queried. The software automatically installs, as an example, a dormant station. The following commands are also available: • CALL to make a call to the station selected; • Hang to end the call in progress; • Add Station to add a new AMS-8060 Field Monitoring station to the list; • Sort Station to sort the station list by Station Identifier order • Exit to exit the program. Selecting two or more stations will cause the following error message: The list of remote stations contains the following information: • • • • • Station Identifier (Name): the station name Telephone Number: the telephone number of the station SIM card Last Link: date and time of the latest connection made; Links: number of completed connections/number of trials; Alarm: alarm status relative to latest link; Clicking the line of the selected station will open a window displaying more information. Instructions for use 3-17 3.4.6.1 Alarm column The status of alarms relative to latest link, in the last column, is normally empty if there were no alarms. A red dot is displayed, followed by a description of the type of event causing the alarm in case of just one alarm. In case of no alarm, a green box with the word “None” will appear when the mouse cursor is positioned over the alarm cell. If more alarms occurred, to avoid overcrowding the column the word "Several" is displayed: position the mouse pointer on the Alarm field to display the list of all the alarms. Possible messages: - 3-18 UnLock: case open Over Heat: temperature higher than 60°C Probe: receiver, antenna or probe error Battery: low battery Warning: E.M. field beyond the Warning threshold Alarm: E.M. field beyond the Alarm threshold No Call: no communication from a time longer than the value set in: “Warning if not called after XX hours” HangUp: the fixed or mobile telephone line hung up Download failure: the download has not been completed Several: informs that more than one alarm occurred. Instructions for use 3.4.7 Entering a new station Before making calls or downloading data from an existing Field Monitor, click the Add Station button to add the station to the list. The screen looks like this: The procedure to add a station is as follows: • Enter the station name (you can use alphanumeric characters) on the Station Identifier (Name) line. This name will be recorded in the station memory the first time it is queried. It will also appear on the display of your mobile phone every time the station is queried via SMS or when that station sends its daily Reports; • Enter the phone number of the SIM card installed in the station; • Optionally, you can enter the number of the Certificate of Conformity provided with the station; • If necessary, select one of the Automatic Download functions and, if required, the Auto ASCII File function to automatically generate a .txt file after every data download. • Select the Warning if not called mode and set the desired time if you want an alarm to be generated in case the station didn’t call, or has not been called for a time longer than the set value. The security password will be requested for every operation. If a wrong password is entered, the following message appears: Instructions for use 3-19 3.4.8 Removing a station To remove a station from the list, click Remove Station. The message is: If the answer is YES, the software will ask for the Terminal Password and the station will be deleted; if the answer is NO, the operation will be aborted. If a station that had been removed is added again with the same name (as well as a station is renamed using a name that has been yet used before) all the data related to the previously performed measurements will be automatically restored in the PC memory unless the folders containing these specific data has been erased. 3.4.9 Editing a station To change the name or telephone number of a station, click on that station line to open the following window: It is now possible to edit the station data, enable or disable automatic download functions or automatic creation of .TXT files, or set the telephone number digits to “Hide” condition. For each of the above operations the program will require to enter the security Terminal Password. 3-20 Instructions for use 3.4.10 Automatic data downloads The window for editing or adding the stations also provides an Automatic Download function which makes monitoring fully automatic, with transfer of the data from the station, generation of the .TXT file, etc.. Therefore some stations can be programmed for manual connection, other units, after being called, will automatically transfer the data, while others again will automatically call the control PC at a preset time and download their data by themselves. It is possible to enable the station for automatic download by selecting the flag PC Answering or PC Calling or both. In this case a symbol appear at the left of the station name: Arrow up = PC Answering Arrow down = PC Calling Both = both flags selected If no command is enabled, data can only be downloaded manually. If the function Hide Digits is selected, the telephone numbers of the stations to call, edit or add will be encrypted and no longer displayed on the window screen. The telephone number will be masked even in the status window. Instructions for use 3-21 3.4.11 Answering By enabling the command PC Answering, every time the controller PC answers to an automatic call coming from the station, measured field data are downloaded automatically. The downloaded period starts from the first data after last download. To program the station for automatic calls, proceed as follows: • • • • • • • • access the station by pressing Call; wait for the connection to be established; when the software displays the configuration of the station, use the command Enable Setting and enter the Setting Password In the window Schedule for MODEM write the telephone number of the controller PC. Up to 10 different telephone numbers can be entered. In case the first one doesn’t answer the station will call the other numbers, in sequence, until one answers and secure communication. The number which answers and secure a communication will receive the data. Data will be downloaded only to a PC that is switched on, with modem enabled and 8060SW02 software running. In the Time window enter the time when the call has to be made (obviously the PC and modem must be on at that time); In the Stand BY (H) window write for how many hours the GSM modem must stay on. It is not necessary to set the modem to be always on (24 hours), normally it should be on only few hours per day. When the modem is off the station cannot receive incoming calls; In the window Every (H) enter 24 or a submultiple of 24 hours defining the daily rate at which the operation has to be repeated (24 means the modem is programmed to switch on once a day); The function Originate CALL should be ON. If OFF is selected, the modem will be switched on but no call will be made. On receiving a call via modem from a station, the software requests that the calling station identifies itself and on the basis of the response string, it proceeds as follows: 1. If the ID (Name assigned to the station) of the calling station is on the list of known stations, the SW02 prepares to receive the data in the corresponding directories; 2. If the ID is not in the list of known stations, the SW02 adds the new station to the list (entering the telephone number as 00000000) and creates the directories to receive the corresponding data; 3. If the ID is not provided or does not respect the protocol (e.g. a call by a telephone), the 8060-SW02 put itself in stand-by. After having identified the calling station, all the parameters are requested in order to trace the call in the proper log, and after that all the field data since the latest successful link are requested, so as to ensure continuity of the downloaded data. After the download of the data, the software sends the hang-up command to the station to minimize link time and make itself available for another call. 3-22 Instructions for use 3.4.12 Calling When the PC Calling function is enabled, every time the station is called using the CALL command, the data present on the station - and recorded since the latest download - will be automatically downloaded to the PC. This can be very useful because it makes unnecessary to remember the time of the latest download. After having completed the automatic download, the station does not hang up immediately but remains linked until either the call is ended manually or for 2 minutes after the last operation. 3.4.13 Auto ASCII File Select Auto ASCII File to automatically generate an ASCII file containing all downloaded field data; the format will be the same adopted with the “Save As TABLE” function on the main menu, under the File Menu command. When a call, either incoming or outgoing, is reported by the station and the data are downloaded manually or automatically, all the files normally placed in the directory Station Name \Year\Months\Day are also copied in the special directory called Station Name\Autotxt. When all the data have been downloaded they are grouped in a single file starting from date and time of the downloading start up to date and time of the downloading end. Then the ASCII file named AUTOTEXT.TXT will be created. Every time a download is performed the last text file is overwritten by the new one. The autotext.txt file includes the data interval from “Date & Time Start” to “Date & Time Stop” It is then possible to open the autotext.txt file using other applications (Word, Excel …) or directly from 8060-SW02 software. In this case the file will be displayed in graphical form where it will be possible to apply the zoom function or save it in other folders. Instructions for use 3-23 3.4.14 Warning if not called after XX hours This function is useful to generate a “No Call” alarm message within the alarm column when: - It is more than XX hours since the last manual or automatic call; the previous picture shows a “No Call” alarm generated 24 hours after the last call. This message is useful to understand if: - the station modem did not switch on; - the software was not active in the control PC; - PC or modem were off - The GSM service provider did not provide the link A manual call is suggested to check the station configuration. 3-24 Instructions for use 3.4.15 Calendar of measurements The calendar, created automatically by the software, always shows the current month and year and is used to select and display in graphical form the data downloaded from the selected Field Monitoring station, simply by clicking the button of the desired day or week. Only the buttons with blue characters contain data, which has been previously downloaded from the station. Days or weeks with red characters are empty, clicking one of them the following message is displayed: The first time a button with blue characters is clicked an internal process for the generation of the graphic and all the necessary files will start. The first time a specific week is selected the following picture is shown: Instructions for use 3-25 On the right side of the calendar there are graphical data of the maximum battery voltage and solar cells power balance for the last month. These graphs are extremely important and allows the user to program the maintenance of the batteries or the power supply system. The full 31 days graph gives valid values only when your station has been used for at least one month. For example, if you are using a station since 10 days, only the previous 10 days give the exact values, the other 20 days give meaningful data. It is also possible to visualize the exact value for a given time simply placing the mouse pointer along the curve (see example). The last part of the main screen contains a status bar showing additional information relative to the operations in progress, and the program exit button. 3-26 Instructions for use 3.5 Calling a station To call an Area monitor, you should: - Assign a station name or use an existing one - Assign the SIM card telephone number (if the area monitor is located outside your country, please add the prefix of the country called and check your SIM card is enabled for international data calls) - The modem shall be correctly configured and switched on - The right serial port where the modem is connected has to be selected. See Software installation chapter. - The station modem should be ON. - Push CALL button On the Status bar will appear in sequence all the operations performed by the software: Modem testing Dialing the Area Monitor Sending modem commands Provider data exchange Receiving notification from the remote Area monitor Sometimes it happens that a station is called with a name different from what is stored into the station itself. Suppose that in your PC list you defined a station called democisano while the internal name of the station is 000WE50907, the program notify it and offers the following message: Answering YES, the software will rename the station with the new name democisano inside the station itself. That means that the PC has higher priority over the station. In this case all the downloaded data will be recorded under the directory democisano. Instructions for use 3-27 Answering No, another window opens: If the answer is Yes, the software allows access to the station and then the data download takes place, with these data saved in the relative directory named 000WE50907. In this case the name saved in the station takes priority and the one in the list of the PC is updated. If the answer is No the data will be downloaded temporarily in the directory democisano. Selecting Cancel no operation will be performed. 3-28 Instructions for use 3.6 Control window Once a link has been successfully established, the control window is opened for the selected station and it is possible: • check the settings and parameters of the station; • edit the settings using the "password"; • download field data to the PC; The control window looks like this: To close the communication push Hang & Exit. The following message will appear where “000WE50907” is the station name.: Answering Yes the communication will be terminated. Instructions for use 3-29 3.7 Description of controls The control window is divided in different zones grouping the available commands by type and function. The main zones are: ALARMS divided in: • Last Field • WARNING • ALARM • Averaging Period • Battery Section • Device Section • Over Heat • Case OPEN • NOTIFY ALARMs through Storing Settings with the subcommands: • Rate • Peak The Storing Setting affects the memory duration before old data are overwritten. P.Time: Processing time. It mainly depends on the Bands setting. The minimum Rate should be, at least, =10 x Processing time. Schedule for MODEM divided in: • Telephone number • Time (HH:mm) • Stand by (H) • Every (H) • Originate CALL Up to 10 fixed phone numbers can be programmed. The first phone number which is free and allows the data download will interrupt the search for the other number. Schedule for SMS divided into: • Telephone number • Time (HH:mm) • Stand by (H); this value affects battery duration • Every (H) • Send REPORT Up to 10 mobile phones can be programmed. All the mobile phones will receive the daily report. Get DATA divided in: • Start with the subcommands - Since Last Time - From MRK# - Date & Time The starting date must be not later than the Stop date. Starting date cannot be before “First Valid Date” displayed on the lower left side of the control window: 3-30 Instructions for use The following message is displayed if trying to download data stored before the First Valid Date or an interval longer than memory capacity: • Stop with the subcommands: - Up to NOW - Up to MRK# - Date & Time The Stop date must be later than the Start date otherwise an error message will appear. • Recall is used to start the data downloading. • Update Firmware to update the internal firmware of the station. Information about station firmware (rel. number and upload date) are displayed in the lower right side of the control window: • Station Date & Time with subcommand - Set Clock, to transfer the current date of the PC to the station • It is recommended to check the station clock before starting any new monitoring campaign. Be sure to download any useful data before clock setting as previously acquired field data will be no more downloadable. • Markers with subcommands: - Start - Stop • Read Station Configuration to read the electromagnetic field, status of alarms and configuration; • GPS to show the position data; • Enable Setting to edit the setup (setting password required); Instructions for use 3-31 • • • Band Analysis to display and set the frequency bands parameters of the selective analysis Selective Mode Timing to program the timing of the selective analysis ( measuring receiver ON/OFF scheduling). Hang & Exit to end the link. To edit the station settings , use the Enable Setting button. You will be asked to enter the security “Setting Password”. 3-32 Instructions for use 3.7.1 ALARM Depending on the local laws, the place of installation, the climatic conditions, and the duration of measurement, certain alarms must be enabled for the control and proper operation of the field monitor. In addition, if the station is installed in what is defined as a “sensitive” location as regards electromagnetic fields, the alarm for exceeding the threshold defined by law must be enabled to ensure control almost in real time. All alarms can be set on a dual threshold, with reference to the occurrence of an event (OUT): i.e. exceeding a threshold; and upon regaining normal conditions (IN). OUT: enable or disable an alarm notification in the following cases: 1. On exceeding a threshold setting for attention (Warning) 2. On exceeding an alarm threshold (Alarm); 3. When battery voltage is too low (<11,09 V); 4. When the antenna is missing or defective; 5. In case of malfunction of the receiver; 6. On exceeding the temperature limit inside the field monitor; 7. When the radome is removed Whenever an alarm occurs, the GSM modem will remain on for 30 minutes. It allows the AMS-8060 to send the proper SMS message and the operator to query the station and download the data. IN: enabled (ON pressed) or disabled (OFF pressed) notifies you that normal conditions have been restored. 3.7.1.1 NOTIFY ALARMs through Notification of alarms can be made with a message either via modem or SMS or both; the choice can be selected in the corresponding zone. The alarm notification via SMS can be send up to 10 cellular phones. Notification via modem will be sent to the first number that answers the call. For each alarms there is a bar in the in control window that shows by its color the current status of the respective alarm, regardless of whether notice via modem or SMS is enabled or disabled: RED: alarm condition activated; GREEN: alarm not active. 3.7.1.2 Last Field Last Field shows the Total average field of the last period settled in the Averaging Period field. This field is refreshed each time you click the Last field button. This value can be remotely queried at any time from a mobile phone by sending the following SMS message to the station: #00?LFA* Instructions for use 3-33 3.7.1.3 Averaging Period Average time of Last Field value. The mean can be arithmetical (AVG) or root-mean-square (RMS). The value is automatically set according to the Rate setting. In this example, with Send REPORT enabled, all the mobile phones in the list (max 10), will receive, every day, the maximum value averaged on a period of 6 minutes. 3.7.1.4 Max Field ALARM Settings Field alarm The field monitor features two thresholds of the field value readings, one for warning and one for alarm. On exceeding one of these thresholds, a message is sent to the mobile phone or a call is done to the PC. This occurs only if the ON function is enabled in the NOTIFY ALARMs through window. Select ON to enable the station to monitor the alarms and select OFF when no action shall be taken. The OUT function is used to control the excedings of the alarm threshold; select IN to control the return of the electrical field values below the set value. In this example an alarm will occur when the field exceeds 6 or 10 V/m averaged on the rate setting time period. Thus, brief but intense field variations will not necessarily cause any alarm if the averaged value (in this example on 6 minutes) does not exceed 6 or 10 V/m. 3-34 Instructions for use 3.7.1.5 Battery Section Battery Alarm. The internal control system of the Field Monitor features a voltmeter for measurement of the battery voltage. This function ensures constant control of the power situation for correct operation of the system. Settings are made as for all the other alarms. Two bars are displayed, Warning bar and Alarm bar. The Alarm bar turns red when the battery voltage is below 11,03V. The Warning bar turns red when the battery voltage is below 11,09V (the selective unit is automatically switched OFF in case of Battery warning or alarm) and if the alarm notification is enabled an appropriate message will be sent via SMS. The Warning alarm is deactivated when the battery voltage reaches 11,97V. The average power consumption of the station is approximately: 100 mW with GSM off and receiver off 200 mW with GSM in stand-by and receiver off 2 W with GSM transmitting and receiver off 8W with GSM off and receiver on The battery voltage value can be remotely queried using a mobile phone and sending to the station the SMS message: #00?BAT* 3.7.1.6 Device section Alarm for devices in use. The following section displays any device alarm. The type of antenna used by a specific station can be read by any mobile phone by sending the SMS message: #00?ANT*. Clicking the “Device info” button opens the following “device info” window Instructions for use 3-35 The “Device Info” window displays several information related to the • Probe: model, frequency range, calibration date. • Antenna: model, frequency range(s), calibration date. • Receiver: model, serial number, HW and FW version, calibration date • Configuration: Serial number of the station, configuration (battery, GPS, probe, modem) • Status: any device alarm caused by: Receiver ON, Receiver communication, Antenna error, Probe error. The RF components of the AMS-8060 are tested and calibrated individually after production. For best overall instrument accuracy the antenna factor is measured on the assembled AMS 8060, thus including all corrections of RF parts, if any. For this reason the certification date of the system and the last calibration date of the antenna are corresponding. 3.7.1.7 Over Heat Temperature alarm. An alarm is generated in case the internal temperature is > 60°C. 3.7.1.8 Case OPEN Case open alarm. Whenever the external protective case of the field monitor is opened, an alarm message is sent. If the station is remotely queried by the PC, the band will be red rather than green indicating this alarm has been activated: 3-36 Instructions for use 3.7.2 Schedule for MODEM Programming the station for modem links. To query the station by a remote PC linked to a line or GSM modem, the station modem must be on. In addition, when an alarm occurs, the station can automatically call the telephone number of the modem used by the control PC. Programming consists of setting a scheduled time for switching on the GSM modem of the station, the duration of “GSM ON” period and repetition interval. The parameter Time (HH:mm) specifies at what time the modem has to be switched on and placed in Stand-By condition, while the parameter Stand BY (H) determines how long it stays on. The parameter Every (H) indicates the repetition or after how many hours from the latest start the GSM has to be switched on again. To prevent the schedule from changing every day, this parameter has to be programmed in submultiples of 24, so that only the following values are accepted: 1,2,3,4,6,8,12,24. If the command Originate CALL is ON, at the time indicated in the Time (HH:mm) field, the station will automatically call the remote PC dialling the first phone number in the list. In case the called number does not answer or the line is busy, the station will try to communicate with the next phone number on the list and so on until one is found available for the link. Instructions for use 3-37 3.7.3 Schedule for SMS Querying the station with SMS messages. The station can be remotely queried from any GSM mobile phone by SMS messages; in addition, the station can automatically send alarm messages or daily reports to ten different mobile phones whose numbers are in the list. Even in this case, the time for sending daily report as well as another period to set the modem ON can be programmed as described in the previous paragraph. With the Send REPORT command ON, at the time indicated in the window Time (HH:mm) the station switches the modem ON and automatically sends its daily report to all the mobile phones listed. The minimum Stand By time (expressed in hours) is 0; in this condition the station sends the Report via SMS at the time indicated and automatically switches off the internal GSM modem. It is possible to receive and read the daily report on any mobile phone (max field value, minimum battery voltage and status of station, telephone number of station, time and date) by sending the SMS message: #00?RPT*. The Report shown on the phone display will indicate the highest field value, the lowest battery voltage since the last daily report and the date/time at which these parameters have been detected. Therefore if at 9.00 a report is sent and at 10.00 the station is queried with the request of a new report, the display will show the highest field value and lowest battery voltage between 9.00 and 10.00. Chapter 5 of this Manual describes in detail all the commands and the messages available via SMS. 3-38 Instructions for use 3.7.4 Rate Settings Configuration of data memorization. Data are saved in the station at a frequency (Rate) ranging from 5 seconds to 6 minutes. Example: if the rate of 1 minute is selected, the station will store, every minute, the average value of all the measurements taken during the last minute. In addition to the average value it is possible to set the storing of the peak value (maximum total field occurred in the rate selected) The acquisition method chosen is very important to decide the appropriate data downloading interval to avoid overwriting of useful data in memory When the memory reaches its maximum storage capacity the new incoming data overwrites the oldest one, last period data are then always available. Any change in rate setting should be done only if all important field data has been already downloaded as they will not be still downloadable after setting has changed. The following message will be displayed: Answering YES the software will show a second message to prevent a wrong selection: Answering yes you are allowed to change the storing settings but all the previously acquired data cannot be downloaded. The previously acquired data are lost changing one of the following settings: • Storing rate • Selection or deselection of Peak option • Selective mode timing • Kind and number of bands • Date and time of the monitoring station It is therefore suggested to download all the data before changing any of the listed settings. Instructions for use 3-39 3.7.5 Get DATA Downloading data from the station to the PC. The data in the internal memory of the station can be downloaded after defining a Start and Stop event as follows: The Start and Stop of the data download is done between the following commands, in any combination: • Since Last Time: Automatically enters the time and date of the latest download; • From MRK #: download from a preset Marker time stamp. • Date & Time: any date and time indicated; • Up to NOW: actual date and time with reference to the station; The “Recall” command starts downloading the field data acquired between Start and Stop settings. The data downloaded will be assigned automatically to the relevant days of the calendar and those days will be marked with blue characters. The Start event must be earlier than the Stop event otherwise an error message will be displayed, as follows: If the download period is longer than the memory available at the rate defined, the following message will appear: After downloading, click Hang & Exit to go back to the calendar to view the data downloaded. 3-40 Instructions for use During the download of the data from the station a window is displayed with two bars indicating the progress of the download. The horizontal bar shows the downloading progress of every interval of about five hours. During data download, mainly due to poor reception or to poor quality of the GSM signal, some error message may be received. In these cases, repeat the RECALL command. The AMS-8060 station cannot operate without antenna even when downloading acquired field data. In case the antenna is accidentally removed when station is ON a reset will be required: switch the station OFF, connect the triaxial antenna and switch ON again. Instructions for use 3-41 3.7.6 Examples of errors Many phenomena can affect good communications between the GSM modem of the AMS-8060 station and the modem of the PC. If the station has a poor or disturbed GSM signal, we can get several kind of error messages. Possible problems from an Area monitor system could come from: • • • • • • The message in the status window is: Area monitor itself(electronic or low battery) Area monitor GSM modem or its SIM card GSM provider Telephone line Modem connected to the PC PC itself If the modem is off or the software is searching for the modem on a different serial port than the one to which the modem is physically connected, the message is: The software assumes that the station is locally connected to a serial port. Answering YES, the software tries to connect the station via serial port, and if there is no connection the next message is: Answering YES the software will try again to communicate with the station. Trying to establish a local or remote connection, If the station does not answer because it is off or the internal GSM modem is off or the batteries are completely down the message will be: 3-42 Instructions for use In case of error in data transmission this message will appear: The control of the checksum guarantees the quality of the data received. When this error occurs, sometimes the software closes the application and exits. No answer from the AMS-8060 station Data cannot be downloaded. Selecting Read Station Conf. when station doesn’t respond last successfull connection will be displayed. Instructions for use 3-43 If there are communications problems between the servers of different GSM Service Providers, this message appears. The same message can appear when there is heavy traffic or when the server is unable to perform roaming. If the station is switched off or if the signal is insufficient, the message NO CARRIER appears in the Status frame of the main window. If the software does not see any available serial port on the PC where it is installed, the following message appears: See paragraph 3.4.2. 3-44 Instructions for use 3.7.7 Updating Firmware Update of internal Firmware. It is important to update the internal firmware in order to use all the new functions added and eliminate any bug in the software. To update the firmware, use the Execute command. The station will place the old firmware in a back-up memory and will try to load the new firmware. A window with a colored progress bar appears on the screen and indicates the loading progress of new firmware. The following steps will be carried out: 1. Example of request to confirm transfer; 2. Example of firmware transfer with progress bar. 3. Back writing (Internal copy of FW); 4. Reset and automatic startup of station with new version of Firmware Instructions for use 3-45 The firmware upload process requires good condition of data communication as, in case of communication errors, the entire file should be uploaded again. For this reason it is recommended to upgrade locally the station firmware accessing the station by means of RS232 cable connection. In case of errors, normally due to poor telephone connection, the following message will be displayed: In case, for any reason, the new firmware is not completely and successfully transferred to AMS-8060, the station will automatically restore the old firmware in order to prevent malfunctions or stops. The AMS-8060 firmware and software updates are available for downloading from the internet web site www.narda-sts.it 3-46 Instructions for use 3.7.8 Station Date & Time Use the Set Clock command to update or change the internal clock in the station and synchronize it with the time set on the PC. The internal clock of the station is very accurate and in many cases much more accurate than the clock on the PC. The internal clock is not automatically updated to summer time and/or to standard winter time. It is recommended to check the station clock before starting any new monitoring campaign. Be sure to download any useful data before clock setting as previously acquired field data will be no more downloadable. Instructions for use 3-47 3.7.9 Markers Markers creation and use. The typical station usage is to leave it always on acquiring data, when a specific range of time has to be put in evidence, as direct intervention or station moving, a Marker start and stop can be set for. Data between two markers can be downloaded and displayed. This feature is useful when the station is moved from one location to another, the acquired data in this period is not meaningful and the user can clearly identify them with markers. Marker setting Up to 10 markers can be set. Empty markers show “VOID” • Select marker to set in the pull down window; • Write down the marker description then key Enter a confirm window like the following will pop up; • 3-48 The marker will get the current station time for default, however It is possible to set a different time and date: Instructions for use • The following window will pop up when date has to be changed: • Repeat above steps to set the stop; Instructions for use 3-49 3.7.9.1 Deleting a Marker To cancel a Marker, select the Marker you wish to cancel, right click on it, press Cancel button. Start and Stop buttons allow to send selected markers to Get DATA window: The marker stop event time must be subsequent to the start one, otherwise a error indication will pop up. Trying to select a marker in which the time reference has not been assigned will cause the following message: 3-50 Instructions for use 3.8 General Commands Six general commands are found at the bottom of the control window: - Read Station Conf - GPS - Enable Setting - Band Analysis - Selective Mode Timing - Hang & Exit 3.8.1 Read Station Conf. To read the status of the AMS-8060 station, select Read Station Conf. Click on the button to start a new query of the station to update the control window. No field data block is downloaded from the station memory with Read Station Conf. command. 3.8.2 GPS This command opens the GPS window showing position and time information. The GPS module takes the position data on regular basis and every time the modem switches ON. In case data are not available, for example when the station is installed indoor, the following message is displayed: Instructions for use 3-51 3.8.3 Enable Setting To enable settings on the station, click on the Enable Setting button. You will be asked to enter the security password in a window like that: 3-52 Instructions for use 3.8.4 Band Analysis The Band Analysis button allows to ask the station which bands have been activated for the selective analysis. A dedicated window opens and the station start to download the band configuration. After the band configuration has been downloaded you will see on the left the list of the bands, the Actual and RMS values and, in case, the peak values. The Read Values button can be used to update readings. In the upper righ side a specific configuration file can be selected (files with extension *.SBT). Information related to the selected configuration file are displayed in the description area. Instructions for use 3-53 Each frequency band can be selected and edited (clicking the Edit File button)as required keeping in mind the following few rules: - 20 frequency bands as maximum; in each band the lower frequency value must be smaller than the upper frequency one; no overlap between frequency bands; Very high fields which frequency is out of the overall frequency range of the created table (from minimum frequency of first band to the maximum frequency of the last one) but within 75MHz-3GHz range may cause saturation of the receiver causing wrong measurements. To avoid this condition, unless the operator knows there are no strong signals out of the band of interest, we suggest to create tables with the lowest band starting from 75MHz and highest one ending at 3GHz. Check the command Enable Control on Lowest Frequency and Highest Frequency to obtain the following warning in case this condition is not satisfied when defining a new table: 3-54 Instructions for use Click on a specific band to edit band parameter as follows: Only alphanumeric ASCII characters can be used in band table files. Assigning band names avoid using different characters which may be cause of malfunction. Predicted Process Time Process time, displayed in the lower left side of the Edit Band Table window, depends on band configuration. This parameter limits the Rate selection as, at least, ten processes are required every time the field data is stored in the station memory. The maximum accepted Process Time is 36s which allows the 6 min rate selection only. Each data input or change must be confirmed clicking on the “OK” button It is then possible to save the modifications: setting errors will be notified with a message. If no error is found in the modified setting the operator will be informed, with the following message, that, saving the new file, the modified table will overwrite the original one which will be lost. Answer NO to the previous message if you want to save the modified table as a new one without erasing the existing file. The following window opens: Assign a suitable name and click OK to save the new table. Instructions for use 3-55 The band table stored within the station is read by the software and stored in the configuration file named “BAND.SBT”. This is a temporary file automatically updated on the basis of the setting table found within the station at each connection. When using the AMS8060 3AX2 dual band antenna, and, in general, when frequencies below 10MHz are to be measured, the band table should be defined in order to avoid measuring the “0Hz” signal which exist in every spectrum analyzer. Every spectrum analyzer displays the 0Hz signal everytime the RBW filter is larger than half the minimum frequency to be measured. To achieve a good scanning speed without affecting the measurement accuracy, the AMS-8060 sets automatically the larger RBW filter which allows at least 4 measurements during the scan of the most narrow band of the band table. Setting a new table, when needed, to avoid 0Hz signal to be measured due to the automatic RBW filter setting, the lowest band set by user is automatically split into two contiguous bands in order to set a narrow filter. A message is displayed to inform the operator. See the following example: 3-56 Instructions for use The most narrow band of this table is 1MHz wide (T set1: from 83MHz to 84MHz) it would select 200KHz RBW (possible step …200kH, 300kHz…). The first band, being very wide, would not activate a more narrow filter. Starting from 100kHz with a 200kHz filter the “0Hz” signal would be measured… An error message is displayed Instructions for use 3-57 The first band is automatically split. The first one, 200KHz wide, activates a narrow filter which does not include the 0Hz signal when measuring 100kHz. This table does not cause band splitting as the second band, 100kHz wide, activates a narrow filter. 3-58 Instructions for use 3.8.5 Selective Mode Timing The Selective Mode Timing button allows the user to set the time at which the selective analysis is ON. The analysis will be on only in the selected half hour intervals. In the preceding example the selective analysis is activated in all the 24 hours as all the time intervals has been selected. The “Set Configuration” button sends the selective timing information to the station. The usual warning messages will follow to avoid that any accidental change in the setting invalidates the previously acquired data. Finally, the timing table is written in the memory of AMS-8060. 3.8.6 Hang & Exit The Hang & Exit button ends the ongoing communication with the station and returns to the main window. Instructions for use 3-59 3.9 Download data via serial port RS232 In some situations where, for example, the GSM signal is very weak or there is no coverage of the network by the GSM Service Providers, it is possible to make an acquisition of long term data without downloading them daily via GSM. At the end of the desired acquisition period, or on regular basis for longer periods, the data can be downloaded to a PC using the serial port in the station and a direct RS232 link. The procedure to follow is: • Open the station by removing the radome • Connect the serial cable supplied between the RS232 connector on the AMS-8060 station and the serial port of the PC • If necessary, change the properties of the icon of 8060-SW02 entering the command COMM=N; where N is the number of the COM port on the PC where the RS232 is connected • Run the software • Call the station by pressing the CALL button With no modem in use, the software will promptly display the message: Answer YES to enter the station menu to download the data or change its configuration. 3.9.1 Possible errors If the station is switched off, the serial communication cannot take place and the error message is: Answer NO and try to solve the problem checking the conditions of the cable and if it has been connected to the port used by the software. If the answer is YES, the software will show the existing communication at the time of the latest data download. 3.10 Software update 3-60 To update the software you can download, free of charge, the latest release from the NARDA website: www.narda-sts.it Registration is required. After you have saved it into the PC, you must decompress it to get the complete list of files to be installed. You can save them into a CD or into the PC hard disk. The updating procedure is like the first installation one. Instructions for use 4 – Data presentation 4.1 Introduction This Chapter is a guide to display, to interpret or manipulate the data downloaded from the AMS-8060 by the 8060-SW02 data acquisition and control Software. Any time a new station is being added to the station list, in the 8060-SW02 main window, a new directory is automatically created under the root 8060SW02 program directory. All data downloaded from the new station will be written into that directory. The name assigned to the new directory is in the following form: first 20 characters of the station name (without spaces or special characters) Example: for a station called NUOVA CENTRALINA CISANO the directory name will be NUOVACENTRALINACISAN. For station name use only alphanumerical ASCII characters. 4.2 The Calendar Every time the measured values are downloaded from a station they are stored in the directory assigned to that station, divided by year, month and day. On the main program window there is a Calendar area where user can select data to display by day or week. To avoid program malfunction do NOT move or rename data directory or files created by the program . By selecting the corresponding day or week on the Calendar windows it is possible to recall the corresponding data and display them in a graphical format. Year and month is selected by the pull down menus. The blue color pushbuttons have already downloaded data. The red ones are empty. It is possible to open the week if at least one blue day is available. Document AMS8060EN-21009-3.66 - © NARDA 2007 Data presentation 4-1 4.3 Data window Select a blue colored day or week to open the main graphic window. Data processing and evaluation functions are available through the various menus and buttons including: • • • • • • • • • • • • • Open Files function to show any graph of any station Save Files function to save the graphs into a file Print function to print any graph Option function to select the averaging time Trace function to highlight or to hide when the GSM was ON; to show all axis, the Peak value and the average value Marker function to position the Marker over a specific trace Vertical function to expand vertically the graphs Clipboard function to save the current graph Band selection pull down menu ZOOM function to expand horizontally the graphs Comment function to add or to modify a comment Setup function to select the Limit and the colors ? icon to show the software release The graphical data window displays acquired data by day or week, in the above example you can note a grey vertical band, it represent the internal GSM modem activation. The 8060 internal modem can be activated by the user to interrogate the station, but also from the mobile provider to periodically check the communication. That indication allows the user to discriminate field generated by modem from those in the installation environment. The data window is divided in 3 sections: • The main command bar on the top followed by a secondary commands one; • The graphical window for data presentation in the middle; • The status bar on the bottom. 4-2 Data presentation 4.4 Main Commands The main commands are: 4.4.1 File This command is used to open any files of any station, to save the downloaded data, to expand graph details, to print and, finally, to close the graphical window. For the proper use see the Open files and Save files commands described later on. Some functions of the File command are not enabled when the Zoom function is ON 4.4.2 Option This command is used to select the time for averaging (Average Time), the colors (Color); see the Setup icon described later on; the decimal separator (Decimal Separator). The window will be: Various averaging time settings will be available depending on the storing rate selected into the station. The minimum enabled value matches the rate setting. Data presentation 4-3 4.4.3 Trace The Trace command allows to select the trace display mode on the graphical window. The possible choices are: • POST AVG 6 min: 6 minutes averaging; • Peak: Peak value; if it has been activated into the station • AVG 30 s: the average value calculated over the time period which matches the storing rate selected into the station; in this example it is 30 s • GSM Band: to show or to hide the GSM activity • All Trace ON: to show all traces • All Trace OFF: to hide all traces Only the enabled traces (for all the frequency bands) will be used to create the equivalent TXT file during Save file process. 4.4.4 Marker When the station is programmed to capture all possible data, the graphical display is crowded with many traces. The function Marker allows to position a small triangle over the desired trace and to display the value of the field and the related time. The window will be: The Marker is visible activating the zoom function Use the mouse to move the marker along the trace 4-4 Data presentation 4.4.5 Vertical This function is used to display the graph in linear or logarithmic scale and allows to select the full scale value with the “Zoom Range” function. “Full Range” is the maximum range value allowed by the antenna in use, typically 300 V/m. Subsequent ranges gives better level resolution up to the maximum one with the “x 100 Range” selection. The display will be: Data presentation 4-5 4.5 Secondary Commands The secondary Commands are: 4.5.1 Save Files It is possible to save the menu setup and all measurement in different formats. 1. Draft (Diagram) (*.RS2) (Default format) Archive for future data processing. 2. Panel (*.P55) A file with extension *.P55 is saved. It contains the setting chosen by the Setup function. The user can easily recall the file with preferred settings. (the program start by default with setting in the file default.P55) 3. BitMap (*.BMP) a graphic file in bitmap format is saved, it is the actual diagram displayed on the graphical window. 4. ASCII (*.TXT) A text file with all measurement data is saved. The window will be: The measurement data could be saved in any directory During this procedure the software will show all files already saved. 4-6 Data presentation 4.5.1.1 Save File in ASCII format The TXT files in ASCII format display an * (asterisk) on lines corresponding to measurements taken during a transmission of the station modem due to the GSM provider or by the user during data downloading. Such data are represented on the graphic display with vertical bands on light color (the color can be selected by the user). On the following example you can note 3 lines with an asterisk following the Time column. They are related to a measurement taken while the station was transmitting information by the internal GSM modem In this example, at 0:06, at 2:06 and at 4:06 the internal modem has been interrogated by the provider for a short period of time. No significant increase in the measurement is detected. In other conditions the Peak column would show a field increment caused by the GSM transmission. If in Trace Menu the GSM Band was not enabled the asterisks (*) do not appear in the table. Data presentation 4-7 4.5.1.2 Data interpretation When a file is saved in TXT format and the table is opened, an huge amount of data are available. The Peak column is available only if the station has been programmed to collect such data. The TXT files contain the station name, file name, date and time, Probe used, the limit (if defined in the Setup menu) and the type of averaging. After such information, the table will provide all requested data enabled by the Trace menu (in the following example for space reasons the columns following the first band have been cut off. The complete file will contain, for each frequency band, the standard 6 min average, the average on the set value (in this case, again, 6 min.), min and max value in the 6 minutes interval. The header of each column is the specific frequency band. 8060-SW02 for Windows Station: TERZA CENTRALINA DI PROVA Date: 17/05/2006 Time: 00.00 Probe 3AX 75M-3G Freq.1;77;M;100;M .... Freq.2;800;M;900;M Date Time 6 min 6 min Lo6 min Hi6 min .... 17/05/2006 00:00 00:06 00:12 00:18 00:24 00:30 00:36 00:42 0.06 0.06 0.06 0.06 0.06 0.06 0.06 0.06 0.06 0.06 0.06 0.06 0.06 0.06 0.06 0.06 OFF OFF OFF OFF OFF OFF OFF OFF OFF OFF OFF OFF OFF OFF OFF OFF .... .... .... .... .... .... .... .... The 8060 sampling rate depends on the number of selected frequency bands. After 6 minutes the average value of the samples is calculated and stored in the station memory. The sample with the highest value is stored as the Peak value. The 6 min column represents the total value of the field module for each band. Different average times may be set by the Option function. 4-8 Data presentation 4.5.2 Open Files Saved measurement (*.RS2) or setting (*.P55) files can be opened (loaded into 8060 software) with Open Files button. If the software is already in the Graphic mode, select File and then Open; the software will show all available stations. By selecting a station (in this example centrali), the following window will show the Years and, if available, the “autotxt” directory: Associate with each station name, the software creates the directory of the year (“2005” in this example) and the directory “autotxt” that contains all data saved automatically if the function Auto ASCII File was enabled. By selecting the desired year, the menu will show all Months and Weeks available: By selecting the Month, the software will list all available days that have data in it. Select the day of the month required and Click OK to open data, Cancel to abort. Data presentation 4-9 4.5.2.1 Open Autotext file The file inside Autotxt directory is saved in TXT format to be easily exported to any data base applications, but also they can be shown in graphic 8060 format (.RS2). The Start and Stop time frame of the graph is defined by the download conditions selected by the user during the downloading process. The above example shows the Autotext.RS2 file from 00.00 to 17.12. Instead, opening the FdayXXX.RS2 (XXX identifies the day) file, automatically created inside the Month/Day directory, in 8060 format, the graph will always show the complete day from 0.00 to 24.00. Therefore with the function Auto ASCII File is possible to create any graph with user definable start and stop day and time. For example, from Friday to Monday or from a time frame that includes two months. Of course, the time frame has to be selected during download procedure. 4-10 Data presentation 4.5.2.2 Data evaluation Sometimes the measured field is quite low and below the minimum sensitivity of the probe. In this case the software assigned the string LOW. The following example offers a partial graph of a full day acquisition. It shows the total value, the peak and the 6 min average starting from 15:30. The marker is positioned at 10.36 and show LOW as a field value. The string LOW appears anytime the measured value is below of the specific sensitivity of the probe. If the above file is saved as a TXT file and later recovered with WORD or EXCEL application, the result will be: 8060-SW02 for Windows Station: TERZA CENTRALINA DI PROVA Date: 16/11/2006 Time: 00.00 Probe 3AX 75M-3G Freq.1;77;M;100;M Date 16/11/2006 Time 10:00 10:06 10:12 10:18 10:24 10:30 10:36 10:42 10:48 10:54 6 min LOW LOW LOW LOW LOW LOW LOW LOW LOW LOW 6 min LOW LOW LOW LOW LOW LOW LOW LOW LOW LOW …. Peak 0.09 0.09 0.09 0.09 0.09 0.09 0.09 0.09 0.09 0.09 …. …. …. …. …. …. …. …. …. …. Even if the 6min average is LOW. the peak value (Peak) could be higer. In this example we have the Peak value of 0.09 V/m while the 6min average is LOW. When the electric field is below the sensitivity of the instrument the LOW information will be written into memory as to notify that the measurement could be not significant due to the intrinsic noise. The LOW threshold is not fixed but dynamically changes according to the bandwidth and input attenuator setting. These parameter is automatically set for the best accuracy. As a general rule, values below sensitivity threshold aren’t to be taken into account as not significant. Data presentation 4-11 4.5.3 Print : Print command prints the current display on the selectable printer. Palette colors settled by Setup function are used on the output print. Selecting the Print button the following window will open: 4-12 Data presentation 4.5.4 Clip Board The current bitmap of the displayed window is copied into the Windows Clipboard. The user can paste the image on other active software, without create exchange files. This command is useful when a Word Processor, like Word for Windows, is used to generate reports for the measurement taken. Palette colors settled by Setup function are used on the output. The File Name sub window displays the current file name (a description will be displayed positioning the mouse cursor over this control ). It is normally refreshed after every LOAD command. The Recorded Time e Status sub windows show the initial time and date of the displayed data. Next sub window Station Name displays the station name. Next control, a pull down one, allows the user to select a specific frequency band. The displayed data are referred only to the selected band. The first character “B” means “Band”. B21 is the total result band – as if the measurement was taken with a broad band probe – B22 is the “Others” band, totalizing the contribution of the frequencies not included in the former bands. In the side picture the Band 1 ranges from 77 to 100MHz; Band 2 from 110 to 900MHz; Band 3 from 910 to 990MHz and Band 4 from 1 to 3GHz. According to the specification of the antenna in use the Band “Others” includes the contribution of frequencies from 100 to 110MHz, from 900 to 910MHz and from 990 to 1000MHz. Data presentation 4-13 4.5.5 Zoom Mode In Zoom Mode the user can zoom on any part of the data line. The Marker function is also activated. A little blue cursor will appear on the display. Using the mouse it can be moved along the graph, the time and field information are displayed in the lower bar. To activate the Zoom proceed as follows: • Select Zoom Mode; • Place the Marker arrow by mouse on the desired zoom start point; • Holding the left mouse button down, move the Marker to the desired zoom end point; • Release the mouse button to expand the display between the selected zoom points. Or: • Select the Zoom function from the File menu; • Type Zoom start and stop date and time. To help user to select the wanted zoom two vertical lines will be displayed during this procedure To return to normal display select again the button Zoom Mode. The minimum zoom span is 120 seconds (2 minutes).A bigger zoom factor is not available as it should have no other effect than enlarge distance between data point without adding any significant information. If a shorter time is selected an error message will pop up. Selecting the Zoom Mode also the Marker is activated. The Marker is represented by a colored arrow, the user can move along the graphical line by mouse. The time elapsed since the measure start and the field level corresponding to the current Marker position will be displayed on the status bar. This function helps when a detailed analysis of data values is required. Anytime the Zoom Mode button is active all other commands are inactive (excluding Save, Print, ClipBoard and Help). 4-14 Data presentation 4.5.6 Comment This command displays the Comment field, the user can write or modify a comment with maximum 1024 characters. The window field will be similar to the following example: The comment will be printed or saved only if this command is active. 4.5.7 Redraw : 4.5.8 Setup The Redraw command refreshes the display. This operation is required when the PC does not have enough memory and several applications are running simultaneously. The Setup command opens the color setup window. The setup can be changed at any time, new setup can be saved on file and recalled later. The setup window is similar to the following: Every trace of the graph, listed under the column Colors, can be changed, the user can select different colors for the display (Screen), the BMP file (BMP Files) or for the printer(Printer). 4.5.8.1 Color Palette The Color Palette windows help the user to select the wanted colors. Data presentation 4-15 4.5.9 Limit The Limit setting displays a reference line on the current graph The limit can be activated or deactivated selecting the corresponding ON selection. 4.5.9.1 SCREEN Sample The small sub window on the upper right corner shows an example of the settled colors either for display, save or print. With Exit button the Setup window will be closed maintaining settings for the current graph display, to recall later the same configuration the current settings must be saved selecting Save Files function. 4.5.10 Software release Click the icon to shown the software release installed. 4.6 Graphical window The sub window in the middle of the main window displays data graph: In the graphical window are displayed , for the selected band, traces related to the data acquired according to the Storing Settings section. When Zoom Mode is active a small triangle with apex down put in evidence the actual Marker position. The limit settled in the Setup window, helps in comparing graph levels. 4-16 Data presentation 4.7 Status window The lower part of the main window displays the status sub window. The Status window tell the user about various program status condition, it also displays a brief explanation of window command and options when mouse is placed over each of them. Following are some examples: Current mode of operation. Values of the Marker position. Description of Clip Board button. 4.8 Data Import from Word or Excel All graphs can be saved into TXT format and retrieved later on. During the process of converting and saving the graphic into a TXT file, the following window will appear: By using Word or Excel application, click the Open file command and select Type of file: all files; then find the file to open starting from the directory 8060SW02 and follow the necessary path (Station name, year, month and day) until the file is found. Data presentation 4-17 4.9 Controller Log File All activities requested by manual interventions from the user or done automatically by the area monitor are registered into a file called “Logfile.txt”. The file is created and continuously updated in the directory where the software has been installed. The following is an example: 20/11/07 14:26:11 Launched Narda Area Monitor System 8060 Release 3.35 (COMM 1 Ready) MODEM OK 20/11/07 14:26:29 Program finished 20/11/07 14:26:52 Launched Narda Area Monitor System 8060 Release 3.35 (COMM 1 Ready) MODEM OK 20/11/07 15:16:41 democisano Put/Changed in the list as # 1 20/11/07 15:19:22 democisano New tel. Number:123456789 20/11/07 15:34:20 democisano Automatic DownLoad PC Answering OFF 20/11/07 15:34:26 democisano Automatic DownLoad PC Calling OFF 20/11/07 15:34:44 democisano New tel. Number:3484914754 20/11/07 15:36:01 20/11/07 15:36:29 20/11/07 15:36:44 20/11/07 15:37:52 20/11/07 15:47:57 20/11/07 15:54:59 Calling democisano 3484914754 Connected Connected democisano Dowloading from 12/11/2007 11:12 to 20/11/2007 15:36 Closing communication Program finished 20/11/07 16:06:37 Launched Narda Area Monitor System 8060 Release 3.35 (COMM 1 Ready) MODEM OK 20/11/07 16:33:49 Program finished 21/11/07 11:41:19 Launched Narda Area Monitor System 8060 Release 3.35 (COMM 1 Ready) MODEM NOT FELT 21/11/07 11:47:04 21/11/07 11:47:35 21/11/07 11:47:43 21/11/07 11:48:38 21/11/07 11:50:22 Calling democisano 3484914754 Connected Connected democisano Dowloading from 20/11/2007 15:36 to 21/11/2007 11:49 Closing communication This file is never cancelled except by the user, 4-18 Data presentation 4.10 Station Log Files Beside the controller Log file which keep trace of all the operations performed by the control software, other log files are created to keep trace of the station status. These files are stored in every “day” folder containing downloaded data. th The picture on the left shows the Station Log File path for November 30 2007 (see selected file). The station log file name is FILE.LOG Every time the station stores the field data, according to the rate setting, information about the station status are stored too. Station log file header shows the station ID and band table information. After header details about status are showed as follows: Station: 000WE50907 ecall date 26/03/2008 17:12:00 Band : 1 RadioFM;75000;K;108000;K Band : 2 Radiodifusion;195000;K;223000;K Band : 3 Fijo-Movil;406000;K;470000;K Band : 4 TV;470000;K;830000;K Band : 5 TVdigital;830000;K;862000;K Band : 6 TRACyGSM-RI;870000;K;880000;K Band : 7 GSMI;880000;K;915000;K Band : 8 TRACyGSM-RII;915000;K;925000;K Band : 9 GSMII;925000;K;960000;K Band : 10 Renlaces;1452000;K;1492000;K Band : 11 Radioenlaces;1492000;K;1517000;K Band : 12 E1800I;1660000;K;1670000;K Band : 13 DCS1800I;1710000;K;1785000;K Band : 14 DCS-1800II;1805000;K;1880000;K Band : 15 DECT;1880000;K;1900000;K Band : 16 UMTSI;1900000;K;2025000;K Band : 17 UMTSII;2110000;K;2200000;K Band : 18 RadioenlacesTV;2300000;K;2484000;K Band : 19 ICM;2484000;K;2500000;K Band : 20 Radionavegacion;2700000;K;3000000;K Peak enable Station Date & Time : 26/03/08 18:04 ------Date------GSM AVG 26/03/2008 17:12:00 ON ON 26/03/2008 17:18:00 OFF ON 26/03/2008 17:24:00 ON ON 26/03/2008 17:30:05 ON ON 26/03/2008 17:36:00 ON ON 26/03/2008 17:42:00 ON ON 26/03/2008 17:48:00 ON ON 26/03/2008 17:54:00 OFF ON 26/03/2008 18:00:00 ON ON Timing ON ON ON ON ON ON ON ON ON Batt ON ON ON ON ON ON ON ON ON ERR ANT OFF OFF OFF OFF OFF OFF OFF OFF OFF ERR SRM OFF OFF OFF OFF OFF OFF OFF OFF OFF ERR EP3 OFF OFF OFF OFF OFF OFF ON ON ON TEMP > OFF OFF OFF OFF OFF OFF OFF OFF OFF CASE OPEN SRMBypass OFF OFF OFF OFF OFF OFF OFF OFF OFF OFF OFF OFF ON OFF OFF OFF OFF OFF ERR Reset OFF OFF OFF OFF OFF OFF OFF OFF OFF GSM: Modem status ON/OFF AVG: Type of averaging, ON=AVG, OFF=RMS Timing: Receiver ON/OFF, when off the other information of this table are disabled Batt: Battery status: ON=no alarm on battery voltage ERR.ANT: antenna error, OFF=no error ERR SRM: receiver error, OFF=no error ERR EP3: probe error, OFF=no error TEMP: overheat alarm, OFF=no alarm CASEOPEN: caseopen alarm: OFF=no error SRM: internal parameter, for service purpose only Bypass: internal parameter, for service purpose only Data presentation 4-19 This page has been left blank intentionally 4-20 Data presentation 5 - SMS Messages and Commands 5.1 Introduction This Chapter includes a list of commands which can be sent to AMS-8060 in the form of SMS, by means of a mobile phone, or directly by serial connection (RS-232 cable or modem). Commands allow the user to set several parameters and ask for data or information about the station status. Commands have the following syntax: #00QCommand(parameters)* where: # = command string start character; 00 = zero zero (00) always present; Q = ? for query commands; S for setting commands; Command = command string; (parameters) = setting parameter (where needed); * = command string end character. Commands are divided in two main categories: • Query COMMANDs; • Setting COMMANDs. Document AMS8060EN-21009-3.66 - © NARDA 2007 SMS Messages and Commands 5-1 5.2 Command list 5-2 Query COMMANDs Syntax Function #00?ALR* #00?ANT* #00?BAT* #00?BNDxx* #00?CLK* #00?DEV* #00?ERS* #00?FRQ* #00?FWD* #00?GPS x* #00?IDN* #00?LFA* #00?MRD* #00?MRDn* #00?MRK* #00?MRKn* #00?MSK* #00?NRM* #00?NTB* #00?PRB* #00?PTR* #00?RPT* #00?RPT0* #00?STA* #00?SVD* #00?TAB* #00?TAP* #00?TAV* #00?TDM* #00?TDMn* #00?TDS* #00?TDSn* #00?TMP* #00?TPH* #00?TSM* #00?TSS* #00?WRN* Field Alarm threshold query command. Antenna data query command. Battery voltage query command. Specified Band data query command. Station internal clock query command. Device data query command. Type P alarm detail query command. Antenna frequency range query command. FW release and last FW uploading date query command. GPS position data query command. Identifier query command. Last mean value query command. All markers date and time query command. Single marker date and time query command. All markers text query command. Single marker text query command. Alarm status query command. Memory span query command. First/last band query command. Antenna data query command. Predicted Process Time query command. Report query command. Report with reset query command. Alarms status query command. Date/time of first valid data query command. Last measured value for each band query command Last measured peak value for each band query command Average of measured values for each band Modem phone directory list query command. Modem single phone number query command. SMS phone directory list query command. SMS single phone number query command. Temperature query command. Receiver activation mask query command Modem scheduling query command. SMS scheduling query command. Field Warning threshold query command. SMS Messages and Commands Setting COMMANDs Syntax Function #00SALR(parameters)* #00SATH* #00SCLD(parameters)* #00SCLT(parameters)* #00SCNL(parameters)* #00SDIC* #00SDIR* #00SENC* #00SENR* #00SIDN(parameters)* #00SMRDn(parameters)* #00SMRKn(parametrs)* #00SMSK(parameters)* #00STDM(parameters)* #00STDS(parameters)* #00STPH(parameters)* #00STSM(parameters)* #00STSS(parameters)* #00SWRN(parameters)* Alarm threshold setting. Hang off current call. Clock date setting. Clock time setting. Deferred call enabling. Outgoing call disabling. Report send disabling. Outgoing call enabling. Report send enabling. Station identifier setting. Marker date and time setting. Marker setting. Alarm mask setting. Modem phone number setting. SMS phone number setting. Selective measurement activation time setting Modem programmed time setting. SMS programmed time setting. Warning threshold setting. SMS Messages and Commands 5-3 5.3 Query COMMANDs Command ?ALR ?ANT ?BAT ?BNDxx ?CLK ?DEV Query commands interrogate the station for data, it respond back with a message containing requested information. Query commands contain a ? character in the command string. Description Example Field Alarm threshold query command. Example: #00?ALR* The answer displays the threshold value in Response: ALR=20 V/m; 1 the current unit followed by the averaging time (minutes). Asks for information regarding the antenna Example: #00?ANT* in use. Response: ANT= 3AX 75M-3G,Threeaxis probe 75MHz - 3 GHz,Narda,,3501/01,G-0028 Battery voltage query command. Example: #00?BAT* The answer displays the battery values Response: BAT=13.38 VOLT and centimes of VOLT in the format: BAT=VV.vv* Asks for data related to the specified Example: #00?BND01* for band frequency band, where xx = band number. number 1. Response:BND=1;FM;88;MHz;89;MHz Station internal clock query command. Example: #00?CLK* The answer displays the time and date in Response: CLK=13.32.57;23.11.07 the format: CLK=HH.mm.ss;GG.MM.YY* H ---> hours m ---> minutes s ---> seconds G ---> day M ---> month Y ---> year Asks for data related to the receiver: model,serial number, HW version, last calibration date,FW version. It is used for service purposes Example: #00?DEV* Response: DEV=PMM,SRM_AMS,8060,MB0000,02,25.10.06,V1.5.2 AMS; ?ERS Error description in case of “P” alarm. Example:#00?ERS* Answer is in bit format: Response: ERS=0 (no alarm). Bit 0: Antenna error (1) Bit 1: Receiver error (2) Bit 2: Receiver off (4) Bit 3: Broadband probe error (8) Bit 4: More than 2 auto-restart in half hour (16) ?FRQ Asks for antenna frequency range. Example: #00?FRQ* Answer give freq.min and freq.Max for Response: each block. Unit is in kHz. FRQ=100:30000:75000:300000 5-4 SMS Messages and Commands Command ?FWD ?GPS x Description Asks for firmware release and firmware uploading date and time. Example last Example: #00?FWD* Response: FWD=3.56 10/07;11.39.38;18.10.07 Asks for GPS position data. Example: #00?GPS* If “x” is set to “1” last valid position data are Response: GPS=$GPGLL,,,,,,V,N returned (useful in case no position data Example: #00?GPS 1* are detected. Response format: Response: GPS=$GPGLL,Latitude,Longitude,time GPS=$GPGLL,4404.42028,N,00809.54 of last reading,A,A 284,E,213547.00,A,A ?IDN Identifier request. Example: #00?IDN* The answer displays the identifier followed Response: IDN=democisano;SAM by the station model and firmware release. 01;3.56 10/07; ?LFA Last mean value query command. The answer displays the mean value in the current unit, followed by the averaging time (same as ALR command) ?MRD All markers date and time query command. The answer displays the date and time for all markers or VOID (if not set). (a <LF> Line Feed separator is included after each number) ?MRDn Single marker date and time command. (n variable between 0 and 9). The answer displays the date and time of the selected marker or VOID (if not set). ?MRK All markers text query command. The answer displays the Markers content or VOID if empty. (a <LF> Line Feed after each number) Example: #00 ?LFA* Response: LFA=0.46 V/m; 6 Means 0,46 V/m is the mean value for last 6 minutes. Example: #00 ?MRD* Response: MRD= 08:00 07/11/07 08:00 08/11/07 void void void void void void void void query Example: #00?MRD1* Response: MRD1=08:00 08/11/07 Example: #00?MRK* Response: MRK= start Segrate office test stop Segrate office test void void void void void void void void SMS Messages and Commands 5-5 Command ?MRKn ?MSK Description Single marker text query command. (n variable between 0 and 9). The answer displays marker text or VOID. Example Example: #00?MRK0* Response: MRK0=start Segrate office test Alarm setting query command. The answer displays a string containing the alarm setting mask and selected method of notification in the following format: MSK=AWPVLTSawpvl-s MODEM SMS Each character represent an enabled alarm. Type of alarm as described below in the ?STA command explanation. The character “- “ shows an alarm not enabled. When MODEM is displayed any alarm is notified by a call to the controller PC. When SMS is displayed any alarm is notified by SMS to mobile phone. Example1: #00?MSK* Response: MSK=A---L--------Description: alarms enabled are: (field) Alarm OUT, Case Open OUT. Even if activated alarms will not be notified. Example2: #00?MSK* Response: MSK=AW-----aw----MODEM Description: alarms enabled are: (field) Alarm OUT, (field) Warning OUT, (field) Alarm IN, (field) Warning IN. Activation of any of the above alarms will be notified by modem (automatic call to the controller PC). Example3: #00?MSK* Response: MSK=---V-TS---v--s SMS Description: alarms enabled are: Battery Section OUT (V and S), Over Heat, Battery Section IN (v and s). Activation of any of the above alarms will be notified by SMS (message to the mobile phone numbers specified in the “Schedule for SMS” section of the control software). Example4: #00?MSK* Response: MSK=AWPVLTSawpv-s SMS MODEM Description: all alarms are enabled. Activation of any of the above alarms will be notified by both SMS and modem. ?NRM Memory duration before overwriting. Example: #00?NRM* It depends on the table configuration and storing time settings. Response: NRM=3510,14,15,0,0 The answer returns the memory span in terms of number of records and time (days, hours, minutes and seconds). ?NTB Asks for the first and last band number as Example: #00?NTB* in the analysis table Response: NTB=1;17 ?PRB Antenna information query command. The answer displays the antenna model, last calibration date, unit, divisor, level range and frequency range. 5-6 SMS Messages and Commands Example: #00?PRB* Response: PRB=3AX 75M3G;21.11.05;V/m:100.00:100.00:0.08:7 5.00:3000.00:N Command ?PTR Description Example This command asks for the Predicted Example: #00?PTR* Process Time which depends on setting. Response: PTR=33 Unit is seconds ?RPT It asks for max recorded field and minimum battery voltage with date and time stamp since last automatic Report is sent. (the “Send Report” function should be enabled in the “Schedule for SMS” section of the control software or sending the “SENR” message). Showed field value is related to the Total band. ?RPT0 Same as above but with reset function to Example: #00?RPT0* start a new observation period. Response: RPT= MAX:2.14V/m 10:57 19/10/07 Battery=11.62V/m 02:31 25/10/07 ?STA Example: #00?RPT* Response: RPT= MAX:2.14V/m 10:57 19/10/07 Battery=11.62V 02:31 25/10/07 Example of next SMS: #00?RPT* Response: RPT= MAX:0.38V/m 10:19 08/11/07 Battery=12.70V 10:18 08/11/07 Alarm status request. Example: #00STA* Information about any active alarm is Response: STA=----L--------returned in the following format: Description: Case Open alarm is active. STA= AWPVLTSawpvl-s Every letter identify an active alarm as Example: #00STA* follows: Response: STA=------S------Description: Battery Section alarm is A = (field) Alarm OUT active due to the battery voltage below W= (field) Warning OUT warning threshold (11.09V < VBatt < P= Device Section OUT 11.97V). V= Battery Section OUT (alarm threshold) L= Case Open OUT Example: #00STA* T= Over Heat Response: STA=---V--S------S=Battery Section OUT (warning threshold) Description: Battery Section alarm is a= (field) Alarm IN (back in normal active due to the battery voltage below warning and alarm thresholds condition after Alarm OUT) (VBatt<11.03V). w= (field) Warning IN p= Device Section IN v= Battery Section IN (alarm threshold) l= Case Open IN s= Battery Section IN (warning threshold) Character “-“ means not active alarm SMS Messages and Commands 5-7 Command ?SVD Description Example Asks for date and time of first valid data Example: #00SVD* which is congruent with actual setting. Response: SVD=0:09.30.06;09.10.07 Answer contains a number (for internal use) followed by the requested date and time in the following format: n:hh.mm.ss;dd.mm.yy ?TAB Asks for the last measured values. Example: #00?TAB* Answer contains last field value for each Response: TAB=--Total, Other, frequency band of the band table. Band1, Band2,… ?TAP Asks for the last peak measured values. Example: #00?TAP* Answer contains last field peak value for Response: TAP=--Total, Other, each frequency band of the band table. Band1, Band2,… ?TAV Asks for the last averaged values. Example: #00?TAV* Answer contains last averaged field value Response: TAV=--Total, Other, for each frequency band of the band table. Band1, Band2,… ?TDM Modem phone directory list query command. The answer displays the phone numbers stored in the “Schedule for modem” section of the control software (phone number of controller PC modem) or VOID if empty in the format: (a <LF> Line Feed after each number): TDM= xxxxxxxxxxx xxxxxxxxxxx void * Same as above but selecting a specific position in the directory list (n variable between 0 and 9). The answer displays the requested phone number or VOID in the format: TDMn=xxxxxxxxxxx* Example: #00?TDM* Response: TDM= 0123456789 void void void void void void void void void SMS phone directory list query command. The answer displays the phone numbers stored in the “Schedule for SMS” section of the control software (phone number of mobile phones to which send messages) or VOID if empty in the format: (a <LF> Line Feed after each number): TDS= xxxxxxxxxxx xxxxxxxxxxx void * Example: #00?TDS* Response:TDS= 1234568565 void void void void void void void void void* ?TDMn ?TDS 5-8 SMS Messages and Commands Example: #00?TDM1* Response: TDM1=VOID Command ?TDSn Description Example Same as above but selecting a specific Example: #00?TDS1* position in the directory list (n variable Response:TDS1=1234568565 between 0 and 9). The answer displays the requested phone number or VOID in the format: TDSn=xxxxxxxxxxx* ?TMP Internal temperature query command. Example: #00?TMP* It returns the internal temperature value in Response: TMP=302 °K. Unit:°K ?TPH Receiver activation mask query command for the 48 programmable half hours of selective analysis (0= selective analysis OFF; 1= selective analysis ON) To avoid too long data strings the original 48 byte one (a byte every half hour) is divided in six parts, 8 characters each. Each part is then converted in hexadecimal. For example, the string: 0001000000010000000100000011100011 10000111000011 is divided in six parts 8 characters long. Each part is converted from binary to hexadecimal: 00010000 = 10 00010000 = 10 00010000 = 10 00111000 = 38 11100001 = E1 11000011 = C3 ?TSM Modem programming time setting query Example: #00?TSM* command. Response: Answer returns information (as set in the TSM=ON 17:26 ( 1h) each 24h “Schedule for Modem” section of the control software) with the following format: TSM=ON HH:mm ( Xh) each Yh or: TSM= HH:mm ( Xh) each Yh depending on auto call setting of the modem. (Xh) is the stand-by time Example: #00?TPH* Response: TPH=10101038E1C3 which, after conversion, gives the string: 00010000000100000001000000111000 1110000111000011 where the first character is related to the half hour included from 00:00 to 00:29 SMS Messages and Commands 5-9 Command ?TSS ?WRN 5-10 Description SMS programming time setting query command. Answer returns information (as set in the “Schedule for SMS” section of the control software) with the following format: TSS=ON HH:mm ( Xh) each Yh or: TSS= HH:mm ( Xh) each Yh depending on the activation of “send report” command. ( Xh) is the stand-by time Example Example: #00?TSS* Response: TSS=ON 17:26 ( 1h) each 24h* Field Warning threshold query command. Example: #00?WRN* The answer displays the threshold in the Response: WRN= 4.0; 6* current unit of measure followed by the time (minutes) of the calculated mean. SMS Messages and Commands 5.4 Setting COMMANDs Command SALRx.x Setting commands send setting data to the system, the station can answer back with a SMS message with requested information or a setting confirmation. Setting commands contain a “S” character at the beginning of command. Description Example Alarm threshold setting. Example: #00SALR6.0* The parameter xx.x is the threshold value Response: ALR= 6.00 V/m; 6 in the format: #00SALR 6.0* (same response as ?ALR command) SATH This command hang up the current Example: #00 SATH* communication and the line. It should be Response is always: #00 ATH=OK* always used to end any remote operation (by modem) to confirm the end of data exchange. SCLD Clock date setting. Example: #00SCLD 12.11.07* The response is the same as in the ?CLK Response:OLK=11.55.57;12.11.07 command. SCLT Clock time setting. Example: #00SCLT 12.13.40* The response is the same as in the ?CLK Response:OLK=12.13.40;12.11.07 command. SCNL This command enable a deferred call to the number nnnnnnnn The call is initiated d minutes later. The format is: #00 SCNL d nnnnnnnn * where d is in minutes between 1 and 9 and nnnnnnnn is the remote phone number. Example: #00 SCNL 5 018220346* Response: CNL=018220346 The station will recall that phone number after 5 minutes. SDIC This command disables the station to call. When disabled the MODEM will power on at time set with the STMS and enter a stand by state ready for incoming call or SMS messages. (same response as ?TSM command). Example: #00 SDIC* Response: TSM= 14:53 ( 1h) each 24h Confirm the station is disabled to call. The modem scheduling is showed too. SDIR SMS Report send disabling. When disabled the GSM modem will power on at time set with the STMS and enter a stand by state, ready for incoming call or SMS messages. (same response as ?TSM command). Example: #00 SDIR* Response: TSS=16:15 ( 1h) each 24h Confirm the station is disabled to send SMS report. The “schedule for SMS” is showed too. SMS Messages and Commands 5-11 Command Description This command enables the station to call. The time of call shall be set with STSM command. The station power on the MODEM, initiate the communication link and call the first number in the MODEM phone number list, at the end of call the modem enter a stand by state for the time remaining. Note that only call is enabled and not also the modem power on. (same response as ?TSM command). Example Example: #00 SENC* Response: TSM=ON 14:53 ( 1h) each 24h Confirm the station is enabled (ON) to call. The “schedule for modem” is showed too. SENR SMS Report send enabling. When enabled the station power on the GSM, at the time set with the STSS command, initializes communication and send the report with a SMS message to all phones in the SMS numbers list, at the end it enter the stand by state for the time remaining. Note that only message sending is enabled and not also the GSM power on. (same response as ?TSS command). Example: #00 SENR* Response: TSS=ON 12:00 ( 2h) each 24h Confirm the station is enabled to send SMS report. The “schedule for SMS” is showed too. SIDN Station identifier setting. Example: #00 SIDN Demo Cisano* Max 20 characters. Response: The response is the same as in the ?IDN IDN=Demo Cisano;SAM 01; 3.56 command. 10/07; The command format is: #00SIDN Station Name* SMRDn Marker n date and time setting where n is Example: #00SMRD2 12:30 11/13/07* between 0 and 9. The format is: Response: HH:mm MM.DD.YY. MRD2=12:30 11/13/07 SENC This command is not used to set the marker date and time, in fact it is automatically created when marker is written, but is useful to change it later. The answer is the inputted date and time if no errors. SMRKn 5-12 Marker n setting where n is between 0 and 9. The string can be max 32 characters long. When setting is successful the answer is the text in storage, otherwise an error will came up. Marker date/time is automatically set to the AMS-8060 internal clock. To cancel marker data write down 00000. SMS Messages and Commands Example: #00SMRK1 Segrate Newtest 1* Response: MRK1=Segrate Newtest 1 Example: #00SMRK0 00000* Response: MRK0=VOID Command SMSK Description Alarm mask setting. The mask contains mnemonic symbols representing each alarm as in the following table. Symbols can be in each order. W= (field)Warning threshold exceeded A= (field)Alarm threshold exceeded w= (field)Warning threshold re-entered a= (field)Alarm threshold re-entered P= Device section alarm p= Device section alarm re-entered V= Low battery alarm v= Low battery alarm re-entered L= Case open alarm l= Case open alarm re-entered T= Overtemperature alarm SMS= notify alarm through SMS enable MODEM= notify alarm through MODEM enable Example Example: #00SMSK AL SMS* enables field and case open alarms to be notified by SMS. Response: MSK=A---L--------- SMS To get a notification of the alarm, also modem or SMS should be enabled. (same response as ?MSK command) STDM Modem phone number setting. Example: #00 STDM2 987654321* In the following format: Response: TDM2=987654321 #00 STDMn xxxxxxxxxx* where: n is the list # between 0 and 9, xxxxxxxxxx is the phone #. To replace simply rewrite the number, to cancel write down 00000. (same response as ?TDMn command). STDS SMS phone number setting. Example: #00 STDS2 0000000* In the following format: Response:TDS2=VOID* #00 STDSn xxxxxxxxxx* where: n is the list # between 0 and 9, xxxxxxxxxx is the phone #. To replace simply rewrite the number, to cancel write down 00000. (same response as ?TDSn command). SMS Messages and Commands 5-13 Command STPH STSM Description Receiver activation mask setting command for the 48 programmable half hours of selective analysis (0= selective analysis OFF; 1= selective analysis ON) To avoid too long data strings the original 48 byte one (a byte every half hour) is divided in six parts, 8 characters each. Each part is then converted in hexadecimal. For example, the string: 0001000000010000000100000011100011 10000111000011 is divided in six parts 8 characters long. Each part is converted from binary to hexadecimal: 00010000 = 10 00010000 = 10 00010000 = 10 00111000 = 38 11100001 = E1 11000011 = C3 Example Example: #00STPH 10101038E1C3*; Set the mask as follows: 00010000000100000001000000111000 1110000111000011 where the first character is related to the half hour included from 00:00 to 00:29 Modem programmed time setting. Example: #00 STSM 14.53.01.24* In the following format: Response: #00 STSM HH.mm.xx.ee* TSM=14:53 ( 1h) each 24h where: HH.mm is the MODEM power on the modem will power on at 14:53, will stay on for 1 hour and the power on time (switched on and in Stand-By). operation will be repeated every day. xx on time period in hours. ee repetition time in hours. xx and ee must always be 2 numerals without spaces, and submultiples of 24. (same response as ?TSM command). STSS SMS programmed time setting. Example: #00 STSM 12.00.02.24* In the following format: Response: #00 STSS HH.mm.xx.ee* TSS=12:00 ( 2h) each 24h* where: HH.mm is the MODEM power on the modem will power on at 12:00, will stay on for 2 hour and the power on time (switched on and in Stand-By). operation will be repeated every day. xx on time period in hours. ee repetition time in hours. xx and ee must always be 2 numerals without spaces, and submultiples of 24. (same response as ?TSS command). SWRNx.x 5-14 Warning threshold setting. Example: #00SWRN4.0* The parameter xx.x is the threshold value Response: WRN= 4.0 V/m; 6 in the format: #00SWRN 4.0* (same response as ?WRN command) SMS Messages and Commands 6 – Packaging Instructions 6.1 Introduction This section provides the information useful for a correct packaging in case the unit has to be returned for service to the factory or whenever you need to prepare the AMS-8060 unit for shipment. The station should be disassembled stepping back the installation procedure included in section 2. The unit includes parts that are sensitive to mechanical shocks as well as heavy ones like the power pack. It is therefore suggested to follow carefully the packing instructions to avoid damages due to the shipment. The following instruction provide several picture useful to identify the various boxes of the original packaging and their use. 6.2 Packaging instructions Box A contains the solar panel. Box B contains accessories 1 Document AMS8060EN-21009-3.66 - © NARDA 2007 Packaging Instructions 6-1 Box C inside view Box C contains power pack and box B Box F contains the receiver unit 6-2 Packaging Instructions Box E contains antenna Box D contains box F and box E Box D inside view Packaging Instructions 6-3 Box G contains radome Box H (main box) 6-4 Packaging Instructions Insert Box C in the Box H Insert Box D in the Box H. Packaging Instructions 6-5 Insert Box G in the Box H. Insert Box A in the Box H 6-6 Packaging Instructions Box H ( Main ) Use pallet and straps for the final packing. Packaging Instructions 6-7 This page has been left blank intentionally 6-8 Packaging Instructions 7 – Action of the wind on the AMS-8060 7.1 Introduction This section provides the information necessary to install and use the Area Monitor System AMS-8060 in the presence of wind. The Field Monitor is usually installed outdoors where the strong winds can endanger its stability that depends on the weight and eventual ballast bags or nylon wind strays. Depending on the wind speed, it is possible to calculate the weight of the ballast bags through the tables below to guarantee the stability of the apparatus. It is necessary to calculate the speed and pressure of the wind in the place of installation; through the table it is possible to determine if it is necessary to use the ballast bags with their full weight or to fasten the nylon wind strays AMS-8060 unit Document AMS8060EN-21009-3.66 – © NARDA 2007 Action of the wind on the AMS-8060 7-1 7.2 AMS-8060 Tabella 7-1 Wind resistance of the AMS-8060 Aerodynamic form Air density [N/mc] Wind pressure 2 [N/m ] Overturning moment [Nm] Stabilizing moment [Nm] Weight ballast [N] 3,60 7,20 10,80 14,40 18,00 21,60 25,20 28,80 32,40 36,00 39,60 43,20 46,80 50,40 54,00 57,60 61,20 64,80 68,40 72,00 75,60 79,20 82,80 86,40 90,00 93,60 97,20 100,80 104,40 108,00 1,00 2,00 3,00 4,00 5,00 6,00 7,00 8,00 9,00 10,00 11,00 12,00 13,00 14,00 15,00 16,00 17,00 18,00 19,00 20,00 21,00 22,00 23,00 24,00 25,00 26,00 27,00 28,00 29,00 30,00 1,20 1,20 1,20 1,20 1,20 1,20 1,20 1,20 1,20 1,20 1,20 1,20 1,20 1,20 1,20 1,20 1,20 1,20 1,20 1,20 1,20 1,20 1,20 1,20 1,20 1,20 1,20 1,20 1,20 1,20 1,25 1,25 1,25 1,25 1,25 1,25 1,25 1,25 1,25 1,25 1,25 1,25 1,25 1,25 1,25 1,25 1,25 1,25 1,25 1,25 1,25 1,25 1,25 1,25 1,25 1,25 1,25 1,25 1,25 1,25 0,75 3,00 6,75 12,00 18,75 27,00 36,75 48,00 60,75 75,00 90,75 108,00 126,75 147,00 168,75 192,00 216,75 243,00 270,75 300,00 330,75 363,00 396,75 432,00 468,75 507,00 546,75 588,00 630,75 675,00 0,26 1,03 2,32 4,13 6,45 9,28 12,63 16,50 20,89 25,79 31,20 37,13 43,58 50,54 58,02 66,01 74,52 83,54 93,08 103,14 113,71 124,80 136,40 148,52 161,16 174,31 187,97 202,15 216,85 232,07 0,39 1,55 3,48 6,19 9,67 13,92 18,95 24,75 31,33 38,68 46,80 55,70 65,36 75,81 87,02 99,01 111,78 125,32 139,63 154,71 170,57 187,20 204,60 222,78 241,73 261,46 281,96 303,23 325,28 348,10 -42,49 -36,69 -27,02 -13,49 3,92 25,19 50,33 79,34 112,22 148,96 189,57 234,05 282,40 334,61 390,69 450,64 514,46 582,15 653,70 729,12 808,41 891,57 978,59 1069,48 1164,24 1262,87 1365,37 1471,73 1581,96 1696,06 7-2 Action of the wind on the AMS-8060 NOTE Ballast bags Ballast bags filled with Ballast bags filled with water not necessary sand Wind speed [m/s] Fastening the nylon wind strays Wind speed [km/h] WEIGHT BALLAST VARIATION IN COMPARISON TO THE WIND SPEED Weight Ballast [N] 1800 1700 1600 1500 1400 1300 1200 1100 1000 900 800 700 600 500 400 300 200 100 0 0 10 20 30 40 50 60 70 80 90 100 110 120 Wind Speed [km/h] Fig. 7-1 Weight Ballast variation in comparison to the wind speed for AMS-8060 Action of the wind on the AMS-8060 7-3 This page has been left blank intentionally 7-4 Action of the wind on the AMS-8060 NARDA Safety Test Solutions S.r.l. Socio Unico Sales & Support: Via Leonardo da Vinci, 21/23 20090 Segrate (MI) - ITALY Tel.: +39 02 2699871 Fax: +39 02 26998700 Manufacturing Plant: Via Benessea, 29/B 17035 Cisano sul Neva (SV) Tel.: +39 0182 58641 Fax: +39 0182 586400 http://www.narda-sts.it Mod. 18-1 Caro cliente grazie per aver acquistato un prodotto NARDA! Sei in possesso di uno strumento che per molti anni ti garantirà un’alta qualità di servizio. NARDA riconosce l'importanza del Cliente come ragione di esistenza; ciascun commento e suggerimento, sottoposto all'attenzione della nostra organizzazione, è tenuto in grande considerazione. La nostra qualità è alla ricerca del miglioramento continuo. Se uno dei Suoi strumenti NARDA necessita di riparazione o calibrazione, può aiutarci a servirla più efficacemente compilando questa scheda e accludendola all’apparecchio. Tuttavia, anche questo prodotto diventerà obsoleto. In questo caso, ti ricordiamo che lo smaltimento dell'apparecchiatura deve essere fatto in conformità con i regolamenti locali. Questo prodotto è conforme alle direttive WEEE dell’Unione Europea (2002/96/EC) ed appartiene alla categoria 9 (strumenti di controllo). Lo smaltimento, in un ambiente adeguato, può avvenire anche attraverso la restituzione del prodotto alla NARDA senza sostenere alcuna spesa. Può ottenere ulteriori informazioni contattando i venditori NARDA o visitando il nostro sito Web www.narda-sts.it. Dear Customer thank you for purchasing a NARDA product! You now own a high-quality instrument that will give you many years of reliable service. NARDA recognizes the importance of the Customer as reason of existence; in this view, any comment and suggestion you would like to submit to the attention of our service organization is kept in great consideration. Moreover, we are continuously improving our quality, but we know this is a never ending process. We would be glad if our present efforts are pleasing you. Should one of your pieces of NARDA equipment need servicing you can help us serve you more effectively filling out this card and enclosing it with the product. Nevertheless, even this product will eventually become obsolete. When that time comes, please remember that electronic equipment must be disposed of in accordance with local regulations. This product conforms to the WEEE Directive of the European Union (2002/96/EC) and belongs to Category 9 (Monitoring and Control Instruments). You can return the instrument to us free of charge for proper environment friendly disposal. You can obtain further information from your local NARDA Sales Partner or by visiting our website at www.narda-sts.it. 5 Servizio richiesto: 5 Service needed: Solo taratura Calibration only Riparazione Repair Riparazione & Taratura Repair & Calibration Taratura SIT Certified Calibration Altro: Other: Ditta: Company: Indirizzo: Address: Persona da contattare: Technical contact person: Telefono: Phone n. Modello: Equipment model: Numero di serie: Serial n. 5 Accessori ritornati con l’apparecchiatura: Nessuno Cavo(i) Cavo di alimentazione 5 Accessories returned with unit: None Cable(s) Power cable Altro: Other: 5 Sintomi o problemi osservati: 5 Observed symptoms / problems: 5 Guasto: Fisso Intermittente 5 Failure: Continuous Intermittent Sensibile a : Freddo Sensitive to: Cold Caldo Heat Descrizione del guasto/condizioni di funzionamento: Failure symptoms/special control settings description: Se l’unità è parte di un sistema descriverne la configurazione: If unit is part of system please list other interconnected equipment and system set up: Vibrazioni Altro Vibration Other Suggerimenti / Commenti / Note: Suggestions / Comments / Note: