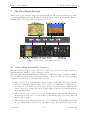
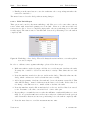
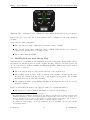
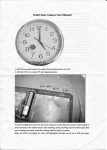
1
Nesis User’s Manual Kanardia September 2011 © Kanardia d.o.o. Nesis User Manual – Version 2.0 1 Nesis — User’s Manual Contact Information Publisher and producer: Kanardia d.o.o. Ulica heroja Rojška 70 SI-3000 Celje Slovenia Tel: +386 590 12 521 Fax: +386 590 11 416 Email: [email protected] A lot of useful and recent information can be also found on the Internet. See http://www. kanardia.eu for more details. Copyright This document is published under the Creative Commons, Attribution-ShareAlike 3.0 Unported licence. Full license is available on http://creativecommons.org/licenses/by-sa/ 3.0/legalcode web page and a bit more human readable summary is given on http: //creativecommons.org/licenses/by-sa/3.0/. In short, the licens gives you right to copy, reproduce and modify this document if: you cite Aleš Krajnc, Kanardia d.o.o. as the author of the original work and you distribute the resulting work only under the same or similar license to this one. Credits This document was written using TeTeX (LATEX) based document creation system using Kile integrated LaTeX environment running on Linux based operating system. Most of the figures were drawn using Open Office Draw and Inkscape applications. Photos and scanned material was processed using Gimp. All document sources are freely available on request under the licence mentioned above and can be obtained by email. Please send requests to [email protected]. Revision History The following table shows the revision history of this document. Revision 2.0 Date 30 Sept 2011 Description Initial release Document File NesisUserManual-200.pdf 2.0.1 15 March 2012 Minor update NesisUserManual-201.pdf The documents can be downloaded from Kanardia web site www.kanardia.eu. Version 2.0 2 © Kanardia 2011 Nesis — User’s Manual CONTENTS Contents 1 Introduction 1.1 General Information About Nesis . . . . . . 1.2 Principles of the Operation . . . . . . . . . 1.2.1 Attitude, Heading and Velocities . . 1.2.2 Engine Sensors . . . . . . . . . . . . 1.2.3 Sensor Calibration . . . . . . . . . . 1.3 Charts, Flight and Navigation Information . . . . . . . 6 6 7 7 8 8 9 2 Nesis Basics 2.1 Command Panel . . . . . . . . . . . . . . . . . . . . . . . . . . . . . . . . . . 2.2 Turning On/Off . . . . . . . . . . . . . . . . . . . . . . . . . . . . . . . . . . . 2.2.1 Start-up Procedure . . . . . . . . . . . . . . . . . . . . . . . . . . . . . 10 10 11 11 3 The Five Major Screens 3.1 Classic Flight Information – Screen 1 . 3.1.1 Menu . . . . . . . . . . . . . . 3.1.2 Moving Map Zoom Level . . . 3.2 Navigation – Screen 2 . . . . . . . . . 3.2.1 Menu . . . . . . . . . . . . . . 3.3 Engine Monitor – Screen 3 . . . . . . . 3.3.1 Menu . . . . . . . . . . . . . . 3.4 Modern Flight Information – Screen 4 3.4.1 Menu . . . . . . . . . . . . . . 3.5 Settings – Screen 5 . . . . . . . . . . . . . . . . . . . . . 13 13 14 15 15 16 17 18 18 21 21 . . . . . . . . . . . . . . 22 22 22 22 23 24 24 25 25 26 26 27 27 27 28 4 Flight-Time Activities 4.1 Setting QNH . . . . . . . . . . . . . . 4.1.1 QFE Operation . . . . . . . . . 4.1.2 Initial QNH Setting . . . . . . 4.2 List of Nearest Airports . . . . . . . . 4.3 Selecting a Waypoint . . . . . . . . . . 4.3.1 The Waypoint Selection Mode 4.3.2 Name Filter . . . . . . . . . . . 4.3.3 Radius Filter . . . . . . . . . . 4.3.4 Type Filter . . . . . . . . . . . 4.3.5 New User Waypoint . . . . . . 4.4 Route Selection . . . . . . . . . . . . . 4.4.1 Activating a Route . . . . . . . 4.4.2 Route Manipulation . . . . . . 4.5 Adjusting Fuel Level . . . . . . . . . . Version 2.0 3 . . . . . . . . . . . . . . . . . . . . . . . . . . . . . . . . . . . . . . . . . . . . . . . . . . . . . . . . . . . . . . . . . . . . . . . . . . . . . . . . . . . . . . . . . . . . . . . . . . . . . . . . . . . . . . . . . . . . . . . . . . . . . . . . . . . . . . . . . . . . . . . . . . . . . . . . . . . . . . . . . . . . . . . . . . . . . . . . . . . . . . . . . . . . . . . . . . . . . . . . . . . . . . . . . . . . . . . . . . . . . . . . . . . . . . . . . . . . . . . . . . . . . . . . . . . . . . . . . . . . . . . . . . . . . . . . . . . . . . . . . . . . . . . . . . . . . . . . . . . . . . . . . . . . . . . . . . . . . . . . . . . . . . . . . . . . . . . . . . . . . . . . . . . . . . . . . . . . . . . . . . . . . . . . . . . . . . . . . . . . . . . . . . . . . . . . . . . . . . . . . . . . . . . . . . . . . . . . . . . . . . . . . . . . . . . . . . . . . . . . . . . . . . . . . . . . . . . . . . . . . . . . . . . . . . . . . . . . . . . . . . . . . . . . . . . . . . . . . . . . . . . . . . . . . . . . . . . . . . . . . . . . . . . . . . . . . . . . . . . . . . . . . . . . . . . . . . . . . . . . . . . . . . . . . . . . . . . . . . . . . . . . . . . . . . . . . . . . . . . . . . . . . . . . . . . . © Kanardia 2011 Nesis — User’s Manual CONTENTS 5 Browsig the Map 5.1 Moving the Map . . . . . . . . . . . . . . . . . . . . . . . . . . . . . . . . . . 29 29 5.2 Zooming the Map . . . . . . . . . . . . . . . . . . . . . . . . . . . . . . . . . . 29 5.3 Waypoint . . . . . . . . . . . . . . . . . . . . . . . . . . . . . . . . . . . . . . 30 5.4 5.5 Route . . . . . . . . . . . . . . . . . . . . . . . . . . . . . . . . . . . . . . . . Direct To . . . . . . . . . . . . . . . . . . . . . . . . . . . . . . . . . . . . . . 30 31 5.6 Home . . . . . . . . . . . . . . . . . . . . . . . . . . . . . . . . . . . . . . . . 31 6 Settings 6.1 32 Route Planner . . . . . . . . . . . . . . . . . . . . . . . . . . . . . . . . . . . 6.1.1 Route List Commands . . . . . . . . . . . . . . . . . . . . . . . . . . . 33 34 6.1.2 Waypoint Editing Commands . . . . . . . . . . . . . . . . . . . . . . . 34 6.2 Logbook . . . . . . . . . . . . . . . . . . . . . . . . . . . . . . . . . . . . . . . 35 6.3 User Preferences . . . . . . . . . . . . . . . . . . . . . . . . . . . . . . . . . . 6.3.1 User . . . . . . . . . . . . . . . . . . . . . . . . . . . . . . . . . . . . . 36 37 6.3.2 Map . . . . . . . . . . . . . . . . . . . . . . . . . . . . . . . . . . . . . 37 6.4 6.3.3 System . . . . . . . . . . . . . . . . . . . . . . . . . . . . . . . . . . . Units . . . . . . . . . . . . . . . . . . . . . . . . . . . . . . . . . . . . . . . . . 37 38 6.5 Compass Calibration . . . . . . . . . . . . . . . . . . . . . . . . . . . . . . . . 38 6.5.1 First Step . . . . . . . . . . . . . . . . . . . . . . . . . . . . . . . . . . 39 6.6 6.5.2 Second Step . . . . . . . . . . . . . . . . . . . . . . . . . . . . . . . . . Time & Date . . . . . . . . . . . . . . . . . . . . . . . . . . . . . . . . . . . . 40 40 6.7 Software Update . . . . . . . . . . . . . . . . . . . . . . . . . . . . . . . . . . 41 6.7.1 Downloading Updates . . . . . . . . . . . . . . . . . . . . . . . . . . . 41 6.7.2 6.7.3 Extracting Update Files into USB Stick . . . . . . . . . . . . . . . . . Transferring Files into Nesis . . . . . . . . . . . . . . . . . . . . . . . . 41 42 6.7.4 Firmware Update . . . . . . . . . . . . . . . . . . . . . . . . . . . . . . 43 File Transfer Service . . . . . . . . . . . . . . . . . . . . . . . . . . . . . . . . 43 6.9 Alarms . . . . . . . . . . . . . . . . . . . . . . . . . . . . . . . . . . . . . . . . 6.10 User Waypoints . . . . . . . . . . . . . . . . . . . . . . . . . . . . . . . . . . . 44 44 6.11 System Preferences . . . . . . . . . . . . . . . . . . . . . . . . . . . . . . . . . 45 6.11.1 Nesis . . . . . . . . . . . . . . . . . . . . . . . . . . . . . . . . . . . . . 45 6.11.2 Glide . . . . . . . . . . . . . . . . . . . . . . . . . . . . . . . . . . . . 6.12 Attitude Adjustment . . . . . . . . . . . . . . . . . . . . . . . . . . . . . . . . 46 46 6.12.1 Yaw Misalignment . . . . . . . . . . . . . . . . . . . . . . . . . . . . . 46 6.12.2 Roll and Pitch Adjustment . . . . . . . . . . . . . . . . . . . . . . . . 46 6.13 Airplane & Engine . . . . . . . . . . . . . . . . . . . . . . . . . . . . . . . . . 6.13.1 Engine Type . . . . . . . . . . . . . . . . . . . . . . . . . . . . . . . . 47 47 6.13.2 Daqu Parameter Table . . . . . . . . . . . . . . . . . . . . . . . . . . . 48 6.14 Tank Calibration . . . . . . . . . . . . . . . . . . . . . . . . . . . . . . . . . . 49 6.8 Version 2.0 4 © Kanardia 2011 Nesis — User’s Manual CONTENTS 6.14.1 Setup Tanks . . . . . . . . . . . . . . . . . . . . . . . . . . . . . . . . 6.14.2 Calibrate Sensors (Min/Max) . . . . . . . . . . . . . . . . . . . . . . . 50 50 6.14.3 Edit Tank Shapes . . . . . . . . . . . . . . . . . . . . . . . . . . . . . 51 6.15 Sensor Offset Correction . . . . . . . . . . . . . . . . . . . . . . . . . . . . . . 52 7 Instruments 7.1 Airspeed Indicator . . . . . . . . . . . . . . . . . . . . . . . . . . . . . . . . . 53 53 7.2 Attitude Indicator . . . . . . . . . . . . . . . . . . . . . . . . . . . . . . . . . 54 7.3 Altitude Indicator . . . . . . . . . . . . . . . . . . . . . . . . . . . . . . . . . 55 7.4 7.5 Vertical Speed Indicator and Accelerometer . . . . . . . . . . . . . . . . . . . Tachometer and Manifold Pressure Indicator . . . . . . . . . . . . . . . . . . 55 56 7.6 Gyrocopter Rotor and Engine RPM Indicator . . . . . . . . . . . . . . . . . . 57 7.7 Helicopter Rotor and Engine RPM Indicator . . . . . . . . . . . . . . . . . . 57 7.8 7.9 Heading Indicator with Moving Map . . . . . . . . . . . . . . . . . . . . . . . Mini Engine Monitor . . . . . . . . . . . . . . . . . . . . . . . . . . . . . . . . 58 59 7.10 Fuel Computer Monitor . . . . . . . . . . . . . . . . . . . . . . . . . . . . . . 60 Version 2.0 5 © Kanardia 2011 Nesis — User’s Manual 1 1. Introduction Introduction First of all, we would like to thank you for purchasing our product. Nesis is a complex instrument and we strongly recommend reading the manual before using Nesis. The introduction chapter contains some general information about the instrument and principles of the operation. Later chapters describe Nesis use and reveal the details. You may be also interested in reading the Nesis Purchase Guide and Nesis Installation Manual documents. 1.1 General Information About Nesis Nesis consists of electronic units which work closely together to bring flight, engine and fuel information onto graphical display. The system is presented on figure 1. The system consists of the following electronic components: Figure 1: Illustration of minimal Nesis configuration. Engine monitoring unit (Daqu) is used to connect the engine, fuel and electric sensors. Airu is an inertial navigation unit (AHRS) aided by the GPS and pressure sensors. Airu provides attitude, position and velocities. Airu is hidden inside the Primary Nesis display. Mabu unit is a hidden unit and serves as motherboard for the embedded computer, as a data logger and as a CAN bus interface. Mabu is integral part of any Nesis display. Primary Nesis display presents all relevant information that appears on the CAN bus in a pilot friendly form on a large LCD screen. Most of this manual describes how to access, read and interact with the Nesis display. The Nesis system can be easily extended into a much more complex form, figure 2. We achieved this by introducing CAN bus for the communication between the units. The CAN bus does the magic of the all possible known and unknown future extensions. Imagine the CAN bus as a kind of computer network. Just like new computers can be easily connected to the network, we connect new devices to CAN. This allows introduction of secondary Nesis display, autopilot, weather service, external warning panel lights, transponder. . . Version 2.0 6 © Kanardia 2011 Nesis — User’s Manual 1.2 Principles of the Operation Figure 2: Illustration of extended Nesis configuration using CAN bus. Although the secondary Nesis display does not have the Airu unit inside, it is fully functional and behaves almost exactly like the primary Nesis display. The Nesis family of products and accessories keeps growing and growing. Please refer to the Nesis Puchase Guide for all available options. 1.2 Principles of the Operation As it was indicated above, Nesis uses special units to provide the information. The flight information (attitude, position and velocities) are obtained by Airu and Magu, while all engine related information is obtained from Daqu. All these units are connected to the CAN bus. 1.2.1 Attitude, Heading and Velocities Nesis uses state of the art MEMS1 sensors to read various physical quantities. Since all sensors are solid state, Nesis has no moving parts. This means it has less problems with fatigue and ageing. The following MEMS sensors are used in the Nesis system: The angular rate sensors, also known as gyros, are used in the attitude calculation. The angular rates are integrated in time in order to predict new attitude from the old one. We could say that they give short-time attitude prediction. They are also used in gravity vector calculation. The acceleration sensors are measuring apparent gravity vector. The true gravity vector is calculated assuming coordinated flight and readings from the other sensors (velocity and angular rate sensors). The ball slip indicator is directly obtained from the acceleration sensors. The absolute pressure sensor is used to calculate altitude and vertical velocity (vario). The differential pressure sensor provides indicated airspeed (IAS). When it is coupled with the outside air temperature sensor, it also calculates true air speed (TAS). 1 MEMS – micro-electromechanical systems, a.k.a micromachines, a.k.a micro systems technology. Version 2.0 7 © Kanardia 2011 Nesis — User’s Manual 1.2 Principles of the Operation The magnetic field sensors are used to measure the magnetic field vector. This vector is needed to determine the airplane magnetic and true heading. The later also needs magnetic declination, which is automatically calculated from the world magnetic model2 when airplane position is known. Note that the magnetic field sensor is optional and Nesis works well without it. Assuming coordinated flight we calculate the referencing attitude from the gravity vector and heading. These values are then compared with the short-term prediction of the attitude. Nonlinear Kalman filters are used to combine the short-term prediction and referencing attitude solution into one most probable solution. This is what you see on the attitude indicator. In a very similar way, short-term inertial position prediction is compared with the GPS position. Again, Kalman filtering is used to obtain the final solution. 1.2.2 Engine Sensors Engine related sensors are connected to the engine monitoring unit (Daqu). Daqu is designed to be installed on the engine side of the firewall. This has two advantages: Since the unit is close to the engine, all cables are short and no extensions are needed. This means less weight and makes installation simpler, too. We need only one tiny hole trough the firewall for the CAN bus cable. The cable transfers all the information and provides the power supply for Daqu. Daqu is designed to monitor engine sensors for various engines up to six cylinders (e.g. Rotax, Jabiru, Lycoming). When an engine is equipped with proper sensors, it can measure engine RPM, cylinder head temperature (CHT), exhaust gas temperature (EGT), oil pressure, oil temperature, fuel pressure, fuel flow, fuel level, manifold pressure, carburetor air temperatue, voltage, battery current, alternator current, coolant temperature and more. In the case of gyrocopter or helicopter installation, it also reads the rotor RPM sensor. The results of all these measurements are then transmitted on the CAN bus, where all other units are able to read them. 1.2.3 Sensor Calibration Almost all MEMS sensors have one common problem – they are sensitive to the temperature change. This means that each unit must be calibrated individually. Each sensor of every unit is measured at different temperatures and compared with reference values. Results are optimized mathematically in order to minimise the sensor errors. Resulting calibration coefficients are written into flash memory of the microcontroller. This procedure can be done in our lab only, since some special tools and machinery are needed. The compass calibration, however, is an exception. Although the electronic compass (Magu) is carefully calibrated in our lab, it needs to be recalibrated in your airplane. Practically every airplane has some magnetic material present in the compass surroundings. Such material locally disturbs Earth magnetic field and compass must take this disturbances into account. Please refer to section 6.5 on page 38 for more details. 2 The world magnetic model is maintained and updated by National Geophysic Data Center, http://www. ngdc.noaa.gov/geomag/ Version 2.0 8 © Kanardia 2011 Nesis — User’s Manual 1.3 1.3 Charts, Flight and Navigation Information Charts, Flight and Navigation Information Charts, flight and navigation information is obtained from many different sources. All these sources are freely available on the Internet. Wherever it is possible we cross-check the information and we try to make it current. However, this is not possible in all aspects and the quality of the information may vary from country to country. It is important to notice that we cannot guarantee that the information included with Nesis or otherwise provided by Kanardia is current and correct. It is the pilot responsibility to prepare himself for the flight and to collect all required information from reliable sources. It is strongly suggested that the pilot keeps valid printed navigation maps and other legally required material at disposal anytime during the flight. Version 2.0 9 © Kanardia 2011 Nesis — User’s Manual 2 2. Nesis Basics Nesis Basics This chapter describes the organization of the Nesis instrument. It teaches you about the individual buttons and their meaning. After reading you will be familiar with basic Nesis operations. Forthcoming sections reveal the details. 2.1 Command Panel The Nesis command panel is organized according to figure 3. It uses eight push buttons and one rotating knob to manipulate the user interface. Additionally, it has an USB port3 used for software, chart and data updates. Figure 3: Organization of Nesis front panel. Here is a brief description of individual items: The On/Off button is used to turn Nesis on/off. The USB port (or SD card slot) is used for software, chart and data updates. The OK/Menu button is used to confirm selection, to accept a decision or to display a menu. The rotating knob, hereinafter referred to as the knob, is mostly used to select things, change values, change zoom levels, etc. The Cancel/Esc button is used to reject selection, to cancel some decision or to change/escape to some other selection level. The multi-function buttons Btn 1 ...Btn 5 have two modes: 3 Some earlier versions use SD card slot for the same purpose. In this case SD card also stores all map files and it must be kept inserted during the flight. Version 2.0 10 © Kanardia 2011 Nesis — User’s Manual 2.2 Turning On/Off 1. Direct mode – with no menu labels shown on the display, the buttons allow direct access to individual screens. 2. Menu mode – is active when at least one menu label is visible on the screen. For the moment, try to remember the position of the OK/Menu and the Cancel/Esc buttons. 2.2 Turning On/Off The On/Off button is used to turn Nesis on or off. It has no other meaning. The button sends the signal to the electronic circuit. Depending on the current status of the electronics, it executes one of the following actions. If Nesis is off, a short press on the On/Off button turns it on. If Nesis is on, a short press on the On/Off button starts the shutdown procedure. Any action during the shutdown period cancels the operation. A long press on the On/Off button for about 5 seconds unconditionally turns Nesis off by cutting the power to the internal computer. In this case internal buffers are not flushed and Nesis will take a little longer to boot on the next start. This procedure should be used only for the cases when Nesis stops responding. Note: The On/Off button is a soft button and the internal electronic circuit consumes a small amount of electric energy even when Nesis is off. Although such consumption is very small, it may influence the condition of your battery when the airplane is not used for a very long period (say a few weeks). Therefore it is strongly recommended that Nesis is not connected directly to the battery. It should be connected to an avionics power bus, which has a mechanical switch between the bus and the battery. 2.2.1 Start-up Procedure When Nesis is powered on, the start-up procedure commences. The internal computer starts loading operating system and the Nesis main program. When the program is loaded, it continues loading various databases like airfields, navigation points, airspaces, charts etc. This procedure takes some time. Once the program is ready, it opens the start-up dialog as shown on figure 4. Figure 4: Initial agreement (left), pilot selection, QNH and fuel level setting (right). Pressing the OK button accepts the agreement and advances to the next page. This page asks for the pilot name, QNH and fuel level. Use the following commands to enter the required information. Version 2.0 11 © Kanardia 2011 Nesis — User’s Manual 2.2 Turning On/Off 1. Turn the knob to select the pilot4 . Press the OK button to confirm the pilot selection. 2. This takes you to fuel level selection5 . Turn the knob to set current fuel level and press the OK button. Act conservative and set slightly less fuel than you really have. 3. Use the knob to set QNH level. If correct QNH value is not known, it may be approximated by setting QFE altitude to the airfield elevation. Sometimes, you want to go back and correct some selection. 1. Press the Cancel button in order to switch from the control edit mode into the control selection mode. 2. Use the knob button to select a pilot, fuel level or QNH control. 3. Pressing the OK button puts the selected control into the edit mode. 4. Use the knob button to pick a pilot from the list, adjust QNH or fuel level. Press the OK button when done. Once the dialog was closed, Nesis is ready to use. 4 5 You can’t edit the list of pilots here. If you want to add a new pilot, remove or rename an existing one, please refer to section 6.3 on page 36 for more details. The fuel level option is shown only when no fuel level sensors are connected to Daqu. Version 2.0 12 © Kanardia 2011 Nesis — User’s Manual 3 3. The Five Major Screens The Five Major Screens This section describes the five major screens used in Nesis. The screens are directly accessible by pressing multifunction buttons when no menu labels are visible on the display. Figure 5 illustrates the connections between buttons and screens. Figure 5: Each button opens different screen. 3.1 Classic Flight Information – Screen 1 The first (leftmost) button activates the classic flight information screen. The screen shows flight information which is of pilot’s primary concern. The most important instruments have classical look and follow the recommended IFR T layout (classic six-pack). Figure 6 shows an example of the screen. All round gauges are fully configurable and may show other information as well. 1. The airspeed indicator displays IAS (indicated airspeed) and TAS (true airspeed). The indicator background displays white, green, yellow arc, VNE limit, recommended approach speed , best climb speed, first degree and second degree flap speed limit. Please refer to section 7.1 on page 53 for more details. Airspeed indicator is available in knots, mph, and km/h units. 2. The artificial horizon indicator provides current attitude and side-slip information. Roll and pitch angle can be read from the top and middle scale respectively. The ball indicates the side-slip. 3. The altitude indicator shows current baro-corrected altitude. It is available in feet and meters. When scale is given in feet, the third needle can be shown as well. It also Version 2.0 13 © Kanardia 2011 Nesis — User’s Manual 3.1 Classic Flight Information – Screen 1 Figure 6: Illustration of the classic flight information screen. displays current QNH reference pressure (a.k.a. baro-correction). QNH can be set in hPa and inHg units. 4. The moving map indicator is a kind of HSI indicator, which provides basic navigation information. It is located below the artificial horizon. The moving map can be configured to follow aircraft true heading, tracking or magnetic heading6 . 5. The RPM indicator is combined with the manifold pressure gauge. This combination allows optimal setting of power lever and propeller pitch. 6. The variometer – vertical speed indicator can be displayed in feet/min, m/s and m/min units. Variometer is combined with g-meter, which is located below the center. 7. The engine monitor organizes all most important engine parameters into one simple colored bar based chart. Each bar corresponds to some parameter and the color of the bar to its current status. 8. The fuel computer monitor provides the fuel and economy information. How much fuel is left, what is current and average fuel consumption, approximate range and endurance. Gyrocopters and helicopters have rotors and in this case engine RPM is usually combined with rotor RPM, see page 57 for an example. 3.1.1 Menu Pressing the OK/Menu button brings up possible commands for the classic flight information screen, figure 7. These commands are: 6 Magu is required for true and magnetic heading. Version 2.0 14 © Kanardia 2011 Nesis — User’s Manual 3.2 Navigation – Screen 2 Figure 7: The menu commands for the classic flight information screen. The QNH button opens a dialog where a QNH value is set. See page 22. The Pitch button is used to adjust the pitch during the flight. The Airfield button allows you to select from airfields in your surrounding. Airfields are sorted according to their distance from current position. Selected airfield becomes a new waypoint and Nesis goes into the direct to waypoint mode. See page 23. The Waypoint button opens a dialog where a waypoint is selected from database. Waypoints are filtered according to their type, distance from current position and name. On selection, Nesis goes into the direct to mode. See page 24. The Route button opens two different dialogs. If no route is active, a route selection is offered. However, if a route is already active, a route leg or a route waypoint can be activated. See section 4.4 on page 27. 3.1.2 Moving Map Zoom Level Nesis keeps updating several different moving map zoom levels. These levels are seamlessly computed in the background and are immediately available. The only exception is the startup, when Nesis needs some time to prepare the initial maps. Zoom levels are changed by turning the knob button. 3.2 Navigation – Screen 2 The navigation screen is a large moving map combined with some additional information. Large HSI scale and vertical airspace situation are painted over the map. The top and bottom bars are used to display other significant information as it is depicted on figure 8. 1. A large horizontal situation circle over the map gives situational awareness. The HSI circle and map rotate according to current tracking, true heading or magnetic heading. Tracking/heading option is set in the Settings dialog, see page 36. 2. The tracking/heading label shows current tracking/heading course. 3. The vertical airspace situation bar illustrates vertical organization of airspace at given position. The dark area is used to identify active airspace and clear area identifies no airspace. 4. The current baro-corrected altitude is displayed on the same bar, giving an idea what is the airplane vertical position regarding airspace zones. 5. The top bar displays current wind speed and direction7 , true airspeed, ground speed, number of visible GPS satellites, local time (it can also show UTC) and flight time. 7 Magu unit is required for the wind information Version 2.0 15 © Kanardia 2011 Nesis — User’s Manual 3.2 Navigation – Screen 2 Figure 8: Illustration of the navigation screen. 6. The map scale is shown according to the zoom level. It can be used to estimate distances on the map. 7. The bottom bar displays active waypoint, bearing, distance, tracking and time needed to reach the waypoint. 8. Current position of the airplane – the latitude and longitude coordinates.8 9. Information about active route. The bottom bar includes estimated time of arrival to the last route waypoint, time to the last route waypoint, distance left and cross track error (perpendicular distance to the active leg). The route is also illustrated on the map. Black line represents the route, thicker cyan line is used for the remaining distance on the active leg. White rectangle shows estimated time of arrival to the next waypoint and black rectangles show estimates for all remaining waypoints on the route. 3.2.1 Menu The OK/Menu button gives similar commands that were already described in the classic flight information screen section 3.1.1 on page 14. New commands are Legend and Browse. The first one opens a legend dialog, shown on figure 9. The second one (textttBrowse) allows moving the map, creating routes and selecting direct to points from the map. A detailed description of the Browse mode is given in section 5 starting on page 29. 8 WGS84 system is used for the coordinates. The same system is used by GPS. Version 2.0 16 © Kanardia 2011 Nesis — User’s Manual 3.3 Engine Monitor – Screen 3 Figure 9: Legend. Figure 10: Menu options for the navigation screen. 3.3 Engine Monitor – Screen 3 The engine monitor screen displays classic indicators of various engine and fuel related parameters. Some instruments and parameters are configurable and they may be adjusted to individual needs. Figure 11: Illustration of the engine monitor screen (Rotax 912 version). Figure 11 illustrates an example of the engine monitor screen. The engine monitor screen is Version 2.0 17 © Kanardia 2011 Nesis — User’s Manual 3.4 Modern Flight Information – Screen 4 highly configurable and your screen may look a bit different. 1. The fuel indicator combines the fuel related parameters like fuel flow, fuel level and manifold pressure. Fuel flow and fuel level units are configurable and may be set in liters or US gallons. 2. RPM and engine time is a reproduction of a classical instrument. 3. The indicator displays system voltage and current. Typically, alternator current is shown. However, this depends on the current transducer installation. 4. Oil and fuel pressures are combined into one indicator. Units are configurable: bars and PSI may be used. 5. Oil and water (coolant) temperatures are also combined into one indicator. Available units are ◦ C and ◦ F. 6. Cylinder head temperature (CHT) and exhaust gas temperatures (EGT) share the same indicator. On figure 11 only two CHTs are monitored, hence needles for hot (orange dot) and cold (blue dot) are displayed.9 When more than two cylinders are monitored, bars are used instead the needles. The same is true for the EGTs. 7. Backup battery status.10 8. Outside air temperature is also shown at the bottom. 3.3.1 Menu The engine monitor screen has it own specific menu. Figure 12 presents its options. Figure 12: The menu options for the engine monitor screen. The QNH button opens a dialog where QNH value is set. The Fuel Level button adjusts current fuel level. This option is available only when no fuel level sensors are connected to the Daqu and Nesis calculates fuel level. Please see note in section 7.10 on page 60. 3.4 Modern Flight Information – Screen 4 The modern flight Information screen is composed of a background image and an overlay. The background image can show: large artificial horizon, 9 10 The orange and blue dots refer to the hot and cold cylinder respectively. It is assumed that cold cylinder is number 1 and the hot is number 2. UPSU unit is required. Version 2.0 18 © Kanardia 2011 Nesis — User’s Manual 3.4 Modern Flight Information – Screen 4 synthetic vision, large moving map (similar to the navigation screen), check list, an image, that shows live video image from a compatible USB video camera11 , guidance screen for taking orthophoto pictures12 . The background image can be configured using the View command. Figure 13: Dialog for changing views. The overlay shows various flight parameters in the form of bars and scales. The upper part shows flight information, while the lower part is reserved for the engine parameters, see figure 15 on page 21. The overlay consist of the following items: 1. The compass scale moves according to current airplane heading or tracking. This depends on the settings, see section 6.3 on page 36. The scale also displays the heading bug marker, which gives you direction to the selected waypoint. 2. The heading label displays true heading, tracking or magnetic heading. 3. The altitude label displays the altitude scale. When the altitude indicator approaches to the top of the scale, it is rescaled automatically. 4. The VSI (vario) scale. 5. The moving altitude label. The altitude label moves, while the scale background is kept constant. This way we try to mimic the behavior of classic instruments, where the position of the needle gives the information without the need to actually read the label. 6. The vario label displays current value of the vertical speed. 11 12 One useful example may be glider towing – a back facing small camera may replace a mirror and provides unobscured video image of the glider. Geoniss orthophoto device must be connected to the CAN bus for the orthophoto mode to be operational. Version 2.0 19 © Kanardia 2011 Nesis — User’s Manual 3.4 Modern Flight Information – Screen 4 Figure 14: Different views of the Modern Flight Information screen: Synthetic vision, moving map, check list and video from the camera. 7. Current QNH setting (baro-correction) is displayed below the altitude and vario scale. 8. The RPM indicator with the RPM needle and position. 9. The electric instruments section (voltage and current). 10. The pressure section (oil and fuel pressures). 11. The temperature section (EGTs, CHTs, carburetor, oil and coolant). 12. The inclinometer (slip-skid) indicator. 13. The TAS label is located below the airspeed scale. 14. Navigation information; currently selected waypoint, bearing and distance, tracking and time needed to reach the waypoint. 15. The airspeed scale with the colored sections and limiting values. 16. The attitude indicator together with the roll and pitch scale. Version 2.0 20 © Kanardia 2011 Nesis — User’s Manual 3.5 Settings – Screen 5 Figure 15: Modern look of the flight information screen. Artificial horizon is taken for the background. 3.4.1 Menu The menu has the same commands as the menu of the classic screen. There is additional View command used to change the view, see figure 13. Figure 16: Menu commands for the modern screen. Only the extended portion of commands is shown. 3.5 Settings – Screen 5 The rightmost direct button opens the settings screen. Individual icons on the screen lead to various configuration dialogs. Due to the complexity, the settings screen has its own chapter, which starts on page 32. Version 2.0 21 © Kanardia 2011 Nesis — User’s Manual 4 4. Flight-Time Activities Flight-Time Activities This chapter describes procedures that are mainly used during the flight. The major flighttime activities are: Setting reference QNH pressure. Selecting an airport from the nearest airports list. Selecting a waypoint. Selecting an existing route or a route leg. Adjusting fuel level. Setting pitch correction. 4.1 Setting QNH The QNH setting is accessible from classic flight information, engine monitor and modern flight information screens. Press the OK/Menu button to display the menu and then press the QNH button. A QNH setting dialog pops up, figure 17. Figure 17: Setting the QNH. Turn the knob to set correct QNH reference pressure. Press the OK button to accept the selection. This also closes the dialog. Optionally, you can simply wait and Nesis will accept given value after a few seconds. Press the Cancel button to close the dialog. Recent changes are rejected. 4.1.1 QFE Operation When you operate your airplane locally, say around domestic airfield, then you may set the QFE altitude rather than QNH. In order to set your altimeter to the zero altitude (the QFE altitude), turn the knob until the bottom number is close to zero.13 But, be careful. You can do this only while you are sitting on the ground. Otherwise the QFE setting will be wrong. 4.1.2 Initial QNH Setting When QNH is not known and you are sitting on an airfield with a known altitude, you can approximate QNH value by setting the QFE altitude to the known airfield altitude. This gives a pretty good QNH approximation. 13 Normally, you can’t get exact zero because you change baro-correcting pressure in discrete steps. One hPa at the sea level corresponds to approximately 8 meters of altitude. Version 2.0 22 © Kanardia 2011 Nesis — User’s Manual 4.2 4.2 List of Nearest Airports List of Nearest Airports A list of nearest airports is available from the classic flight information screen, navigation screen and modern navigation screen. It is considered to be a kind of a distress feature. In order to access the list, press the OK/Menu button to display the menu and then press the Airfield button. A dialog shown on figure 18 appears. Airfields are sorted according to the distance from the airplane position at the time when the button was pressed. Distance and bearing are shown for each airfield. Colored arrows indicate the relative direction to the airfield according to the direction of the airplane at the time when the dialog was opened. Arrow colors indicate whether an airfield can be reached in the glide mode14 . Red arrow indicates that airfield can’t be safely reached in the glide mode. Yellow arrow indicates that airfield might be reached in the glide mode, however below the safety altitude. Green arrow indicates that airfield should be reached in the glide mode at or above the safety altitude. Minimal safety altitude and glide ratio are configured in the settings dialog. Please refer to section 6.3 for more details. Important note: the arrow colors calculation does not take terrain into account. So, it is possible that an airfield is marked as green, but it is not reachable due to the high terrain between the airplane and the airfield. Figure 18: Selecting from the list of nearest Airfields. With the dialog active, the following commands are available: Turn the knob to select the desired airfield and press the OK button to accept the selection. Press the Close button to close the dialog. Press the All button to include airfields and landing fields which are not in ICAO. Press the ICAO button to show only ICAO airfields (default option). The selected airfield becomes new waypoint and Nesis navigation goes into the direct to mode. 14 Glide mode means that engine is not running and that the airplane is flying at the speed of the best glide. Version 2.0 23 © Kanardia 2011 Nesis — User’s Manual 4.3 4.3 Selecting a Waypoint Selecting a Waypoint A waypoint selection is a bit more complex process than selecting one of the nearest airports. Nesis maintains separate lists of airfields, navigation aids15 , VFR reporting points16 and user points. As in the nearest airfield case, all points are sorted according to the distance from the airplane position at the time of dialog was opened. Since there are many points available for selection, filters need to be applied in order to hide some of the points. There are three type of filters and all of them are acting simultaneously: Range filter is used to limit the search to some reasonable distance. If you do not see your point on the list, consider to increase the radius limit. Nesis remembers last radius used and will reuse the same radius on the next run. Type filter is used to include or exclude individual lists: airfields, navigation aids, VFR reporting points and user specific points. Name filter is used to filter points according to their name. Only names which match given pattern are listed. In the case of airfields, Nesis searches for the name or ICAO label. Press the OK/Menu button to show menu label and select the Waypoint button to open the dialog shown on figure 19. Figure 19: The waypoint selection dialog. 4.3.1 The Waypoint Selection Mode The dialog always starts in the waypoint selection mode with radius filter and type filter set to previously used values. The previous setting of the name filter is reset, however. Turning the knob changes current selection. 15 16 By the navigation aid we mean VORs, NDBs, ILSes, TACANs and other similar radio navigation aids, which locations are often used in VFR flight for the navigation. In Europe, VFR reporting points are more and more used in VFR flights to define the flying routes and entry/exit points between airspace zones. Version 2.0 24 © Kanardia 2011 Nesis — User’s Manual 4.3 Selecting a Waypoint Pressing the OK button accepts the selection and sets it as a new waypoint in the direct to mode. The Close button closes the dialog, rejecting any selection. The Name button activates the name filter editing. The Radius button activates the radius control. The Type button activates the type selection. The New button opens a dialog where you can add a new waypoint. 4.3.2 Name Filter The name filter allows you to enter a few letters. As letters are entered, the list displays only those waypoints, which name matches letters in the filter. Figure 19 illustrates the situation where the letter L is about to be entered in the name filter. Note that airfields are matched against ICAO labels or airfield names at the same time. Once the name filter control is in the text edit mode, you have the following options: Turn the knob until desired letter is displayed. Press the OK button to enter the displayed letter into the name filter field. The list of waypoints changes accordingly. Press the Cancel button to remove the last letter in the edit box. Press the OK button on the paragraph symbol to stop editing. This restores the waypoint selection mode. Repeat the first two steps in order to enter more than one letter. 4.3.3 Radius Filter When the radius filter is active, you have the following options: Use the knob to change the waypoint search radius. As soon as radius is changed, the number of items found label changes. Press the Accept button to accept the new radius and switch back into the waypoint selection mode. Press Cancel button to keep previous radius and switch back into the waypoint selection mode. Note that large radius makes Nesis a bit less responsive, since it needs to scan among large number of waypoints. Please, also note that the list is able to display only 99 closest waypoints. If your waypoint is not listed, you should apply a more strict filter, say the name filter. Version 2.0 25 © Kanardia 2011 Nesis — User’s Manual 4.3.4 4.3 Selecting a Waypoint Type Filter The type filter toggles the lists used in waypoint selection. Here you can: Use the knob to select which waypoint list type to include or exclude. Press the OK button to toggle current selection. Press the Accept button to switch back into the waypoint selection mode. 4.3.5 New User Waypoint The New command opens a dialog where a user waypoint is created. A new waypoint requires coordinates (latitude and longitude) and a name. Initially, current airplane position is shown. Degrees, minutes and seconds are used to describe a coordinate. Figure 20 shows an example of the new user waypoint dialog. Figure 20: An example of the user waypoint dialog. 1. Use the knob to select the coordinate field you want to change. 2. Press OK to activate the field control and turn the knob to change it. Once correct value is shown in the field, press OK again. This accepts the entry and advances to the next field. 3. Repeat steps 1 and 2 until the waypoint coordinate is correct. 4. Select the Name control and enter a short name for the waypoint. As you modify the coordinates, a small map is shown on the right. This map is centered at the coordinates position. The map can be zoomed by pressing the Zoom + and Zoom buttons. The Back button sets the coordinate fields back to the initial point. Once the coordinate is known, press the Save button to save this point into the Nesis flash drive. Press Close in order to close the dialog without saving the new user waypoint. User waypoint can be created, edited and deleted from the settings screen. Please refer to section 6.10 on page 44. Version 2.0 26 © Kanardia 2011 Nesis — User’s Manual 4.4 4.4 Route Selection Route Selection This section describes how to activate and manipulate an existing route. It is assumed that the route was already created. The route planning is described in the section 5.4 on page 30 and in the section 6.1 on page 33. The route functions are accessed via the Route menu button. Depending on the current situation, the button opens two different dialogs. If there was no active route, Nesis opens the route selection dialog. However, if some route is already active, Nesis opens the route manipulation dialog. Both options are described next. 4.4.1 Activating a Route With no active route, the Route button opens the dialog shown on figure 21. This dialog displays all existing routes. Routes are sorted alphabetically. Turn the knob to select a route and press the OK or Activate button to activate it. Press the Cancel button to close the route selection dialog. Figure 21: Selection of a Route. When a route is activated any previous active waypoint is deactivated. According to the airplane position, Nesis first tries to activate the starting waypoint in the Route. Direct to is used in this case. However, when Nesis determines that airplane position fits into one of the route legs, the leg mode is activated showing the remaining part of the leg to fly. The above assumption may not be suitable for every situation and we need a mechanism to select either a different route leg or a different route waypoint. 4.4.2 Route Manipulation When a route is already active, the Route button brings up the route manipulation dialog shown on figure 22. This dialog allows change of currently active route waypoint. It also allows to deactivate the route completely. Use the knob to select a route waypoint. The Select Leg button selects a leg on the route that leads to the selected waypoint. Nesis switches to the route mode guiding you to follow the selected leg. The Direct To button guides you to the selected waypoint in the direct to mode. Press the Deactivate button to deactivate the route. Version 2.0 27 © Kanardia 2011 Nesis — User’s Manual 4.5 Adjusting Fuel Level Figure 22: Selection of a leg or a waypoint in an existing route. 4.5 Adjusting Fuel Level This option is available only when no fuel level sensors are connected to Daqu and Nesis calculates remaining fuel from the fuel flow information. The fuel level is first adjusted during the Nesis start-up procedure. However, if you need to modify it during the flight, switch to the engine monitor screen, press the OK/Menu button and then select the Fuel Level button. A dialog similar to figure 23 appears. Turn the knob to adjust the fuel level. Note, the fuel level changes in steps. Act conservative and set slightly less fuel than you really have. Confirm the selection by pressing the OK button. Reject and close the dialog by pressing the Cancel button. Figure 23: Setting a fuel level. Version 2.0 28 © Kanardia 2011 Nesis — User’s Manual 5 5. Browsig the Map Browsig the Map The navigation screen has a special menu command called Browse, which changes the navigation map mode into the browse mode. The browse mode allows you to do the following: Move the map to any position you want. Do the graphical route planning. Set the direct to waypoint to a point selected on the map. Activate newly planned route. 5.1 Moving the Map At the first use after Nesis start-up, the map is centered at the airplane position. Later on, the position of the previous browsing is preserved. During browsing, the map orientation is always North up. A small circle called cursor is used to move the map around and to refer to some specific points on the map, see figure 24 on page 30. The cursor is always located on a radial line, which starts at the map center. A point on the map is selected in two steps. In the first stept radial line is adjusted so that it covers the point. In the second step, the cursor is moved along the radial line over the point. Radial and cursor are working in a polar coordinate system. Using the radial and the cursor, the map is moved by repeating three simple steps. These steps may be repeated as long as it is necessary. 1. Use the knob to adjust the radial angle. The radial line rotates in large steps. Press OK when the line is close to the point where you want to move. OK switches to the fine radial selection step. 2. Now use the knob to do the fine radial selection. Press OK to switch to the cursor move step. 3. Use the knob to slide the cursor on the radial line. Slide the cursor to the point where you want to center the map and press OK. This centers the map and switches back to the large step radial selection. If you want to exit Browse mode, you have to press Cancel button. 5.2 Zooming the Map In order to change the zoom level of the map, press the Zoom button and turn the knob. Once correct zoom level is reached, press the Cursor button to switch back to the cursor-radial mode. Version 2.0 29 © Kanardia 2011 Nesis — User’s Manual 5.3 Waypoint Figure 24: Browsing the map. Radial directs to north-east and cursor is close to the MS2 GPS waypoint. At the bottom, browse specific menu is shown. 5.3 Waypoint The map can be moved to some known waypoint directly using the Waypoint button. This opens the waypoint dialog. Select a waypoint from the list and press the OK button. The map will be centered at selected waypoint automatically. 5.4 Route The Route buttons is mostly used to create a new route from a series of cursor positions or waypoint selections. The buttons opens a list of commands, which are briefly described below: Route|New starts a new route and clears any exiting route points which were entered so far. Route|Add. This command adds the cursor position as a new route waypoint. If there is a known navigation point close to the cursor position, this point is used. Otherwise, a temporary waypoint with cursor coordinates is used. Route|Save saves the route into Nesis flash drive. It does not activate the route, however. Route|Activate activates the route. It exits the browse mode and switches back to the flight mode with the newly created route being active. Note however, that the route was not saved automatically. Once the Nesis is turned off, restarted or a new route is activated, the route is lost. Thus, you should consider saving the route before activating it. Route|Edit activates classic route manipulation window. This window is described in section 6.1 on page 33. Version 2.0 30 © Kanardia 2011 Nesis — User’s Manual 5.5 Direct To Route|Del. Wpt. removes the last waypoint form the route. When route is empty, it does nothing. In order to create a route using a series of cursor positions, follow the next procedure: 1. Move the cursor to some point, where you want to start a route. 2. Select the Route|New command. This sets the cursor position as the first route point. At the same time, map is centered at the route starting point and the top bar on the map becomes visible. 3. Move the cursor to next route waypoint either by using radial-cursor approach or by selecting a waypoint from the dialog. 4. Press the Route|Add button to add the cursor to the route. Repeat the last two steps until the route is complete. 5. Finish the route by saving it to the Nesis flash drive. Press the Route|Save button. 6. If you want to activate the route, choose the Route|Activate command. This exits the browse mode, switches to the flight mode and activates the route immediately. 5.5 Direct To The Direct To button sets cursor as a new active waypoint. The command exits the browse mode and shows the normal flight mode map. Newly created waypoint becomes active in the direct to mode. 5.6 Home The Home button is used move the map back to the current aircraft position. Version 2.0 31 © Kanardia 2011 Nesis — User’s Manual 6 6. Settings Settings The settings screen allows choosing from several different icons. Figure 25 illustrates the screen. The settings icons are arranged into two groups. The first group consists of icons which are accessible to the user, while the second group consists of icons which are accessible to the service personel only. Figure 25: User settings options (left) and service settings options (right). The following options are available in the user group. Each option is described later in individual subsections: The Route Planning icon is used to create, delete and edit the routes. The Logbook icon is used to view the flight logs. The User Preferences icon is used to change some parameters, which define Nesis behaviour. The Units icon is used to change the instrument units. The Compass Calibration icon is used to calibrate compass by turning the airplane or to adjust the compass heading correction. The Date & time icon is used to set computer time with GPS and to set time zone. The Software Updates icon allows updating the software in Nesis and units connected to the CAN bus. The File transfer service icon is used to copy map updates, check list and translations. The Alarms icon is used to set individual alarms. The User Waypoints icon allows adding, editing and deleting user specific waypoints. The Service Mode icon is a gateway to the service specific settings. Version 2.0 32 © Kanardia 2011 Nesis — User’s Manual 6.1 Route Planner Some user options are not shown on secondary Nesis screen, some options require password entry before proceeding and some options are available only when correct hardware is detected. The factory default password is 314, first three most significant digits of number π. The password was introduced in order to prevent unwanted accidental alteratoins of important settings. Figure 26: Password is required in order to open certain options. Figure shows five digits, but three digits are enough. The Service Settings require special password, which is specific for each Nesis unit. The following options are available in the service mode. These options are executed rarely and require extra care. The System Preferences icon is used to set instrument screen configuration and flight parameters. The Level Adjust icon is used to adjust the installation specific roll, pitch and yaw correction angles of the AHRS unit (Airu). The Airplane Engine icon configures the engine related settings and sensors connected to the engine monitoring unit (Daqu). The Tank Calibration icon starts setup procedure for the fuel level measuring hardware and run procedures required for the fuel tank shape calibration. The Sensor Offset Correction alows zero adjustments of several sensors and engine time. The User Mode icon allows you to switch back to the user specific settings. 6.1 Route Planner The route planner is used to manipulate routes. The routes may be created, edited or deleted. Typically, routes are created on ground as a part of the flight planning process. Note, that you can also use the browse mode of the navigation screen to create the routes. See section 5.4 starting on page 30. Figure 27 shows the route planner dialog. It has three logical parts: The Cruising speed indicates your cruising speed. You can change it in the User preferences dialog. The Route list displays existing routes. Routes can be created, edited, deleted or reversed. The Waypoint list displays waypoints in the selected route. When the waypoint list is active, waypoints can be inserted, deleted and reversed. Version 2.0 33 © Kanardia 2011 Nesis — User’s Manual 6.1 Route Planner Figure 27: En example of the route planning screen. 6.1.1 Route List Commands The following commands are available with the route list control: The New command creates an empty route. A dialog shown on figure 28 appears and it asks for the route name. Keep the input empty and Nesis will generate a route name for you. The name will be a combination of the first and last waypoint on the route. Figure 28: Entering a name for the new route. The Edit command activates the waypoint list control where waypoints can be inserted or removed. The Delete command permanently removes selected route. The deletion must be confirmed. The Reverse command reverses the waypoints in the route. When a route is planned in one direction, reversing it gives a route in the opposite direction. The Close command closes the route planning. Changes are saved automatically. 6.1.2 Waypoint Editing Commands When the waypoint editing control is active, the following commands may be used: The Insert command inserts a new waypoint before the selection. The waypoint is obtained from a dialog, which was already described in section 4.3 on page 24. Version 2.0 34 © Kanardia 2011 Nesis — User’s Manual 6.2 Logbook The Delete command removes currently selected waypoint. The Rename command allows you to specify a new name for the route. An empty name results in a name which is composed of the first and the last route waypoint. The Reverse command reverses the waypoints in the route. When you plan a route into one direction, reversing it gives you a route in the opposite direction. The Save saves changes. 6.2 Logbook Logbook serves as a pilot log. It records flights and displays them in the list. An example of such record is given on figure 29. Figure 29: The logbook dialog displays list of most recent flights. Each log entry reveals several details of selected flight. The entries in the log have the following columns: Date when the flight was taken. Take off time. Landing time. When you fly traffic patterns, Nesis will try to merge the patterns into one record. In this case the take off time will be the time of the first take off and the landing time will be the time of the last landing. Flight time is the total flight time. Pilot of the airplane. This is why you have to select correct pilot at the start-up. Turn the knob button to change the selected flight. Changing the flight reveals further details about the flight: The engine on/off control tells when the engine was started and stopped for the selected flight. In the case of motorgliders, it displays first engine start and the last engine stop. Version 2.0 35 © Kanardia 2011 Nesis — User’s Manual 6.3 User Preferences The cycles/time control holds number of engine cycles during the flight. Typically, just one cycle is shown, however motorgliders (powered gliders) may have more. The time is the total engine time during the flight. The distance control gives information about the distance traveled during the flight. This is not a distance on a route or between two most distant points in the flight, but simply a distance like it would be measured in a car.17 The speed avg./max control shows the average and the maximal true airspeed on your flight. The total and specific fuel consumption is given in the fuel tot./spec control. Maximal altitude reached during the flight is also recorded. It is presented in the Alt max box. Nesis uses quite sophisticated algorithms to record true flights. It distinguishes between a flight time and a block on/block off time. Furthermore, if you have a motorglider, it correctly detects that engine was turned off and that you are in the gliding mode. Nesis considers that a flight has started when airspeed is larger than 12 m/s (43.2 km/h) and that a flight has finished when airspeed drops below 12 m/s. Engine is monitored in parallel. An engine start is detected when engine exceeds 500 RPM and engine stop is recorded when RPM drop below that limit. Special algorithms are used to prevent false flight or engine recordings due to false engine starts or wind bursts. Important: In order to provide all this information, Nesis needs to monitor engine RPM beyond the engine stop. The current flight will be closed about 10 seconds after the engine has been stopped. This means that engine must be stopped before Nesis is tuned off in order to close the log properly. Stopping the engine and turning Nesis off later is in a dispute with common behavior of most pilots. They usually turn off all the avionics and quit the engine last, to prevent unnecessary discharge of the battery. Nesis uses only 0.8 A at 12 V (about 10 W)18 and has almost no impact on battery when running for a few minutes. 6.3 User Preferences This dialog allows customizing user preferences. There are several logically grouped sections. An example is given in figure 30. Use the Close command to save the changes and close the dialog. In most cases, this restarts Nesis. 17 18 Mathematically speaking, if v(t) represents TAS and t represents time, then the distance D is calculated ∫ as D = T v(t)dt. One Nesis display with Daqu and Magu is assumed. Two Nesis displays with Daqu and Magu are consuming about 1.5 A at 12 V. Version 2.0 36 © Kanardia 2011 Nesis — User’s Manual 6.3 User Preferences Figure 30: The user settings dialog. 6.3.1 User The user section deals with pilot names, language,aircraft registration and cruising speed. Select the active pilot from the list of pilots. The pilot list also allows entering a new pilot, editing name of an existing pilot or deleting a pilot from the list using New, Edit and Delete commands, respectively. The language selection option affects the language of the Nesis user interface. It also affects the language of the voice messages. When translation is not available, English is used instead. Optionally, aircraft registration may be entered for your convenience. The Cruising speed control is used to enter typical ground speed during cross-country flights. This speed is used to calculate time estimates. Nesis remembers last used cruising speed. 6.3.2 Map Map option defines the way map is presented on the map screens. All map screens are affected: mini map on the classic screen, navigation screen and modern screen. Three options are available here: Heading up shows map oriented according to the true heading. This option is meaningful only if magnetic compass (Magu) is present on the CAN bus. Tracking up shows map aligned to the GPS tracking angle. Magnetic up shows map aligned to the magnetic heading. Note that compass unit (Magu) is required for this operation. In this Nesis software version, map colors can’t be changed and the Standard option is the only available. 6.3.3 System The system section allows setting LCD brightness and audio volume level. As you change the values, screen brightness and audio volume react accordingly. Version 2.0 37 © Kanardia 2011 Nesis — User’s Manual 6.4 6.4 Units Units Nesis uses several units for different physical quantities like distance, velocity, mass, volume, etc. They affect the instruments and texts. The table 1 on page 38 shows which units are available. The quantities are grouped according to their function and not to their physical meaning. Figure 31: En example of units selection dialog. Table 1: Available units for individual physical quantity. Physical quantity Altitude (length) Airspace altitude (length) Speed (velocity) QNH (pressure) Vario (vertical velocity) Wind speed (velocity) Distance (length) Pressure (used in engine) Temperature Mass Fuel (volume) Fuel flow (volume flow) 6.5 Units meter, feet feet only km/h, knots, mph hPa, inHg m/s, feet/min, m/min km/h, m/s, knots km, SM, NM bar, psi C, F kg, lbs l, gal l/h, gal/h Compass Calibration The Magu unit (magnetic compass) is carefully calibrated in our lab. However, like any magnetic device, Magu is affected by nearby ferrous materials as well as by local electromagnetic fields produced by other electronic devices. Earth magnetic field (which is what we want to detect) is combined with the unwanted magnetic fields produced by ferrous materials and electromagnetic devices. The calibration process can efficiently remove a large part of the error caused by the unwanted magnetic fields, but only if such fields are not too strong. Therefore, it is of ultimate Version 2.0 38 © Kanardia 2011 Nesis — User’s Manual 6.5 Compass Calibration importance to install Magu away from ferrous materials (like engine or steel rods) and away from electromagnetic devices (like speakers, radio transmitter, transponder, etc.) Since electromagnetic devices emit their magnetic field only when they are turned on, you must turn on all electric devices before you start the compass calibration and keep them activated for the time of calibration. You should also make your airplane as level as possible. The calibration is done in two steps. Both steps are briefly explained first. Later, more detailed step by step procedure is given. The first step requires turning the airplane for a little bit more than one full circle, about 400◦ . This step efficiently removes a large portion of the nonlinear error. However, some error, which is more or less constant in all directions, remains. This is called the offset error. In the second step, this remaining offset error is entered manually. In order to obtain the offset error, airplane shall be directed into two or three known reference headings19 . Write down the differences between the reference heading and Nesis heading shown on the HSI map. Average value of the differences, gives the final offset, which should be entered into Nesis. Note that the second step can be done much later (a few days or weeks) than the first step. Figure 32 shows compass calibration dialog. 6.5.1 First Step Here are the instructions needed to perform the first step of the calibration. Please, be sure that you will be able to turn the airplane for more than one full circle in a position, which is as close to the level flight as possible. Figure 32: Compass calibration dialog - first step is in the progress. 1. Open the Compass Calibration dialog and enter the password. 19 Be careful. When the reference headings are magnetic headings, Nesis HSI map must be set to Magnetic up and when the reference headings are true headings, Nesis HSI map must be set to Heading up. Version 2.0 39 © Kanardia 2011 Nesis — User’s Manual 6.6 Time & Date 2. Press the Record button and turn the airplane for more than one full circle. Try to keep constant angular rate when turning. The recording stops automatically, when thick green line makes full circle on the Nesis screen. 3. Observe the new calibration line. In most situations, this line should be within the red dotted line interval. The calibration line shows magnetic compass correction calculated at given heading. These corrections can reach up to +/- 20◦ and in rare cases even more. 4. If you are happy with the results, press the Save button to keep new calibration. Otherwise, press Reset button and go to step 2. 5. Press Close in order to complete the step one. This closes the calibration dialog. 6.5.2 Second Step Here we assume that the first step was completed successfully. Now, a constant offset error remains. You need to obtain this error by observing difference between known reference headings and by the headings shown on the HSI map. This error is more or less constant regardless to the direction. You can calculate the difference comparing true headings or by comparing magnetic headings, but do not mix them. You should never calculate difference between magnetic heading reference and true heading HSI map reading or vice versa. Write down this difference for a few different directions and calculate the average. Set this average into Nesis. 1. Open the Compass Calibration dialog and enter the password. 2. Press the Offset button and enter the offset. 3. Press OK to close the offset dialog. 4. Press Save to save new offset into magnetic compass. 5. Close the calibration dialog using Close. This completes the magnetic compass calibration. 6.6 Time & Date Nesis internal clock requires correct UTC20 time. When Nesis internal time does not match the UTC time, internal time is synchronized with the help of dialog shown on figure 33. Press the Use GPS button to synchronize Nesis time with the GPS time. Please note that this command works only when the airplane is not flying and engine is not running21 . The same dialog is used to set the time zone – used for local time. A time difference between local time and the UTC time must be set. Some countries (India and Iran, for example) do not round the time difference to whole hour, but to 30 minutes. Some areas in Australia even use 15 minutes local time intervals. 20 21 UTC – Coordinated Universal Time. Visit en.wikipedia.org/wiki/UTC_time for more details. The reason for this limitation has ground in the logbook recording. Logbook is started as soon as engine starts or flight is detected. Thus a time change corrupts logbook records. Version 2.0 40 © Kanardia 2011 Nesis — User’s Manual 6.7 Software Update Figure 33: Date and time setting. Turn the knob to select control and press the OK button to start editing. Turn the knob to set the hour/minute difference and press the OK button to accept new value or press the Cancel button to restore previous one. Finally, press the Close button to save the changes and close the dialog. Nesis restarts. 6.7 Software Update The Nesis software is under constant development and if you want to keep your Nesis up to date, you should update your Nesis regularly. This section describes actions required to update the software. The update is performed in several steps: downloading updates, extracting update files into an USB stick, transferring files from USB stick into Nesis, updating firmware. 6.7.1 Downloading Updates The software updates can be found in the update page of our web site http://www.kanardia. eu. Click on the update file and save it to a hard drive of your PC computer. 6.7.2 Extracting Update Files into USB Stick The update file is simply a zip file, which encapsulates several update packages22 . These packages must be extracted into the USB stick. More precisely, they must be extracted into the base (root) folder of the stick. Once files were copied, please make sure that the USB stick is safely removed from PC. 22 All update packages have deb extension. Version 2.0 41 © Kanardia 2011 Nesis — User’s Manual 6.7 Software Update Figure 34: Package files extracted into the root section of an USB stick. Windows Explorer (left), Linux KDE Dolphin (right). 6.7.3 Transferring Files into Nesis Insert the USB stick into the Nesis USB port and follow the steps below: 1. Select the Software Update icon and enter the required password. After the dialog is shown, a list of updates appears on the screen. An example is shown on the figure 35. Nesis automatically hides the packages, which shouldn’t be updated. This means that you usually see less packages than stored in the USB stick. 2. Press the Upgrade button and wait for Nesis to finish copying the files from the USB stick to internal flash drive. 3. When Nesis is finished, press the Close button. In most cases this restarts Nesis. Figure 35: An example of the update dialog where list of available updates is shown. If you have two or more Nesis screens on board, you need to update each one separately. The update dialog also shows the Advance command. This command is obsolete and will be removed in next versions. Version 2.0 42 © Kanardia 2011 Nesis — User’s Manual 6.7.4 6.8 File Transfer Service Firmware Update The procedure described so far has only transferred new firmware files from the USB stick into the Nesis flash drive. But, it has not transferred the files into individual remote units (AHRS, magnetic compass, engine monitoring unit, etc). In order to update firmware of remote units, follow the procedure given below. This procedure is available from the primary Nesis only. Secondary Nesis, when present, must be also turned on. Figure 36: Firmware update dialog. 1. Select the Software Updates icon and enter the required password. 2. Press the Firmware button. This opens a new dialog, shown on the figure 36. The units listed on your screen will be similar. 3. Use the knob to select the first unit with the Upgrade text shown in the Status column. 4. Press the Program button and confirm. 5. Wait until the progress bar completes. The progress bar may restart once or twice. 6. Wait 10 seconds more and then press the Rescan button to repopulate the units. Newly programmed unit should appear with status set to Keep. 7. Repeat steps 3-6 until all units have status Keep. Press the Close button when finished. The Downgr (downgrade) button is obsolete and it should not be used. This command will be removed in next versions. Otherwise, this command was used to force the system to install an older version of the software. 6.8 File Transfer Service This dialog is used to copy new files in Nesis. You can copy updates for maps, check lists and translations. Version 2.0 43 © Kanardia 2011 Nesis — User’s Manual 6.9 Alarms When USB key with updates is inserted new files are listed in the Files to copy window. Simply press the Copy button to proceed. First files are verified and then copied. After all files are copied, Nesis will restart. Note: When verification of any file fails no file will be copied into Nesis. Figure 37: File transfer service dialog. 6.9 Alarms This dialog is used to configure individual alarms. Each alarm can be set to one of the four options: Disable is used to disable alarm completely. This is useful in the case of a sensor failure. A faulty sensor keeps signaling false alarms and here you disable it until sensor is replaced. Text is used to display alarm without any sound. Sound + Text is used to display alarm and plays a beep sound. Voice + Text is used to display alarm and plays a voice describing the alarm. Alarm text output and human voice depend on the language settings. When selected language is not available, English is used. 6.10 User Waypoints Nesis allows storing user specific waypoints. These waypoints are entered during the flight, see section 4.3.5 on page 26 and can be edited using this dialog as well. Use New to enter new user waypoint in the system. Use Edit to modify selected user waypoint. Use Delete to remove the selected user waypoint. Use Close to exit. Version 2.0 44 © Kanardia 2011 Nesis — User’s Manual 6.11 System Preferences Figure 38: Alarms configuration dialog. Figure 39: An example of the user waypoints editing dialog. 6.11 System Preferences The system preferences are separated into two panels. The first one coveres the look of the Nesis screens, while the second deals with the aircraft gliding perfromance. Figure 40: An example of the system preferences dialog. 6.11.1 Nesis The Nesis section mostly deals with the look of the Nesis on the screen, which instrument layout shall be shown, type of the modern screen and availability of the demonstration mode. Normally, the instruments selection should never be changed, since Nesis comes with the selection tuned for your airplane. Please, do not change this unless we advise you to Version 2.0 45 © Kanardia 2011 Nesis — User’s Manual 6.12 Attitude Adjustment do so. Demo option is normally not selected. However, when set to Yes it allows Nesis to go into the demo mode. This also enables a demo icon on the user settings screen. Note, the demo mode requires specially prepared demo files on an USB key. Without such files, demo mode is not operational. 6.11.2 Glide The glide settings are only meaningful for airplanes. Helicopters and gyros do not benefit much from them23 . The glide parameters defined are the airplane glide ratio a.k.a. finesse and the altitude reserve. These settings are used in the Airfield dialog, where a list of nearest airfields is given. See section 4.2 on page 23. Please, set the finesse conservatively (smaller numbers are conservative), use one or two values less then given by aircraft producer. Also, set at least 200 meters for the altitude reserve. 6.12 Attitude Adjustment During the assembly of the Airu unit into the primary Nesis display box and during the installation of the Nesis display into the instrument panel, a small misalignment may appear. This means that internal axes of the Airu unit are not parallel to the airplane axes – the Airu unit is slightly rotated. Such misalignment can be perfectly adjusted without loss of precision using the procedure described next. Please note that you can’t adjust the attitude when the airplane is flying or engine is running. Before the automatic alignment is made, the yaw misalignment shall be determined. 6.12.1 Yaw Misalignment If the instrument panel is perfectly flat and perpendicular to the airplane x-axis (longitudinal axis) than there is no yaw misalignment and the correction angle is zero. This perfect situation is illustrated on figure 41 left. Some instrument panels or Nesis installations are skewed regarding the airplane x-axis (longitudinal axis). In this case you need to measure the misalignment angle Ψ and enter it into Nesis. Nesis accepts corrections up to 10◦ . Figure 41 defines positive and negative Ψ angle. Once Ψ is measured, enter it into the Yaw control, see the top of figure 42. Yaw correction affects the roll and pitch correction as well. Hence it is important to be set before roll and pitch corrections are made. 6.12.2 Roll and Pitch Adjustment Once yaw correction is known (in most cases it is zero), roll and pitch can be automatically corrected. Please make sure that airplane is level for both, roll and pitch. Make also sure that Nesis is turned on for at least five minutes – this warms up the internal electronics and stabilizes numerical filters. Once the airplane is level and Nesis is warm, press the Adjust button to start the automatic procedure. 23 Set finesse not more than 1 for gyrocopter or helicopter case. Version 2.0 46 © Kanardia 2011 Nesis — User’s Manual 6.13 Airplane & Engine Figure 41: Illustration of possible yaw misalignment of Nesis – top view; perfect position (left), positive yaw misalignment error (middle), negative yaw misalignment error (right). Wait for the progress bar to finish and observe the roll and pitch numerical values. At the end, they should be close to zero. Press the Save button to save the values. The Close button closes the dialog and restores previous correction. Figure 42: En example of attitude adjustment dialog. 6.13 Airplane & Engine This dialog sets the engine type and configures sensor parameters for the engine monitoring unit (Daqu). 6.13.1 Engine Type The top control is used to specify the engine type. Currently, this affects the fuel flow calculation only. The Nesis system does not need a fuel flow sensor and still provides pretty accurate fuel consumption. The fuel consumption is calculated using specially prepared Version 2.0 47 © Kanardia 2011 Nesis — User’s Manual 6.13 Airplane & Engine Figure 43: Engine monitoring unit channel configuration dialog. mathematical models that are based on the engine type, engine RPM and manifold pressure. The precision of our mathematical model is in the same range as precision of the fuel flow sensors. 6.13.2 Daqu Parameter Table Daqu is able to read many different sensors and these sensors can be connected to different Daqu ports. Using the table we tell Daqu, which sensor is connected to which port and what is the role of the sensor. Additionally, some other configuration parameters can be also set. Each row in the table corresponds to one Daqu channel. Channels are labeled as combination of one capital letter and a number. Letters define the channel type, while the numbers enumerate channels of each type. Four channel types are used in Daqu: A: Designates analog channels which are typically used to connects resistive sensors. Typical resistive sensors are thermocouple temperature probes, various VDO pressure sensors, VDO temperature sensors, many fuel level sensors, etc. B: Designates analog channels used to read active sensors. Active sensors require power in order to operate properly. Hence, Daqu provides 5V source and GND (ground) connection near B channel ports. C: Is an analog channel used to read higher voltage levels. Only one such channel is available. This channel is typically used to read the system voltage. Z: Are digital channels that are measuring time between pulses. They are used to connect engine RPM signals, fuel flow, current transducers and rotor RPMs. Please, refer to the Installation Manual to get more details about sensor connections. After the sensors are connected, each sensor needs to be configured here. They are configured by repeating the following steps: Version 2.0 48 © Kanardia 2011 Nesis — User’s Manual 6.14 Tank Calibration 1. Use the knob to select a channel and press OK to open the channel configuration dialog. See figure 44. (a) Specify the sensor function (what is sensor used for), sensor type (which sensor is used), is sensor isolated (thermocouples only, otherwise ignored), report time interval (not used in this version), filter time constant (small values – sensor responds quickly, larger values – sensor responds slowly, shows average). (b) Digital sensors require number of pulses per event. For example, Rotax engine require 1 pulse per engine revolution and some fuel flow sensors require up to 8000 pulses per liter. (c) Fuel flow sensors require a fuel flow correction factor. A value larger than one, increases the fuel consumption indication, while a value smaller than one decreases fuel consumption indication. (d) Press Save to accept new parameters. This closes the dialog and returns to the step one. (e) Press Reset to reset the channel (use this on unused channels). (f) Press Close to close the channel editing without accepting new parameters. 2. Once all channels are set, you must press Save in order to transfer the new configuration to Daqu. This also makes new configuration active. 3. Press Close to exit the dialog. This does not save the new configuration. Figure 44: En example of digital channel configuration dialog. Since digital fuel flow senor is selected, the Pulses and Correction options are also available. 6.14 Tank Calibration Before tank calibration can be performed, fuel level sensors must configured. Sensor configuration was described in section 6.13 starting on page 47. The tank calibration icon displays a list of three options: Setup tanks combines sensors, hardware units and tank names. This must be done first. After this other two options become available. Calibrate sensors (min/max) is used to calibrate a tank, which shape is already known. Here, only empty tank and full tank limits are required. Version 2.0 49 © Kanardia 2011 Nesis — User’s Manual 6.14 Tank Calibration Edit tank shapes makes a complete tank shape calibration taking several measurements. After measurements are complete, min/max calibration is done automatically. 6.14.1 Setup Tanks After fuel level sensors are connected to some unit (Daqu in this case, but other units are planned in the future), the unit must be linked with tank names. This is done in the dialog shown on figure 45. Figure 45: Tank setup dialog. In the dialog the tank C has User defined shaped. The tank is connected to the device with serial number 1145 (Daqu in this case). Give tank a name. Use very short names - just one letter when possible. Choose the tank shape. Select your tank aircraft and tank model when available or specify the User shape. When non-user shape is selected, proceed to the min/max calibration. For the User shape, you must proceed with the Edit tank shape option. 6.14.2 Calibrate Sensors (Min/Max) This option can be used only, when the tank shape is already known. This is true for all non-user shapes. For user specified shapes, the option is available only, if the tank shape was already determined before. Figure 46: Defining the sensor limits on a known tank shape. Observe the sensor value. This value must be alive and must change as the tank becomes full or empty. At the end, the sensors values next to the empty and full labels should be significantly different. The actual values depend on the sensor type. It may happen that the sensor value for the empty tank is larger than the sensor value for the full tank. This is not an error and it simply indicates that sensor is working in the opposite direction. Follow the steps below: 1. Empty the fuel tank completely. Once the tank is empty, press the Empty button. 2. Now, fill up the tank completely and press the Full button. Version 2.0 50 © Kanardia 2011 Nesis — User’s Manual 6.14 Tank Calibration 3. Finally, press the Save button to save the results into the corresponding unit where the sensors are attached to. The Close button closes the dialog without saving changes. 6.14.3 Edit Tank Shapes This option can be used for the User tank shape only. Here we record a curve that connects sensor values with actual fuel quantity stored in tank. Please note that most fuel level sensors are not able to detect a completely empty tank – they stop indicating before the tank is truly empty. The same is true for the full tank. Sensors stop indicating before the tank is completely full. Figure 47: Tank shape editor dialog. The table always shows fuel in liters, even when gallons were used on input. In order to calibrate sensor against tank shape, please follow these steps. 1. Make sure tank is completely empty. Add the inaccessible amount of fuel into the tank. You may also consider to add a few extra liters, for safety. This defines the zero fuel level. 2. Press the Add button and select the zero fuel from the dialog. This adds a line into the dialog, which combines zero fuel level with the sensor reading. 3. Add a known quantity of fuel into the tank and observe the Sensor value label. This value MUST change – must be different from the last recorded value. If the value does not change or the difference is too small, add more fuel into the tank. 4. Press the Add button and tell how much fuel above the zero fuel level has been entered so far. Press OK to add a line, a new fuel level – sensor value pair. 5. Repeat this process until the sensor reaches the full limit or tank is full (whatever comes first). Do not press the Add button, if the sensor value is not different from the previous value. Remember that most sensors stop indicating before the tank is completely full. 6. Press the Save button to send the measurements into unit. Version 2.0 51 © Kanardia 2011 Nesis — User’s Manual 6.15 Sensor Offset Correction Press the Close button to exit the dialog without saving. The procedure above determines the tank shape and calibrates the sensor at the same time. Therefore, min/max sensor calibration is not necessary. 6.15 Sensor Offset Correction The Sensor Offset Correction dialog allows various system adjustments, listed below: Engine time - new engine time can be set, say after an engine replacement. Manifold pressure - should show the atmospheric pressure when the engine is off. Altitude correction - altitude sensor may slightly shift its origin when the instrument has been exposed to very low or very high temperatures. Adjust the offset in order to get correct barometric pressure. Airspeed correction - just like the altitude sensor, airspeed sensors may also suffer from temperature histeresis. Adjust it so that it will show 0 pressure. Do not do this on open when wind is blowing. Altenator current offset. Geoniss zero reference offset. Fuel flow factor offset. Normally, the factor should be around one. However, if you consistently find the fuel flow too small or too large, you can adjust the indication using this factor. For example, setting the factor to 0.90 will show 10% less, while 1.20 will indicate 20% more than before. Figure 48: Sensor Offset Correction dialog. Version 2.0 52 © Kanardia 2011 Nesis — User’s Manual 7 7. Instruments Instruments 7.1 Airspeed Indicator The airspeed indicator is used to display indicated and true airspeed. Indicated airspeed (IAS) is obtained form differential pressure sensor. The measured differential pressure (the difference between the total pressure and the static pressure) is converted into velocity assuming ISA24 conditions. When outside temperature is known, Nesis calculates true airspeed (TAS) as well. Although only two values are shown on the indicator, the scale has several markings as you can see on figure 49. Figure 49: Airspeed indicator optimized for an airplane using two step landing flaps. The markings on the figure has the following meanings: IAS (indicated airspeed) is presented by a needle, which starts at center and ends at scale markings. TAS (true airspeed) is shown as a number inside the window. The white range is the normal range of operating speeds for the aircraft with the flaps extended as for landing or takeoff. Depending on the aircraft, the white range may have additional upper speed limits, which are based on flap extension step. See also VFE1 and VFE2 . White range in a helicopter or gyrocopter indicates the best speed for the autorotation. The green range is the normal range of operating speeds for the aircraft without flaps extended. The lower limit of the green range is also referred to as VS – stall speed or minimum steady flight speed for which the aircraft is still controllable. The upper limit is also referred to as VNO – maximum structural cruising speed. The yellow range is the range in which the aircraft may be operated in smooth air, and then only with caution to avoid abrupt control movement. The redline mark indicates the VNE (velocity never exceeded), the maximum demonstrated safe airspeed that the aircraft must not exceed under any circumstances. 24 ISA – International Standard Atmosphere. Version 2.0 53 © Kanardia 2011 Nesis — User’s Manual 7.2 Attitude Indicator The yellow dot marks the VRef – landing reference speed, which is the recommended speed used on landings. The blue line represents the Vy speed, which will allow for the best rate of climb. The orange dots, one dot for VFE1 and two for VFE2 , are used to mark the upper limits for extended flaps. The full flap extension limit is represented by VFE2 . The lower and upper scale limits are not important from the pilot’s point of view but are presented here, because they can also be configured. Different type of airplanes operate in different range and the upper and lower scale limits can be modified to adjust for the optimal scale range. Units used for the indicated and true airspeed. 7.2 Attitude Indicator The attitude indicator also known as artificial horizon is used to inform the pilot of the orientation of the aircraft relative to earth. It indicates pitch and roll.25 Figure 50: Attitude indicator combined with the slip–skid indicator. Figure 50 illustrates the attitude indicator combined with the inclinometer (ball) as it is found in Nesis. The following markings are found on the indicator: The roll scale is used to give a rough estimate about the roll value. The roll arrow in the form of yellow triangle is used to mark current roll value on the scale. The white triangle on the scale identifies zero roll situation. The pitch scale gives a rough estimate about current pitch angle. The scale should be read at the middle point of the yellow wing reference line. The yellow wing reference line is fixed and represents the horizontal reference line of the aircraft. At the center, the line is broken at 45 degree angle giving two short lines. These lines help indicating 45 degree roll. The white horizontal line separates the artificial sky from ground – this is the artificial horizon line. 25 Roll is also known as bank. The term bank is often found in literature but we prefer the term roll. Version 2.0 54 © Kanardia 2011 Nesis — User’s Manual 7.3 Altitude Indicator The slip-skid indicator, also known as the ball or inclinometer, indicates the coordination of aileron and rudder. Remember: Nesis can be used in VFR26 conditions only. Hence attitude indicator should be treated as an insignificant help to the pilot and nothing more. 7.3 Altitude Indicator An altitude indicator, also known as altimeter, is used to measure the atmospheric pressure from a static port outside the aircraft. This measurement is then converted into an altitude above mean sea level, in accordance with a mathematical model defined by the ISA. The altitude is always calculated according to some reference pressure (QNH value – baro-correction). This pressure must be set by a pilot and can be changed during flight. The QNH value is typically obtained from air traffic control. Please, refer to section 4.1 on page 22 for more details about how to set the QNH reference pressure. Figure 51: The altitude indicator with the scale given in meters. The indicator shown on figure 51 is used to display calculated altitude and reference QNH pressure (baro-correction). The altitude is shown by two needles, where the short needle points to 1000 feet (or meters) and the long needle points to 100 feet (meters).27 The pressure based altimeter is more precise then the GPS obtained altitude. The absolute pressure sensor used in Nesis has absolute error of less than one hectopascal, which is about 8 m at the sea-level. This precision is maintained over wide temperature range. 7.4 Vertical Speed Indicator and Accelerometer A vertical speed indicator (VSI), also known as a variometer, a rate-of-climb indicator, or a vertical velocity indicator (VVI), is an instrument in an aircraft used to inform a pilot of the instantaneous rate of descent or climb. In powered flight the pilot makes frequent use of the VSI to maintain level flight, especially during turning manoeuvres. Figure 52 shows VSI used in Nesis. 26 27 VFR – visual flight rules. These rules are a set of aviation regulations under which a pilot may operate an aircraft in weather conditions sufficient to allow the pilot, by visual reference to the environment outside the cockpit, to control the airplane attitude, navigate, and maintain safe separation from obstacles such as terrain, buildings, and other aircraft. The feet version of altimeter can be configured to show the third – 10000 feet – needle as well. Version 2.0 55 © Kanardia 2011 Nesis — User’s Manual 7.5 Tachometer and Manifold Pressure Indicator Figure 52: The metric version of variometer used in Nesis. It can be shown in feet per minute, metres per second or meters per minute, depending on choice of units. See section 6.3 on page 36 for more details. The indicator shows acceleration as well. The acceleration is shown in a numeric form in term of Gs. 7.5 Tachometer and Manifold Pressure Indicator A tachometer is an instrument that measures the rotation speed of a motor shaft. It displays the revolutions per minute (RPM), hence its alternative name RPM indicator. A manifold pressure is an effect of choked flow through a throttle in the intake manifold of an engine. It is a measure of the amount of restriction of airflow through the engine, and hence of the unused power capacity in the engine. Both indicators are related to the power settings. Therefore, we combined them into one single indicator, see figure 53. This allows the pilot to optimally set the throttle and the propeller pitch. Figure 53: The combination of RPM and manifold pressure indicator. The tachometer scale is fully configurable. Note that some engines do not specify green and yellow range. Hence, such range is optional. The optional green range defines the recommended range of RPM. Version 2.0 56 © Kanardia 2011 Nesis — User’s Manual 7.6 Gyrocopter Rotor and Engine RPM Indicator The optional yellow range defines the range of RPM, which should not be used for longer period and should be generally avoided. The red mark limits the engine RPM. The upper scale range can be set to any value. The manifold pressure scale is always given in inHg (inches of mercury) units. Although this unit is far from SI system of units, it is very common in aviation. During research, we were not able to find an aviation manifold pressure indicator with any other unit. Therefore, inHG is the only unit option for the manifold pressure in Nesis. 7.6 Gyrocopter Rotor and Engine RPM Indicator Gyropocters require indication of rotor RPM. In this example (figure 54) rotor RPM and engine RPM indicators are combined in one instrument. At the bottom a window with a numerical RPM values is also shown. However, this is not a limitation. The window can show manifold pressure instead. Figure 54: The combination of rotor RPM and engine RPM. Both scales are fully configurable. The optional green range defines the recommended range of RPM. The optional yellow range defines the range of RPM, which should not be used for longer period and should be generally avoided. The red arc limits the RPMs. 7.7 Helicopter Rotor and Engine RPM Indicator Piston engine powered helicopters have engines directly connected to the rotor (using some transmission, of course). So rotor RPM are directly related to engine RPM. The instrument on figure 55 gives rotor and engine RPM expressed in percentages. The scales are set in such a way that needles under normal operation have the same indication. Any misalignment of needles can be easily spotted giving a clear indication that something is wrong with the transmission. Version 2.0 57 © Kanardia 2011 Nesis — User’s Manual 7.8 Heading Indicator with Moving Map Figure 55: The combination of rotor RPM and engine RPM. Both scales are in percentages. Like in the gyrocopter case, the bottom window can be configured to show the manifold pressure. Both scales are fully configurable. The optional green range defines the recommended range of RPM. The optional yellow range defines the range of RPM, which should not be used for longer period and should be generally avoided. The red lines limit the RPMs. 7.8 Heading Indicator with Moving Map Nesis introduces a combination of heading indicator and moving map. Traditionally, a heading indicator28 informs a pilot about the airplane heading. However, in Nesis a pilot can choose between true29 heading, tracking and magnetic heading. This selection was described in section 6.3 on page 36. The scale and the map is rotated in the direction of the airplane nose. The tracking option is based on the movement of the airplane. In this case the scale and map are orientated in the direction of the airplane ground track. The tracking information is based on the GPS tracking. The magnetic heading option displays the map in the magnetic direction detected by magnetic compass. Figure 56 shows that the indicator is equipped with a lot of useful information: The direction box shows numeric information of current true heading.30 28 29 30 Heading indicator is also known as directional gyro. The Magu unit has a built-in world magnetic model, which provides magnetic worldwide declination and inclination information. Hence the magnetic heading is automatically corrected into true heading. Note however, that the precision of the model is limited to general magnetic field behavior. The model does not include large local anomalies and unpredictable events like magnetic storms. We will use the term heading to describe the instrument. However, if tracking option is active it should read tracking instead. Version 2.0 58 © Kanardia 2011 Nesis — User’s Manual 7.9 Mini Engine Monitor Figure 56: Small heading indicator combined with a moving map. A heading scale arc illustrates directions about 45◦ left and right of current heading. Current position is marked with the airplane symbol. This symbol is always shown on the same place and the map is moving beneath. Because we are more interested what is in front, the symbol is positioned at the bottom. The moving map can be viewed at different zoom levels. In order to give a visual feedback for the distance, the zoom scale is shown on the left side of the map. Nesis calculates two prediction points and shows them on the map. These points shows the future position assuming current heading, airspeed and wind situation. The prediction times depend on the zoom level. Large zoom levels have larger prediction times and vice versa. The wind arrow is used to inform pilot about the wind direction. When the windspeed is less than 2.0 m/s, the arrow is omited. The top bar displays numeric information about the bearing and distance to the selected waypoint and current ground speed. The bottom bar displays the wind information (wind speed and wind direction) and name of currently selected waypoint. 7.9 Mini Engine Monitor The mini engine monitor window shows the most relevant engine information in one place in the form of color bars, see figure 57. Each bar corresponds to one engine parameter. Green, yellow and red colors represent normal, caution and dangerous range, respectively. The monitor bars are grouped into temperatures, pressures and RPMs. The temperature group includes EGT, CHT, oil, water (coolant) and carburetor temperatures. The pressure group usually includes oil and fuel pressure. Since Nesis can be put into different configurations, the parameters shown in the monitor may vary. Version 2.0 59 © Kanardia 2011 Nesis — User’s Manual 7.10 Fuel Computer Monitor Figure 57: Illustration of the mini engine monitor. 7.10 Fuel Computer Monitor The fuel computer monitor provides the fuel related information like fuel quantity, economy, range and endurance. Figure 58 shows an example of such information. Figure 58: Fuel computer displays fuel economy, fuel level, endurance and range. The fuel computer monitor provides the following information: The current fuel consumption displays momentary fuel burning rate. It is given in l/h (liter per hour) or gal/h (gallons per hour) units. The average fuel consumption displays the fuel used in the last few minutes. This is a moving average value and is also used to predict the endurance and range. The result is given in l/h or in gal/h units. The range is a derived value, which is based on the available fuel quantity, average fuel consumption, current ground speed and the fuel needed for 45 minutes reserve. The available fuel level is reduced by the 45 minutes fuel reserve amount. This means that theoretical range is longer than the range displayed on the monitor. The endurance is also a derived value based on the available fuel quantity and average fuel consumption. It represents the engine time left assuming average fuel consumption. Note that all values strongly depend on current throttle setting. A change on throttle setting results in a change of current and average fuel consumption, endurance and range. Important: When no fuel level probes are connected to Daqu, Daqu and Nesis provide a software version of the tank where Nesis calculates the available fuel based on the information that is entered before the flight or updated during the flight. The fuel level is reduced by subtracting the fuel flow integrated in time. Both, the initial information and the fuel flow integration, may be source of significant error, which can quickly lead to wrong fuel level indication. An indication higher than actual represents a dangerous situation, where the fuel computer displays more fuel than it actually is. This gives wrong and unsafe information to the pilot. An indication lower than actual is not so dangerous. Therefore, a pilot must Version 2.0 60 © Kanardia 2011 Nesis — User’s Manual 7.10 Fuel Computer Monitor frequently compare the fuel level indicated by the fuel computer with the independent external fuel gauges and indicators and update the Nesis fuel level. The fuel level update procedure is described in section 14.5 on page 28. Version 2.0 61 © Kanardia 2011