1
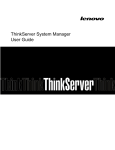
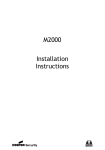
Next copy the firmware image file to the MC.
Open the System tab page from the menu, for the MeshPoint Firmware Upgrade setting, click
the Choose File button to browse your computer hard drive locate and select the firmware file.
Then click the Upload button to start copy the file to the MC.
In about an hour, the MPs will download the firmware image file from the MC and do the firmware
upgrade.
Fig 4.2j –Upload MP firmware file in MeshController
iii) User Access Conditions selection
Fig 4.2k –Selecting Open option in User Access Condition
Administrator can choose a holistic control method to manage user access on the network.
There are 4 options: Open, User Agreement, Hotspot and Internet Access Controller
Select by clicking on the respective option radio button to activate it.
For configuration example, leave it as Open, the default setting.
If you plan to enable the download and upload speed control for all users, click on Enable DL/UL
Limit box and add a tick. A tick in the box indicates function is enabled. Then enter the maximum
speed allowed, in kilobits/sec, in the respective download and upload box.
For instructions on setup of other options, please refer Appendix 1 section in this document.
iv) Select the MPs boot recovery action when the controller connection is lost.
By default the MPs check-in to the controller every 5 minutes in normal operation. If an MP has lost
the connection with the controller it automatically reboots to recover. The recovery process may
create a network connection disruption. The lost connection may just a temporary Internet
connection lost. To skip the reboot action, tick on the No Reboot if no Controller box.
Default is not tick.
Configuration on the Network Settings tab page is now completed.
Click the Save Settings button to save and activate the configuration.
It will take about 5-10min for all MPs to reboot and reconfigured the wireless mesh network.
During the reboot, the MPs become inactive and the Mesh Management tab page will display the status
of the MPs with this icon,
indicated with the icon,
. After the MPs are up again their icon status will change; mesh nodes are
and gateways indicated with the icon,
. This indicates the network is ready.
On completing these 2 steps, your mesh network is now configured and activated.
Keeping accurate date and time
If you are using the MC to manage the network, it is important for the MPs and the MC to keep accurate
date and time. To setup the NTP server on the MC please refer to the System Tools chapter on M1.2 Setting the NTP server on MeshController.
Compex Mesh@worK User’s Manual rev 1.11 (Copyright)
20