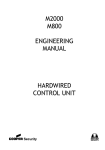
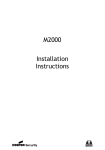
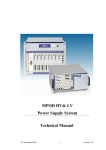
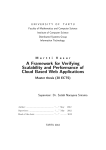
1
Fig M1.6.2d –Status after all MPs have checked-in
Step 5
Now click the Change Mesh ID button and enter a new Mesh ID.
You can create your own Mesh ID but it must be of the format, XX:XX:XX:XX:XX:XX where X is a hex
number (0 -9 and a-f).
Assuming the current Mesh ID is 77:ca:ff:ee:ba:be and you want to change to the new Mesh ID,
78:ca:ff:ee:ba:be, then enter this new Mesh ID.
nd
After an MP have updated to the new Mesh ID, the 2 status indicator will turn orange color. See Fig
M1.6.2e below. It will remains in orange color when all MPs have not updated the new Mesh ID.
Fig M1.6.2e –Status when all MPs have not updated the Mesh ID
nd
In about 10 minutes, once all the MPs have updated the new Mesh ID, the 2 status indicator will
st
nd
changed from orange to green color. Now both 1 and 2 status indicators will display green color and
the new Mesh ID is displayed in the Mesh ID column in the table.
See Fig 1.6.2f below.
This indicates all the MPs have successfully updated the new Mesh ID.
FigM1.6.2f –Status after all MPs have updated the Mesh ID
Step 6
Install the MPs back in the R&D department. MPs with the new Mesh ID will form a separate and
isolated wireless mesh network. While the Sales department will form another wireless mesh network
next door. Thus, two virtual wireless mesh networks are created.
Process is now completed.
Compex Mesh@worK User’s Manual rev 1.11 (Copyright)
58