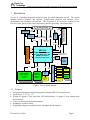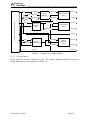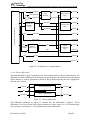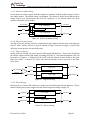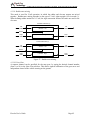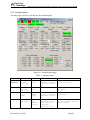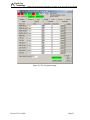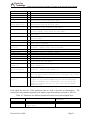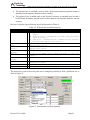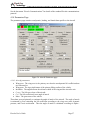
1
Piccolo System User's Guide
8 Fourth Street
PO Box 1500
Hood River, OR 97031
(541) 387-2120 phone
(541) 387-2030 fax
[email protected]
Bill Vaglienti
Ross Hoag
Marius Niculescu
April 18, 2005
Version 1.3.0
Cloud Cap
Technology
PO Box 1500, No. 8 Fourth St, Hood River, OR 97031, ph 541 387 2120, fax 541 387 2030
Table of Contents
1
2
3
4
Introduction............................................................................................................................. 6
1.1
Features ........................................................................................................................... 6
1.2
CPU................................................................................................................................. 7
1.3
Sensors ............................................................................................................................ 7
1.4
Servos.............................................................................................................................. 7
1.5
Datalink........................................................................................................................... 7
1.6
Payload interface............................................................................................................. 8
1.7
Piccolo Plus..................................................................................................................... 8
1.8
Piccolo II......................................................................................................................... 8
Avionics .................................................................................................................................. 8
2.1
Front panel connections .................................................................................................. 9
2.2
Power options................................................................................................................ 11
2.3
Servo options ................................................................................................................ 11
2.4
Installation location and orientation.............................................................................. 11
2.5
Air data system ............................................................................................................. 12
2.6
GPS antenna.................................................................................................................. 12
2.7
Communications antenna.............................................................................................. 12
Ground Station ...................................................................................................................... 12
3.1
Power ............................................................................................................................ 12
3.2
Connections................................................................................................................... 13
3.3
Pilot in the loop............................................................................................................. 13
Operator Interface ................................................................................................................. 14
4.1
Installation and running ................................................................................................ 14
4.2
Running......................................................................................................................... 14
4.3
Ground station screen ................................................................................................... 15
4.3.1
File Menu .............................................................................................................. 15
4.3.2
Window Menu ...................................................................................................... 15
4.3.3
Units Menu............................................................................................................ 15
4.3.4
GPS ....................................................................................................................... 16
4.3.5
Network Control ................................................................................................... 16
4.3.6
Diagnostic ............................................................................................................. 16
4.3.7
MHX radio settings............................................................................................... 17
Piccolo User’s Guide
Page 2
Cloud Cap
Technology
4.3.8
PO Box 1500, No. 8 Fourth St, Hood River, OR 97031, ph 541 387 2120, fax 541 387 2030
System version ...................................................................................................... 17
4.4
Avionics Window ......................................................................................................... 17
4.5
Telemetry page.............................................................................................................. 18
4.5.1
GPS data................................................................................................................ 18
4.5.2
Air data.................................................................................................................. 19
4.5.3
Attitude ................................................................................................................. 19
4.5.4
System................................................................................................................... 20
4.5.5
Winds .................................................................................................................... 20
4.5.6
Nav Filter Health................................................................................................... 20
4.5.7
Gyro and Accelerometers ..................................................................................... 21
4.5.8
RPM ...................................................................................................................... 21
4.5.9
Request Fast/Slow................................................................................................. 21
4.5.10
UHF radio settings ................................................................................................ 21
4.5.11
Sonic altimeter ...................................................................................................... 21
4.5.12
Compass................................................................................................................ 21
4.6
AP commands ............................................................................................................... 21
4.6.1
Current autopilot status ......................................................................................... 22
4.6.2
Changing autopilot commands ............................................................................. 22
4.6.3
Autopilot Mode..................................................................................................... 23
4.6.4
Stick Mode ............................................................................................................ 24
4.6.5
Engine ................................................................................................................... 24
4.6.6
Actions .................................................................................................................. 24
4.6.7
Track data.............................................................................................................. 25
4.7
Map ............................................................................................................................... 25
4.7.1
All about flight plans ............................................................................................ 26
4.7.2
Making new flight plans ....................................................................................... 27
4.7.3
Sending flight plans .............................................................................................. 28
4.7.4
Editing flightplans................................................................................................. 28
4.7.5
Dragging waypoints .............................................................................................. 28
4.7.6
Making landing flight plans .................................................................................. 28
4.7.7
Geo-referencing your own map file...................................................................... 31
4.8
4.8.1
Preflight......................................................................................................................... 32
Altimeter setting.................................................................................................... 32
Piccolo User’s Guide
Page 3
Cloud Cap
Technology
PO Box 1500, No. 8 Fourth St, Hood River, OR 97031, ph 541 387 2120, fax 541 387 2030
4.8.2
Zero Air Data ........................................................................................................ 33
4.8.3
Control surface tests.............................................................................................. 33
4.8.4
Validate ................................................................................................................. 33
4.9
Autopilot limits ............................................................................................................. 33
4.9.1
Command limits.................................................................................................... 33
4.9.2
Output limits ......................................................................................................... 33
4.9.3
Mission limits........................................................................................................ 34
4.10
Sensors .......................................................................................................................... 35
4.10.1
Zeroing sensors ..................................................................................................... 35
4.10.2
Gyro bias estimate................................................................................................. 36
4.10.3
Gyros in the original Piccolo ................................................................................ 36
4.10.4
Gyros in Piccolo Plus and Piccolo II .................................................................... 36
4.10.5
Installation orientation .......................................................................................... 37
4.11
Surfaces......................................................................................................................... 37
4.11.1
Actuator calibrations............................................................................................. 37
4.11.2
5 channel mode ..................................................................................................... 38
4.11.3
10 channel mode ................................................................................................... 39
4.11.4
Aileron differential................................................................................................ 40
4.11.5
Aileron to rudder mixing ...................................................................................... 41
4.11.6
Flap to elevator mixing ......................................................................................... 41
4.11.7
Flaperon mixing .................................................................................................... 41
4.11.8
Elevon mixing....................................................................................................... 41
4.11.9
Ruddervator mixing .............................................................................................. 42
4.11.10
4.12
Nose Gear.......................................................................................................... 42
Autopilot gains.............................................................................................................. 43
4.12.1
Dynamic pressure to elevator................................................................................ 44
4.12.2
Yaw rate to aileron................................................................................................ 44
4.12.3
Altitude to elevator ............................................................................................... 44
4.12.4
GPS to turn rate..................................................................................................... 45
4.12.5
Roll to aileron ....................................................................................................... 45
4.12.6
Pitch to elevator .................................................................................................... 45
4.12.7
Yaw rate to rudder ................................................................................................ 45
4.12.8
Altitude to elevator ............................................................................................... 45
Piccolo User’s Guide
Page 4
Cloud Cap
Technology
4.12.9
Turn compensation................................................................................................ 45
4.12.10
Surface display.................................................................................................. 46
4.12.11
Initial Trime ...................................................................................................... 46
4.13
Payload pages................................................................................................................ 46
4.13.1
Digital I/O Lines ................................................................................................... 49
4.13.2
Analog Input Lines ............................................................................................... 54
4.13.3
Serial Ports ............................................................................................................ 55
4.14
5
PO Box 1500, No. 8 Fourth St, Hood River, OR 97031, ph 541 387 2120, fax 541 387 2030
Parameters Page ............................................................................................................ 57
4.14.1
Aircraft parameters ............................................................................................... 57
4.14.2
Landing parameters............................................................................................... 58
4.14.3
Launch parameters ................................................................................................ 58
4.14.4
Global parameter management ............................................................................. 58
Development environment.................................................................................................... 59
5.1
Software environment................................................................................................... 59
5.2
Design environment ...................................................................................................... 59
5.3
Hardware in loop simulation......................................................................................... 59
5.4
Software in loop simulation .......................................................................................... 60
Piccolo User’s Guide
Page 5
Cloud Cap
Technology
PO Box 1500, No. 8 Fourth St, Hood River, OR 97031, ph 541 387 2120, fax 541 387 2030
1 Introduction
44 pin filtered sub D
(5.5-20) Vin
Input
Protection
CAN A
CAN B
Deadman
switch
CAN
Transceivers
Servo
Power
5V out
7 User defined TPUs
Servo, Serial, I/O, Timing
2 RS232
I/O ports
5 PWM Outputs
Servos 1-5
Refresh
Dual CAN
Interface
Optional Daughter Board
Interface Connectors
Piccolo is a complete integrated avionics system for small unmanned aircraft. The system
includes avionics hardware and software, ground-station hardware and software, and a
development and simulation environment. This document is the end-user’s manual for the
Piccolo system, and provides a basic description, interface guidelines, and system setup.
SPI
TPUs
x5
3.3V
3VA
5VA
MPC555
40MHz Embedded Power
PC with 448K Flash, 26K
SRAM and a host of
integrated peripherals
Monitor
Serial
BDM
Port
Interface Bus
Serial/PPS
SPI
10 Bit
Inputs
MHX-910/2400
Datalink Radio
Daughter
Board
10bit AtoD Inputs x8
External Trigs x2
Motorola
M12 GPS
Daughter
Board
16 Bit
AtoD
115KPa
Barometric
Altimeter
Amplifiers and 2nd order
LPFs
Power Supplies
5V
Up to 2
Mbytes
Burst
SRAM
Temp
Gyro X
Dual Axis
Accel
Gyro Y
Gyro Z
Dual Axis
Accel
Daughter
Board
Plugin
4KPa
Airspeed
Sensor
Figure 1. Piccolo block diagram
1.1 Features
•
•
•
•
•
•
Exceptional integration and processing power from the MPC555 main processor.
Small size: 4.8” x 2.4” x 1.5”
Weight 212 grams (7.5oz) with radio, GPS and enclosure. 90 grams (3.1oz) without radio
and enclosure.
3-axis rate and acceleration measurements.
Deadman’s switch for safety.
Expandable using the external interface or daughter board connector.
Piccolo User’s Guide
Page 6
Cloud Cap
Technology
•
•
•
•
•
PO Box 1500, No. 8 Fourth St, Hood River, OR 97031, ph 541 387 2120, fax 541 387 2030
Complete hardware integration including sensors, datalink, and servo drivers.
Wide range of software support, including complete end-user programmability.
Reference software design for ground station and simulation tools.
Fully autonomous or pilot in the loop operation.
Capable of being installed in multiple attitudes.
1.2 CPU
The heart of Piccolo is the MPC555 microcontroller. This is a new breed of automotive
controller based on the PowerPC architecture. The MPC555 marries an enormous array of
interfaces to a powerful RISC engine that delivers 40Mhz PowerPC operation, including
hardware floating point.
1.3 Sensors
There are two generations of the system, the original Piccolo and the newer Piccolo Plus.
Piccolo Plus uses three ADXRS300 gyros and two two-axis ADXL210e accelerometers, which
combined with its CPU horsepower gives Piccolo the ability to run sophisticated filters; and
allows installation in any attitude. The earlier generation Piccolo uses three Tokin CG-16D rate
gyros and two two-axis ADXL202 accelerometers.
The Motorola M12 GPS provides Piccolo with its basic groundspeed and position. The M12 is
differential capable, and Piccolo will supply it with any DGPS corrections received over the
datalink. The Piccolo ground station is capable of generating these corrections using its own
M12.
Piccolo includes a dual ported mpxv50045 4kPa dynamic pressure sensor, an absolute ported
mpx4115a barometric pressure sensor, and a board temperature sensor. Together these sensors
provide the ability to measure true air speed and altitude. Combined with the GPS the air data
sensors allow Piccolo to generate an estimate of winds aloft each time the aircraft turns by fitting
true airspeed against GPS groundspeed. The wind estimate is useful since it enables an
intelligent selection of heading when the wind speed exceeds the flight speed of the aircraft.
The system also estimates the attitude of the aircraft and the gyro biases on-line through a
Kalman filter which uses the GPS-derived pseudo-attitude as the measurement correction.
1.4 Servos
Piccolo includes 10 servo outputs. These outputs are geared for model aircraft servos, which
require pulse-width modulated signals, and 4-6 volt power. Alternatively some servo systems
use a CAN (Controller Area Network) bus to provide the servo signals. Piccolo includes two
independent CAN buses. In either case the servo power supply is a separate input to Piccolo so
that transient servo loading doesn’t disable core system functions.
1.5 Datalink
Piccolo includes a sophisticated datalink that is built on the MHX 910/2400 radio modem from
Microhard Systems Inc. The datalink has up to 40Kbaud of throughput and is used for command
and control, autopilot telemetry, payload data transfer functions, differential GPS corrections
Piccolo User’s Guide
Page 7
Cloud Cap
Technology
PO Box 1500, No. 8 Fourth St, Hood River, OR 97031, ph 541 387 2120, fax 541 387 2030
uplink, and pilot in the loop modes. The datalink architecture allows multiple aircraft to be
controlled by a single operator from a single ground station.
1.6 Payload interface
An unmanned aircraft is only as useful as its payload. Accordingly, Piccolo provides several
means of connecting to payloads, including CAN, asynchronous serial, and discrete I/O. Data
received from the payload(s) can be downlinked over the main datalink.
1.7 Piccolo Plus
Piccolo Plus is the current generation of the Piccolo system. The Piccolo Plus was introduced in
early 2004 as a form-fit-function replacement for the Piccolo avionics. It utilizes new inertial
sensors to improve the performance and robustness of the system. For the purposes of this
manual the Piccolo and the Piccolo Plus are equivalent units.
1.8
Piccolo II
Piccolo II is a derivative of the Piccolo Plus avionics which contains an additional
daughterboard with a new GPS with faster output rate, and an additional external connector
which provides analog input lines, Iridium modem lines, additional digital lines, and a secondary
payload serial port. The GPS unit installed on Piccolo II is the µBlox TIM LP, with an output
rate of 4 Hz. This unit replaces the Motorola M12 existing on the Piccolo Plus avionics.
2 Avionics
Avionics refers to the airborne component of the Piccolo system. It is the most complicated part
of the system and requires the most care in setup. Most of the setup is actually done through the
operator interface software, and is described in that section. This section deals with the physical
installation of the avionics.
Piccolo User’s Guide
Page 8
Cloud Cap
Technology
PO Box 1500, No. 8 Fourth St, Hood River, OR 97031, ph 541 387 2120, fax 541 387 2030
Figure 2 - Piccolo Front Panel
Figure 3. Piccolo II Front Panel
2.1 Front panel connections
All connections to the Piccolo are through the front panel as shown in Figure 2 and include the
filtered 44-pin vehicle interface connector, GPS and UHF antenna SMA connectors as well as
the Pitot and Static pressure port nipples which are compatible with 3/32” ID tubing.
Table 1 outlines the functionality of each pin on the external interface connector. A complete
flight harness reference schematic with power and servo leads is available for review on our
downloads page.
Piccolo User’s Guide
Page 9
Cloud Cap
Technology
PO Box 1500, No. 8 Fourth St, Hood River, OR 97031, ph 541 387 2120, fax 541 387 2030
Table 1. Vehicle Interface Connector Pin-out.
TYPE
O
O
Piccolo User’s Guide
Page 10
SERIAL COMMS
* - These pins are ganged together onboard the Piccolo. Typically one is used as the servo power input with the
rest available as outputs to power servos or payloads.
CAN
Second servo power ground (default) or NC2 (optional)
PWR/GND
O
I
Program/User Mode Control Input - MPIO32B5
Hardware Reset - actve low
Ground
RS232 Program Port/Ground Station Interface/User Serial
RS232 Program Port/Ground Station Interface/User Serial
Second servo power input (default) or NC1 (optional)
Main DC Input - 5.5-20 Vin
SPARE I/O
O
I/O
I/O
I/O
I/O
I/O
O
O
O
O
5
5V
5V
O
4
I
I
O
3
I/O
I/O
0
I
I/O
I/O
LEVEL FUNCTION
Gnd for servo 1
*
Power for servo 1
Servo 1 signal output - Left Aileron
5V
Gnd for servo 2
*
Power for servo 2
Servo 2 signal output - Left Elevator
5V
Gnd for servo 3
*
Power for servo 3
Servo 3 signal output - Left Throttle
5V
Gnd for servo 4
*
Power for servo 4
Servo 4 signal output - Left Rudder
5V
Gnd for servo 5
*
Power for servo 5
Servo 5 signal output - Left Flap
5V
Servo 6 signal output - Right Aileron
5V
Servo 7 signal output - Right Elevator
5V
Servo 8 signal output - Right Throttle
5V
Servo 9 signal output - Right Rudder
5V
Servo 10 signal output - Right Flap
5V
*
*
Servo power input 4.8-6V DC (4 or 5-cell pack)
*
Switched Output Voltage (Driven by Deadman's Switch)
*
Ground
Ground
Ground
CAN Ground
CAN
CAN A Serial High
CAN
CAN A Serial Low
232
User RS232 Output - TPU_B[0]
232
User RS232 Input - TPU_B[1]
5V
User Configurable I/O
5V
User Configurable I/O
2
NAME
GND
SERVO_Vout
PWMSM[0]
GND
SERVO_Vout
PWMSM[1]
GND
SERVO_Vout
PWMSM[2]
GND
SERVO_Vout
PWMSM[3]
GND
SERVO_Vout
PWMSM[4]
TPU_A[0]
TPU_A[1]
TPU_A[2]
TPU_A[3]
TPU_A[4]
USER_Vout
USER_Vout
USER_Vin_1
SWITCHED_USER_Vout
GND
GND
GND
CAN_GND
CAN_HI_A
CAN_L0_A
TXD_RS232
RXD_RS232
TPU_B[2]
TPU_B[3]
GND
*PROGRAM/USER
*HRESET
GND
SCI_2_TX_232
SCI_2_RX_232
USER_Vin_2/EXT_NC1
VIN
GND
GND/EXT_NC2
1
PIN
15
30
44
14
29
43
13
28
42
12
27
41
11
26
40
39
38
37
36
35
25
24
23
6
10
9
8
7
22
21
34
33
5
20
4
19
18
3
32
31
16
1
2
17
Cloud Cap
Technology
PO Box 1500, No. 8 Fourth St, Hood River, OR 97031, ph 541 387 2120, fax 541 387 2030
The Piccolo II provides, in addition to the standard Vehicle Interface Connector, a 25-pin
MicroDot connector located between the GPS and UHF antenna connectors - see Figure 3. The
pin-out listing the functionality of each pin on the MicroDot connector is presented in Table 2.
Table 2. Piccolo II MicroDot Connector Pin-out
PIN
24
13
12
11
10
9
22
23
21
19
17
15
8
18
20
7
6
16
5
4
14
3
2
1
25
NAME
CAN_LO_B
CAN_HI_B
AIN0
AIN1
AIN2
AIN3
AGND
AGND
TPU_B8
TPU_B9
TPU_B10
TPU_B11
GND
GND
GND
TXD1_232
RXD1_232
GND
TXD2_232
RXD2_232
GND
TXD3_232
RXD3_232
GND
No Connection
TYPE
I/O
I/O
I
I
I
I
LEVEL
CAN
CAN
5V
5V
5V
5V
I/O
I/O
I/O
I/O
5V
5V
5V
5V
O
I
RS232
RS232
O
I
RS232
RS232
O
I
RS232
RS232
FUNCTION
Serial TX/RX
Serial TX/RX
10 bit anlog input
10 bit anlog input
10 bit anlog input
10 bit analog input
Analog ground
Analog ground
GPIO3
GPIO4
GPIO5
GPIO6
Ground
Ground
Ground
Iridium TXD
Iridium RXD
Ground
Iridium DTR
Iridium CD
Ground
Payload2 RS-232 Tx
Payload2 RS-232 Rx
Ground
2.2 Power options
Piccolo accepts 8 to 20V DC (3.6 Watts at 12 Volts nominal) input power. This power is
regulated down to internal voltages required for the main board. A second input, 4.8 to 7V DC,
is used to power the servos (either a 4 or 5-cell battery pack can be used). It can be applied to any
one of the unused servo power or user_vout pins (we typically use pin 23).
2.3 Servo options
Piccolo has ten PWM (Pulse Width Modulation) outputs available for servos. There are two
basic modes of operation, 5-channel mode, and 10-channel mode. Most systems will use 10channel mode. In either mode individual servo control signals can be reassigned to other
payload control functions. Details of the different servo options can be had from section 4.11.
2.4 Installation location and orientation
There is no limitation on the installation location of Piccolo. However in general you should
choose a location that will minimize vibration (see the “Vehicle Integration Guidelines“
document for further installation details). For large aircraft it is preferred to mount the avionics
Piccolo User’s Guide
Page 11
Cloud Cap
Technology
PO Box 1500, No. 8 Fourth St, Hood River, OR 97031, ph 541 387 2120, fax 541 387 2030
close to the center of gravity in order to reduce the acceleration that results from centripetal
motion and changes in angular rate.
The orientation of the avionics in its final installation is important. The avionics has a natural
coordinate system, which is marked on the front panel. The coordinate system uses English
aircraft conventions, with the X-axis pointing through the nose, the Y-axis out the right wing tip,
and the Z-axis pointing down. You do not have to install the avionics in its natural coordinate
system; however the Euler angle rotations between the avionics coordinate system and aircraft
coordinate system must be known.
2.5 Air data system
Piccolo has pressure port inputs for total (or Pitot) pressure and static pressure. A 4KPa
differential pressure sensor measures the difference between the total pressure and static pressure
to determine the dynamic pressure. A 115KPa absolute pressure sensor measures the static
pressure. An accurate air data system is critical to the performance of Piccolo. Both the
dynamic and static pressures are used in the primary control loops. In addition the dynamic
pressure is used to calculate the true air speed, which is used for wind measurement.
The total and static pressure ports should be plumbed to pressure probes (see “Vehicle
Integration Guidelines” document for further details).
2.6 GPS antenna
The GPS antenna should be mounted on the aircraft where it has a clear view of the sky. In
particular consider how the antenna’s view of the sky will change with aircraft pitch and roll
motion. Ideally the antenna should be mounted on a large metal groundplane, however
satisfactory performance can be had with a small (a few inches across) groundplane made of foil
or metal tape on the aircraft.
2.7 Communications antenna
A 900MHz or 2.4GHz ISM band ¼ wave or similar antenna will need to be installed on the host
airframe. You should try to maximize the separation between the GPS and UHF antennas to
minimize potential interference. Again refer to the “Vehicle Integration Guidelines” document
for examples and further details.
3 Ground Station
Piccolo’s ground station is based upon the same hardware that makes up the avionics package. It
manages the communication link to one or more avionics systems, interfaces to the pilot in the
loop console, and provides a command and control stream to the operator interface PC.
3.1 Power
The ground station is powered through the included power supply that provides DC power. A
battery is included in the ground station for backup operation in case the main input power is
lost. When main power is connected the battery will be charging (Yellow LED). The ground
station will not be on until the external switch is turned on (Green LED).
Piccolo User’s Guide
Page 12
Cloud Cap
Technology
PO Box 1500, No. 8 Fourth St, Hood River, OR 97031, ph 541 387 2120, fax 541 387 2030
3.2 Connections
The Ground Station connects to the operator interface PC through a standard 9-pin serial cable.
The ground station GPS Antenna is connected to the rear panel SMB connector and the ground
station UHF antenna is hooked up to the BNC connector. The pilot console connects through the
included 6-pin circular DIN pilot console cable. Please refer to the Quick Setup Guide for photos
and a complete descriptions of each component.
3.3 Pilot in the loop
Pilot in the loop commands are input to the ground station through a Futaba compatible buddybox 6-pin DIN connector. The ground station will attempt to decode up to 9 pulses in the serial
train. They are: aileron, elevator, throttle, rudder, autopilot on/off (gear), flaps, brakes,
parachute, and ignition. The fifth channel, usually used for retract landing gear, is used to select
autopilot on/off status. A pulse longer than 1.5ms on this channel selects autopilot off. A short
pulse selects autopilot on. Although the ground station will decode up to 9 pulses, only the first
5 pulses are strictly required. Any pulses not supplied by the pilot console will be given default
values.
The power switch on the Futaba pilot console should be left off; it will receive its power from the
ground station. In addition the RF module of the pilot console can be removed since it serves no
purpose in this application.
Piccolo User’s Guide
Page 13
Cloud Cap
Technology
PO Box 1500, No. 8 Fourth St, Hood River, OR 97031, ph 541 387 2120, fax 541 387 2030
4 Operator Interface
The Operator Interface (OI) is a software system that runs on a Windows PC and provides a
command and control interface for Piccolo operators. Most of the system features are accessible
from this interface, and so we will use this part of the user’s guide to describe many of the basic
capabilities of the system.
4.1 Installation and running
The operator interface must be correctly installed before it can be used. A windows installer1
file, “Operator Interface.msi” is provided for this. Double click on the file to launch the installer.
The onscreen instructions are simple to follow and amount to choosing where you’d like the
operator interface to be installed.
4.2 Running
Once installed the Operator Interface executable can be run like any
Windows application. After the application has been launched, the
communication setup dialog will appear on the screen - see Figure 4.
The default option is to connect to the groundstation over the COM1
serial port, at 57600 baud, and run as a TCP/IP server on port 2000.
Other connection options are: connecting as a client to an Operator
Interface server, connecting to the avionics through an Iridium satellite
modem, or opening a binary telemetry file for replay. Once the
connection parameters are set as desired, press the "OK" button to
continue loading the Operator Interface program.
The connection options can also be specified through command line
switches listed in Table 3. The method is still functional - if command
line arguments are provided, the system will not display the comm
setup dialog, but will instead use the parameters directly.
Figure 4. Comm setup dialog.
Table 3. Command line switches
Switch
-P=
Meaning
Controls the serial port that the OI will use to connect to the
ground station. For example –P=2 will cause the OI to look for the
ground station on COM2.
1
The windows installer is a relatively new component of Windows. Windows 2000 and XP include the windows
installer; however older versions of Windows must have the installer installed (ironic, I know). If your version of
Windows does not recognize the .msi extension it is because you need the windows installer. Use the
WinInstall9X.exe or the WinInstallNT.exe files to install the installer.
Piccolo User’s Guide
Page 14
Cloud Cap
Technology
-B=
-LISTEN=
-SERVER=
-R=
PO Box 1500, No. 8 Fourth St, Hood River, OR 97031, ph 541 387 2120, fax 541 387 2030
Changes the baud rate used for the serial connection. The nominal
connection to the ground station is done at 56K (57600). However
specialty applications may require a different baud rate.
Enables the OI to act as a server. In this mode the operator
interface will listen for incoming TCP connections and send and
receive Piccolo packets over the connection. The port number used
for the listening mode is passed on the command line, for example –
LISTEN=2000 will cause the OI to listen for clients on port 2000.
Enables the OI to connect to a Piccolo data server (which could be
another OI in server mode). The data passed on the switch controls
the computer name and port number that the OI will try to connect
to. For example –SERVER=MyServerName:2000 will cause the OI to
initiate a TCP connection to a computer call MyServerName, on port
2000. This switch cannot be used at the same time as –LISTEN or –P.
Enables the OI to replay a binary log file. The data passed on the
switch is the name of the binary log file (usually *.tel). This
switch cannot be used with any of the other switches except –LISTEN.
4.3 Ground station screen
After the Operator Interface has started and the
communications have been set-up, the first visible window is
the ground station dialog, Figure 5.
4.3.1 File Menu
The File menu has the option to bring up the communication
setup dialog as well as the command to exit the Operator
Interface application.
4.3.2 Window Menu
The Window menu has options for minimizing or restoring
any avionics windows in the system, for selecting any
avionic window, and for cascading or tiling the avionics
windows. Also from this menu, you can open a dialog for
Iridium modem control, groundstation and avionics panels
for displaying uplink message history. In addition, the
avionics dialog can be reconfigured in one of three view
modes available: simple view (avionics setup pages are
hidden), advanced read-only (avionics setup pages can only
be viewed but not edited), and advanced view (all pages are
shown and all parameters can be edited).
Figure 5. Operator Interface ground station window
4.3.3 Units Menu
The units menu allows the user to select the units that telemetry are displayed in. Angles can be
displayed in decimal degrees, degrees minutes seconds, or in radians. Anything which is not an
angle can be displayed in either Metric or English units.
Piccolo User’s Guide
Page 15
Cloud Cap
Technology
PO Box 1500, No. 8 Fourth St, Hood River, OR 97031, ph 541 387 2120, fax 541 387 2030
4.3.4 GPS
The GPS button invokes a dialog that gives a display of the current ground station GPS data, and
the differential base station setup.
Figure 6. Groundstation GPS window
The left panel will display the GPS status and current position solution. The right panel allows
the user to specify a base position by either typing the coordinates of the base station (if
accurately known) or by running a time average of the groundstation GPS solution if the
Average button is pressed. The base position can be updated by pressing the Send button. The
middle panel allows the user to see the current base position, and to enable sending of GPS
corrections to the avionics.
4.3.5 Network Control
The ground station manages simultaneous communications to multiple avionics by using a
polling scheme in which it periodically requests communications from each avionics in a list.
The list is composed of Piccolo addresses, which are the serial number of each avionics.
The Add Address button can be used to send a message to the ground station telling it to add the
requested serial number to its polling list. The Pilot Address button works like the Add
Address button, except it tags the address to receive manual pilot commands from the pilot
console. Only one pilot address can exist in the system. The Rem Address button is used to
remove addresses from the list, except the pilot address. Remove All will remove all addresses
from the list, again excepting the pilot address. The ground station stores the list of serial
numbers in non-volatile memory so any changes made to the list are not lost when the ground
station is powered down.
If the Dynamic box is checked, the groundstation will switch to dynamic network management
mode. This includes the ability to detect new avionics not yet in the polling list, as well as
remove avionics that are not responding. The dynamic network management does not affect the
pilot address.
In practice there is only enough bandwidth for about 10 avionics at one time. If there are avionics
in range that you do not wish the groundstation to talk to, either disable the dynamic network
management, or use a different radio channel.
The text box next to each avionics slot displays the link ratio, which is the percentage (from 0 to
100) of communications frames sent by the ground station that are correctly acknowledged by
the avionics.
4.3.6 Diagnostic
The diagnostic group contains diagnostic data from the ground station. T[°C] is the temperature
of the main board in degrees Celsius. The boards have been tested from 0 to 80°C. Mhx rssi is
Piccolo User’s Guide
Page 16
Cloud Cap
Technology
PO Box 1500, No. 8 Fourth St, Hood River, OR 97031, ph 541 387 2120, fax 541 387 2030
the receive signal strength indicator from the MHX radio. It is in units of dBm and ranges from
–71 (strong signal) to –115 (no signal). When communicating with multiple avionics the RSSI
field will be a composite of the different signal strengths. Current refers to the input current to
the ground station, and is displayed in Amps. Voltage is the input voltage, which should always
be near 12 Volts for the ground station. The Internal signal is a composite of all of the internal
voltages of the ground station. OK will be displayed here if the internal diagnostics are nominal,
else the offending system will be displayed. GS Serial indicates if the serial communication to
the ground station is function, OK will be displayed here if it is, else BAD will be displayed.
4.3.7 MHX radio settings
The MHX radio settings allow the user to control the power output and the hopping pattern of
the Microhard radio in the ground station. The radio is a frequency hopping spread spectrum
system, which means that it doesn’t use a single frequency, but instead hops along a pattern of
frequencies. One radio in any network is a master (always the ground stations) and slaves in the
network synchronize their hopping to match the master. In order to operate multiple ground
stations in close proximity they must be using different hopping patterns to avoid interference.
Pushing the Req button will request the current hopping pattern and power output of the radio.
Pushing the Send button will update the hopping pattern and power output of the radio.
The request spectrum button is used to invoke a special feature of the radio, which allows it to
operate as a spectrum analyzer. The radio will sample all of its channels and return a text-based
result, which allows the user to see the background noise level on every channel. Note that when
any of these radio features are invoked the radio will be taken offline, suspending
communications for a short while.
4.3.8 System version
The system version panel provides several lines of text containing the version information of the
groundstation hardware and software, as well as a button that can be used to request this
information from the groundstation.
The first text line will display the software version number. The second line will display the
release date for the software and whether it is an actual release or a test version. The third line of
text will display the type of groundstation hardware, and the last line will display the type of
radio that the groundstation is equipped with.
4.4 Avionics Window
When a Piccolo avionics is added to a network slot in the Groundstation, a new window is
created which is specific to that avionics. The window is built upon a tab dialog box, with each
tab displaying a different part of the system. The top of the tab dialog displays the address of the
avionics, the number of milliseconds that the avionics has been on since last power-up or reset,
and the date and time from the GPS, see Figure 7.
Just under the title bar is a series of lights that are used as alarms. They represent the six most
important parameters regarding the health of the vehicle. The alarms are giving in order of
decreasing priority from left to right. For each parameter the light will be red if the data
indicates that parameter is out of range:
•
ALT is the altitude alarm. The altitude alarm is based upon the altitude limits specified
for the avionics (see section 4.9).
Piccolo User’s Guide
Page 17
Cloud Cap
Technology
PO Box 1500, No. 8 Fourth St, Hood River, OR 97031, ph 541 387 2120, fax 541 387 2030
•
IAS is the indicated airspeed alarm. Similar to the altitude alarm the IAS alarm is based
upon the airspeed limits for the avionics (see section 4.9).
•
SYS is the system diagnostic alarm. It is based upon the main input voltage, and the
board temperature. The main input voltage limit that will trigger the alarm are 11 and 15
Volts. The avionics temperature limits that will trigger the alarm are 0 and 80 degrees C.
•
GPS is the GPS alarm. It is based upon the health of the GPS receiver as indicated by the
number of satellites and PDOP (precision dilution of precision) value. The alarm will be
triggered if the GPS does not have a 3D fix, or if the PDOP is larger than 5.
•
LINK is the wireless link alarm. It is based upon the avionics RSSI and the link ratio and
it will be activated if the RSSI drops below -101, or if the link drops below 85%.
•
COM is the communications alarm. It is based upon the communications timeout
specified for the avionics (see section 4.9).
An audio output can be enabled for the alarm system. If one or more of the parameters are
alarming, and if the audio output is enabled, then a warning will be given every two seconds for
the alarm with the highest priority.
Below the flight parameter alarms, the next row of lights consists of the flight termination
alarms. If any of the flight terminations is asserted, the corresponding light will be red instead of
green. There are currently three flight termination alarms:
•
Aerodynamic termination. If the light is off (neither green, nor red) then the aerodynamic
termination is not armed. If armed, the light will be green. If asserted, it will be red.
•
Engine kill. In addition to changing the color of the light, it will also provide the status of
the ignition (on or off).
•
Deadman line. The light will turn red if the deadman line is dropped.
4.5 Telemetry page
The telemetry page displays data from all the sensors of the system. This display in Figure 7 is
shown in advanced mode.
4.5.1 GPS data
The GPS data gives the information received from the GPS onboard the avionics. The GPS data
are updated once per second. The data in Figure 7 indicate that the vehicle is currently sitting on
the ground, in Hood River, Oregon. Notice the PDOP value. This is the precision dilution of
precision number, which is based purely on the geometry of the visible satellite constellation.
Typical values should be less than 5. There are usually always at least six satellites visible, and
sometimes as many as 10. In some cases, the number of visible satellites will be zero. This will
occur if the GPS receiver does not have a complete GPS constellation almanac. Once the
almanac download is complete this value will be correct. If you are seeing high PDOP values, or
too few satellites, that indicates the GPS is not performing well, typically due to problems with
the antenna configuration.
On the Status line there is a series of lights which describe the status of the GPS receiver. These
are the following:
Piccolo User’s Guide
Page 18
Cloud Cap
Technology
PO Box 1500, No. 8 Fourth St, Hood River, OR 97031, ph 541 387 2120, fax 541 387 2030
•
DGPS - it should be green if the differential corrections have been enabled at the
groundstation, and gray if DGPS is not enabled.
•
ANT - green if GPS antenna is connected to the avionics, red otherwise.
•
3D, 2D, ACQ - one of these three will be green depending on which state the GPS
receiver is in - ACQ if it is acquiring, 2D if it has a 2D solution, and 3D if it has a 3D
position solution.
•
DR - as long as GPS outputs position and velocity data, the DR will stay gray. When
GPS cannot provide solution, the Piccolo navigation will fall-back to dead-reckoning,
and the DR light will turn red.
Figure 7. Telemetry page
4.5.2 Air data
The air data gives the airspeed and barometric altitude information. The temperature indicated is
based on the internal board temperature with an offset to account for warming in the box.
4.5.3 Attitude
The attitude display gives the estimated Euler attitude angles for the vehicle, which are obtained
by Kalman-filtering the rate gyro outputs and correcting the outputs using the pseudo-attitude
derived from inertial reference frame accelerations. If the vehicle is not moving, the
Piccolo User’s Guide
Page 19
Cloud Cap
Technology
PO Box 1500, No. 8 Fourth St, Hood River, OR 97031, ph 541 387 2120, fax 541 387 2030
accelerometers are used for this purpose, while the GPS-derived acceleration is used during the
flight. Thus, the system will output vehicle roll and pitch angles both on the ground and in flight.
However, the estimation of heading (yaw) requires motion since it is based on measuring the
groundspeed and wind speed vectors.
4.5.4 System
The system group contains diagnostic data from the avionics. This data is identical to that from
the ground station.
is the temperature of the main board in degrees Celsius. The boards have been
tested from 0 to 80°C for Piccolo, and –40 to 85°C for Piccolo Plus.
•
T[°C]
•
is the receive signal strength indicator from the MHX radio. It is in units of dBm
and ranges from –71 (strong signal) to –115 (no signal).
•
•
is a percentage from 0 to 100, which represents the acknowledgment ratio. On each
communications frame the ground station polls an avionics and waits for its response. At
the end of the frame the avionics sends an acknowledgement packet to the ground station
to indicate the frame is complete. The ground station now tracks the percentage of the
received acknowledgements and sends that data to the operator interface, where the user
can use it as a metric for communications performance. This is most useful in situations
where there may be interference. In that case the RSSI signal may still indicate good
strength, but packets may be dropped due to the interference.
Current refers to the input current, and is displayed in Amps.
•
Voltage
•
S[V]
•
The Internal signal is a composite of all of the internal voltages of the avioncis. OK will
be displayed here if the internal diagnostics are nominal, else the offending system will
be displayed.
RSSI
Link
is the input voltage, which should always be between 8 and 20 volts.
is the servo voltage, and S[A] is the servo current. The servo voltage and current
are only available on Piccolo Plus and Piccolo II.
4.5.5 Winds
The winds group displays the latest data from the wind-finding by maneuver calculation. Winds
are named for the direction they come from, hence South wind is the component of the wind
from the South going to the North. The time of the wind calculation is also provided, as is
estimated wind error. The wind data are an integral part of the sensor fusion algorithms on the
vehicle as well as the navigation system. In addition they can be useful when planning longer
range flights.
4.5.6 Nav Filter Health
The Nav Filter Health panel displays several important parameters regarding the Kalman filter
that estimates the attitude of the vehicle and the gyro biases.
•
•
•
field informs if the Kalman filter has been initialized and it is operational.
Att field reads OK if the covariance of the attitude solution is within normal limits.
Bias field reads OK if the covariance of the gyro bias states is within normal limits.
Ready
Piccolo User’s Guide
Page 20
Cloud Cap
Technology
PO Box 1500, No. 8 Fourth St, Hood River, OR 97031, ph 541 387 2120, fax 541 387 2030
4.5.7 Gyro and Accelerometers
The gyro and accelerometer data follow standard US aircraft sign conventions; i.e. the X-axis
points through the nose, the Y-axis through the right wing, and the Z-axis down. Hence when
flying at a one-g loading the Z accelerometer will indicate -9.8 m/s/s.
4.5.8 RPM
External IO lines 5 and 20 (TPU_B2 and B3) are provided for measuring RPM. The RPM is
measured by sampling the time between falling edges on the signals. TPU_B2 is used to
measure left engine RPM and B3 is used to measure right engine RPM.
4.5.9 Request Fast/Slow
The request fast and request slow buttons alter the rate at which the telemetry data are sent. The
system defaults to slow mode in which it sends data once per second. In fast mode the data are
sent 20 times a second (or as fast as available bandwidth will allow). Fast mode is provided for
diagnostic purposes and is not used for routine flying.
4.5.10 UHF radio settings
The UHF radio settings allow the user to control the power output and the hopping pattern of the
Microhard radio in the avionics. The radio is a frequency hopping spread spectrum system,
which means that it doesn’t use a single frequency, but instead hops along a pattern of
frequencies. It is possible to work with multiple ground stations by configuring each ground
station to use a different hopping pattern and then changing the hopping pattern of the avionics to
match the desired ground station. Pushing the Req button will request the current hopping
pattern and power output of the radio. Pushing the Send button will update the hopping pattern
and power output of the radio. When changing hopping patterns the avionics will automatically
revert to the previous setting if communications are not established with a ground station on the
new pattern. Note that while requesting or changing the radio settings the radio will be taken
offline and communications will be suspended for a few seconds. As a result you should not
request or change the radio settings when flying under manual control.
4.5.11 Sonic altimeter
This field will display the sonar altitude reading if a sonar is connected to the avionics. In current
version of our software the sonar altimeter is not used by the autopilot for control of the airplane.
The sonar measurement is included with the autopilot telemetry and displayed here.
4.5.12 Compass
This field will display the magnetic heading measurement, if a Honeywell HMR-2300
magnetometer is connected to the avionics. In addition to displaying the value here, the magnetic
heading is also used on-board, if available, in the attitude filter.
4.6 AP commands
The autopilot commands page displays the current autopilot command status, and allows you to
change the commands. In the upper left hand corner the green box indicates that the autopilot is
on. This is because the global autopilot switch on the pilot console is on; or the console is not
plugged into the ground station; or this avionics is not selected for manual control. If manual
control were selected from the pilot console the AUTOPILOT ON box would be red, and would
read MANUAL.
Piccolo User’s Guide
Page 21
Cloud Cap
Technology
PO Box 1500, No. 8 Fourth St, Hood River, OR 97031, ph 541 387 2120, fax 541 387 2030
Figure 8. Autopilot commands page
4.6.1 Current autopilot status
The top-left half of the autopilot command page gives the current status. There are five autopilot
loops, and hence five rows in the table. The first column of the table gives the telemetry data
that is appropriate for that loop. The second column of the table gives the status of each
individual loop (AUTO, ON, or OFF). The third column gives the commanded value for each loop.
The AUTO states means that the loop is enabled and the command for that loop is automatically
generated. This applies only to the turn rate and altitude commands when the tracker is on. ON
or OFF indicate the loop is enabled or disabled respectively. The actual loop status is a logical OR
of the global autopilot status and the loop status. Hence it is possible to have a loop on, but still
have the autopilot off.
4.6.2 Changing autopilot commands
The top-right half of the autopilot command page provides a location for changing the current
commands individually. The desired commands entered in these fields are then are sent by
pushing the Send button for each loop. The Copy Current Commands button will copy the
information from the status display into the command fields.
Piccolo User’s Guide
Page 22
Cloud Cap
Technology
PO Box 1500, No. 8 Fourth St, Hood River, OR 97031, ph 541 387 2120, fax 541 387 2030
4.6.3 Autopilot Mode
The Autopilot Mode panel displays the current operating mode the autopilot is set to, and allows
the user to command manually 2 of the 7 operating modes available. Here is a listing of all of the
operating modes.
Table 4. Autopilot Modes
Mode
Pre-launch
Transition
Climb-out
Flying
Landing
Final
Approach
Touchdown
Description
The vehicle is waiting for a launch indication. This is the
state that the system starts in, and is also the state it goes to
when the user commands auto-launch. In this state all outputs are
held to the trim condition, with the exception of the throttle
which is held at the prelaunch throttle value.
Auto launch is in progress. The system enters this state when the
airspeed reaches 75% of the minimum airspeed limit. In this state
the autopilot is watching the dynamic pressure. If it falls
below 50% of the minimum value the system goes back to prelaunch. If, after a half second the dynamic pressure remains
above half the minimum value the autopilot switches to the next
state. In this state all outputs are held to the trim condition,
with the exception of the throttle which is held at the prelaunch
throttle value.
System is airborne, waiting for GPS to settle. In this state the
autopilot is turned on, except that the turn rate command is held
to zero. The autopilot will stay in this state for seven
seconds.
The standard operating mode.
Aircraft navigates the landing pattern. In this state the minimum
altitude limit does not apply.
Aircraft is on final approach. The autopilot is watching for the
vehicle’s altitude to reach the flare altitude. If it does reach
the flare altitude before reaching the landing waypoint, it will
kill the engine, update the airspeed command to the flare speed,
and level the aircraft.
Engine has been killed prior to touchdown. In this state the
autopilot does not navigate the flightplan segment, instead it
keeps the aircraft in a wings-level attitude.
The three buttons on the panel control the user-selectable operating modes.
•
The Pre Launch button puts the avionics into pre-launch mode. When entering this mode
with the autopilot on, the autopilot will suspend execution of the main control loops,
leaving their outputs at the trim position, with the exception of the throttle which will be
set to its prelaunch value. The autopilot will stay in this mode until the airspeed signal
reaches 75% of its minimum command value. When this happens the autopilot will
pause for 0.5 seconds, and then proceed through the transition and climb-out states until it
reaches the flying state.
•
The Land now button will initiate an automatic landing, by sending the aircraft to the
landing pattern entry waypoint, if a landing flightplan has been uploaded to the aircraft.
The current landing pattern entry point can also be viewed and manually updated from
the limits page. Once the autopilot is in landing mode, the Land now button will change
Piccolo User’s Guide
Page 23
Cloud Cap
Technology
PO Box 1500, No. 8 Fourth St, Hood River, OR 97031, ph 541 387 2120, fax 541 387 2030
to Go Around. If the Go Around button is clicked, the aircraft will abort the current
approach and attempt a new one by going back to the landing pattern entry waypoint.
4.6.4 Stick Mode
The Stick Mode panel displays and updates the level of stability-augmented manual control on
the aircraft. At the top of the panel, the current mode is displayed. There are three stick modes,
and the corresponding buttons are provided below. By stability augmentation, we refer to
manually assisted autonomous flight, in which all control loops are active but the individual loop
commands are offset with values provided from the pilot console.
•
If mode is set to None, then all control loop commands are internal (either from the
Operator Interface, or from the Navigator, but none from the pilot console).
•
In Steering mode, the turn rate command is obtained from the aileron stick on the pilot
console. The mapping of this control is such that with the stick centered and no trim the
turn rate command is zero, while at full stick deflection the aircraft turns, with a bank
angle command equal to the maximum bank angle limit.
•
The Full Authority mode adds the ability to control the airspeed loop with the elevator
stick, the throttle and flap signals from the pilot console are applied directly (open-loop).
The lateral control is like the Steering mode explained above, however in addition the
rudder signal from the pilot console is appended to the rudder output from the internal
yaw damper.
4.6.5 Engine
The Engine panel displays and updates the engine status. The current engine/ignition status is
presented at the top of the panel, while the button to kill or enable the engine is at the bottom of
the panel.
The Kill Engine button gives the user the ability to override the altitude control loop and force
the throttle output to zero. The engine kill feature can be driven by the user, through the button
on the autopilot page, or driven by the deadman status logic, see section 4.9 for details.
4.6.6 Actions
The Actions panel provides a list of toggle buttons, which can act as on/off switches for various
UAV systems. For the buttons to work, the I/O lines must be configured for the specific actions,
on the Payload page.
The UAV systems that can be controlled by these buttons are:
•
•
Lights: can be turned on or off, from the user interface or as a result of tracking a
waypoint.
Parachute: can be deployed from the user interface, or as a result of reaching a waypoint,
or by manual control, using the eighth channel of the pilot console.
•
Drop: can be deployed from the user interface, or as a result of reaching a waypoint.
•
Brakes: can be actuated from the user interface, or by manual control, using the seventh
channel of the pilot console.
Each of these actions needs a hardware line to function. Accordingly the payload interface
(4.13) has been expanded to include options for any I/O line to do any of these functions. The
Piccolo User’s Guide
Page 24
Cloud Cap
Technology
PO Box 1500, No. 8 Fourth St, Hood River, OR 97031, ph 541 387 2120, fax 541 387 2030
lights functions use discrete output. The other functions can be driven as discrete outputs, or as
pulse width signals (e.g. for servo control).
4.6.7 Track data
Below the autopilot status display the tracker input variables are displayed. They are: the along
track distance, which is the distance to go before reaching the waypoint; the cross track distance,
which is the perpendicular distance from the track to the vehicle (positive right); and the along
and cross track velocities.
4.7 Map
Figure 9. Map page
The map page displays the current location of the vehicle, and provides an interface for creating
flight plans. The map is built on ESRI’s MapObjects, which means that it is capable of
displaying geo-referenced raster files, as well as vector shape files. To add a layer to the map
select the button Add image layer or Add vector layer. Each layer added is displayed below
the add buttons. In Figure 9 there are two layers, which are named sf.tif and wsiearth.tif.
The layers can be turned off by pressing the button that contains the layer name. Layers can be
removed by the rem button next to the layer name.
Whenever the mouse pointer is over the map the location of the pointer is displayed at the top of
the map. The map can be zoomed in by selecting the In radio button and using the mouse to
Piccolo User’s Guide
Page 25
Cloud Cap
Technology
PO Box 1500, No. 8 Fourth St, Hood River, OR 97031, ph 541 387 2120, fax 541 387 2030
click and drag a rectangle on the map. The rectangle will become the extents of the map.
Zooming out is accomplished by selecting the Out radio button and clicking on the map. Each
click expands the map area by 50%. To move the map select the Pan button, and click and the
drag the map with the mouse. Or use the scroll bars to pan the map.
At the top of the map page the most important data from the telemetry stream are displayed: the
altitude, true air speed, input voltage, board temperature, and receive signal strength from the
radio. In addition the waypoint (shown as WP in the upper right corner) that the vehicle is
currently tracking is displayed. The waypoint command can be changed by entering a new
waypoint and clicking Send.
The map also displays flight plans for the vehicle. There are two types of flight plans displayed:
remote plans and local plans. The display of either type of flight plan can be turned on or off
using the Local or Remote check boxes. Remote plans are those that are stored onboard the
avionics, i.e. remote from the operator interface, and they are drawn in red. Local plans are those
that are stored on the operator interface, i.e. they have not yet been sent to the avionics, and they
are drawn in white.
To see the flight plans that are onboard the avionics press the Request button. This will trigger
the avionics to send all of its flight plans.
4.7.1 All about flight plans
Flight plans are made of linked lists of waypoints. Each waypoint encodes latitude, longitude,
altitude, and the index of the next waypoint to be used. The avionics has storage for 100
waypoints. These waypoints can be used to make one flight plan that is 100 waypoints long, or
50 flight plans with two waypoints each, or any combination between. The key concept is that
all flight plans must close. This means that at some point the next waypoint must point to a
waypoint that was previously in the list. In Figure 9 the flight plan is made of waypoint 10,
which goes to 11, which goes to 12, to 13, to 14, to 15, to 16, and back to 14. Note that although
all flight plans must close, they do not have to be a loop. In the sequence given above the
aircraft will end up flying the triangle between waypoints 14, 15 and 16.
Flight plans also encode altitude. Each time the navigator switches waypoints it changes the
altitude command to the value in the waypoint it is going to. To edit a flight plan, including the
altitude, push the Select radio button, highlight the flight plan and then click Edit. The dialog
in Figure 10 dialog will appear.
In addition to the basic position, the flight plans include a feature called the wind-finding interval
(WF in Figure 10). This interval describes the time between performing s-turns along the flight
plan. The s-turns allow the avionics to measure the wind. You can disable the wind-finding by
setting the interval to zero or less than zero.
Each waypoint also has a feature called pre-turn, which can be enabled or disabled according to
the check box in Figure 10. Pre-turn allows the avionics to estimate when to turn so that it
doesn’t overshoot the segment that follows the waypoint. When you create a flight plan in the
Operator Interface pre-turn will be on by default; however if you need to guarantee the vehicle
flies over a waypoint you can disable the pre-turn for that point.
A waypoint can be declared as orbit waypoint, in which case the aircraft will circle the waypoint
rather than flying to it. This can be enabled or disabled according to the Orbit radius in Figure
10. An orbit waypoint has a rotation sense, a radius, and an orbit time associated with it. Check
Piccolo User’s Guide
Page 26
Cloud Cap
Technology
PO Box 1500, No. 8 Fourth St, Hood River, OR 97031, ph 541 387 2120, fax 541 387 2030
the Right box to have the airplane fly the orbit in a clockwise sense, or leave the checkbox blank
to have the airplane orbit counter-clockwise. During the orbit, the aircraft will maintain a
constant distance to the waypoint according to the Radius specified in the edit box. The airplane
will orbit the waypoint for the time specified in the Time edit box, after which the Navigator will
switch to the next waypoint. If the orbit time is zero the vehicle will orbit indefinitely.
Figure 10. Flight plan edit dialog
The next four checkboxes are related to the actions described in Section 4.6.6. If you would like
the airplane to perform these actions autonomously, check one or more of the four action flags.
The parachute and drop actions are performed when the vehicle reaches the waypoint. The lights
function is applied while the aircraft is flying to the waypoint.
The next waypoint flag is the Slope. If Slope is not checked, the altitude control will track a
constant altitude, which is the altitude of the target waypoint. The airplane will go to this target
altitude immediately and maintain the command until it switches to the next waypoint. If Slope
flag is set, then the aircraft will attempt to track a slope leading from origin waypoint to target
waypoint; thus, the airplane will climb/descent at constant rate, such that it reaches the waypoint
altitude when it is in the proximity of the target waypoint. This mode is used in creating a
landing pattern, but it can be used for other purposes as well.
The next waypoint flag is the Land. Check this box to mark the waypoint as a touchdown
waypoint, thus making the current flightplan a landing pattern, and the current track segment a
final approach. If you do not intend to perform an automatic landing, leave this checkbox blank.
Note that Figure 10 shows the dialog for a remote plan, which cannot be edited. If the plan were
local the edit boxes would be white (i.e. editable) and any changes made would be reflected on
the map.
4.7.2 Making new flight plans
To make a new flight plan select the New multipoint radio button. Then, using the mouse,
click on the map once for each waypoint. To end the flight plan double click. The flight plan
will automatically close. To control which point it closes to, double click on top of the desired
point. When you are finished the OI will prompt you for the flight plan altitude. After entering
the altitude the new flight plan is drawn as a local plan on the map. There is only ever one local
plan, so the previous local plan will be discarded. The local plan can be edited to include any
altitude information or fine-tuning of the position data.
Alternatively you can make a simple two waypoint flight plan by clicking New quick plan.
Using this option a flight plan is built from the current location of the vehicle to the wherever
you click on the map. A quick plan dialog window is displayed to set various parameters (see
Figure 11). The horizontal position and altitude of the target waypoint can be specified more
accurately if desired; the target waypoint can be setup as an orbit waypoint.
Piccolo User’s Guide
Page 27
Cloud Cap
Technology
PO Box 1500, No. 8 Fourth St, Hood River, OR 97031, ph 541 387 2120, fax 541 387 2030
Also the same dialog allows the user to specify what to do with the newly created plan. If Send
Immediately box is checked, the flightplan will be sent to the avionics immediately after the OK
button is clicked. If the Track Immediately box is checked, the Navigator will also switch
waypoint to this new plan immediately after the OK button is clicked. The default waypoints for
the quick plan are 98 and 99, but this option can be overwritten by specifying a different starting
index in the edit box at the bottom of the dialog.
Figure 11. Quick plan dialog.
4.7.3 Sending flight plans
To send a local flight plan to the avionics press Send. The map will prompt for the starting
waypoint index. The index you choose depends on what plans are already onboard the avionics.
After sending the flight plan the avionics will echo the plan back to the map, and it will be
displayed in red. The local plan, displayed in white, will remain.
4.7.4 Editing flightplans
Only local flightplans can be edited. If you would like to edit a remote flightplan, first make a
copy by selecting the remote flightplan with the mouse and clicking the Copy button. Then
select the white colored local copy of the plan and click the Edit button. If you cannot select the
local plan due to the fact that the remote plan is drawn on top of it, uncheck the Remote button to
turn off the display of remote flightplans.
4.7.5 Dragging waypoints
As of software version 1.1.9 and later you can click and drag waypoints. To do this choose the
Select radio button. Then click and drag on a waypoint. When you release the mouse button
the waypoint location will be updated. If the flight plan was local the change occurs
immediately. If the flight plan was remote the change is sent to the avionics and the screen will
be redrawn when the avionics echoes the new waypoint position.
4.7.6 Making landing flight plans
Landing flight plans can be built by hand, but most of the time they are done using the landing
plan feature of Piccolo. To make a landing pattern, select the "New land plan" radio button.
Click on the map, at the location where you would like the touchdown waypoint to be; now the
Piccolo User’s Guide
Page 28
Cloud Cap
Technology
PO Box 1500, No. 8 Fourth St, Hood River, OR 97031, ph 541 387 2120, fax 541 387 2030
mouse cursor drags an imaginary line segment. Next click on the map in the direction of the
runway that the aircraft should follow (that is, click an arbitrary point on the direction of the final
approach), see Figure 12.
Figure 12. Two points used for creating a landing pattern.
After the two waypoints have been selected, the system will present a landing plan dialog, as in
Figure 13.
Figure 13. Landing plan dialog.
In the dialog, specify the starting index of the landing plan, keeping in mind that an auto
generated landing plan always has 6 waypoints. Also, provide the altitude of the touchdown
waypoint and the sense of the pattern. After clicking the OK button, the parameters of the
landing pattern (those provided in the dialog and on the map) will be sent to the aircraft, which
will generate the landing flightplan based on these and on the current aircraft settings (such as
approach length, glideslope angle). The auto-generated landing plan will then be sent to the
ground and displayed on the map page, as in Figure 14.
Piccolo User’s Guide
Page 29
Cloud Cap
Technology
PO Box 1500, No. 8 Fourth St, Hood River, OR 97031, ph 541 387 2120, fax 541 387 2030
Figure 14. Landing plan generated by the avionics.
How does the Piccolo generate a landing plan? In Figure 15 we can see a listing of the
flightplan, which was presented in Figure 14. We can see that the entry waypoint 90 and the
next one have the same altitude, while the rest of the waypoints have decreasing altitude and
slope flag enabled. Also, we can see that the last waypoint, 95, is the touchdown point since it
has the Land flag enabled and the lowest altitude.
Figure 15. Waypoint listing for a landing plan.
The landing plan is a box-shaped plan on which the cross-wind leg before the final approach has
been divided in two smaller segments such that the airplane makes three 120° turns instead of
two 90° turns. The geometry of the landing plan is presented in Figure 16.
If D is the length of the final approach, as specified in the aircraft parameters, then the size of the
landing plan will be 2D long by 0.75D wide. The first cross-wind segment will be constantaltitude, while the down-wind, the two small cross-wind segments and the final approach will
have a constant glide slope angle, as defined in the aircraft parameters.
The landing pattern entry and go-around point will be, in this example, waypoint 90. The entry
point will always be the first waypoint in the plan, and the autoland waypoint specified in the
mission parameters.
Piccolo User’s Guide
Page 30
Cloud Cap
Technology
PO Box 1500, No. 8 Fourth St, Hood River, OR 97031, ph 541 387 2120, fax 541 387 2030
D
90
95
D
94
120°
Top view of auto-generated
landing plan
0.75D
2D
91
120°
93
120°
92
90,91
Side view of auto-generated
landing plan
92
93
94
95
Figure 16. The auto-generated landing plan diagram (top and side views)
4.7.7 Geo-referencing your own map file
If you have an image of the area you wish to fly and you want to use this image for your map
you will need to geo-reference it. The map will accept geo-referenced TIFF image files; so your
first step is to get your image in TIFF format. The geo-referencing is done through a separate
file, called a world file that has the same name as the image file, but with the extension “tfw”.
The world file contains six numbers, one on each line, and has the following format:
degrees longitude per x pixel
0
0
degrees latitude per y pixel (negative)
Longitude of the upper left corner (positive East)
Latitude of the upper left corner (positive North)
The geo-referencing assumes that the image is linear, therefore it must be a rectilinear projection,
and it must be oriented so that North and South are in the vertical direction. Note that the y-axis
scale factor should be negative; this is a result of computer graphics coordinates systems which
increase downwards. An example world file, which is for Wasco airport in Oregon, follows:
0.00005140576
0.00000000
0.00000000
-.00005140576
-120.68207806
45.591328
Piccolo User’s Guide
Page 31
Cloud Cap
Technology
PO Box 1500, No. 8 Fourth St, Hood River, OR 97031, ph 541 387 2120, fax 541 387 2030
4.8 Preflight
Figure 17. Preflight checklist.
The preflight page gives a user-configurable preflight checklist. Each item of the checklist is
represented by a box that can be checked to indicate that step has been done. The checklist can
be configured through a simple text file, "preflight.txt" in the working directory of the Operator
Interface application. If the file doesn’t exist the OI will create a generic preflight list. However
if the file exists, then each line of the file will become an item in the preflight page checklist.
For a detailed description of the generic preflight checklist items see the document “Preflight
Checklist for the Piccolo System”.
In addition to the checklist, the preflight page includes some of the user interface elements
required to perform the checklist items, including the altimeter setting, sensor zeroing, GPS
health, system health, and control surface tests.
4.8.1 Altimeter setting
The preflight page has the altimeter setting request and send button. The altimeter setting is the
atmospheric pressure at seal level used to calculate barometric altitude. Push the Req button to
learn the current setting; and push the Send button to alter the setting to whatever is in the edit
box. If the GPS update box is checked before sending the altimeter setting, then the system will
periodically adjust its altimeter setting during the flight such that the barometric altitude output
matches the GPS altitude solution.
Piccolo User’s Guide
Page 32
Cloud Cap
Technology
PO Box 1500, No. 8 Fourth St, Hood River, OR 97031, ph 541 387 2120, fax 541 387 2030
4.8.2 Zero Air Data
The air data sensors (dynamic and barometric pressure) can be zeroed to take out any residual
error before launch. This action should be performed only when the aircraft is on the ground, not
moving, and with the dynamic pressure port shielded from wind. To do this press the Zero Air
Data button. The sensor readings at the time the button is pushed will be stored as the sensor
offset and applied to subsequent readings. If the Actual Altitude field contains a value when
the sensors are zeroed then the barometric pressure zero is also adjusted to match the actual
altitude. It is best to zero the barometric pressure sensor after setting the altimeter setting.
4.8.3 Control surface tests
The control surface test functions are only available when the system is in pre-launch mode and
is not in manual control. The purpose of these tests is to provide means for making sure that the
control surfaces move freely and in the right direction, in the case when no pilot console is
attached to the groundstation.
To test a control surface, press one of the direction buttons, to move the control surface in that
direction. When a button is pressed, a pilot stream packet is being sent, similar to the ones
provided from the pilot console. After the pilot timeout elapses, the control surface returns to the
trim value. The pilot timeout can be adjusted on the Autopilot Limits page.
4.8.4 Validate
Pushing the validate button will cause the operator interface to downlink parameters from the
aircraft and compare them against a file of parameters. The file name is based upon the
description field (a string field stored on the avionics and requested by the operator interface), or,
if the file doesn’t exist, the OI will prompt the user to supply it. If the comparison shows that all
parameters are correct, the operator interface will indicate “validation succeeded!”. If any
parameter does not match the offending parameter will be displayed to the user.
This feature is intended to allow operators to make sure that the avionics is correctly configured
for the aircraft that they are operating. Accordingly the parameters that are compared are those
which are specific to a type of aircraft, but not a specific vehicle. Hence the sensor calibrations,
surface calibrations, and autopilot trims are not compared.
4.9 Autopilot limits
The limits page is used to view and alter the autopilot and mission limits.
4.9.1 Command limits
The airspeed, altitude, and turn rate commands are limited by max and min dynamic pressure,
max and min altitude, and max and min bank angle. The Piccolo autopilot is mostly de-coupled
between longitudinal and lateral control, hence extending the bank angle limits beyond 30°
should only be done with caution.
4.9.2 Output limits
In addition to the command limits this page also shows the output limits. The five outputs from
the autopilot will not exceed the values given here. To see the current limits press the Request
Limits button. To change the limits press the Send Limits button.
Piccolo User’s Guide
Page 33
Cloud Cap
Technology
PO Box 1500, No. 8 Fourth St, Hood River, OR 97031, ph 541 387 2120, fax 541 387 2030
Figure 18. Autopilot limits page
4.9.3 Mission limits
The limits page also shows the mission limits.
•
The Pilot timeout gives the amount of time the system will remain in manual control
mode without new manual control inputs. If this timeout elapses the system will
automatically switch to autopilot mode. The pilot timeout should never be set to zero as
this will block the possibility of manual flight.
•
If communications fail entirely for the time defined in Comm timeout the avionics will
take action by flying the flight plan indicated by the Lost comm waypoint. It is
important to note that the lost communications waypoint identifies a whole flight plan,
not just a single waypoint. When the communications timeout elapses, the avionics
examines the lost comm flight plan and makes an intelligent choice of the waypoint to
use. The choice is based on finding the waypoint that is closest to the avionics AND
which is closer to the termination point of the flight plan than the avionics is.
•
The GPS timeout defines the amount of time for the aircraft to continue to perform
normally without a new GPS solution. When the time expires, the GPS timeout will be
asserted for flight termination.
•
The Autoland waypoint defines the entry point to the landing flightplan. It can be
specified on this page, but it will also be updated every time a new landing plan is created
Piccolo User’s Guide
Page 34
Cloud Cap
Technology
PO Box 1500, No. 8 Fourth St, Hood River, OR 97031, ph 541 387 2120, fax 541 387 2030
from the Map page. When the Land now button is clicked on the Autopilot Commands
page, the navigator will send the aircraft to this waypoint. Also, when the landing is
aborted, the navigator will send the aircraft to this waypoint.
The Flight Termination panel allows the user to specify which conditions have to be met for
flight termination to be asserted. Depending on which checkboxes are checked, the flight
termination may happen if GPS times out, or comm times out or both GPS and communications
time out.
The next panel below allows the user to specify what the system should do when flight
termination is asserted. The available actions can be:
•
Close the throttle - this will cause the airplane to glide to the ground while still tracking
or attempting to track the current flightplan.
•
Drop deadman line - the deadman is an output switch which requires a continuous
hardware refresh in order to stay active. Hence if the system fails for any reason the
switch will turn off. For safety the deadman can be connected to the engine ignition, or
some flight termination system (parachute deployment, for example).
•
Aerodynamic termination - this will close the throttle, command maximum right aileron
and rudder, up elevator, and maximum flaps.
The deadman can also be dropped when the user (or flight termination, or landing logic) kills the
engine. This is useful for vehicles which are using the deadman line as an engine on/off feature.
4.10 Sensors
The sensors page gives the current sensor readings, the gyro bias estimates, the magnetometer
calibration, the ability to zero the sensors and set the avionics orientation with respect to the
aircraft body-frame.
4.10.1 Zeroing sensors
There are two sensor zeroing buttons:
•
The Zero All button will remove residual errors in all inertial and air data sensors. This
includes the 3 accelerometers, the 3 rate gyros, the Pitot and static pressure sensors. Since
the system automatically estimates gyro biases, the Zero All function is seldom
necessary.
Warning ! The Zero All function requires the aircraft to be perfectly level and
motionless. Since accurate level orientation is difficult to achieve in the field,
this function should be used only in the lab.
•
The Zero Air Data button will remove residual errors in the Pitot and static pressure
sensors. If the Actual Altitude field contains a value when the sensors are zeroed then
the altitude zero is also adjusted to match the actual altitude. When zeroing the air data
systems be sure there is no effect from wind on the pitot tube. The best way to do this is
to shield the pitot tube from the wind. When shielding the pitot tube be sure that the tube
is still vented to the atmostphere, i.e. don’t completely seal it.
Piccolo User’s Guide
Page 35
Cloud Cap
Technology
PO Box 1500, No. 8 Fourth St, Hood River, OR 97031, ph 541 387 2120, fax 541 387 2030
Figure 19. Sensor calibrations
4.10.2 Gyro bias estimate
Even with temperature compensation the gyros have more drift than is acceptable for flight
control. Hence the avionics continuously estimates the bias error in the gyros using data from
the GPS. The bias estimates are displayed in the gyro bias estimate box.
4.10.3 Gyros in the original Piccolo
The gyros are the most crucial sensors for basic stability of the vehicle. They are also the most
sensitive to disturbances. In particular the most common problem with the gyros results from
rapid temperature changes. These errors are most visible in the gyro bias numbers. The gyros
have about ±100°/s at 10 bits of dynamic range. Hence if the bias value approaches these limits
the gyros will stop functioning as the sampling hardware becomes saturated. The gyro
calibration scheme used in the Piccolo provides for a hardware shift of the gyros. Hence the
actual offset number displayed on the calibration pages represents an offset in hardware rather
than software. The Piccolo software will automatically shift the gyro hardware bias if it detects
that the gyro errors are becoming too large for correct operation of the system.
4.10.4 Gyros in Piccolo Plus and Piccolo II
The gyros used in Piccolo Plus are much more stable and robust than those used in Piccolo; as
well as having more dynamic range (±300°/s at 16 bits). Hence the hardware shifting done in
Piccolo has been eliminated in Piccolo Plus and Piccolo II.
Piccolo User’s Guide
Page 36
Cloud Cap
Technology
PO Box 1500, No. 8 Fourth St, Hood River, OR 97031, ph 541 387 2120, fax 541 387 2030
4.10.5 Installation orientation
Since the avionics has 3-axis gyros and accelerometers it can be installed in any orientation and
the readings rotated to match the installation angles. The installation orientation is given by the
three Euler angles Yaw (psi), Pitch (theta), and Roll (phi). Currently the Operator Interface only
supports choosing Euler angles that are along principal axes of the vehicle. There are 24
different possible principal axes orientations, which can be selected with the Principal axis
options spin buttons. The Euler angles are used to describe the rotation from the avionics
coordinate frame to the vehicle coordinate frame. The avionics coordinate frame is marked on
the front panel of the box. To change the angles press the Send Euler Angles button.
4.11 Surfaces
The surfaces page is used to control how the five autopilot outputs are mixed and matched to
generate up to ten servo outputs; and also to provide the calibration information to go from
surface angle to servo pulse width.
4.11.1 Actuator calibrations
In a real airplane the surface position, direction of travel, and amount of travel depend on the
actuator to surface linkage design. In order to account for variations in the linkage the autopilot
and/or mixer outputs are translated to actuator signals via calibration data. The calibration data
account for sign convention, surface neutral, travel limits, and any non-linearities in the surface
motion.
Each channel has its own calibration data, an example of which can be seen in Figure 20. The
data relates the actuator pulse width in microseconds to the surface motion in degrees. In the
case of the throttle the surface position is interpreted as fraction of full scale, and is always
between 0.0 and 1.0. The surface position data are usually given in ascending order, and the
pulse widths are in ascending or descending order. The sign convention on the surface deflection
has the following rules: flaps, ailerons, and elevators are all positive down. Rudders are positive
right. For ruddervators the sign convention follows the elevator rule, i.e. positive down.
The autopilot outputs 5 signals that are then adjusted using the output mode (5 or 10 channel)
and mixing rules. The resulting outputs are then converted to pulse widths via piecewise-linear
interpolated lookups through each channel’s calibration data. If the requested deflection is
outside of the table, then the pulse width is limited to the extremes in the table. Although the
pulse width column in Figure 20 is regularly spaced, this is not required. Note the extreme pulse
width values of 1103 and 1929. These correspond to ±100% pulse width as measured from a
Futaba pilot console.
The Request all data button will trigger the avionics to send all of its surface setup
information. On the left of the page the mixing options are given. To change only the mixing
options alter the settings accordingly and then press the Send Config button. To change all
surface settings including mixing and calibrations, use the Send all data button.
Piccolo User’s Guide
Page 37
Cloud Cap
Technology
PO Box 1500, No. 8 Fourth St, Hood River, OR 97031, ph 541 387 2120, fax 541 387 2030
Figure 20. Surface calibration page
The surfaces page only shows the pulse width to angle calibration for one surface at a time. The
surface displayed is chosen with the Surface selection radio buttons. To change the surface
calibration table enter in the new table data; then press Order Table, which will put the table in
order of increasing angles, then press Send Table.
In order to determine the calibration numbers it is helpful to be able to explicitly set the pulse
width being sent to any given channel. This can be done with the surface test feature in the
bottom left corner of the page. To use the feature the autopilot must be on (i.e. not in manual
control). Enter in a desired pulse width and press the Test Pulse button. The requested pulse
width will be sent out the selected channel for 60 seconds. While the pulse is being sent you can
measure the actual surface deflection. By doing this for each desired pulse width the surface
calibration table can be built up. The inverse function of commanding the surface to deflect a
certain angle is also available, using the Test Angle button.
4.11.2 5 channel mode
In this mode only 5 output channels are used. The channel mapping depends on the type of
mixing option that is to be supported, see Figure 21. Note that in 5-channel mode flaperon and
elevon mixing cannot be used simultaneously, elevon and ruddervator mixing cannot be used
simultaneously, and aileron differential is only available in flaperon mode.
Piccolo User’s Guide
Page 38
Cloud Cap
Technology
PO Box 1500, No. 8 Fourth St, Hood River, OR 97031, ph 541 387 2120, fax 541 387 2030
Roll
Left aileron
Aileron differential
-1.0
Right aileron
Left aileron
Aileron
differential
Channel 1
Optional Flaperon
mixing
Right aileron
Channel 5
Autopilot or manuall pilot commands
Roll
Pitch
Left elevator
Optional Flap
to Elevator
mixing
Channel 2
Optional Elevon
mixing
Right elevator
Channel 1
Engine
Channel 3
Yaw
Aileron to
Rudder
Left Rudder
Channel 4
Optional
Ruddervator
mixing
Aileron to
rudder mixing
Right Rudder
Flap
Left Flap
Channel 2
Channel 5
Figure 21. 5-channel servo output diagram
4.11.3 10 channel mode
In this mode all 10 output channels are used. The channel mapping depends on the type of
mixing option that is to be supported, see Figure 22.
Piccolo User’s Guide
Page 39
Cloud Cap
Technology
PO Box 1500, No. 8 Fourth St, Hood River, OR 97031, ph 541 387 2120, fax 541 387 2030
Roll
Left aileron
Left aileron
Aileron
differential
Aileron differential
x -1.0
Right aileron
Autopilot or manual pilot commands
Pitch
Channel 1
Optional Flaperon
mixing
Right aileron
Channel 6
Left elevator
Optional Flap
to Elevator
mixing
Channel 2
Optional Elevon
mixing
Right elevator
Engine
Left Throttle
Channel 3
Right Throttle
Channel 8
Yaw
Aileron to
Rudder
Channel 7
Left
Channel 4
Optional
Ruddervator
mixing
Aileron to
rudder mixing
Right
Flap
Channel 9
Left Flap
Channel 5
Right Flap
Channel 10
Figure 22. 10-channel servo output diagram
4.11.4 Aileron differential
Aileron differential is used to control the ratio of up aileron motion to down aileron motion. By
adjusting the aileron differential the designer can guard against tip stall induced by downward
aileron motion, or remove asymmetries caused by the up aileron moving into more sluggish air
than the down aileron.
Left aileron
=Left*(1-sign(Left)*Diff)
Left aileron
Diff
Right aileron
=Right*(1-sign(Right)*Diff)
Right aileron
Figure 23. Aileron differential
The differential parameter in Figure 23 controls how the differential is applied. When
differential is zero the up and down aileron motions are equal; when it is 1.0 the ailerons only
move upwards; and when it is –1.0 the ailerons only move downwards.
Piccolo User’s Guide
Page 40
Cloud Cap
Technology
PO Box 1500, No. 8 Fourth St, Hood River, OR 97031, ph 541 387 2120, fax 541 387 2030
4.11.5 Aileron to rudder mixing
In this mode the aileron output from the autopilot is summed with the rudder output to form a
new rudder output. The aileron output is unchanged. This feature is useful for aircraft that have
strong adverse yaw characteristics that must be countered; or for aircraft which have their
primary roll control via the rudder.
Yaw command
= Yaw + (Roll*Mixing)
Left rudder
Mixing
= Yaw + (Roll*Mixing)
Roll command
Right rudder
Figure 24. Aileron to rudder mixing
4.11.6 Flap to elevator mixing
The flap to elevator mixing is used to compensate for the change in elevator trim as the flaps are
moved. Most vehicles will use a positive amount of flap to elevator mixing(i.e. positive flap
deflection causes positive elevator deflection).
4.11.7 Flaperon mixing
In this mode the ailerons are used to provide aileron and flap functions. This is done by biasing
the aileron outputs with the flap output, according to Figure 25. Note that the flaperon value can
be positive or negative. A flaperon of 100% will cause the ailerons to move down as far as the
flaps move down. A flaperon of –100% will cause the ailerons to move up as far as the flaps
move down.
Left aileron
Left flaperon
= Left + Flap
Flap command
Flap
X
Flaperon
Right aileron
= Right + Flap
Right flaperon
Figure 25. Flaperon mixing
4.11.8 Elevon mixing
In this mode two elevator like surfaces are used to provide aileron and elevator functions. This is
done by biasing the elevator outputs with the aileron output according to Figure 26.
Left elevator
= Left + Aileron
Left elevon
Aileron
Right elevator
= Right - Aileron
Right elevon
Figure 26. Elevon mixing
Piccolo User’s Guide
Page 41
Cloud Cap
Technology
PO Box 1500, No. 8 Fourth St, Hood River, OR 97031, ph 541 387 2120, fax 541 387 2030
4.11.9 Ruddervator mixing
This mode is used for V-tail operation, in which the rudder and elevator outputs are mixed
together. Ruddervator mixing depends on the type of V-tail, either upright (\/)or inverted (/\).
When defining rudder motion for a V-tail, the sign convention follows the same one used in the
elevators.
Standard ruddervator (\/)
Left
rudder
= Elevator - Left
Left
rudder
Elevator
Right
rudder
= Elevator + Right
Right
rudder
Inverted ruddervator (/\)
Left
rudder
= Elevator + Left
Left
rudder
Elevator
Right
rudder
= Elevator - Right
Right
rudder
Figure 27. Ruddervator mixing
4.11.10 Nose Gear
A separate channel can be specified for the nose gear, by typing the desired channel number
(from 1 to 10) in the Nose Gear edit box. This allows separate calibration of the gear servo and
independent control of the vehicle steering on the ground.
Piccolo User’s Guide
Page 42
Cloud Cap
Technology
PO Box 1500, No. 8 Fourth St, Hood River, OR 97031, ph 541 387 2120, fax 541 387 2030
4.12 Autopilot gains
The gains page is used to view and alter the autopilot gains.
Figure 28. Autopilot gains page
Table 5. Autopilot loops
Loop
Dynamic
Pressure
Inputs
Dynamic
pressure
error [Pa]
Outputs
Elevator
[rad]
Altitude
Barometric
altitude
error [m]
Roll angle
error
[rad]
Throttle
[0-1]
Position,
Velocity
Turn
rate
Command
[rad/s]
Roll
Tracker
Piccolo User’s Guide
Aileron,
Rudder
[rad]
Scaling
Gains scale with
dynamic pressure,
reference at 380
Pa.
No scaling
Notes
Maintains a commanded
dynamic pressure.
Gains scale with
dynamic pressure,
reference at 380
Pa.
Convergence
parameter scales
with square of
airspeed,
reference at 25
Maintains a commanded
bank angle.
Maintains a commanded
altitude.
Drives the turn rate
loop to achieve desired
track targets.
Page 43
Cloud Cap
Technology
PO Box 1500, No. 8 Fourth St, Hood River, OR 97031, ph 541 387 2120, fax 541 387 2030
Turn
Yaw rate
[rad]
Aileron,
Rudder
[rad]
Pitch
Pitch
angle
[rad]
Elevator
[rad]
Yaw
Yaw rate
[rad/s]
Rudder
[rad]
Altitude2
Barometric
altitude
error [m]
Elevator
[rad]
Adjust
speed
Barometric
altitude
error [m]
Turn compensator
Bank angle
[rad]
Dynamic
pressure
command
[Pa]
Elevaotr
[rad],
Throttle
[0-1]
m/s
Gains scale with
dynamic pressure,
reference at 380
Pa.
Gains scale with
dynamic pressure,
reference at 380
Pa.
Gains scale with
dynamic pressure,
reference at 380
Pa.
Gains scale with
dynamic pressure,
reference at 380
Pa.
No scaling
Gains scaled in
control law.
Alternative turn rate
control for maintaining
a commanded turn rate.
Damps out pitch
oscillations.
Damps out yaw
oscillations.
Improved tracking of
commanded altitude or
glideslope.
Improved tracking of
commanded altitude or
glideslope.
Helps maintain the TAS
command when entering or
exiting a turn.
To see the current gains press the Request Gains button. When the avionics responds the
Gains in Synch field will turn green. To change the gains alter one of the fields and push the
Send Gains button. Adjustments to the gains should be done first on the simulator before finetuning in flight. See the “Steps to Autonomous Flight” and “Initial Flight Test Cards” for more
information about setting gains.
4.12.1 Dynamic pressure to elevator
These gains are used to feed dynamic pressure error (in Pascals) to the elevator (in radians). This
controls the airspeed of the vehicle, and helps damp slow (phugoid) longitudinal oscillations.
4.12.2 Yaw rate to aileron
These gains are normally not used, since the roll angle to aileron gains do a better job of
managing the turn rate of the vehicle. However certain classes of vehicle may work better with
these gains. They are used to control the turn rate of the vehicle by feeding the yaw rate (in
radians per second) to the aileron command (in radians).
4.12.3 Altitude to elevator
Version 1.3.0 introduces a new altitude controller. The derivative gain term of this loop sets the
vertical rate command and is interpreted as meters per second of vertical rate per meter of
altitude error. The proportional and integral terms feedback vertical rate error (in meters per
second) to the throttle. The altitude rate term controls how quickly the autopilot can move the
throttle.
Piccolo User’s Guide
Page 44
Cloud Cap
Technology
PO Box 1500, No. 8 Fourth St, Hood River, OR 97031, ph 541 387 2120, fax 541 387 2030
4.12.4 GPS to turn rate
This loop is used to steer the vehicle to the waypoint. The proportional and derivative terms
feedback heading error (in radians) to turn rate command (in radians per second). The
convergence parameter (in meters) controls the shape of the trajectory the vehicle flies as it
approaches track. Larger values produce smoother operation but take more time to converge.
4.12.5 Roll to aileron
These terms feed back the bank angle error (in radians) to the aileron command (in radians).
This is the primary method of controlling the vehicle turn rate. The autopilot will not allow an
integral gain term to be set for this loop and for the yaw rate to aileron loop at the same time.
4.12.6 Pitch to elevator
These terms feed back the pitch angle (in radians) to the elevator (in radians). This helps damp
some pitch oscillations. It is not strictly required, but can help to improve the longitudinal
performance of the autopilot.
4.12.7 Yaw rate to rudder
This term feeds back the yaw rate (in radians per second) to the rudder (in radians). It is used to
damp yaw oscillations.
4.12.8 Altitude to elevator
These terms are used to improve the ability of the autopilot to hold altitude. They are not
normally required, but can make a difference for certain cases, such as autoland where tight
control of the altitude is required.
When enabled the adjust speed option will cause the autopilot to change its dynamic pressure
command in order to reach the target altitude. This can be useful when the system is operating in
air with large vertical motions (thermals).
4.12.9 Turn compensation
• When turn compensation is enabled the autopilot adjusts the pitch rate command fed to
the pitch damper to
•
The bank to elevator term is used to help keep the nose up through a turn. It represents
the change in elevator angle needed to affect the change in load factor dictated by the
bank angle. The gain supplied should be calculated according to the formula: W /
(Sw(δCL/δE)), where:
o W is the weight of the vehicle in Newtons.
o Sw is the wing area in square meters.
o δCL/δE is the change in lift coefficient per change in elevator.
•
The bank to throttle term is used to help maintain the energy state of the vehicle through
a turn. It represents the change in throttle needed to balance the increase in drag due to
the change in load factor. The gain supplied should be calcualted according to the
formula: W / (πeAR(δP/δT)), where:
o W is the weight of the vehicle in Newtons.
o e is the span efficiency factor.
o AR is the aspect ratio
Piccolo User’s Guide
Page 45
Cloud Cap
Technology
PO Box 1500, No. 8 Fourth St, Hood River, OR 97031, ph 541 387 2120, fax 541 387 2030
o δP/δT is the change in power (in Watts) per throttle motion.
4.12.10 Surface display
The gains page also gives a display of the current control surface positions, both the left and
right. The labels on the control surface display will update according to the type of mixing
selected in the surfaces page (i.e. elevons, ruddervator, etc.).
4.12.11 Initial Trime
To the right of the surface display is the initial trim value. Whenever a loop is turned from off to
on, its integrator gets initialized. The turn rate, airspeed, altitude, and yaw damper loops get
initialized to the value displayed in the Initial trim display. The other loop integrators get
initialized to 0. To request the current trim setting push Request Trim. You can enter trim
values and push the Send Trim button to change them. You can also tell the avionics to use its
current loop commands as the trim value by pushing the Capture Trim button.
4.13 Payload pages
The payload pages give the user the ability to control and reconfigure the I/O lines on the 44-pin
external connector and - in the case of a Piccolo II - the additional I/O lines on the 25-pin
microdot connector. Ordinarily the manipulation of these lines is done through third-party
applications, which can provide the user with an application specific interface. However, the
Operator Interface provides a generic payload control display that can be used for testing
purposes - see Figure 29 for the first payload page and Figure 30 for the second payload page.
Piccolo User’s Guide
Page 46
Cloud Cap
Technology
PO Box 1500, No. 8 Fourth St, Hood River, OR 97031, ph 541 387 2120, fax 541 387 2030
Figure 29. The first payload page.
Piccolo User’s Guide
Page 47
Cloud Cap
Technology
PO Box 1500, No. 8 Fourth St, Hood River, OR 97031, ph 541 387 2120, fax 541 387 2030
Figure 30. The second payload page.
For the Piccolo and Piccolo Plus avionics, there are twelve I/O lines and two serial ports that can
be manipulated. On the Piccolo II, there are sixteen digital I/O lines, three serial ports, and four
analog inputs available. Consult Table 6 to find out what I/O lines are available on your
avionics.
Table 6. I/O line availability.
I/O Line
Right Aileron
Right Elevator
Right Throttle
Right Rudder
Right Flap
TPU_B2
TPU_B3
Left Aileron
Left Elevator
Left Throttle
Left Rudder
Left Flap
TPU_B8
Piccolo User’s Guide
Piccolo
x
x
x
x
x
x
x
x
x
x
x
x
Availability
Piccolo Plus
x
x
x
x
x
x
x
x
x
x
x
x
Piccolo II
x
x
x
x
x
x
x
x
x
x
x
x
x
Page 48
Cloud Cap
Technology
TPU_B9
TPU_B10
TPU_B11
AN0
AN1
AN2
AN3
Payload
Payload 2
Comm
PO Box 1500, No. 8 Fourth St, Hood River, OR 97031, ph 541 387 2120, fax 541 387 2030
x
x
x
x
x
x
x
x
x
x
x
x
x
x
4.13.1 Digital I/O Lines
Each of the digital I/O lines has a primary function and several alternate functions. For each
digital I/O line, the function can be changed by selecting it from the pull-down list - see Figure
31, filling-in Parameter1 and Parameter2 if necessary, and clicking the Send button for that
particular I/O line.
Figure 31. Pull-down list with all available functions.
See Table 7, Table 8, and Table 9 for a description of all functions / modes of operation. Please
note that the digital lines listed in Table 8 are accessible only on the Piccolo II avionics.
Table 7. Digital I/O lines available on the 44-pin connector for payload expansion
Piccolo User’s Guide
Page 49
Cloud Cap
Technology
PO Box 1500, No. 8 Fourth St, Hood River, OR 97031, ph 541 387 2120, fax 541 387 2030
Pin
44
Name
PWMSM[0]
Type
I/O
43
PWMSM[1]
I/O
42
PWMSM[2]
I/O
41
PWMSM[3]
I/O
Primary function
Left aileron
pulse
Left elevator
pulse
Left throttle
pulse
Left rudder pulse
40
PWMSM[4]
I/O
Left flap pulse
39
TPU_A[0]
I/O
38
TPU_A[1]
I/O
37
TPU_A[2]
I/O
36
TPU_A[3]
I/O
35
5
20
3132
TPU_A[4]
TPU_B[2]
TPU_B[3]
Comm Port
I/O
I/O
I/O
Seri
al
Right aileron
pulse
Right elevator
pulse
Right throttle
pulse
Right rudder
pulse
Right flap pulse
Left RPM
Right RPM
Comms, no flow
control, at
57,600 baud
3334
Payload
Port
Seri
al
Payload stream
data at 57,600
baud
Alternate functions
Discrete I/O; pulse/period
output
Discrete I/O; pulse/period
output
Discrete I/O; pulse/period
output
Discrete I/O; pulse/period
output
Discrete I/O; pulse/period
output
Discrete I/O; pulse/period I/O
Discrete I/O;
pulse/period I/O
Discrete I/O;
pulse/period I/O
Discrete I/O;
pulse/period I/O
Discrete I/O; pulse/period I/O
Discrete I/O; pulse/period I/O
Discrete I/O; pulse/period I/O
External comm at user baud rate;
Payload stream data at user baud
rates less than 56K; Secondary
payload stream data at user baud
rates less than 56K; NMEA
output; Honeywell HMR2300
magnetometer protocol.
External comm at user baud rate;
Payload stream data at user baud
rates less than 56K; Secondary
payload stream data at user baud
rates less than 56K; NMEA
output; Honeywell HMR2300
magnetometer protocol.
Table 8. Digital I/O lines available on the 25-pin microdot connector (Piccolo II only)
Pin
21
19
17
15
1-3
Name
TPU_B[8]
TPU_B[9]
TPU_B[10]
TPU_B[11]
Payload 2
Port
Type
I/O
I/O
I/O
I/O
Seri
al
Primary function
Disabled
Disabled
Disabled
Disabled
Secondary payload
stream data at
57,600 baud
Alternate functions
Discrete I/O; pulse/period I/O
Discrete I/O; pulse/period I/O
Discrete I/O; pulse/period I/O
Discrete I/O; pulse/period I/O
External comm. at user baud
rate; Payload stream data at
user baud rates less than 56K;
Secondary payload stream data at
user baud rates less than 56K;
NMEA output; Honeywell HMR2300
magnetometer protocol.
Table 9. Modes of operation for the payload digital lines.
Piccolo User’s Guide
Page 50
Cloud Cap
Technology
PO Box 1500, No. 8 Fourth St, Hood River, OR 97031, ph 541 387 2120, fax 541 387 2030
Modes
Default
Discrete Out
Discrete In
Pulse/Period Out
#
0
1
2
3
Inverted
Pulse/Period Out
Pulse In
4
5
Inverted Pulse In
6
Period In
7
Inverted Period
In
Lights
Parachute Servo
8
Parachute
Discrete
Drop Servo
Drop Discrete
Brakes Servo
Brakes Discrete
AGL Trigger
AGL Sense
AGL blank inhibit
Parachute Servo
Engine on
Parachute
Discrete Engine
on
Launch sense
Iridium power
control
9
10
11
12
13
14
15
16
17
18
19
20
21
22
Description
Signal operates as its primary function
Operates as a discrete output.
Operates as a discrete input.
Generates a repeating square wave with user
specifiable period and high time.
Generates a repeating square wave with user
specifiable period and low time.
Measures the time between the rising and falling edge
the signal, only valid for the TPUs.
Measures the time between the falling and rising edge
of the signal, only valid for the TPUs.
Measures the time between rising edges, only valid for
the TPUs.
Measures the time between falling edges, only valid
for the TPUs.
Turn lights on or off.
Actuate a servo to trigger parachute release. Engine
will also be killed.
Assert/deassert an I/O line to trigger parachute
release. Engine will also be killed.
Actuate a servo to trigger drop mechanism.
Assert/deassert an I/O line to trigger drop mechanism.
Actuate a servo to engage brakes.
Assert/deassert an I/O line to engage brakes.
Trigger the sonic AGL sensor.
Sample the sonic AGL sensor, only valid for the TPUs.
Used to inhibit blanking for low altitude readings,
only valid for the TPUs.
Actuate a servo to trigger parachute release. Engine
will remain on.
Assert/deassert an I/O line to trigger parachute
release. Engine will remain on.
Used to hold the autopilot in prelaunch mode even when
the airspeed signal indicates it is flying, only valid
for the TPUs.
One digital line must be dedicated to this type of
output if an Iridium modem and its associated power
control hardware are connected to the avionics. The
function allows the user to turn the Iridium modem
power on/off.
Each signal line has two 32-bit parameters that are used to describe its functionality. The
meaning of each parameter depends on the mode of operation and they are listed in Table 10.
Table 10. Parameters for different operational modes of the payload digital lines.
Modes
Meaning
Default
Discrete Out
N/A
Zero for low output, nonzero for
high output.
Piccolo User’s Guide
of first parameter
Meaning of second
parameter
N/A
N/A
Page 51
Cloud Cap
Technology
Discrete In
Pulse/Period Out
Inverted
Pulse/Period Out
Pulse In
Inverted Pulse
In
Period In
Inverted Period
In
Lights
Parachute Servo
Parachute
Discrete
Drop Servo
Drop Discrete
Brakes Servo
Brakes Discrete
AGL Trigger
AGL Sense
AGL inhibit
Parachute Servo
Engine on
Chute Discrete
Engine on
Launch sense
Iridium power
control
PO Box 1500, No. 8 Fourth St, Hood River, OR 97031, ph 541 387 2120, fax 541 387 2030
N/A
Period of the output signal in
nanoseconds.
Period of the output signal in
nanoseconds.
Number of input periods over
which to accumulate the signal.
Number of input periods over
which to accumulate the signal.
Number of input periods over
which to accumulate the signal.
Number of input periods over
which to accumulate the signal.
State of the output line when
the lights are off
Pulse width of the signal in
nanoseconds when the parachute
is retracted.
State of the output line when
the parachute is retracted.
Pulse width of the signal in
nanoseconds when the drop
function is off.
State of the output line when
the drop function is off.
Pulse width of the signal in
nanoseconds when the brakes are
fully released.
State of the output line when
the brakes are off.
N/A
N/A
N/A
Pulse width of the signal in
nanoseconds when the parachute
is retracted.
State of the output line when
the parachute is retracted.
State of the input line that
causes the autopilot to remain
in prelaunch.
State of the output line. The
corelation between low and high
states of this line and the
actual power-on and power-off
states of the Iridium modem
depends on the particular
Iridium power control hardware
that is used.
N/A
Pulse width of the output
signal in nanoseconds.
Pulse width of the output
signal in nanoseconds.
N/A
N/A
N/A
N/A
N/A
Pulse width of the signal
in nanoseconds when the
parachute is deployed.
N/A
Pulse width of the signal
in nanoseconds when the
drop function is on.
N/A
Pulse width of the signal
in nanoseconds when the
brakes are fully applied.
N/A
N/A
N/A
N/A
Pulse width of the signal
in nanoseconds when the
parachute is deployed.
N/A
N/A
N/A
The Sample boxes that are provided for each of the digital I/O lines are used to display the input
value, for the lines which are configured as inputs. All of the digital inputs are sampled and sent
from the avionics to the ground at once, at the fixed time intervals specified by the Sample Time
Piccolo User’s Guide
Page 52
Cloud Cap
Technology
PO Box 1500, No. 8 Fourth St, Hood River, OR 97031, ph 541 387 2120, fax 541 387 2030
box, but no faster than 100 ms. If the sample time is zero, the inputs are not sampled and no
samples are being downloaded to the groundstation.
Here are some examples of setting-up digital lines:
1. Configuring the TPU_A[3] line to output a constant PWM servo output. The specification
to the output we want is: pulse period 20 ms, pulse width 1.219 ms. We pick the appropriate
mode of operation for the TPU_A[3] line which on the Payload page is listed by its primary
function (right rudder). Then we set the first parameter to 20000000 nanoseconds, and the second
parameter to 1219000 nanoseconds. At this time the settings should look like in Figure 32.
Finally we press the Send button to send these new settings for this particular digital line to the
avionics.
Figure 32. Configuring a digital line for constant PWM servo output.
2. Configuring the TPU_B[3] line to sample a discrete input. We want the avionics to sample
a digital line and send the measurement to the ground at a fixed rate of 4 Hz. Since the TPU line
goes straight into the avionics processor, we would have to make sure that the voltage on this
line will never exceed 5 V. Assuming this condition is met, we can sample the line with the
settings shown in Figure 33. We then press the Send button and at that time the line will be reconfigured and the rate at which the digital input are sampled and downloaded will be set to 4
Hz.
Figure 33. Configuring a digital line for discrete input.
Piccolo User’s Guide
Page 53
Cloud Cap
Technology
PO Box 1500, No. 8 Fourth St, Hood River, OR 97031, ph 541 387 2120, fax 541 387 2030
4.13.2 Analog Input Lines
For the Piccolo II only, the payload page allows the user to configure the scaling and display of
the analog readouts of the 4 input lines available on the avionics.
Each line has a primary function and several alternate function. Please note that these functions
refer only to how the measurement is scaled and displayed. The only "physical" function of these
lines is analog voltage input, in the 0 - 5 Volt range. The analog channels are listed in Table 11,
and their modes of operation in Table 12.
Table 11. Analog input lines available on the 25-pin microdot connector (Piccolo II only)
Pin
12
Name
AN0
Type
AIN
Primary function
Analog
measurement in
millivolts
Analog sample in
millivolts
11
AN1
AIN
10
AN2
AIN
Analog sample in
millivolts
9
AN3
AIN
Analog sample in
millivolts
Alternate functions
Raw ADC counts; Custom analog
measurement with offset and
scale factor
Raw ADC counts; Custom analog
measurement with offset and
scale factor
Raw ADC counts; Custom analog
measurement with offset and
scale factor
Raw ADC counts; Custom analog
measurement with offset and
scale factor
Table 12. Modes of operation for the analog input lines
Modes
Default
#
0
Raw input
1
Scaled input
2
Description
Signal operates as its primary function - millivolt
measurement output, range is 0 to 5000 mV.
Outputs the analog measurement in raw ADC counts,
range is 0 to 1023.
Customize the analog measurement with an offset and a
scale factor.
As shown in Table 13, the two parameters are only used when the line is configured for scaled
input mode. In this mode of operation, the analog measurement will be offset by the number
specified in Parameter1 and scaled by the number specified in Parameter2 as shown in the
formula below:
Scaled Input = (Scale Factor / 1,000,000) x (Raw Input - Offset)
Table 13. Parameters for different operation modes for the analog input lines
Modes
Meaning
Default
Raw input
Scaled input
N/A
N/A
Measurement offset in ADC counts
Piccolo User’s Guide
of first parameter
Meaning of second
parameter
N/A
N/A
Scale factor (number of
Page 54
Cloud Cap
Technology
PO Box 1500, No. 8 Fourth St, Hood River, OR 97031, ph 541 387 2120, fax 541 387 2030
(range is 0 to 1023) (number of
counts for a zero-reading).
custom units per ADC count
and multiplied by one
million).
As an example, if we have a temperature sensor with a range of -40 to 80 deg. C, and 0 to 5 V
analog output range, we would need the following settings:
The scale factor is the range of the sensor measurement divided by the range of the A/D
converter which is 1023 counts, and multiplied by one million:
ScaleFactor = (80 + 40) / 1023 * 1000000 = 117302
The offset represents the number of A/D converter counts when the thermometer is measuring 0
deg. C. Normally this would be obtained through calibration, but for this example we can assume
a linear dependence:
Offset = 40 / (80 + 40) * 1023 = 341 counts
Setting the mode of the analog input line to "Scaled Input" and putting the offset and scale factor
computed above in parameter 1 respectively parameter 2, we obtain the settings shown in Figure
34.
The sampling of the analog inputs in the avionics happens at the same time the digital inputs are
sampled, and the time interval between samples can be adjusted from the "Sample Time" edit
box. The smallest sample time allowed is 0.1 seconds. If the sample time is set to zero, the input
lines will not be sampled.
Figure 34. Example of custom scaling for analog measurement on input line AN0.
4.13.3 Serial Ports
The payload control page also gives the ability to set the protocol and baud rate for the three
external serial ports. The ports are named according to the default functions:
•
The communications port is nominally used for external communications using the same
communications protocol that runs over the internal UHF link.
Piccolo User’s Guide
Page 55
Cloud Cap
Technology
PO Box 1500, No. 8 Fourth St, Hood River, OR 97031, ph 541 387 2120, fax 541 387 2030
•
The payload port is nominally used to send a bi-directional primary payload stream of
data between the Operator Interface and the avionics.
•
The payload 2 port, available only on the Piccolo II avionics, is nominally used to send a
bi-directional secondary payload stream of data between the Operator Interface and the
avionics.
However, each port can perform any one of the functions in Table 14.
Table 14. Protocols for external serial ports
Protocol
Default
#
0
Comms, Piccolo
flow
Comms no flow
control
Payload pass
through
NMEA out
1
2
3
4
Payload-2 pass
through
Magnetometer 2300
5
6
Reserved1
Reserved2
7
8
Meaning
•
Payload port: Transparent payload stream input and
output.
• Payload 2 port: Transparent secondary payload stream
input and output.
• Comm port: Standard Piccolo communications, without
wireless half duplex flow control
Standard Piccolo communications, with wireless half
duplex flow control
Standard Piccolo communications, without wireless half
duplex flow control
Transparent payload stream input and output.
Output of the NMEA strings GPGGA and GPRMC for each GPS
sample.
Secondary transparent payload stream input and output.
Honeywell HMR2300 3-axis magnetometer protocol, fixed
baud rate at 9600.
N/A
N/A
The protocol for each of the serial ports can be changed by selecting it from a pull-down list, as
show in Figure 35.
Figure 35. Selecting the serial port protocol.
Piccolo User’s Guide
Page 56
Cloud Cap
Technology
PO Box 1500, No. 8 Fourth St, Hood River, OR 97031, ph 541 387 2120, fax 541 387 2030
See the document “Piccolo Communications” for details of the standard Piccolo communications
protocol.
4.14 Parameters Page
The parameters page contains aerodynamic, landing, and launch data specific to the aircraft.
Figure 36. Aircraft Parameters page.
4.14.1 Aircraft parameters
• Wing area: The wing area is the primary area that the aerodynamic lift coefficient data
are referenced to.
• Wing span: The tip to tip distance of the primary lifting surface of the vehicle.
• Incidence: The angle between the reference chord of the wing and the aircraft x-axis.
• CLalpha: The lift curve slope of the aircraft.
• CL0: The lift coefficient at zero angle of attack.
• Mass: The gross mass of the vehicle.
These data are used primarily to estimate the angle of attack of the aircraft. The angle of attack
is estimated by first estimating the lift coefficient according to the wing area, mass, dynamic
pressure, and Z-axis acceleration. Then the angle of attack is calculated according to Alpha =
Piccolo User’s Guide
Page 57
Cloud Cap
Technology
PO Box 1500, No. 8 Fourth St, Hood River, OR 97031, ph 541 387 2120, fax 541 387 2030
(CLest – CL0)/CLalpha. Finally the angle of attack of the x-axis is calculated according to Alpha =
Alpha - Incidence.
4.14.2 Landing parameters
The landing parameters give the data that the avionics will use to build a automating landing
flight plan.
•
•
•
•
•
•
Approach length: The final approach length.
Approach slope: The glideslope of the final approach.
Landing flaps: The flap setting to use when flying a landing flight plan.
Landing IAS: The indicated airspeed to use when flying a landing flight plan.
Engine Kill decision height: The height above the touchdown point at which to kill the
engine and change airspeed.
Flare IAS: The indicated airspeed to use after killing the engine.
4.14.3 Launch parameters
The launch parameters provide the necessary data to setup for an autonomous launch. The
system currently only supports catapult launching. The prelaunch throttle setting gives the
throttle setting that is used while the autopilot mode is in prelaunch. As soon as the autopilot
leaves prelaunch mode the throttle will change to the throttle trim value. A typical fuel-powered
aircraft will have the prelaunch throttle set to 1, so that the system is at maximum power while
on the catapult. A typical electric power aircraft will have the prelaunch throttle set to zero so
the electric motor remains off until the autopilot leaves the prelaunch state.
4.14.4 Global parameter management
Similar to the parameter validation feature on the preflight page (4.8.4) this part of the
parameters page allows the user to download or upload all the parameters used in the validation
process. Select Save all to file or Upload all from file to save or upload parameters
respectively. As with the validation feature this does not affect sensor calibrations, surface
calibrations, or autopilot trims.
The parameter description field gives space to provide a string description of the parameter
settings. The description is stored in EEPROM on the avionics with the other parameters. Press
Send to update the description or Request to get the current description. Note that any changes
made to the parameter settings will cause the parameter description to say “modified”
Piccolo User’s Guide
Page 58
Cloud Cap
Technology
PO Box 1500, No. 8 Fourth St, Hood River, OR 97031, ph 541 387 2120, fax 541 387 2030
5 Development environment
The development environment is the set of tools that allows the vehicle designer to configure the
avionics and software to accommodate the specific application. The tools that make up the
development environment include:
•
•
•
•
•
•
Avionics hardware, with built-in debugging and communication resources.
Software compiler/debugger and driver source code.
Control systems design and analysis tools.
Auto-code generation tools for control systems and state machines.
Aircraft simulation model.
Hardware in loop simulation tools.
While there are many small avionics systems available, few provide all the tools listed above.
Piccolo is novel in part because the development environment was designed in from the
beginning.
5.1 Software environment
Piccolo includes built-in software that will be suitable for many applications, however for those
applications that require fine control over the software, the software source code for the entire
Piccolo system can be licensed.
5.2 Design environment
In recent years new design tools for control systems have come to maturity. The popular Matlab
environment with its controls simulation package Simulink, has been augmented by the addition
of the autocode tool Real-Time-Workshop (RTW). Using these tools control system designers
can graphically model physical plants and design control laws and state machines. The resulting
designs can then be automatically coded in C using RTW, compiled using the software
environment, and downloaded to the target system. Piccolo has more than enough CPU muscle
to run complicated autocoded algorithms. Indeed the basic control software that comes with
Piccolo was designed in exactly this fashion, and Cloud Cap has made the design available to
developers.
5.3 Hardware in loop simulation
Hardware-in-loop (HIL) simulation is a cornerstone of unmanned aircraft development. Welldesigned simulators allow the aircraft control laws and mission functionality to be tested without
risking hardware in flight test. Although HIL simulation cannot replace flight-testing, it
measurably reduces the likelihood of failure by detecting bugs and deficiencies in the lab.
To facilitate this vital (and typically difficult) function the Piccolo developers kit includes a
hardware in the loop simulator that can be used to test the performance of a Piccolo
implementation. The HIL simulator is based upon the external CAN interface. When in
simulation mode Piccolo sends control surface signals and receives sensor inputs from the CAN
interface. A PC with a CAN interface card running the HIL simulation software completes the
necessary hardware. See the documents “Hardware in the Loop simulator for the Piccolo
Avionics” and the “Piccolo Quick Setup Guide” for more details on how to use the simulator.
Piccolo User’s Guide
Page 59
Cloud Cap
Technology
PO Box 1500, No. 8 Fourth St, Hood River, OR 97031, ph 541 387 2120, fax 541 387 2030
5.4 Software in loop simulation
Software in loop simulation provides the same functionality as the hardware-in-loop simulation,
with the difference that the Piccolo and groundstation firmware run on a PC instead of the actual
avionics and groundstation hardware; therefore, the method has the advantage that besides one or
two networked PCs, no other hardware is necessary.
•
The GroundstationPC and PiccoloPC software applications will take the place of the
groundstation and Piccolo avionics.
•
A network TCP/IP socket on port 3000 replaces the CAN-bus connection between the
Simulator and the avionics.
•
The wireless connection between the avionics and the groundstation is replaced by a
multicast network connection to address 224.0.0.1 on port 4004.
•
The serial connection between the groundstation and the Operator Interface is replaced by
a CommSDK network connection on port 2000.
•
To run the software-in-loop simulation, the main computer can be used to run the
Simulator, PiccoloPC, GroundstationPC, and the Operator Interface. Alternatively, if a
second computer is available, you can run the Simulator and PiccoloPC on the main
computer, and run the GroundstationPC, Operator Interface, and the FlightGear visual
display on the secondary computer.
•
If a Windows-compatible joystick is available the GroundstationPC application will use it
as Pilot console.
•
Multiple PiccoloPCs can be run by using the command line switch –SN= to set the serial
number of each software avionics.
Here are the steps to follow when setting up the software-in-loop simulation:
1. On the main computer, launch the PiccoloPC application.
2. On the main computer, launch the GroundstationPC application.
3.
On the secondary computer, launch the Operator Interface with the following command
line:
operatorinterface -SERVER=[MAIN_COMPUTER]:2000
where you need to replace [MAIN_COMPUTER] with the network name of the
computer running GroundstationPC.
4. Make sure that you see the groundstation telemetry, and add the avionics to the network
addresses list if necessary.
5. On the main computer start the Simulator, and from the "External" menu select "AP
Simulation" such that the simulator sends its data to a TCP/IP socket instead of CAN bus,
and specify the computer name as "localhost" if PiccoloPC runs on the same computer.
6. Make sure that in the Operator Interface you can see the sensor data that is being sent
from the Simulator, and in the Simulator you can see the control surfaces that are being
sent by the PiccoloPC. If everything looks in order, the software simulation is ready to
run.
Piccolo User’s Guide
Page 60