1
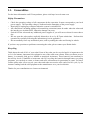
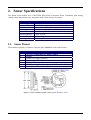
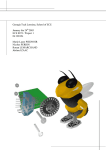
Sonar
USER MANUAL
K-Team S.A.
Version 1.0
Lausanne, 28 February 2001
Documentation author:
K-Team S.A.
Chemin du Vuasset, CP 111
1028 Préverenges
Switzerland
[email protected]
http://www.k-team.com
Trademark Acknowledgements:
MUST00a Plug’n’Play Ultrasonic Sensor: Mr. Robot
Matlab: The Mathworks
LabView: National Instruments
Koala: K-Team S.A.
NOTICE:
•
The contents of this manual are subject to change without notice.
•
The information contained in this manual is, to the best of our knowledge, complete, accurate and
up to date. However, K-Team can assume no responsibility or liability for any inaccuracies or
omissions. Should any errors be detected please inform K-Team S.A.
SONAR USER MANUAL
2
Contents
1. INTRODUCTION..............................................................................................................................................................3
1.1. GENERALITIES ...............................................................................................................................................................4
2. SONAR SPECIFICATIONS .............................................................................................................................................5
2.1. SONAR PINOUT ..............................................................................................................................................................5
3. GETTING STARTED .......................................................................................................................................................6
3.1. TESTING ........................................................................................................................................................................6
3.2. CALIBRATION ................................................................................................................................................................7
4. USING THE SONAR SENSORS......................................................................................................................................8
4.1. USING THE SERIAL PORT ...............................................................................................................................................8
4.2. USING A CUSTOM C PROGRAM .....................................................................................................................................8
5. SOFTWARE EXAMPLE ..................................................................................................................................................9
1. Introduction
Thanks for choosing the ultrasonic sonar extension for Koala! The sonar extension for Koala greatly
expands the obstacle detection capability of the Koala.
The Koala sonar package includes 6 ultrasonic sonar transducers as shown in figure 1. These sensors
can detect obstacles over a wide range from 15cm to 3m, and complement nicely the Koala’s 16
built-in infrared proximity sensors, which have a range from 5cm to 20cm. The Koala can thus use the
sonar sensors for exploring wide-open areas, while using the infrared sensors as a “virtual bumper”
and for negotiating tight spaces.
In addition, the independent sonar modules can be oriented in any direction and mounted in any
desired configuration, or even used for other applications!
Figure 1 - Koala equipped with 6 sonar sensors
SONAR USER MANUAL
3
1.1. Generalities
For the latest information on K-Team products, please visit http://www.k-team.com
Safety Precautions
•
•
•
•
•
•
Check the operating voltage of all components before operation. It must correspond to your local
power supply. The operating voltage is indicated on the nameplate of the power supply.
Don't plug or unplug any connector when the system is switched ON.
All connections (including adding or disconnecting extensions) must be made when the robot and
the interface are switched OFF, otherwise damage can occur.
Switch OFF the robot and any additional power supplies if you will not use them for more than a
day.
Do not open the robot unless explicitly directed to do so by K-Team technicians. Perform this
operation by carefully following the instructions given in appendix C.
Do not manually force any mechanical parts, such as pushing the robot and forcing its wheels.
If you have any questions or problems concerning the robot, please contact your Koala dealer.
Recycling
Think about the end of life of your robot! Parts of the robot can be recycled and it is important to do
so. It is for instance important to keep batteries out of the solid waste stream. When you throw away a
battery, it eventually ends up in a landfill or municipal incinerator. These batteries can contribute to
the toxicity levels of landfills or incinerator ash. By recycling the batteries through battery recycling
programs, you can help to create a cleaner and safer environment for generations to come. For these
reasons please take care to recycle your robot and robot accessories at the end of its life cycle, by for
instance sending back the old equipment to the manufacturer or to your local dealer.
Thanks for your contribution to a cleaner environment!
SONAR USER MANUAL
4
2. Sonar Specifications
The Koala sonar module uses a MUST00a Plug’n’Play Ultrasonic Sonar Transducer with analog
voltage output that permits easy integration with a wide variety of systems.
Technical Aspect
Power supply
Output
Range
Beam Angle
Refresh Rate
Operating Range
Module Weight
Mounting
Details
8-16 VDC, 30mA
0-5 VDC analog output (max. 4.096V for Koala)
15cm to 3m (0.1% accuracy)
15 degree nominal (80cm at 3m)
10Hz (using IIR filter with 10% feedback)
-40°C to 85°C
Approx 55g each
M3 threaded hole
2.1. Sonar Pinout
The transducer pinout is as follows (only the pins in bold are used on the Koala):
Pin
1
2
3
4
5
6
7
Function
8-16 VDC regulated power supply (30mA)
Ground
External TTL trigger (unused)
Trigger enable (unused)
Clock out TTL (unused)
0-5 VDC analog distance output (4.096 V max for Koala)
(unused)
Figure 2 - Sonar transducer pinout (courtesy www.mrrobot.com)
SONAR USER MANUAL
5
3. Getting Started
If your sonar sensors were shipped with a Koala robot, the robot should already have an example
program loaded in its memory. This program demonstrates a simple Braitenberg obstacle avoidance
program example using the sonar sensors, and the source code is provided (sonar.c) to help you
develop your own applications.
WARNING: This example program will move the robot!
Make sure the robot is on the floor in an open space and NOT ON A TABLE!
To activate the example program, put the Koala in mode 9 and then start the robot (see Koala
documentation for more details on operating the Koala). The sonar sensors should start clicking and
after a short pause the Koala will begin to move.
As the sonar sensors have a relatively long range, this program works best in wide-open spaces. If the
environment is too cluttered the robot gets easily claustrophobic, and has trouble avoiding obstacles.
An interesting solution would be to use the sonar sensors in open spaces, but to switch to using
infrared sensors once obstacles get too close. We leave this as an exercise to the reader!
If you bought the sonar modules to use with an existing Koala (or if your new Koala does not seem to
have the program pre-loaded) please use the following procedure to download the test software to the
robot.
1. Connect to the Koala serial port using a terminal program set to 38400 N81.
2. Ensure the Koala is in mode 3, and then turn on the robot. A startup message should appear on the
terminal screen (see Koala documentation for more details).
3. Type sfill then return, and then send the pre-compiled example file sonarnav.s37 to the robot
using a simple ASCII text transfer (consult your terminal program documentation if you are unsure
of how to do this).
4. When the download is finished, erase the flash memory by typing flash E and wait for the
confirmation.
5. Now write the program into the flash memory by typing flash W and wait for the confirmation.
6. Turn off the robot, disconnect your serial cable, and then follow the instructions marked above.
3.1. Testing
An example program (sonar.c) is shipped with the sonar modules to help test the sonar modules. It
is set to map a sonar output of 0-4.096 volts to a distance of 15cm to 3m, but can be used for other
ranges either by modifying the software, or simply by scaling its output to your desired range.
To test the output of your sensors please use the following procedure:
1. Connect to the Koala serial port using a terminal program set to 38400 N81.
2. Ensure the Koala is in mode 3, and then turn on the robot. A startup message should appear on the
terminal screen (see Koala documentation for more details).
3. Type run sloader then return, and then send the pre-compiled example file sonartst.s37 to
the robot using a simple ASCII text transfer (consult your terminal program documentation if you
are unsure of how to do this).
SONAR USER MANUAL
6
Once the download has finished the following text should appear on your screen (the numbers will
vary):
Testing sonar sensors...
0
1
2
3
4
5
----+----+----+----+----+---3000 3000 963 994 3000 3000
The distances are shown in millimetres, and the example above shows that the left-hand sensors (0 and
1) are both at their maximum limit of 3000mm (i.e. they see nothing), as are the right-hand sensors 4
and 5. The two central sensors (2 and 3) however both indicate an obstacle at a distance of roughly
1m (1000mm).
3.2. Calibration
All sonar modules are shipped pre-calibrated to a range of 15cm to 3m, but if you prefer to use another
range or if any of the modules become decalibrated, you will need to repeat the calibration procedure.
Please note that the default range of 15cm to 3m is the maximum range possible, but you can reduce
this.
To calibrate the sensors it is recommended you use both the test program described above in section
3.1 and a voltmeter connected between ground and the analog output of the sensor being calibrated.
The following calibration procedure has been empirically tested here at K-Team; you may find another
procedure works best for you.
1. Turn the ZERO pot counter-clockwise (CCW) a lot (at least 12 turns).
2. Place the sonar to be tested in front of a large planar obstacle (a wall, for example) at the maximum
desired distance (e.g. 3m). In our tests the voltmeter read approximately 4.4 volts.
3. Turn the FULL SCALE pot clockwise (CW) until the voltage suddenly drops. Back off CCW a bit
until the voltage is around 4.1 volts and the test software just begins to read 3000mm.
4. Place an obstacle at the minimum distance from the sensor (e.g. 15cm). In our tests the voltage
read around 0.33 volts.
5. Turn the ZERO pot CW until the voltage drops to 0.03 volts. Back off CCW a bit until you are
just at the point where the voltage drops to 0.03 volts.
6. Put the sonar again at maximum distance—the distances should read just slightly less than
3000mm. Now reduce the GAIN pot (CCW) to minimum. The distances shown by the software
should now saturate to 3000mm. Now mount the gain slowly (CW) until the distance just drops
below 3000mm, and then turn the pot CW another 1/16 of a turn more.
SONAR USER MANUAL
7
4. Using the Sonar Sensors
To use the sonar sensors simply read the 6 analog inputs of the Koala. The Koala analog inputs have a
range of 0 to 4.096 volts, and you must calibrate your sensors so that the minimum and maximum
desired distances of the sonar produce voltages in this range (see section 3.2 for details).
There are two ways you can read the analog inputs: via a serial line using the Koala SerCom protocol,
or by writing a custom C program loaded into the robot’s memory.
4.1. Using the Serial Port
Simply connect to the Koala’s serial port with a terminal program set to 38400 N81. Make sure the
Koala is in mode 3 and turn on the robot (see the Koala documentation for more details). After the
startup message is displayed, you can read the 6 analog inputs directly using the command I.
The sensors are numbered 0 to 5 from left to right (from the robot’s perspective). To read the
rightmost sensor, for example, type I,5 and you will receive a reply of the form i,1023, where the
value given is in the range 0 to 1023. A zero corresponds to 0 volts (minimum distance) and 1023
corresponds to 4.096 volts (maximum distance). You can simply scale the value by your sonar range
to obtain the effective distance.
This simple serial protocol is very flexible, and lets you write control routines using any application
that supports serial port communication (e.g. Matlab, LabView, etc.). You do, of course, need a serial
cable connected to the robot at all times, or you may use a radio modem to transmit the commands to
the host computer.
4.2. Using a Custom C Program
For the ultimate in speed and flexibility, you can write a custom C application compiled for the Koala
and stored in its onboard flash memory. To read the analog inputs you must use the command
sens_get_ana_value(input) which returns a value in the range 0 to 1023 as explained in
section 4.1. Note that to access the analog input numbers 0 to 5, you must read the inputs 4 to 9 (i.e.
you must add 4 to your desired input number). Please see the example file sonar.c given in section
5 for more details.
For information on how to compile programs for Koala, please see the K-Team website
(www.k-team.com) for more information.
SONAR USER MANUAL
8
5. Software Example
sonar.c
/*
; Test and Braitenberg obstacle avoidance using MUST00a ultrasonic sensors
; ========================================================================
;
;------------------------------------------------------------------------; Author:
Skye Legon 27/02/01
([email protected])
; Modifs:
;
; This program reads 6 ultrasonic distance sensors and reports their
; distance (calibrated such that 0v -> 4v corresponds to 150mm -> 3000mm)
; or performs a simple Braitenberg-type obstacle avoidance.
;
;------------------------------------------------------------------------*/
#define BRAITENBERG 1
#include
#include
#include
#define
#define
#define
#define
// set this to 1 to compile the Braitenberg version
<sys/kos.h>
<stdlib.h>
<stdio.h>
MAX_DIST 3000
MIN_DIST 150
MEAN_SPEED 50
INV_GAIN
100
//
//
//
//
max distance (mm) of sonar
min distance (mm) of sonar
mean speed of Koala
Braitenberg inverse gain value
int32 _dist[6];
int32 SonarDistance(uint32 sensor)
{
int32 value;
// note sensor 0 is analog input 4 etc.
if ((value = sens_get_ana_value(sensor+4)) < 0) return value;
return (value * (MAX_DIST - MIN_DIST) + (MIN_DIST * 1023)) / 1023;
}
void procUpdateSonar()
{
uint32 i;
for (;;)
{
for (i=0; i<6; i++)
{
_dist[i] = SonarDistance(i);
}
tim_suspend_task(100);
}
}
#if BRAITENBERG
void procMainTask()
{
// simple Braitenberg obstacle avoidance (moves!)
uint32 i;
int32 speed[2];
int32 deltaSpeed;
int32 gainSign[6] = {1,1,1,-1,-1,-1};
printf("Using sonar sensors to avoid obstacles...\r\n");
printf(" 0
1
2
3
4
5
L
R \r\n");
printf("----+----+----+----+----+----+---+---\r\n");
for (;;)
{
deltaSpeed = 0;
for (i=0; i<6; i++)
{
printf("%4ld ", _dist[i]);
deltaSpeed += gainSign[i] * (MAX_DIST - _dist[i]);
SONAR USER MANUAL
9
}
speed[0] = MEAN_SPEED + (deltaSpeed/INV_GAIN);
speed[1] = MEAN_SPEED - (deltaSpeed/INV_GAIN);
printf("%3ld ", speed[0]);
printf("%3ld ", speed[1]);
printf("
fflush(stdout);
mot_new_speed_2m(speed[1], speed[0]);
tim_suspend_task(100);
\r");
}
}
#else
void procMainTask()
{
// just print the sonar values (don't move!)
uint32 i;
printf("Testing sonar sensors...\r\n");
printf(" 0
1
2
3
4
5 \r\n");
printf("----+----+----+----+----+----\r\n");
for (;;)
{
for (i=0; i<6; i++)
{
printf("%4ld ", _dist[i]);
}
printf("
\r");
fflush(stdout);
tim_suspend_task(100);
}
}
#endif
int main()
{
sens_reset();
mot_reset();
install_task("procUpdateSonar\r\n", 800, procUpdateSonar);
install_task("procMainTask\r\n", 800, procMainTask);
return 0;
}
SONAR USER MANUAL
10