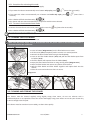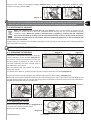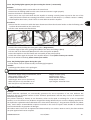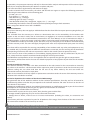
1
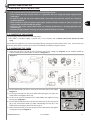
3 4WD
4
Instructions for installation and use
English
EN
"
Summary"
+
+
"
PRECAUTIONS"BEFORE"USE".............................................................................................................."2+
1.1+IMPORTANT+SAFETY+INSTRUCTIONS+...............................................................................................................+2+
1.2.+CONTENT+OF+THE+PACKAGE+...........................................................................................................................+2+
1.3.+ASSEMBLING+THE+CADDY+...............................................................................................................................+2+
"
USE"..................................................................................................................................................."3+
2.1.+RECOMMENDATIONS+FOR+USE+......................................................................................................................+3+
2.2.+IMMERSING+THE+CLEANER+.............................................................................................................................+4+
2.3.+ELECTRICAL+CONNECTION+.............................................................................................................................+4+
2.4.+PROGRAMMING+THE+CLEANING+CYCLES+.......................................................................................................+4+
2.5.+REMOTE+CONTROL+MODE+(VORTEX™4)+........................................................................................................+6+
2.6.+USAGE+WITH+AN+EXTERNAL+TIMER+(VORTEX™4)+...........................................................................................+6+
"
CLEANING"AND"MAINTENANCE"........................................................................................................"7+
3.1.+CLEANING+THE+FILTER+BASKET+.......................................................................................................................+7+
3.2.+CLEANING+AND+STORING+THE+CLEANER+........................................................................................................+7+
3.3.+RECYCLING+THE+PRODUCT+.............................................................................................................................+8+
"
REPLACEMENT"OF"ACCESSORIES"......................................................................................................"8+
4.1.+REPLACING+THE+BRUSHES+..............................................................................................................................+8+
4.2.+REPLACING+THE+TYRES+...................................................................................................................................+8+
"
TROUBLESHOOTING"........................................................................................................................."9+
5.1.+The+cleaner+does+not+stay+firmly+on+the+pool+bottom+...................................................................................+9+
5.2.+The+cleaner+does+not+or+no+longer+climbs+the+pool+sides+..............................................................................+9+
5.3.+On+start%up+the+cleaner+does+not+move+.........................................................................................................+9+
5.4.+The+programme+I+and+programme+II+indicators+flash+alternately+..................................................................+9+
"
TECHNICAL"INFORMATION"............................................................................................................."10+
"
WARRANTIES"................................................................................................................................."10+
"
REGISTRATION"ON"LINE".................................................................................................................."12+
"
CONFORMITY"................................................................................................................................."12+
"
Please"read"this"manual"carefully"before"using,"maintaining"or"repairing"this"appliance!"
"
" symbol" indicates" important" information" that" must" be" taken" into" account" in" order" to" avoid" risk" of"
The"
personal"injury"and/or"damage"to"the"appliance.""
"
The""
"symbol"indicates"useful"information."
+
The"images"presented"in"this"manual"are"for"information"purposes"only,"they"are"not"contractual."The"hatch,"
brushes"and"wheels"on"the"robots"may"vary"according"to"the"model."
"
+
+
H03606%00.A2.EN+
Ver.+05/2011+
1+
PRECAUTIONS"BEFORE"USE""
+
1.1"IMPORTANT"SAFETY"INSTRUCTIONS"
"
! The"control"box"must"not"be"positioned"in"an"area"likely"to"flood."
! If" the" control" box" falls" into" the" water" it" is" imperative" that" you" unplug" the" power" supply" before"
retrieving"it."
! In" order" to" avoid" the" risk" of" an" electric" shock," never" open" the" electronic" control" box." Consult" a"
qualified"technician."
! Never" attempt" to" repair" the" power" supply" cable." Contact" customer" services" in" order" to" replace" the"
original"cable,"in"order"to"avoid"any"hazards."
! Disconnect" the" power" supply" cable" before" any" cleaning," maintenance" or" servicing" operations" and"
after"each"use."
! In"order"to"avoid"accidents"occurring,"do"not"play"with"the"cleaner"or"its"cable."
+
"
+
1.2."CONTENT"OF"THE"PACKAGE""
The+packaging+should+contain+the+following+items:+
! The+ robot,+ a+ transport+ caddy,+ a+ control+ unit,+ a+ user+ manual,+ and+ a" remote" control" unit" (Vortex™4" robot"
only).+
+
Check+that+the+appliance+has+not+been+damaged+during+transport+(shocks,+broken+parts,+etc.).+If+you+notice+any+
defective+parts,+please+contact+your+retailer+immediately+and+before+using+the+cleaner.+
+
1.3."ASSEMBLING"THE"CADDY"
"
a) Insert+ the+ top+ tubes+ (1)+ and+ (2)+ into+ the+ lower+ part+ of+ the+ caddy+ (13).+ Diagram" 1." The+ handles+ should+ be+
oriented+towards+the+cable+holder+as+shown+in+diagram"1_a.+
+
+
+
+
+
+
+
+
+
+
+
+
+
+
+
+
+
+
+
Diagram"1"
b) Fit+the+cable+holder+(3)+and+its+cover+(4)+on+the+lower+part+of+the+caddy."
Diagram"2.+
c) Fit+2+long+screws+(8),+into+the+cover+while+maintaining+the+nuts+(9)+in+the+
cable+holder+and+tighten+them+(12).+
d) Fit+the+screw+(7)+at+the+bottom+of+the+cable+holder+and+tighten+it+using+
the+key+(12)."Diagram"2.+
e) Fit+the+cable+holder+(6)+and+its+control+box+holder+(5),+fit+the+long+screws+
(8),+ in+ the+ control+ box+ holder+ (5)+ while+ maintaining+ the+ nuts+ (9)+ in+ the+
cable+holder+and+tighten+them+with+the+key+(12).+
f) Place+the+small+screw+(7)+on+the+top+part+of+the+cable+holder+and+tighten+
it+using+the+key+(12).+Diagram"3.+
H03606%00.A2.EN+
Ver.+05/2011+
Diagram"2
Diagram"3""
2+
"
"
"
"
"
"
"
"
"
"
"
"
"
"
"
"
"
"
"
"
"
g) Place+the+2+caps+on+the+wheels+as+shown+on+Diagram"4.+
h)+ Position+ blocks+ (10)+ and+ (11)+ using+ the+ 4+ screws,+ paying+
attention+ to+ the+ arrows+ and+ orientation,+ Diagram" 5" or" 6"
(according+ to+ model)." Tighten+ the+ screws+ using+ a+ Philips+
screwdriver.+
"
"
Diagram"1_a"
Diagram"4""
Diagram"5"="Vortex™"3,"Vortex™"4
Diagram"6"="Vortex™"3"4WD
USE"
"
2.1."RECOMMENDATIONS"FOR"USE"
! The+cleaner+must+operate+in+pool+water+maintained+at+the+following+levels:+Chlorine+<+3+mg,+pH+between+6.8+
and+7.6,+temperature+between+10°C+and+35°C.+
! Use+your+cleaner+as+often+as+possible.+You+will+benefit+from+a+pool+that+is+always+clean+and+the+filter+will+not+
become+clogged.+
! If+ the+ pool+ is+ very+ dirty,+ especially+ during+ first+ use,+ remove+ larger+ pieces+ of+ debris+ using+ a+ net+ in+ order+ to+
optimise+the+cleaner's+performance.+
! Remove+thermometers,+toys+and+other+objects+that+might+damage+the+cleaner+from+the+water.+
! Immerse+the+cleaner+in+the+pool,+before+starting+a+cleaning+cycle.+
! Do+not+leave+the+cleaner+in+the+water+permanently.+
! Stow+your+cleaner+on+its+caddy+as+soon+as+possible+after+use,+in+order+to+avoid+distorting+the+flexible+edge+at+
the+opening+to+the+filter.+
! Never+cover+the+control+box+while+the+cleaner+is+in+operation+
! Do+not+leave+the+control+box+in+direct+sunlight+after+having+used+the+cleaner.+
! If+part+of+the+pool+is+not+properly+cleaned,+change+the+place+where+you+immerse+the+cleaner+until+you+find+the+
best+position+of+entry+to+achieve+the+best+coverage.+
! The+cleaner's+behaviour+is+strongly+influenced+if+the+cable+is+tangled.+Spread+the+cable+out+in+the+sun+from+
time+to+time+so+that+it+resumes+its+original+shape.+
! The+behaviour+of+the+cleaner+can+be+influenced+by+the+jet+at+the+pool+return+outlets+especially+when+the+filter+
pump+ is+ operational.+ In+ this+ case+ we+ recommend+ that+ you+ start+ your+ cleaner+ when+ the+ filter+ pump+ is+ not+
operational.+
"
"
Do"not"use"your"cleaner"during"shock"chlorination!
"
"
H03606%00.A2.EN+
Ver.+05/2011+
3+
2.2."IMMERSING"THE"CLEANER"
+
Do"not"allow"bathing"when"the"cleaner"is"in"the"pool.""
+
+
Immerse+the+cleaner+in+the+water"(Diagram"7_1)+vertically+and+move+it+slightly+in+all+directions+(7_2)+so+that+the+
air+in+the+robot+is+expelled."
Diagram"7
+
+
+
+
+
+
+
It+is+imperative+that+the+cleaner+sinks+to+the+bottom+and+comes+to+rest+without+intervention+from+you.+Spread+
the+cable+out+over+the+pool.+For+optimum+operation+we+recommend+that+you+place+the+caddy+with+the+control+
box+midway+down+the+length+of+the+pool.+"
Diagram"8"
+
"
"
"
"
+
2.3."ELECTRICAL"CONNECTION"
"
! Place+the+control+box+at+a+distance+of+at+least+3.5+meters+from+the+pool+
edge+and+away+from+direct+sunlight;+it+can+either+be+placed+on+the+ground+
or+attached+to+the+caddy.+
! Connect+ the+ cleaner+ cable+ to+ the+ control+ box+ (Diagram" 9_1" &" 9_2)+ and+
lock+ the+ connector+ by+ firmly+ tightening+ the+ ring+ by+ turning+ it+ clockwise.+
Make+sure+the+connector+is+sufficiently+pushed+into+place,+if+this+is+not+the+
case+repeat+operation+(9_2).+
! Connect+ the+ power+ cable.+ Only+ connect+ the+ control+ box+ to+ a+ power+
outlet+protected+by+a+30+mA+maximum+ground+fault+circuit+breaker+(if"in"
doubt" contact" a" qualified" electrician).+ Ensure+ that+ the+ plug+ is+
permanently+and+easily+accessible.++
Diagram"9"
"
"
"
"
"
"
"
"
If" you" use" an" extension" cable" to" connect" your" cleaner" to" the" power" supply," ensure" the" control" box" is"
placed"no"less"than"3.5"meters"from"the"pool"edge."
"
2.4."PROGRAMMING"THE"CLEANING"CYCLES"
+
2.4.1.+Description+of+keys+and+indicator+diodes+
+
Program"I:+Maximised+cleaning+of+the+pool+floor+in+minimum+time.+Duration"1.30"hr.+
Program"II:+Intense+cleaning+of+the+pool+floor+and+pool+sides,+including+the+waterline.+Duration"2.30"hr.+
OFF"button:+used+to+cut+the+cleaner+power+supply+at+the+end+of+a+cleaning+cycle.+
"
APPLIES"FOR"VORTEX™4"ONLY:"
Decreases+cleaning+time+by+30+min
.+Increases+cleaning+time+by+1+hr
+
+
H03606%00.A2.EN+
Ver.+05/2011+
4+
"
2.4.2.+Start%up+
! When+the+cleaner+is+powered+on,+the+control+box+remains+in+standby.+
! The+cleaner+is+started+by+pressing+the+key+corresponding+to+one+of+the+2+
Diagram"10+
cleaning+ programmes+ (Diagram" 10).+ The+ indicator+ located+ above+ the+
selected+ programme+ will+ light+ up.+ The+ cleaner+ starts+ after+ a+ few+
seconds+and+calculates+its+own+trajectory.+
! You+can+change+the+selected+cleaning+programme+at+any+time+when+the+
cleaner+ is+ operating.+ Just+ press+ the+ key+ corresponding+ to+ the+ other+
programme+(I+or+II).+A+complete+new+cleaning+cycle+will+start.+
"
"
APPLIES"FOR"VORTEX™4"ONLY:"
! Depending+on+how+clean/dirty+the+pool+is,+you+may+wish+to+modify+the+
Diagram"11
length+of+the+cleaning+cycle+by+pressing
.+You+can+increase+this+time+
by+ one+ hour+ or+ reduce+ it+ by+ 30+ minutes+ by+ pressing+ the+ key+ a+ second+
+ a+ third+ time+ will+ reset+ to+ the+ initial+ predefined+
time.+ Pressing+
cleaning+times+(1+hr+30+or+2+hrs+30).++
Upon+starting%up+the+next+time,+the+robot+will+recall+the+parameters+that+
were+used+for+the+previous+operation.+
! To+stop+the+cleaner+during+a+programme+press+on
.+Diagram"11.++
+
Remarks:"
If+you+press+the+key+for+the+current+programme+it+will+have+no+effect.+
+ to+ shut+ off+ the+ cleaner+
At+ the+ end+ of+ the+ programme+ the+ cleaner+ stops+ but+ remains+ in+ standby.+ Press+
power+supply.+
Due+ to+ the+ vast+ range+ in+ the+ shape+ and+ size+ of+ different+ pool+ steps,+ it+ is+ possible+ that+ the+ cleaner+ may+
encounter++difficulties+in+cleaning+these+areas+of+a+pool.+When+the+robot+is+descending+along+the+pool+wall,+it+
may+also+come+away+from+the+wall.+
The+cleaner+lowers+its+suction+power+when+reversing.+Some+debris+may+not+be+suctioned+during+this+reverse+
action.+
If+the+cleaner+sucks+in+air+at+the+water+line+a+safety+mechanism+is+triggered+and+it+will+sink+back+to+the+bottom+
after+a+few+moments.+
The+cleaner+tends+to+tip+over+and+float+for+a+few+seconds,+this+is+not+a+malfunction,+it+will+return+to+its+normal+
position.+
If+your+pool+has+an+alarm+it+is+strongly+recommended+that+the+pool+is+well+filled+so+that+the+robot+does+not+
touch+the+alarm+repeatedly+and+damage+it.+
It+is+also+strongly+recommended+to+keep+the+pool+cover open+when+using+the+cleaner+in+"bottom+and+sides"+
"
"
2.4.3.+End+of+program"
"
VORTEX™3,"VORTEX™"3"4WD"
! The+robot+stops+and+the+indicator+corresponding+to+the+program+is+lit.+
At+ the+ end+ of+ the+ cycle+ the+ robot+ must+ cool+ down+ for+ 15+ minutes+ in+
order+ to+ avoid+ potential+ damage+ to+ the+ seals.+ After+ 15+ minutes+ the+
indicator+will+blink+meaning+that+the+cleaner+can+be+removed+from+the+
water.+
! Press+on+the+power+button
Diagram 12
.+Diagram"12.+
"
VORTEX™4"
! The+robot+stops+and+the+4+led+indicators+flash+successively+in+a+loop.+Wait+15+minutes+before+removing+the+
robot+from+the+pool.+This+corresponds+to+the+cooling+time+required+in+order+to+avoid+potential+damage+to+the+
seals.+
! Press+on+the+power+button
H03606%00.A2.EN+
.+Diagram"12.+
Ver.+05/2011+
5+
Wait" approximately" 15" minutes" after" the" end" of" the" programme" before" removing" the" cleaner" from" the"
water."
"
"
•+If+you+wish+to+run+a+new+programme+once+the+cleaner+has+stopped+press+the+corresponding+button.++
"
Before+ removing+ the+ cleaner+ from+ the+ pool,+
disconnect+ the+ power+ cable+ and+ disconnect+
the+floating+cable+from+the+control+box.+Bring+
the+cleaner+towards+you,+by+gently+pulling+on+
the+cable+(Diagram"13_1).++
Diagram"13
+
As+soon+as+the+robot+is+within+reach,+take+hold+of+it+using+the+handle+(13_2)+and+gently+remove+it+from+the+pool,+
allowing+the+water+it+contains+to+drain+back+into+the+pool+(13_3).+"
"
Do"not"pull"on"the"cable"to"remove"the"cleaner"from"the"water.
"
"
2.5."REMOTE"CONTROL"MODE"(VORTEX™4)"
"
You+can+steer+the+robot+freely+using+the+remote+control+unit.++
There+are+4+keys+on+the+remote+unit:+
+
Turn"left
+
+
+
+
Forward"
+
Turn"
right
Reverse
+
+
To+ use+ the+ remote+ control+ feature,+ simply+ press+ a+ key+ when+ the+ robot+ is+ operational+ in+ the+ swimming+ pool.+
Simply+press+briefly+the+"forward"+and+"reverse"+keys+to+control+the+robot+accordingly.+Maintain+the+"right"+or+
"left"+keys+to+turn+the+robot+in+the+corresponding+direction.+
will+flash+alternately.++
When+in+use,+the+two+diodes+
To+revert+to+the+automatic+mode:+
! Do+not+press+on+or+use+any+of+the+remote+control+keys+for+a+minimum+of+45+seconds.+
+or+
! Press+the
+key.+
"
2.5.1.+Synchronisation+procedure+
If+ you+ have+ replaced+ the+ control+ unit+ or+ the+ remote+ control+ unit+ in+ terms+ of+ after+ sales+ or+ repair,+ it+ will+ be+
necessary+to+synchronise/pair+the+two+items+with+each+other+once+again:+
! Connect+the+robot+to+the+control+unit+then+connect+the+control+unit+to+the+main+power+supply.+
! Press+
++
for+more+than+6+seconds+until+the+2+diodes+flash+
! Hold+down+the+key+
+
on+the+remote+control.+
+ then+ the+ two+ diodes+ will+ flash+ simultaneously+
! The+ diode+ on+ the+ right+ will+ flash+ 5+ times+
.+
! The+remote+control+is+correctly+synchronised+with+the+control+unit+when+the+diodes+turn+off.+
+
2.6."USAGE"WITH"AN"EXTERNAL"TIMER"(VORTEX™4)"
In+this+mode+the+control+unit+can+launch+a+preset+
power+source+(timer).+
or+
cleaning+cycle+when+the+unit+detects+an+external+
or+a+bottom+and+walls+cycle
+:+the+diode+for+the+corresponding+
You+can+select+either+a+bottom+only+cycle+
programme+will+flash.++
Regardless+of+the+cycle+selected,+the+cleaning+time+is+2+hrs+30+min.+This+duration+cannot+be+changed.+Program+
the+timer+for+a+minimum+operation+time+of+3+hours.+
H03606%00.A2.EN+
Ver.+05/2011+
6+
2.6.1.+Procedure+for+activating+this+mode+
! Connect+the+control+unit+to+the+main+power+supply.+
! If+you+want+the+robot+to+automatically+run+a+bottom+only"cycle,+press+
+
+(more+than+3+seconds).+
! If+ you+ want+ the+ robot+ to+ automatically+ run+ a+ bottom+ and+ walls" only" cycle,+ press
seconds).+
++
+ (more+ than+ 3+
+
! The+2+diodes+will+flash+simultaneously:+
! The+cleaner+will+now+start+automatically+in+conjunction+with+the+time+selected.+
+
2.6.2.+To+cancel+the+automated+start+mode+
! Connect+the+control+unit+to+the+main+power+supply.+Press+the+
+key+(more+than+6+seconds).+
+
! The+2+diodes+will+flash+simultaneously:+
+
CLEANING"AND"MAINTENANCE"
"
3.1."CLEANING"THE"FILTER"BASKET"
We+advise+you+to+clean+the+filter+after+each+use.+
+
Make" sure" the" power" supply" cable" is" disconnected" from" the" power" outlet" or" that" the" floating" cable" is"
disconnected"from"the"control"box.+
+
+
+
! Press+on+button+(Diagram"14_1)+on+the+filter+basket+access+cover.+
! Lift+the+cover+(14_2)+completely+until+it+remains+in+a+vertical+position.+
! Remove+the+filter+basket+holder+using+its+handle+(14_3).+
! Press+on+the+filter+holder+button+(14_4)+and+pull+the+filter+basket+apart+from+
its+holder+(14_5).+
! The+filter+basket+will+separate+from+the+holder+(14_6).+
! Empty+the+filter+basket+and+clean+it+using+running+water+(Diagram"14_7).+
! Rinse+the+filter+basket+and+remove+any+debris+stuck+inside+it.+
! Refit+ the+ filter+ basket+ and+ filter+ holder+ together+ and+ replace+ back+ into+ the+
cleaner.+
! Close+the+cover+and+make+sure+that+it+is+secure.+
+
"Diagram"14+
"
"
"
"
"
"
"
3.2."CLEANING"AND"STORING"THE"CLEANER"
+
+
The+ cleaner+ must+ be+ cleaned+ regularly+ using+ slightly+ soapy+ clean+ water,+ do+ not+ use+ solvents+ such+ a+
trichloroethylene+or+its+equivalent.+Rinse+the+cleaner+thoroughly+using+clean+water.+Do+not+let+your+cleaner+dry+
in+direct+sunlight+near+the+pool.+
+
+
The+cleaner+must+be+stored+on+its+own+caddy,+so+that+it+dries+quickly.+
H03606%00.A2.EN+
Ver.+05/2011+
7+
Place+ the+ rear+ wheels+ on+ the+ support+ wedges+ (Diagram" 15_1).+ Tilt+ the+ robot,+ then+ push+ it+ backwards+ until+ it+
reaches+it+storage+position+(15_2).+
+
+
+
+
+
Diagram"15
+
+
"
The"cleaner"cable"must"be"disconnected"from"the"control"box"before"removing"the"cleaner"from"the"pool."
Wind"the"cleaner"cable"around"the"hooks"located"at"the"rear"of"the"caddy"starting"from"the"cleaner.
"
3.3."RECYCLING"THE"PRODUCT"
"
When" your" appliance" has" reached" the" end" of" its" lifespan,+ and+ if+ you+ would+ like+ to+ dispose+ of+ it+ or+
replace+ it:+ do+ not+ throw+ it+ into+ your+ household+ waste+ and+ do+ not+ use+ your+ household+ recycling+
containers+ either.+ When" this" symbol" is" mentioned" on" an" appliance," it" means" that" the" equipment"
must"not"be"disposed"of"casually."It"will"be"collected"selectively"so"that"it"can"be"reused,"recycled"or"
recovered."Any"substances"it"may"contain"which"are"potentially"dangerous"to"the"environment"will"
be"eliminated"or"neutralised."
Enquire+with+your+retailer+for+the+conditions+that+apply+to+the+recycling+of+your+product+and+to+the+organisations+
that+can+handle+its+recycling.+
+
REPLACEMENT"OF"ACCESSORIES"
"
"
4.1."REPLACING"THE"BRUSHES"
Diagram"16
Diagram"17
"
"
The+cleaner+is+fitted+with+PVC+brushes.+There+are+
''wear''+indicators+on+the+brushes+(Diagram"16).+
To+maintain+cleaner+performance+at+its+best+you+
need+ to+ replace+ the+ brushes+ as+ soon+ as+ one+ of+
the+ wear+ indicators+ has+ been+ reached+ (even+ if+
the+blade+wear+is+not+even).+
We+ recommend+ that+ you+ replace+ the+ brushes+
every+two+seasons.+
To+remove+worn+brushes,+remove+the+tabs+from+the+holes+in+which+they+are+fitted+(Diagram"17).+
+
+
To+fit+new+brushes+start+by+fitting+the+side+without+tabs+under+the+brush+holder+(Diagram"18_1).+
Roll+the+brush+around+its+holder+and+slide+the+tabs+into+the+fixing+holes.+Pull+on+the+end+of+each+tab+(18_2)+so+that+
its+edge+passes+through+the+slit.+Cut+the+tabs+using+scissors+so+that+they+are+at+the+same+level+as+the+other+blades.+
Repeat+this+operation+with+the+second+brush.+
+
+
"
Diagram"18
"
"
"
"
"
"
4.2."REPLACING"THE"TYRES"
+
4.2.1.+Removing+the+old+tyres+
+
Pull+on+the+rear+side+of+the+old+tyre+(Diagram"19_1)+
to+remove+the+tyre+lip+from+the+wheel.+
Remove+the+old+tyre+(19_2).+
Diagram"19
+
H03606%00.A2.EN+
Ver.+05/2011+
8+
4.2.2.+Assembling+the+new+tyres+
+
Present+the+tyres+on+the+wheel+(Diagram"20_1).+Pay+attention+to+the+orientation+of+the+tyre:+make+sure+that+the+
“inside”+mark+on+the+walls+is+on+the+inner+side+of+the+wheel.+
Push+one+section+of+the+tyre+around+the+wheel+and+fit+the+rib+of+the+tyre+in+the+groove+of+the+wheel+(20_2).+
Install+the+rest+of+the+tyre+on+the+wheel+and+verify+the+rib+of+the+tyre+fit+well+with+the+groove+of+the+wheel+(20_3).+
Adjust+the+rib+of+the+inner+side+of+the+tyre+in+the+groove+of+the+wheel+(20_4).+You+may+turn+the+wheel+gently+if+
needed.++
+
+
Diagram"20+
+
+
TROUBLESHOOTING""
"
5.1."The"cleaner"does"not"stay"firmly"on"the"pool"bottom"
"
There+is+air+in+the+appliance+casing.+Repeat+the+immersion+operations+strictly+complying+with+the+instructions+in+
the+"Cleaner+immersion"+(§2.2)+
"
5.2."The"cleaner"does"not"or"no"longer"climbs"the"pool"sides"
"
This+may+have+two+causes:+
! The+filter+basket+is+full+or+dirty:+all+you+need+to+do+is+clean+it;+
! Although+the+water+seems+clear,+microscopic+algae,+invisible+to+the+human+eye,+are+present+in+the+pool.+As+a+
result+the+pool+sides+become+slippery+and+prevent+the+cleaner+from+climbing.+Carry+out+a+shock+chlorination+
treatment+and+slightly+reduce+the+pH.+Do+not+leave+the+cleaner+in+the+pool+during+this+treatment.+
+
5.3."On"start_up"the"cleaner"does"not"move"
! Check+that+the+outlet+to+which+the+control+box+is+connected+is+receiving+a+power+supply.+
! Check+ that+ you+ have+ started+ one+ of+ the+ two+ programmes,+ check+ that+ the+ indicator+ for+ the+ selected+
programme+is+lit.+
If"the"problem"persists"contact"your"retailer."
+
5.4."The"programme"I"and"programme"II"indicators"flash"alternately"
+
! Disconnect+the+power+supply+and+wait+20+seconds+before+reconnecting+the+control+box.+
! Check+that+no+debris+impedes+the+rotation+of+the+brushes+and/or+the+propeller.+
! Clean+the+filter.+
! Start+a+new+cleaning+programme.+If"the"problem"continues"contact"your"retailer.+
"
The+flashing+lights+are+an+indication+of+problems+with+the+control+unit+and/or+the+cleaner+but+are+not+necessarily+
indicative+of+a+major+problem+with+the+unit+and+can+sometimes+resolve+themselves.+
.+Then+start+a+new+cycle:+
To+remove+the+flashing+light,+press+the+button
! If+the+cleaner+runs+normally+for+around+5+minutes,+it+was+a+minor+troubleshooting+error.+
! If+the+flashing+light+persists,+check+the+cleaner+with+following+procedure+first.++
! After"this"check,"if"the"flashing"light"persists,"please"contact"your"retailer.""
"
!
"
" In"any"case,"don't"open"the"control"unit."
H03606%00.A2.EN+
Ver.+05/2011+
9+
Issue:&The&flashing&lights&appears&just&after&starting&the&cleaner&(<&20&seconds).&
&
Solution:"
! Ensure+the+floating+cable+is+connected+to+the+control+unit.+
! Disconnect+the+floating+cable+from+the+control+unit+and+connect+it+again+properly.+
! Ensure+the+cleaner+is+well+submerged.+
! Then+ start+ a+ new+ cycle+ and+ check+ that+ the+ impeller+ is+ rotating+ correctly+ (water+ ejected+ at+ the+ rear+ of+ the+
robot)+and+that+the+wheels+are+rotating+(two+wheels+=+Vortex™+3+and+Vortex™+4+;+4+wheels+=Vortex™+3+4WD).
! If+the+impeller+doesn't+turn,+check+if+there+is+some+debris+around+the+impeller.
"
Procedure:"
! Ensure+that+the+control+unit+cable+has+been+disconnected+from+the+electrical+outlet+or+that+the+floating+cable+
has+been+disconnected+from+the+control+unit."+
! Lift+the+cover.+Remove+the+filter+basket.+
+
Diagram"21
! Loosen+the+screws+holding+the+cover+grid+in+place.+(Diagram"21_1).+
! Push+the+edges+of+the+cover+grid+together+(21_2)+at+the+same+time+lifting+it+(21_3).+
! Lift+the+end+of+the+flow+outlet+(21_4)+and+the+same+time+pull+it+out+(21_5).+
! Clean+the+impeller+or+the+flow+outlet+and+re%assembly+all+the+parts+properly.+
! Check+the+cleaner+again+in+the+pool:+if+the+impeller+doesn't'+rotate+please"contact"your"retailer.+
If+one+of+the+wheels+is+blocked,+please"contact"your"retailer.+
+
Issue:&The&flashing&lights&appear&during&the&cycle.&
! If+the+cleaner+sucks+air+for+60+seconds,+the+flashing+light+appears."
Solution:"
! Submerged+the+cleaner+in+the+pool+again.+
+
TECHNICAL"INFORMATION"
+
Control+box+supply+voltage:+220%240+VAC+;+50+Hz++
Robot+supply+voltage:+30+VDC++
Installed+load:+150+W+max++
Cable+length:+18+m+or+21+m+(Vortex™4)++
Robot+size+(W+x+D+x+H):+43+x+48+x+27+cm++
Pack+size+(W+x+D+x+H):+56+x+56+x+56+cm+
Weight+of+robot:+9,5+kg+
Packed+weight:+19+kg+
Width+cleaned:+270+mm+
Pump+output:+16+m3/h+
Cycle+lengths:+1h30+and+2+h30+
+
WARRANTIES"
+
Principle"
Unless+ otherwise+ stipulated,+ we+ contractually+ guarantee+ the+ correct+ operation+ of+ our+ new+ Products.+ We+
guarantee+ that+ our+ Products+ conform+ to+ their+ technical+ specifications+ and+ that+ they+ are+ free+ of+ material+ and+
manufacturing+default.+
The+ present+ warranty+ is+ limited,+ at+ our+ discretion,+ either+ to+ the+ repair+ or+ exchange+ for+ a+ new+ or+ repacked+
Product,+or+to+the+refund+of+any+Products+recognized+as+being+defective+by+our+services.+Shipping+expenses+for+
the+repaired+or+replaced+Products+delivered+to+the+client+will+be+borne+by+us.+The+guarantee+excludes+any+labour+
costs,+ travel+ and/or+ accommodation+ expenses+ incurred+ as+ the+ result+ of+ repairs+ made+ outside+ of+ continental+
France+and+excludes+any+payment+of+damages.++
All+Product+returns+must+first+be+approved+and+determined+by+our+services.+Returns+sent+by+the+Client+without+
our+prior+approval+will+not+be+accepted.+
H03606%00.A2.EN+
Ver.+05/2011+
10+
In+particular,+the+spare+parts+warranty+will+only+be+honoured+after+analysis+and+inspection+of+the+returned+spare+
parts+by+our+company+followed+by+the+decision+to+replace+said+parts.+
In+all+cases+the+seller's+legal+warranty+will+continue+to+apply.+
In+order+to+benefit+from+the+warranty,+the+Client+and+the+End+User+agree+to+respect+the+following+parameters+
concerning+the+water+balance+of+the+swimming+pool:++
%+pH:+6.8+<+pH+<+7.6+
%+free+chlorine+(*+:+<+3,0+mg/L+
%+total+bromine+(*):+<+5.0+mg/L+
%+stabilising+agent+(if+used):+<+75+mg/L+
%+total+dissolved+metals+(iron,+manganese,+copper,+zinc…)+:+<+0.1+mg/L++
(*):!Swimming!Pool!Cleaners!must!be!removed!from!the!pool!before!using!a!shock!treatment.!
Note:+Using+water+drawn+from+a+well+is+forbidden.+
"
General"limitations"
The+present+warranty+does+not+apply+to+visible+defects+that+the+Client+failed+to+report+upon+accepting+delivery+of+
the+Products.+
Also+ excluded+ from+ the+ warranty+ are:+ defects+ or+ deterioration+ due+ to+ the+ unsuitability+ of+ the+ Product+ with+
respect+ to+ the+ end+ User's+ needs,+ due+ to+ normal+ wear,+ to+ negligence,+ to+ incorrect+ installation+ or+ to+ a+ use+ that+
does+ not+ conform+ to+ the+ recommendations+ mentioned+ in+ the+ User+ Manual,+ to+ lack+ of+ maintenance+ and/or+ a+
handling+accident,+to+incorrect+storage,+and/or+by+studies,+instructions+and/or+specifications+made+by+our+Client.+
Any+modifications+made+by+the+Client,+by+the+End+User+or+by+any+third+party+to+our+Products+will+automatically+
void+the+warranty+in+full.+The+same+will+apply+if+original+parts+were+to+be+replaced+with+spare+parts+not+sold+by+
us.++
Our+Client+will+be+responsible+for+ensuring+compatibility+of+our+Products+with+any+other+pool+equipment+it+may+
be+installed+with,+by+checking+with+the+different+manufacturers+concerned,+also+for+ensuring+that+all+installation+
and+operating+instructions+and+rules+are+respected+in+order+for+the+overall+system+to+operate+correctly.+
In+the+case+of+a+return+of+the+product+to+our+workshop,+shipping+expenses+to+and+fro,+will+be+borne+by+the+end+
user,+except+for+those+expenses+mentioned+under+paragraph+2+of+the+present+article.+
Immobilisation+and+deprivation+of+use+of+an+appliance+due+to+repair+will+not+give+the+right+to+compensation.++
This+warranty+will+become+void+in+the+case+of+a+default+in+payment+or+late+payment+by+our+Client+for+the+Product+
concerned.+
+
Period"covered"by"the"warranty"
The+effective+warranty+start+date+is+the+date+mentioned+on+the+sales+invoice+for+the+new+Product+as+issued+by+
our+Client+to+the+End+User.+This+document+will+be+required+as+proof+of+purchase+in+order+for+the+warranty+to+be+
effective.+ Failing+ this,+ our+ Client+ shall+ bear+ the+ full+ cost+ of+ any+ claims+ made+ by+ the+ end+ User+ under+ the+
contractual+warranty+and+after+its+expiry+date.+
Under+no+circumstances+shall+any+repairs+or+replacements+carried+out+under+the+terms+of+this+warranty+cause+its+
duration+to+be+extended+or+renewed.+
+
Particular"dispositions"for"Products"of"the"Electrical"Robot"Range""
We+guarantee+that+all+our+Products+conform+to+their+technical+specifications,+that+they+are+free+of+material+or+
manufacturing+defects+and+that+they+correspond+to+the+technical+evolution+and+state+of+the+art+at+the+time+of+
their+launch+on+the+market.+
Subsequent+modifications+made+to+our+Products+(improvements+or+modifications+made+as+part+of+the+technical+
development+of+the+products)+will+not+give+any+right+to+an+intervention+on+our+behalf.+
The+following+are+excluded+from+the+warranty:+
•+Normal+wear+on+parts+such+as+tyres,+tracks,+belts,+brushes,+gears+and+the+filter.+
•+Damage+caused+by+lightening+or+by+an+incorrect+electrical+connection.+
•+ Damage+ due+ to+ shocks,+ incorrect+ use+ or+ incorrect+ maintenance+ (including+ the+ robot,+ its+ accessories+ and+
cables).+
The+warranty+will+cover+a+period+of+2+years+for+all+products+of+the+range,+from+the+date+of+the+sales+invoice+for+
the+new+Product+issued+to+the+end+User+by+our+Client.+
+
+
For"any"warranty"issues,"please"contact"your"local"retailer."
We"recommend"that"you"keep"your"purchase"invoice"safe,"if"you"require"assistance"for"your"product.
+
+
+
H03606%00.A2.EN+
Ver.+05/2011+
11+
CAUTION:"USE"OF"THE"VORTEX™3,"VORTEX™4"and"VORTEX™"3"4WD"CLEANER"IN"A"VINYL"LINER"POOL""
Certain"vinyl"liner"patterns"are"particularly"susceptible"to"rapid"surface"wear"of"pattern"removal"caused"by"
objects" coming" into" contact" with" the" vinyl" surface," including" pool" brushes," pool" toys," floats," fountains,"
chlorine"dispensers,"and"automatic"pool"cleaners."Some"vinyl"liner"patterns"can"be"seriously"scratched"or"
abraded"simply"by"rubbing"the"surface"with"a"pool"brush."Ink"from"the"pattern"can"also"rub"off"during"the"
installation"process"or"when"it"comes"into"contact"with"objects"in"the"pool."Zodiac"Pool"Care"Europe,"is"not"
responsible"for,"and"the"Limited"Warranty"does"not"cover,"pattern"removal,"abrasion"or"markings"on"vinyl"
liners."
+
+
+
REGISTRATION"ON"LINE"
+
Register+your+product+on+our+website:+www.zodiac_poolcare.com"
you+will+be+the+first+to+be+informed+of+new+Zodiac+products+and+special+offers,+
You+can+help+us+to+constantly+improve+the+quality+of+our+products.+
+
+
+
"CONFORMITY"
+
This+device+was+designed+and+manufactured+according+to+the+following+standards:+
"
The"low"voltage"directive:"2006/95/EC+
The"Electromagnetic"compatibility"directive:"2004/108/EC++
EN+55014%1:+2000++A1:2001++A2:2002+;+EN+55014%2:+1997++A1:2002+
EN+60335%1:+2002+++A1:2004+++A2:2006++A11:2004+++A12:2006+;+EN+60335%2%41:+2003+++A1:2004+
+
Relative+to+which+it+is+compliant.+
The+product+has+been+tested+under+normal+conditions+of+use.+
+
SAFETY"STANDARDS:"
Vortex™3+ and+ Vortex™4+ and+ Vortex™+ 3+ 4WD+ has+ been+ classified+ as+ compliant+ to+ the+
relevant+requirements+of+IEC+60335%2%41+by+the+ETL.+
"
R&TTE"COMPLIANCE:"Vortex™4"
BZT+%+ETS+certification+Gmbh,+attests,+under+its+responsibility+that+the+product+ERONE+O24A+manufactured+by+
ELPRO+ INNOTEK+ s.p.A,+ Via+ Piave,+ 23+ %+ 131020,+ to+ which+ this+ current+ attestation+ refers,+ conforms+ to+ the+
corresponding+norms+and+normalisation+documents;+
>+EN+300+220%3+V1.1.1+(2000%09)+
>+EN+301+489%03+(2000%07)+
>+EN+60+065+(1998):+audio,+video+and+similar+electronic+devices.++
+
+
The"manufacturer"reserves"the"right"to"modify"these"specifications"without"notice."
Although"the"Vortex™3,"Vortex™4"and"Vortex™"3"4WD"cleaning"robots"have"been"tested"in"a"large"variety"of"
swimming"pools,"Zodiac"cannot"be"held"responsible"in"the"case"of"a"non_perfect"adaptation"of"the"robot"to"a"
particular"swimming"pool."
"
H03606%00.A2.EN+
Ver.+05/2011+
12+
Your retailer/ votre revendeur
Pour plus de renseignements, merci de contacter votre revendeur.
For further information please contact your retailer.
Hinweise und Auskünfte erhalten Sie bei Ihrem Händler.
Voor nadere inlichtingen kunt u zich wenden tot uw zwembadbouwer.
Para cualquier información adicional contactar con su detallista.
Contacte o seu revendador para obter informaçoes mais detalhadas.
Per qualsiasi informazione supplementare, mettetevi in contatto
con il vostro rivenditore al dettaglio.
ZODIAC® is a registered trademark of Zodiac International, S.A.S.U., used under license.
ZODIAC POOL CARE EUROPE / BP 90023, 49180 St Barthélémy d’Anjou cedex-France / S.A.S.U AU CAPITAL DE 517 200 € / SIREN 395 068 679 / RCS PARIS / Pour Qui Pourquoi / Edition 05-2011 / W2088B / H0360600.A2
Zodiac : Innovative pool products and services