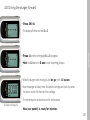
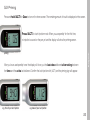
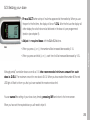
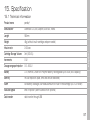
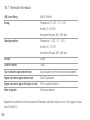
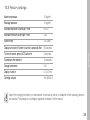
1
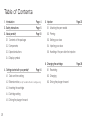
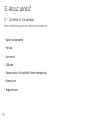
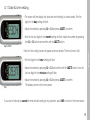
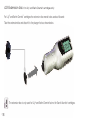
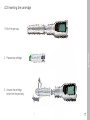
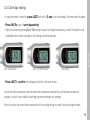
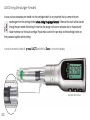
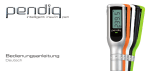
User Manual
English
Table of Contents
1. Introduction
Page 4
2. Safety instructions
Page 5
5.1 Attaching the pen needle
3. About pendiq®
Page 10
5.2 Priming
5. Injection
3.1 Contents of the package
5.3 Setting your dose
3.2 Components
5.4 Injecting your dose
3.3 Operation buttons
5.5 Handling of the pen after the injection
Page 22
3.4 Display symbols
6. Changing the cartridge
®
Page 14
4. Getting started with your pendiq
4.1 Date and time setting
4.2 Extension disc
®
4.4 Cartridge setting
4.5 Driving the plunger forward
2
6.2 Changing
®
(for Lilly and Berlin-Chemie cartridges only)
4.3 Inserting the cartridge
6.1 Rewinding
6.3 Driving the plunger forward
Page 28
7. Dose memory
Page 33
11. Charging the battery
Page 46
7.1 Reviewing the last injection (time & units)
11.1 Charging the battery using the USB cable
7.2 Total dose
11.2 Using the USB cable for the transfer of data
8. Pre-programming injections
Page 37
8.1 Programming time segments
12. Manual injection mode
Page 48
13. Cleaning and storage of your pen
Page 54
14. Problems?
Page 55
15. Specifications
Page 57
English
7.3 Injection memory
8.2 Changing number of time segments
8.3 Injecting a time segment dose
15.1 Technical information
15.2 Factory settings
9. Description of alarm signals
Page 44
10. Alarm sounds on/off
Page 45
15.3 Descriptions of technical symbols
16. Product warranty
Page 61
17. General information
Page 62
3
1. Introduction
The digital insulin pen pendiq® is designed to deliver insulin for the insulin-required diabetes mellitus. With this pen you
can adjust every dose up to increments as small as 0.1 U (0.001ml) and with the memory function you can review your
injection history with the date, time and amount of insulin delivered.
This manual gives you instructions on how to use and maintain your pen. You should read and follow the instructions
carefully before you start using the pen. Please keep this manual for your reference and register online on our website
www.pendiq.com.
Other languages?
Please check out our website www.pendiq.com for a download of this user manual in other languages.
4
2. Safety Instructions
Important information for the safe use of the pendiq® pen.
• Compatibility: The pendiq® pen is only suitable for the use of 3ml-insulin cartridges (300 Units, U-100-Insulin) of the
manufacturers Lilly®, Sanofi-Aventis® and Berlin-Chemie®. Insulin cartridges from manufacturers other than the
stated manufacturers are not suitable for the pendiq® pen and may not be used. The intended functionality of the
English
pendiq® is not secured when using insulin cartridges that are not adequate for the pendiq®.
• The manufacturer is not responsible for the safety, dosage accuracy and functionality as well as any damage
caused by the usage of insulin cartridges that are not adequate for the pendiq®.
• Before using your pendiq®, you should consult your healthcare professional and read this important information
carefully. The manufacturer is not responsible for any problem or damage caused by not following the instructions.
• Consult your healthcare professional, if you encounter abnormal blood glucose levels.
• The pen is not designed for the blind or visually impaired without a trained assistant.
• Before using the pen for the first time, check that the date and time is set correct.
5
2. Safety Instructions
• For safety reasons it is recommended not to let the alarm sounds be turned off constantly as important alarm
sounds (e.g. blockage) are also muted.
• Always make sure that the pen body and the cartridge holder are firmly screwed together before the injection.
• Always make sure that the pen needle is removed from the cartridge holder before priming.
• Never insert a used or previously inserted cartridge into the cartridge holder.
• Always make sure that there are enough units left for your dose.
• In case your pen is lost or damaged, always carry an extra medicine delivery device and extra medicine.
• Before the injection, you should check if you have inserted the correct insulin type as prescribed by your healthcare
professional.
• Always remove possible air bubbles before each injection by producing a drop of insulin appearing at the needle tip.
• Do not share this pen with other people to prevent infection.
6
2. Safety Instructions
• If you require the assistance of another person for the injection, please pay extra attention when handling the pen as
the pen needle may injure you or your assistant and may lead to infections.
• Do not modify or disassemble the pen. Do not use the pen if any part of your pen looks broken or damaged.
Contact your local supplier or your healthcare professional.
English
• For safety reasons a damaged pendiq® may not be used.
• Do not pull out the USB lid or manual switch lid by force.
• Always use a new sterile pen needle.
Health care professionals strongly recommend not reusing a pen needle. Using a new needle for each injection will
minimize the risk of infections and a pen needle blockage.
• The inserted insulin cartridge and the cartridge manufacturer in the settings must match.
If they don’t match the pen cannot recognize the exact residual amount of insulin in the cartridge and the amount
of units displayed may then differ from the real residual amount. This can result in the injection of an incorrect dose.
7
2. Safety Instructions
• Do not keep the needle attached to the pen after the injection.
Always safely withdraw and dispose the used needle. Always follow general safety measures for the removal and
disposal of needles in order to minimize the risk of unintended needle penetration and transmission of infectious
diseases. Otherwise, it may cause incorrect insulin delivery, leakage of insulin and unintended needle injury, etc.
• Do not expose the pendiq® to moisture.
pendiq® is not water-proof and holds no protection against the ingress of water or moisture.
When exposed to water or moisture the pen may suffer damages and not function properly.
• Do not store in the refrigerator.
• Do not use water when cleaning the pendiq®. Do not immerse the pen in water.
• Do not throw or drop your pen on purpose as shocks and impacts may damage the pen.
• Keep away from heat and do not expose the pen to direct sunlight.
When exposed to heat the pen may suffer damages and not function properly.
8
2. Safety Instructions
• Always make sure that the battery of the pen is well charged.
It is recommended to fully charge the battery as often as possible to extend the duration of battery life.
• Manual injection mode is only for emergencies! To avoid potential problems, do not use the manual injection mode
while the pen works normally.
English
• When using the manual injection mode only turn your pen in the direction as described in the manual.
• After using the manual injection mode please rewind your pen and drive the plunger forward afterwards.
• Keep away from electronic equipment including electromagnetic waves or frequency.
pendiq® may suffer damages when exposed to electromagnetic waves.
• Keep away from flammables and do not use in the presence of a flammable anesthetic mixture with air or with
oxygen or nitrous oxide.
• The pendiq® pen is also suitable for domestic use.
9
3. About pendiq®
3.1 Contents of the package
Check if all the following items are contained in the product box:
• Digital insulin pen pendiq®
• Pen case
• User manual
• USB cable
• Extension disc (for Lilly® and Berlin-Chemie® cartridges only)
• Warranty card
• Registration card
10
3.2 pendiq® components
A : Pen cap
B : Pen body
D
C : Cartridge holder
E
D : Cartridge (not included)
K
J
I
English
E : Pen needle (not included)
F : Operation buttons
(+), (–), (M), (ACT)
G
H
C
G : LCD screen
H : USB port
A
B
I : Plunger and plunger foot
J : Dose ring (for manual injection only)
F
K: Extension disc
11
3.3 Operation buttons
(ACT) button is used
- to turn on the pen
- to confirm an operation or setting
- to inject dose
- to return to home screen
(M) button is used
- to enter the menu
- to review memory
- to cancel an operation or setting
(display returns to home screen)
12
(+)
-
button is used
to increase number
to prime
to track forward in injection memory
to drive the plunger forward
(–)
-
button is used
to decrease number
to track back in injection memory
to rewind the plunger
3.4 Display symbols
A
B
C
A : To display operation status,
numbers, symbols, etc.
English
B : Battery status
C : Display unit
D : Blockage
E : Insulin cartridge indicator
F : Memory
G : Confirmation
H : Alarm sound on
D
E
F
G
H
13
4. Getting started with your pendiq®
When you use your pendiq® for the first time, follow the steps below to get started.
The pendiq® has no OFF button. The screen turns itself off after 60 seconds when no button is pressed.
When going through the menu with the (M) button, you can always return to the home screen by pressing (ACT).
4.1 Date & time setting
• Press (ACT) and hold for 3sec to turn on the display.
• The LCD screen now displays the home screen. When no cartridge is inserted and
the plunger is completely rewound, the display will show more than 300.0 U as e.g.
beside.
home screen
• Press (M) once and then press the (+) or (–) button. The ‘year setting’ will
appear as shown beside. The last two digits of the year will flash.
• Adjust the year by pressing (+) or (–) and press (ACT) to confirm.
year
14
4.1 Date & time setting
• The screen will then display the ‘date and month setting’ as shown beside. First the
digits for the day setting will flash.
• Adjust the number by pressing (+) or (–) and press (ACT) to confirm.
• Now the last two digits for the month setting will flash. Adjust the number by pressing
the (+) or (–) buttons and confirm with the (ACT) button.
Next the ‘time setting’ screen will appear as shown beside. The time format is 24h.
• First the digits for the hour setting will flash.
• Adjust the number by pressing (+) or (–) and confirm with the (ACT) button. Now the
last two digits for the minute setting will flash.
time
• Adjust the number by pressing (+) or (–) and press (ACT) to confirm.
The display returns to the home screen.
If you want to interrupt or cancel the time and date setting or any operation, press (M) to return to the home screen.
15
English
day & month
4.2 Extension disc
(for Lilly® and Berlin-Chemie® cartridges only)
For Lilly® and Berlin-Chemie® cartridges the extension disc needs to be used as followed:
Take the extension disc and attach it to the plunger foot as shown below.
The extension disc is only used for Lilly® and Berlin-Chemie® but not for Sanofi-Aventis® cartridges.
16
4.3 Inserting the cartridge
English
1. Pull off the pen cap.
2. Prepare new cartridge.
3. Unscrew the cartridge
holder from the pen body.
17
4.3 Inserting the cartridge
4. Insert a new
cartridge into
the cartridge
holder.
5. Screw the
cartridge holder
and the pen body
firmly together.
Once you have inserted the cartridge you will need to adjust the settings of the pen to the insulin
manufacturer you use.
18
4.4 Cartridge setting
• In case the screen is turned off, press (ACT) and hold for 3 sec to turn on the display. The home screen will appear.
• Press (M) 5x to go to ‘cartridge setting’.
• Adjust the numbers by pressing (+) or (–) choosing the type of cartridge manufacturer you need. The pendiq® is only
English
compatible with the insulin cartridges of the following insulin manufacturers:
CA01 : Sanofi-Aventis®
CA02 : Lilly®, Berlin-Chemie®
CA03: Not yet
• Press (ACT) to confirm and the display will return to the home screen.
You set the insulin manufacturer once and unless the manufacturer prescribed by your healthcare professional
changes, you don’t have to adjust the cartridge type when inserting a new cartridge.
After you have set the correct insulin manufacturer in the cartridge setting you need to drive the plunger forward.
19
4.5 Driving the plunger forward
In case you have screwed a pen needle onto the cartridge holder it is very important that you remove the pen
needle again from the cartridge holder before driving the plunger forward. Otherwise the insulin will be ejected
through the pen needle while driving it forward as the plunger will have no resistance due to the punctured
rubber membrane of the insulin cartridge. Please make sure that the pen body and the cartridge holder are
firmly screwed together before priming.
In case the screen is turned off, press (ACT) and hold for 3sec to turn on the display.
example home screen
20
4.5 Driving the plunger forward
• Press (M) 4x.
English
• The display will show four bars [----].
• Press (+) and the priming sign [<----] will appear.
• Hold the (+) button for 2 sec to start the priming process.
• When the plunger starts moving you can let go of the (+) button.
• Now the plunger will slowly move towards the cartridge and it will stop when
the piston rod foot hits the end of the cartridge.
• The remaining units will be shown on the home screen.
example remaining units
Now your pendiq® is ready for injection.
21
5. Injection
The screen must be turned on for at least 60 seconds while you operate in the injecting mode.
Health care professional strongly recommend using a new pen needle for every injection. When a pen needle
is used several times the medicine flow cannot be guaranteed as the pen needle may block. This leads to the
injection of an incorrect dose. pendiq® recognizes when the medicine flow is affected and will signalise a
blockage by showing a flashing cross (X) on the screen and a flashing red LED light. Additionally you will hear
an acoustic signal.
5.1 Attaching the pen needle
If you use longer acting NPH (Basal) insulin, you need to stir the insulin by turning the pen up and down at least
10x as per cartridge instructions before you attach the pen needle. Please read the patient
information sheet of the insulin manufacturer.
• Take a new pen needle and remove the protective seal.
• Attach the needle by firmly screwing it onto the threads at the end of the cartridge holder.
• Remove the outer protective cap and the inner needle cap from the needle.
22
5.2 Priming
Press and hold (ACT) for 3sec to turn on the home screen. The remaining amount of insulin is displayed on the screen.
Press (ACT) to start injection mode. When you use pendiq® for the first time,
English
no injection is saved on the pen yet and the display will show the priming screen.
priming
After you have used pendiq® once the display will show you the last dose delivered alternating between
the time and the units last delivered. Confirm the last injection with (ACT) and the priming sign will appear.
e.g. time of your last injection
e.g. dose of your last injection
23
5.2 Priming
• Hold the pen with the needle pointing up in order to raise any air bubbles.
• Press (+) until you see a drop of insulin at the tip of the needle.
• Each time you press (+), 0.5 U will be ejected from the needle.
priming
In case the insulin is not ejected through the needle tip even though you repeatedly press (+) to remove air, the
pen needle may be blocked. In case of a blockage, the display will show a flashing (X) and the LED light will flash
red. Additionally you will hear an acoustic signal. Use a new pen needle and repeatedly remove the air until
a drop of insulin appears at the needle tip.
If you want to cancel the operation and move to the home screen, press (M).
24
5.3 Setting your dose
• Press (ACT) when a drop of insulin has appeared at the needle tip. When you use
the pen for the first time, the display will show 1.0 U. After the first use the display will
either display the units that were last delivered or the dose of a pre-programmed
injection (see chapter 8).
• Adjust the required dose with the (+) or (–) buttons.
• When you press (+) or (-), the number will be increased/decreased by 0.1 U.
English
dose
• When you press and hold (+) or (-), each time it will be increased/decreased by 1.0 U.
Although pendiq® can deliver doses as small as 0.1 U the recommended minimum amount for each
dose is 0.5 U. The maximum amount for one dose is 60.0 U. When you have reached the number 60 the red
LED light will flash to inform you that you have reached the maximum dose limit.
You can cancel the setting of your dose at any time by pressing (M) and return to the home screen.
When you have set the required dose you will need to inject it.
25
5.4 Injecting your dose
The number of units for your dose is now displayed on your LCD screen.
• Firmly hold your pen and insert the needle to your injection site using the injection technique recommended by
your healthcare professional.
• Press (ACT) to start the injection process. The number on the display will now decrease to [0.0].
• During injection the LED light on the pen flashes green.
• Afterwards the pen will now count down from 15 to 0 seconds. This is how long it is recommended to keep the
needle inserted in the injection area.
• After the 15 second countdown the screen will show the sign [End] on the display.
• The green light will flash 3x and you hear 4x a short acoustic signal.
26
5.4 Injecting your dose
• Now you can withdraw the pen needle from your injection site.
• After the injection the remaining amount of insulin is automatically shown on the home screen.
English
example remaining units
5.5 Handling the pen needle after the injection
• Carefully place the outer cap back on the pen needle and unscrew the needle.
• Dispose the used needle as advised by your healthcare professional or according to local regulations.
27
6. Changing the cartridge
When the residual amount of insulin in the cartridge is 20.0U or lower the cartridge status sign on the display will start to
flash to inform you that you will soon need to change the cartridge. To change the cartridge you will first need to rewind
the plunger.
6.1 Rewinding
• Pull off the pen cap. You will now see the transparent cartridge holder with the used cartridge.
• In case there is a pen needle still attached to the cartridge holder, remove the pen needle to avoid potential injuries.
• In case the display is turned off, press (ACT) and hold for 3sec to turn on the display.
• The LCD screen displays the remaining amount of insulin in the cartridge.
• Press (M) 4x.
• The display will show four bars [----].
• Press (–) and the rewinding sign [---->] will appear.
28
6.1 Rewinding
• Hold (–) for 2sec to start the rewinding process.
• When the plunger starts moving, let go of the (–) button. The plunger will now slowly
move all the way back.
• When the plunger has completely rewound, the sign for driving the plunger forward [<----]
will appear with an (OK?) in the right corner of the LCD screen as shown beside.
driving forward
You can interrupt the process of driving the plunger forward or rewinding it at any time by pressing (M).
The plunger will stop and the display will return to the home screen. Follow the instructions to start again from the
beginning. It is important that you to get familiar with the process of rewinding and driving forward the plunger.
29
English
rewinding
6.2 Changing
• Take off the pen cap and unscrew the transparent cartridge holder from the pen body.
• Take the used cartridge out of the cartridge holder.
• Insert the new cartridge into the cartridge holder.
• Screw the cartridge holder and the pen body firmly together.
• Dispose the used cartridge according to the instructions of the insulin manufacturer.
6.3 Driving the plunger forward
In case you have screwed a pen needle onto the cartridge holder it is very important that you remove the pen needle
again from the cartridge holder before driving the plunger forward. Otherwise the insulin will be ejected through
the pen needle while driving it forward as the plunger will have no resistance due to the punctured
rubber membrane of the insulin cartridge.
Please make sure that the pen body and the cartridge holder are firmly screwed together before priming.
30
6.3 Driving the plunger forward
• The LCD will now still display the following screen for driving the plunger forward again.
• Press (ACT) to start the process of driving the plunger forward. The plunger will stop
when it hits the end of the cartridge.
• The remaining amount of insulin will be displayed on the home screen.
English
driving forward
In case the screen turned itself off while you changed the cartridge, follow the steps below to drive plunger forward:
• Press (ACT) and hold for 3sec to turn on the home screen.
When the plunger is completely rewound, the display will show more than 300.0U.
example home screen
31
6.3 Driving the plunger forward
• Press (M) 4x.
• The display will show four bars [----].
• Press (+) and the priming sign [<----] will appear.
• Hold (+) for 2sec to start the priming process.
• When the plunger starts moving, let go of the (+) button.
• Now the plunger will slowly move towards the cartridge and it will stop when the piston rod
foot hits the end of the cartridge.
• The remaining units will be shown on the home screen.
example remaining units
32
7. Dose memory
7.1 Reviewing your last injection (time & units)
The pen is designed to prevent the risk of double dosages.
Therefore your last dose is always displayed when you enter injection mode.
English
To check your last injection, press (ACT) once.
Now the last injection is displayed on the LCD screen with the time and the amount of insulin delivered alternating.
e.g. time of your last injection
e.g. dose of your last injection
Press (M) to return to home screen.
33
7.2 Total dose
• Press and hold (ACT) for 3sec to turn on the home screen.
example home screen
• Press (M) once to see present time.
example present time
• Press (M) once more to see the total of units delivered today.
example total dose
34
7.3 Injection memory
• When the home screen is displayed, press (M) 3x to see your injection memory.
date
time
English
• The display will now show the last dose delivered, alternating between the date, time and units of the last
dose (e.g. below).
dose
• Press (–) to go back in dose history and review other previous doses.
• Each time you press (–), the memory will go back one injection.
• The screen will alternate between date, time and units of the dose.
• Press (+) to go forward in dose history.
35
7.3 Injection memory
• Press (ACT) to return to the home screen.
example home screen
pendiq® greatest benefit is to save the last 195 injections with date, time and amount of units delivered. When
you exceed 195 injections, the first injections will be deleted from the memory as the pen cannot store more than
195 injections. Please make sure that you transfer the memory regularly to your diabetes management software.
When you transfer the injection history to the software, pendiq® will not delete the data on the pen but always keep
the last 195 injections saved.
36
8. Pre-programming injections
Pre-programming means that you can pre-program a fixed dose for a time segment of your choice.
pendiq® pre-programming is convenient because you can pre-program a maximum of 9 time segments a day,
each time segment delivering one pre-programmed dose.
English
8.1 Programming time segments
• Press (ACT) and hold for 3sec to turn on the home screen. The remaining amount
of insulin is displayed.
example home screen
37
8.1 Programming time segments
• Press (M) 6x to go to ‘pre-programming’ option as shown beside.
• Press (ACT) to enter ‘time segment setting’.
• The t on the left side of the display means time segment. On the right side of the display you
will see the time segment number flashing.
time segment number (flashing)
• Choose how many time segments you would like to program by pressing (+) or (-)
and confirm by pressing (ACT). You can pre-program up to 9 time segments.
example 3 time segments
38
8.1 Programming time segments
• After you have confirmed the number of time segments you would like to program, the ‘time
setting’ of the first time segment will appear as shown beside.
time segment
example starting time
06:00 a.m. (flashing)
• Adjust starting time by pressing (+) or (–) and press (ACT) to confirm. A time segment
ends automatically with the starting time of the next time segment.
• The right side of the screen will now show you the dose amount you need to adjust.
• Adjust units by pressing (+) and (–). When you have chosen the required dose for the time
segment, press (ACT) to confirm.
time segment
example dose amount for
the time segment (flashing)
39
English
• To the left side on the screen you will see the time segment you would like to program. To the
right side of the screen you can choose when you would like your time segment to start.
The time format is 24h.
8.1 Programming time segments
Set the starting time and dose for the next time segments as previously explained and confirm settings with (ACT).
example next time segments
starting time (flashing)
dose (flashing)
starting time (flashing)
dose (flashing)
After you have confirmed the dose amount for the last time segment, the display will return to
the home screen.
example home screen
40
8.1 Programming time segments
You can program up to 9 time segments.
The following illustration will give you an example of pre-programmed time segments.
These are only examples of pre-programmed time segments. The time segments
programmed will automatically be repeated every 24 hours unless the
pre-programmed mode is deactivated.
If you want to deactivate the pre-programmed time segments,
choose time segment 0 in ‘time segment settings’ and confirm with (ACT).
To review your time segment settings at any time, press (M) 6x and enter
the ‘pre-programming setting’ with (ACT).
Use the (ACT) button to review and confirm your pre-programmed time segments.
41
English
The starting time of a time segment is automatically the ending time of the
previous time segment.
8.2 Change number of time segments
To change the number of time segments you have programmed previously, you will have to return to
‘time segment setting’.
• Starting from the home screen, press (M) 6x. The display will show you how many time
segments are programmed so far.
• Press (ACT) to enter ‘time segment setting’. The time segment number will now flash.
• Choose new number of time segments by pressing (+) or (-) and confirm with (ACT).
• Set starting time and dose for the time segments as previously explained and confirm settings with (ACT).
• After you have confirmed the dose amount for the last time segment, the display will return to the home screen.
If you would like to cancel the starting time or dose setting of a time segment, press (M). The display will then return to
the time segment screen. Now you can choose again how many time segments you would like to program. If you want to
reset the preprogrammed time segments and therewith turn off the preprogramming mode, press (M). The time
segment number will change to zero. To confirm the reset press (ACT). To cancel and return to home screen, press (M).
42
8.3 Injecting time segment dose
During a time segment the pre-programmed dose for a time segment is saved in the injection mode, so you can deliver
the dose quickly and easy.
• Press and hold (ACT) for 3 sec to turn on the home screen.
• Press (ACT) again to enter ‘injection mode’. The screen will now display last injection delivered alternating between time and amount.
• After you have attached a new, sterile pen needle on the cartridge holder and have removed the outer and inner cap,
you need to prime the pen needle.
• Hold the pen with the needle facing upwards.
• Press (+) repeatedly until a drop of insulin appears at the needle tip.
• After you primed the pen, press (ACT) to proceed.
• The screen will now display the pre-programmed dose of the time segment you are in.
• If you would like to inject more or less than your time segment dose, adjust the number of units by using (+) or (-).
If you would like to proceed with the injection of your pre-programmed dose, insert the pen needle into your injection
site using the injection technique recommended by your healthcare professional, and press (ACT) to start the injection.
43
English
• Press (ACT) to proceed to removing air bubbles (chapter priming).
9. Description of alarm signals on the display
A
A : Battery symbols
When the battery is low the battery image
flashes and then the screen turns off itself.
When the battery is empty, the LED light
flashes red 3 times and you hear an acoustic
signal. The LCD screen turns itself off and
won’t turn itself on again until the battery is
charged.
B : When the pen needle is blocked the X on
the display flashes. Also the LED light flashes
red and you hear an acoustic signal (beep).
C : If the residual amount is less than 20.0U,
the insulin cartridge image flashes.
B
44
C
D
D : When the bell symbol is displayed on the
home screen, the alarm sounds are
turned on.
10. Alarm sounds on/off
• Press (ACT) and hold over 3sec to turn on the home screen.
• The remaining amount of insulin is displayed on the home screen.
• Press (M) 7x to enter ‘alarm sounds settings’. The display will show the word bell.
English
• Choose with (+) or (–) the alarm sound setting.
alarm sounds on
alarm sounds off
home screen with alarm on
• Press (ACT) to confirm.
When the alarm sounds are turned on, the bell symbol is displayed on the home screen.
The alarm sounds are optional so that the diabetic has the possibility to inject insulin discreetly in public places.
But it is recommended not to let the alarm sounds be turned off all the time as important alarm sounds
(e.g. for a pen needle blockage) will be also muted. When you choose to turn off the alarm sound,
please pay extra attention to the alarm signals of the LED light on the pen body.
45
11. Charging the battery
If the LED light of the pendiq® does not show a green light while your pen is recharging, you have to check the
USB cable connection.
11.1 Charging the battery using the USB cable
• Open the USB port cover on the side of your pen.
• Take the USB cable that was delivered with the product box and plug in the end
of the USB connection into the USB port of the pen.
• Connect USB cable with your computer or with a USB charger
(not contained in the product box) to charge your pen.
• While the pen is charging, the LED light will show a flashing green light.
• When your pen is completely charged, the LED light shows a consistent green light
and you can remove the charger from your pen.
46
11.2 Using the USB cable for the transfer of data
• Open the USB port
cover on the side of your pen.
• Plug in the small end of the USB cable into the USB port of your pen.
• Connect the USB cable with the USB port of your computer.
English
• Start diabetes management software.
To download a Diabetes Management Software that is compatible with the pendiq®,
go to the website www.pendiq.com and check out the site for downloads.
47
12. Manual injection mode
(for emergencies only)
In case of emergency (e.g. battery empty, display failure) the pendiq® is convertible to manual injection mode.
Manual injection mode is for emergencies only. Do not use manual injection mode while the pen works without
problem in digital mode. In manual injection mode, pendiq® does not register nor recognize the delivered doses.
The following illustration will show you how to switch pendiq® to manual injection mode:
1.
Push rubber lid back at the raised edge.
2. Pull up the end of rubber lid.
3. Switch to manual mode by pushing
the red button down as described below.
Manual injection mode = red switch towards the display
Digital injection mode = red switch towards cartridge holder
4. Close the rubber lid.
48
12. Manual injection mode
English
5. Screw pen needle onto cartridge holder, holding the
pen with your fingers between the dose ring and
the pen body.
If you hold the pen at the pen body, the pen will turn
itself while screwing on the needle and insulin will be
ejected. You will notice due to the clicking sound.
49
12. Manual injection mode
Once you have screwed on the pen needle you will need to remove any air
bubbles.
• Hold the pen with the pen needle facing upwards.
• Hold the pen with your fingers between the dose ring and the cartridge
holder.
• Turn the pen body with the free hand until a drop of insulin appears at
the needle tip. The pen can only be turned in one direction. You will notice the
correct direction due to clicking sound.
• Never forcibly turn the other direction as it may damage the pen.
• If you cannot turn the pen body, check if the pen has been switched to manual
mode correctly. In digital mode you cannot turn the pen body.
• Each dimple on the dose ring represents 1.0 unit.
• You hear a clicking sound for each dimple. Each click signalises the delivery of
1.0 unit.
50
12. Manual injection mode
When you have removed possible air bubbles, insert the pen needle
into your injection site using the injection technique recommended by your
healthcare professional.
• Hold the pen firmly with your fingers between the dose ring and
the cartridge holder.
English
• Hold the pen still.
• Turn the pen body (where the display is) with your free hand.
• The pen can only be turned in one direction. You will notice the correct
direction due to the clicking sound.
• Never forcibly turn the other direction as it may damage the pen.
• Each dimple on the dose ring represents 1.0U and you will hear a clicking
sound for each turn. Count the clicks until you have delivered your
required dose.
51
12. Manual injection mode
•
After you have delivered your required dose, count to 15 and
remove the needle from the injection site.
•
Hold the pen with your fingers between the dose ring and the
cartridge holder while you reattach the protective outer
needle cap and remove the needle.
If you hold the pen at the pen body, the pen will turn itself while
unscrewing the needle and insulin will be ejected.
You will notice due to the clicking sound (see page 49).
• Safely dispose pen needle according to general safety rules.
• To switch the pen back to digital mode, push the rubber lid
back at the raised edge and push the red switch as illustrated
above. As the button is always blocked after manual injection mode
you will need to turn the pen body clockwise while pushing the
button up at the same time in order for the button to click into
place. Never forcibly try to turn the pen.
52
12. Manual injection mode
• Close rubber lid.
English
The pendiq® is now converted back to digital mode. You can check if the pen
is switched back to digital mode by trying to turn the pen. If you cannot turn it,
the pen is converted to digital mode but never forcibly try to turn the pen.
Charge the battery as soon as possible.
Even when the battery is empty and the pen won’t turn back on, your dose memory is never lost. Your dose
history is still saved on the pen even when the battery was empty and the pen was turned off.
The manual injection mode was designed for emergencies. In manual injection mode, pendiq® does not register
the delivered doses nor recognises the amount of insulin delivered. Therefore the plunger of the pen needs
to be rewound and afterwards driven forward again so the pen can recognize the new amount of insulin
remaining in the cartridge. After using manual injection the displayed residual amount of insulin may differ
from the real amount delivered.
To see a demonstration of the manual injection mode, please visit the following website
www.pendiq.com/usermanual.
53
13. Cleaning and storage of the pen
• Do not use water when cleaning the pendiq®.
• Do not immerse the pen in water or any liquids.
• Do not use any chemicals or liquid materials to clean the pen.
• Incorrect cleaning and dirt may damage the pen.
• Do not use grease or any lubricants.
• Do not store the pendiq® in the refrigerator.
• Keep it away from moisture, dust, extreme heat and cold as well as direct sunlight.
• Gently wipe the pen body, the pen cap and the pen case with a dry or lightly damp cloth.
• pendiq® is a technical device. Please use your pendiq® considerate and appropriate.
• Please pay attention to the storage advice of the insulin manufacturers.
54
I cannot screw the cartridge
holder onto the pen body?
Check that the cartridge is completely inserted into the cartridge holder. Make
sure the cartridge holder is completely and securely screwed onto the pen body.
A part of the pens’ display
stays turned on all the time?
Your display is not working correctly. Contact your local distributor.
I want to turn the pen off?
In order to prevent your pen from accidentally being turned off during injection, there
is no OFF button. The screen turns itself off after 60sec when no button is pressed.
I have an air bubble in the
cartridge after I prime.
Hold the pen with the needle facing upwards; tap with your finger gently against the
cartridge holder so that the air bubble rises to the top. Start ‘removing air bubbles’.
In case the bubble in the cartridge does not disappear although you repeatedly press
(+) for removing air bubble, do the following:
Initiate the process of driving the plunger forward until a stream of insulin is ejected
from the needle. STOP the process by pressing (M) in order to avoid the loss of too
much insulin. It is possible that a small air bubble may remain in the cartridge. Repeat
the priming process in the injection mode until a drop of insulin appears at the needle
tip.
Change the pen needle.
A drop of insulin does not
Check the medicine flow again until a drop of insulin appears at the needle tip.
appear at the needle tip
when I check the insulin flow.
55
English
14. Problems?
14. Problems?
The pen has run out of battery?
The battery is rechargeable. Please read the chapter Charging the battery and
make sure that the battery is always well charged (manual injection mode is
only for emergencies!).
I am unable to attach the
extension disc to the plunger.
Do I really need the extension
disc?
Yes, you always need the extension disc for Lilly® and Berlin-Chemie® cartridges
because it extends the plunger and makes sure that you will receive the full
amount of 300.0 U. After 300.0 U have been used there is usually a small amount
of insulin left in the cartridge. The patient always receives the full amount of
300.0 U with each cartridge even if there is some insulin left.
I would like to adjust the amount of
insulin delivered when priming.
The fixed amount for priming is 0.5 U and cannot be changed or decreased.
Each time (+) is pressed 0.5 U are delivered.
After inserting a new cartridge and
priming the pen, my display shows
less than 300.0U. Does this mean
there is less than 300.0U insulin in
the cartridge?
No. The motor-driven plunger foot of the pendiq® applies more pressure on the
rubber plunger of the insulin cartridge than the plunger of traditional pens. Due to
the elasticity of the rubber plunger of the insulin cartridges, the remaining
amount of insulin displayed may vary slightly. This does not mean that there are
less than 300.0U in the cartridge.
For further information visit our website www.pendiq.com and check our FAQs.
56
15. Specification
Product name
pendiq®
Manufacturer
Diamesco Co.,Ltd., Daejeon, 305-500, Korea
Length
182mm
Weight
46g (without insulin cartridge and pen-needle)
Infusion rate
2.0U/sec
Cartridge Storage Volume
3ml (300.0U)
Increments
0.1U
Dosage range per Injection
0.5 ~ 60.0U
Battery
3.7V, 90mAh, Lithium-Ion-Polymer battery, rechargeable up to 300x (80% capacity)
Memory
195 last injections (date, time and amount delivered)
Alarm
low battery, blockage, low residual amount of insulin in the cartridge (20.0 U or lower)
Acoustic signals
end of injection (alarm sounds on/off optional)
Data transfer
data transfer through USB
English
15.1 Technical information
57
15.1 Technical information
USB Current Rating
Storage
USB 5V, 500mAh
Temperature: -10 ~ 40℃ / 14°F ~ 104°F
Humidity: 10 ~ 90% RH
Atmospheric Pressure: 660 ~1060 mbar
Operating conditions
Temperature: 0 ~ 40℃ / 32°F ~ 104°F
Humidity: 20 ~ 70% RH
Atmospheric Pressure: 660 ~1060 mbar
Warranty
2 years
Duration of battery
7 days
Type of protection against electric shock
Class II equipment with internally powered equipment
Degree of protection against electric shock
Type BF applied part
Degree of protection against the ingress of water
IPX0 (no special protection)
Mode of operation
Continuous operation
Equipment not suitable for use in the presence of a flammable anesthetic mixture with air or with oxygen or nitrous
oxide (EN 60601-1).
58
Maximum pressure
1.5 kg/cm2
Blockage pressure
1.0 kg/cm2
Allowable maximum volume per 1 time
60.0 U
Allowable minimum volume per 1 time
0.5 U
Injection rate
2.0 U/sec.
Display turns itself off (when no button is pressed) after
60 seconds
To turn on screen, press (ACT) button for
3 seconds
Countdown after injection
15 seconds
Dosage increments
0.1 U
Display of units in
U (=0.01 ml)
Cartridge volume
3ml (300.0 U)
English
15.2 Factory settings
Apart from charging the battery, no maintenance or services as well as no calibration of the measuring function
are required. The change of a cartridge is explained in chapter 6 of this manual.
59
15.3 The List of Icons
Rx only
Manufacturer
Serial number
SN
Type BF applied part
2
2
Class II equipment
Rx only
Reference number
SN
Electromagnetic compatibility IEC 60601-2-24
Appointed agent in the EC
2
only
Protect from humidity
RxRx
only
SN
Material classification (only GER)
Disposal note (only EU)
Specific references regarding storage and/or handling
The date of manufacture
Direct Current
SN SN
Attention, consult accompanying documents
CE certificate number
60
Rx only
16. Product warranty
The statutory warranties shall apply to this product. You are entitled to warranty rights in accordance with the statutory
provisions for a period of two years beginning with the date of purchase. After your purchase of the pendiq® we
recommend to register online on our website www.pendiq.com or to fill out the registration card enclosed and
return it to us.
In the unlikely event of failure during the two years of warranty, please fill out the warranty card contained in the product
box and send it together with the damaged or defective pendiq® to the following address:
English
pendiq GmbH
Customer service
Baerler Strasse 100
47441 Moers, Germany
Please state the reason of your reclamation on the warranty card. The pens send back to us will be recycled after the
inspection according to legal regulations. The manufacturer is not responsible for damages caused by the use of unsuitable insulin cartridges or pen needles and for any inappropriate usage of the pendiq®.
61
17. General information
Manufacturer
Diamesco Co.,Ltd
Migun Techno World II #305, 533-1, Yongsan-dong
Yuseong-gu, Daejeon, 305-500, Korea
Tel. +82 70 8672-6410
Fax. +82 70 8650-6405
[email protected]
www.diamesco.com
Sales in the EU*, Norway, Switzerland, Turkey and the Middle East
pendiq GmbH
Baerler Strasse 100
47441 Moers, Germany
Tel. +49 (0)2841 79 90 90
Fax. +49 (0)2841 79 90 98
[email protected]
www.pendiq.com
*excluding: Sweden, France, Hungary, Bulgaria, Poland, Estonia, Lithuania, Latvia
62
17. General information
pendiq® meets the requirements of the standards of IEC 60601-2-24 and ISO 13485.
pendiq® is a registered trademark of pendiq GmbH.
Lilly® is a registered trademark of Eli Lilly and Company.
Berlin-Chemie® is a registered trademark of the Berlin-Chemie AG.
Sanofi-Aventis® is a registered trademark of the sanofi-aventis-group.
All trademarks are acknowledged.
9519620 Shadow black (black)
9519637 Cool silver (silver)
9519643 Arctic white (white)
9519672 Lime green (green)
9519666 Funky orange (orange)
English
PZN
PZN
PZN
PZN
PZN
The CE-marking indicates that the product has been subject to an assessment of his conformity with the MDD and that
the medical device fulfills the requirements of the Medical Device Directive (93/42/EEC).
Please check our website www.pendiq.com or www.diamesco.com for an updated issue of this manual since
issued in February 2012. Technical changes reserved.
Rev. 90100-2012-02
63
pendiq GmbH
Baerler Straße 100
47441 Moers
Germany
Tel.: +49 (0) 28 41 / 79 90 90
Fax: +49 (0) 28 41 / 79 90 98
Mail: [email protected]
www.pendiq.com