1
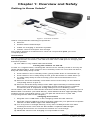
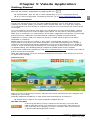
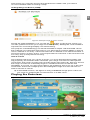
User Manual EN English We move you ENEN The content of the User Manual, including all figures and drawings, is copyrightprotected information belonging to Hocoma and/or third parties, and is provided solely for the purpose of operating and maintaining the device. Using the content for other purposes or copying the content is prohibited, unless prior written consent has been obtained from Hocoma. This manual applies to Valedo® Manufacturer Hocoma AG Industriestrasse 4 CH-8604 Volketswil Switzerland Hotline Switzerland (toll-free): 00 800 4488 4422 Hotline Germany (toll-free): 00 800 4488 4422 Hotline Austria (toll-free): 00 800 4488 4422 Hotline USA (toll-free): (00) 1 844 488 4422 Hotline Canada (toll-free*): 011 8004 488 4422 Hotline UK (toll-free**): 00 8004 488 4422 * This number is not available from mobile phones. ** There may be a charge for mobile use. Please contact your provider for information. [email protected] www.hocoma.com Subject to technical modifications. The most recent user manual is available online at www.valedotherapy.com. Copyright Hocoma AG Last revision: 2014-09-26 Introduction ......................................................................... 4 A Little Background Info… .................................................... 4 Chapter 1: Overview and Safety ....................................... 5 Getting to Know Valedo® ...................................................... 5 Safety Regulations ............................................................... 7 Intended Use .......................................................................................... 8 Indications .............................................................................................. 8 Contraindications ................................................................................... 8 Risk Factors ........................................................................................... 9 Limitations of Performance .................................................................... 10 Adverse Effects ...................................................................................... 10 Maintenance ......................................................................... 10 Firmware Updates.................................................................................. 10 Reporting Adverse Events .................................................... 10 Chapter 2: Training Setup .................................................. 11 Initial Training Session ......................................................... 11 Preparing the Training Space................................................................ 11 Putting on the Sensors .......................................................................... 11 Using the Belt ......................................................................................... 12 Training ................................................................................. 12 Chapter 3: Valedo Application .......................................... 13 Getting Started ...................................................................... 13 First Time Installation ............................................................................. 13 Home Screen ......................................................................................... 13 Profile Management ............................................................................... 14 Setting Range of Motion (ROM) ............................................................ 15 Playing the Exercises ........................................................... 15 Chapter 4: Technical Information ..................................... 18 Technical Specifications ....................................................... 18 The Sensors ........................................................................................... 18 The Cable ............................................................................................... 18 The Double-Sided Tape......................................................................... 18 The Belt (optional) .................................................................................. 19 General Operating Conditions .............................................. 19 Electromagnetic Compatibility .............................................. 19 FCC and IC Statements ....................................................... 20 Risk Management ................................................................. 20 Chapter 5: Troubleshooting .............................................. 21 Troubleshooting .................................................................... 21 Problems with the Sensors .................................................................... 21 Problems While Preparing for a Training Session ............................... 21 Problems During the Training Session ................................................. 22 Alerts....................................................................................................... 23 Chapter 6: Legal Matter ..................................................... 24 Explanation of Symbols Used .............................................. 24 Symbols on Packaging or Device ......................................................... 24 Disclaimer ............................................................................. 25 Warranty Terms .................................................................... 25 Warranty terms: USA ............................................................................. 25 Warranty terms: EU ............................................................................... 26 EN The Sensors ........................................................................................... 5 The Cable ............................................................................................... 6 The Belt (optional) .................................................................................. 6 The Computing Device .......................................................................... 7 The Valedo Case ................................................................................... 7 The Valedo Application .......................................................................... 7 Introduction Welcome and thank you for purchasing Valedo! ENEN If you’re reading this, that means you’re one of millions around the world who suffer from lower back pain. The good news for you is that you’ve taken an important first step in treating this lingering epidemic. Many people don’t know that a Valedo workout can be done in only minutes. Keep Valedo around for a quick workout before work, during your lunch break or even while you travel! For business or pleasure, you’ll find that Valedo is easy to use, engaging and entertaining. So what are you waiting for? Let’s get moving! A Little Background Info… At Hocoma we’re known for our large physical rehabilitation products such as Lokomat®, Armeo® and Erigo®, but we are also a pioneering company in the field of implementing sensor technology into functional therapy for lower back pain. That’s where Valedo® and its clinical sister products Valedo®Motion and Valedo®Shape come in. Find more information on all of our clinical products at www.hocoma.com and more information on Valedo® at www.valedotherapy.com. This user manual describes the safe and correct use of Valedo. Follow the safety information and instructions in the user manual and general safety and hygiene norms. When you are training with Valedo you are medically considered a user. For all other activities with Valedo, you are considered the operator. Keep this manual handy for quick reference, and read through again from time to time. In the interest of ease of reading, we use the male form (he, him, his) when referring to both male and female. Introduction V_UM1.1_en_1409 4 Chapter 1: Overview and Safety Getting to Know Valedo® EN Figure 1: Overview of Valedo Valedo comprises the following components: Sensors Double-sided medical tape Cable for charging or firmware updates Valedo case for transport and storage The Valedo System is understood to mean all components plus your own computing device. The Sensors The two sensors that come with Valedo are lightweight and easy to operate. They are equipped with one button, one LED and one micro-USB port for charging and firmware updates. The LED is only visible when illuminated. Turning the sensors on and off If used on a regular basis, awaking the sensors from standby mode is as easy as gently shaking them. If the sensors are in standby mode for more than 48 hours, they will enter deep sleep mode. If the sensors are in standby mode, gently shake them to wake them up. If the sensors are in deep sleep mode, push the button to wake them up. To enter deep sleep mode manually, press and hold the button for 4 seconds. Sensors will enter standby mode after 30 seconds if they do not detect a computing device to pair to. Sensors will enter deep sleep mode after approximately 5 minutes when they cannot connect to your computing device but they sense continual movement; this is important during transport to save battery power. Once awake, the sensors will indicate with their LEDs that they are searching for a Bluetooth® connection (see table below); when Bluetooth has appropriately been enabled on the computing device, you can pair the sensors to it (see The Computing Device later in this chapter). Charging the sensors 1. Plug the micro-USB ends of the charging cable into the sensors. 2. Plug the regular USB end of the charging cable into your personal computer OR into an IEC 60950 approved USB charger. You may have a charger already; many new mobile phones and other mobile products come with an IEC 60950 compliant USB charger. Charge the sensors for at least 90 minutes for a full charge. While the sensors are charging it is impossible to train. Chapter 1: Overview and Safety V_UM1.1_en_1409 5 ENEN The sensors are equipped with an LED and blinks and flashes to communicate what it’s doing or if it needs charging. Below is a table with the different LED modes and their explanations. LED mode Sensor status Mode explanation On Charging— fully charged The sensors are plugged in and are fully charged. Inverted pulse: Long on - short off Charging— not fully charged The sensors are plugged in but are not yet fully charged. Off Standby Off Deep Sleep The sensors have turned themselves off. This happens after 48 hours in standby mode. Press button to turn sensors back on. Pulse: Short on – Long off Awaiting connection The sensor is on and waiting for the Bluetooth connection with the computing device. Slow flash (1 second on, 1 second off) Connected The sensor is on and correctly connected via Bluetooth with the computing device. Fast flash (~0.5 second on,~0.5 second off) Triple flash (3x per second) Connected— alert The sensors are not actively searching for a Bluetooth signal. Shake to turn sensors back on. The sensor is on and connected with the computing device, but there is a warning message.* The sensor is running low on battery and needs to be charged.* Battery low * Warning messages and low battery alerts will also appear on the computing device. Do not soak or submerge the sensors in any liquid. Use a damp cloth to wipe surfaces. The Cable The cable that ships with Valedo is a standard USB to dual micro-USB cable. Use this cable for both charging and firmware updates of the sensors. Both micro-USB connectors can be used to charge, but only one can be used for firmware updates. Simply put, you can charge both sensors simultaneously, but you can only update one sensor at a time. For information on updating the sensors, see the Maintenance section later in this chapter. Figure 2: USB head on the left, two micro-USB heads on the right. Micro-USB head in the middle can be used for both charging and firmware updates. The Belt (optional)1 If you wish to train without using the double-sided medical tape, consider our specially designed belt. The sensor simply snaps into the belt buckle. Easily adjust the size by pulling the loose cord. 1 The belt is an optional accessory. Go to www.valedotherapy.com for availability. Chapter 1: Overview and Safety V_UM1.1_en_1409 6 EN Figure 3: Training belt. Hand wash and hang dry. The Computing Device All training requires a computing device. For a list of supported devices, consult www.valedotherapy.com. Take care of your computing device by regularly updating your operating system. On the computing device you will need to download and install the Valedo application (see Chapter 3). Pairing sensors and computing device via Bluetooth 1. Enable Bluetooth on your computing device (usually in “settings” or “configuration”). 2. Turn on sensors. 3. Open the Valedo application. 4. Create new profile making sure to indicate that you have sensors. See Chapter 3 for more information on creating a profile. 5. Connect sensors in the Sensor Management screen. For initial operation you must go through steps 1-5; for subsequent use, the Bluetooth connection will automatically pair the sensors to the computing device upon opening the Valedo application. The Valedo Case The case Valedo came in did not just keep it safe during its journey to you; the case will also keep Valedo safe when you store or transport it. See case in Figure 1. We recommend always keeping the Valedo sensors in the case between training sessions. The Valedo Application The standard Valedo application for lower back therapy is available for free download. Additional features or applications may be made available for purchase. The computing device you have will dictate where you need to go to download the Valedo application; when there, search for “Valedo”. For example: iPad users can go to the App Store. For complete details on the Valedo software application, see Chapter 3. Protect your computing device from viruses. The Valedo application stores only a minimum amount of information including the profile information given for each user and their performance on the exercises they have done. Regularly check www.valedotherapy.com to see if there are available updates for the Valedo application. Safety Regulations You must comply with the security precautions listed below and those found throughout the manual to ensure safe use of Valedo. Every and all warning messages must be observed without fail. Valedo sensors are not toys and can present choking hazards. Keep out of reach of children and pets. Do not use Valedo if any of the components are damaged or modified. Take note of indications, contraindications and risk factors before use. Chapter 1: Overview and Safety V_UM1.1_en_1409 7 When using tape, use medical tape only. You must wipe the sensors off before and after use. We recommend a soft damp cloth. ENEN Intended Use Valedo is a personal therapy system that aims to improve back health and aid in the prevention of non-specific lower back pain. Valedo offers mobilization, stretching, strength, stabilization, balance and movement awareness exercises for users to do in the comfort of their own home. In general we recommend training 20 minutes daily. Trunk and pelvis movements are measured from two wireless sensors attached to your body and transferred to a personal computing device (such as a tablet). These movement signals are analyzed and provide accurate real-time functional feedback in a game setting (Augmented Performance Feedback) of how you are moving and if you are moving correctly. Augmented Performance Feedback gives you a motivating and safe way to do movement training. The system monitors your movement performance and guides you through exercises specifically designed for general lower back pain therapy. Indications Non-specific low back pain Stability training of trunk and spinal musculature Mobility training of spinal column and pelvic girdle Training body balance and posture. If you are unsure if you have an indication, consult with your medical expert (this may be a doctor, physical therapist or chiropractor). You can still use Valedo if you have the following conditions, but only in consultation and under supervision of your medical expert. Problems with the sacroiliac joint (e.g. pelvic girdle pain, blocking) Fibromyalgia (persistent, widespread pain and tenderness, generally presents with symptoms of sleep problems, fatigue, joint stiffness, among others) Benign hypermobility syndrome (joint or limb pain with attendant symptoms of joint subluxation, joint dislocation, among others) Neurological conditions (e.g. stroke patients) less than three months after last incidence Neurological conditions (e.g. stroke patients) requiring improved trunk stability and body perception (with little or no apraxia (inability to execute learned purposeful movements)) Herniated disk, including post-operative state Spinal stenosis (narrowing of the spinal canal), including post-operative state Stable vertebral fractures Ankylosing spondylitis (type of arthritis that may lead to stiffness or fusion of the vertebrae in the spine) with painful limitation of spinal movement Osteoporosis (decrease in bone mass) (light or middling level) with accompanying pain Multiple Sclerosis (central nervous system disease) (non-progressive stage) with disturbed body perception Parkinson's disease (progressive nervous system disorder) with disturbed body balance and posture. Contraindications Functional training with Valedo is not possible or indicated in every case. In general, Valedo must not be used in the following cases to avoid causing you any harm. The following contraindications must therefore be observed, in particular: Bone cancer, including spinal tumors or vertebral metastasis Instability of the spine, such as unstable vertebral fractures or in spondylolisthesis (forward displacement of a vertebra) (grade II or higher), particularly with neurological signs Chapter 1: Overview and Safety V_UM1.1_en_1409 8 Acute rheumatoid arthritis or acute spondyloarthritis (acute inflammation of bones or joints) Infection of bones or joints Acute sacral, lumbar or thoracic nerve root entrapments leading to sensorimotor function deficits Severe level of osteoporosis (decrease in bone mass) or osteomalacia (bone softening) with latent risk of fracture Recent serious accidents (e.g. whiplash, spinal contusion) without prior consultation with a medical expert Implanted ferromagnetic materials or active devices within the body Spinal fusions within the first three months postoperative Skin disease or lesions in the vicinity of sensor placement (including cut or broken skin, eczema, etc.) Patients who have been subjected to long-term bed rest Having an implanted pacemaker. The above list does not claim to be exhaustive. If you are unsure if you have a contraindication, consult with your medical expert. If you have a contraindication, but feel like you still want to train with Valedo, you must first check with your medical expert. The decision whether a particular treatment is suitable in cases of contraindications always lies within the competence of your medical expert. He is required to evaluate the possible risks and side effects of the treatment against the benefit gained from it in each individual case. Your individual situation and the general risk assessment for specific patient groups are of equal importance in this regard. Increased development of osteoporosis in chronic patients also has to be taken into account. As severe osteoporosis is a contraindication, it is your responsibility to stay within the recommendations of your competent medical expert and follow the treatment plan as laid out by him. If you are a chronic patient or have been immobile for a long period of time, short training sessions are recommended to begin with. A tendency to overtrain at the beginning is common and can lead to muscle fatigue, soreness or joint discomfort if initial training sessions are too long. Just like with any other training program, small steps at the beginning are critical in order to avoid overtraining and consequent injuries. With time your body will adapt to the training and you will be able to train longer and do more strenuous exercises. CAUTION: IF AT ANY TIME WHILE USING VALEDO YOU EXPERIENCE DISCOMFORT, UNUSUAL FATIGUE OR EVEN SLIGHT PAIN, STOP IMMEDIATELY AND CONSULT A QUALIFIED MEDICAL EXPERT BEFORE RESUMING VALEDO TRAINING. DO NOT ATTEMPT TO EXCEED A COMFORTABLE RANGE OF MOTION. DISREGARD OF THIS CAUTION CAN RESULT IN PERSONAL INJURY. Examine yourself regularly for any possible skin irritations or signs of allergic reactions. If a skin complication from the medical tape arises, discontinue training and consult a dermatologist. Risk Factors Valedo is not meant to replace the expertise or experience of your medical expert. If you are unsure if you are at risk, consult with your medical expert. Valedo is one therapy tool that can help treat lower back pain and improve trunk stability, mobility and overall balance. Please observe the following risk factors. Spondylolisthesis (forward displacement of a vertebra) (grade I without neurological signs) Acute spinal disc hernia (e.g. disc herniation) without nerve compression Severe cardiovascular or cerebrovascular event, like a myocardial infarction (heart attack), aortic aneurysm (enlargement of the aorta) or stroke, within three months of last incidence Severe balance deficits with increased fall risk Chapter 1: Overview and Safety V_UM1.1_en_1409 9 EN Severe neurological disability, including compression of the spinal cord or cauda equine (bundle of nerves in the lower back), nerve root compression, etc. Cognitive deficits which prevent comprehension of exercises Pregnancy Epileptic seizure within the past two years which are not controlled medically, or photosensitivity Retinal disease which may be exacerbated by watching video games. ENEN Limitations of Performance The device is not designed for exercises performed while lying on the back. The device was not originally designed for use in open environments (for example, outdoors). The device is not designed to diagnose or analyze movement quality. If the Valedo sensors are used skin mounted, they are prone to soft tissues movements which may not reflect the underlying spinal movement. Users must be aware of the limitations on the effectiveness of using the sensors if there are thick adipose tissue deposits (fat) where sensors should be placed. Since the Valedo sensors use wireless communication technology (Bluetooth Low Energy 4.0) within a similar bandwidth as Wi-Fi, there may be instances where signal loss is experienced. Adverse Effects Hocoma AG has exercised great diligence in selecting the materials that are in contact with our clients in the clinic or at home. These materials have been assessed for their biological compatibility and are continuously monitored by the manufacturers. Nevertheless, there is always a small chance that some materials may lead to allergic reactions in individuals under exceptional circumstances. Maintenance Maintenance of Valedo is straightforward. Wipe the sensors with a damp cloth before and after training and store them in the Valedo case between trainings to protect them from excessive lint, dust, humidity or sunlight. Take care to remove any residual adhesive should there be any. Before use, make sure the sensors are charged. Firmware Updates The USB to micro-USB cable supplied is used not only for charging but also for sensor firmware update. The sensor firmware can be updated by inserting the data transfer micro USB plug into the sensor (see Figure 2) and connect the USB end into a computer. Check www.valedotherapy.com for firmware updates; follow the instructions on the screen. Please do NOT unplug the sensor from your computer while updating the firmware. Reporting Adverse Events Adverse events with products of Hocoma which led or could have led to serious injuries to persons (life-threatening or serious injuries or death) and or damage to objects must be reported immediately after the adverse event to Hocoma AG by going to www.valedotherapy.com or by telephone. After an adverse event the product may only be used again following approval and release by Hocoma AG. Chapter 1: Overview and Safety V_UM1.1_en_1409 10 Chapter 2: Training Setup Initial Training Session Turn on your sensors and pair them to your computing device. Now let’s prepare the training space and learn where to put the sensors. Preparing the Training Space Many tablet computing devices have covers that also function as stands. With some computing devices it is possible to connect it to your television or computer monitor. Consult the user manual of your computing device for information. If you do connect your computing device to your television or computer monitor, remember to keep the computing device nearby as the sensors are connected to it and you will have to tap buttons on the screen. Unplug your computing device from its charging cable for training. Clear the space around your feet from any cables or other items you may trip on during training. Be careful if you train on a rug; the rug might bunch and become a tripping hazard. We recommend either choosing a new training space or moving the rug for training. Make sure the sensors are kept at least 1 m (39 inches) away from any electromagnetic, ferromagnetic (such as large speakers or appliances) or metallic objects. Mobile phones, watches, power adaptors (for a laptop), or other devices containing magnetic elements can distort sensor signals. Keep these items an appropriate distance away from the sensors. Walls and floors may also contain electrical cables, metal pipes or reinforced frames. Putting on the Sensors Placing the lower back sensor Placing the chest sensor Figure 4: Correct placement of lower back sensor Figure 5: Correct placement range of the chest sensor 1. Wipe the sensors with a damp cloth. 2. Place a piece of double-sided tape on the back of the sensor. 3. Remove the backing of the double-sided tape. 4. Place the sensor. (Make sure micro-USB port is pointing down.) Wearing a belt for your pants could cause the sensor to fall off or could lead to sensor signal distortion. It may be easier the first few times to place the chest sensor without a shirt and in front of a mirror. Always unplug sensors from charging cable before placing them on yourself. We recommend wiping the backside of both sensors and the areas of your body where the sensors go with a damp cloth and then drying. This will help the double-sided tape to stick better to the sensor and to your skin. Chapter 2: Training Setup V_UM1.1_en_1409 11 EN Make sure you have plenty of space around you to safely train. You have the option of training while holding the computing device or with it standing on a table in front of you. Both sensors are interchangeable and can be used either on the chest or the lower back. Take care to place the sensors correctly. If the sensors are placed incorrectly it may cause different visual feedback and may lead to exaggerated movements on the screen. ENEN Using the Belt Placing sensor in the belt and putting belt on 1. Click sensor into the belt (see Chapter 1). 2. Pull belt around your chest or pelvis. 3. Hook buckle into loop. 4. Pull loose end of belt to tighten. 5. Move until sensor is in the correct position, either chest or pelvis (See above for sensor position). 6. Tighten again until sensors do not shift position while you move. Check www.valedotherapy.com for belt availability. Training Once you have put on the sensors, training can begin. Training involves various exercises in a game environment; each exercise is designed for you to execute specific movements. Start training Training is done through the Valedo application on your computing device. Tap the icon to enter the application. Figure 6: Icon on computing device (example from iPad, icon may look slightly different across computing devices). All training exercises are designed to target a specific lower back movement; each movement will be demonstrated before starting the exercise. Take care to mimic the movement exactly; this will minimize the risk of improper movements and injuries stemming therefrom. Take care not to overtrain, especially during your first sessions with Valedo. While motivation in training is always positive, prolonged or overtraining can result in muscle fatigue, which may cause further injury when undertaking daily tasks. In general, overtraining is exercising more or more intensely than what your body can reasonably recover from. See the warning under Contraindications in Chapter 1. If the exercise requires a movement that is outside of your capabilities, do not “push” to make the correct movement. The best way to avoid this situation is to redo the Range of Motion settings to reestablish the limits of your personal movement range. Ending the training session 1. Close the software application on your computing device. 2. Remove the sensors. 3. Remove the double-sided tape (from you or the sensors). 4. Dispose of the double-sided tape. 5. Wipe the sensor with a damp cloth. 6. Store the sensors in the Valedo case. Chapter 2: Training Setup V_UM1.1_en_1409 12 Chapter 3: Valedo Application Getting Started Start up the Valedo application by tapping the icon . Understand “Tap” as tap or click depending on your computing device. Before you can begin training you’ll need to set up Valedo. Tap on the start screen and if your sensors aren’t on yet, the software will ask you to turn them on and create your profile. Enter your name, date of birth and sex. You can also import your information from Facebook, tap the Facebook icon and follow the instructions on screen. You can always come back and edit your information or add new profiles—which gives you the chance to share Valedo with others on the same computing device. After you’ve entered your information, the Valedo application will guide you through the first sensor calibration and the Range of Motion (ROM) measurements. Calibration is easy: with your sensors in place, stand still and then bow when indicated to continue. Measuring your range of motion is also easy: in the ROM screens you will be instructed to mimic the pose in the example. Accurately assessing your range of motion is important because the application must know the limits of your ability to move in order to precisely recreate your movements on the screen. For more info on ROM setting, see Setting Range of Motion (ROM) later in this chapter. If you need additional assistance visit www.valedotherapy.com to learn more about the movements and ROM. After the initial setup you’ll be directed to the Home Screen; from there you’re free to explore the Village! Home Screen Figure 7: Home Screen Here you are on the home screen. There’s not much yet because the villagers are waiting for your help! Visit the different neighbors to see what exercises they’re working on. Swipe left or right to move through the neighborhood. On the screen: In the top left-hand corner of the Home Screen you’ll see this ribbon with the name you entered in your profile. This does not only indicate who’s playing, it’s also a button! This is a shortcut to the Profile Management screen. Chapter 3: Valedo Application V_UM1.1_en_1409 13 EN For a list of supported computing devices, go to www.valedotherapy.com First Time Installation Exercise Goal (not set): Tap here to set and monitor your training goal. ENEN Exercise Goal (set): Once you’ve set a goal, a dot will appear on the target. The color of the dot indicates your progress: red means goal not reached; yellow means you’re in progress; and green means you’ve reached your goal. Stretching: This is an unlockable section of the Valedo application. Here you will learn and be instructed on how to do different stretching exercises. Badges: As you play and progress through the various exercises, you will earn badges. Here you can see what you’ve earned and what’s still missing! Reporting: Curious as to your progress? Here you can see how long you’ve played, the number of pick-ups collected and more. Range of Motion: Re-establish your ROM here. The screen is identical to what you had to do for your initial setup—though it might be a good idea to revisit this section as you progress in the game. You might find yourself able to go a bit farther! Valedo Button: Tap this button to go to www.valedotherapy.com or to send an email to Valedo. Sensor Button: Indicates battery level and sensor connection strength. It is also a shortcut button to the Sensor Management screen. Quick Therapy: Tap here to simplify the exercise selection and have Valedo randomly select exercises for you. Unlock five houses to activate this functionality; only exercises you’ve unlocked can be selected for you as the random exercises. Information: Clicking this will bring up information regarding Valedo. On the Home Screen the Info button is in the bottom right-hand corner. Profile Management Figure 8: Profile Management Screen. Notice the Back Up and Restore buttons. In the Profile Management section you can add, edit or delete profiles. It is also here where you can back up and restore all profiles you’ve uploaded to iCloud. You must have iCloud installed on your device. Tap [Back Up] to upload all profiles to iCloud and tap [Restore] to download your last uploaded profiles to your current device. Chapter 3: Valedo Application V_UM1.1_en_1409 14 This means you can train across devices that have Valedo and your iCloud account installed without missing a step! Setting Range of Motion (ROM) EN Figure 9: Example range of motion screen. During the initial installation or if you tap the button on the Home screen you can set, update and track your range of motion (ROM). Setting the correct ROM is important for accurate gameplay and safe training. The purpose of establishing your individual ROM is simple: with the ROM values the software can adjust the exercises to your personal movement ability so they’re not too difficult or too easy. If the exercises are too difficult it can stint motivation or increase chance of injury due to overcompensated movements. If the exercises are too easy, they quickly become boring. How it’s done The software will show you a pose to mimic; you must hold that pose briefly and tap [Capture], the software then calculates your range of motion for that specific movement. The range of motion bar must be green (see Figure 9); this is to ensure the range of motion is sufficiently large for sensible exercise movement and playability. If it is red, you will not be able to tap [Capture] and move on to the next movement. There are multiple poses but setting the range of motion should not take more than a minute. In the ROM screens, the figure is doing a MIRROR image pose of the one you must do. Imagine the movement tutor is a little mirror. Playing the Exercises Tap one of the buildings in a district to get started. Figure 10: Example of a training introduction screen. Chapter 3: Valedo Application V_UM1.1_en_1409 15 In the introduction screen you’ll have the chance to toggle the exercise mode. In general, the exercise modes are as follows: Precision: how precisely you control the movements of both sensors Isolated Precision: how precisely you control the movement of one sensor while holding the other still ENEN Stabilization: how well you hold a position Isolated Stabilization: how well you hold a position concentrating on one sensor while maintaining the other still Free Mode: do squats at your own pace, not according to the timing bar as in Precision and Stabilization Not all modes are available for all exercises. Exercise modes are explained in the application. Difficulty level is determined by the number of times you’ve done an exercise. You can also change the duration of the exercise and you can see your previous bests. Accuracy rates how precise your movements were toward the exercise goal. Smoothness rates how smooth your movements were. Isolation (only for isolation modes) rates how well you moved one sensor while keeping the other still. As you can see, the Village is pretty empty save a few build sites in the various districts. Help build up the houses at the sites by completing exercises. For example, you are at the Torso district. The one house on the left represents the first exercise you can do. Unlock other houses in that district and others buy completing exercises. Build up houses and unlock new districts by training regularly, but watch out, your houses will shrink if you don’t train regularly! For each exercise take the robot out to gather gems. When you’ve returned you’ll have the resources to build up the house and unlock new movements and districts! Take note of the white dots under the movement icon (see Figure 7). These indicate how close you are to building the next level of the house. You get a white dot when you complete an exercise; when you have enough, the house will grow. Tapping [Play] will bring you right into the exercise. There will be a quick calibration and then a brief introduction of the movement. After that, away you go! Do the movements as demonstrated to correctly move the robot—and if you’re not moving correctly, it’ll let you know! Some exercises require you to follow a path, some to fly through hoops and some have completely different goals. Make sure to read the instructions at the start of each exercise so you know what you’re to do! Figure 11: Example of in-game screen. Chapter 3: Valedo Application V_UM1.1_en_1409 16 On the screen: Time until level is over Points earned Point multiplier EN Energy bar: Shows how much energy you have. Get energy by following the path, jumping through hoops, and more! Pause button: (in exercise) Allows you to calibrate, quit the exercise or simply take a breather! Movement tutor button: (in exercise) Tapping this icon in the bottom right-hand corner during gameplay will expand an in-exercise hint on how to properly execute the move for the game. It will shrink back down after two seconds. Invert left/right and up/down: Tapping [Pause] will give you the option to toggle the hip movement control, where available. Chapter 3: Valedo Application V_UM1.1_en_1409 17 Chapter 4: Technical Information Technical Specifications The Sensors EN General Dimensions (L × W × H) 42 mm × 32 mm × 16 mm (1.65 in × 1.26 in x 0.60 in) Weight 18 grams (each) Expected service life 3 years Electronics Power supply Integrated Recharging Solution (polymer Liion battery, 3.7V, 160mAh). Replacing battery is not permitted. Wireless Transmission Frequency 2.4 GHz band (Bluetooth Low Energy) Radiated Output Power Max. 1 mW Accuracy Gyroscope Range Max. 2,000 degrees per second Accelerator Speed Max. ± 16 g Digital Compass 1 to 2 degrees accuracy Orientation ± 360 degrees on all axes Operating Range 20 meters with a clear line of sight to the computing device. However, precise operating range of sensors depends on training environment. The Valedo application will not recognize non Hocoma sensors. Do not attempt to use third party sensors with Valedo. Further complications of trying to use non Hocoma sensors may include but are not limited to corruption of your saved info within the Valedo application, corruption of information on your computing device outside of the Valedo application environment, damage to the third party sensors and personal injury. The Cable General Main cable dimensions (L) 900 mm (35.40 in) Extension dimensions (L) 300 mm (11.80 in) Weight 30 grams Revision USB revision 2 Expected service life 3 years The Double-Sided Tape General Dimensions (two pieces) (L x W) 39 x 38 mm (1.53 x 1.49 in) Expected service life 3 years when stored at temperatures of 10 to 27°C (50 to 80°F) and a relative humidity of 40 to 60%. Chapter 4: Technical Information V_UM1.1_en_1409 18 The Belt (optional)2 General Dimensions (L) ~60 to 120 cm (23.60 to 47.20 in) (exact dimensions on website) ~50 grams Expected service life 3 years EN Weight General Operating Conditions The device must only be used in clean, dry rooms with level floors. Make sure you have plenty of space around you while you train, and keep large ferromagnetic equipment (e.g. stereo system or large speakers) or devices at least 2 meters (6 feet) from you. We recommend that the device be used indoors. Operating Environment Temperature 15 ºC to 35 ºC / 59 ºF to 95 ºF Air humidity 30 % to 75 % Air pressure 700 to 1060 hPa Packaging and Transportation Temperature -20 ºC to 45 ºC / -4 ºF to 113 ºF (1 month maximum) Air humidity 45 % to 85 %, no condensation Air pressure 700 to 1060 hPa Storage Temperature -20 ºC to 35 °C / -4 ºF to 95 ºF (6 months maximum) 45 °C / 104 ºF (1 month maximum) Air humidity 45 % - 85 %, no condensation Air pressure 700 - 1060 hPa Valedo must only be stored indoors. For the technical specifications of the computing device, consult its user manual. Electromagnetic Compatibility Medical electrical devices are subject to special precautions with regard to electromagnetic compatibility (EMC), and must be installed and operated only according to the information specified in this document. Wireless communications equipment such as wireless home network devices, mobile phones, cordless phones and their base stations, walkie-talkies may interfere with Valedo. Only converters and cables supplied by or obtained from the manufacturer as spare parts may be used. Other cables and accessories not provided by the manufacturer may affect EMC performance and result in increased emissions or decreased immunity of Valedo. Only the following parts are compliant with Valedo: Sensor, part number 30814 Cable, part number 30813 Keep mobile phones and other devices containing wireless or magnetic components more than 1 m (39 inches) from the Valedo sensors. 2 The belt is an optional accessory. Go to www.valedotherapy.com for availability. Chapter 4: Technical Information V_UM1.1_en_1409 19 FCC and IC Statements EN Statement according to Part 15.105 This equipment has been tested and found to comply with the limits for a Class B digital device, pursuant to Part 15 of the FCC Rules. These limits are designed to provide reasonable protection against harmful interference in a residential installation. This equipment generates, uses and can radiate radio frequency energy and, if not installed and used in accordance with the instructions, may cause harmful interference to radio communications. However, there is no guarantee that interference will not occur in a particular installation. If this equipment does cause harmful interference to radio or television reception, which can be determined by turning the equipment off and on, the user is encouraged to try to correct the interference by one or more of the following measures: Reorient or relocate the receiving antenna. Increase the separation between the equipment and receiver. Connect the equipment into an outlet on a circuit different from that to which the receiver is connected. Consult the dealer or an experienced radio/TV technician for help. Statement according to Part 15.19 and RSS-210 Part 15 of the FCC Rules and with Industry Canada license-exempt RSS standard(s). Operation is subject to the following two conditions: 1. this device may not cause harmful interference, and 2. this device must accept any interference received, including interference that may cause undesired operation. Statement according to Part 15.21 Changes or modifications made to this equipment not expressly approved by Hocoma may void the FCC authorization to operate this equipment. RF Exposure Information according to 2.1091 / 2.1093 / OET bulletin 65 Radiofrequency radiation exposure Information The radiated output power of the device is far below the FCC radio frequency exposure limits. Risk Management Connection of Valedo to a computer network that includes other equipment could result in previously unidentified RISKS; identify, analyze, and control such RISKS (refer to IEC 60601-1:2005) Subsequent changes to a computer network could introduce new RISKS and require new analysis. Changes to the computer network include: Changes in computer or data network configuration Connection of additional items to computer network Disconnecting items from computer network Update of equipment connected to computer network Upgrade of equipment connected to computer network The term computer network used here corresponds to the term network/data coupling in IEC 60601-1:2005. Chapter 4: Technical Information V_UM1.1_en_1409 20 Chapter 5: Troubleshooting Troubleshooting If you are experiencing difficulties with the system please refer to the following website: www.valedotherapy.com If you have any queries or need further clarification of issues for which we have not provided a satisfactory solution, first contact your local Hocoma service center. See copyright page at beginning of manual for contact information. Problems with the Sensors Issue The sensors are not turning on. Action Gently shake the sensor to turn it on. If that does not work, push the button to turn on. If both actions above do not work, that means the batteries are depleted and must be charged. If you suspect sensor failure check on www.valedotherapy.com for sensor diagnostics and procedures for replacement under warranty. Problems While Preparing for a Training Session Issue The computing device does not start. Action Make sure the computing device has been charged or is plugged in. For further troubleshooting tips for the computing device, please consult its user manual. Valedo sensors are not connecting to the computing device. Make sure your computing device is compatible with Valedo. For a list of supported devices consult www.valedotherapy.com. Make sure your computing device is running the latest version of its operating system. Make sure the sensors are charged before connecting to the computing device software. Make sure the sensors are not connected to a power source via the USB cable Make sure Bluetooth is enabled on your computing device. Make sure you are close enough to the computing device (sensor icon on computing device will indicate if sensors and computing device are connected). Turn sensors off and on again. Restart computing device. Restart Valedo application. Chapter 5: Troubleshooting V_UM1.1_en_1409 21 EN This section enables Valedo users to check against the technical problems listed below and take relevant measures. Problems During the Training Session Issue The sensor(s) fall(s) off. Action Clean the back of the sensor with a soft damp cloth before placing a new strip of double-sided tape. EN Wipe the areas of the skin where you will attach the sensor(s) with a soft damp cloth before reattaching. Dry your skin and sensor before attaching the tape and mounting the sensor to your body Reattach the sensor and press firmly for 5 seconds to make sure sensor sticks to your skin. If all of the above suggestions do not work, then you may have to consider acquiring the training belt from Hocoma. The avatar in the range of motion (ROM) settings screens does not show the correct movement. Make sure that the sensors are still communicating with the computing device. During training exercises, the avatar moves about rapidly. Stop the exercise and redo the range of motion (ROM) settings. Having a very small ROM will make for an exaggeratedly sensitive avatar movement during gameplay. Redo the ROM settings making sure to stand very still while the sensors calibrate and only bow to confirm and proceed when indicated to do so. Turn sensors off and on again. Restart computing device. Restart Valedo App. The avatar does not move when doing the exercises. Make sure that the sensors are still on and communicating with the computing device. Turn sensors off and on again. Restart computing device. Restart Valedo App. The indicator LEDs show they are connected (see Chapter 1 for LED modes) but avatar does not move. Make sure that the sensors are still communicating with the computing device. The movement required in the game is larger than what you can do. Reset Exercise ROM values. After training, you see reddening or irritation under where the sensors were attached to the skin. This might indicate an allergic reaction to the double-sided tape. Stop training immediately and consult with your dermatologist before continuing Valedo training. Turn sensors off and on again. Restart computing device. Restart Valedo App. Setting up correct and accurate ranges of motion during the Exercise ROM is critical; therefore, do not compensate or overexert when setting up these parameters. This will ensure that the in-game movements required do not exceed what you are physically capable of doing. See Chapter 3 for info on setting the ROM. Chapter 5: Troubleshooting V_UM1.1_en_1409 22 Alerts The following alerts may appear on the screen during exercises. If so, follow the instructions below. Alert Action As you can see here a sensor is not communicating properly with the computing device and the battery is depleted. Remove the depleted sensor from your body and recharge (see Chapter 1 for charging information) If the sensor is charged and still indicates that there is no signal with the computing device, turn sensor off and then back on again with the application still running. Chapter 5: Troubleshooting V_UM1.1_en_1409 23 EN In the top right-hand corner you will see the sensor signal and battery icons. Chapter 6: Legal Matter Explanation of Symbols Used Indicates potentially dangerous situations or actions. Symbol in accordance with ISO 7010-W001. EN Highlights useful tips, recommendations and information needed to operate the device correctly and efficiently. 1. 2. Step-by-step explanation of tasks for proper use of the product. 3. Manufacturer and year of manufacture. Symbol indicates the manufacturer’s reference number of the device. Symbol indicates manufacturer’s batch number of the device. Complies with MDD93/42/EEC Requirements. Type BF applied parts. Double-sided medical tape is only for single use. It cannot be used for a second time. Use-by date for the double-sided medical tape. Symbol indicates temperature limits for operation, transport and storage. Symbol indicates humidity limits for operation, transport and storage. Symbol indicates atmospheric pressure limits for operation, transport and storage. Protect the environment. When disposing of this unit, or the batteries it uses, do so in an environmentally friendly way. The unit must not be disposed of in normal household waste. Dispose of old products in accordance with pertinent local regulations at an appropriate collection point. If you have any questions, contact your local competent waste management authority. IP22 The IEC Ingress Protection Rating. Symbol for nonionizing radiation. Symbols on Packaging or Device 2 Sensors 100 pieces of medical tape 1 USB cable Chapter 6: Legal Matter V_UM1.1_en_1409 24 1 Case Follow user manual and quick user guide. Computing device (not included) EN Bluetooth® compatible. The Bluetooth® word mark and logos are registered trademarks owned by Bluetooth SIG, Inc. and any use of such marks by Hocoma AG is under license. Valedo complies with electromagnetic regulations as laid out by the Federal Communications Commission. Symbol found only on devices sold in the USA, UK and Canada. Disclaimer CAUTION: All Hocoma products are medical devices and must be used in strict adherence to the user manual and only according to the recommendations contained therein; failure to do so may result in personal injury. Please contact Hocoma should you have any questions. For the latest available information about the medical indications, contraindications, side effects and risks associated with the Valedo® components and software application it is strongly recommended that you regularly consult Hocoma’s website: www.hocoma.com/legalnotes. Valedo is marketed for home use and is intended to improve back health and to prevent nonspecific low back pain by promoting specific movements and exercises. Movement and exercise are associated with potential risk of injury. Users of Valedo are responsible for their movement and exercise and manner in which they use the product. For specific product information you should regularly consult the current summary of product characteristics at www.valedotherapy.com. While there may be information in Valedo, the user manual and in marketing materials related to certain medical conditions and their treatment, promptly consult your own doctor or qualified medical personnel about using Valedo if you are currently injured, medicated or under a doctor's care for a medical condition. Valedo is not designed or intended to diagnose specific ailments or conditions, nor does Hocoma offer personalized medical diagnosis or patient-specific treatment advice. Failure to consult qualified medical personnel before using the product or any failure to follow either their recommendations or the product instructions can result in personal injury. If at any time after beginning use of the product you experience discomfort or pain, loss of range of movement, or any other problem, stop using the product immediately and consult qualified medical personnel. DISCLAIMER: This information provides details about medical products, which may not be available in all countries and may not have received approval or market clearance by all governmental regulatory bodies throughout the world. Nothing herein should be construed as a solicitation or promotion of any product or of an indication of any specific use for any product which is not authorized by the laws and regulations of the country where the reader of this information resides. Warranty Terms Warranty terms: USA Valedo is warranted to be free from defects in workmanship and materials within 12 months of the purchase date when used in accordance with the present user manual. The warranty extends only to the end user. Hocoma will at its own Chapter 6: Legal Matter V_UM1.1_en_1409 25 discretion refurbish or replace Valedo covered by the warranty free of charge. Repair, modification or replacement lies solely within the competence of Hocoma AG. Hocoma AG does not warrant or guarantee any therapeutic result or success when using Valedo. EN Warranty terms: EU Valedo is warranted to be free from defects in workmanship and materials within 24 months of the purchase date when used in accordance with the present user manual. The warranty extends only to the end user. Hocoma will at its own discretion refurbish or replace Valedo covered by the warranty free of charge. Repair, modification or replacement lies solely within the competence of Hocoma AG. Hocoma AG does not warrant or guarantee any therapeutic result or success when using Valedo. Chapter 6: Legal Matter V_UM1.1_en_1409 26