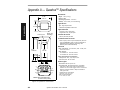
1
Quadrus 2D Code Reader User's Manual ™ P/N 83-006500 Rev F Information and specifications in this manual are subject to change without notice. Copyright © 2007 by Microscan Systems, Inc., 1201 S.W. 7th Street, Renton, Washington, U.S.A. 98057 (425) 226-5700 FAX: (425) 226-8682 All rights reserved. The information contained herein is proprietary and is provided solely for the purpose of allowing customers to operate and/or service Microscan manufactured equipment and is not to be released, reproduced, or used for any other purpose without written permission of Microscan. Throughout this manual, trademarked names might be used. Rather than put a trademark (™) symbol in every occurrence of a trademarked name, we state herein that we are using the names only in an editorial fashion, and to the benefit of the trademark owner, with no intention of infringement. Microscan Limited Warranty Statement and Exclusions What is Covered? Microscan Systems Inc. warrants to the original purchaser that products manufactured by it will be free from defects in material and workmanship under normal use and service for a period of one year from the date of shipment. This warranty is specifically limited to, at Microscan’s sole option, repair or replacement with a functionally equivalent unit and return without charge for service or return freight. What is Excluded? Any products or parts that have been subject to misuse, neglect, accident, unauthorized repair, improper installation, or abnormal conditions or operations. Any products or parts that have been transferred by the original purchaser. Customer mis-adjustment of settings contrary to the procedure described in the Microscan owners manual. Upgrading software versions at customer request unless required to meet specifications in effect at the time of purchase. Units returned and found to have no failure will be excluded. Claims for damage in transit are to be directed to the freight carrier upon receipt. THIS EXPRESS WARRANTY EXCLUDES ALL OTHER WARRANTIES, EXPRESS OR IMPLIED, INCLUDING BUT NOT LIMITED TO, IMPLIED WARRANTIES OF MERCHANTABILITY AND FITNESS FOR PURPOSE. MICROSCAN SYSTEMS INC. SHALL NOT BE LIABLE FOR ANY SPECIAL, INCIDENTAL, OR CONSEQUENTIAL DAMAGES, WHETHER IN CONTRACT, TORT, OR OTHERWISE. Some states do not allow the exclusion or limitation of incidental or consequential damages or limitations on an implied warranty, so the above limitation or exclusion may not apply to you. This warranty gives you specific legal rights, and you may also have other rights which may vary from state to state. The buyer acknowledges that he/she is not relying on the seller’s skill or judgment to select or furnish goods suitable for any particular purpose and that there are no warranties that extend beyond the description on the face hereof. Before Requesting Service… Please check the owners manual for proper setup and cabling procedures and any customer settings for mis-adjustment for your particular application. Correcting these may save you a service call. To receive Warranty Service… Contact your nearest Microscan Service Center at the address shown below for a Return Material Authorization (RMA) number before returning product. Receipt of an RMA number is not an admission of warranty status. All product must be returned freight prepaid to the location issuing the RMA number before the expiration of the warranty period. ii Table of Contents Table of Contents.................................................................................. iii List of Illustrations .................................................................................. v List of Tables......................................................................................... vi About the Quadrus™ ........................................................................... vii About this Manual ................................................................................ vii Keystroke Entries ................................................................................. vii Notes.................................................................................................... viii Certification Labels ............................................................................... ix Chapter 1Quick Start Step 1 - Attach Cabling ........................................................................ 1-2 Step 2 - Mount Quadrus™ ................................................................... 1-3 Step 3 - Install ESP™ on Host Computer ............................................ 1-4 Step 4 - Open ESP™ ........................................................................... 1-5 Step 5 - Establish Communications ..................................................... 1-6 Step 6 - Locate Symbol........................................................................ 1-7 Step 7 - Center Symbol in the Field of View ........................................ 1-8 Step 8 - Static Label Setup .................................................................. 1-9 Step 9 - Moving Label Setup.............................................................. 1-10 Step 10 - Saving Settings .................................................................. 1-11 Chapter 2Menu Configuration Using ESP™ to Configure the Quadrus™ ........................................... 2-2 Communications Menu ........................................................................ 2-3 Protocol Menu...................................................................................... 2-9 Operations Menu ............................................................................... 2-14 Symbol Menu ..................................................................................... 2-25 In/Out Menu ....................................................................................... 2-28 Illumination Menu .............................................................................. 2-36 Custom Menu..................................................................................... 2-39 Chapter 3Serial Configuration About Serial Configuration ................................................................... 3-4 Communications Port........................................................................... 3-6 Protocol................................................................................................ 3-7 Operations ......................................................................................... 3-10 Symbol ............................................................................................... 3-15 In/Out ................................................................................................. 3-16 Illumination......................................................................................... 3-20 Chapter 4Utilities Read Rate............................................................................................ 4-5 Counters .............................................................................................. 4-6 Trigger.................................................................................................. 4-8 Master Label ...................................................................................... 4-10 Checksum/Part Number..................................................................... 4-13 iii Interface............................................................................................. 4-14 Send .................................................................................................. 4-17 Self Test ............................................................................................ 4-19 Reader Status.................................................................................... 4-20 Imaging.............................................................................................. 4-21 Chapter 5 Calibration Locate Label ....................................................................................... 5-2 Illuminate ............................................................................................ 5-3 Auto Calibration .................................................................................. 5-4 Dynamic Setup ................................................................................. 5-13 Chapter 6Evaluation Overview.............................................................................................. 6-2 Image Source ...................................................................................... 6-3 Image Flow .......................................................................................... 6-4 Load..................................................................................................... 6-5 Analysis ............................................................................................... 6-6 Action................................................................................................... 6-7 Appendices Appendix A — Quadrus™ Specifications ..............................................A-2 Appendix B — Electrical Specifications .............................................. A-3 Appendix C — Transferring Files ....................................................... A-5 Appendix D — Maximum Symbol Sizes ................................................... A-7 Appendix E — Optional Equipment .................................................. A-10 Appendix F — ASCII Table ............................................................... A-12 Appendix G — Data Matrix Symbology ............................................... A-13 Appendix H — Histograms ......................................................................A-15 Appendix I — Multidrop Communications .....................................................A-17 Appendix J — Glossary of Terms ..................................................... A-20 iv List of Illustrations Figure 1-1 Quadrus™ Connectors on Back of Quadrus™ ......................... 1-2 Figure 1-2 Distance from Symbols ............................................................. 1-3 Figure 1-3 Main ESP™ Menu .................................................................... 1-5 Figure 1-4 Host Serial Port Configuration ......................................................1-6 Figure 1-5 Reader Configuration Transfer .....................................................1-6 Figure 1-6 Calibration/Locate ..................................................................... 1-7 Figure 1-7 Label/Quadrus™ Position ......................................................... 1-8 Figure 1-8 Illumination ................................................................................ 1-9 Figure 1-9 Dynamic Setup ....................................................................... 1-10 Figure 1-10 Send/Receive Dialog ............................................................ 1-11 Figure 2-1 Configuration Setup File ........................................................... 2-2 Figure 2-2 Communications Menu Structure ............................................. 2-3 Figure 2-3 Protocol ..................................................................................... 2-9 Figure 2-4 Operations Menu .................................................................... 2-14 Figure 2-5 Triggering Setup ..................................................................... 2-15 Figure 2-6 Match Code Setup .................................................................. 2-21 Figure 2-7 Symbol Setup ......................................................................... 2-25 Figure 2-8 Reader In/Out Setup ............................................................... 2-28 Figure 2-9 Input 1 Dialog Box .................................................................. 2-29 Figure 2-10 Output 1 ................................................................................ 2-30 Figure 2-11 Quality Output Options ......................................................... 2-34 Figure 2-12 Illumination Menu .................................................................. 2-36 Figure 2-13 Custom Menu ....................................................................... 2-39 Figure 4-1 Options ..................................................................................... 4-4 Figure 4-2 Read Rate ................................................................................. 4-5 Figure 4-3 Counter ..................................................................................... 4-6 Figure 4-4 Serial Trigger Character ........................................................... 4-8 Figure 4-5 Master Label Commands ........................................................ 4-10 Figure 4-6 Checksum/Part Number ......................................................... 4-13 Figure 4-7 Interface .................................................................................. 4-14 Figure 4-8 Download ................................................................................ 4-17 Figure 5-1 Calibration ................................................................................. 5-2 Figure 5-2 Typical Overlay Image .............................................................. 5-3 Figure 5-3 Auto Calibrate ........................................................................... 5-4 Figure 5-4 Scanner Density ....................................................................... 5-4 Figure 5-5 Label Speed .............................................................................. 5-4 Figure 5-6 IP Data Base ............................................................................. 5-5 Figure 5-7 More Settings ............................................................................ 5-7 Figure 5-8 Illumination Adjustment Flow .................................................... 5-8 Figure 5-9 Thermal Label Image ................................................................ 5-9 Figure 5-10 Thermal Label Histogram ....................................................... 5-9 Figure 5-11 Adjusted Laser Etch Image ................................................... 5-10 Figure 5-12 Dark Image ........................................................................... 5-11 Figure 5-13 Label #3 Histogram ............................................................... 5-11 Figure 5-14 Adjusted Image ..................................................................... 5-12 v Figure 5-15 Adjusted Histogram .............................................................. 5-12 Figure 5-16 Two Trigger Setup ................................................................ 5-15 Figure 6-1 Evaluation Menu ....................................................................... 6-2 Figure 6-2 Capture and Load ..................................................................... 6-4 Figure 6-3 Captured Image ........................................................................ 6-5 Figure 6-4 Line through Symbol ................................................................ 6-6 Figure 6-5 Line Scan ................................................................................. 6-6 Figure A-1 Quadrus™ Dimensions ............................................................ A-2 Figure A-2 System Diagram ...................................................................... A-3 Figure A-3 Grounding Diagram, Scanner-Host .......................................... A-4 Figure A-4 Low Density Symbol Size Limitations ...................................... A-7 Figure A-5 High Density Size Limitations .................................................. A-8 Figure A-6 Quadrus™ UHD Symbol Size Limitations ................................ A-9 Figure A-7 Universal Stand ...................................................................... A-10 Figure A-8 Adaptor Plate -- Quadrus™ to Universal Stand ..................... A-11 Figure A-9 Base Plate .............................................................................. A-11 Figure A-10 Data Matrix ECC 200 Symbol ............................................. A-13 Figure A-11 Pixel/Element Relationship .................................................. A-14 Figure A-12 Histogram 1 .......................................................................... A-15 Figure A-13 Statistics for Histogram 1 ..................................................... A-16 Figure A-14 Histogram 2 .......................................................................... A-16 Figure A-15 Typical Multidrop Network .................................................... A-17 Figure A-16 Polling Sequence ................................................................ A-17 Figure A-17 Select Sequence ................................................................. A-18 List of Tables Table 2-1 Symbology Identifier Option Values for Data Matrix ................ 2-27 Table 2-2 Full Quality Outputs ................................................................. 2-33 Table 3-1 Summary of Serial Configuration Commands ........................... 3-2 Table 3-1 Protocol Commands .................................................................. 3-8 Table 4-1 Summary of Serial Operational Commands .............................. 4-2 Table 4-2 Maximum Characters ............................................................. 4-12 Table 4-3 Hex Value to Binary Conversion .............................................. 4-20 Table 4-4 Reader Status from Binary Code ............................................. 4-20 Table 5-1 Quality Outputs ........................................................................ 5-10 Table A-1 Host Connector ......................................................................... A-3 Table A-2 Power Connector ...................................................................... A-3 Table A-3 Trigger Connector ..................................................................... A-3 Table A-4 Maximum Symbol Size by Element (Low Density) .................... A-7 Table A-5 Maximum Symbol Size by Element (High Density) ................... A-8 Table A-6 Maximum Symbol Size by Element (UHD) ................................ A-9 Table A-7 ASCII Table with Control Characters ...................................... A-12 Table A-8 Multidrop Address Characters ................................................. A-19 vi About the Quadrus™ The Quadrus™ is a fully integrated 2D scanner, with the ability to illuminate, read, and decode two-dimensional (2D) data matrix symbologies. Using Microscan’s Easy Setup Program (ESP™), the Quadrus™ can be ™ quickly configured and calibrated from a computer running Windows 3.1 ™ or Windows 95 operating system. ESP™ allows you to save multiple configuration files to the host for later use or for transfer to other readers. FOR TECHNICAL SUPPORT, ph: 425-226-5700 or email: [email protected]. About this Manual This manual provides complete information on setting up and installing the Quadrus™. Chapter 1, “Quick Start,” will get you started quickly with your setup and give you references for further information. Chapter 2, “Menu Configuration,” has instructions for configuring the Quadrus™ by menu, using the Easy Setup Program. Chapter 3, “Serial Commands,” has instructions for configuring the Quadrus™ by serial command. Chapter 4, “Utilities,” describes serial operational commands and ESP™ menu commands that can be used by the host. Chapter 5, “Calibration,” provides instructions for Calibrating your Quadrus™, first for stationary “static” symbols and then for moving “dynamic” symbols. Chapter 6, “Evaluation,” provides details for evaluating received “captured” images. For specifications, see Appendix A on page A-2. The appendices also include an ASCII table as well as other useful information relating to bar coding and the Quadrus™. Keystroke Entries Keystrokes to be entered from your terminal are highlighted in bold, as in <A>, including a < left angle bracket symbol (unless redefined by Command Start Character command) and followed by a > right angle bracket symbol. vii Approvals This equipment is designed for approval or compliance by the following organizations: • CDRH (Center for Devices & Radiological Health) • UL (Underwriters Laboratories, Inc.) • cUL (UL mark of Canada) • TüV (Technischer überwachungs-Verein) • FCC (Federal Communication Commission) • CE Compliant Warning and Caution Summary This equipment has been tested and found to comply with the limits for a Class A digital device, pursuant to part 15 of the FCC Rules. These limits are designed to provide reasonable protection against harmful interference in a residential installation. This equipment generates, uses, and can radiate radio frequency energy, and, if not installed and used in accordance with the instructions, may cause harmful interference to radio communications. However, there is no guarantee that interference will not occur in a particular installation. If this equipment does cause harmful interference to radio or television reception, which can be determined by turning the equipment off and on, the user is encouraged to try to correct the interference by one or more of the following measures: • Reorient or relocate the receiving antenna • Increase the separation between the equipment and receiver • Connect the equipment into an outlet on a circuit different from that to which the receiver is connected • Consult the dealer or an experienced radio/TV technician for help This appliance can only be connected to a VDE approved power supply with a rating voltage between 10 V DC and 28 V DC. the SELV power supply must be rated at least 6,5 W at the output to avoid any hazard. European models must use a similarly rated Class I or Class II power supply that is certified to comply with standard for safety EN 60950. viii Zulassungen Dieses Gerät wurde für die Zulassung durch die folgenden Organisationen und in Übereinstimmung mit deren Normen entwickelt: CDRH (Center for Devices & Radiological Health; Zentrum für Geräte und Strahlenschutz) UL (Underwriters Laboratories, Inc.) cUL (kanadisches UL-Zeichen) TüV (Technischer Überwachungsverein) FCC (Federal Communication Commission; Kommunikationsausschuß der USA) CE konform Sicherheitshinweis und Vorsichtsmaßnahmen Diese Gerät wurde geprüft und entspricht den Grenzwerten für ein digitales Gerät der Klasse A gemäß Teil 15 der FCC-Richtlinien. Diese Grenzwerte bieten ausreichenden Schutz vor schädlichen Störungen bei einer Installation in Wohnräumen. Dieses Gerät kann Hochfrequenzstrahlung erzeugen, verwenden und abgeben. Wenn es nicht den Anleitungen entsprechend installiert und verwendet wird, kann es zu Funkstörungen kommen. Es gibt jedoch keine Garantie, daß bei bestimmten Installationen keine Störungen auftreten. Sie können feststellen, ob dieses Gerät den Funk- oder Fernsehempfang beeinträchtigt, indem Sie es ein- und ausschalten. Versuchen Sie in diesem Fall, die Störung mit Hilfe einer der folgenden Methoden zu beheben: • Richten Sie die Empfangsantenne anders aus, oder wählen Sie einen anderen Standort. • Erhöhen Sie den Abstand zwischen diesem Gerät und dem Empfangsgerät. • Schließen Sie dieses Gerät an eine Steckdose eines anderen Stromkreises als dem des Empfangsgerätes an. • Setzen Sie sich mit dem Händler oder einem erfahrenen Funk- und Fernsehtechniker in Verbindung. Dieses Gerät darf nur an eine VDE geprüfte Spannungsversorgung mit 10V ··· bis 28V ··· angeschlossen werden. Die SELV Spannungsversorgung muß mindestens 6,5 W am Ausgang liefern, um Gefahren zu vermeiden. Modelle für den europäischen Markt müssen eine entsprechende Stromversorgung der Klasse I oder II verwenden, die nach der Sicherheitsrichtlinie EN 60950 zertifiziert ist. ix WARNING Use of controls, adjustments, or performance of procedures other than those specified herein may result in hazardous laser light radiation exposure. WARNING There are no user serviceable parts in the MS-810 scanner. Opening the scan head voids the Microscan Systems warranty and could expose the user to laser diode power of up to 7 m W. WARNING The laser beam can be harmful to eyesight. Avoid eye contact with the laser beam. Never point the beam at other people, or in a direction where people may be passi ng. WARNUNG Die Verwendung von Steuerelementen, Anpassungen oder das Ausführen von Prozeduren, die von den hier beschriebenen abweichen, kann dazu führen, daß Sie gefährlichen Laserstrahlen ausgesetzt werden. WARNUNG Der Scanner MS-810 enthält keine Teile, die durch den Benutzer gewartet werden können. Durch Öffnen des Abtastkopfes wird die Gewährleistung von Microscan Systems nichtig. Außerdem können Sie einer Laserdiodenleistung von bis zu 7 mW ausgesetzt w erden. WARNUNG Der Laserstrahl kann Ihre Augen schädigen. Vermeiden Sie direkten Blickkontakt mit dem Laserstrahl. Richten Sie den Strahl niemals auf anwesende Personen oder dorthin, wo möglicherweise Personen vorbei kommen könnten. x Certification Labels This certification label is located on the back of the Quadrus™ • Designed for FCC, TüV, CE, CDRH, UL/cUL • ISO 9001/Cert. No. US96/0465. 1201 SW 7th St. Renton,W A 98055 THIS EQUIPM ENT HAS BEEN TESTED W ITH CLASS A COM PUTING DEVICES AND HAS BEEN FOUND TO COM PLY W ITH PART 15 OF FCC RULES,SEE INSTRUCTION M ANUAL.OPERATION IN A RESIDENTIAL AREA M AY CAUSE UNACCEPTABLE INTERFERENCE TO RADIO AND TV RECEPTION REQUIRING THE OPERATOR TO TAKE W HATEVER STEPS ARE NECESSARY TO CORRECT THE INTERFERENCE. COVERED BY ONE OR M ORE OF THE FOLLOW ING PATENTS AND PATENTS PENDING. 5,291,009 5,354,977 5,532,467 J2 LISTED UL 1950 4K68 PO W ER DECODE 10-28V 5W 11--120030 J3 J4 Back of Quadrus™ xi xii Quick Start 1 Chapter Contents Step 1 - Attach Cabling ........................................................................ 1-2 Step 2 - Mount Quadrus™ ................................................................... 1-3 Step 3 - Install ESP™ on Host Computer ............................................ 1-4 Step 4 - Open ESP™ ........................................................................... 1-5 Step 5 - Establish Communications ..................................................... 1-6 Step 6 - Locate Symbol........................................................................ 1-7 Step 7 - Center Symbol in the Field of View ........................................ 1-8 Step 8 - Static Label Setup .................................................................. 1-9 Step 9 - Moving Label Setup.............................................................. 1-10 Step 10 - Saving Settings .................................................................. 1-11 This chapter will get you started quickly with your setup and give you references for further information. Quadrus 2D Code Reader User’s Manual 1-1 1–Quick Start Chapter 1–Quick Start Chapter 1 Step 1 Attach Cabling a) Attach host cable to the Quadrus 25-pin host connector. Note: See Appendix A, “Quadrus™ Specifications” for pinout and connector types. Caution: Do not use a host cable with more wires connected than required for the application. The host connector of the reader has many outputs that could cause damage or interfere with normal operation if connected and improperly used. b) Attach power cable to power connector. If using Microscan power supply, use PN 97-100004-07 (120V) or PN 97-100004-08 (240V). c) If used, attach trigger device to trigger connector. (Microscan offers object detector, PN 99-440001-08 and PN 99-440002-01). 25-pin host connector Power connector Trigger connector Figure 1-1 Quadrus™ Connectors on Back of Quadrus™ 1-2 Quadrus 2D Code Reader User’s Manual Mount Quadrus™ 1–Quick Start Step 2 Mount Quadrus™ Position Quadrus™ at the correct distance from your symbol. 5" (12.7 cm) 4" (10.16 cm) 2" (5.08 cm) UHD High Density Low Density Figure 1-2 Distance from Symbols If using an ultra high density (UHD) model, the reader should be placed 2 inches (5.08 cm) from the symbol. If using the high density, the reader should be 4 inches (10.16 cm) from the symbol. If using the low density, the reader should be 5 inches (12.7 cm) from the symbol. For best results, pitch or skew reader 10° to 20° relative to symbol. Note: See “Quadrus™ Specifications” on page A-2 for Quadrus™ mounting dimensions. Quadrus 2D Code Reader User’s Manual 1-3 1–Quick Start Chapter 1 Step 3 Install ESP™ on Host Computer Note: ESP™ (Easy Setup Program) runs on Microsoft Windows 3.1 and Windows 95™ operating systems. It is assumed that you are familiar with your operating system and the procedures for installing Windows-based programs. To install ESP™: a) Make a backup copy of the ESP™ disk(s). b) Double-click the setup icon and follow the on-screen directions: c) Select a directory and/or a sub-directory for your ESP™ as requested: d) Upon completion, you will have a shortcut icon that looks like this: 1-4 Quadrus 2D Code Reader User’s Manual Open ESP™ 1–Quick Start Step 4 Open ESP™ a) Double-click the ESP™ icon. b) You will see a screen similar to figure 1-3 Pull-down menus Toolbar Settings window Figure 1-3 Main ESP™ Menu Quadrus 2D Code Reader User’s Manual 1-5 1–Quick Start Chapter 1 Step 5 Establish Communications a) To set up your host communications, first select your Serial Port from the pull down Serial Port Configuration menu (figure 1-4). Note: Laptops are typically set to Com 1; desktops are typically set to Com 2. b) From the toolbar, click on the Auto Baud button, which looks like this: Quadrus will cycle through the various baud, parity, data bit, and stop bit combinations until it finds the one that allows it to connect with your computer. Once connected, you will see a green button at the bottom of your screen like this: Figure 1-4 Host Serial Port Configuration You can also select Serial Port (figure 1-4) and make setting directly.1 c) To transfer your current ESP settings to the reader, click SEND/RECV button on the main menu and click SEND/NO SAVE or SEND/SAVE to save for power up. d) If you want to load the settings from the reader to the host computer, click RECEIVE FROM READER. You will see the horizontal bar at the bottom of the box fill up with blue (figure 1-5).2 If you fail to establish communications, a communication parameter may be set incorrectly, you have a mismatched ESP/application programs, or you may have a loose or bad host Figure 1-5 Reader Configuration Transfer cable connection. 1. The defaults are 38.4K Baud Rate, None for Parity, 8 Data Bits, and 1 Stop Bits. 2. The blue bar is a timer and does not necessarily indicate a successful transfer of settings from the reader to the host. 1-6 Quadrus 2D Code Reader User’s Manual Locate Symbol 1–Quick Start Step 6 Locate Symbol a) With a label in front of the Quadrus at the proper distance, click the CALIBRATION button. b) Click the LOCATOR tab. Unless you enabled Single Shot for Serial Trigger (in the Operations menu), Calibration will put the Quadrus™ in a Continuous mode (overriding any other trigger settings), and cause it to search for images and symbols. When Quadrus™ finds an object that satisfies its criteria for a symbol, Quadrus™ displays it in the locator box as a polygon outline. The outline will be red if Quadrus™ detects an extraneous object or fails to decode a symbol. It will be green if a symbol is successfully decoded. Read rate bar Locator Figure 1-6 Calibration/Locate Quadrus 2D Code Reader User’s Manual 1-7 1–Quick Start Chapter 1 Step 7 Center Symbol in the Field of View When an object is detected in the field of view (FOV), it is represented by a red or green outline in the Locate Label dialog box window. If the outline is Red, the object could be a symbol that has not yet been decoded. If green, the object is a symbol that has successfully been decoded. a) While watching the response of the outline(s) inside the Locate Label dialog box window, reposition the label or Quadrus™ (without changing the recommended distance between them) until you’ve centered the label in the window. b) You will minimize specular reflection and improve your read rate if you are careful to set the Quadrus™ at least 15° angle relative to a line perpendicular with the label. c) To confirm that Quadrus™ is looking at your symbol, check Overlay option to see a compressed image. Note: In Overlay mode, there is approximately 1 second delay between image captures. Note: The read rate percentage, from 0 to 100, is indicated by the read rate bar below the message window (figure 1-6). At20.2least 15° ° Note: For in depth discussion of illumination parameters, see "Illuminate” on page 5-3. Label Figure 1-7 Label/Quadrus™ Position 1-8 Quadrus 2D Code Reader User’s Manual Static Label Setup 1–Quick Start Step 8 Static Label Setup a) Click THE ILLUMINATE tab to analyze and change illumination settings. Illuminate Figure 1-8 Illumination b) Click the Send button. If a decodable label is in your field of view, you will see a compressed image of the symbol, as shown in figure 1-8. c) To see a histogram of the object represented by the polygon, place your cursor tip over the polygon and double click. The goal here is to make the necessary adjustments to the illumination parameters to enable decoding and improve read quality. You can do this by analyzing quality output, histograms, and line scans. See “Illuminate” on page 5-3 for detailed instructions on setting up and fine-tuning your reader. Quadrus 2D Code Reader User’s Manual 1-9 1–Quick Start Chapter 1 Step 9 Moving Label Setup When you click Dynamic, you see the Dynamic parameters (figure 1-9) which allow you to set up for multiple symbols and adjust the time delay between the appearance of a moving object (as sensed by an external object detector) and the arrival of its associated symbol or symbols in the center of the reader’s view. Dynamic Figure 1-9 Dynamic Setup You can also go back to static setup and adjust shutter time, etc. in the Illumination dialog box and retest in “Dynamic.” For complete info on setting up Quadrus™ for a dynamic (moving labels) application, see “Dynamic Setup” on page 5-13. 1-10 Quadrus 2D Code Reader User’s Manual Saving Settings 1–Quick Start Step 10 Saving Settings Using the Send/Recv dialog box, you can send your current settings to the reader’s memory by clicking SEND/NO SAVE. You can also save your current settings to the reader for power-up by clicking SEND/SAVE. Once you’ve arrived at satisfactory settings for a particular symbol or operation, you may want to save these settings to a file on your host computer by using the File\Save As function and creating a file name that relates to your symbol or application. This allows you to continue on and make additional changes to your scanner without losing the originals. See also “Interface” on page 4-14 for other save/ reset/recall operations. Figure 1-10 Send/Receive Dialog Note: Allow at least 3 seconds after saving before sending a command or starting another operation. Quadrus 2D Code Reader User’s Manual 1-11 1–Quick Start Chapter 1 1-12 Quadrus 2D Code Reader User’s Manual Chapter 2 Menu Configuration 2–Menu Config. Chapter Contents Using ESP™ to Configure the Quadrus™ ........................................... 2-2 Communications Menu ........................................................................ 2-3 Protocol Menu...................................................................................... 2-9 Operations Menu ............................................................................... 2-14 Symbol Menu ..................................................................................... 2-25 In/Out Menu ....................................................................................... 2-28 Illumination Menu ............................................................................... 2-36 Custom Menu..................................................................................... 2-39 This chapter tells how to configure the Quadrus™ using the ESP™ program on a Windows based (Windows 3.1 or Windows 95) computer. Note: Related serial commands that can be entered by commands from a host or an auxiliary computer are listed in Chapter 3, “Serial Commands.” After changes are made in the configuration menus, they can be sent in total to the Quadrus™ and the current settings will be posted in a status window. It is important to note that configuration settings can be saved directly to the Quadrus™ or as files to your computer that can individually be recalled at a later date and saved to the Quadrus™. Note: See Step 3, “Install ESP™ on Host Computer,” on page 1-4 and Chapter 4, “Utilities,” for testing and operational uses of the ESP™ program. Quadrus 2D Code Reader User’s Manual 2-1 Chapter 2 Using ESP™ to Configure the Quadrus™ Figure 2-1, “Configuration Setup File,” shows the window you will see when you launch the Quadrus™ ESP™. 2–Menu Config. Pull down menus Toolbar An “Untitled...” file loads with the original factory default settings Access configuration menu changes here. Terminal emulation window displays echoed commands and data Click here to calibrate your label setup File status: Also titled “Current Menu/Reader Settings” following a save or receive You can also access the configuration menus by selecting any item here. Allows you to perform tests and access operational information. Allows you to send/receive between the Quadrus™ and the host Click here to evaluate images Figure 2-1 Configuration Setup File To access the configuration menus, press the MENU button. If using a mouse, single click on menu items and enter text as appropriate. If using the keyboard, use the Alt key, underlined letters, and the tab key to move to the desired field. You can then use arrow keys or the space bar to scroll through the selections and the Enter key to accept changes. 2-2 Quadrus 2D Code Reader User’s Manual Communications Menu The Communications menu allows you to set the communication protocols of the Quadrus™. (See figure 2-2.). 2–Menu Config. Figure 2-2 Communications Menu Structure When you make and save menu communications changes to the Quadrus™, those changes will automatically be matched in the Serial Port configuration. Default Clicking the DEFAULT button will reset all options on the Communications menu to factory defaults. You can then click Apply followed (in the pop-up dialog box) by SEND/NO SAVE or SEND/SAVE. Host Port Parity Default: None Options: None, Even, Odd Allows you to select an error detection routine in which one data bit in each character is set to 1 or 0 so that the total number of 1 bits in the data field is even or odd. Quadrus 2D Code Reader User’s Manual 2-3 Chapter 2 Data Bits Default: Eight Options: Seven, Eight Allows you to establish the total number of bits in each character. 2–Menu Config. Stop Bits Default: One Options: One, Two Allows you to select the last one or two bits in each character to indicate the end of the character. Baud Rate Default: 38.4K Options: 1200, 2400, 4800, 9600, 19.2K, 38.4K, 57.6K, 115.2K Allows you to set the number of bits transmitted per second. Aux Port Parity Same as Host Port Data Bits Same as Host Port Stop Bits Same as Host Port Baud Rate Default: 38.4K Options: 1200, 2400, 4800, 9600, 19.2K, 38.4K, 57.6K Allows you to set the number of bits transmitted per second. Aux Port Mode Default: Disabled Options: Disabled, Transparent, Half Duplex, Full Duplex, Daisy Chain, Cmd Process Allows you to set communications parameters between the reader and an auxiliary port. An auxiliary port can be used to configure the menus, send data to the host, and display data transmissions originating from the host or reader. The Aux Port baud rate should never exceed Host Port baud rate or auxiliary port data could be lost. 2-4 Quadrus 2D Code Reader User’s Manual Transparent Used to batch data from the aux port to the host. The reader buffers data from the aux port and displays the keyed data on the aux port. The reader transmits aux port data to the host when a symbol is scanned or a carriage return is entered from the aux port. Data Initiated from the Aux Port. •Aux Port data is passed • Aux Port data to the host is always sent with a preamble and a postamble. Aux. Port Host • If the reader is in a polled mode to the host, aux port data will still pass through. Quadrus™ Data initiated from the Reader. •Transmission to the aux port occurs immediately upon a good read. • Scan data to the aux port does not include a preamble or a postamble. • Communications with the aux port is always in Point-toPoint protocol, even if the host is in a polled protocol mode. Aux. Port Host Quadrus™ Data initiated from the Host. •In unpolled mode, all host data is echoed to the aux port. Aux. Port Host Quadrus™ Quadrus 2D Code Reader User’s Manual 2-5 2–Menu Config. through to the host whenever a return key is pressed at the aux port or whenever bar code data is sent. If sent with bar code data, it is processed on a first-in/first-out basis Chapter 2 Half Duplex Mode In half duplex mode all aux port data and bar code data is sent directly to the host. Bar code data is transmitted to the aux port device at the same time the data is sent to the host. Data initiated from the Aux Port. •Aux Port data to the host is ignored if the reader is in a polled mode. 2–Menu Config. • Aux Port data or scanned data is sent to the host whenever it is received. • Aux Port data is not echoed. Aux. Port Host • Aux Port data to the host is always sent without a preamble or a postamble. Quadrus™ Data initiated from the Reader. •Scan data is transmitted to the aux port at the same time it is transmitted to the host. Data transmission conforms with all parameters specified in the configuration menu (e.g., Preamble, Postamble, End of Read Cycle). Aux. Port Host Quadrus™ Data is initiated from the Host. •In unpolled mode, all host data is echoed to the aux port. Aux. Port Host Quadrus™ 2-6 Quadrus 2D Code Reader User’s Manual Full Duplex Mode In full duplex mode, all aux port data and bar code data is sent directly to the host. Bar code data is not transmitted to the aux port device. Data initiated from the Aux Port. •Aux port data is passed directly through to the host whenever it is received by the reader, unless the reader is in a polled mode, in which case the data will be ignored. Aux. Port Host Quadrus™ • Aux Port data to the host will not have a preamble or a postamble. Data initiated from the Reader . •Scan data is not sent to the aux port. Aux. Port Host Quadrus™ Data initiated from the Host.. •In unpolled mode, all host data is echoed to the aux port. Aux. Port Host Quadrus™ Daisy Chain Mode In a daisy chain application, a primary reader is linked directly to the host and succeeding readers are linked in tandem. Data from succeeding readers is transmitted directly to the host as if it were coming from the primary reader. Succeeding Reader(s) Host The conditions for a daisy chain application are: 1. The primary reader’s trigger and the succeeding readers’ Primary Reader triggers must be set to External or Serial. If all are set to Serial, the host can send serial triggers to all readers in the chain. 2. Each succeeding reader in the daisy chain must have its host connections connected to the aux. port of its preceding reader and enabled for serial or external trigger. Quadrus 2D Code Reader User’s Manual 2-7 2–Menu Config. • Aux Port data is not echoed. Chapter 2 3. Each succeeding reader in the daisy chain should be set to send its data no less than 20 ms before its preceding reader. For example, if the primary reader is set to timeout in 100 ms, the first succeeding reader can be set to 80 ms, the next to 60 ms, etc. 4. Postamble must be set to CR (^M) and enabled. 5. Succeeding readers must have noread messages disabled. 6. Multilabel separator characters and the number of labels must match in all readers in the daisy chain. 2–Menu Config. Daisy Chain Status. Default: Disabled Options: Disabled, enabled Daisy Chain ID. Default: 1 and / Options: One or two ASCII characters Daisy Chain Description. Just before sending a noread message, the primary reader checks its auxiliary port for data. It waits a maximum of 20 ms. If no character is received in 20 ms, it sends a noread message to the host. After each character received, it waits up to 20 ms for the next character or a CR. If a complete message is received, it is sent to the host instead of the noread message. Daisy-chained readers can send a series of symbols by enabling Multilabel and a common multilabel separator. If a reader does not receive the expected number of labels, noread messages are appended to the data string to make up the difference between the number of labels enabled in Multilabel (Number of Labels) and the number of labels read. For example, a primary and two succeeding readers have Number of Labels set to 3 and Multilabel Separator defined as %. If the primary and the first succeeding reader do not find labels, but the next reader registers a good read, the transmitted results would be: label data % noread % noread. Command Process If enabled, allows you to enter ESP™ or direct serial string commands via the Quadrus™ aux port. It is important to note that while Quadrus™ can determine which port—host or aux— to output data in response to serial commands, it has no way of knowing which port to output externally triggered read cycle data. Therefore when Command Process mode is selected, Quadrus™ will output externally triggered read cycle data in one of two ways: 1. If the last command came from the aux port, then externally triggered read cycle data will be output to both the host and the aux ports. 2. If the last command came from the host port, then externally triggered read cycle data will only be output to the host port. 2-8 Quadrus 2D Code Reader User’s Manual Protocol Menu Selected Protocol Default: Point-to-Point Options: Point-to-Point, Point-to-Point with XON/XOFF Figure 2-3 Protocol Default Clicking the DEFAULT button will reset all options on the Protocol menu to factory defaults. You can then click Apply followed (in the pop-up dialog box) by SEND/NO SAVE or SEND/SAVE. Quadrus 2D Code Reader User’s Manual 2-9 2–Menu Config. Protocols define the sequence and format in which information is transferred between devices. Chapter 2 Selected Protocol Default: Point-to-Point Options: Point-to-Point, Point-to-Point with RTS/CTS, Point-to-Point with XON/XOFF, Point-to-Point with RTS/CTS & XON/XOFF, Polling Mode D, Multidrop, User Defined, User Defined Multidrop 2–Menu Config. Protocols define the sequence and format in which information is transferred between devices. Point-to-Point Has no address and sends data to the host (RS-232) whenever it is available and without any request or handshake from the host. Point-to-Point with RTS/CTS (Request-to-Send/Clear-to-Send) Used only with RS-232. This is a simple handshaking protocol that allows a device to initiate data transfers to the host with an RTS (request-to-send) transmission. The host, when ready, responds with a CTS (clear-to-send) and the data is transmitted. CTS and RTS signals are transmitted over two dedicated wires (see table A-1 on page A-3). Point-to-Point with XON/XOFF (Transmitter On/Off) Used only with RS-232. This selection enables the host to send a single byte transmission command of start (XON) or stop (XOFF). If an XOFF has been received from the host, data will not be sent to the host until the host sends an XON. During the XOFF phase, the host is free to carry on other chores and accept data from other devices. Point-to-Point with RTS/CTS & XON/XOFF Used only with RS-232. It is a combination of Point-to-Point with RTS/CTS and Pointto-Point with XON/XOFF. Polling Mode D Like Point-to-Point, Polling Mode D requires a separate connection to the host; but unlike Point-to-Point, it requires an address and must wait for a poll from the host before sending data. When in Polling Mode D, an address of 1 is automatically displayed on the configuration screen. However, during transmission, a 1C hex poll address (FS) and a 1D hex select address (GS) are substituted for the 1. Multidrop Note: Readers intended to link up to a Microscan MS-5000 multidrop concentrator must be configured in standard Multidrop protocol. Note: To avoid slow or degraded performance when the Quadrus™ is networked with Microscan’s MS-5000 multidrop concentrator, the MS-5000 must have Turnaround Timeout set to 35 ms and should have Baud Rate set to 38.4 and Number of Devices 2-10 Quadrus 2D Code Reader User’s Manual set to no more than the actual number of connected devices. See MS-5000 Multidrop concentrator User’s Manual. Similar to Polling Mode D except that a unique poll address and select address are required for each multidrop device, and only one host port connection is needed for up to 50 devices. (For Multidrop poll and select characters, see Table A-8, “Multidrop Address Characters,” on page A-19.) User Defined Note: A specific ASCII character must not be assigned more than once. Used only with RS-232. User Defined is necessary when a new protocol must be defined to match a specific host protocol. ASCII characters can be assigned as an address and as protocol commands (RES, REQ, EOT, STX, ETX, ACK, NAK, From Host). In order to enable a handshaking protocol, you must manually assign values where necessary. When User Defined is selected, the displayed protocol commands match those of the previously selected protocol. User Defined is considered to be in a polled mode only if an address has been assigned. The address can be any ASCII character from the ASCII table in Appendix F on page A-12. If null is selected as the address, the reader will not function in a polling sequence. From Host, if enabled, allows the handshaking protocol to be initiated from the host, if unpolled. Default: Disabled Options: Disabled, Enabled Messages sent to the host from the Quadrus™ will always include the reader’s defined protocol. The status of From Host determines if messages sent to the Quadrus™ from the host must also include the defined protocol. If From Host is disabled, the defined protocol is not included. If From Host is enabled, the defined protocol must be included. (See “Selected Protocol” on page 3-7 for further information.) User Defined Multidrop Used when connecting to a concentrator or other device that does not match standard Multidrop protocol. Any single character (even-numbered — 02 hex to 7E hex) in the ASCII table can be assigned as the address character. The character chosen is used as the poll character and the subsequent ASCII character becomes the select character. For example, if a ^B (02 hex) is selected as the address, ^C (03 hex) becomes the select address that the host will use in sending host select commands. (See Table A-7, “ASCII Table with Control Characters,” on page A-12.) Quadrus 2D Code Reader User’s Manual 2-11 2–Menu Config. Requires a concentrator or controller using RS-485 communications. When Multidrop is selected, the protocol characters for RES, REQ, etc. are assigned automatically. (See “Appendix I — Multidrop Communications” on page A-17 for poll and select sequences.) Chapter 2 Note: Definitions of commands in User Defined and User Defined Multidrop must be duplicated in host applications to enable poll and select sequences to execute correctly during transmission. Note: Typically, parameters in User Defined Multidrop are defined by first enabling Multidrop, then enabling User Defined Multidrop. This pre-loads Multidrop characters into the parameters. You then change individual characters to match the host or other requirements. 2–Menu Config. Output Data Format Preamble (enable/disable) Default: Disabled Options: Disabled, Enabled (within any protocol) Allows you to enable or disable the preamble character(s). Preamble (definition) Default: CR (carriage return). Options: Up to four ASCII characters except NUL, <, or >.1 If enabled, allows you to define up to four characters that can be added in front of the symbol data. For example, a carriage return. Postamble (enable/disable) Default: Enabled Options: Enabled, Disabled (within any protocol) Allows you to enable or disable the Postamble character(s). Postamble (definition) Default: Options: CR LF (carriage return/line feed). Up to four ASCII characters except NUL, <, or >.1 Allows you to define up to four characters that can be added after the symbol data. When enabled, the default CR LF causes each symbol to be displayed on its own line. Response Timeout (character) Default: 4 (40 ms) Options: 0 to 255 (in 10 ms increments) Allows you to set the time the reader will wait between characters before timing out if ACK, NAK, and ETX are enabled, and a host response is expected. 1. In the case where only one character is entered, a NUL character is selected to serve as a place holder; however, no output will result. 2-12 Quadrus 2D Code Reader User’s Manual Intercharacter Delay Default: 0 Options: 0 to 255 in 10 ms increments. Zero (0) causes no delay between characters. Allows you to set the time interval in milliseconds between individual characters transmitted from the Quadrus™ to the host computer. A high setting will significantly slow down communications. For example, a 200 setting will result in a 2 second delay between each character that is transmitted. Default: Disabled Options: Disabled, Enabled An error-checking routine that verifies the accuracy of transmissions. It is the exclusive OR of all characters in the transmitted message. The result is appended to the end of the transmitted message. Quadrus 2D Code Reader User’s Manual 2-13 2–Menu Config. Longitudinal Redundancy Check (LRC) Chapter 2 Operations Menu 2–Menu Config. The Operations menu allows you to set the operations parameters for the Quadrus™. (See figure 2-4.) Figure 2-4 Operations Menu Default Clicking the DEFAULT button will reset all options on the Operations menu to factory defaults. You can then click Apply followed (in the pop-up dialog box) by SEND/NO SAVE or SEND/SAVE. Note: Selecting the Default button will only restore those settings of the current menu. Trigger Click Trigger Setup button to set Trigger Mode, Trigger Level, Trigger Variance, Trigger Source, and Trigger Delay. 2-14 Quadrus 2D Code Reader User’s Manual Trigger Mode Default: External Edge Options: External Edge, Continuous Read, Continuous Read 1, External Level, External Edge, Serial Data, Serial Data & Edge Allows you to establish the type of trigger event that will initiate and end the read cycle. (See “End of Read Cycle” on page 2-19.) 2–Menu Config. Figure 2-5 Triggering Setup Continuous Read Note: Continuous Read is typically used for testing only. Trigger input options are disabled and the Quadrus™ is always in the read cycle. Symbol data is decoded, and symbol information is transmitted repeatedly, as long as the symbol is in the read range of the Quadrus™. When To Output options have no affect on Continuous Read. Continuous Read is useful in testing read performance. Note: If Match Code is enabled, the Quadrus™ defaults to Continuous Read 1. Continuous Read 1 When enabled, symbol data is immediately transmitted once every time new symbol data is placed in front of the Quadrus™. With End Of Read Cycle set to Timeout and the symbol not changed, the Quadrus™ repeats the output at the end of each timeout period. For example, if Timeout is set to one second, the Quadrus™ outputs the symbol data immediately, and then repeats the output at intervals of one second, for as long as the symbol continues to be scanned. With End Of Read Cycle set to New Trigger, the Quadrus™ outputs the current symbol data immediately, but outputs it only once. A new symbol appearing at any time in the scan range will produce a new read output as long as the new symbol is not identical to the previous symbol. Quadrus 2D Code Reader User’s Manual 2-15 Chapter 2 Note: Enabling Continuous Read 1 will default Number of Labels (page 2-24) back to one (if set for 2) and only the first symbol in a supplemental label will be read. External Level 2–Menu Config. Allows a read cycle to be initiated by a trigger signal from an object detector when an object appears within the detector’s range. The read cycle endures until the object moves out of the detector’s range unless a good read or timeout occurs (if Timeout is enabled for End of Read Cycle). External Edge As with Level, Edge allows a read cycle to be initiated by a trigger signal, but unlike level mode, the read cycle ends with a good read output, a timeout, or a new trigger. If Edge Single Shot is enabled then the read cycle will also end on a noread regardless of the timeout setting. Serial Data Quadrus™ accepts an ASCII character from the host or controlling device as a trigger to start a read cycle. Serial Data & External Edge The Quadrus™ accepts either an external trigger or a serial ASCII command to start and end a read cycle. Single Shot Default: Enabled Options: Enabled, Disabled When enabled, an edge or serial trigger will begin the read cycle which ends after one captured image, without reference to good decodes or timeout. It is useful in trend analysis and can check daisy chain output in a noread condition. It also treats data from auxiliary port as if it were decoded from the current frame of data. Serial Trigger Character Default: Options: GS (^] corresponds to <GS> displayed in menu) Any single ASCII character except NUL, an existing host command character, or an on-line protocol character. Note: Serial Data (page 2-16) or Serial Data & Edge (page 2-16) must be enabled for Serial Trigger Character to take effect. “N/A” is displayed in the menu when all other triggering modes are enabled. Allows you to define a single ASCII character as the host serial trigger character that initiates the read cycle.1 The serial trigger is considered an on-line host command and requires the same command format as all host serial commands (that is, to be entered within the < > brackets). 2-16 Quadrus 2D Code Reader User’s Manual Trigger Filter Default: 0 Options: 0 to 65,535 (0 to 3 seconds) (in 46 µs increments) Allows you to set the duration of the trigger debounce time. Trigger Variance Fixed Options: Fixed, Auto Applies only if Two Triggers is selected. Choose Fixed to apply the same Trigger Delay Time to each read cycle or when setting up Two Triggers for the first time. Choose Auto for Two Triggers setup to have Quadrus™ compare subsequent edge triggers and automatically adjust Delay Time. Trigger Level Default: Positive Options: Positive, Negative Allows you to determine whether a positive or negative transition will initiate the read cycle. Note: External Trigger (page 2-16), External Edge (page 2-16), or Serial Data & Edge (page 2-16) must be enabled for Trigger Level to take effect. Note: If using the Microscan object detector, enable Positive. Trigger Source Default: One Trigger Options: One Trigger, Two Triggers Allows you to select one or two trigger sources. If you select Two Trigger, you can either tie both trigger inputs together into single trigger inputs (as an open collector) or wire them into separate inputs (see table A-3 on page A-3 for wiring details and notes). Note: At this time, pin 12 accepts only TTL input. When set to Two Trigger mode the Quadrus™ behaves as follows: 1. Upon receiving the first trigger edge, Quadrus™ will start a timer. 2. Upon receiving the second trigger edge, Quadrus™ will stop the timer. 1. For example, assigning an upper case C would nullify the <C> (Enter Decode Rate Test) command. For a list of operational commands used by the Quadrus™, see Chapter 4, “Operational Commands.” Quadrus 2D Code Reader User’s Manual 2-17 2–Menu Config. Default: Chapter 2 3. Quadrus™ determines the ratio between the current two-trigger delta time and the previous two-trigger delta time. Note: If Trigger Variance mode is set to Auto, then Quadrus™ will decrease or increase the current Trigger Delay Time by the ratio calculated in step 3; if Trigger Variance is set to Fixed, then Trigger Delay Time will not change. You use Fixed to manually set a Trigger Delay Time for the initial setup. After that, you switch to Auto and Quadrus™ computes the speed automatically in real time. 2–Menu Config. Trigger Delay Default: Time Options: Time, Pulse Allows you select and define the conditions (time or pulses) that must transpire before a read cycle can begin. Both these methods allow you to adjust the position of the symbol and the delay time for Quadrus™ to capture the image without moving the trigger device. However, it is significant to note that of the two, only Trigger Delay Time will function with Two Triggers enabled in Trigger Source. Trigger Delay (µSec) 0 Default: Options: Any number between 0 and 65,535 (0 to 3 seconds), in 46 µs Increments. At the occurrence of an Edge Trigger the Quadrus™ will wait the designated time to capture an image. # Pulses Default: 0 Options: 0 to 255 With Pulse enabled, the Quadrus™ will wait the designated Number of Pulses before the read cycle is activated. Multi-Capture Mode Note: Multi-capture mode has no corresponding serial configuration command. Serial commands for multi-capture mode are found in “<t...> Multiple Trigger Delays” in Chapter 4, “.” Default: Disabled Options: Disabled, Enabled If enabled, multiple captures can proceed from a single trigger. For each additional capture, a corresponding delay is set up using the <t...> operational command explained in “<t...> Multiple Trigger Delays” on page 4-8. 2-18 Quadrus 2D Code Reader User’s Manual For example, if your application requires that two symbols be read from a single trigger, you need to ensure the following: 1. Multiple Trigger Events from 1 Trigger is enabled. 2. The first trigger event is set up using the trigger delay field <KG>. 3. The second shot is set up using the <t...> operational command. 4. The # Trigger Events After 1st Trigger field is set to 1. Any number between 0 - 65,535 in 46 µs increments Default: 1 Options: Any number from 1 to 10. 2–Menu Config. # of Captures after Trigger Number of captures that can occur after a trigger if Multi-Capture is enabled. Delay Time 1 Default: 0 Options: Any number between 0 and 65,535, in 46 µs Increments. At the occurrence of an Edge trigger the Quadrus™ will wait the designated Trigger Delay Time before the read cycle is activated. Read Cycle Allows you select the conditions for ending the read cycle and the timeout duration, if a timeout is selected. End of Read Cycle Default: Timeout Options: Timeout, New Trigger, Timeout & New Trigger Timeout Can end the read cycle after a specified period of time. If no symbol has been read, a timeout causes a noread message (if enabled) to be transmitted. When External Edge, Serial Data, or Serial Data & Edge is enabled, a timeout ends the read cycle. With External Level enabled, the read cycle does not end until the falling edge (the second trigger) occurs. The next read cycle does not begin until the next rising edge trigger. With Continuous Read 1 Output enabled, a timeout initiates a new read cycle and allows the same symbol to be read again. Quadrus 2D Code Reader User’s Manual 2-19 Chapter 2 New Trigger Ends the read cycle at the occurrence of a new trigger event, and if no symbol has been read, causes a noread message, if enabled, to be transmitted at the occurrence of the new trigger event. With either External Edge, Serial Data, or Serial Data & Edge enabled, an edge or serial trigger ends a read cycle and initiates the next read cycle. With External Level enabled, a falling edge trigger ends a read cycle. However, the next read cycle does not begin until the occurrence of the next rising edge trigger. 2–Menu Config. Timeout & New Trigger Ends the read cycle after a specified period of time or at the occurrence of new trigger event, and if no symbol has been read, causes a noread message, if enabled, to be transmitted. With either External Edge, Serial Data, or Serial Data & Edge enabled, a timeout, or an edge or serial trigger whichever comes first, ends the read cycle. An edge or serial trigger also initiates a new read cycle. With External Level enabled, the read cycle does not end until the occurrence of a falling edge, and the next read cycle does not begin until the next rising edge trigger. Timeout (mS) Default: 1000 (one second) Options: 0 to 65,535 Allows you to set the length of time the read cycle will remain active before timing out. Maximum Decode Time (mS) Default: 1000 (one second) Options: 0 to 65,535 Allows you to set the length of time the reader will spend, after a label has been located, attempting to decode a label before timing out and seeking another symbol. You can enable additional time if necessary to allow the Quadrus™ to use a special algorithm that will adjust decode parameters and continue to try to decode the label. Noread Default: Enabled Options: Enabled, Disabled You can clear this box if you want to disable the noread message. Noread Message Default: NOREAD Options: Up to seven ASCII characters (except NUL) 2-20 Quadrus 2D Code Reader User’s Manual Allows you to define any combination of ASCII characters (except NUL) up to seven characters as the noread message. When enabled, the noread message will be transmitted to the host at a timeout or the end of a read cycle if the symbol has not been decoded. Match Code Default: Disabled Options: Disabled, Enabled, Sequential, Wild Card Note: Enabling Continuous Read 1 will default Number of Labels (page 2-24) back to one (if set for 2) and only the first symbol in a supplemental symbol will be read. Allows you to enter a master label into the Quadrus™ memory to be compared with subsequently scanned symbols. (See “Master Label” on page 4-10.) The results of this comparison determine the reader’s data and output pulses. Figure 2-6 Match Code Setup The following conditions apply: • A triggered mode must be enabled for Match Code Type to take effect. • Multi-labels will not work when Match Code Type is enabled. (Enabling Match Code will cause Number of Labels to default back to one.) • If you wish to send a pulse on a Good Read, Match Code Type must be disabled. Quadrus 2D Code Reader User’s Manual 2-21 2–Menu Config. Note: A triggered mode (page 2-15 to page 2-16) must be enabled for Match Code to take effect. Chapter 2 Match Code Type Disabled. No effect on operations. Enabled. Instructs the reader to compare symbols or portions of symbols with the 2–Menu Config. master label. Sequential Matching. Instructs the reader to compare symbols or portions of symbols for sequential numbers in ascending or descending order. Sequencing occurs after each match. It is important to note that all sequential match code operations are performed on Master Label #1 in the Master Label Data Base. Wild Card. Allows you to enter user-defined wild card characters in the master label. For example, with wild card defined as a default asterisk, entering URGENT** as your master label will result in matches for URGENT, URGENT1, and URGENT12 but not for URGENT123. As in the above example, when wild cards are appended to the end of the master label, symbols of variable lengths can result in matches. However, wild cards in the beginning or center of a symbol (e.g., UR**NT) do not allow for variable symbol lengths. Data Base Size Default: 10 Options: 1 to 10 You can setup from 1 to 10 the master labels. It is important to note that changing the number of master labels in the data base changes the maximum length for each master label due to a fixed data base size for the aggregate. The aggregate Master Label Data Base is 2048 bytes in size, so if The # of Master Labels is set to 1 (see <KM> command in “Multilabel” on page 2-24) then the max value for Match Start Position and Match Length is 2048. If the # of Master Labels is set to 2, the maximum data base size would be 1024, and so on until at ten symbols, the maximum per label is 204 (see “Master Label Data Base” on page 4-12). Note: Since the size of the master label data base varies according to the number of Master Labels enabled, the Match Start Position and Match Length maximum values will vary as well. Caution: You must be careful when changing the Number of Master Labels (1 to 10), because if you enter a value for Number of Master Labels that is different than the current value and any of the master labels exceed the new size limitation, all Master Labels will be deleted except Master Label #1, unless its size exceeds the new maximum. Match Start Position Match Start Position must be set to 1 or greater to enable this feature. Defines the first character in the symbol (from left to right) that will be compared with those of the master label when Match Code Type is set to Enabled or Sequential. For example, if you set Match Start Position to 3, the first 2 characters read in the symbol will be 2-22 Quadrus 2D Code Reader User’s Manual ignored and only the 3rd and subsequent characters to the right will be compared, up to the number of characters specified by Match Length. Match Length Defines the length of the character string that will be compared with that of the master label when Match Code Type is set to Enabled or Sequential and Match Start position is set to 1 or greater. For example, if Match Length is set to 6 in a 10 character symbol, and Match Start Position is set for 2, only the 2nd through 7th characters (from left to right) will be compared. Default: Disabled Options: Disabled, Enabled Enabling New Master Pin will allow you to momentarily connect the New Master Pin to ground (must be held low for a minimum of 10 ms) in order to clear any existing master label information from Master Label #1 buffer in the master label data base, and to record the next good read as the new master label information for Master Label #1. Note: This pin will not work for any of the other master labels in the data base. Sequence on Noread When disabled, the reader does not sequence (increment or decrement) on a noread. When enabled, the reader sequences on every noread. Sequence on every Mismatch When disabled, and if a mismatch is out of sequence by no more than 1, then the sequence resumes and searches indefinitely. When enabled, the reader sequences on every mismatch. Master Label Edit Allows you to enter in master label data for up to 10 labels. Enter data under Master Label 1, scroll down to Master Label 2 and enter data for that label, and so on. Reader Output When to Output (symbology data) Default: As Soon As Possible Options: As Soon As Possible, End of Read Cycle Allows you to choose when the symbol’s data is sent to the host computer. Quadrus 2D Code Reader User’s Manual 2-23 2–Menu Config. New Master Pin Chapter 2 As Soon As Possible Causes symbol data (good reads) to be transmitted immediately upon a good decode. End of Read Cycle Causes symbol data output to be delayed until the end of the read cycle. 2–Menu Config. Bar Code Output Default: Good Read Options: Good Read, Disabled, Match, Mismatch Note: If Bar Code Output is set to Match or Mismatch, symbol data will not output unless Match Code is enabled and a master label is received into memory. Beeper Status Default: On Good Options: On Good, On Noread, Disabled A beep is emitted either after each good read or noread. Multilabel Allows you to define the number of different symbols that the reader will read during a single trigger event (including multiple symbols decoded within a frame). Separator Default: , (comma) Options: Any ASCII character except NUL, <, or >. Allows you to define the ASCII character that will separate symbol data when it is sent to the host. Number of Labels Default: 1 Options: 1 to 6 Note: If Number of Labels is set to 2 while Match Code or Continuous Read 1 is enabled, Number of Labels will default back to one. Allows you to choose the number of different symbols that will be read in a single trigger event. The labels can be a mix of any enabled bar code symbologies and more than one label can be decoded per frame. 2-24 Quadrus 2D Code Reader User’s Manual Symbol Menu The Symbol menu allows you to setup specific parameters of each symbology. (See figure 2-7.) 2–Menu Config. Figure 2-7 Symbol Setup Default Clicking the DEFAULT button will reset all options on the Symbol menu to factory defaults. You can then click Apply followed (in the pop-up dialog box) by SEND/NO SAVE or SEND/SAVE. Quadrus 2D Code Reader User’s Manual 2-25 Chapter 2 Background Color Default: White Options: White, Black Background color is important. Use the finder pattern as your reference. If the finder pattern is white (or light), the background color should be black (or dark). The terms Black and White are relative and you should think in terms of lighter or darker. 2–Menu Config. Symbol Type Default: Options: ECC 200 ECC 000, ECC 050, ECC 080, ECC 100, ECC 140, ECC 200 See “Data Matrix Symbology” on page A-13 for descriptions. Identifiers You can instruct the reader to output the ECC Level (symbol type) and/or the symbology identifier along with the label data. ECC Level (symbol type) Default: Disabled Options: Disabled, Enabled Allows you to enable the reader to output the symbol type (ECC 200, ECC 000, etc.). Symbology Identifiers Default: Disabled Options: Disabled, Enabled If Symbology Identifier is enabled, it adds a prefix to the decoded data. The symbology identifier for Data Matrix is: ]dm where: ] is the symbology identifier flag (ASCII value 93). d is the code character for the Data Matrix symbology. m is a modifier character with one of the values defined in table 2-1. 2-26 Quadrus 2D Code Reader User’s Manual Table 2-1 Symbology Identifier Option Values for Data Matrix Option Value Option ECC 000-140 1 ECC 200 2 ECC 200, FNC1 in 1st or 5th position 3 ECC 200, FNC1 in 2nd or 6th position 4 ECC 200 supporting ECI protocol 5 ECC 200, FNC1 in 1st or 5th position plus supporting ECI protocol 6 ECC 200, FNC1 in 2nd or 6th position plus supporting ECI protocol Quadrus 2D Code Reader User’s Manual 2–Menu Config. 0 2-27 Chapter 2 In/Out Menu 2–Menu Config. The Reader In/Out menu allows you to set the conditions under which Quadrus™’s inputs and outputs symbol data, signals, and pulses. Figure 2-8 Reader In/Out Setup Symbology output data and noread messages are transmitted on pin 2 under conditions set principally in Bar Code Output. Pulses are transmitted via pins 6 and 8 (Output 1 and Output 2 respectively) and individually configured under conditions set in Output 1 and Output 2. Default Clicking the DEFAULT button will reset all options on the In/Out menu to factory defaults. You can then click Apply followed (in the pop-up dialog box) by SEND/NO SAVE or SEND/SAVE. Allows you to choose the conditions that will send symbol data (or noread messages) to the host computer via RS-232 on pin 5. 2-28 Quadrus 2D Code Reader User’s Manual Input Configuration Input 1 applies to host pin 12, Input 2 applies to host pin 21. Default Click the DEFAULT button to display factory default settings for Input 1. Default: Positive Options: Positive, Negative 2–Menu Config. Polarity Figure 2-9 Input 1 Dialog Box Allows you to choose a positive or negative transition. Input Mode Default: Disabled Options: Disabled, Reset Counts, Unlatch Output, Set Trigger Delay Disabled No input signals. Reset Counts Resets all counters. Unlatch Output Sends a pulse to end active state of Latch Mode 1 set in Output 1, Output 2 or Output 3. Trigger Delay When Trigger Delay is enabled, both the 1st and 2nd trigger input pulses will be expected at the Trigger Input (pin 10). When Set Trigger Delay is not enabled, trigger input from the 1st trigger will be expected at Input-1 (pin 12). Caution: Input-1 accepts TTL level voltage only. Output Configuration Output 1 applies to host pin 6. Output 2 applies to host pin 8. Output 3 applies to host pin 15. Quadrus 2D Code Reader User’s Manual 2-29 Chapter 2 2–Menu Config. Upon selecting this option a dialog box will appear: Figure 2-10 Output 1 Default Click DEFAULT button to display factory default settings. Output On Default: Mismatch or Noread Options: Mismatch or Noread, Match, Mismatch, Noread, Trend Analysis Allows you to set the conditions that will output a pulse. To see the options for enabling Match Code and receiving a master label into memory see “Master Label” on page 4-10. Note: If Output On is set to Mismatch or Noread, or Mismatch, a relay pulse will not output unless Match Code is enabled and a master label is received by reader memory. Mismatch or Noread Sends a pulse (to the output pin that is enabled) when the symbol's data does not match that of the master label or the label is not decoded before the end of the read cycle. Note: Matchcode must be enabled for a pulse to be sent. (See “Operations Menu” on page 2-14.) 2-30 Quadrus 2D Code Reader User’s Manual Match Sends a pulse (to the output pin that is enabled) when the decoded symbol matches the master label. (If Match Code is disabled, a good read will have the same effect.) Note: Matchcode must be enabled for a pulse to be sent. (See “Operations Menu” on page 2-14.) Mismatch Note: Matchcode must be enabled for a pulse to be sent. (See “Operations Menu” on page 2-14.) Noread Sends a pulse (to the output pin that is enabled) when the symbol’s data is not decoded before the end of the read cycle. Trend Analysis Outputs a pulse when a trend analysis condition is met. (See“Trend Analysis” on page 2-32.) Output Mode Default: Pulse Options: Pulse, Latch Mode 1, Latch Mode 2, Latch Mode 3 Allows you to select either pulse or latch output mode. Pulse Enabling Pulse allows a pulse to be sent when the selected Output On condition is met. Enabling Latch causes the output to toggle high or low (depending on selected polarity) when the selected Output On condition is met. Latch Mode 1 (unlatch pin) The programmable output is pulled active when the Output On condition has been met and is held active until either Input #1 or Input #2 is toggled to the opposite polarity. Note: In order for this mode to work correctly, you must set either Input #1 or Input #2 to the correct polarity and set Input Function for Unlatch Output. Latch Mode 2 (unlatch opposite condition) The programmable output is pulled active when the Output On condition has been met and is held active until the opposite of the Output On condition is met. For example, if Noread is the condition set in Output On, Output will be pulled active upon a Noread condition and held active until a Good Read condition occurs. Quadrus 2D Code Reader User’s Manual 2-31 2–Menu Config. Sends a pulse (to the output pin that is enabled) when the decoded symbol does not match the master label. Chapter 2 Latch Mode 3 (unlatch Enter Read Cycle) The programmable output is pulled active when the Output On condition has been met and is held active until the Read Cycle is re-entered. Pulse Width (in 10 ms incs) Default: 5 (.05 seconds) 2–Menu Config. Options: 0 to 255 (divide the number entered by 100 for time in seconds) Allows you to set the duration of the good match/noread output signals at the output pin that is enabled. When the edit box is selected, you can use the arrow keys to increase or decrease the settings, or you can just enter the value. Polarity Default: Negative Options: Negative, Positive Allows you to choose a positive or negative transition. Trend Analysis Trend Analysis Mode Outputs a pulse when a trend analysis condition is met. Default: Noread Options: Image Degradation, Mismatch, Noread Allows you to select the type of analysis that the reader will monitor. Note: Image Degradation is for future use and is not functional at this time. Trigger Evaluation Sample Default: 10 Options: 0 to 255 Allows you to set the number of triggers. Number to Output On Default: 5 Options: 0 to 255 Allows you to set the number of times a condition that you define in Trend Analysis Mode occurs in the Trigger Evaluation Sample to cause an output. 2-32 Quadrus 2D Code Reader User’s Manual Quality Output When you check Quality Output parameters, Quadrus™ calculates each and appends these values to each label output. For example, if you enable all the outputs, they will be returned in the order shown in table 2-2. See “Sample Symbol # 1, Thermal” on page 5-9 for a functional description and examples with different labels. Table 2-2 Full Quality Outputs % Cell Damage Symbol Contrast Total Decode Time Capture Time Locate Time Decode Time Pixels per Element Both Elements enabled 0123456789abcdefghijklmnopqrstuvwxyz 0 128 256 36 210 10 13 17 light pixels dark pixels You can choose to output symbol quality values by checking any of the following check boxes: % Cell Damage. Number of cells (also called elements) damaged per total number of cells x 100. The ideal reading is 0 (zero). Symbol Contrast. The difference between the arithmetic means of the darkest 10% and lightest 10% of the image pixels which fall within the area of the symbol, extending outward to the limits of any required quiet zones. A value of 80 is considered optimum, with 70 as a minimum for an A-grade threshold. Total Decode Time. Displays the sum of Capture Time, Locate Time, and Decode Time. A target total is anything under 200 ms that guarantees you are getting at least 5 scans per second (1000 ms/200 ms). Capture Time. Displays the time elapsed between the CCD trigger and all the CCD data has been DMA’d to external memory. Note: Capture time is dependent on the shutter time. Locate Time. For the first label in the field of view, the time from the start of image processing until the label has been located and is ready to be decoded. For each additional label in the field of view, the time from the exit of the decode function of the previous label until the current label has been located and is ready to be decoded. Decode Time. Time required to decode label. Quadrus 2D Code Reader User’s Manual 2-33 2–Menu Config. Label data Chapter 2 Pixels Per Element. Default: Disabled Options: Disabled, Dark Elements, Light Elements, Both Elements You can output pixels per dark element, pixels per light element, or both. This calculation records the number of pixels for each element, either dark or light, in the clocking pattern for both x and y directions. 2–Menu Config. Enabling Both Elements is very useful since you can quickly compare the balance between dark and light pixels. Contrast Method. Default: Compressed Options: Compressed, Full Size Method used to calculate the symbol contrast of the image, either compressed or fullsized. Output Separator. Allows you to select an ASCII character as a separator between the label data and the appended Quality information. Recommended Quality Output Setup 1. In the In/Out menu, check % Cell Damage, Symbol Contrast, and Total Decode Time. 2. Set Pixels per Element to Both Elements, as shown in figure 2-11. Figure 2-11 Quality Output Options 3. In the Trigger menu under Utilities, click the Serial Trigger Character SETUP Button and click Send. 2-34 Quadrus 2D Code Reader User’s Manual Output Filter Default: Disabled Options: Disabled, Enabled If only part of the information in a label is to be transmitted to the host, Output Filter can be used. It allows a preset number of characters to be transmitted starting at a set position in the label. In the multilabel mode, partial output is performed on each separate label. “1234567890” is transmitted as “34567” “1234” is transmitted as “34” “1234,abcde” is transmitted as “34,ab” “12” is transmitted as “” Start Default is 1. Range is 1 to 300 Length Default is 63. Range is 1 to 300 Quadrus 2D Code Reader User’s Manual 2-35 2–Menu Config. For example, if the start position is set to 3 and the length to 5, the following occurs: Chapter 2 Illumination Menu 2–Menu Config. Upon selecting this menu a dialog box will appear which will contain the following: Figure 2-12 Illumination Menu Note: See “Illumination Adjustment Flow” on page 5-8. Default Clicking the DEFAULT button will reset all options on the Illumination menu to factory defaults. You can then click Apply followed (in the pop-up dialog box) by SEND/NO SAVE or SEND/SAVE. Illumination You can enable or disable the Internal Illumination. You can also adjust the duration of time the LEDs will be on. However, the Quadrus™ ESP™ will do this automatically when you set shutter time in ESP™ Illumination menu. Therefore you should make your exposure time adjustments in Shutter Time before attempting to change LED Illumination Time. However, if you do need to fine-tune your exposure time, you can make adjustments in LED Illumination Time (by serial command only), but should observe the following: 2-36 Quadrus 2D Code Reader User’s Manual • If you select an LED Illumination Time that is longer than Shutter Time, the LED’s will shut off at the end of exposure time since there is no benefit in applying power to the LED’s while the CCD is not active. • Setting the LED Illumination Time to less than the exposure time will effectively shorten the time the image is received by the CCD array. For comparison, think of LED Illumination and shutter time in terms of a conventional camera’s flash and shutter speeds, respectively. Internal Options: Internal, External, Internal and External Internal. Uses the Quadrus™’ internal light source to illuminate the symbol at the time of capture. External. Relies on an exterior light for illuminating the symbol. If disabled, regardless of the mode of operation, the external strobe output will be in an inactive state. Internal and External. Allows you to use both internal and external illumination. External Source Default: Continuous Options: Continuous, Strobe Continuous. If Continuous is enabled for External Source, strobe output will depend on the read cycle mode. If in Continuous Read (in Operations menu), the strobe output will be continuously active. However, if the read cycle is in a triggered mode, then the strobe will be pulsed active upon entering the read cycle and pulled inactive upon leaving the read cycle. Strobe. If Strobe mode is selected, the strobe output will pulse active during the CCD exposure time only. Strobe Edge Default: Positive Options: Positive, Negative You can select either Negative or Positive transition for the Strobe Edge. This selection will be grayed out if External Illumination is disabled or Continuous External source is selected. Quadrus 2D Code Reader User’s Manual 2-37 2–Menu Config. Default: Chapter 2 Illumination Settings (See “Manual Settings” on page 5-6 for additional explanations.) 2–Menu Config. Shutter Time Default: 1/500 Options: 1/60, 1/125, 1/ 250, 1/500, 1/1000, 1/2000, 1/4000, 1/10K, 1/20K, 1/50K, and 1/100K. Allows you to select the desired shutter time.This is similar in function to an everyday photo camera. The rule of thumb is the faster the object is passing through your field of view, the shorter your shutter time must be to capture an undistorted image. If you select durations of 1/20K or shorter, shutter time is controlled by illumination time. Background Offset Default: Medium Options: Dark (50), Medium (100), Light (150), Custom (0 to 255) Allows you to change the Offset value. This adjustment is usually made experimentally during calibration (see “Illumination Adjustment Flow” on page 5-8). Also see Contrast Default: 200 Options: 0 to 255 This adjustment is usually made experimentally during calibration. A higher setting brightens the image. Threshold Type Default: Adaptive Options: Adaptive, Fixed (0-255) Adaptive. An Adaptive routine sets the light/dark threshold from data acquired from the current read. Fixed applies the same gray scale threshold value to each and every symbol. Generally, Adaptive gives better results than Fixed. See following descriptions of each. Fixed. Allows you to enter a fixed number (from 0 to 255) that determines how the reader distinguishes light from dark pixels. Unlike Adaptive, a Fixed Threshold value is applied consistently to each and every label. Fixed works best when decode time must be as short as possible and the reflectance and illumination of the symbol area is uniform and unchanging. 2-38 Quadrus 2D Code Reader User’s Manual Custom Menu In some cases there may be a discrepancy between your application code and the ESP™ version. If so, after you’ve sent a Receive from Reader command, you will see the following Custom Menu: 2–Menu Config. Figure 2-13 Custom Menu In this case, the application code residing in this reader has a KQ command that does not match the command in the current ESP™ version and the commands listed here are those that do not match. The Custom menu provides a way of identifying those commands that vary from your current version of ESP™. When you save your current ESP™ configuration file, the same custom commands will be available upon recall. If you subsequently download a version of the application code to the reader that matches your version of ESP™, the Custom menu tab will no longer appear. Quadrus 2D Code Reader User’s Manual 2-39 2–Menu Config. Chapter 2 2-40 Quadrus 2D Code Reader User’s Manual Chapter 3 Serial Commands Chapter Contents Serial command strings are entered from an ASCII terminal, from a host computer, or within the Terminal window of the Quadrus™ ESP™ for Windows™. As with menu configuration commands, serial configuration commands relate to the initial reader setup. Note: For a more detailed explanation of Quadrus™ serial commands, see explanations of corresponding ESP™ commands in Chapter 2, “Menu Configuration.” Note: The order that serial commands are presented in this chapter conforms to the serial command groupings established in the application software and therefore may not always follow the order established in Chapter 2, “Menu Configuration.” Quadrus 2D Code Reader User’s Manual 3-1 3–Serial Commands About Serial Configuration ................................................................... 3-4 Communications Port........................................................................... 3-6 Protocol................................................................................................ 3-7 Operations ......................................................................................... 3-10 Symbol ............................................................................................... 3-15 In/Out ................................................................................................. 3-16 Illumination......................................................................................... 3-20 Chapter 3 Table 3-1 Summary of Serial Configuration Commands Function K Ka CommunKy ications Kb Kf Kd Ke KA Protocol KB Kc 3–Serial Commands KT? Operations Aux Port Host Port RS-422 Protocol Preamble Postamble Response Timeout Intercharacter Delay LRC Comm./Protocol Status Request Kg Trigger Ki KJ Kj KI Serial Trigger Character Trigger Variance Trigger Polarity Trigger Source KG Trigger Delay Kh Read Cycle Kk KL Noread Message Multilabel Kn Match Code KM Kz Ku Kl KV? 3-2 Command Host Port Master Label Database Size New Master Pin Beeper Status Reader Output Operations Status Request Format <Kabaud,parity,stop bits,data bits> <Kymode,baud rate,parity,stop bits,data bits,daisy chain status, daisy chain ID> <Kbstatus> <Kfprotocol,address> <Kdstatus,preamble character(s)> <Kestatus,postamble character(s)> <KAtimeout setting> <KBtime interval> <Kcstatus> <KT?> <Kgmode,trigger filter time,single shot,multi-capture, # captures after trigger> <Kitrigger character> <KJtrigger variance mode> <Kjpolarity> <KItrigger source> <KGtrigger delay type,trigger delay time,number of delay pulses> <Khend of read cycle,timeout,max decode time> <Kkstatus,noread message> <KLnumber of labels,multilabel separator> <Kntype,sequential matching,match start position,match length,wild card character,sequence on noread,sequence on every mismatch> <KMnumber of master labels> <Kzstatus> <Kustatus> <Klbar code output,when to output> <KV?> Quadrus 2D Code Reader User’s Manual Table 3-1 Summary of Serial Configuration Commands (continued) Function K KQ Symbol Kv Output # 1 Kw Output # 2 KH Output # 3 KP Coordinate Data Status KO Quality Output KS Serial Verification Ko <KQstatus> <Konarrow margins status,symbology identifier status> <KW?> <KEstatus,start postion,length> <KKmode,polarity> <KCmode,polarity> <Kvoutput on,polarity,pulse width,output mode,trend analysis mode,trigger evaluation period,# to output on> <Kwoutput on,polarity,pulse width,output mode,trend analysis mode,trigger evaluation period,# to output on> <KHoutput on,polarity,pulse width,output mode,trend analysis mode,trigger evaluation period,# to output on> <KPstatus> <KO% cell damage,symbol contrast,total decode time,capture time,locate time,decode time,pixels per element,ECC level,symbol contrast,output separator> <KScommand echo status,command beep status,control/hex output> KX? Operation Command Output Format In/Out Status Request KR Internal Illumination <KRstatus,LED illumination time> KY External Illumination <KYstatus,source,strobe edge,pulse width> KZ Illumination Parameters Kx Image Settings <KZshutter time,AGC min,offset,AGC max.> <Kxthreshold type,quiet zone color,number of symbols to find,fixed threshold value,flag early out> KU Illumination Status Request K/ Illumination Format <K/command output format> <KX?> <KZ?> Quadrus 2D Code Reader User’s Manual 3-3 3–Serial Commands KE KK KC Data Matrix Narrow Margins/Symbology Identifier Code Types Status Request Partial Output Input # 1 Input # 2 KW? In/Out Command Chapter 3 About Serial Configuration Serial Configuration Command Format The format for a serial configuration command is, <Kparameterdata,data,...etc.><initializing command> Where: • Less than < and greater than > symbols are included as part of the commands. • “parameter,” as used here, are those character(s) that precede the data. • The “initializing command” <A> or <Z> is sent after configuration is complete. <Z> resets and saves for power up. <A> initializes the change to RAM. (For more information on additional resets and saves, see page 4-14.) 3–Serial Commands For example, to change Baud Rate and reset without saving changes for power-up, enter <Ka3><A>. Or, to enable UPC and save the change for power-on, enter <Ks1><Z>. When using serial configuration commands, note also the following conventions: • Parameters and data are “case sensitive.” That is, characters must be entered as upper or lower case, as specified. • All data fields (except the last) must be followed by a comma (without a space). • If there is no change in a given field, then commas can be entered alone, or with the existing data (for example, <Ka,,,0> or <Ka4,1,0,0>). • All fields preceding the modified field must be included. For example, in Host Port, to change Data Bits to Eight without changing any other field, enter either:<Ka,,,1> or <Ka4,1,0,1>. • All fields following the modified field can be left out. For example, in the RS-232 port, to change Baud Rate to 4800, enter <Ka3>. (See examples on following pages.) Concatenating Serial Commands Commands can be concatenated (added together) to a maximum of 64 characters in a single string or data block. Additional data blocks of 64 or less characters can be sent provided there is at least a 10 ms pause between blocks. For example, <Kc1><Kh1><Ko1><A> enables LRC, sets End of Read Cycle mode to New Trigger, enables Narrow Margins and resets the data buffers (without saving the changes for power-on). 3-4 Quadrus 2D Code Reader User’s Manual Serial Command Status Request The status of parameters can be requested by entering the command followed by a question mark. For example, enter <Ke?> to request the status of Postamble. Commands <KT?>, <KV?>,<KW?>,<KX?>, and <KU?> are used to request the status of groups of parameters (see table 3-1 on page 3-2). Loss of Communications Making changes to communications parameters such as Baud Rate, Parity, Stop Bits, LRC, etc. without corresponding changes in linked device(s) can result in the loss of communications. If this should occur, with power applied to the reader, default the reader by: 1. momentarily connecting pin 11 to ground (pin 17) until the beeper sounds, then 2. breaking the connection and within three seconds reconnecting. Caution: The reader will reset all standard configuration parameters. 3–Serial Commands Quadrus 2D Code Reader User’s Manual 3-5 Chapter 3 Communications Port Host Port Format: <Kabaud rate,parity,stop bits,data bits> baud rate: 1 = 1200 2 = 2400 3 = 4800 parity: 0 = None 1 = Even 2 = Odd data bits: 0 = Seven 1 = Eight 4 = 9600 5 = 19.2K 3–Serial Commands 6 = 38.4K 7 = 57.6K 8 = 115.2K stop bits: 0 = One 1 = Two Aux Port Format: <Kymode,baud rate,parity,stop bits,data bits,daisy chain status, daisy chain ID> mode: 0 = Disabled 1 = Transparent 2 = Half Duplex 3 = Full duplex baud rate: 1 = 1200 2 = 2400 3 = 4800 4 = 9600 4 = Daisy Chain 5 = 19.2K 5 = Command Processing 6 = 38.4K 7 = 57.6K data bits: 0 = Seven 1 = Eight daisy chain status 0 = Disabled 1 = Enabled parity: 0 = None 1 = Even 2 = Odd daisy chain ID 1 or 2 ASCII characters Host Port RS-422 Format: <Kbstatus> 0 = Disabled 1 = Enabled 3-6 stop bits 0 = One 1 = Two Quadrus 2D Code Reader User’s Manual Protocol Selected Protocol If selecting one of the options from 0 to 4 (Point-to-Point, Point-to-Point with RTS/CTS, Point-to-Point with XON/XOFF, Point-to-Point with RTS/CTS and XON/XOFF, or Polling Mode D), use this format: Format: <Kfprotocol> protocol: 0 = Point-to-Point 1 = Point-to-Point with XON/XOFF 3 = Point-to-Point with RTS/CTS and XON/XOFF 4 = Polling Mode D 5 = Multidrop (requires address) 6 = User Defined 7 = User Defined Multidrop If selecting Multidrop (5), you must define an address and append it to the command string. Format: <Kf5,address> protocol: 5 = Multidrop address: Any number from 1 to 50 To change the Protocol to Multidrop with an address of 33, enter <Kf5,33>. If selecting User Defined (6) or User Defined Multidrop (7), complete the format by either choosing new parameters or concatenating unchanged data fields (separate by commas). Note: For User Defined, first select Point-to-Point <Kf0> and then User Defined <Kf6...>. For user Defined Multidrop, first select Multidrop <Kf5>, then User Defined Multidrop <Kf7...>. Format: <Kfprotocol,RES,address,REQ,EOT,STX,ETX,ACK,NAK> protocol: 6 = User Defined; From Host: 0 = disabled 1 = enabled To select an unpolled ACK/NAK User Defined protocol with LRC disabled, enter <Kf0><Kf6,,,,,,,^F,^U><Kc0>. ACK and NAK will be displayed in the menu.<Kf0> nulls the address and <Kc0> disables LRC. Address, can be assigned any ASCII character except a null. Control characters are used to define RES through NAK (except Address).Table 3-1 lists the control characters Quadrus 2D Code Reader User’s Manual 3-7 3–Serial Commands To change the Protocol to Point-to-Point with XON/XOFF, enter <Kf2> Chapter 3 used for these data fields. (Refer to Table A-7, “ASCII Table with Control Characters,” on page A-12 for more information.) Format: <Kfprotocol,RES,address,REQ,EOT,STX,ETX,ACK,NAK> protocol: 7 = User Defined Multidrop To select an unpolled ACK/NAK User Defined protocol with LRC disabled, enter <Kf0><Kf6,,,,,,,^F,^U><Kc0>. <Kf0> nulls the address and <Kc0> disables LRC. ACK and NAK will be displayed in the menu. 1 Note: Address, can be assigned any ASCII character except a null. Control characters are used to define RES through NAK (except Address). Table 3-1 lists the control characters used for these data fields. (Refer to Table A-7, “ASCII Table with Control Characters,” on page A-12 for more information.) 3–Serial Commands Table 3-1 Protocol Commands Protocol Command (Mnemonic displayed on Microscan menu) Control Characters (Entered in menu or serial command) Effect of Command RES ^D Reset REQ ^E Request EOT ^D Reset STX ^B Start of Text ETX ^C End of Text ACK ^F Acknowledge NAK ^U Negative Acknowledge Preamble Format: <Kdstatus,preamble character(s)> status: 0 = Disabled 1 = Enabled preamble character(s): Enter one to four preamble characters Default is CR 1. A control character, although conventionally represented here and in the ASCII table on page A-12 as two characters (^F or ^U, etc.), is actually a single ASCII character that is entered on the keyboard by holding down the control key while pressing the desired letter. 3-8 Quadrus 2D Code Reader User’s Manual Postamble <Kestatus,postamble character(s)> status: 0 = Disabled 1 = Enabled postamble character(s): Enter one to four postamble characters Default is CR, LF Response Timeout Format: <KAtimeout setting> Any number from 0 to 255 in 10 ms increments Default is 4 (40 ms) Note: A zero creates an indefinite wait. Allows you to set the time the reader will wait before timing out if ACK, NAK, and ETX are enabled, and a host response is expected. Format: <KBtime interval> Any number from 0 to 255 in 1ms increments. Default is 0 Allows you to set the time interval in milliseconds between individual characters transmitted from the Quadrus™ to the host computer. Longitudinal Redundancy Check (LRC) Format: <Kcstatus> 0 = Disabled 1 = Enabled An error-checking routine that verifies the accuracy of transmissions. Communications/Protocol Status Request Format: <KT?> Returns status of each command in the group. Quadrus 2D Code Reader User’s Manual 3-9 3–Serial Commands Intercharacter Delay Chapter 3 Operations Trigger Format: <Kgmode,trigger filter time,single shot,multi-capture, # captures after trigger> mode: 0 = Continuous Read 1 = Continuous Read 1 Output 2 = External Level 3 = External Edge multi-capture: 0 = Disabled 1 = Enabled 4 = Serial Data 5 = Serial Data & Edge 3–Serial Commands single shot: 0 = Disabled 1 = Enabled trigger filter time: Any number between 0 - 65,535 Default is 217 # captures after trigger: Any number between 1 - 10 Default is 1 Mode Allows you to establish the type of trigger event that initiates or ends the read cycle. Trigger Filter Time Any number between 0 and 65,535 (3 seconds) in 46 µs increments. Allows you to set the duration of the trigger debounce time. Edge Single Shot When enabled the read cycle ends after a single captured image, whether or not it is successfully decoded. This is valid only if External Edge trigger is enabled. Multi-Capture If enabled, multiple captures can proceed from a single trigger. # of Captures after Trigger Number of captures that can occur after a trigger if Multi-Capture is enabled. 3-10 Quadrus 2D Code Reader User’s Manual Serial Trigger Character Format: <Kitrigger character> Default is ^] Allows you to define a single ASCII character as the host serial trigger character that initiates the read cycle. Trigger Variance Format: <KJtrigger variance mode> 0 = Fixed 1 = Auto Applies only if Two Triggers is selected. You can choose Fixed to apply the same Trigger Delay Time to each read cycle or you can choose Auto to have Quadrus™ compare subsequent edge triggers and automatically adjust Trigger Delay Time dynamically. (See Important Note under Trigger Source.) Format: <Kjtrigger polarity> 0 = Negative 1 = Positive Allows you to determine whether a positive or negative transition will initiate the read cycle. Trigger Source Format: <KItrigger source> 0 = One Trigger 1 = Two Trigger Allows you to select one or two trigger sources. Quadrus 2D Code Reader User’s Manual 3-11 3–Serial Commands Trigger Polarity Chapter 3 Trigger Delay Format: <KGtrigger delay type,trigger delay time,# pulses> trigger delay type: trigger delay time: # pulses: Any number from 0 to 65,535 Any number from 0 = Time (in 46 µs Increments) 0 to 255. 1 = Pulse Default is 0 Default is 0 If you select Time for the Trigger Delay Type, at the occurrence of an Edge trigger, the Quadrus™ will wait the designated time before the read cycle is activated. If you select Pulse, the Quadrus™ will wait the designated number of pulses before the read cycle is activated. Read Cycle 3–Serial Commands Format: <Khend of read cycle,timeout> end of read cycle: 0 = Timeout 1 = New Trigger 2 = Timeout & New Trigger timeout: Any number from 0 to 65,535 Default is 100 (in 10 ms Increments) Allows you select the conditions for ending the read cycle and the timeout duration, if a timeout is selected. Noread Message Format: <Kkstatus,noread message> status: 0 = Disabled 1 = Enabled noread message: Any ASCII string up to 7 digits. Default NOREAD Allows you to enable (or disable) and define the noread message. Multilabel Format: <KLnumber of labels,multilabel separator> number of labels: Any number between 1 and 6 Default is 1 multilabel separator: Any valid ASCII character Default is , Allows you to define the number of different labels that the reader will read during a single trigger event. The labels can be a mix of all enabled bar code symbologies and more than one label can be decoded per frame. 3-12 Quadrus 2D Code Reader User’s Manual Match Code Format: <Kntype,sequential matching,match start position,match length,wild card character,sequence on noread,sequence on every mismatch> type: 0 = Disabled 1 = Enabled 2 = Sequential match length: 1 to Max length of allowed. Default is 1a sequence on noread: 0 = Disabled 1 = Enabled wild card character: Any ASCII character Default is * sequence on every mismatch: 0 = Disabled 1 = Enabled 3 = Wild Card sequential matching: 0 = Increment 1 = Decrement match start position: 0 to Max length allowed. Default is 0a When set to other than Disabled, you can receive a master label into the reader’s memory to be compared with subsequently scanned labels. The results of this comparison determine the data display and output pulses, if enabled. Master Label Database Size Format: <KMnumber of master labels> You can select and define from 1 to 10 master labels with this command or by entering or reading in master labels directly in the Master Label dialogue box in “Master Label Data Base,” on page 4-12. New Master Pin Format: <Kzstatus> 0 = Disabled 1 = Enabled When Match code is enabled, enabling New Master Pin will allow you to momentarily connect the New Master Pin to ground. Quadrus 2D Code Reader User’s Manual 3-13 3–Serial Commands a. See “Master Label Data Base” on page 4-12 . Chapter 3 Reader Output Format: <Klbar code output,when to output> bar code output: 0 = Disabled 1 = Match 2 = Mismatch 3 = Good Read when to output: 0 = As soon as possible 1 = End of Read Cycle Allows you to choose whether or not to output a good decode (label data) or a noread to the host. When disabled, a label is decoded and the read cycle transpires as usual, but neither label data nor the noread message is transmitted to the host. The read cycle counters are updated, and the current number of good reads or noreads can be obtained via operational commands. Beeper Status 3–Serial Commands Format: <Kustatus> 0 = Disabled 1 = On Good 2 = On Noread 3-14 Quadrus 2D Code Reader User’s Manual Symbol Symbol Type Format: <KQECC 200 status,ECC 000 status,ECC 050 status,ECC 080 status, ECC 100 status,ECC 140 status> status: (for each of the six matrix symbols identified above) 0 = Disabled 1 = Enabled default is ECC 200 Narrow Margins/Symbology Identifier Format: <Konarrow margins status,symbology identifier> symbology identifier status: 0 = Disabled 1 = Enabled 3–Serial Commands narrow margins status (not used): 0 = Disabled 1 = Enabled If Symbology Identifier is enabled, it adds a prefix to the decoded data. Quadrus 2D Code Reader User’s Manual 3-15 Chapter 3 In/Out Allows you to choose the conditions that will allow the Quadrus™ to receive or output pulses and data to the host computer. Output Filter Format: <KEstatus,start position,length> status: 0 = Disabled 1 = Enabled start position: 1 to 1556 Default is 1 length: 1 to 1556 Default is 1556 Input # 1 3–Serial Commands Format: <KKmode,polarity> mode: 0 = Disabled 1 = Reset Counts 2 = Unlatch Output 3 = Set Trigger Delay polarity: 0 = Negative 1 = Positive Input #2 Format: <KCmode,polarity> Functions the same as Input # 1, except that mode 3 option is not available. Output # 1 Format: <Kvoutput on,polarity,pulse width,output mode trend analysis mode,trigger evaluation period,# to output on> output on: polarity: 0 = Mismatch or Noread 1 = Good Match 2 = Mismatch 0 = Negative 1 = Positive pulse width: Any number from 0 - 255 (in 10 ms incr.) Default is 5 3 = Noread 4 = Trend Analysis 3-16 Quadrus 2D Code Reader User’s Manual output mode: 0 = Pulse 1 = Latch Mode 1 (Unlatch Pin) 2 = Latch Mode 2 (Unlatch Opposite Condition) 3 = Latch Mode 3 (Unlatch Re-enter Read Cycle) trend analysis mode: 0 = Image Degradation 1 = Mismatch 2 = Noread trigger evaluation period: Any number from 0 - 255 Default is 0 # to output on: Any number from 0 - 255 Default is 0 Output On Allows you to determine the conditions under which a output pulse will be output (high or low depending on polarity) to the host connector. Mismatch or Noread. Sends a pulse when the label’s data does not match that of the master label, or the label is not decoded before the end of the read cycle. Good Match. Sends a pulse when the decoded label matches the master label. Noread. Sends a pulse when the label’s data is not decoded before the end of the read cycle. Trend Analysis. Sends a pulse when a trend analysis condition is met. Output Mode Pulse. Normal mode of operation. Pulled active when Output On condition is met and held active for the duration of the selected pulse width. Latch Mode 1. (Unlatch Pin) Pulled active when Output On condition is met and held active until either Input #1 or Input #2 sends a pulse to end the active state. Note: In order for this mode to work correctly, you must set either Input #1 or Input #2 to the correct polarity and set Input Function for Unlatch Output. Latch Mode 2. (Unlatch Opposite Condition) Pulled active when Output On condition is met and held active until the opposite condition of the selected Output On condition has been met. For example, if Noread is the selected Output On condition, the Programmable Output will be pulled active on a Noread condition and held active until a Good Read occurs. Latch Mode 3. (Unlatch Enter Read Cycle) Pulled active when the Output On condition is met and held active until the Read Cycle is re-entered. Polarity. Allows you to choose a positive or negative transition for the output pulse. Quadrus 2D Code Reader User’s Manual 3-17 3–Serial Commands Mismatch. Sends a pulse when the label’s data does not match that of the master label. Chapter 3 Trend Analysis Mode A pulse will be sent when the value entered for # To Output On has been reached within the trigger window selected in Trigger Evaluation Period. Note: Image Degradation is for future use and is not functional at this time. Output #2 Format: <Kwoutput on,polarity, pulse width,output mode trend analysis mode,trigger evaluation period, # to output on> Functions the same as Output # 1. Output #3 Format: <KHoutput on,polarity,pulse width,output mode, trend analysis mode, trig evaluation period,# to output on> 3–Serial Commands Functions the same as Output # 1. Quality Output Format: <KO% cell damage,symbol contrast,total decode time,capture time,locate time,decode time,pixels per element,ECC level,contrast method,output separator> % cell damage: 0 = Disabled 1 = Enabled symbol contrast: 0 = Disabled 1 = Enabled total decode time: 0 = Disabled 1 = Enabled capture time: 0 = Disabled 1 = Enabled locate time: 0 = Disabled 1 = Enabled decode time: 0 = Disabled 1 = Enabled pixels per element: 0 = Disabled 1 = Dark elements 2 = Light elements ECC level:* 0 = Disabled 1 = Enabled symbol contrast method: 0 = Compressed (dynamic read) 1 = Full Size (static read) 3 = Both elements output separator: any ASCII character default is SP (space) * ECC level is found in the Symbol menu. 3-18 Quadrus 2D Code Reader User’s Manual Serial Verification Note: This group of commands is not available in the ESP™ menus. Format: <KScommand echo status,serial command beep status,control/hex output> command echo status: 0 = Disabled 1 = Enabled serial command beep status: 0 = Disabled 1 = Enabled control/hex output: 0 = Control 1 = Hex Command Echo Status Serial Command Beep Status When enabled, the reader beeps once whenever a serial command is entered to indicate that the command was accepted and processed. If an invalid command is entered, the reader beeps five times to indicate an invalid entry. However, this does not necessarily mean that all data fields have been entered incorrectly. Only one bad field needs to be found in order to activate the five beep response. Control Hex Output Determines response to an Echo serial command or status request command. When set to Control, ASCII control character output is enabled. for example a carriage return would be output as ^M. When set to Hex, the output is the actual character, for example, a carriage return would be output as “D”. Quadrus 2D Code Reader User’s Manual 3-19 3–Serial Commands When enabled, serial configuration commands is processed and the new string for that command is echoed back to the host. If an invalid command is sent to the host, the reader will echo back the current setting of that command. For example, if the current Noread Message is “NOREAD” and <Kk1, NONSENSE> is entered, the reader will echo back <Kk1, NOREAD>. In this example the attempted entry “NONSENSE” exceeds the maximum allowable seven character. Therefore it is rejected and the current NOREAD message is echoed back and remains the Noread Message. It is important to note that if a command with multiple fields is processed, some of the fields may have been processed properly following an “invalid” command. These changes will be in the string echoed back so that you will know what did or did not change. Chapter 3 Illumination Internal Illumination Format: <KRstatus,LED illumination time> status: 0 = Disabled 1 = Enabled LED Illumination time: Any number between 0-65535 Default is 25641 (16.66 ms). (in 0.65 µs Increments) External Illumination 3–Serial Commands Format: <KYstatus,source,strobe edge,pulse width> status: 0 = Disabled 1 = Enabled source: 0 = Continuous 1 = Strobe strobe edge: 0 = Negative 1 = Positive Illumination Settings Format: <KZshutter time,contrast,offset,AGC max.> shutter time: contrast: offset: 0 = 1/60 Any number between 0-255 Any number between 0-255 1 = 1/125 Default 200 Default 150 2 = 1/250 3 = 1/500 4 = 1/1000 5 = 1/2000 6 = 1/4000 7 = 1/10,000 AGC maximum: Any number between 0-255 Default 255 Shutter Time. Shutter Time allows you to set shutter time down to 1/10,000 of a sec- ond. Note: If you adjust Shutter Time in the ESP™ Illumination menu, you can select even shorter times, down to 1/100,000. This is possible because the ESP™ adjusts LED Illumination Time to effectively achieve exposures consistent with shutter times less than 1/ 1000. Therefore it is recommended that you use Shutter Speed either here or in ESP™ to adjust exposure. 3-20 Quadrus 2D Code Reader User’s Manual Image Settings Format: <Kxthreshold type,quiet zone color,number of symbols to find,fixed threshold value,flag early out> threshold type: 0 = Adaptive 1 = Fixed quiet zone color: 0 = Black 1 = White number of symbols to find: Any number from 1-6 Default is 1 fixed threshold value: Any number from 0 to 255 Default is 125 flag early out: 0 = Disabled 1 = Enabled 3–Serial Commands Quadrus 2D Code Reader User’s Manual 3-21 3–Serial Commands Chapter 3 3-22 Quadrus 2D Code Reader User’s Manual Chapter Utilities 4 Chapter Contents Operational commands for the Quadrus™ reader can be entered as serial command strings or, in most cases, as menu selections via the Quadrus™ ESP™. This chapter includes both operational serial command strings and corresponding ESP™ commands. Quadrus 2D Code Reader User’s Manual 4-1 4–Utilities Read Rate............................................................................................ 4-5 Counters .............................................................................................. 4-6 Trigger.................................................................................................. 4-8 Master Label ...................................................................................... 4-10 Checksum/Part Number..................................................................... 4-13 Interface ............................................................................................. 4-14 Send................................................................................................... 4-17 Self Test............................................................................................. 4-19 Reader Status .................................................................................... 4-20 Imaging .............................................................................................. 4-21 Histogram........................................................................................... 4-22 Chapter 4 Summary of Serial Operational Commands Table 4-1 Summary of Serial Operational Commands Command Type Read Rate Counters Trigger 4–Utilities Master Label Checksum 4-2 ESP™ Cmd? Serial Command Name Enter Decodes/Second Read Rate Test Yes <C> Yes <Cp> Yes <J> Exit Read Rate Test Yes <O> Noread Counter Reset Yes <N> Noread Counter Request Yes <T> Trigger Counter Request Yes <U> Trigger Counter Reset Yes <V> Match Code/Good Read Counter Request Yes <W> Match Code/Good Read Counter Reset Yes <X> Mismatch Counter Request Yes <Y> Mismatch Counter Reset No <t...,...> Trigger Delay Number,Value No <t#?> Request Trigger Delay Value No <E> Enable Match Code No <F> Disable Match Code Yes <)XXXX)> Enter Percent Read Rate Test Send Master Label Yes <)> Request Master Label Data Yes <))> Delete Master Label Data Yes <G> Store Next Label Scanned as Master Label No <G...> Store Next Label Scanned as Master Label #___ Send Master Label # and Data No <M...,...> Yes <!> Display Checksum of application software Yes <#> Display Software Part Number Quadrus 2D Code Reader User’s Manual Table 4-1 Summary of Serial Operational Commands Command Type Interface (Outputs and Resets) Download Receive Status Imaging Histogram Matrix Serial Command Yes <L1> Output # 1 Pulse Yes <L2> Output # 2 Pulse Yes <L3> Output # 3 Pulse Yes <A> Reset Yes <Ad> Restore Default Operating Parameters No <An> Read Saved Operating Parameters Name No <Af> Read Saved Factory Settings Yes <Z> Save for Power-on No <Zd> Restore Default Operating Parameters & Save for Power-on No <Zp> Save Factory Settings Yes <Zf> Restore Factory Defaults & Save for Powerup Yes <d1> Send Application Code Yes <d3> Send Image File No <u1> Receive Active Image (659 x 494 pixels) No <u2> Receive Compressed Image (82 x 61 pixels) No <u3> Receive Entire CCD Image (780 x 517 pixels) No <?> No <?1> Request Software Status No <$> Self Test & Output Results No <c> Image Capture No <D1> Capture and Decode Image No <D2> Decode Current Image No <h1> Histogram Request No <h2> Histogram Statistics Request No <e> Number of Pixels per Element Request Reader Error Status 4–Utilities Self Test ESP™ Cmd? Most of the commands listed above can be also be accessed from the Utilities menu. Quadrus 2D Code Reader User’s Manual 4-3 Chapter 4 For your convenience, at the bottom of each utility menu, you will see a Options button which when clicked allow you to address specific scanners on a multidrop network. 4–Utilities Figure 4-1 Options 4-4 Quadrus 2D Code Reader User’s Manual Read Rate You can check the percentage read rate by accessing Read Rate from the Utilities pull down menu or clicking the Utilities button and Read Rate tab to see the following: Figure 4-2 Read Rate With a readable symbol in place and Percent enabled, click Start to see the read rate percentage. <C> Decodes/Second Read Rate Test Click on Decodes/Sec. under Single Label and click Start or send <C> to enter Decodes/Second Read Rate Test to output the decodes per second and label data (if any) for single labels. The Decodes/Second Read Rate Test processes 25 images and records the time required to do so. The decodes per second is then calculated from this value. <Cp> Percent Read Rate Test <J> Exit Read Rate Test Click on Stop or send <J> to end Decodes/Second Read Rate Test <C> or Percent Read Rate Test <Cp>. Quadrus 2D Code Reader User’s Manual 4-5 4–Utilities Click on Percent and click Start or send <Cp> to output the percentage of scans decoded and label data (if any). The Percent Read Rate Test processes 25 images and calculates the percentage of good decodes. Chapter 4 Counters You can request counter numbers or reset the counters by accessing Counters from the Utilities pull-down menu or by clicking the Utilities button and Counters tab to see the following: Figure 4-3 Counter The Xs in all counter commands denote a numeric value from 00000 to 65,535. After reaching the maximum numeric limit of 65,535, an error message will be displayed and the counter will automatically rollover and start counting again at 00000. To obtain the cumulative total of counts after the rollover has occurred, add 65,536 per each rollover (the reader does not keep track of the number of rollovers) to the current count. 4–Utilities Note: All counter values will be lost if you cycle power to the reader or send an <A> command. Clicking Reset for any counter will reset that counter to 0. Clicking Request for any counter will return the current number for that counter. <N> Noread Counter Request Clicking Request or sending serial command <N> displays the total number of noreads that have occurred since power-on or the last Noread Counter Reset command. <O> Noread Counter Reset Clicking Reset or sending serial command <O> sets Noread Counter to 00000. <T> Trigger Counter Request Clicking Request or sending serial command <T> displays the total number of triggers since power-on or the last Trigger Counter Reset command. 4-6 Quadrus 2D Code Reader User’s Manual <U> Trigger Counter Reset Clicking Reset or serial command <U> sets the trigger counter to 00000. <V> Match Code/Good Read Counter Request Clicking Request or sending serial command <V> displays the total number of good reads matching the master label or, if Match Code is not enabled, the number of good reads since power-on or the last Match Counter Reset command. This counter is always enabled, but will only work as a match count when Match Code is enabled. If Match Code is not enabled, this counter records the number of good reads. This count can be requested at any time. <W> Match Code/Good Read Counter Reset Clicking Reset or sending serial command <W> sets the Match Counter to 00000. <X> Mismatch Counter Request Clicking Request or sending serial command <X> displays the message the number of labels successfully read that do not match the master label since power-on or the last Mismatch Counter command. <Y> Mismatch Counter Reset Clicking Reset or sending serial command <Y> sets the Mismatch Counter to zero. 4–Utilities Quadrus 2D Code Reader User’s Manual 4-7 Chapter 4 Trigger A serial trigger initiates a read cycle in the reader. It is useful testing the reader in a triggered mode. You can select, set up, and send serial trigger characters by accessing Trigger from the Utilities pull-down menu or by clicking the Utilities button and the Trigger tab to see the following: 4–Utilities Figure 4-4 Serial Trigger Character Setup Clicking SETUP loads the current serial trigger character. Send Clicking Send sends a trigger character to the reader. Note: The trigger character can also be defined by serial configuration command as <Ki...> (see “Serial Trigger Character ” on page 3-11). <t...> Multiple Trigger Delays Format: <ttrigger delay # [1 to 10], trigger delay value [0 - 65,535 in 46 µs incr.]> You can enter the trigger delays for the multiple triggers from a single trigger event mode of operation. You enter the trigger delay number, followed by a trigger delay value. The multiple triggers from a single trigger mode functions as follows: 4-8 Quadrus 2D Code Reader User’s Manual The multiple triggers from a single trigger mode functions as follows: 1st Trigger Delay = Normal Trigger delay set up using the <KG> command. 2nd Trigger Delay = Multiple trigger delay set up using the <t1,XXXXX> command. 3rd Trigger Delay = Multiple trigger delay set up using the <t2,XXXXX> command. 4th Trigger Delay = Multiple trigger delay set up using the <t3,XXXXX> command. 5th Trigger Delay = Multiple trigger delay set up using the <t4,XXXXX> command. 6th Trigger Delay = Multiple trigger delay set up using the <t5,XXXXX> command. 7th Trigger Delay = Multiple trigger delay set up using the <t6,XXXXX> command. 8th Trigger Delay = Multiple trigger delay set up using the <t7,XXXXX> command. 9th Trigger Delay = Multiple trigger delay set up using the <t8,XXXXX> command. 10th Trigger Delay = Multiple trigger delay set up using the <t9,XXXXX> command. 11th Trigger Delay = Multiple trigger delay set up using the <t10,XXXXX> command. <t#?> Request Trigger Delay Value You can request the trigger delay value for any trigger by entering a question mark (?) immediately following the trigger delay number. For example, if you wanted the trigger delay value for the 5th trigger delay, enter <t5?>. If a value of 3500 had been entered, the Quadrus™ would return <t5/X3500>. If no value had been assigned, it would return <t5/0>. Note: Trigger Delay Value is returned in brackets with a forward slash regardless of the status of Operation Command Output Format. 4–Utilities Quadrus 2D Code Reader User’s Manual 4-9 Chapter 4 Master Label Note: Match code operations are intended for use when the reader is in a triggered mode, that is with an external or serial trigger enabled. If Match Code is enabled while the reader is in Continuous Read, the reader defaults to Continuous Read 1 Output and label data must change before the reader will output data again,unless a timeout, if enabled, occurs. When a master label has been defined, scanned labels are compared with the master label and under certain conditions relay driver signals may be output and internal counters advanced. 4–Utilities You can set up master label functions by accessing Master Labels from the Utilities pull down menu or clicking the Utilities button and Master Label tab to see the following: Figure 4-5 Master Label Commands <E> Enable Match Code You can enable Match Code by clicking Setup in MENU\Operations or by sending <E>. This allows you to subsequently enter a master label and begin comparing labels against the master label.1 You can also enable Match Code (if not enabled) anytime you click the Program button in any of the 10 Master Label text blocks. You will see the following message: 1. If no master label is entered following the Enable Master Label, every subsequent decoded label will be a “mismatch” and will increment the mismatch counter by one. 4-10 Quadrus 2D Code Reader User’s Manual <F> Disable Match Code You can disable match code by clicking Disable in MENU\Operations\Match Code Type or by sending an <E> command. After enabling Match Code, a master label can be sent to the reader by entering the master label data by keystroke (SEND) or by instructing the reader to load the next label scanned as the master label (NEXT LABEL/MASTER). <)XXXX)> Send Master Label Data Typing in data into the first master label text block of the Master Label dialogue (figure 4-5) and clicking Send Text or sending a serial command <)XXXX)> (with data in place of the Xs) sends master label information as Master Label #1 in the master label data base from the host or a terminal. Master label information can be sent at any time and saved in nonvolatile memory with a <Z> command. A stored master label will not affect standard operations unless Match Code is enabled. The Xs denote alphanumeric data. <)> Request Master Label Data Clicking Setup in the Master Label dialogue (figure 4-5) or sending serial command <)> immediately sends master label #1 data to the host. Note: If Operation Command Output Format is set for Bracketed, the data from the reader will be returned with brackets and forward slash, such as <)/XXXX>. Note: If the master label information has previously been stored in nonvolatile memory (by a <Z> command), cycling the power will restore that information. <G> Store Next Label Scanned as Master Label With Serial Data or External Edge enabled, clicking Setup followed by Program under the #1 master label text block in the Master Label dialogue, or sending serial command <G> causes the reader to read the next bar code label scanned as the master label #1and all subsequently decoded labels are compared against the new master label data. (See “Multilabel” on page 3-12.) Master label # can be any number from 1 to 10. For example if <G5> is entered the next label read will be saved as master Label #5. Quadrus 2D Code Reader User’s Manual 4-11 4–Utilities <))> Delete Master Label Data Selecting and deleting the data on data line 1 in the Master Label dialogue (figure 4-5) or sending serial command <))> deletes master label #1. Chapter 4 Master Label Data Base All match code operations, except sequential, utilize up to 10 labels that can be saved to non-volatile memory for access on power on. It is important to note that changing the number of master labels in the data base changes the maximum length for each master label due to a fixed data base size. The maximum characters per each master label as the numbers change, as can be seen in table 4-2 or in figure 4-5. Max. # of Chars. per Label: XXX is updated as you change the total number of master labels. Table 4-2 Maximum Characters Master Label Number Maximum Characters #1 2048 #2 1024 #3 682 #4 512 #5 409 #6 341 #7 292 #8 256 #9 227 #10 204 You can send up to 10 master labels to the master label data base by using this command or by using the Master Label dialogue (figure 4-5) by clicking Serial Data or External Edge and clicking Program for each master label that you want to add. <G...> Store Next Label Scanned as Master Label #____ Allows you to assign a master label number (1 through 10) for the next label you are scanning. <M...,...> Send Master Label Information Clicking OK or entering <Mmaster label #,master label data> 1 4–Utilities <M...?> Request Master Label Data You can request master label information about a specific master label by following the master label # with a question mark. For example, to request data for master label #5, enter <M5?>. Quadrus™ will display master label #5 data in brackets. If no master label data is present then the label number <M5> (or <M/5> if Operation Command Output Format is enabled) would be displayed without label data. <M...,> Delete Master Label Data You can delete specific master labels. For example, to delete master label # 5, enter <M5,>. The blank master label data field following the comma tells the reader to delete the indicated master label from the data base. 1. You can set up your number of master labels by configuration command “Master Label Database Size ” on page 3-13; it will only allow the user Master Labels up to the number of master labels available. So, if the number of master labels has been set to 5, then this command will not allow you to enter a master label # (index) above 5. 4-12 Quadrus 2D Code Reader User’s Manual Checksum/Part Number You can request the software part # or check sum figures by accessing Checksum from the Utilities pull down menu or clicking theUtilities button and Checksum tab to see the following: Figure 4-6 Checksum/Part Number <#> Part Number Request Command Clicking Part # or sending <#> displays the software part number as 35-XXXXXX-XX, or as <#/35-XXXXXX-XX> if Operation Command Output Format is enabled. <!> Check Sum Request Command Clicking Checksum or sending <!> returns a four-digit hex number (specific to a given software version) used to verify a reader’s software. 4–Utilities Quadrus 2D Code Reader User’s Manual 4-13 Chapter 4 Interface You can control pulses and perform resets by accessing Interface from the Utilities pulldown menu or by clicking the Utilities button and the Interface tab to see the following: Figure 4-7 Interface Software Reset 4–Utilities Caution: Record all data that you wish to save prior to sending these commands. A reset will cause the numeric counters in use to lose their count. For your convenience certain factory settings (Shutter Time, Offset, Contrast, and AGC Max) are saved apart from all other operating parameters. You can define and save your own set of factory settings as “Saved Factory Settings” or recall “Factory Defaults,” those set in the factory and not changeable, at any time. In the following diagrams the oval RAM box represents volatile memory and the rectangular boxes, non-volatile memory. The two rectangles on the right hold the special factory settings, those on the left apply to all other parameters. The following are accessed in Utilities/Interface menu under Software Reset: <A> Reset Clicking Reset in the Interface menu or sending serial command <A> resets all configuration commands in RAM and resets all counters and operating parameters. <A> Saved Factory Settings Saved Parameters RAM Default Parameters 4-14 Initialize Quadrus 2D Code Reader User’s Manual Factory Defaults <Ad> Restore Default Operating Parameters Sending serial command <Ad> performs an <A> reset and copies default parameters (except factory settings) to RAM. <Ad> Initialize Saved Factory Settings Saved Parameters RAM Factory Defaults Default Parameters <An> Restore Saved Settings Clicking on Restore Saved Settings in the Interface menu or Sending serial command <An> performs an <A> reset and copies saved parameters to RAM. <An> Initialize Saved Factory Settings Saved Parameters RAM Factory Defaults Default Parameters <Af> Read Saved Factory Settings Sending serial command <Af> performs an <A> reset and copies saved factory settings to RAM. <Af> Initialize Saved Factory Settings Saved Parameters RAM Factory Defaults Default Parameters <Z> Reset/Save <Z> Initialize Saved Factory Settings Saved Parameters RAM Default Parameters Quadrus 2D Code Reader User’s Manual Factory Defaults 4-15 4–Utilities Clicking Reset/Save in the Interface menu or sending serial command <Z>, performs an <A> reset and saves parameters (except factory settings) to non-volatile memory for power on. Chapter 4 <Zd> Restore Default Operating Parameters/ Save for Power-on Clicking Default in the Interface menu or sending serial command <Zd> performs an <A> reset, restores default parameters, and saves them (except factory settings) to non-volatile memory for power on. <Zp> Save Factory Settings Sending serial command <Zp> performs an <A> reset and saves ONLY factory settings to non-volatile memory for power on. <Zd> Initialize Saved Factory Settings Saved Parameters RAM Factory Defaults Default Parameters <Zp> Initialize Saved Factory Settings Saved Parameters RAM Factory Defaults Default Parameters <Zf> Restore Factory Defaults & Save for Power-on Sending serial command <Zf>, performs an <A> reset, copies special factory defaults to RAM, and saves ONLY the factory settings for power-on. Outputs <Zf> Initialize Saved Factory Settings Saved Parameters RAM Default Parameters Factory Defaults 4–Utilities <L1> Output # 1 Pulse Clicking Output # 1 Pulse or sending serial command <L1> sends a pulse to pin 6 (at any time regardless of Match Code or Output # 1 Driver status). <L2> Output # 2 Pulse Clicking Output # 2 Pulse or sending serial command <L2> sends a pulse to pin 8 (at any time regardless of Match Code or Output # 2 Driver status). <L3> Output # 3 Pulse Clicking Output # 3 Pulse or sending serial command <L3> sends a pulse to pin 15 (at any time regardless of Match Code or Output # 3 Driver status). 4-16 Quadrus 2D Code Reader User’s Manual Download You can select and send image files or application code by serial command or by accessing Send from the Utilities pull-down menu or by clicking the Utilities button and the Send tab. Send Application Code Caution: Do not update the ap code unless you are certain the .hex file is the correct file for your application and compatible with your ESP™. If you need to update your application code, use the <d1> serial command, or 1. Click Send Application Code button and use the dialog box to locate the “ap” code file (ending in .hex). 2. Click OK. You should see a solid bar moving across the menu and a message below, as shown in figure 4-8. 3. Be sure to wait for the beep. Immediately after receiving the Send command, a switch to 8 bit data length (if not already present) must be made for serial communication. The answer from the reader will be ACK (in 8 bit data length). The following format will then be sent to your reader: <length indicator(4 bytes), data (binary), CRC (4 bytes)> Length Indicator A 4 Byte binary value indicating the length of the binary data file to be sent, most significant byte first. A maximum length of 65,535 can be sent (Length = 0xFFFF). Note that the length does not include the check sum. Quadrus 2D Code Reader User’s Manual 4-17 4–Utilities Figure 4-8 Download Chapter 4 Data 8 bit binary data, either an image file or code. CRC Cyclical Redundancy Check. A 32 bit string of the length value and binary data file received. If the Receive was successful the reader will respond with an ACK, otherwise a NAK will be transmitted. Afterwards the communications will return to the previous data bit length. Current status and response messages are displayed in the Message Box. Send Image File Click Send Image File or send <d3> to bring up a browse box from which you select an image that is automatically sent to the reader upon selection. Send Boot Code 4–Utilities Click Send Boot Code or send <d2> to send a boot code to program the in-circuit flash memory in the reader. A dialogue box appears that prompts you for a password and upon entry, a horizontal bar shows transfer progress. 4-18 Quadrus 2D Code Reader User’s Manual Self Test <$> Self Test Command Instructs reader to run self test and output results. 4–Utilities Quadrus 2D Code Reader User’s Manual 4-19 Chapter 4 Reader Status <?> Request Reader Error Status Displays certain operating parameters. After sending <?>, the reader immediately responds with <XX>, where “XX” is a two character ASCII hex value. The hex characters offer a “shorthand” code for displaying status. Table 4-3 Hex Value to Binary Conversion To interpret the reader’s code, follow this example: Hex Value Digits 1. You send a <?> command to Quadrus™. 2. It responds with an ASCII hex value of 82. 3. Refer to table 4-3 to find the Hex value’s binary conversion. 4. For example, the binary bit digits for 8 is 1000 and the binary bit digits for 2 is 0010. Hence, the binary conversion of 82 is 10000010. 5. Next plug in these numbers into the Bin. Code column of table 4-4. Note: You do this “backwards.” That is, from the bottom up, the first binary digit with the last bit. 6. The binary zero indicated a zero status (not enabled), the 1 next to Command Received indicates that the Command Received flag is set. 3 2 1 0 0 1 2 3 4 5 6 7 8 9 A B C D E F 0 0 0 0 0 0 0 0 1 1 1 1 1 1 1 1 0 0 0 0 1 1 1 1 0 0 0 0 1 1 1 1 0 0 1 1 0 0 1 1 0 0 1 1 0 0 1 1 0 1 0 1 0 1 0 1 0 1 0 1 0 1 0 1 0 Command error detected 0 1 Command received 1 2 Communication error detected 0 <?1> Request Software Status 3 Flash sector unprotect failure 0 4 Host/Aux port buffer overflow 0 5 Reader is in a Read cycle 0 6 Watch dog reset 0 7 Parity (0=enabled, 1=disabled) 1 Bit 4–Utilities 7 6 5 4 Table 4-4 shows status byte and the meaning of the individual bits (the bin. digits are only entered as part of the above example): Table 4-4 Reader Status from Binary Code 4-20 Binary Bit Digits Reader Status Bin. digit Returns the following in this order: status byte, part-number, Flash checksum, current RAM parameter checksum, and Flash parameter checksum. The status byte is output with brackets around it and the rest of the data is comma delimited with brackets around the packet. Quadrus 2D Code Reader User’s Manual Imaging You can choose to capture an image and decode, or decode the current image generated from image processing. <D1> Capture Image and Decode You first enable the coordinate data output by sending <KP1>. After decoding, the reader outputs the following: <number of objects,coordinate data,decode status,length of decoded data, decode data>. The following example represents two objects with one successful decode: <002,040,050,100,100,025,020,010,010,000,040,023,030,100, 125,120,110,030,001,014,ABCD1234000127> The bold values represent, in order: Number of Objects, Noread, and Good Read. Number of objects. Three digit output indicating the number of objects in the field of view. For example, if there are 2 objects in the field of view, as in the above example, it will output as “002”. Coordinate Data This field outputs the x, y pixel coordinates from top left, top right, bottom left, and bottom right corners of each object, in that order. Each x and y coordinate is represented by three digits and there should be eight fields for each object, separated by commas. Decode Status Decode status. A “000” represents no decode and a “001” represents a successful decode. Length of each decoded label fields (maximum of 6 fields). In the above example the decoded data has a field length of 14 which is represented as “014”. Decode Data Decode data for each object that is successfully decoded. In the above example the decoded data is “ABCD1234000127”. <D2> Decode Current Image Similar to Decode command in Evaluation dialog. Decodes the current image in memory and output either the label data or a NOREAD message. Note, if coordinate data output is enabled, with <KP1>, then the data will be output in the above format; otherwise just the label data or Noread message will Quadrus 2D Code Reader User’s Manual 4-21 4–Utilities Length of Decoded Data Chapter 4 be output. <c> Image Capture Command Similar to Capture command in Evaluation dialog. Captures the image in the field of view. Histogram <h1> <h3> Histogram Request Command Similar to Histogram command in Calibration dialog. Allows you to define specific areas of an image for evaluation by providing coordinates in ASCII format. Format is returned as follows: <h1point1.x,point1.y,point2.x,point2.y,point3.x,point3.y,point4.x, point4.y> or <h3point1.x,point1.y,point2.x,point2.y,point3.x,point3.y,point4.x, point4.y> The coordinates, in ASCII format, are top left to bottom right corner. The Quadrus™ then calculates the histogram from the compressed data that resides inside of these coordinates. Use <h3...> format for ASCII return. Use <h1...> format for 8 bit data communications in binary format <h2> Histogram Statistics Request Command The Quadrus™ returns the statistics in this format: <h2Mean,Median,Variance,Min,Max,Low Peak,High Peak> 4–Utilities The statistics data is returned in ASCII decimal format. Matrix <e> Number of Pixels per element Command Outputs the number of pixels per element for current bar code as XX or if Operation Command Output Format is enabled, as <e/XX>. 4-22 Quadrus 2D Code Reader User’s Manual Chapter 5 Calibration Chapter Contents Locate Label ....................................................................................... 5-2 Illuminate ............................................................................................. 5-3 Auto Calibration .................................................................................. 5-4 Dynamic Setup .................................................................................. 5-13 For many 2D labels, particularly where symbols have low contrast between light and dark elements, you will not achieve the best decode rate without some manual adjustments of the Illumination parameters: Shutter Time, Offset, Threshold, and Contrast. You can adjust these experimentally and by analyzing Quality Outputs, histograms, and line scans. Calibration is done first statically with a stationary label, and then dynamically, with labels in motion. Calibration Tips Quadrus 2D Code Reader User’s Manual 5–Calibration • Always check the distance from the reader to the label. It should be 2” for UHD model and 4” for high density, and 5” for low density Quadrus™ readers. • Make certain your reader is angled at least 15° relative to a perpendicular from the label. • Shorten shutter time for faster moving labels; increase it for slower moving labels. • Ensure that the threshold is close to midway between histogram curves or use Adaptive threshold. • Adjust so that histogram curves are widely spaced. • Make experimental adjustments in small increments, generally no more than 5 at a time. • Try to balance dark and light pixel per element values. • Keep a running log of Illumination and Quality Output settings, read rates, and decodes per second and always save settings you may want to revisit. 5-1 Chapter 5 Locate Label Refer to the start-up steps in Chapter 1, “Quick Start.” 1. Place a test label in front of the Quadrus™ at the correct distance with at least 15° pitch. 2. From the main menu click the CALIBRATION tab to open the Calibration menu. 3. Click the LOCATOR tab. Quadrus™ begins capturing images and searching for symbols. When it finds an object that satisfies Quadrus™’ criteria for a symbol, Quadrus™ displays it in the Locator window as an polygon outline, red if an extraneous object or an undecoded label, green if a successfully decoded label. This is measured by the purple bar at the bottom of the image, which in this case is at the 100% read rate mark. 4. At this point you may need to reposition your label or reader Figure 5-1 Calibration to center the image while maintaining the correct distance, and achieving the maximum read rate. 5. Check Overlay to see a current screen image of the label similar to the image you see in Illumination. 5–Calibration Note: Check Mirror to reverse the image to make the screen object movements congruent with your label movements relative to the reader. Note: Under Serial Trigger, you should use the default Continuous to repeat captures without timing out. Check One Shot to check daisy chain input or data from an auxiliary port. If you select Continuous you can see a graphical representation of the percentage read rate in the Read Rate bar at the bottom of the menu. 5-2 Quadrus 2D Code Reader User’s Manual Illuminate The Illuminate dialog allows you view the symbol on screen, adjust parameters and immediately review the changes to the image. 1. Illuminate dialog by clicking the ILLUMINATE tab. 2. Click Send to display the image. (figure 5-2).1 Note: A blurry image may indicate that the symbol is not at the correct focal length from the reader; however, since this is a compressed version of the image that Quadrus™ has captured, it may give an erroneous indication of an out-of-focus condition. See "Image Flow” on page 6-4 for instructions on receiving a full resolution image from Quadrus™. Histogram To generate a histogram for the first time, place the tip of your mouse pointer on the image and double click. Subsequently you just click the Histogram button or the Image button to toggle back and forth. You can also click the Statistics button to see associated histogram data. See sample symbol Figure 5-2 Typical Overlay Image 5–Calibration 1. You only need click the Send button the first time to generate an image. After this you make adjustments to either Shutter Time, Offset, Threshold, or Contrast and an updated image is automatically generated. Quadrus 2D Code Reader User’s Manual 5-3 Chapter 5 Auto Calibration If—when in the Illuminate dialog (under Calibration)—you click Auto Cal, a dialog like the one in figure 5-3 will appear which lets you set the shutter time or allow the Auto Calibrate routine to calculate it for you by clicking Calculate. In general, the faster the application (or line speed), the shorter the shutter time. However it is recommended that you click Calculate. If you click Calculate, you will see a dialog like the one in figure 5-4. Enter the Density Type of your model. Figure 5-3 Auto Calibrate Note: The FIS number on your Quadrus’ label will identify your model type by its ending: -UHD is “Ultra High” density, -HD is “High” density, -LD is “Low” density, etc. Click OK to set label speed (figure 5-5). Enter your label speed in inches per second (2.54 cm/inch for conversion). Figure 5-4 Scanner Density Click OK and OK. The Quadrus will go through several iterations before picking the optimum settings for your application. Data Base Figure 5-5 Label Speed 5–Calibration If you click Data Base, an IP (image processing) data base dialog is opened, such as seen in figure 5-4. 5-4 Quadrus 2D Code Reader User’s Manual Figure 5-6 IP Data Base The IP Data Base allows you setup and store a data base with up to 20 different IP (Image Processing) settings for various combinations of symbols and conditions. Clicking the chevrons >> or << at the bottom of the dialog will advance or return you to the next group of 5 settings. Notice that your current settings are displayed in the block at the top of the dialog. If you click Load Current IP, you will see the current settings being applied to the first data base row 1. Each time you click Load Current IP, your current settings are applied to data base row 1 and all data base row settings shift down one so that row 2 now has row 1’s settings, and so forth on down to the last row whose earlier settings are discarded. In operation, the Quadrus reads the current settings first. If successfully decoded, it will output the data; if not, it continues on, using the settings from data base row 1, then 2, and so on until the number of settings enabled is reached. When a settings row successfully decodes the symbol, it is moved to Current Settings and the current settings shift down to #1. The settings from #1 drop down into #2, and so forth until all the rows enabled by # of Settings are updated. In this manner, the last successful settings are always applied first. When you are in Calibration mode—doing Locator, Illuminate, or Dynamic—you will need to click Active in Calibration after you set # Of Settings in order to have Quadrus cycle through the data base. Quadrus 2D Code Reader User’s Manual 5-5 5–Calibration For each row of settings you will need to click Send IP [#] to save these settings to Quadrus. Or you can click Send All to send all settings to the reader at once. Chapter 5 Manual Settings You can also make adjustments manually while in the Illuminated dialog to Shutter TIme, Contrast, and Background (explained in Symbol menu) and, by clicking More Settings, you can also set Background Offset and Threshold Type. At the core of image decoding, each pixel on the Quadrus™ CCD receives a quantity of light that must be designated light or dark. The distribution of these pixels can be understood graphically by histograms. See Figure 5-8, “Illumination Adjustment Flow,” on page 5-8 for sequence of adjustment for static labels. Shutter Time Default: 1/500 Options: 1/60, 1/125, 1/ 250, 1/500, 1/1000, 1/2000, 1/4000, 1/10K, 1/20K, 1/50K, and 1/100K. The duration that light is received by the reader, similar to the shutter speed of a conventional camera. When shutter time is shortened, less light is absorbed and more pixel values appear on the dark side of the histogram. (For shutter times 1/ 20K or less, exposure time is controlled by the LED or external illumination duration.) In general, you increase shutter time to lighten the image. However, for moving labels, too long of a shutter time can cause blurring (see "Adjust Shutter Speed” on page 5-14). Contrast Default: 200 Options: 0 to 255 Controls the photo-sensitivity of Quadrus™. Similar to Offset in that higher values lighten the image and vice versa, but all changes are amplified. (In terms of histograms, increasing contrast expands pixel values to the right by a multiplier affect.) Increase contrast when contrast is low (pixels values tightly clustered to the left). Find the upper and lower range of Contrast and set at the midpoint. 5–Calibration Background Default: 200 Options: 0 to 255 If the finder pattern is White (or light, relative the background), the background color should be set to Black. The terms Black and White are relative and you should think in terms of lighter or darker. 5-6 Quadrus 2D Code Reader User’s Manual Background Offset Default: Medium Options: Medium (100), Light (150), Dark (50), and Custom (0-255) Controls overall darkness/lightness. Increasing Offset lightens the overall image and vice versa. (In terms of histograms, pixel values are changed as an additive affect.) The Find the upper and lower range of Offset and set at the midpoint. Threshold Default: Adaptive Options: Adaptive, Fixed (1-255) Figure 5-7 More Settings The dividing line between dark and light pixels is represented in Quadrus™ histograms as a vertical dashed line. Threshold should be midway between light and dark pixel clusters. Significant shifts in threshold can make decoding difficult or impossible. If using Fixed Threshold, find the upper and lower range of Threshold and set at the midpoint. 5–Calibration Quadrus 2D Code Reader User’s Manual 5-7 Chapter 5 Start here View image in Illumination mode Decrease Contrast and/or Background Offset settings Increase Contrast and /or Background Offset Too dark Too light Is symbol outlined in red or green? No Is image too dark, or too light? Neither Yes Check other limits (symbol size, contrast, etc.) and start over Double click on image to view Histogram Th res ho ld Does Histogram shape look ideal ? Adaptive? Yes Yes No No Find decode limits for Threshold setting, and set to middle value 5–Calibration Ligh t D ar k Saturated light (or dark): adjust offset Low contrast: Adjust contrast Check Quality Outputs D ar k Lig ht D ark Figure 5-8 Illumination Adjustment Flow 5-8 Quadrus 2D Code Reader User’s Manual Lig ht Sample Symbol # 1, Thermal With a black on white background thermal label, and Using factory defaults, that is, loading an untitled file in ESP™, we did the following: 1. Performed a Locate Label, positioned label, and obtained a 100% read rate. 2. Generated a crisp image in Illumination (figure 5-9). Figure 5-9 Thermal Label Image 3. Generated a histogram that had well-separated light/dark distribution (figure 5-10). 4. Generated a Quality Output reading of 0 121 186 14 15 (table 5-1). Quadrus 2D Code Reader User’s Manual 5–Calibration Figure 5-10 Thermal Label Histogram 5-9 Chapter 5 With a zero cell damage rate, and a close balance between dark and light ratios of Pixels per Element (14/15), and 100% read rate, there seemed to be little reason to try to improve on these readings. Sample # 2, Laser Etch Table 5-1 Quality Outputs Label data Total Pixels % Cell Symbol Decode per Damage Contrast Time Element 0123456789abcdefg 0 121 186 14 15 5–Calibration For this example, we used a gold on green background, laser etched label, and a new default ESP™ file. dark pixels light pixels 1. First we selected the Image menu and reversed the background to black (since the green background appeared darker than the etched gold). 2. Then we ran a test image (in Illumination). The result was almost black. 3. To compensate, we doubled the shutter time (from 1/500 to 1/250). 4. Next we increased the contrast to lighten the image. At a value of 210 a green outline appeared around the image, indicating good reads. 5. We continued to increase the contrast until the outlines turned red (at 234). 6. We split the difference and pegged the contrast at 222 (see figure 5-11). 7. Next we checked the histogram (this looked good) and the Quality Outputs. These were 0 139 208 15 9. 8. The 15 9 indicated a disproportionate white to black pixel ratio and the 208 was slightly above our target of 200 ms to give us our five scans per second. 9. We lowered the offset to 80. This darkened the image and the resulting Quality Outputs was an acceptable 198 for total decode time and dark to light numbers of 14 and 9, a slight improvement. Figure 5-11 Adjusted Laser Etch Image 10. The resulting read rate was 100% and the decodes per second was five, both satisfactory for our purposes. 5-10 Quadrus 2D Code Reader User’s Manual Quality Output Analysis — Label # 3, ink jet This symbol was printed on the top of a milk cap, black with a light purple background. 1. After locating the image, we clicked Illumination, then Send, we got a dark image that was only reading at 89% read rate. (figure 5-12). Figure 5-12 Dark Image Figure 5-13 Label #3 Histogram 2. When a histogram was generated, the curves were very close together (figure 5-13). So we increased contrast to spread the curves, and decreased offset to lower the brightness. 3. Because of extraneous objects and low contrast inherent in the label, the threshold was not holding from image to image. Therefore we unchecked the Auto Threshold Adjust and set threshold at 70. 4. We succeeded in enhancing the separation by intensifying contrast while bringing down the offset. 5. The result was a histogram that while separated, had too much “noise” and little or no distinction between the light and dark curves. 6. The approach we took was to double shutter time to 1/125 (this brightened the image), compensate for this by decreasing contrast, and increase offset accordingly. Finally, we allowed threshold to float automatically to 134. 8. This worked! The new image was crisp (figure 5-14) and the histogram curves, while low, were wide apart and distinct (figure 5-15). The Quality numbers went to 2 126 158 14 16, all acceptable. Most importantly, the read rate rose to 100%. Quadrus 2D Code Reader User’s Manual 5-11 5–Calibration 7. Chapter 5 Summary Figure 5-14 Adjusted Image Figure 5-15 Adjusted Histogram Quadrus™’ robust features make the task of adjusting Illumination parameters both challenging and rewarding. Once again, you can experiment with Illumination parameters by increasing contrast to widen those curves, decreasing offset to lower the overall brightness, holding threshold in one place while you work the other parameters, allowing it to float only when your histogram, quality outputs, and/or read rate have been established. Remember to double-click the image outline to generate a histogram. See Calibration Tips at the beginning of this chapter. 5–Calibration You can further analyze and improve read rates by capturing full images and analyzing line scans with advanced features described in Chapter 6, “Evaluation.” 5-12 Quadrus 2D Code Reader User’s Manual Dynamic Setup After you’ve calibrated your static symbol in “LOCATOR” and “ILLUMINATE,” you can use Dynamic Setup to configure your application for moving symbol applications. Trigger Delay Settings (Constant Speed) The Quadrus™ can capture up to 11 images per trigger, provided you set up the timing for each. When you click Dynamic Setup, the dynamic parameters appear and a symbol outline appears in the Calibration window so you can tell immediately if your image capture is timed correctly. To setup: 1. Enter the number of image captures in Capture #. This is the number of images the Quadrus™ will be capturing for each trigger. 2. Calculate the time delay, Delay (Sec), the distance from where the object is detected to the center of Quadrus™ FOV, divided by the speed of the object. 3. This will give you a starting point for your timing. 4. Starting with the first, Capture # 1, enter the time delay in the Delay box. Do the same for all Captures. 5. With your application in motion and symbols moving through the reader’s FOV, observe the delay between the trigger event (usually an object detector) and the flash from the Quadrus™. Does the flash occur before or after the symbol passes through the FOV? 6. Use the slider button on the horizontal bar to adjust your timer so that the flashing occurs when the symbol is in passing under the Quadrus™. 7. Notice that the numbers in the Delay window will increment rapidly as you slide the button corresponding to a span of approximately 3 seconds. 8. Check the Calibration window for the appearance of the symbol’s image. 9. Fine tune your timer until the image moves to the center of the window. Clicking to the right or left of the slider button will increment or decrement the timing in small steps. Once you get the image centered with good decodes (green image), move on to Capture # 2 and so on until all subsequent symbols associated with this trigger are timed to pass under the Quadrus™.1 Quadrus 2D Code Reader User’s Manual 5-13 5–Calibration 1. Delay values for each capture number are computed in reference to the initial trigger event, which means that small errors in timing are not cumulative as you setup for subsequent captures. Chapter 5 10. If you are not getting good reads, do a Capture and Load in Evaluation. If the image appears blurry, the likely cause is label speed. If so, see “Adjust Shutter Speed.” 11. Make shutter speed or any other adjustments as you did in “Illumination” until you get good decodes with the new shutter time. 12. Repeat “Trigger Delay Settings (Constant Speed)” for this symbol, and after a good reads are obtained, move on to Capture Number 2 and subsequent symbols. If you are getting good reads, but the symbols arrive in the Quadrus™’ FOV at varying times, you may need to add another object detector and proceed to “Trigger Delay Settings (Variable Speed).” Adjust Shutter Speed Just as with any picture camera, to prevent blurry images you might need to decrease shutter time as the speed of your subject increases. For the Quadrus™, labels should move no more than 2 pixels (and ideally less than 1) over shutter time. The formula for shutter time is: 2 × Horizontal FOV (in.) Shutter Time = ------------------------------------------------------------ ÷ label speed (in,/sec) 659 Where 659 is the number of horizontal pixels in every Quadrus™ and Horizontal FOV (field of view) is 1.67” for the low density model, 1.0” for the high density model, and 0.65” for the UHD model. For example, a label moving at 10 inches per second past a UHD model, 2 × 0.65 Shutter Time = ------------------- ÷ 10 = 200µsec 659 5–Calibration 200 µsec is 1/5000 of a second, which for 10 inches per second is your maximum shutter time and of course half this (or 1/10,000) is your ideal shutter time. 5-14 Quadrus 2D Code Reader User’s Manual Trigger Delay Settings (Variable Speed) If you are getting good reads, but the symbols arrive in the Quadrus™’ FOV at varying times, you may need to add another object detector and configure for two triggers in order to adjust the capture timing of your Quadrus™ to match the arrival of your symbols. 1. Add second object detector halfway between the first detector and the Quadrus™, as in figure 5-16. 2. Configure Menu\Operations\Trigger Setup\Trigger Source for Two Triggers. 3. Click OK, Apply, and Send to Reader. 4. Go back to Calibration\Dynamic Setup and set Trigger Variance for Fixed. 5. This allows you to manually set the first trigger delay. Trigger # 1 6. Start up your operation and calibrate your delay for the first symbol just as you did in “Trigger Delay Settings (Constant Speed).” Trigger # 2 7. Now set Trigger Variance to Auto. 8. Subsequent trigger delays will be set automatically. 9. If the symbol is not centered in the FOV, set trigger Variance to Fixed again, adjust the Delay to center the symbol, then change the Trigger Variance back to Auto. Object Symbol Quadrus Figure 5-16 Two Trigger Setup 10. Repeat for additional captures. 5–Calibration Quadrus 2D Code Reader User’s Manual 5-15 5–Calibration Chapter 5 5-16 Quadrus 2D Code Reader User’s Manual 6 Evaluation Chapter Contents Overview .............................................................................................. 6-2 Image Source....................................................................................... 6-3 Image Flow .......................................................................................... 6-4 Load ..................................................................................................... 6-5 Analysis................................................................................................ 6-6 Action ................................................................................................... 6-7 Quadrus 2D Code Reader User’s Manual 6-1 6–Evaluation Chapter 6–Evaluation Chapter 6 Overview The Evaluation menu and its routines are an integral part of the ESP™. You can use it to evaluate several symbology features and pinpoint problems in your reads and/or symbols. When you click the EVALUATION tab you generate the evaluation dialog and a blank image screen as shown in figure A-1. The image, captured dynamically from a symbol or received from a previously captured file, appears on the Image View screen. Image files are saved to disk as.img or optionally as .bmp for viewing on third party software. Figure 6-1 Evaluation Menu 6-2 Quadrus 2D Code Reader User’s Manual 6–Evaluation Image Source Reader When enabled, the image to be evaluated will be received from the Quadrus. File When enabled, the image is retrieved from a saved computer image file. Quadrus 2D Code Reader User’s Manual 6-3 6–Evaluation Chapter 6 Image Flow Note: Bypass this procedure if you want to receive and evaluate the last image captured by the Quadrus. Capture To capture an image: 1. Ensure that the label is positioned and decodable by checking in Calibration\Locate. 2. Open the Evaluation dialog and click the Capture button (under Quadrus Image) to take a snapshot of the symbol. You should see the Quadrus flash once as it captures the image. Figure 6-2 Capture and Load 6-4 Quadrus 2D Code Reader User’s Manual 6–Evaluation Load From Reader Click Load (under Quadrus Image) to transfer the image (figure 6-2). After the bar fills with blue the image is shown in the Image View window (figure 6-3). Decode Click the Decode button to see the symbol’s data displayed in the box below the load bar. Save Click Save (under File Image) to name and store the image in your computer’s files. (by clicking Load under File Image) Figure 6-3 Captured Image Quadrus 2D Code Reader User’s Manual 6-5 6–Evaluation Chapter 6 Analysis Once received, you can analyze line scans that you draw across the image. Because line scans are drawn horizontally, it is recommended that you position your symbol so that the resulting image is perpendicular to the Image View dialog. Line Scan You can see a graphic representation of a lineal portion of your captured symbol by: 1. Clicking and dragging your cursor across the symbol in Image View to form a horizontal line (figure 6-4). 2. Next click the Line Scan button to see the plotted line scan (figure 6-5). You can move this line up or down on this image by clicking on the up or down blue arrows on the left. You can also analyze specific points on the symbol by clicking anywhere along the x-axis to generate a vertical red dashed line. Click right and left arrows to move this line incrementally. In the example in Figure 6-4 Line through Symbol figure 6-5 there are a total of 243 pixels along the horizontal line. Figure 6-5 Line Scan 6-6 Quadrus 2D Code Reader User’s Manual After your analysis, you can return to the Calibration menu, make changes in Illumination, then check read rates and resulting histograms and line scans. Be sure to save your settings to file when you arrive at the optimum reads. Quadrus 2D Code Reader User’s Manual 6-7 6–Evaluation Action 6–Evaluation Chapter 6 6-8 Quadrus 2D Code Reader User’s Manual A Appendices Appendices Contents Appendix A — Quadrus™ Specifications ............................................. A-2 Appendix B — Electrical Specifications ..............................................A-3 Appendix C — Transferring Files ........................................................A-5 Appendix D — Maximum Symbol Sizes ...................................................A-7 Appendix E — Optional Equipment ..................................................A-10 Appendix F — ASCII Table ................................................................A-12 Appendix G — Data Matrix Symbology ...............................................A-13 Appendix H — Histograms ......................................................................A-15 Appendix I — Multidrop Communications ....................................................A-17 Appendix J — Glossary of Terms .....................................................A-20 Quadrus 2D Reader User’s Manual A-1 Appendix A — Quadrus™ Specifications Mechanical Weight: 1 lbs. (0.5 kg) 2.96" 7.52 cm Housing: IP65 Operating temperature: 0 to 40°C Humidity: 5% to 90% (non-condensing) Light Source Appendices 2.27" 5.77cm Type: High Output LEDs Software-adjustable strobe time Light Collection CCD array, 659 x 494 pixels M4 (4 pls) mounting* 1.00" 2.54 cm Progressive scan, square pixel Interface Protocols RS-232, RS-422, RS-485 0.97" 2.5 cm Communication Protocols Point-to-point, Point-to-point w/RTS/CTS, Point-topoint w/XON/XOFF, Point-to-point w/RTS/CTS & XON/XOFF, Polling Mode D, Multidrop, User Defined, User Defined Multidrop Electrical 5.14" 13.06 cm Power requirement: 10 to 28 VDC, max. 3.5 W, max. 2.97" 7.54 cm 2A inrush current Power Supplies: 97-100004-07 120 VAC version 97-100004-08 240 VAC version 0.81" 2.07 cm Safety & Compliance Certifications Designed for: FCC, TüV, CEd, UL/cUL ISO 9001/Cert. No. 06-1080 Status Lights 3 2 1 Yellow Power LED: On power-on 2 Green Status LED: Normal operations: illuminates 4 25 1 14 13 1 whenever a data matrix label is decoded and remains on until a new trigger occurs. Continuous Read or Continuous Read 1 Output: flashes for each good read. *Outputs sink 8 mA, source 400 µA **Inputs VIL = 0.8 V, VIH = 2.0 V (see 74 LS for further details) *** VIL = 2.0V, VIH = 3.0V *Caution: Maximum penetration depth of screws is 0.200" (5.08 mm). Figure A-1 Quadrus™ Dimensions A-2 Quadrus 2D Reader User’s Manual Appendix B — Electrical Specifications Host Connector Power Connector Mates with 25-pin D-Subminiature socket. Table A-1 Host Connector 1 Signal ground 2 Transmit data RS-232 (out) 3 Receive data RS-232 (in) Mates with Microscan power pack PN 97-100001-14 or 97-100001-15, or with Switchcraft EN3C2F16K Table A-2 Power Connector 1 Power 10 to 28 VDC (in) 2 Power ground 4 Request-to-send (out) 5 Clear-to-send (in) 6 Output-1 (out) (TTL level)* 7 Signal ground 8 Output-2 (out) (TTL level)* 1 9 Strobe (out) 2 +12 VDC (out) @50 mA maximum 10 Trigger Input (in) (max. 24 V)*** 3 Ground 11 Default (in) (TTL level)** 4 Strobe (out) 12 Input-1 (in) (TTL level)** 13 RXD 485 + (in) 14 TXD 485 – (out) Appendices Trigger Connector Mates with Microscan Object Detector PN 99440002-01 or Switchcraft EN3C4MK Table A-3 Trigger Connector 15 Output-3 (out) (TTL level) 16 RXD 485 – (in) 17 Power ground 18 Power 10 to 28 VDC (in) 19 TXD 485 + (out) 20 Aux transmit data RS-232 (out) 21 Input-2 (in) (TTL level)** 22 Ground 23 Aux receive data RS-232 (in) 24 +12VDC (out) @50 mA maximum 25 New master (in) (TTL level)** *Outputs sink 8 mA, source 400 µA **Inputs VIL = 0.8 V, VIH = 2.0 V (see 74 LS for further details) *** VIL = 2.0V, VIH = 3.0V Trigger (in) (Power/Trigger Connector Kit 98-200025-03) Important Note: When using two triggers (see “Trigger Source” on page 2-17). You can wire two trigger devices to a single input (either pin 1 of the trigger connector or pin 10 of the host connector) provided that you are using open collector devices (“wire-or”); or you can wire two triggers inputs independently, the first to either pin 1 of the trigger connector or pin 10 of the host connector and the second to pin 12 of the host connector. External object detector Inputs to/outputs from internal signals Quadrus Host To power supply Figure A-2 System Diagram Quadrus 2D Reader User’s Manual A-3 COM A-4 AC Source I/O Chassis Signal VIN + Scanner Ground Loops VIN + Ground loops, signal degradation due to different ground potentials in communicating devices, can be eliminated or minimized by ensuring that both the host, scanner, and their power supplies are connected to a common earth ground. + – + – AC Source + – AC Source RX– RX+ TX– TX+ RS-232 signals have a common signal ground (pin 4). Pin 4 is normally connected to pin 13 (chassis ground) in the scanner; however, under certain conditions (e.g., when potential differences exist between power outlet grounds) signal and chassis grounds can be isolated from each other inside the scanner by Microscan technicians. VIN + Host < Control Signal > Proper grounding is necessary for operator safety, noise reduction, and the protection of equipment from voltage transients. Buildings, including any steelwork, all circuits, and all junction boxes must be grounded directly to an earth ground in compliance with local and national electrical codes. RX– RX+ TX– TX+ Appendices Ground and Shield Considerations Scanner Figure A-3 Grounding Diagram, Scanner-Host Quadrus 2D Reader User’s Manual Transferring Files Appendix C — Transferring Files Receiving Settings from Quadrus™ If you want your host computer to receive the current settings from Quadrus™, click RECEIVE FROM READER. from a File If you want to load the settings from a saved settings file to your host computer, open the desired file and then click SEND/NO SAVE and follow this with RECEIVE FROM READER. (Clicking RECEIVE FROM READER in this context ensures that the reader’s current settings will appear in your host settings list.) Saving Current Configuration to Quadrus™ You can save in two ways: 1. Click Apply in the current menu page. Note: Selecting OK on these menu pages will only update the items in the Current Settings window. 2. From within the SEND/RECV box, click SEND/NO SAVE to initialize settings and reset counters only, or click SEND/SAVE to initialize, reset counters, and save these settings to the Quadrus™’s memory for power up. to File You can save a file by selecting SAVE AS (or SAVE) from the File pull-down menu. The settings are saved only on the computer’s hard drive or other storage media. This is particularly useful for backing up files or for configuring multiple configurations. Creating a New Configuration File To create a new file of configuration settings, first be sure you’ve saved the current configuration file to the computer’s hard drive or other storage media. Next pull down the File menu in the ESP™ and select New. A new Untitled window will open with a listing of the factory default settings. Change these settings to suit your requirements and save this file to the computer’s hard drive under a new name. You can also load, edit, and save an existing configuration file. Quadrus 2D Reader User’s Manual A-5 Appendices If receiving scan data and you are in Continuous Read, symbols being scanned may interfere with your data request. Restoring Factory Default Settings Note: Be certain that you’ve saved any other configuration files to the host computer that you may want to reload later. Defaulting by Menu Commands Default settings can be reset for individual menus pages or for all menus at once. To restore factory defaults for individual menus (Communications, Operations, Code Types, or Reader Settings), Appendices 1. Click the DEFAULT button on the specific menu, 2. Click SEND/NO SAVE, and then RECEIVE FROM READER. To restore factory defaults for ALL menus, select the DEFAULT button on the Reset page of the Utilities menu. Defaulting by New 1. Close and save your current file. 2. Select New in the File pull-down menu. The resulting File will have your original factory default settings. Give it a new name and save to it as you make changes. 3. Click SEND/NO SAVE, and then RECEIVE FROM READER. See “Software Reset,” on page 4-14 for a complete discussion of transfer options. A-6 Quadrus 2D Reader User’s Manual Maximum Symbol Sizes Appendix D — Maximum Symbol Sizes Each of the three Quadrus™ models—low density, high density, and ultra high density (UHD)—have finite fields of view that limit symbol size as well as the number of characters per element dimension. A symbol does not exceed the maximum symbol size if its diagonal dimension plus 25% is not greater than the Y dimension of the Quadrus™’s field of view. For example the diagonal dimension plus 25% of a 30 mil symbol with 22 x 22 elements is equal to 2.0" which is less than 1.5". Appendices Low Density Symbol Sizes Low Density F ield of V iew = 1.67" x 1.25" Field of View X Y 2.0" 1.5" 5.08 cm 3.81 cm D iagon al (inch es) plu s 2 5% D iagon al (inch es) Figure A-4 Low Density Symbol Size Limitations Table A-4 Maximum Symbol Size by Element (Low Density) Element Square Symbols Rectangular Symbols Row x Col. in elements 13 mil 15 mil 20 mil 25 mil 30 MIL 52 x 52 44 x 44 32 x 32 26 x 26 22 x 22 Diagonal symbol size plus 1.195" 1.167" 1.131" 1.149" 1.167" 25% 3.04 cm 2.96 cm 2.87 cm 2.92 cm 2.96 cm Row x Col. in elements 16 x 48 16 x 48 16 x 16 16 x 36 6 x 12 Diagonal symbol size plus 0.822" .949" 1.265" 1.231" 1.074" 25% 2.09 cm 2.41 cm 3.21 cm 3.13 cm 2.73 cm Quadrus 2D Reader User’s Manual A-7 High Density Symbol Sizes High Density F ield of V iew = 1.0" x 0.75" Field of View Y 0.75" 1.9 cm D iagon al (inch es) plu s 2 5% Appendices X 1.0" 2.54 cm D iagon al (inch es) Figure A-5 High Density Size Limitations Table A-5 Maximum Symbol Size by Element (High Density) Element 8 mil Row x Col. in elements Square Symbols Row x Col. in elements Rectangular Symbols A-8 25 mil 30 mil 52 x 52 40 x 40 32 x 32 26 x 26 20 x 20 16 x 16 14 x14 Diagonal symbol size .735" plus 25% 1.87 cm 10 mil .707" 1.80 cm 13 mil .735" 1.87 cm 15 mil .689" 1.75 cm 20 mil .707" 1.80 cm 16 x 48 16 x 48 16 x 36 16 x 36 12 x 26 Diagonal symbol size .506" plus 25% 1.29 cm .632" 1.61 cm .640" 1.63 cm .739" 1.88 cm Quadrus 2D Reader User’s Manual .716" 1.82 cm .707" .742" 1.80 1.88 cm cm 8 x 12 8 x 12 .451 .541 1.15 1.37 cm cm Maximum Symbol Sizes UHD Symbol Sizes U H D D ensity F ield of V iew = 0 .6 5" x 0 .47 " Field of View X Y 0.65" 0.47" Diagonal (inc h es) Diagonal (inches) plu s 25% Appendices Figure A-6 Quadrus™ UHD Symbol Size Limitations Table A-6 Maximum Symbol Size by Element (UHD — Ultra High Density) Element 5 mil Square Symbols Rectangular Symbols Row x Col. in elements 20 mil 25 mil 52 x 52 26 x 26 24 x 24 18 x 18 16 x 16 12 x 12 8 mil 10 mil 13 mil 15 mil 10 x10 Diagonal symbol size .460" .368" .424" .414" .424" .424" .442" plus 25% 1.14 cm 0.93 cm 1.08 cm 1.05 cm 1.08 cm 1.08 cm 1.12 cm Row x Col. in elements 16 x 48 36 x 48 12 x 26 8 x 12 8 x 12 8 x 12 Diagonal symbol size .316" .394" .358" .234" .270" .361" plus 25% .803 cm 1.00 cm .909 cm .594 cm .686 cm 917 cm Quadrus 2D Reader User’s Manual A-9 Appendix E — Optional Equipment Universal Stand The Microscan Universal Stand is available in 4-inch, 6-inch, and 10-inch flex models. • 4-inch, knob adjustable handle98-200008 • 6-inch, knob adjustable head and foot98-200007 Appendices • 10-inch flax neck, adjustable head98-200006 • 7-1/4-inch extension kit 98-200024 4 inch Universal Stand Mates to adaptor plate Ball joint 6 inch Universal Stand 10 inch Flex Neck Universal Stand Adjust knob 4" 10.16 cm .25" .635 cm 6" 15.24 cm 10 " 25.40 cm .25 " .635 cm 2" 5.080 cm .190" DIA. .483 cm DIA. 4 PL 6-inch Extension Bar Kit 2.5" 6.350 cm Bottom 3-inch Extension Joint Kit 6" 15.24 cm 3" 7.62 cm 1.250" 3.175 cm . 50" D IA. 1 270c m DIA. 3P l . .20" DIA. .508 cm DIA. 3 PL 1.250" 3.175 cm 1.125" 1.125" 2.858 cm C 2.858 cm L Figure A-7 Universal Stand A-10 Quadrus 2D Reader User’s Manual Optional Equipment Adaptor Plate C L 4X .190 THRU 92 .350 2X R1.143 .250 2X R.652 4X 8-32UNC-2B THRU 3.265 3.137 3.829 Appendices 2.686 2.532 1.032 .300 .350 .261 R.03 .850 1.049 Microscan PN 98-200018 C L 1.700 Figure A-8 Adaptor Plate -- Quadrus™ to Universal Stand Base Plate B as e P la te B ase P la te H o le P atte rn (R edu ce d scale) 7" (17.8 cm ) 1.0" 2.54 cm 3.5" (8.9 cm ) 9" 22.9 cm 2.0" 5.08 cm CL 1.125" 2.86 cm 2.025" 5.14 cm 1.59" 4.04 cm 6.97" 17.7 cm .75" 1.90 cm .344" .874 cm .725" 1.84 cm Microscan PN 98-200017-01 C L Figure A-9 Base Plate Quadrus 2D Reader User’s Manual A-11 Appendix F — ASCII Table Appendices Table A-7 ASCII Table with Control Characters A-12 Dec Hex Mne Ctrl Dec Hex 00 01 02 03 04 05 06 07 08 09 10 11 12 13 14 15 16 17 18 19 20 21 22 23 24 25 26 27 28 29 30 31 00 01 02 03 04 05 06 07 08 09 0A 0B 0C 0D 0E 0F 10 11 12 13 14 15 16 17 18 19 1A 1B 1C 1D 1E 1F NUL SOH STX ETX EOT ENQ ACK BEL BS HT LF VT FF CR SO SI DLE DC1 DC2 DC3 DC4 NAK SYN ETB CAN EM SUB ESC FS GS RS US ^@ ^A ^B ^C ^D ^E ^F ^G ^H ^I ^J ^K ^L ^M ^N ^O ^P ^Q ^R ^S ^T ^U ^V ^W ^X ^Y ^Z ^[ ^\ ^] ^^ ^_ 32 33 34 35 36 37 38 39 40 41 42 43 44 45 46 47 48 49 50 51 52 53 54 55 56 57 58 59 60 61 62 63 20 21 22 23 24 25 26 27 28 29 2A 2B 2C 2D 2E 2F 30 31 32 33 34 35 36 37 38 39 3A 3B 3C 3D 3E 3F Ch SP ! " # $ % & ' ( ) * + , . / 0 1 2 3 4 5 6 7 8 9 : ; < = > ? Dec Hex Ch 64 65 66 67 68 69 70 71 72 73 74 75 76 77 78 79 80 81 82 83 84 85 86 87 88 89 90 91 92 93 94 95 40 41 42 43 44 45 46 47 48 49 4A 4B 4C 4D 4E 4F 50 51 52 53 54 55 56 57 58 59 5A 5B 5C 5D 5E 5F @ A B C D E F G H I J K L M N O P Q R S T U V W X Y Z [ \ ] ^ _ Quadrus 2D Reader User’s Manual Dec 96 97 98 99 100 101 102 103 104 105 106 107 108 109 110 111 112 113 114 115 116 117 118 119 120 121 122 123 124 125 126 127 Hex Ch 60 61 62 63 64 65 66 67 68 69 6A 6B 6C 6D 6E 6F 70 71 72 73 74 75 76 77 78 79 7A 7B 7C 7D 7E 7F ` a b c d e f g h i j k l m n o p q r s t u v w x y z { | } ~ D Data Matrix Symbology Appendix G — Data Matrix Symbology1 Individual element (or module) A white corner on a white background symbol indicates an even number of elements per side, a black corner indicates an odd number. Appendices Even number of elements per side indicates an ECC 200; an odd number indicates 000 to 140 (in most cases) Alternating finder pattern on two sides used to define cell structure Solid finder pattern on two sides define physical size, orientation and symbol distortion Figure A-10 Data Matrix ECC 200 Symbol Symbol Features ECC 000 - 140 ECC 200 Number of rows and columns (including finder pattern) Odd (except for some closed applications) Even Element in upper right hand corner Dark (for light background labels) Light (for light background labels) Error correction routine Convolution Reed-Solomon Symbol sizes (not including quiet zones) 17 to 21 sizes (squares only) 24 squares 6 rectangular Append in structured format No Yes, up to 16 symbols Subdivide code word stream into blocks for error detection No Yes, for symbols with more than 255 code words Extended channel interpretation for other character sets No Yes, optional Data encoded in: Base 11, 27, 41, 37, ASCII, 8-bit Byte ASCII, C40, text, X12, EDIFACT, and Base 256 1. For complete specification, see International Symbology Specification-Data Matrix, by AIM International; http:\\www.aimi.org Quadrus 2D Reader User’s Manual A-13 Pixels and Elements Pixels Appendices Element Symbol Figure A-11 Pixel/Element Relationship Figure A-11 shows the relationship between pixels and an ECC 200 symbol. Each reader density model (UHD, High Density, and Low Density) has a minimum pixel to element ratio For successful decoding, which depends on illumination, orientation, and quality of printing. Symbol Sizes Since symbols are positioned an exact distance from the front of the Quadrus™, it is possible to calculate the limits to the size of symbols for each density model. Tables A-4, A-5, and A-6 show precise sizes per element size for EEC 200 symbols. These are calculated for the worse case scenario; each symbol is rotated diagonal to the shorter Y (height) dimension of the reader’s field of view and 25 percent additional space is added on to this to allow for quiet zones. A-14 Quadrus 2D Reader User’s Manual Histograms Appendix H — Histograms To generate a histogram, place the tip of your cursor on the red or green border line of the object, and double click. The resulting histogram can be seen in figure A-12. Histogram Figure A-12 Histogram 1 The vertical dashed red line is the threshold that separates pixels interpreted as black from those designated as white, those to the left being black and those to the right being white. Good Image contrast usually has a bimodal histogram with its low and high peaks as far apart as possible. To see statistical information of the histogram click the Statistics button (figure A-13). Quadrus 2D Reader User’s Manual A-15 Appendices A histogram is a graphical presentation of the numeric count of the occurrence of each intensity (grey level) in an image. The horizontal axis is the values of grey levels and the vertical axis is the number of pixels for each grey level. 4. To move the peaks further apart, increase the contrast. For example, changing Contrast to 190 produces a wider histogram as seen in figure A-14. Appendices Since Auto Threshold Adjust is enabled, Threshold has changed from 100 to 126. This keeps the red line centered between the peaks. Figure A-13 Statistics for Histogram 1 As shown in figure A-14, the histogram peaks have moved apart. 5. Now, if you reduce the offset and further increase the Contrast, you will get an even better histogram. 6. Test by clicking the Image and Statistics buttons. Figure A-14 Histogram 2 A-16 Quadrus 2D Reader User’s Manual Multidrop Communications Appendix I — Multidrop Communications This appendix describes the rules for setting up a concentrator or controller to communicate with a Quadrus™ in standard Multidrop protocol, as presented in “Protocol Menu,” on page 2-9. Multidrop Addresses • No two readers in the Multidrop Network can have the same address. Host Concentrator or Controller • Each reader in the network must have an address (from 01 to 50) assigned in its configuration program. Polled Protocol Multidrop ONLY RS-485 Interface (LAN) Reader 01 Each address has its own separate poll and select address (from 1C to 7F hex as shown in table A-8 on page A-19). For example, during a polling sequence, Reader 03 expects a 20 hex (“SP” ASCII poll character) from the concentrator. And during a select command, it looks for a select value 21 hex (“!” ASCII select character). Appendices Figure A-15 shows a typical Multidrop network in which 1 to 50 readers can communicate with a host via an intermediary device, a concentrator or a controller. Reader 02 Reader 03 Figure A-15 Typical Multidrop Network Polling Sequence Data that is transmitted to the host (bar code data, noread messages, counters, etc.) via concentrators is solicited by poll requests from the host. End of Sequence Start of Sequence Concentrator Scanner 02 RES 1E REQ ACK 1E STX DATA ETX LRC RES Figure A-16 Polling Sequence The polling sequence example in figure A-16 begins with a RES (reset) from the concentrator followed by poll address 1E (ASCII hex value for Reader 02) and a REQ (request). The reader responds by first transmitting its own address, 1E, followed by a STX (start of text) character, and then the data. Next it transmits an ETX (end of Quadrus 2D Reader User’s Manual A-17 text) character and an LRC (longitudinal redundancy check) character. If the concentrator (or controller) receives the data from the reader and is able to validate it with an LRC calculation, it responds with an ACK (acknowledgment). If the reader in turn sends the ACK, the reader ends this successful exchange with a RES (reset). Polling Reset Appendices • If the reader has no information, it responds to a poll request by transmitting a RES (reset). • If the reader receives a NAK instead of the ACK after transmitting its data string, it will transmit the data string again up to three times. If the reader still does not receive an ACK, it will transmit a RES (reset) and discard the data in its buffers. • If the READER transmits data to the concentrator and the concentrator responds with an ACK or NAK, but the reader doesn’t receive the concentrator’s response, the reader will timeout and transmit a REQ to the concentrator and request another response. If after three retries (the number of times it transmits a REQ to the concentrator) the reader receives no response, it ends the transmission with a RES (reset). Select Sequence Unlike poll requests, select commands always originate from the host and consist of serial configuration or operation commands to devices that are configured in Multidrop. The reader complies with the command when it is polled during the cycle. Figure A-17 is an example of a select sequence. Start of Sequence Concentrator RES 1F REQ Scanner 02 End of Sequence STX <T>ETX LRC 1F ACK RES 1F ACK Figure A-17 Select Sequence A RES (reset) is the first command in the select sequence. The 1F hex is the select address associated with Reader 02 address (see table A-8 on page A-19). It is followed by a REQ (request). The reader responds with its own select address, 1F hex, and an ACK (acknowledge). The concentrator then transmits an STX (start of text), the data (in this case a <T>), an ETX (end of text), and an LRC character. The reader replies by transmitting its own address, followed by an ACK, acknowledging receipt of the command. Upon receipt of an ACK, the concentrator concludes the successful exchange with a RES. In the example above, the reader only acknowledges a trigger counter request from the concentrator. It does not respond to the trigger counter request until a subsequent poll. For example, if the reader’s trigger count was 12 at the time the trigger A-18 Quadrus 2D Reader User’s Manual Multidrop Communications counter request was received, on a subsequent poll it would transmit 02T/00012. (The 02 at the beginning of the string is the reader’s address.) Select Reset • If the reader receives bad data from the concentrator, it transmits a SEL (its select address) and a NAK to the concentrator. The concentrator transmits the data up to three times. The concentrator will end the sequence with a RES (reset) if no ACK is received.1 Table A-8 Multidrop Address Characters Poll Character Select Character Multidrop Address Poll Character Select Character ASCII HEX ASCII HEX ASCII HEX ASCII 01 ^\ 1C ^] 1D 26 N 4E O HEX 4F 02 ^^ 1E ^- 1F 27 P 50 Q 51 03 SP 20 ! 21 28 R 52 S 53 04 " 22 # 23 29 T 54 U 55 05 $ 24 % 25 30 V 56 W 57 06 & 26 ' 27 31 X 58 Y 59 07 ( 28 ) 29 32 Z 5A [ 5B 08 * 2A + 2B 33 \ 5C ] 5D 09 , 2C - 2D 34 ^ 5E _ 5F 10 . 2E / 2F 35 ` 60 a 61 11 0 30 1 31 36 b 62 c 63 12 2 32 3 33 37 d 64 e 65 13 4 34 5 35 38 f 66 g 67 14 6 36 7 37 39 h 68 i 69 15 8 38 9 39 40 j 6A k 6B 16 : 3A ; 3B 41 l 6C m 6D 17 < 3C = 3D 42 n 6E o 6F 18 > 3E ? 3F 43 p 70 q 71 19 @ 40 A 41 44 r 72 s 73 20 B 42 C 43 45 t 74 u 75 21 D 44 E 45 46 v 76 w 77 22 F 46 G 47 47 x 78 y 79 23 H 48 I 49 48 z 7A { 7B 24 J 4A K 4B 49 | 7C } 7D 25 L 4C M 4D 50 ~ 7E ∆ 7F 1. For additional information on Multidrop, see the MS-5000 Multidrop Concentrator User's Manual. Quadrus 2D Reader User’s Manual A-19 Appendices Multidrop Address Appendix J — Glossary of Terms Adaptive. Routine in Quadrus™ code that sets threshold from data acquired from the current read only. (See Fixed.) Appendices Bandwidth. Range of frequencies (energy transitions) that are allowed to pass through bandpass filters during signal processing. Baud Rate. The term used to describe the number of discrete signal events per second. In RS-232 and RS-422/485 systems, baud rate is the same as bits per second (bps). Bimodal. Relating to a histogram. Two peaks showing definite separation between light and dark values. Bin. An individual stack of pixels at a given grey scale value on a histogram. Capture. A single frame, shot, or picture. The total CCD image acquired by the Quadrus™ and held in its buffer for analysis and decoding. CCD Array. The grid of CCDs (literally, “charged-coupled devices”) in a linear or 2D reader that senses light. Configuration. The method used to change factory default settings for operational features to match a specific application. Configuration can be done through the ESP™ menus or with serial commands. Connector. Physical device (plug or socket) on unit or cable to provide in/ out connectivity for various circuits and pins. Convolution. Error correction scheme used by ECC 000 - 140. Counter. Memory space provided to keep track of read cycle events. CRC. Cyclical Redundancy Check. A 32 bit string of the length value and binary data file received. Data Matrix. Two-dimensional code type characterized by arrays of square elements and a finder pattern. Decode Rate. The number of good reads per second decoded by the reader. Default. The original factory settings. Defaulting. Act of resetting the reader to the original factory settings. Dynamic Setup. Testing and configuration done with symbols in motion. ECC 000 to 140. Two-dimensional Data Matrix symbols characterized by an odd number of elements, except for some closed applications. ECC 200. Two-dimensional Data Matrix symbol characterized by an even number of elements. Edge. External Triggering mode in which a detected object is recognized by a single edge pulse. A-20 Quadrus 2D Reader User’s Manual Glossary of Terms Element. Smallest square-shaped component of a 2D symbol in light or dark contrasting shades. End of Read Cycle. The time at which the reader stops expecting label information to decode. This can be caused by a timeout, a trigger event, or a good read. EPROM. Erasable, programmable, read only memory. Error Correction. Scheme to check accuracy of data. Fixed. The dividing line between dark and light pixels is represented in Quadrus™ histograms as a vertical dashed line Exposure Time. The duration of time the Quadrus™ CCD array is available to capture an image. See Illumination Time. Frame. A single capture, shot, or picture. The total CCD image received by the Quadrus™ and held in its buffer for analysis and decoding. Focal Length. The distance measured from the reader to the center of the depth of field, or focal point. FOV. Field of View. The rectangular pattern in which a label can be read by the CCD array. Good Match. The event occurring when a scanned label matches the master label information that is stored in the memory of the reader. Good Read. The event that occurs when a label's data is accurately scanned and decoded. Histogram. A visual representation of the frequency of various intensities of light (grey levels) in an image. Illumination. The light, external or internal, flashed over a symbol sufficient to enable the reader to detect each element within a given symbol. Illumination Time. The duration in which the LED’s are held on during image capture. See Exposure Time. Label Speed. The rate in inches or centimeters per second at which a label moves through the scan beam. LED Illumination. Internal Quadrus™ light source. Level. The period of time between the arrival and departure of an object is referred to as “level,” a reference to the horizontal signal that is displayed on an oscilloscope. Line Scan. Graphical representation of the grey scale levels of a selected slice of the image. Master Label. A label or label data that is stored in the reader’s memory and is compared with subsequently scanned labels. Match Code. The ability to compare data matrix labels being scanned against a master label that is stored in the memory of the reader. Quadrus 2D Reader User’s Manual A-21 Appendices Flash Memory. Non-volatile random access memory. Matrix Symbology. Grid of rectangular elements (or modules) in a regular pattern to represent data for retrieval by a vision scanning system. Menu Configuration. The process of changing factory default settings via a sequence of menus displayed on a terminal monitor. Mil. One thousandths of an inch or 0.0254 mm. In bar-coding, a measurement that identifies a data matrix label by the width of its narrowest element. Mismatch. An event that occurs when the scanned data matrix label does not match the master label that is stored in the memory of the reader. Appendices Module. Another name for Element. See Element. Noread. A non-read. A condition that occurs when the reader is set up to decode labels, and no labels are scanned during the read cycle. Null. A non-printed character that acts as a space-holder. Number of Scans Calculation. The number of times a data matrix label is scanned by the reader during one pass. Object Detector. A photo electric device used to sense the presence or absence of an object. One Shot. Single frame or capture. Operational Commands. Serial commands from the host to the reader that control current operating parameters, counters, master label operations, and program management that are not stored in non-volatile RAM. Parity. An error detection routine in which one data bit in each character is set to 1 or 0 so that the total number of 1 bits in the data field is even or odd. Pitch. Label (or reader) rotation around the center of a line parallel to the label’s line of travel. Point-to-Point. A protocol consisting of a single communications event, typically used to connect a data matrix reader to a terminal or host computer. Port. Logical circuit for data entry and exit. (One or more ports may be included within a single connector.) Protocol. The rules for communication between devices, providing a means to control the orderly flow of information between linked devices. Quiet Zones. Specified “clear” (nonprinted) areas between data matrix symbols and other image objects. The quiet zone is greater than one element in width, and should have the opposite reflectance value of the finder pattern. Read Cycle. A programmed period of time or condition during which the reader will accept data matrix label input. Read Range. The distances in which a label can be reliably read, as measured from the front of the reader. See “Depth of Field.” Reed-Solomon Error Correction Code. A linear, error correcting block code used A-22 Quadrus 2D Reader User’s Manual Glossary of Terms by ECC 200, suited to the correction of character errors which could be, in bar or matrix codes, the obliteration or removal of part of the symbol. ROM. Read Only Memory. Memory that cannot be changed. Reader. A scanning device that is comprised of a scan head and a decoder integrated in one package. Serial Commands. Online data strings (including configuration and operations) from a host or other terminal to the reader, that are always preceded by a < left angle bracket symbol and followed by a > right angle bracket symbol. Single Shot. Single frame or capture. Skew. Label (or reader) rotation around the center of the skew axis, a line perpendicular to the label’s direction of travel and the center of the reader’s beam. Specular Reflection. The direct, mirror-like reflection of light back to the reader, causing saturation. Static Setup. Menu driven interface to allow testing and adjustment of stationary symbols. Strobe Pulse. An reader output pulse synchronized to allow external strobe illumination. Strobe Rate. Number of strobes per second that the reader projects. Symbology. A set of Data Matrix symbols, such as Data Matrix, that have special rules to define the elements and patterns to represent specific numeric or alphanumeric information. Tilt. Label (or reader) rotation around the centerline of the FOV. For 2D code, this is 360°. Timeout. A user-selected period of time that ends a reader's read cycle. Quadrus 2D Reader User’s Manual A-23 Appendices Serial Configuration (Host Configuration). Serial command specifically for changing configuration and distinguished from operational command by the fact that they modify the non-volatile for power up configuration. Most of these commands begin with the upper case K character immediately following the left angle bracket symbol, as in <Kg3>. Appendices A-24 Quadrus 2D Reader User’s Manual Index Symbols # of Captures after Trigger 2-19, 3-10 # Pulses 2-18 % Cell Damage 2-33 % cell damage 3-18 A About the Quadrus vii About This Manual vii Action 6-7 Adaptive 2-38 Adaptor Plate A-13 AGC maximum 3-20 Analysis 6-6 Application Code 4-17 Approvals viii As Soon As Possible 2-24 ASCII Table A-14 Aux Port 2-4, 3-6 Background Color 2-26 Background Offset 2-38, 5-7 Bar Code Output 2-24 Base Plate A-13 Baud Rate (aux port) 2-4 Baud Rate (host port) 2-4 Beeper 3-14 Beeper Status 2-24 Binary Code 4-20 Boot Code 4-18 Index B CDRH viii, ix CE Compliance viii CE Konformitätszeichen ix Cell Damage 2-33 Certification Labels xi Checksum 4-13 Command Echo Status 3-19 Command Process (aux port) 2-8 Communication Protocols A-2 Communications 1-6 Communications Menu 2-3 Communications Port 3-6 Compliance Certifications A-2 Concatenating Serial Commands 3-4 Concentrator A-19 Configuration Serial Commands, summary 3-2 Connectors 1-2 Continuous 2-37 Continuous Read 2-15 Continuous Read 1 2-15 Contrast 2-38, 5-6 Contrast Method 2-34 Control Hex Output 3-19 Controller A-19 Coordinate Data 4-21 Counters 4-6 CRC 4-18 Creating a New Configuration File A-6 cUL viii, ix Custom Menu 2-39 D C Cabling 1-2 Cabling (ground loops) A-5, A-22 Calibrate Symbol 1-7 CALIBRATION 5-2 Capture 6-4 Capture Image and Decode 4-21 Capture Time 2-33 capture time 3-18 Caution Summary viii Daisy Chain Mode (aux port) 2-7 Data (aux port) 2-4 Data Base Size 2-22 Data Bits (host port) 2-4 Data Matrix 3-15 Decode 6-5 Decode Current Image 4-21 Decode Data 4-21 Decode Status 4-21 Decode Time 2-33 Quadrus 2D Code Reader User’s Manual I-1 Index Index decode time 3-18 Decodes/Second 4-5 Defaulting A-7 Delay Time 1 2-19 Delete Master Label Data 4-11, 4-12 Disable Match Code 4-11 Distance from Symbol 1-3 Download 4-17 Dynamic Setup 1-10, 5-13 H E Identifiers 2-26 ILLUMINATE 1-9 Illuminate 5-3 Illumination 2-36, 3-20 Illumination Menu 2-36 Illumination Settings 2-38, 3-20 Image Capture 4-22 Image File 4-18 Image Flow 6-4 Image Settings 3-21 Image Source 6-3 Imaging 4-21 In/Out 3-16 In/Out Menu 2-28 Input # 1 3-16 Input #2 3-16 Input Mode 2-29 Intercharacter Delay 2-13, 3-9 Interface 4-14 Internal 2-37 Internal Illumination 3-20 ECC 200 Symbology A-15 ECC Level 2-26 ECC level 3-18 Edge 2-16 Edge Single Shot 3-10 Electrical A-2 Electrical Specifications A-3 Elements A-16 End of Read Cycle 2-19, 2-24 ESP 1-4, 1-5, 2-2 EVALUATION 6-2 External 2-37 External Edge 2-16 External Illumination 3-20 External Level 2-16 External Source 2-37 F Factory Defaults 4-16 Factory Settings 4-16 FCC viii, ix Field of View 1-8 Fixed 2-38 fixed threshold value 3-21 flag early out 3-21 Full Duplex Mode (aux port) 2-7 G Glossary A-23 Good Match 3-17 Ground and Shield Considerations A-22 Grounding A-5 I-2 Half Duplex Mode (aux port) 2-6 high density 1-3 High Density Symbol Sizes A-9 Histogram 4-22, 5-3, A-17 Host Port 2-3, 3-6 Host Serial Port Configuration 1-6 I K Keystroke Entries vii L laser beam x Laser Etch 5-10 Latch Mode 3-17 Latch Mode 1 2-31 Latch Mode 2 2-31, 3-17 Latch Mode 3 2-32, 3-17 Length Indicator 4-17 Quadrus 2D Code Reader User’s Manua l Length of Decoded Data 4-21 Level 2-16 Light Collection A-2 Light Source A-2 Line Scan 6-6 Load 6-5 Locate Label 5-2 Locate Symbol 1-7 Locate Time 2-33 locate time 3-18 LOCATOR 5-2 Longitudinal Redundancy Check 2-13, 3-9 low density 1-3 Low Density Symbol Sizes A-8 LRC 3-9 Multilabel 3-12 Multilabel Separator 2-24 Multiple Trigger Delays 4-8 M O Master Label 4-10 Master Label Data Base 4-12 Master Label Edit 2-23 Match 2-31 Match Code 2-21, 3-13, 4-10 Match Code Type (master label) 2-22 Match Code/Good Read Counter 4-7 Match Length 2-23 Match Start Position 2-22 Matrix 4-22 Maximum Decode Time 2-20 Maximum Symbol Sizes A-8 Mechanical Specifications A-2 Mirror 5-2 Mismatch 2-31, 3-17 Mismatch Counter 4-7 Mismatch or Noread 2-30, 3-17 Mode (aux port) 2-4 Mount Quadrus 1-3 Moving Label 1-10 Multi-Capture 3-10 Multi-Capture Mode 2-18 Multidrop 2-10, 3-7 Multidrop Communications A-19 Object detector 1-2 Offset 2-38, 5-7 offset 3-20 Operational Serial Commands, summary 4-2 Operations 3-10 Operations Menu 2-14 Optional Equipment A-12 Output # 1 3-16 Output # 1 Pulse 4-16 Output # 2 Pulse 4-16 Output # 3 Pulse 4-16 Output #2 3-18 Output #3 3-18 Output Data Format 2-12 Output Filter 2-35, 3-16 Output Mode 2-31, 3-17 Output On 2-30, 3-17 Output Separator 2-34 output separator 3-18 Outputs 2-29, 4-16 Overlay 1-8, 5-2 N Narrow Margins 3-15 New Master Pin 2-23, 3-13 New Trigger 2-20 Noread 2-20, 2-31, 3-17 Noread Counter 4-6 Noread Message 2-20, 3-12 Number of Labels 2-24 Number of Objects 4-21 number of symbols 3-21 Number to Output On 2-32 Parity (aux port) 2-4 Quadrus 2D Code Reader User’s Manual I-3 Index P Index Index Parity (host port) 2-3 Part Number 4-13 Percent Read Rate Test 4-5 Pixels A-16 Pixels Per Element 2-34 pixels per element 3-18 Point-to-Point 2-10, 3-7 Point-to-Point with RTS/CTS 2-10 Point-to-Point with RTS/CTS & XON/XOFF 2-10, 3-7 Point-to-Point with XON/XOFF 2-10, 3-7 Polarity (input) 2-29 Polarity (output) 2-32 Polarity, output 3-17 Polling Mode D 2-10, 3-7 Polling Sequences A-19 Postamble 2-12, 3-9 Power Connector A-3 Power connector 1-2 Preamble 2-12, 3-8 Protocol 2-10, 3-7 Protocol Commands 3-8 Protocol Menu 2-9 Pull-down menus 1-5 Pulse 2-31, 3-17 Pulse Width 2-32 Q Quality Output 2-34, 3-18, 5-10 quiet zone color 3-21 R Read Cycle 2-19, 3-12 Read Rate 4-5 Read Saved Factory Settings 4-15 Read Saved Operating Parameters 4-15 Reader Output 2-23, 3-14 Reader Status 4-20 RECEIVE FROM READER 1-6 Receiving Settings A-6 Request Master Label Data 4-12 Request Master Label Information 4-11 I-4 Reset 4-14 Reset Functions 4-14 Reset/Save (Save for power on) 4-15 Response Timeout 2-12, 3-9 Restore Default Operating Parameters 4-15 Restore Default Operating Parameters/Save for Power-on 4-16 Restore Factory Defaults & Save for Power-on 4-16 RS-422 3-6 S Safety A-2 Save Factory Settings 4-16 Saving Settings 1-11, A-6 Saving Settings to the Quadrus A-6 Select Sequence A-20 Self Test 4-19 Send Master Label Information 4-11, 4-12 SEND/NO SAVE 1-6, 1-11 SEND/RECV 1-6 SEND/SAVE 1-6, 1-11 Separator 2-24 Sequence on every Mismatch 2-23 Sequence on Noread 2-23 Sequential 2-22 Serial Command Beep Status 3-19 Serial Commands, Configuration 3-2 Serial Commands, Operational 4-2 Serial Configuration 3-4 Serial Data 2-16 Serial Data & Edge 2-16 Serial Port 1-6 Serial Trigger Character 2-16 Serial Verification 3-19 Shielding A-5 Shutter Speed 5-14 Shutter Time 2-38, 3-20, 5-6 Sicherheitshinweis ix Single Shot 1-7, 2-16 Software Reset 4-14 Specifications A-2 Quadrus 2D Code Reader User’s Manua l Static Label Setup 1-9 Status Lights A-2 Status Request 3-5, 3-9 Stop Bits (aux port) 2-4 Stop Bits (host port) 2-4 Store Next Label Scanned as Master Label 4-11 Strobe 2-37 Strobe Edge 2-37 Symbol 3-15 Symbol Contrast 2-33 symbol contrast 3-18 symbol contrast method 3-18 Symbol Menu 2-25 Symbol Sizes A-16 Symbol Type 2-26 Symbology Identifier 3-15 Symbology Identifiers 2-26 System Diagram A-3 Trigger Evaluation Sample 2-32 Trigger Filter Time 3-10 Trigger Filter Timing Value 2-17 Trigger Level 2-17 Trigger Mode 2-15 Trigger Source 2-17, 3-11 Trigger Variance 2-17, 3-11 Tü V ix TüV viii U UHD Symbol Sizes A-10 UL viii, ix ultra high density 1-3 Universal Stand A-12 Unlatch Output 2-29 User Defined 2-11 User Defined Multidrop 2-11 V Index T Vorsichtsmaßnahmen ix Thermal 5-9 Threshold 5-7 Threshold Type 2-38 threshold type 3-21 Timeout 2-19 Timeout (x 10 ms) 2-20 Toolbar 1-5 Total Decode Time 2-33 total decode time 3-18 Transferring Files A-6 Transparent (aux port) 2-5 Trend Analysis 2-31, 2-32, 3-17 Trend Analysis Mode 3-18 Trigger 2-14, 3-10, 4-8 Trigger Characters 4-8 Trigger Connector A-3 Trigger Counter 4-7 Trigger Delay 2-18, 2-29, 3-12 Trigger Delay Settings 5-13, 5-15 Trigger Delay Value 4-9 W Warning Summary viii Warranty Statement ii When to Output 2-23 Wild Card 2-22 Quadrus 2D Code Reader User’s Manual I-5 Index Index I-6 Quadrus 2D Code Reader User’s Manua l Table 2-1 Symbology Identifier Option Values for Data Matrix ................ 2-27 Table 2-2 Full Quality Outputs ................................................................. 2-33 Table 3-1 Summary of Serial Configuration Commands ............................ 3-2 Table 3-1 Protocol Commands .................................................................. 3-8 Table 4-1 Summary of Serial Operational Commands .............................. 4-2 Table 4-2 Maximum Characters .............................................................. 4-12 Table 4-3 Hex Value to Binary Conversion ............................................................................................... 4-20 Table 4-4 Reader Status from Binary Code ............................................. 4-20 Table 5-1 Quality Outputs ........................................................................ 5-10 Table A-1 Host Connector ..........................................................................A-3 Table A-2 Power Connector .......................................................................A-3 Table A-3 Trigger Connector ......................................................................A-3 Table A-4 Maximum Symbol Size by Element (Low Density) ....................A-7 Table A-5 Maximum Symbol Size by Element (High Density) ...................A-8 Table A-6 Maximum Symbol Size by Element (UHD — Ultra High Density) A-9 Table A-7 ASCII Table with Control Characters .......................................A-12 Table A-8 Multidrop Address Characters .................................................A-19 vii viii Figure 1-1 Quadrus™ Connectors on Back of Quadrus™ ......................... 1-2 Figure 1-2 Distance from Symbols ............................................................. 1-3 Figure 1-3 Main ESP™ Menu .................................................................... 1-5 Figure 1-4 Host Serial Port Configuration ......................................................1-6 Figure 1-5 Reader Configuration Transfer .....................................................1-6 Figure 1-6 Calibration/Locate ..................................................................... 1-7 Figure 1-7 Label/Quadrus™ Position ......................................................... 1-8 Figure 1-8 Illumination ................................................................................ 1-9 Figure 1-9 Dynamic Setup ....................................................................... 1-10 Figure 1-10 Send/Receive Dialog ............................................................ 1-11 Figure 2-1 Configuration Setup File ........................................................... 2-2 Figure 2-2 Communications Menu Structure ............................................. 2-3 Figure 2-3 Protocol ..................................................................................... 2-9 Figure 2-4 Operations Menu .................................................................... 2-14 Figure 2-5 Triggering Setup ..................................................................... 2-15 Figure 2-6 Match Code Setup .................................................................. 2-21 Figure 2-7 Symbol Setup ......................................................................... 2-25 Figure 2-8 Reader In/Out Setup ............................................................... 2-28 Figure 2-9 Input 1 Dialog Box .................................................................. 2-29 Figure 2-10 Output 1 ................................................................................ 2-30 Figure 2-11 Quality Output Options ......................................................... 2-34 Figure 2-12 Illumination Menu .................................................................. 2-36 Figure 2-13 Custom Menu ....................................................................... 2-39 Figure 4-1 Options ..................................................................................... 4-4 Figure 4-2 Read Rate ................................................................................. 4-5 Figure 4-3 Counter ..................................................................................... 4-6 Figure 4-4 Serial Trigger Character ........................................................... 4-8 Figure 4-5 Master Label Commands ........................................................ 4-10 Figure 4-6 Checksum/Part Number ......................................................... 4-13 Figure 4-7 Interface .................................................................................. 4-14 Figure 4-8 Download ................................................................................ 4-17 Figure 5-1 Calibration ................................................................................. 5-2 Figure 5-2 Typical Overlay Image .............................................................. 5-3 Figure 5-3 Auto Calibrate ........................................................................... 5-4 Figure 5-4 Scanner Density ....................................................................... 5-4 Figure 5-5 Label Speed .............................................................................. 5-4 Figure 5-6 IP Data Base ............................................................................. 5-5 Figure 5-7 More Settings ............................................................................ 5-7 Figure 5-8 Illumination Adjustment Flow .................................................... 5-8 Figure 5-9 Thermal Label Image ................................................................ 5-9 Figure 5-10 Thermal Label Histogram ....................................................... 5-9 Figure 5-11 Adjusted Laser Etch Image ................................................... 5-10 Figure 5-12 Dark Image ........................................................................... 5-11 Figure 5-13 Label #3 Histogram ............................................................... 5-11 ix Figure 5-14 Adjusted Image .................................................................... 5-12 Figure 5-15 Adjusted Histogram .............................................................. 5-12 Figure 5-16 Two Trigger Setup ................................................................ 5-15 Figure 6-1 Evaluation Menu ....................................................................... 6-2 Figure 6-2 Capture and Load ..................................................................... 6-4 Figure 6-3 Captured Image ........................................................................ 6-5 Figure 6-4 Line through Symbol ................................................................ 6-6 Figure 6-5 Line Scan ................................................................................. 6-6 Figure A-1 Quadrus™ Dimensions ............................................................ A-2 Figure A-2 System Diagram ...................................................................... A-3 Figure A-3 Grounding Diagram, Scanner-Host .......................................... A-4 Figure A-4 Low Density Symbol Size Limitations ...................................... A-7 Figure A-5 High Density Size Limitations .................................................. A-8 Figure A-6 Quadrus™ UHD Symbol Size Limitations ................................ A-9 Figure A-7 Universal Stand ...................................................................... A-10 Figure A-8 Adaptor Plate -- Quadrus™ to Universal Stand ..................... A-11 Figure A-9 Base Plate .............................................................................. A-11 Figure A-10 Data Matrix ECC 200 Symbol ............................................. A-13 Figure A-11 Pixel/Element Relationship .................................................. A-14 Figure A-12 Histogram 1 .......................................................................... A-15 Figure A-13 Statistics for Histogram 1 ..................................................... A-16 Figure A-14 Histogram 2 .......................................................................... A-16 Figure A-15 Typical Multidrop Network .................................................... A-17 Figure A-16 Polling Sequence ................................................................ A-17 Figure A-17 Select Sequence ................................................................. A-18 x