1
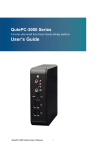
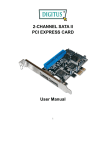
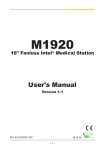
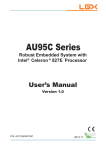
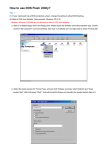
Industrial Touch Panel PC PLXX-WCR USER MANUAL PLXX-WCR User Manual CONTENTS Package Contents 02 Safety Instructions 03 FCC & CE Statement 04 Introduction 05 Features 06 Motherboard Specification 07 System Specification 08 Mounting Installation 11 Bios setup 13 Driver Installation 27 Contact Information 28 - 1- PLXX-WCR User Manual PACKAGE CONTENTS Please make sure that the items shown below are included in the package. Should an item be missing, please contact the local retailer from which you purchased this product. 1 x Industrial Touch Panel PC 1 x Riser card (2 x PCI slot) 1 x DC in Power adapter 1 x Power cord 4 x Screws (M3 x 4) for 2.5” HDD or SSD - 2- PLXX-WCR User Manual SAFETY INSTRUCTIONS 1. Read Instructions: All the safety and operating instructions should be read before the equipment is operated. 2. Retain Instructions: The safety and operating instructions should be retained for future reference. 3. Cleaning: Unplug this equipment from the outlet before cleaning. Do not use liquid cleaners or aerosol cleaners. Use a damp cloth for cleaning. 4. Water and Moisture: Do not use this equipment near water. 5. Ventilation: The openings on the enclosure are provided for ventilation to ensure reliable operation of the equipment and to protect it from overheating. These openings should never be blocked. 6. Power Sources: This equipment should be operated only from the type of power source indicated on the rating label. If you are not sure of the type of power supply, consult your dealer or local power company. 7. Heed Warnings: All warnings on the equipment and in the operating instructions should be adhered to. 8. Object and Liquid Entry: Never push objects of any kind into this equipment through openings as they may touch dangerous voltage points or shout-out parts that could result in a fire or electric shock. Never Spill liquid of any kind on the equipment. 9. Servicing: Do not attempt to service this Equipment yourself as opening or removing covers may expose you to dangerous voltage or other hazards. Refer all servicing to qualified service personnel. 10. Damage Requiring Service: Unplug this equipment from the outlet and refer - 3- PLXX-WCR User Manual servicing to qualified service personnel under the following conditions: a) if the power cord or plug is damaged; b) if liquid has penetrated into the equipment; c) if the equipment has been exposed to moisture; d) if the equipment does not work well, or you cannot get it to work according to the user’s manual; e) if the equipment has been dropped and dam aged; f) if the equipment has obvious signs of breakage. 11. Do not leave this equipment in an environment where the storage temperature is below -10° C or above 70° C. It may damage the equipment. 12. Do not open the sealed enclosure / case of equipment. Once enclosure is disassembled without approval, it will lead in abnormal operating of waterproof gel. For Guarantee of water proof function, please make sure configuration / peripheral has been confirmed to install before shipping. - 4- PLXX-WCR User Manual FCC This device complies with Part 15 FCC Rules. Operation is subject to the following two conditions: (1) this device may not cause harmful interference, and (2) this device must accept any interference received including interference that may cause undesired operation. CE The product(s) described in this manual complies with all applicable European Union (CE) directives if it has a CE marking. For computer systems to remain CE compliant, only CE-compliant parts may be used. Maintaining CE compliance also requires proper cable and cabling techniques. - 5- PLXX-WCR User Manual INTRODUCTION PLXX-WCR Series, equipped with Intel Celeron / i5 processor, is an industrial touch panel PC featuring high performance but low power consumption under the fanless architecture. Moreover, its advanced computing and graphic performance allows manufacturers for complex applications, such as visualization and motion control. In addition, the waterproof gasket design and an external DVD-RW driver are offered optionally for advanced protection from water intrusion and easy data storage / backup respectively. You can also choose to integrate a RFID sensor into the device for RFID technology application, such as logistics, warehousing, distribution or industrial automation (identification of work piece carriers on assembly lines, material flow control, identification of containers and other receptacles). - 6- PLXX-WCR User Manual FEATURES Intel Celeron/i5 CPU + Intel HM 75 chipset Powerful performance but low power consumption under fanless design Compact design 2 x GLAN Up to 2 x COM 4 x USB 1 x Audio (1 x Line-out, 1 x MIC-in) 1920 x 1080 (21” wide screen) DC in 12V / 19V IP65 compliant 6mm thickness aluminum front bezel High quality aluminum - 7- PLXX-WCR User Manual MOTHERBOARD SPECIFICATION CPU Intel Core Celeron / i5 (up to 2.7GHz) Chipset Intel HM76 BIOS AMI 64 Mbit SPI BIOS Memory 2 x 204-pin SODIMM socket supports DDR3 1066MHz up to 8GB Display Controller: Intel HD Graphics Interface: 1 x Dual channel 24-bit LVDS, 1 x DVI (DVI-I), 1 x HDMI Ethernet 1 x Intel 82579LM GbE LAN PHY, 1 x Intel 82574L GbE LAN 10/100/1000 Mbps Audio Realtek ALC886 HD Audio CODEC Storage 2 x SATA 2.0, 1 x mSATA (optional) Expansion 2 x Mini PCIe Rear Panel I/O Port 1x HDMI 1x DVI-I 4x USB2.0 2x RJ-45 LAN 1x Mic-in 1x Line-out DC 12V/19V input Internal I/O 2 x USB 3.0 1x SPI Flash ROM pin header 4 x RS-232 1x chassis intrusion connector 1 x LVDS 1x amplifier pin header Power Output System reset, Programmable 1 ~ 255 sec/min Watchdog Timer Operating temperature: 0°C ~ 60°C Environment Storage temperature: -20°C ~ 80°C - 8- PLXX-WCR User Manual SYSTEM SPECIFICATION SIZE 21.5” CPU Intel Core i5 (up to 2.7GHz) / Celeron 827E Chipset Intel HM76 Express Memory 1 x DDR III SODIMM, up to 8 GB Power Supply DC 12V / 19V external power adapter Rear I/O Ports 1 HDMI, 1 DVI, 2 Gb LAN, 4 USB, 1 Mic-in, 1 Line-Out 1 3-pin terminal block power connector Expansion 2 x Mini PCIe slot (1 with mSATA function), 1 x SIM socket Size/Type 21.5” TFT (16:9) Resolution Full HD 1920 x 1080 Colors 16.7M Luminance (cd/m2) 300 Contrast Ratio 1000:1 Viewing Angle (H/V°) 170/160 MTBF 50,000hrs Touch Screen 5-Wire Resistive Installation VESA mount 100 x 100mm Weight 13.5Kg Operation Temp. 0°C~ 45°C Storage Temp. -10°C ~ 70°C Relative Humidity 0% - 95% non-condensing OS Win 7 Pro, Win 8 Pro, Embedded XP, Embedded 7, Embedded 8 - 9- PLXX-WCR User Manual MOUNTING INSTALLATION Panel PC Mounting Wall (Front) Mounting Wall (Back) Screw Holes Align bottom of Panel PC housing with the bottom edge of the cut out - 10-- PLXX-WCR User Manual VESA MOUNTING INSTALLATION Screw holes in wall or object for VESA mounting installation VESA mounting Bracket VESA mounting Bracket Panel PC Step 1: Screw the VESA mounting plate to the Panel PC Step 2: Screw the VESA mounting bracket to the front of a wall or the front / back Step 3: Slide the VESA mounting plate onto the VESA mounting bracket of an object dependingly - 11 - PLXX-WCR User Manual BIOS SETUP Main The Main menu is the first screen that you will see when you enter the BIOS Setup Utility. System Date The date format is <day>, <month>, <date>, <year>. Day displays a day, from Sunday to Saturday. Month displays the month, from January to December. Date displays the date, from 1 to 31. Year displays the year, from 1980 to 2099. System Time The time format is <hour>, <minute>, <second>. The time is based on the 24-hour military-time clock. For example, 1 p.m. is 13:00:00. Hour displays hours from 00 to 23. Minute displays minutes from 00 to 59. Second displays seconds from 00 to 59. - 12 - PLXX-WCR User Manual Advanced The Advanced menu allows you to configure your system for basic operation. Some entries are defaults required by the system board, while others, if enabled, will improve the performance of your system or let you set some features according to your preference. Important: Setting incorrect field values may cause the system to malfunction. Launch PXE OpROM Enables or disables the boot option for legacy network devices. Launch Storage OpROM Enables or disables the boot option for legacy mass storage devices with option ROM. - 13 - PLXX-WCR User Manual PCI Subsystem Settings This section is used to configure the PCI subsystem settings ACPI Power Management Configuration This section is used to configure the ACPI Power Management. ACPI Sleep State Selects the highest ACPI sleep state the system will enter when the Suspend button is pressed. S1(POS) Enables the Power On Suspend function. S3(STR) Enables the Suspend to RAM function. Resume by PME Enable this field to use the PME signal to wake up the system. Wake system with fixed time Enable or disable system wake on alarm event. When enabled, system will wake on the hr::min::sec specified. - 14 - PLXX-WCR User Manual Trusted Computing (optional) This section configures settings relevant to Trusted Computing innovations. TPM Support Enables or Disables TPM. O.S. will not show TPM. Resetting the platform is required. CPU Configuration This section is used to configure the CPU. It will also display the detected CPU information. Limit CPUID Maximum The CPUID instruction of some newer CPUs will return a value greater than 3. The default is Disabled because this problem does not exist in the Windows series operating systems. If you are using an operating system other than Windows, this problem may occur. To avoid this problem, enable this field to limit the return value to 3 or less than 3. - 15 - PLXX-WCR User Manual IDE Configuration This section is used to configure IDE functions. OnChip SATA Type This field is used to configure the SATA devices supported by the AMD T56N/T40N. Native IDE This option configures the Serial ATA drives as Parallel ATA storage devices. RAID This option allows you to create RAID on Serial ATA devices. AHCI This option allows the Serial ATA devices to use AHCI (Advanced Host Controller Interface). Legacy IDE This option configures the Serial ATA drives as Legacy IDE storage devices. - 16 - PLXX-WCR User Manual USB Configuration This section is used to configure USB. Legacy USB Support Enabled Enables legacy USB. Auto Disables support for legacy when no USB devices are Disabled Keeps USB devices available only for EFI applications. connected. EHCI Hand -off This is a workaround for OS’s that do not support EHCI hand-off. The EHCI ownership change should be claimed by the EHCI driver. Device reset time-out Selects the USB mass storage device start unit command timeout. - 17 - PLXX-WCR User Manual Super IO Configuration This section is used to configure the serial port functions. Case Open Beep Set this field to Enabled to allow the system to alert you of a chassis intrusion event. Watchdog This field is used to enable or disable the Watchdog Timer function. AC Power Loss Turns Off When power returns after an AC power failure, the system’s power is off. You must press the Power button to power-on the system. Turns On When power returns after an AC power failure, the system will automatically power-on. Former-Sts When power returns after an AC power failure, the system will return to the state where you left off before power failure occurs. If the system’s power is off when AC power failure occurs, it will remain off when power returns. If the system’s power is on when AC power failure occurs, the system will power-on when power returns. - 18 - PLXX-WCR User Manual Serial Port 0 Configuration to Serial Port 1 Configuration Serial Port Enables or disables the serial port. Change Settings Selects the IO/IRQ setting of the I/O device PC Health Status This section displays the SIO hardware health monitor. - 19 - PLXX-WCR User Manual JMB36X ATA Controller Configuration Chipset Configures relevant chipset functions. - 20 - PLXX-WCR User Manual North Bridge Configuration GFX Configuration NB GPP Core Config Selects the NB GPP Core configuration. - 21 - PLXX-WCR User Manual North Bridge LVDS Config Select LVDS This field is used to enable or disable the LVDS Panel South Bridge - 22 - PLXX-WCR User Manual Boot Setup Prompt Timeout Selects the number of seconds to wait for the setup activation key. 65535(0xFFFF) denotes indefinite waiting. Bootup NumLock State This allows you to determine the default state of the numeric keypad. By default, the system boots up with NumLock on wherein the function of the numeric keypad is the number keys. When set to Off, the function of the numeric keypad is the arrow keys. Quiet Boot Enables or disables the quiet boot function. Fast Boot Enables or disables boot with initialization of a minimal set of devices required to launch active boot option. Has no effect for BBS boot options. - 23 - PLXX-WCR User Manual GateA20 Active Upon Request- GA20 can be disabled using BIOS services. Do not allow disabling GA20; this option is useful when any RT code is executed above 1MB. Option ROM Messages Set display mode for option ROM. Interrupt 19 Capture Enabled: Allows option ROMs to trap Int 19. Disabled: CSM Support Enabled/ disabled CSM support. If auto is selected, based on OS, CSM will be enabled/ disabled automatically. - 24 - PLXX-WCR User Manual Security Administrator Password Sets the administrator password. User Password Sets the user password. - 25 - PLXX-WCR User Manual Save & Exit Save Changes and Reset To save the changes, select this field and then press <Enter>. A dialog box will appear. Select Yes to reset the system after saving all changes made. Discard Changes and Reset To discard the changes, select this field and then press <Enter>. A dialog box will appear. Select Yes to reset the system setup without saving any changes. Save Changes Save the changes done so far to any of the setup options. Discard Changes Discard the changes done so far to any of the setup options. Restore Defaults To restore and load the optimized default values, select this field and then press <Enter>. A dialog box will appear. Select Yes to restore the default values of all the setup options . - 26 - PLXX-WCR User Manual Save as User Defaults To save changes done so far as user default, select this field and then press <Enter>. A dialog box will appear. Select Yes to save values as user default. Restore User Defaults To restore user default to all the setup options, select this field and then press <Enter>. A dialog box will appear. Select Yes to restore user default. Updating the BIOS To update the BIOS, you will need the new BIOS file and a flash utility, AFUDOS.EXE. Please contact technical support or your sales representative for the files. To execute the utility, type: A:> AFUDOS BIOS_File_Name /b /p /n then press <Enter>. - 27 - PLXX-WCR User Manual The PLXX-WCR Series comes with an AutoRun CD-ROM that contains all drivers and utilities that can help you to install the driver automatically. Insert the driver CD, the driver CD-title will auto start and show the installation guide. If not, please follow the sequence below to install the drivers. Step 1 – Install Chipset Driver 1. Click on the STEP1-CHIPSET folder and select the OS folder 2. Double click on the .exe file located in each OS folder 3. Follow the instructions that the window shows 4. The system will help you install the driver automatically Step 2 – Install VGA Driver 1. Click on the STEP2-VGA folder and select the OS folder 2. Double click on the Setup.exe file located in each OS folder 3. Follow the instructions that the window shows 4. The system will help you install the driver automatically Step 3 –Install LAN Driver 1. Click on the STEP3-LAN folder and select the OS folder 2. Double click on the .exe file located in each OS folder 3. Follow the instructions that the window shows 4. The system will help you install the driver automatically Step 4 –Install Touch Driver (Optional) 1. Click on the STEP4-TOUCH (Option) folder and select the OS folder 2. Double click on the .exe located in each OS folder 3. Follow the instructions that the window shows 4. The system will help you install the driver automatically - 28 - PLXX-WCR User Manual Step 5 –Install Rapid Storage Driver (Optional) 1. Click on the STEP5-RAPID STORAGE (Option) folder and double click on the setup.exe 2. Follow the instructions that the window shows 3. The system will help you install the driver automatically CONTACT INFORMATION If you have any questions, please contact us. Phone: +1 802 861 2300 Email: [email protected] - 29 -