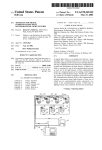
1
Construction Software for Model Plane Wings Version 1.1x User Manual VertriebsgmbH Haunspergstraße 90 A-5020 Salzburg / Austria Tel.: ++43/(0)662/459378-0 Fax.: ++43/(0)662/459378-20 e-mail: [email protected] Internet: www.step-four.at Introduction 1. Introduction Most airfoil programs are based on the construction of individual airfoils or tapered wings. The STEP-FOUR WING designer, however, enables you to build complex wings, including spars, joiners, leading and trailing edges, the sheeting, rudder flaps and fixrure supports, etc., interactively on your computer screen. Simply click on your choice of airfoil in the airfoil data base provided, which contains a fantastic selection of more than 1100 airfoils. Top performance without the need for special CAD knowhow The WING designer has an impressive range of features enabling you to design aerodynamic wings using any geometric data quickly and efficiently. When developing the program, STEP-FOUR made sure that the WING designer could be used by model builders at once, including those who have no experience with CAD programs. Window technology for an improved overview Several windows provide views not only of the top view of the wing but from every angle. You use the mouse to click on the spars, rudder flaps, sheeting and joiners so as to make sure these are located correctly. At a glance you can see if everything is perfect or if there is still a construction error. You notice immediately, for example, if a spar joiner or maybe even the sheeting is perforated. In a 3-D window it is also possible to rotate and move the wing inside a 3-D window anyway you like. As a result you always know exactly what the wing will look like in when it is finished. Includes more than 1100 airfoils The WING designer package includes a database with more than 1100 wing airfoils. In addition, for those of you who want to use your own airfoils, there is a powerful airfoil editor with which you can enter and edit airfoils using tables or graphs. In the event of an airfoil without any coordinates, you can scan it and load it as an image in the background with the airfoil editor, and then vector it easily and quickly. Airfoil editor (optional) Versatile output facilities © 2001 STEP-FOUR GmbH The WING designer is not only a comfortable construction tool, but also allows designs to be output professionally. If you have a plotter or large-scale printer, drawings can be output directly 1:1. If you only have an A3 or A4 printer, the drawing is split up into several sheets that can be joined up into one large, complete drawing. This is really easy, as the WING designer printouts are clearly marked to show where the sheets are to be joined up. In addition to the top view, set of ribs, front or side view, you can even output the sheeting and the leading and trailing edges separately. This makes it very easy to transfer the components to the actual material. -3- Introduction Interfaces for CAD systems and STEPFOUR equipment (optional) © 2001 STEP-FOUR GmbH In the case of special designs, the data can be output in a DXF format for processing in CAD programs. Model builders who already own a STEP-FOUR CNC milling or cutting machine really have an easy time, since special export modules are available that generate files directly in the correct format for the machine concerned. These export modules refer to the same basic data. In other words, simply press a button and the wing can be produced as a conventional rib construction or in the form of a foam core wing. -4- Program Structure 2. Program Structure The WING designer has been designed for the Windows 95 und 98 operating systems, so that Windows users will feel at home very quickly. Before constructing your first wing, however, you should look at the following user instructions, the main icons and hot keys. Certain symbols will look familiar, but get to know the special buttons. The Wing designer is controlled mainly with the aid of symbols and hot keys from the symbol bars. Here are the most important ones: 2.1. Symbols and Hot Keys General New: (Key combination: STRG+N) create new airfoil or new wing. Open file: (Key combination: STRG+O) open existing airfoil or wing file. Store file: (Key combination: STRG+S) stores an airfoil or wing file. Export: Either DXF or STEP-FOUR milling data (For additional milling and DXF export module only) Export: STEP-FOUR cutting data (For additional cutting module only) Print preview Print: (Key combination: STRG+P) opens the printer dialog window. Info: General information about program (version, registration, etc.) Help: Call online help system. Undo: (Key combination: STRG+Z) undoes previous step. Redo: (Key combination: STRG+Y) Opposite of Undo function Zoom in: (Key combination: NUM+) doubles size of section. Zoom out: (Key combination: NUM-) halves size of section. Zoom window: (Function key F11) enlarges the section you have selected with the mouse. Zoom: (Function key F12) fit in window. © 2001 STEP-FOUR GmbH -5- Program Structure Activate measurement function: (Object edit is deactivated.) Activate object edit: (Measurement function is deactivated.) Display coordinate system: Wing editing Activate window: Display / edit wing data alphanumerically. Activate window: Display / edit wing data graphically. Possible graphic views: Top view Front view Location of airfoils in relation to each other View of airfoils above each other Segment view of polystyrene blocks 1) Display polystyrene blocks above each other 1) Display set of ribs (shows calculated ribs) 1) for additional cutting editor module only Levels For a better overview individual graphic display levels can be switched on and off. © 2001 STEP-FOUR GmbH -6- Program Structure Inter-ribs Joiners Tx line Contour (View of ribs with segments) Spars Leading edges Trailing edges Sheeting Rudder flaps Part names Chord Skeleton line Original airfoil Coordinates (cutting editor only.) Activate window: 3D view of wing. Recalculate: All the wing data are recalculated based on current data. © 2001 STEP-FOUR GmbH -7- Program Structure Airfoil editor (Additional module) Smooth: The line of the airfoil is smoothed. Key combination: Shift+F5 Graphic view: Tabular view: Copy upper side to lower side: Function key: F7 Copy lower side to upper side: Function key: F8 Swap lower side with upper side: Function key: F9 2.2. Fly-Out Windows and Feature Menus Many edit functions are activated by means of fly-out windows. A fly-out window is activated by clicking on the right mouse button. Depending on which window or object is being selected, where the mouse pointer is pointing, etc. a certain window or menu is opened. Then certain features can be entered or modified directly in these windows or links to other functions are provided. Example After the command New -> wing click with the right mouse button in the empty area of the graphic display window to open a Fly-Out window. In the above example the function for modifying the display features was called next. Later on in the manual you will find further details about the various fly-out menus including practical examples. © 2001 STEP-FOUR GmbH -8- Program Structure 2.3. The Data Structure of a WING Designer wing Wing segments Every wing in the WING designer consists of at least one or several segments. Each segment defines a single construction section and can be defined geometrically (dimensions, dihedral (V-shape), sweep angle, airfoil, etc.). Segment 1 Segment 2 Simple wings will probably consist of only one or two segments matching the top view. Segment-related objects In addition, of course, the geometric data can also be defined for objects such as the leading and trailing edges, the sheeting, rudder flaps, etc. Seg1 Seg2 Segment3 Spoiler Seg4 Segment5 Seg6 Aileron For complex wings involving rudder flaps and complicated spar and dihedral V-shapes, therefore, several segments are required to define the extra elements. Segment-overlapping objects © 2001 STEP-FOUR GmbH Apart from the segment-related objects mentioned above, there are also parts that are defined as overlapping several segments or overlapping the entire wing. Spars and joiners belong to this category. The starting and final point of a spar always coincides with a segment limit, whereas joiners can be positioned freely within the wing. -9- Program Structure 2.4. Displaying the Wing Structure A wing can be displayed using three different methods. Alphanumerical Display Click on the switch to activate the alphanumerical display window. In the upper section a wing is shown in the form of a hierarchic component tree. In the lower window section the corresponding data are displayed for the selected component. By clicking on a certain object with the right-hand mouse button the fly-out menu corresponding to this object is opened. In the drawing above, for example, the current segment is to be deleted. Click on the + or – box to switch the display of the segment on or off. INFO In the case of certain mouse drivers the function of the right mouse button can be defined individually. You must therefore set the function of the right mouse button in the <context menu>. Otherwise you will not be able to open these fly-out menus. Graphic Display In order to work in a graphic switch. window, click on the Here you can edit most parts and settings with the aid of the mouse. The corresponding numerical values are updated automatically after every graphic modification. At the same time numerical modifications to the alpha window are also always shown in the graphic display window. Click on the right mouse button to open the fly-out window related to the object concerned. © 2001 STEP-FOUR GmbH - 10 - Program Structure 3D View To check your construction data you can also display a wing in perspective in 3D. For this you click on the switch. After activating the window, hold down the left mouse button and rotate the wing anyway you like. Click on the right mouse button to change the mouse function mode. Watch out for the mouse pointer symbol on display. In addition to the rotation function, you can move the coordinate origin and enlarge or reduce the size of the display. If you move the mouse pointer to the left edge of the window, a menu will unfold with various features for displaying the wing. To show the interribs, start by calling view for the the set of ribs in the INFO graphic display window, because only then will all the inter-ribs be calculated. © 2001 STEP-FOUR GmbH - 11 - Program Structure © 2001 STEP-FOUR GmbH - 12 - Wing Editor 3. Wing Editor The WING designer is purely a construction program. In other words, the user is assumed to have the necessary experience of aerodynamic, material durability and construction technology. Before you start designing a wing, you should therefore have a clear idea of its required appearance and design. 3.1. Defining the Geometric Data for the Wing In the following example we will design the wing for a high-speed electric plane. The geometric data for the wing originate from an F3B glider with the following criteria: Wing data Wingspan: 290 cm Wing geometry: triple tapered with laminated balsa tip, outer segments 3° dihedral (V-shape) Tapered wing: RG14-9 on RG14-10 Rudders: ailerons and flaps with 4 servos Root airfoil: 250 mm Tip airfoil: 180 mm Joiner: 10mm carbon rod bearing in 11mm brass tube (0.5 mm wall thickness) Rear edge: swept forward by 5, 13 and 24 mm (straight hinge edge!) Make a sketch with the main dimensions for the wing geometry and enter all the relevant measurements. 3.2. Defining the Wing using the WING Designer Start WING designer Start the wing editor by clicking on the New file icon, select the wing editor and confirm with Ok. © 2001 STEP-FOUR GmbH - 13 - Wing Editor The STEP-FOUR WING designer opens the graphic display window showing a wing segment. In the other half of the screen the alphanumerical input window is opened. Since the F3B wing consists of three segments, you must attach another two segments to the given segment. Attach 2nd segment Attach 3rd segment Click with the right mouse button on the wing segment in the graphic window and then on Attach segment in the fly-out window. This generates the second segment. Use the same method to attach the third segment. Then click on Fit in to display all the segments in the graphic window. If you do not see the entry mask (screenshot below) on your screen, click on the table icon Activate alphanumerical input in the symbol bar. Click on the Segment #1 entry in the hierarchic tree under Wing to activate the input fields for this segment in the lower part of the window. © 2001 STEP-FOUR GmbH - 14 - Wing Editor Define wing contour Set units The lengths, depths and sweep angles have to be set for each of the wing segments. Behind each input field there are buttons with the units (relative to segment root), (absolute in relation to origin of coordinates), and , respectively. Click on the switches to select the unit you require. Now enter the parameters for each wing segment in turn: INFO © 2001 STEP-FOUR GmbH Any change in value in an alphanumerical field means the data concerned have to be recalculated. In the case of complex wings such changes would lead to considerable delays. This is avoided by waiting a while after data input before carrying out a new calculation. If entering a multidigit number is very slow, the delay can be passed over and the input field reset. To avoid problems caused by input errors, you can set the time-out to between one and five seconds in the Calculation time-out field in the Options -> Basic settings menu. - 15 - Wing Editor Geometry segment 1 Segment length: 725 mm Root airfoil: RG14-9, depth = 230 mm Tip airfoil: RG14-9, depth = 210mm. Sweep angle: tip = -5mm. Dihedral (V-shape): top side = 0°. Select airfoil Use the database. switch to enter the airfoil data from your airfoil Once the option field is active, you can see the contour of the selected airfoil on the screen. INFO © 2001 STEP-FOUR GmbH The range of airfoil data is relatively large, as over 1100 files are included. To save time when searching, enter the initials followed by an asterisk (e.g. rg*) as the file name. Then only the airfoil files from the Rg series will be shown. Select the rg149.S4P airfoil. The wing section is tapered from the second until the end of the third segment. The first wing segment is not tapered. Load rg149.S4P as the tip airfoil as well. - 16 - Wing Editor Geometry segment 2 Enter the parameters for the second wing segment. Segment length: 480 mm Root airfoil: Already defined (by tip airfoil of segment 1) Tip airfoil: Not defined = tapered, depth = 170mm. Sweep angle: tip edge = -8mm. Dihedral (V-shape): Lower side = 3.5°. Do exactly the same thing for the third wing segment. Geometrie Segment 3 Segment length: 155 mm Root airfoil: Already defined for tip airfoil of segment 2. Tip airfoil: RG14-10, depth = 119mm. Sweep angle: tip edge = -11mm. Dihedral (V-shape): lower side = 3.5°. © 2001 STEP-FOUR GmbH - 17 - Wing Editor Switch to graphic view In the graphic view ( switch in the symbol bar you can already see the wing geometry of the F3B wing after the adjustment with . The dotted line stands for the T/4 line (25% of cord length). button you get the front view of the wing: With the aid of the The centre piece is not dihedral, the two outer segments are 3.5° dihedral. 3.3. Inserting Spars in the Wing Switch to front view Now insert the main spar into the wing. Since this is a triple tapered surface with a varying sweep angle, the spar is not straight, so that a separate spar must be fitted for each segment. Spar #1 is located in the 1st segment Spar #2 is located in the 2nd segment Spar #3 is located in the 3rd segment Click with the right mouse button on Wing and then on New spar. © 2001 STEP-FOUR GmbH - 18 - Wing Editor Spar in 1st wing segment For the spar we will use pine with a diameter of 6 x 3 mm. Since the wing is completely veneered, the spar should disappear underneath the sheeting. The main spar is to extend along the ribs on the top and bottom sides and is to be aligned with the airfoil. The spar should also be aligned at the highest point on the airfoil. To do this activate the corresponding option fields as indicated in the screenshot. Spar in 2nd wing segment The spar in the second segment is defined in exactly the same way, except that here number 2 is given as the starting and end segment. © 2001 STEP-FOUR GmbH - 19 - Wing Editor Spar in 3rd wing segment Finally do the same for spar #3. In the graphic view (below) you can see the position of the main spar in the wing. © 2001 STEP-FOUR GmbH - 20 - Wing Editor 3.4. Leading Edge Click on the + sign in front of Segment 1 to open the detailed structure of the segment. Select the L.E/T.E entry to display the input fields for these objects in the lower part of the window. The WING designer features three leading edge formats: Cut off Tube Here the front of the L.E. is cut off vertically to the chord at the position indicated. Using this format you can fit a CFK tube, for example, into the leading edge. You can select any diameter for the tube. Fixture support cut out With the aid of the fixture support format, a leading edge with notches for the ribs is produced. The notches in the L.E. and in the rib are always half the defined width. Later, when the wing is assembled, the leading edge produced serves as a fixture support for the exact space between the ribs. Further options allow the alignment of the airfoils to be varied or an insertion under the sheeting. A cut out merely means that the leading edge is not milled. Usually a pine strip of a matching size is inserted. The width of the cut out in the rib matches the width of the strip. Leading edge 1st segment © 2001 STEP-FOUR GmbH In our F3B wing we will insert a fixture support as the leading edge. Enter the values shown here. - 21 - Wing Editor In most cases the follow-on segments for the L.E. will have the same shape. Leading edge follow-on segments To avoid having to enter the data again and again for each segment, click on the checkbox Compute from previous segment. 3.5. Trailing Edge Cut section For the trailing edge there are two formats available, which you can also combine: If a bought milled T.E. is used, a cut section is defined as the trailing edge. The T.E. notch looks just like that of the leading edge. Please note: Airfoils with very thin trailing edges may have to have a very wide fixture support because of the Fixture support wall thickness required. Cut section and notch combination Make T.E. using sheeting © 2001 STEP-FOUR GmbH By combining the notch and section types, the necessary width can be reduced. This type of construction is particularly suitable if you intend using ready-milled solid balsa or a foam core with balsa sheeting as ailerons. In our example a very thin airfoil is used. A solid aileron cannot be used because of the weight, so neither of the two trailing edge types is activated in the screen mask. The T.E. is therefore formed by the top and bottom sheeting only. - 22 - Wing Editor 3.6. Ailerons The STEP-FOUR WING designer generates ailerons with a dihedral section at the lower side of the wing. For this the program needs four parameters: The flap position, either related to the "t´" leading edge of the airfoil or to the "t" trailing edge, the sheeting thickness in the rudder slot marked "s" and the two angles, α and β. Flap definition The rudder depths for the flap and aileron can be found in the construction drawing at the beginning of the manual. Segment #1: Flap position of root rib = 51 mm Flap position of tip rib = 46 mm Select 2 mm for the sheeting thickness. To achieve large rudder amplitude, set both angles to 10° and 25°. Enter the data into the mask for the flaps as shown above. © 2001 STEP-FOUR GmbH - 23 - Wing Editor As for the first segment, enter the following data to define the flaps of the follow-on segments. Segment #2: Flap depth of root rib = 46 mm Flap depth of tip rib = 38 mm Segment #3: Flap depth of root rib = 38 mm Flap depth of tip rib = 27 mm You do not need to click on the entry in the component structure to switch from one flap to another. Using the and entry to another. keys you can switch from one component INFO © 2001 STEP-FOUR GmbH - 24 - Wing Editor 3.7. Defining the Sheeting Complete sheeting To improve the torsional strength of the wing, we want to sheet the top and bottom sides completely with 1.5mm balsa. Click on Segment #1 and then on Sheeting upper side. Clicken on , enter 1.5mm as the sheeting thickness and click on In the following segments the switch is activated automatically. Now the settings are valid for all the other segments as well. If you want to apply different settings for a segment, deactivate the switch. Then you can modify the data for that particular segment. In our example, however, it is not necessary to enter any more data. © 2001 STEP-FOUR GmbH - 25 - Wing Editor Display rib contour Click on the Rib set button and the milling contours of the root and tip ribs for all three segments will appear on the screen. Look at the narrow outer rib of the third segment and you get a good idea of the way in which the WING designer aligns the main spar to the airfoil contour and generates the outer contour of each rib. As a milled notch/fixture support must be used as the leading edge, it only has to be sanded a little. At the same time, the notch/fixture support sets the distance between the ribs. In the above screenshot the wing joiner has already been drawn, so that you can see that the 9mm joiner tube made of brass for the 8mm carbon rod does not fit behind the main spar. This is why the tube is simply placed in front of the main spar. © 2001 STEP-FOUR GmbH - 26 - Wing Editor 3.8. Wing Joiner Please note You can choose between circular and rectangular wing joiners. Wing joiners sometimes only protrude a little into a segment or serve to connect two wing sections, thereby protruding into two segments. That is why wing joiners are the only objects in the WING designer program that can be defined completely separately from the segment data or limits. But this means that you must ensure that the joiner is really located at a sensible position when defining it. In theory you could even locate a joiner a long way outside the wing. The drawing shows the connection between a wing center piece and the outer wing. In the top view the connection looks fairly adequate. But seen in 3D, the connection is clearly totallyimpractical. Insert joiner © 2001 STEP-FOUR GmbH To insert a joiner in the wing, click with the right mouse button on Wing and New joiner. - 27 - Wing Editor Joiners at the wing root We wish to insert a tube with an outer diameter of 11mm and a length of 170mm as the main joiner in the root area of our wing. A second joiner 4mm in diameter and 50mm long is to lock the two wing halves into place. Such joiners can be positioned in the root area by using the fields underneath the and entries. In our example the two joiners are to be centered on the center line of the airfoil. Enter the following parameters for joiner 1. First joiner and fields are The calculated automatically and so do not need our attention here. Enter the following data to lock the wing halves. Second joiner © 2001 STEP-FOUR GmbH - 28 - Wing Editor After completing the input, you can view the wing in the graphic display window. Simply click on the switches Graph and Top view . Now you can see the position of the joiner tube and the lock. Joiner on outer wing To be able to produce a speed and/or a thermic version of the wing, it should be possible to exchange the end segment by inserting a joiner. This is done by inserting two 4mm tubes into segments 2 and 3. To be able to position the joiners in relation to the origin of the coordinates, you must activate the fields (X0) and (Y0). The exact positioning is carried out by indicating the absolute values in the and fields. 1st outer joiner Add another joiner by clicking with the right mouse button on Wing and New joiner. Next enter the data shown below into the mask. © 2001 STEP-FOUR GmbH - 29 - Wing Editor When switching to the graphic view and zoomin, the joiner should look roughly like this from above.. Graphic control Zoomed front view of the same joiner. INFO 2nd outer joiner To become familiar with the effects of the data you input, it is a good idea to change various values and check the results in the graphic view. You can also use the mouse to alter the position of the joiner in the graphic window. Position the mouse pointer on the end of the wing you wish to change, hold down the left mouse button and drag the joiner into the desired position. Observe the effects on the alphanumerical values, too. Insert a fourth joiner and define it as shown below. © 2001 STEP-FOUR GmbH - 30 - Wing Editor Double final rib In order to produce a removable segment 3, the rib involved has to be made twice: once as a final rib for segment 2 and once again as a root rib for segment 3. Do this as follows: Select the input mask for segment 3 and activate the field. Now the view of the set of ribs should look like this: As you can see, a final rib is output for segment 2 as well as a root rib for segment 3. © 2001 STEP-FOUR GmbH - 31 - Wing Editor 3.9. Mounting the Ribs in the Wing Now it is time to define the wing ribs. In the vicinity of the joiners the ribs should be mounted somewhat closer together. In the remaining areas a certain number of ribs are to be distributed evenly. Zwischenrippen einfügen With the right mouse button click on the first segment of the wing. This opens the fly-out menu for editing the segment. Select the menu item In the joiner area the ribs are to be spaced at fixed 40mm intervals. The main joiner is 170mm long, so that four ribs need to be inserted. The material should have a thickness of 2mm. Ribs with fixed spacing Enter the values as shown above. Click on transfer the data. © 2001 STEP-FOUR GmbH to - 32 - Wing Editor Fill up with remaining ribs The remaining ribs are to fill up the whole segment and are to have approx. 60mm spacing between them. Click again with the right mouse button in the empty area of the first segment. Call the Insert several ribs function. Activate the button. If you now alter the number of ribs, the relevant rib distribution will be shown in the field Rib spacing. The graphic window also displays a preview of the ribs. Select 8 inter-ribs. This is equivalent to a spacing of just over 62mm. Then click on Ribs in outer joiner area . Define the joiner in segment 2 as you did for the ribs in the wing root. As the joiner is shorter, only 22mm are indicated. In addition, you must activate the button for the to locate the ribs as calculated from the end of the segment. The same method is used to position the two ribs in the third acts as the reference point here). segment (except that © 2001 STEP-FOUR GmbH - 33 - Wing Editor Inter-ribs Seg. 2 and Seg. 3 Ribs in Segments 2 and 3 Finally the remaining inter-ribs in segments 2 and 3 are inserted. With the right mouse button click in corresponding area of the segment and enter the following values: Segment 2: The vacant area in the second segment is filled with 6 ribs (spacing is approx. 62mm). Segment 3: Grafische Kontrolle Graphic control © 2001 STEP-FOUR GmbH In the last segment two ribs are inserted (spacing approx. 35mm). Once all the ribs have been inserted, the wing for our electric glider will look like the one shown below. Ribs with a joiner slot are not milled from 2mm balsa wood but from Airply with the same thickness. - 34 - Wing Editor Look at set of ribs By clicking on Set of ribs you can look at the layout of the whole set of ribs. Use one of the four magnifying glasses to zoom one or several ribs or to look at a construction detail. Store wing © 2001 STEP-FOUR GmbH Click on to store the wing data on your hard disk. Enter the file name E-glider complete sheeting. - 35 - Wing Editor 3.10. Building a Wing with Partial Sheeting If light wing loading is more important to you than stability, you can use the WING designer to design a wing with partial sheeting. Later you will iron light-weight foil onto the wing. If you intend building an oldtimer model, then of course you will have to use tissue. To facilitate the assembly of a partially sheeted wing, it is recommended to pull the front sheeting over the main spar and to let the rear sheeting protrude by 10 to 20mm over the hinge slot of the ailerons and flaps. This has to be done for both the top and bottom sheeting. If the wing has been joined and dried out, cut the flaps out along the hinge slot. Enter the following parameters for the three wing segments: Top sheeting segment #1 Segment #1 top: Top sheeting: 1.5mm partial sheeting in front: up to first spar Partial sheeting behind root: 51+20 = 71mm Partial sheeting behind end: 46+20 = 66mm © 2001 STEP-FOUR GmbH - 36 - Wing Editor Top sheeting segments #2 and #3 Deactivate the checkbox as well and use the same method to enter the data for segments 2 and 3. Segment #2: top Top sheeting: 1.5mm Partial sheeting in front: up to first spar Partial sheeting behind root: 46+20 = 66mm Partial sheeting behind end: 38+20 = 58mm Segment #3: top Top sheeting: 1.5mm Partial sheeting in front: up to first spar Partial sheeting behind root: 38+20 = 58mm Partial sheeting behind end: 27+20 = 47mm Bottom sheeting Enter the same parameters for the bottom sheeting of the three wing segments as well. switch, the sheeting thickness is If you switch on the also deducted between the front and rear partial sheeting. In the case of our sample wing this switch is not activated. © 2001 STEP-FOUR GmbH - 37 - Wing Editor Check sheeting INFO © 2001 STEP-FOUR GmbH In the graphic display window click on for the set of ribs to get a view of the location of the partial sheeting, as shown in the screenshot below. If the front sheeting only reaches the front edge of the main spar, the main spars are not set lower, but are aligned along the airfoil contour. - 38 - Wing Editor 3.11. Print Output of the Wing Data Graphic output Now you can print the entire wing including the set of ribs, sheeting and fixture support, either as an overview or to scale, on your standard Windows printer. Since the WING designer generates cutting marks, joining the sheets up into a 1:1 scale construction drawing is not difficult. What the printed output looks like basically depends on the printer settings (format size, portrait or landscape format, etc.). Output of top/bottom In the normal graphic window switch view Click on the print preview symbol INFO switch right/left wing to the top view. . A screenshot like the one below is displayed. Which elements are output depends on the setting of the levels in the graphic window of the WING designer. Only the levels that are activated in the graphic window are printed. If you use the standard settings the right half of a wing will be printed. To print the left side you have to proceed as follows: window. Switch to the Graph Click with the right mouse button into the cross section of the rulers Change in the properties window to and change the radio button for the © 2001 STEP-FOUR GmbH direction. - 39 - Wing Editor Output of a 1:1 drawing To output a 1:1 drawing, switch the display to 100% and activate the Marking checkbox. The drawing is now divided into single sheets according to the printer format. In the case of an A4 printer using the landscape format the screen will look like the shot below. Overview © 2001 STEP-FOUR GmbH To see how the drawing is divided, activate the checkbox and you will see the following display on your screen: - 40 - Wing Editor The overview shows us that 12 A4 sheets are required to print the drawing 1:1. Presumably fewer sheets are needed to print in portrait format. Set print layout page Click on the layout symbol to adjust the settings. Select for the paper and click on . The Margin entry indicates how much margin is to be left during the printout. The overlap values show by how many millimetres the printed areas of the sheets are to overlap. As you can see in the screen shot below, the wing layout in our example can be output in eight separate sheets. © 2001 STEP-FOUR GmbH - 41 - Wing Editor Output of other views All the other angles can be output as described for the top view. All you have to do is select the required angle from the bar of switches window. in the graphic display In the example below, for example, a 1:1 set of ribs is output. Alphanumerical output If you have activated the alphanumerical input window instead of the graphic window and you call the print preview function, the data are output in the form of a list. © 2001 STEP-FOUR GmbH - 42 - Output of DXF- HPGL and Milling Files 4. Output of DXF- HPGL and Milling Files (Optional module) With the aid of this optional module the wing data can be used for other purposes in a CAD program or transferred directly to your STEP-FOUR milling machine as SMF milling files. The export window File formats file format in which the required Select to define the data are to be exported. You can choose between three different formats: SMF file DXF file HPGL file © 2001 STEP-FOUR GmbH STEP-FOUR milling files. Autocad Data eXchange Format (commonly used import format for CAD systems) command language for HP plotter systems (can be imported by many drawing and milling systems) - 43 - Output of DXF- HPGL and Milling Files Export options Output units The field defines how the numeric values are to be converted during output. For SMF files the conversion is always 1:1. In other words, 1mm in the WING designer corresponds to 1mm in the milling software. In DXF files the measurement unit is not defined, so that a value of 1.0 originating from a CAD program may be interpreted as 1 inch = 25.4mm. Depending on the units prescribed by your CAD or milling program, you will have to adapt the value for the file units. In the above example therefore you would have to enter 1/25.4 = 0.039370. Three basic export options are available: In the set of ribs version, the cross-sections of all the ribs are output. Using the checkboxes you can indicate which elements are to be output. If you need the output file as a milling file, for your STEPFOUR milling machine for instance, simply click on the and, if necessary, . checkbox The contour/ribs elements contain the entire contour and taking all the sheeting, spars, etc. into account. If, on the other hand, you wish to use the data for further processing in a CAD program, you can select the elements that are to be output individually. In other words, each element is available for further processing. © 2001 STEP-FOUR GmbH - 44 - Output of DXF- HPGL and Milling Files In the section shown below that is separated by a line, additional objects can be output separately. Activate the checkboxes and to export the contours of these objects. Using the and fields, you can output the sheeting procedure. This gives you the exact geometric data for producing matching sheeting components. In addition to outputting individual components, you can also output the top view or the front view of a wing in the form of a file, which is useful, if these data are to be processed further or implemented in a complete CAD drawing. If one of these output options is selected, the checkboxes for certain elements are blocked, because there is no point in outputting a trailing edge or the definition of a flap in the front view. © 2001 STEP-FOUR GmbH - 45 - Output of DXF- HPGL and Milling Files © 2001 STEP-FOUR GmbH - 46 - Styrofoam Cutting (optional module) 5. Styrofoam Cutting (optional module) Cutting with the WING designer is even easier than milling. Let us take the wing of an electric glider as our example. We want to improve the wing's stability and make it a high-tech wing. The wing is to have a carbon spar and only 1mm of balsasheeting. For the spar we will use a carbon-fibre airfoil from R & G with a diameter of 7 x 1 mm and a length of 2 metres (order no. 600 130-2). Since the spar of a cut wing is thinner than in the milled version, it can be positioned at the highest point of the airfoil without colliding with the joiner. At the end of the construction phase we will export the foam core data to the STEP-FOUR polystyrene cutter. The connecting ribs will also be output to the STEP-FOUR milling machine and milled from 2mm sheets of epoxy. 5.1. Modifying the Wing Data Delete superfluous parts Open the wing file, which you previously stored under the name Electric Glider Complete Sheeting. Delete all the inter-ribs. With the right mouse button click on the joiner #4 entry and delete it. Do the same for joiner #3, joiner #2, spar #3, and spar #2. Deactivate the leading edges and the flaps. The top view should now look like the screenshot below. © 2001 STEP-FOUR GmbH - 47 - Styrofoam Cutting (optional module) Insert segment The 11mm hole for the wing joiner is to coincide with the core cut. But as we do not want the hole to be drilled through the entire first segment, an additional segment is inserted. Click within the area of the first segment with the right mouse button to open the fly-out menu. Call the function Insert segment. Enter the values into the screen mask as shown in the screenshot. With a new segment limit is inserted at the end of the joiner. Adjust spar In the two first tapered sections the carbon-fibre airfoil is to be mounted as the spar. Since the first tapered section consists of two segments, the spar must therefore run from segment 1 to segment 3. To prevent the spar from protruding anywhere out of the foam core, we will add 1mm to the thickness. Instead of 7 x 1mm enter 8 x 2mm for the spar measurement. © 2001 STEP-FOUR GmbH - 48 - Styrofoam Cutting (optional module) Adjust segment As mentioned earlier, the joiner can be located at the highest point of the airfoil because of the thin spar. Activate the entry for the X starting position. All the other entries can remain unchanged. Adjust sheeting For the sheeting we will select 1mm balsa complete sheeting. Modify the sheeting values for both the top and bottom sides of the wing. © 2001 STEP-FOUR GmbH - 49 - Styrofoam Cutting (optional module) As opposed to the milling procedure, a wing core can be cut in various ways. The top and bottom sides of the core are always cut separately from the front. In this version the cutting wire is unlikely to sag in the area of the leading edge. As a result, the leading edge of the core is much more accurate. A big disadvantage here are the extremely long dry runs required during the cutting procedure. The core is cut in one go, starting at the rear edge of the core, around the leading edge and back to the rear edge. One disadvantage is that if the wire sags, it can badly distort the L.E. To save time when handling blocks of raw material, it is also possible to activate a mirror-image cut. In this version two cores are output above each other, whereby the upper core is inverted along its longitudinal axis. This enables a right and left core to be cut in a single operation. Setting the cutting parameters Set the cutting parameters for the segments as shown in the following screenshots. Should something in the graphic display window not be clear, please refer to the online help system. Segment #1 © 2001 STEP-FOUR GmbH - 50 - Styrofoam Cutting (optional module) Segment #2 The same values are set for segment #2. The graphic display for the two blocks and the cutting procedure Segment #3 should look like the screenshot below. In our example, the dihedral (V-shape) of the wing should have been cut when the tapered areas were cut. This means segments 3 and 4 require much thicker blocks of raw material than for the first two segments. The following block parameters are set: The run-in and run-out parameters are the same as those for the previous segment. Segment #4 © 2001 STEP-FOUR GmbH Segment 4 is different, because it has a greater block thickness. - 51 - Styrofoam Cutting (optional module) The following screenshot shows the two final blocks graphically. The views of the blocks show you clearly how the wing segments are located in the four blocks of polystyrene. 5.2. Exporting the Cutting Data With the aid of the export function the wing data can be used to create cutting files for the STEP-FOUR professional cutting software. Call export mask © 2001 STEP-FOUR GmbH Click on the data. switch to call the export mask for the cutting - 52 - Styrofoam Cutting (optional module) Create a subdirectory in your S4cut program directory. (As the S4cut software runs under DOS and so only uses eight characters for the directory and file name, you should also restrict your name to only eight characters.) Setting the export options Usually, the segments vary in length, so each segment is output in its own separate file. Enter a file name for the segment and in the entry select the number of the segment required. The normally be the standard output setting. setting will The output options of individual objects will only serve for special applications. In this case, the activated objects are output separately and the cutting procedure will have to be defined afterwards in the STEP-FOUR professional cutting software. © 2001 STEP-FOUR GmbH - 53 - Styrofoam Cutting (optional module) View of the cutting file The above screenshot shows a 3D view of the cutting file loaded into the STEP-FOUR professional cutting software. The block dimensions, the coordinates at the corner points etc. have all been preset. The only thing that still has to be defined is how the joiner is to be cut (in a single cut together with the top side or during its own cycle). Thanks to the powerful functions in the professional cutting software, these parameters can be set with a couple of clicks on the mouse. Then you merely have to select the material and you can cut the core. Inverted cut © 2001 STEP-FOUR GmbH If you activate the option Inverted cut during the parameter definition, a left- and right-hand segment will be cut above each other from the block. - 54 - Airfoil Editor (optional module) 6. Airfoil Editor (optional module) 6.1. Working with the Airfoil Editor The airfoil editor enables you to modify more than 1100 airfoils in the airfoil data base provided and adjust their definitions. But the main purpose of the airfoil designer is to digitize unknown airfoils from construction drawings and to prepare them for further processing by theWING designer as well as by the milling and cutting machines. All you need is a scanner that stores the airfoil concerned as a BMP file on the hard disk. Start airfoil editor With the left mouse button click on New. A selection window is displayed. Select airfoil editor and click OK. Display window The editor provides a tabular and a graphic view. Click on one of the active. buttons to decide which display window is to be In the table you can see the coordinates for the airfoil. Three formats are available: Table formats © 2001 STEP-FOUR GmbH X-Yo X-Yu: The coordinates are displayed in two tables. The first table contains the top side coordinates from the leading edge until the tip. The second table contains the lower side coordinates from the leading edge until the tip. - 55 - Airfoil Editor (optional module) X-Yo-Yu: This display is only possible if the coordinates have . The coordinates are been standardized with displayed in a three-column table. The first column contains the X coordinates from the L.E. until the tip. The second and third columns contain the Y coordinates of the top and bottom sides. Standardize means: The airfoil editor generates a point (with the same X coordinate) on the bottom of the airfoil to match every point on the top of the airfoil, and vice versa. X-Y(100-0-100): The coordinates are displayed in a table. Here the coordinates are shown from the tip of the airfoil, along the top to the L.E. and along the bottom back to the tip (100% - 0 100%). This type of display is used for Eppler airfoils especially. 6.2. Digitizing Unknown Airfoils To be able to digitize a scanned airfoil, the airfoil must be available in a bitmap format (*.BMP). A sample file in this format is already stored in the airfoil directory. To process the sample file, proceed as follows: Load background Click with the right mouse button on the graphic input window and then on Features, Background, . Open the profscan.bmp file in the Airfoil directory and © 2001 STEP-FOUR GmbH - 56 - Airfoil Editor (optional module) click in the features window on . The lower section of the scanned picture is aligned along the red chord. Move origin of coordinates Now the red chord must be placed in the center of the scanned airfoil. With you zoom in the area of the L.E. Click on the origin of the coordinates between the two rulers, hold down the left mouse button and place the origin exactly on the point of intersection of the chord and the vertical line most in front. If you click on you should be able to see the following window on the screen. At the rear of the airfoil, the red center line and the tip of the airfoil in the scanned image do not as yet match up. The chord of the scanned airfoil is clearly somewhat distorted and the depth is shorter than the 100mm of the red center line. © 2001 STEP-FOUR GmbH - 57 - Airfoil Editor (optional module) Move end points Enlarge the rear section of the airfoil. With the left mouse button click on the end point of the red line, hold down the mouse button and drag the point to the end of the scanned airfoil contour. Now you have moved the final coordinate of the top side of the airfoil to the end of the scanned chord. Next, move the end of the bottom of the airfoil into the same position, too. Digitize airfoil With the left mouse button click once on the outer contour of the airfoil. Position the mouse pointer at the required location and press the right mouse button to open the fly-out window and insert a coordinate for the top side. Alternatively, you can use function keys. Position the mouse pointer at the required location and press the <F3> key to insert a point in the top side. Move the display range and so digitize the entire top side of the airfoil. Nine to ten coordinates are quite sufficient. Use the same method to set coordinates for the bottom of the airfoil. Using the function keys, set a point along the bottom with the aid of <F4> . © 2001 STEP-FOUR GmbH - 58 - Airfoil Editor (optional module) Smooth airfoil At the L.E. and along the airfoil contour the rib still looks jagged. But we can soon change this. If you click on the Symbol smooth airfoil. The Wing designer smooths all the coordinates and calculates the curve of the L.E. to switch off the If you click on background, you will see a beautifully rounded, digitized airfoil and curvature line on the screen. Look at the chord and you will see that it points slightly upward (like the scan previously). In order to be able to use the airfoil in the database like any other airfoil, you must ensure that the chord is horizontal. Align chord Click anywhere in the display area with the right mouse button to open the fly-out menu for processing the airfoil. Click on the item Align chord. This causes the airfoil coordinates to be converted and the chord becomes horizontal. © 2001 STEP-FOUR GmbH - 59 - Airfoil Editor (optional module) Scale airfoil Finally, the airfoil is scaled so that the X coordinates are exactly between 0 and 100. Open the fly-out menu again and click on Features. Enter 100mm for the depth in the airfoil parameters card and the airfoil will be scaled to a standard depth of 100mm. Close end of airfoil In the table you can see the coordinates that the WING designer has generated for you fully automatically. The last two points of the top and bottom of the airfoil have been positioned approximately by hand. As a result these points will not usually be situated exactly on the zero line. For certain airfoil editor calculations, however, the Wing designer needs a precisely closed contour. To achieve this, set the coordinate values for the last two points at X=100 and Y=0. Store airfoil data For further use you can now add the digitized airfoil to your airfoil database. © 2001 STEP-FOUR GmbH - 60 - The Options Menu 7. The Options Menu The Options menu provides various facilities, depending on what section of the program you are currently working on. If you are using the airfoil editor, the Options menu will enable you to set the display parameters for processing the airfoil. Options in the wing editor In the wing editor, however, a wider range of functions and settings are available. In the submenu Basic settings you can set certain parameters to suit your requirements. Labelling font: Here you can select the font with which you wish to label the parts. Calculation timeout: In order to update the graphic display of a wing, the wing data need to be recalculated whenever a numeric input field is altered. The input of multidigit numbers would therefore call for a complete calculation after every number, which would lead to considerable delays. This is avoided by indicating a value between one and five seconds in the calculation timeout field. Choose the time value that suits your purposes best. In the file index cards for the various objects you can preset the values that are transferred automatically when the part concerned is inserted. In addition to the dimensions, positions, etc. various codes can be set for the ribs and L.E./T.E. Rib codes In the field an individual code sequence can be composed by indicating a combination of fixed and variable characters. Variables begin with „&“ and a letter following this that stands for the text or number that is to be implemented. Click on the button to display the list of all the possible variables. Select the required variable and it will be transferred to the code field. © 2001 STEP-FOUR GmbH - 61 - The Options Menu List of possible variables: &b Name The text for the name or rib code is entered. &B &S &n &N &g &G Example Airfoil file The file name for the airfoil used is inserted. For inter-ribs with different end airfoils "tapered" is included instead of the file name. Segment number The segment number is included. Element number related to the segment The current number related to the matching segment is included. Element number related to the wing The current number related to the entire wing is included. Rib total related to the segment The total number of ribs in a segment is included. Rib total related to the wing The total number of ribs in a wing is included. To label the root ribs the following code sequence has been defined. Text „Seg.“ Variable &S (=segment number) Text “-“ Variable &b (= text defined in the name field) Text „/R“ Variable &N (=consecutive rib number related to the wing) Text „of“ Variable &G (=total number of ribs in the wing) The entry in the screen mask is as follows: © 2001 STEP-FOUR GmbH - 62 - The Options Menu This generates the graphic text below for a rib: This method helps you compose rib codes that meet your personal requirements. You can follow the same principle to construct names for the fixture support of leading and trailing edges. This command enables you to update all your labels by merely pressing a button, if you want to alter the structure of the label or select a new labelling font. This function serves to adjust colours, the thickness of lines, line type, etc. for the screen and printouts. © 2001 STEP-FOUR GmbH - 63 - The Options Menu © 2001 STEP-FOUR GmbH - 64 - Content Content 1. INTRODUCTION ................................................................................................................... 3 2. PROGRAM STRUCTURE .................................................................................................... 5 2.1. SYMBOLS AND HOT KEYS ....................................................................................................... 5 2.2. FLY-OUT WINDOWS AND FEATURE MENUS ............................................................................ 8 2.3. THE DATA STRUCTURE OF A WING DESIGNER WING ............................................................. 9 2.4. DISPLAYING THE WING STRUCTURE ..................................................................................... 10 Alphanumerical Display................................................................................................................. 10 Graphic Display ............................................................................................................................. 10 3. 3.1. 3.2. 3.3. 3.4. 3.5. 3.6. 3.7. 3.8. 3.9. 3.10. 3.11. WING EDITOR..................................................................................................................... 13 DEFINING THE GEOMETRIC DATA FOR THE WING ................................................................. 13 DEFINING THE WING USING THE WING DESIGNER ............................................................... 13 INSERTING SPARS IN THE WING ............................................................................................. 18 LEADING EDGE...................................................................................................................... 21 TRAILING EDGE ..................................................................................................................... 22 AILERONS ............................................................................................................................. 23 DEFINING THE SHEETING ....................................................................................................... 25 WING JOINER ........................................................................................................................ 27 MOUNTING THE RIBS IN THE WING ....................................................................................... 32 BUILDING A WING WITH PARTIAL SHEETING ........................................................................ 36 PRINT OUTPUT OF THE WING DATA ...................................................................................... 39 4. OUTPUT OF DXF- HPGL AND MILLING FILES.......................................................... 43 5. STYROFOAM CUTTING (OPTIONAL MODULE)........................................................ 47 5.1. 5.2. 6. 6.1. 6.2. 7. MODIFYING THE WING DATA ................................................................................................ 47 EXPORTING THE CUTTING DATA ........................................................................................... 52 AIRFOIL EDITOR (OPTIONAL MODULE) ................................................................... 55 WORKING WITH THE AIRFOIL EDITOR ................................................................................... 55 DIGITIZING UNKNOWN AIRFOILS .......................................................................................... 56 THE OPTIONS MENU......................................................................................................... 61 © 2001 STEP-FOUR GmbH - 65 -