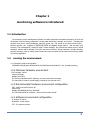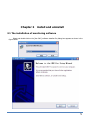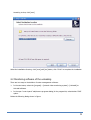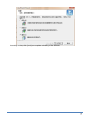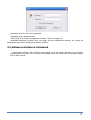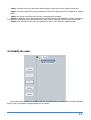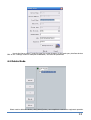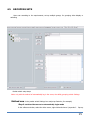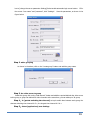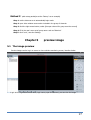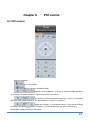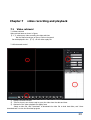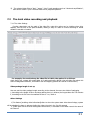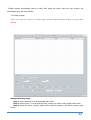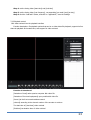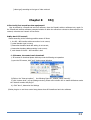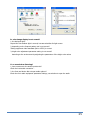
1
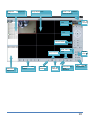
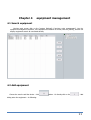
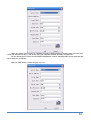
1
contents
Chapter 1 monitoring software is introduced.
1.1 Introduction.............................................................................................................4
1.2
running the environment.......................................................................................4
Chapter 2 install and uninstall
2.1 The installation of monitoring software..................................................................5
2.2 Monitoring software of the unloading`....................................................................6
Chapter 3 Operation and use
3.1 Run the software for the first time.........................................................................8
3.2 Log in.......................................................................................................................8
3.3 Software interface is introduced.............................................................................9
Chapter 4
equipment management
4.1 Search equipment...................................................................................................11
4.2 Add equipment........................................................................................................12
4.3 Modify the node.......................................................................................................14
4.4 Delete Node.............................................................................................................15
4.5 grouping setting......................................................................................................15
Chapter 5
preview image
5.1The image preview...................................................................................................18
Chapter 6
PTZ control
6.1 PTZ control...............................................................................................................20
2
Chapter 7 video recording and playback
7.1 Video retrieval.......................................................................................................... 21
7.2 The local video recording and playback..................................................................22
Chapter 8
FAQ ...................................................................................................................25
3
Chapter 1
monitoring software is introduced
1.1 Introduction
The monitoring center management software is used to implement centralized monitoring of front end
all network video monitoring equipment, storage, data forwarding, manage, and control.(Including the
network video server, network cameras, network, yuntai, etc)Can be set on any device and control,
Remote upgrade, etc;support 1/4/6/9/16/24/36 to display single picture,And two-way voice
intercom, user management, electronic maps, remote Settings, log retrieval and alarm control, mobile
detection, remote search playback,The video, and other functions. Simple operation, friendly interface,
powerful functions, easy to install, great convenience users to realize remote network monitoring system
of network application.
1.2
running the environment
1.2.1 Operating system configuration
32/64bitChinese/English Windows2000/2003/XP/Vista and Windows 7 ,etc ,operating system。
1.2.2 Minimum hardware environment
CPU: Pentium 2.0Ghz
memory:256 MB
Display card:TNT2
The sound card:Need speech listening, two-way radio when necessary
The hard disk:If need to record images, should be not less than 40 G
1.2.3 Recommended hardware environment configuration
CPU: Intel Core2 Duo E7400 2.8G
memory:2G
Display card:NVIDIA GeForce 9600GSO
The hard disk:SATAThe hard disk,More than 8 M cache,2000G
1.2.4 Software environment configuration
IE version 6.0 above
DirectX9.0 version above
TCP/IP network protocol
4
Chapter 2
install and uninstall
2.1 The installation of monitoring software
Select and double click on the [the CMS ] software installer file,dialog box appears as shown in the
figure below:
5
According to clew, click [next]
Select the installation directory, click [next],until [do ]button, click "finish" to complete the installation
2.2 Monitoring software of the unloading
There are two ways to the deletion of center management software:
Ø
In the start menu, select the [program]→[network video monitoring system]→[Uninstall] to
Uninstall software
Ø
In the open "control panel" add/remove programs dialog,In the program list, select delete "CMS"
option.
Delete the following dialog shown in figure:
6
According to clew, click [next] can complete unloading of the software
7
Chapter 3
operation and use
3.1 Run the software for the first time
Through the start menu of [application]→network video monitoring system→[CMS]Into the
software; Or double-click the desktop shortcut
To log in.
First run the software, the following dialog will appear, requires the user need to register an
administrator account
Users can according to the need to enter a user name and password, the user name and password for the
administrator login software use, should be properly kept
3.2 Log in
After registration will pop up the login dialog, after every run software as a pop up the login screen, the
following figure:
8
[username] enter the user name registered.
[password] enter registration code.
Chick [sure] to go into the management interface, "cancel" is logged out.
[Remember password] checked, when once again into the management software, the system will
automatically login center management software interface.
3.3 Software interface is introduced
Management software main interface screen display up to 64 images, according to the need to
manually switch the page, or it can be set automatically switch way round robin of the page to display
links to each channel.
9
Equipment
area
management
Screen lock, minimize
and close button
Image display area
Hard disk
information
time
PTZ
Camera control
Front and back
page
System
setup area
Image capture
Showing
Information
display area
switch
way
The voice
switch
Voice
intercom
Round robin and
packet
Video
retrieval
and playback
switching
10
Chapter 4
equipment management
4.1 Search equipment
Monitor main screen click on the [system Settings]→[monitory point management], into the
equipment management interface, if the equipment connection is correct, click the [search], column can
display equipment search all connected devices,
4.2 Add equipment
Choose the need to add the device,chick
button,Or directly click on the
,Add
dialog enter the equipment,As following:
11
Users can custom [server name] to facilitate the query interface devices.Correctly enter the server user
name and password to log in, click on the [set] can complete the add operation of equipment.
For the remote device control for centralized management, need to manually add a server, manually add
server steps are as follows:
Click the "add" button, set box will pop up is as :
12
Step 1: click the server type drop-down options dialog, choose the need to add the device type
Step 2: the server address bar, type the address of the device (please fill in the IP address or domain
name)
Step 3: the server name field enter the user customize the local name
Step 4: in data port, set up equipment data port, DVS/IP Camera, DVR defaults to [8200], the port can
be customized, according to the network setup port value to fill in the data, code flow type select "WAN".
Step 5: enter the server user name and password to log in, click "Settings" added complete
4.3 Modify the node
Choose the device needs to be modified, click the "modify" button, or double-click to modify equipment
directly, enter the equipment changes dialog box, as follows:
13
User to the [server name], [code flow type ]for custom changes, for the main query interface devices.
Click on the "Settings" button to complete modification, and save the parameters
4.4 Delete Node
Select need to delete the device, click [delete] button, can complete to remove the equipment operation
14
4.5
GROUPING SETS
Users can according to the requirements, set up multiple groups, for grouping video display or
switching
Packet switch setup steps
Note: only with the method of automatically log in the server, the ability grouping switch Settings
Method one: in the packet switch Settings box set(set up factories, for example)
Step 1: set the video server to automatically login mode
In the software window, select the video server, right-click and choose "properties", Pop-up
15
box to [change the server parameter Settings],Select enable automatic login server button, Fill in
the correct "user name" and "password", click "Settings", Save the parameters, as shown in the
figure below:
Step 2: add a grouping
As shown in the above, click on the "create group" button and add the group name
Step 3: the video server to group
Select this group, click on the "add channel" button and add the required delimits the video server
to this group, a group can delimit 36 video channels at the same time, you can add up to 36 group
Step 4: In [packet switching time interval] set cycle switch time between each group, the
shortest switching time interval for 5 s, the longest time interval of 120 s
Step 5: Select [applications] save Settings
16
Method 2:
quick setup packet(to set the "factory" as an example)
Step 1: set the video server to automatically login mode
Step 2: open video window area need to included in the group of channels
Step 3: click the right mouse button, select [the open channel for group save the current]
Step 4: fill in the user's own set of group name: such as "factories"
Step 5: click "sure", save the Settings
Chapter 5
preview image
5.1 The image preview
Preview image need to log in to server to view real-time monitoring screen, interface below:
Login server: right-click device name, login server, open the channel, you can view the image
17
images
Open channel: the right login device channel - open the channel, can view real-time surveillance
Showing way switch: by clicking on the main interface of the lower left button, can change the
monitoring picture display, single highest support 64 road, the following figure:
18
Chapter 6
PTZ control
6.1 PTZ control
Button instructions
On or off the lights
Open or close the windshield wiper
Adjust the zoom multiples, (+) for lens to achieve multiple increases,
(-) to the lens to achieve multiple is reduced, as shown in the above
The course is to choose the point clearly; By (+) and (-) to manually
adjust the focal length of the lens, the best definition, as shown in the above
Adjust into the light; (+) lens aperture open, (-) lens aperture closed,
as shown in the above
Click the direction, can be controlled well up, down, left and right
automatically rotate, as shown in the above.
19
Chapter 7
7.1
video recording and playback
Video retrieval
7.1.1Video retrieval
Video retrieval area as shown in figure:
【 2 】 select query video recording the date and time.
Set the channel and type of query. Click on the search
Can be displayed in the 【 3 】 all the video replay file
7.1.2On demand control
① .Replays showed interface
② .Time to choose, can choose need to query the video here the date and time.
③ .Retrieval of the video playback file display area
.Select a video file, click "download" to download the video file to local hard disks, and "show
download task" to view the download progress
20
④ .The selected video files to "play", "pause", "stop", local operations such as "electronic amplification",
also can be used to "open" the local video file to playback operation.
7.2
The local video recording and playback
7.1.1 The video Settings
Function description: set the path of the video file, under this option can be intuitive show drive
capacity, and the size of the space available, making it easy for users to choose according to actual
situation recorded on location
For example: the need to keep the video file in D disk, the method is as follows:
check the[D set], system will create folder in D packing directory NVFile, then all video files about this
center management software, information such as snapping pictures are stored in this directory
Video package length is set up
User can set the video package length according to the demand, there are two kinds of packaging
1, According to the length of time: minimum packing time is 1 minutes, the longest time was 720 minutes
2, According to the file size: the smallest file size is 1 m, 2048 m
Other Settings
1,This feature [enabling video beforehand]refers to when the system start video alarm linkage, system
will be admitted to alarm in advance before the video, the size in the 5 to 60 seconds
2, [Video path use the channel name]select this function, is recorded on the folder name is the name of
the channel
21
3,[Open channel automatically start the video] after select this option, after the open channel, will
automatically open the video function
7.1.2 Video program
Note: only under the premise of network video encoder adopts automatic landing, to timing video
Settings.
Timing video setup steps
Step 1: set the video server to automatically login mode
Step 2: select [server], in the drop-down menu, choose you need to make regular video server
Step 3: select the server requires regular video [channel] (based on the device channel route
choice)
22
Step 4: set the timing video [start time] and [end time]
Step 5: set the timing video [use frequency], corresponding [per week] and [per day]
Step 6: click the "add task" button, and click on "application", save the Settings
7.2.3 Playback control
Click video retrieval into the playback interface
Function description: file playback options that can be on video video file playback, support the four
channels playback at the same time, and support for video retrieval
Function is introduced
[Detection of local] native queries computer disk video file
[Detection of front-end equipment] query mobile disk video file
[Server] at the front encoder address search
[channel] according to the channel number of the encoder to retrieve
The start time of [start time] video retrieval
[End time] termination time of video retrieval
23
[video type] according to the type of video retrieval
Chapter 8
FAQ
A:The Config Tool search less than equipment?
May be caused by a firewall and anti-virus software, close the firewall, antivirus software to try again. In
the firewall and antivirus software prompted whether to allow the software to choose to allow access to the
network, otherwise can't search to the device.
B:Why don't PTZ control?
Please according to the following possible causes of illness
1, the RS - 485 interface cable connection is not correct,
2, yuntai decoder type is wrong;
3, haeundae decoders baud rate setting is not correct;
4, haeundae decoders address setting is not correct;
5, main board of the RS - 485 interface is bad.
C: IE browse, the control can't download?
1, IE browser to download please click stop controls following set operation
1) open the IE browser, click "tool", below popup Windows
2)Click on the "Internet options",
the following figure 8-1 window, select "security"
3) click "custom level", pop-up Settings window, please refer to below 8-2 to enable all features under
the "ActiveX controls and plug-in"
4). Click "done", determine the Settings
2,Other plug-ins or anti-virus control stop please close all firewalls and anti-virus software
24
D: color image display is not normal?
1, the bad spot light?
Inspect the site ambient light is normal, increase subsidies for light source.
2, depending on the frequent pattern set is not correct?
Testing equipment video standard (PAL or NTSC) is correct.
3, bright color adjustment parameter setting is not correct?
According to the environment by adjusting the parameters of the bright color values
E: no sound when listening?
1, have no access to the audio input device?
Check the host audio connection. .
2, the front-end device did not open audio options?
Check the front audio equipment parameter Settings, see whether to open the audio
25