1
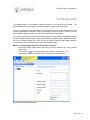
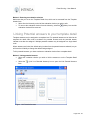
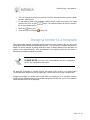
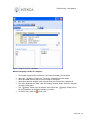
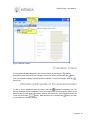
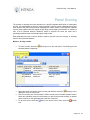
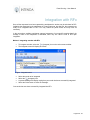
USER MANUAL
Panel Scoring
Version 1.4.4.0
Panel Scoring – User Manual
Table of Contents
Introduction.................................................................................................................................... 2
Definitions ...................................................................................................................................... 2
Opening the Panel Scoring Module ............................................................................................. 4
User access.................................................................................................................................... 6
Resetting password ...................................................................................................................... 8
Process flow................................................................................................................................... 9
Potential answers ........................................................................................................................ 10
Creating a template ..................................................................................................................... 11
Template header ....................................................................................................................... 11
Template Participants................................................................................................................ 13
Template Detail ......................................................................................................................... 14
Linking Potential answers to your template detail..................................................................... 16
Assign a tender to a template .................................................................................................... 17
Maintain tender template ............................................................................................................ 19
Evaluation criteria...................................................................................................................... 20
Maintain participants of the selected tender ............................................................................. 20
Panel Scoring............................................................................................................................... 21
Integration with RFx .................................................................................................................... 22
Page 1 of 22
Panel Scoring – User Manual
Introduction
The Panel Scoring application is an Add-On to the RFx system, providing authenticated external
users the ability to capture point scorings against an evaluation category on a Tender. The
evaluation category will be reserved as a percentage of the total tender evaluation and it’s the
percentage allocated that will be affected by the Panel Scoring application.
A panel of individuals may provide a non-related point allocation per supplier response, thereby
affecting the eventual outcome of business distribution based on aspects other than that which
was allocated on the published Tender. The organization publishing the Tender may want a
percentage of the total evaluation to be provided by the answers given by suppliers, while the rest
of the makeup is done by interpretation of internal role-players who evaluate the supplier
responses, or aspects of the responses.
In other words, the organization who published the Tender, may allocate points themselves to
captured responses by suppliers in the Panel Scoring application. Multiple individuals may
capture their point allocation for an evaluation criterion in the tender template. These points per
supplier are affected by the external parties rating a specific supplier.
Definitions
Term
Definition
Tender template
A tender template consists out of a tender header, tender detail,
participants and possible answers. This template is then linked to an
evaluation criterion of a tender.
RFx
System used to create tenders, contracts and amendments which will
then be awarded and evaluated. A template created in the Panel Scoring
Application will be linked to an evaluation criterion of a tender in RFx.
The search functionality will be available where records are listed in a
grid.
Search in a grid
Figure: Find functionality in a grid
The search is done against the text provided in the text field and the
icon.
column selected. To start the search, select the Find
Page 2 of 22
Panel Scoring – User Manual
Icons used throughout the system:
Icon
Description
Maintain Potential Answers
Template Header and Details
Template users
Assign Tender
Tender Detail
Scoring
Integrate to RFx
User Maintenance
Change Password
Link Potential Answers to evaluation criteria (CTRL + E)
View linked evaluation Criteria (CTRL + V)
Find again
Add a ……….. (CTRL + A)
Edit a ……….. (CTRL + A)
Remove a ……….. (CTRL + D)
Sort the records descending
Sort the records ascending
Move to the next record (CTRL + N)
Move to the previous record (CTRL + P)
Exit Application
Help
What is new
Known Issues
Save
Undo
Drop Down Error
Move one record to the right
Move all the records to the right
Move one record to the left
Move all the records to the left
Page 3 of 22
Panel Scoring – User Manual
Opening the Panel Scoring Module
As illustrated in the figure below Panel Scoring (PS) is accessed via the Intenda Solution Suite (ISS)
icon displayed on your desktop. By selecting this icon you will be allowed access to the Intenda
Solution Suite Dashboard.
Figure: Your desktop
The Intenda Solution Suite logon screen will be displayed.
Figure: Log into ISS
To log into the ISS dashboard, simply select the Organisation that you belong to, and complete
your username and password in the relevant field. Once you are satisfied, select the
button. You will then be redirected to the ISS dashboard.
Page 4 of 22
Panel Scoring – User Manual
Panel Scoring icon
Figure: ISS Dashboard
Page 5 of 22
Panel Scoring – User Manual
To access the PS Module, simply select the PS icon on the dashboard.
Once you have accessed the PS system, the PS main form will be displayed as follows:
User access
User accounts are managed within the system and a distinction is made between administrators
and participants, who are normal account users.
Administrators have the ability to manage the participant accounts, making changes or activating
/ de-activating the accounts. Only administrators are allowed to make changes to templates that
have been created. To access this form, select the
menu.
(User Maintenance) icon from the main
Page 6 of 22
Panel Scoring – User Manual
Figure: Maintain users
Method: Adding a user
•
•
Select the
(Add) icon.
The Add a New User form is displayed:
Figure: Add user profile
Page 7 of 22
Panel Scoring – User Manual
•
•
•
The following fields are listed:
Field
User name:
Description
A login specification.
Password:
A login specification.
Description:
Description of the user.
Email Address:
Email address of the newly registered user.
Account Active:
If selected, the user will be able to access the system with this
specific login details.
Administrator:
If selected, the user profile will be an administrative one.
After providing the profile details of the user, select the SAVE button.
To exit the form without saving, select the CLOSE button.
Method: Editing a user account
•
Select the user you wish to edit from the grid as displayed above.
•
•
Select the
(Edit) icon on the menu bar.
The logon information of the selected user is displayed.
Disabling a participant account ensures that the relevant participant cannot log into the system.
Deleting a user will remove it from the system. To deactivate a user, deselect the Active User
checkbox. To configure a user as an administrator, make sure that the Administrator checkbox is
selected.
•
•
When you are satisfied with the changes made, select the UPDATE button to save it.
To exit without saving, select the CLOSE button.
Method: Removing a user from the system
•
Select the user from the grid you wish to remove.
•
•
(Delete) icon.
Select the
A message confirming the removal of the user will be displayed; select YES to continue
with deletion.
The specific user will now be removed from the system.
Resetting password
Resetting a participant password allows the administrator to reset the password. Each user has
the ability to change his / her password thereby placing you in control of your own logon profile.
To reset your password, select the
(Change Password) icon which is embedded in the menu
at the top. Provide your current password and the new one and select the SAVE button.
Page 8 of 22
Panel Scoring – User Manual
Process flow
The process flow consists out of a few sections; the first section concerns itself with providing
user access to the system, the second with creating a template, the third section with assigning a
template to an evaluation criterion linked to a tender, the fourth section is the scoring of a tender
and the last section relates to the integration of a scored tender with RFx.
Page 9 of 22
Panel Scoring – User Manual
Potential answers
Adding a potential answer allows you to create a new answer and manage the newly created
potential answer. When adding the potential answer, a description, default rating, comments
indicator and active status must be configured. To access this form, select the
Potential Answers) icon from the menu.
(Maintain
Figure: Maintain your potential answers.
Method: Add a potential answer
• Select the
(Add) icon to open the Add Potential Answers form.
• Provide a description, default rating, whether the answer is active and whether the
comments are active. An answer that is not indicated as active by selecting the Answer
Active checkbox will not be picked up in the system. If comments must be mandatory,
make sure that the Comments Active checkbox has been checked.
Editing a potential answer allows a user to make changes to the master record of the answer.
The changes that can be made to an answer are the description, default rating, comments
indicator and active status.
Method: Edit a potential answer
•
Select the potential answer from the grid on the Edit Potential Answers form you wish to
edit.
•
•
Click the
(Edit) icon to display the editable details of the potential answer.
After making the necessary changes, select the Save button or to exit without saving,
select the
(Close) icon.
Deleting a potential answer allows the user to remove a potential answer that is no longer valid.
If a potential answer has been linked to a template or used on a tender, it cannot be deleted as
this will remove the history of the item.
Page 10 of 22
Panel Scoring – User Manual
Method: Remove a potential answer
•
On the Maintain Potential Answers form, select the potential answer you wish to delete.
•
Click on the
(Delete) icon and the record will be removed instantly.
Creating a template
Because a specific template may be assigned to multiple tenders, a template allows you to
predefine a structure that can be linked to tenders. The same group of participants may evaluate
different tenders in the same way where they belong to the same business unit or commodity
grouping. For this reason a template ensures that the user does not need to re-create the
structure whenever a tender needs to be evaluated.
A template consists out of the following;
1. a template header
2. a template detail
3. potential answers
4. participants who do the scoring
Template header
A template header defines the high level information relevant to the template. You will assign a
template to a tender, based on the displayed template header information. Information captured
on this level is the template code, template description, date created and whether the template is
active or not.
To access the Maintain Template Header form, select the
to open the following form:
(Template Header and Detail) icon
Figure: Maintain template headers
Page 11 of 22
Panel Scoring – User Manual
Method: Adding a template header
•
•
•
•
(Add Template Header) icon and the Add Template Header form displays;
Select the
The following fields of the header must be captured;
Field
Header code:
Description
The header code is unique and the system will reject any attempt to
add a duplicate.
Description:
Provide an explanatory description of the template.
Date created:
The system logs the date and time automatically upon creation of a
new template header.
Header active:
An inactive Header will not be listed where Headers could be
selected.
After providing the necessary information, select the SAVE button.
To exit the form without saving anything, select the CLOSE button.
Method: Editing a template header
•
Select the template header from the list you wish to edit.
•
•
•
Then select the
(Edit Header) icon to display the Edit Header form.
After making the necessary changes, select the UPDATE button.
To exit the form without saving, select the CLOSE button.
Method: Removing a template header
•
Select the template header you wish to remove.
•
Then select the
(Delete) icon and it will be removed.
Page 12 of 22
Panel Scoring – User Manual
Template Participants
Template participants are users linked to a template. When a template is assigned to a tender
the linked participants would already be assigned. Only participants linked can capture their
scoring for a particular tender. To access this form, select the
(Template Users) icon.
Figure: Adding users as participants to the template.
Method: Adding users to the template
•
•
The templates available are listed in the dropdown box as illustrated in the image above.
Select the template you wish to add users to.
The form consists out of a Users section and a Users Added section. Users listed in the
Users Added section are linked to the template. Select the user(s) listed in the Users
•
section and then select the “move user to the Added Users section”
button.
The selected user(s) is then added to the template. To save them to the selected
•
(Save) icon.
template, select the
(Close) icon.
To exit the form, select the
These users linked to the template are referred to as participants. To remove users from the
template, select the user listed under the Users Added section and then click the
The selected user is then moved to the Users section.
button.
Page 13 of 22
Panel Scoring – User Manual
Template Detail
The template detail is the breakdown structure whereby you will respond to the tender. The
template detail can be multi-levelled, thereby allowing for a parent child relationship.
It may be necessary for the administrator of a template to sub-divide the template into areas
which the participants understand. When entering their scoring for tenders, users will do it for
their respective categories, which can fall on the following level of a hierarchy.
If you refer back to the process flow, the template detail must be added to the template header,
and then potential answers may be linked to the selected evaluation criteria. Make sure that you
are on the Template Header form, since you have to select a header to add template detail to.
You must first create a template detail to link to the template header.
Method: Linking potential answers to an evaluation criterion
• Select the template header listed in the grid you wish to add detail to on the Template
Header form.
•
Then select the
(Link Potential Answers to Evaluation Criteria) icon. The
maintenance form of the template detail is displayed as illustrated below;
Figure: template detail maintenance.
Page 14 of 22
Panel Scoring – User Manual
•
To add a new template header, select the
Criteria Detail fields become editable.
•
Provide the required information in the fields and the select the
(Save) icon to add the
Template Detail to the hierarchy. Make sure that the Active checkbox has been selected,
otherwise the evaluation category would be inactive.
(Add) icon and the Selected Evaluation
Fields defined
Field
Description
Precision
Specifies the number of digits (the length) of the numeric value, for
example, the length of two would have a maximum of 99 if the maximum
or minimum weren’t specified. Note that this includes the digits after the
comma.
Scale
Specifies the length of the numeric value after the comma, for example
the scale of 2 would allow for the maximum of 99 after the comma (i.e. 0,
99).
Maximum
The maximum value of the numeric entry is specified, for example 45.
Minimum
The minimum value of the numeric entry is stipulated for example 10.
From the above examples, the following criteria have been set down; the precision
should be 4 (to allow 2 digits before and 2 after the comma), with a value not exceeding
45, and not less than 10.
PLEASE NOTE The weights of the evaluation categories you’ve added
must be 100 in total in the hierarchy. A warning message will be displayed if
the weights don’t add up to 100 when you try to save. Only the weights of the
active evaluation criteria will be taken into account.
Method: Editing an evaluation criterion
Make sure that you are on the Maintain Template Detail form, which can be accessed from the
Maintain Template Header form.
•
Select from the hierarchy on the left the evaluation criterion you wish to edit.
•
•
To edit the evaluation criterion details, select the
(Edit) icon.
The editable fields of the evaluation criteria will be displayed on the right of the form.
•
After making the necessary changes, select the
(Save) icon.
Page 15 of 22
Panel Scoring – User Manual
Method: Removing an evaluation criterion
Make sure that you are on the Template Detail form, which can be accessed from the Template
Header form.
• Select from the hierarchy on the left the evaluation criterion you wish to edit.
•
To remove the evaluation criterion from the hierarchy, select the
evaluation criteria will be removed.
(Delete) icon and the
Linking Potential answers to your template detail
Template answers may be assigned to a template level. For potential answers to be linked to the
template the detail code must be activated for potential answers and the potential answer
indicator must also be assigned. Multiple potential answers may be assigned to a single detail
code.
Where answers are linked, the default rating is taken from the potential answer selected, but you
still have the full ability to change the default rating assigned.
To link potential answers, you have to select an evaluation criterion from a template detail.
Method: Linking potential answers
• Select the evaluation criterion you wish to link the answers to on the Template Detail
form.
•
Select the
form.
(Link Your Potential Answers) icon to open the Link Potential Answers
Figure: Link Potential Answers
Page 16 of 22
Panel Scoring – User Manual
•
•
The Link Potential Answers form consists out of the Available Answers section and the
Answers Added section.
To add answers listed in the Available Answers section, select the answer to be added
and then the “move to right”
the Answers Added section.
•
•
Select the
(Save) icon.
To close the form, select the
button. The selected answer will then be moved to
(Close) icon.
Assign a tender to a template
This is the process whereby a template can be linked to a tender created in RFx, but can still be
manipulated before capturing the participant answers. This means that a template assigned to a
tender can still be changed, by taking detail items away or adding additional ones that were not
present on the original template. Only administrators of this specific profile have the option of
maintaining a template assigned to a tender.
PLEASE NOTE If the user is not an administrator they are not allowed to
perform any maintenance at this level.
For assigning a template to a tender number, the tender in RFx must be in a closed status.
Tenders with other statuses will not be listed under Tender Detail on the Assign Template form.
Assigning a template to a tender can be done easily, by assigning it to an evaluation category
residing on the selected tender. Only evaluation categories that have the ‘Link to Price Indicator’
option activated in RFx will be displayed.
Page 17 of 22
Panel Scoring – User Manual
Figure: Assign a tender to a template.
Method: assigning a tender to a template;
•
The tenders created in RFx are listed in a grid under the heading Tender Detail.
•
•
•
•
Select the
(Assign Tender) icon. The Assign Template screen will display.
Select the tender from the grid you wish to assign to a template.
Select the evaluation category of the selected tender you wish to link the template to.
The active templates are listed under the heading Template Detail. Select the template
you wish to be linked to.
•
(Assign Tender) icon will become active. Select the
The
link your template to an evaluation category of a tender.
(Close) icon.
To exit the form, select the
•
(Assign Tender) icon to
Page 18 of 22
Panel Scoring – User Manual
Maintain tender template
Once a template detail has been linked to an evaluation category of a tender, it is referred to as a
tender within the Panel Scoring Application. Maintenance of the potential answers, the
participants and the evaluation criteria is done with ease on this form. To access this form, select
the
(Tender Detail) icon to open the tender maintenance form;
Figure: Select tender to maintain from the grid
For tender maintenance, you have to select the tender you wish to maintain and then the
(View Linked Evaluation Criteria) icon to display the tender detail.
Page 19 of 22
Panel Scoring – User Manual
Figure: Maintain a tender
Evaluation criteria
You may add evaluation categories to the current hierarchy by selecting the
(Add an
Evaluation Criteria) icon. Select the evaluation criterion you wish to edit and then the
(Edit)
icon. The evaluation category’s details will then be editable. To save the changes, select the
(Save) icon.
Maintain participants of the selected tender
To add or remove participants from the tender, select the
(Maintain Participants) icon. The
Maintain Participants form is displayed. The form consists out of the Users section and the Users
Added section. To add users to the tender, select a user listed in the Users section and then the
button. Make sure that you’ve selected the
“move user to the right”
you’ve made the necessary changes.
(Save) icon after
Page 20 of 22
Panel Scoring – User Manual
Panel Scoring
The process of capturing the point allocation for a specific template detail option is called panel
scoring. The prerequisites are that you must be logged in with the correct credentials which have
been linked to the profile that has been assigned to a tender number. Each response captured
must be done against a specific supplier by providing a percentage point allocation or selecting it
from a list of potential answers. Whatever option is selected, the result will relate into a
percentage apportionment for the detail option being scored.
Each participant that logs in has the ability to capture only their own point scoring, or selecting
from the list of potential answers.
Method: Scoring a tender
•
To score a tender, select the
illustrated below is displayed;
(Scoring) icon on the main menu. The following form as
Figure: List of tender details to be scored
•
•
•
Select the tender you wish to score from the grid and then select the
(Scoring) icon to
display the Score a Tender form.
This form consists out of an Evaluation Criteria section and a Possible Answers section.
Select the evaluation criterion in the hierarchy on the left and provide a rating, an answer
and a comment on the right hand side of the form if required.
To save this score, select the
icon.
(Save) icon and to exit the form, select the
(Close)
Page 21 of 22
Panel Scoring – User Manual
Integration with RFx
Once all the responses have been captured by participants the results may be submitted to RFx.
Validating the responses by the participants is a manual process, but after this, the responses are
ready to be integrated back to RFx. You may submit the panel results as many times as
necessary.
In the case where multiple participants captured responses of one specific template detail, the
average of each of the responses is calculated, since only one value is sent to RFx upon
integration.
Method: Integrating a tender with RFx
•
•
To integrate a tender, select the
(Integrate) icon on the main screens toolbar.
The Integrate screen will display as follows:
Figure: Integrate screen
•
Select the tender to be integrated
•
•
•
Select the
(Integrate) icon
A system message will display saying that your tender has been successfully integrated.
Select the Close button to close the message.
Your tender has now been successfully integrated into RFx.
Page 22 of 22