1
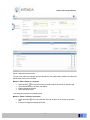
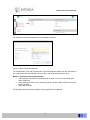
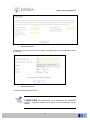
USER MANUAL
Generic Questionnaire
Version 1.2.7.0
Questionnaires Engine Manual
Table of Contents
Table of Contents .......................................................................................................................... 1
Introduction.................................................................................................................................... 2
Difference between an Internal and External Questionnaire .................................................... 3
Icons ............................................................................................................................................... 4
Status bars ..................................................................................................................................... 5
Opening the Sourcing Module ..................................................................................................... 6
User access.................................................................................................................................... 7
Logon to the Questionnaires Engine........................................................................................... 8
Select the type of questionnaire that you would like to access from the main screen. ........ 8
Create a Questionnaire Type ................................................................................................... 8
Load a Buyer Questionnaire....................................................................................................... 12
Maintain a Buyer Questionnaire ............................................................................................ 13
Publish an Internal Questionnaire......................................................................................... 15
Publish an External Questionnaire........................................................................................ 16
Capture Responses................................................................................................................. 19
Evaluate a Buyer Questionnaire ............................................................................................ 22
Integrate a Buyer Questionnaire............................................................................................ 23
Delete a Buyer Questionnaire ................................................................................................ 25
Copy a Buyer Questionnaire.................................................................................................. 26
Close / Extend a Buyer Questionnaire .................................................................................. 27
Create a Questionnaire Template .............................................................................................. 30
Maintain a Buyer Questionnaire Template ........................................................................... 31
Delete a Template.................................................................................................................... 32
Copy a Questionnaire from a Template ................................................................................ 34
1
Questionnaires Engine Manual
Introduction
A Questionnaire can be used internally or externally.
Externally a questionnaire is issued to suppliers to give them sufficient information to enable
them to clearly establish whether they wish to participate in a tender process.
It is also designed by an organisation to secure the necessary reassurances about the capacity,
capability and eligibility of potential bidders to satisfy both the collective minimum requirements
of each tender and the successful completion of the procurement process itself.
A Questionnaire will generally cover at least the following:
•
Details of potential bidder and its business structure
•
Legal & Regulatory requirements
•
Financial information
•
Health & Safety Requirements
•
Details of Workforce
•
Environmental Management Policies
This Questionnaire is forwarded either to a list of pre-selected suppliers, or to the entire supplier
community.
If suppliers are interested in tendering for any future contracts for this specific
commodity category, they will respond by submitting their answers to the questionnaire via the
GlobalERFx website.
On receipt of the supplier’s responses to the Questionnaire, the organisation will evaluate the
questionnaires, and make a recommendation as to which suppliers should be invited to tender
for the relevant contracts.
Internally a questionnaire is issued to an internal Website to role-players within the organisation’s
procurement environment to obtain supplier performance information. This information may be
utilised to determine a supplier’s accreditation in an organisation. This Questionnaire is
forwarded either to a list of role-player or specific role-players within the organisation. Responses
are submitted through the website fro consideration.
2
Questionnaires Engine Manual
Difference between an Internal and External
Questionnaire
An Internal Questionnaire is created for the internal use of an organisation. It is designed by an
organisation to secure the necessary reassurances about the capacity, capability and eligibility of
potential and current suppliers. This is an internal evaluation on the supplier to determine which
supplier to keep using or have potential to be used.
An External Questionnaire is designed by an organisation to give potential suppliers the
opportunity to respond to the questionnaire with their intention to tender for a planned contact.
3
Questionnaires Engine Manual
Icons
Icons used throughout the system:
Icon
Description
Delete / Cancel
Use this button to delete or cancel an occurrence (Inventory, tender etc.) or
remove the link between an item and a list containing the item
Edit
Use this button to Edit existing records
Lookup
Use this button to lookup an item for selection
Select
Use this button to select an item from an available list (commodity category, entity
etc.)
Date Picker
Use this button to capture the Date on a Questionnaire.
Drop Down Arrow
Use this button to display a list of information relevant to the field
Mouse pointer
The mouse pointer can be configured in windows to have other shapes. This is an
example of a mouse pointer.
Home
Select this button if it displays on a form in the Module, to return to the Home page
Logout
Select this button if it displays on a form in the Module, to log out of the Module
Help
Select this button if it displays on a form in the Module, to access screen help
information
Start or End
The start or the end of a complete process
Start and End of step
Start and end of a Step in the process where additional steps resides within the
step
4
Questionnaires Engine Manual
Icon
Description
Step not reached
Step in the process not yet reached
Complete section
A step in the process that has been completed
Status bars
There is a status bar displayed on the create and maintain forms of this module that indicates
what you are doing or have done with your document, and what is still left to do to complete the
lifecycle of the document concerned.
The status bar displays as follows and is self explanatory.
Figure: Status bar
5
Questionnaires Engine Manual
Opening the Sourcing Module
As illustrated in the figure below Sourcing is accessed via the Intenda Solution Suite (ISS) icon
displayed on your desktop. By selecting this icon you will be allowed access to the Intenda Solution
Suite Dashboard.
Intenda Solution
Suite icon
Figure: Your desktop
The Intenda Solution Suite logon form will be displayed.
Figure: Log into ISS
6
Questionnaires Engine Manual
To log into the ISS dashboard, simply select the Organisation that you belong to, and complete
your username and password in the relevant field. Once you are satisfied, select the
button. You will then be redirected to the ISS dashboard.
Figure: ISS Dashboard
The Questionnaire Module is accessed through the ISS Dashboard.
Questionnaires icon on the dashboard.
Simply select the
User access
User accounts are managed within the RFx system.
automatically have access to the Questionnaires Module.
7
Any RFx user or administrator will
Sourcing User Manual
Logon to the Questionnaires Engine
To log into the Questionnaires, simply select the Questionnaires icon from the ISS Dashboard.
The Questionnaires Engine’s Main screen will display as follows:
Select the type of questionnaire that you would like to access from the main screen.
PLEASE NOTE The same method is used for creating both types of
Questionnaires. The only difference between the two types of questionnaires is
when publishing a questionnaire. How to publish will be discussed in depth in
the Publish section of the manual.
Create a Questionnaire Type
A questionnaire is created with its header and associated sections and questions residing under
each section. Questionnaires are linked to commodity categories. The commodity category to
which it is linked will automatically determine which suppliers/Buyer receives the questionnaire
when it is issued.
PLEASE NOTE A questionnaire can only be linked to one commodity
category. If a questionnaire needs to be linked to more that one commodity
category, the user will have to COPY the questionnaire, rename the copy and
then link it to the new commodity category.
8
Questionnaires Engine Manual
To create a new Questionnaire, select the Create Buyer Questionnaire link from the
Questionnaire main form as depicted below.
Figure: Create a Questionnaire access point
The blank Questionnaire header will display as follows:
Figure: Header
Method: Creating a questionnaire header
• Capture the Code and Caption for the new questionnaire.
• Capture the Reference number if required.
• Capture the description for the questionnaire.
• Capture the Benchmark for the questionnaire.
• Check the Rating check box if this questionnaire is to be evaluated.
• Check the Open Indefinitely check box if the questionnaire should have no specific
closing date.
• Check the Active check box to ensure the questionnaire is available for issue.
If you wish to add an attachment to your questionnaire header, do the following:
•
Select the ADD button in the Attachment section of the header
9
Questionnaires Engine Manual
Figure: Attachments section of questionnaire header
•
•
•
•
The Add Attachments form will display.
Select the BROWSE button, locate and select the file you want and select the OK button.
After providing all the necessary information and adding the attachment, select the SAVE
button.
To exit the form without saving anything, select the CANCEL button.
Once you have finished completing and saving the questionnaire header, two other sections
become available. You can capture the sections to which you will add the questions.
Method: Adding a section to a questionnaire
• Select the SECTION bar, and the following form will display:
Figure: Add sections
•
•
•
•
Select the ADD button.
Complete the following fields
o Code
o Caption
o Description
o Order (in which it will appear on the questionnaire)
Check the Active Indicator check box.
Select the SAVE button.
The new section you have just created will now display in the grid under SECTIONS. To edit or
icon or the Delete
delete the section simply select the Edit
above to add more sections to your questionnaire.
10
icon. Follow the steps listed
Questionnaires Engine Manual
Method: Adding a question to a questionnaire
• Select the QUESTIONS bar, and the following form will display:
Figure: Add questions
•
•
Select the ADD button
The expanded questions form displays as follows:
Figure: New question form
•
•
•
•
Complete all of the relevant fields
Check the Active Indicator check box to make it available for completion by the supplier
Once all the fields are complete, check the Rating Indicator box if the supplier’s
response to this question is to be evaluated.
Then check the Lookup Indicator box to set up the possible answer to this question. The
Lookup icon becomes available for selection as follows:
Figure: Lookup Indicator
•
Click on the Lookup
icon. The Potential Answers form displays as follows:
11
Questionnaires Engine Manual
Figure: Potential Answers
•
Complete the following fields:
o Answer code
o Answer description
o Answer caption
o Answer rating
o Answer value
• Check the Active check box
• Select the SAVE button.
The Potential Answer will now have been linked to your question.
• Select the SAVE button again on the Questions form.
The new section you have just created will now display in the grid under QUESTIONS. To edit or
icon or the Delete
icon. Follow the steps listed
delete the question simply select the Edit
above to add more questions and possible answers to your questionnaire.
Load a Buyer Questionnaire
This form is accessed by selecting the Load Buyer Questionnaire link from the Internal
Questionnaire main form as depicted below.
Figure: Load a Questionnaire access point
You will be prompted to select the Questionnaire number you want to work with. Make your
selection and select the OK button.
The questionnaire you have selected will be displayed as being active in the bar at the bottom of
the following form, which will also display all of the functions available for selection:
12
Questionnaires Engine Manual
Figure: Load a Questionnaire main screen
Maintain a Buyer Questionnaire
Once you have created a questionnaire, and selected it from the Load Buyer Questionnaire link
on the main form of Internal Questionnaire, it can be maintain at any given time before it is
issued.
To do so, select the Maintain link from the Buyer Questionnaire menu on the “Load Buyer
Questionnaire” main form as follows:
The questionnaire header with its associated sections and questions will display as follows:
13
Questionnaires Engine Manual
Figure: Maintained questionnaire
You can then make any changes that are allowable to the questionnaire header and select the
SAVE button once you are finished.
Method: Edit a section or a question
•
•
•
•
icon next to the item you wish to edit in the section or question grid
Select the Edit
The selected section or question will display.
Edit the details as required
Select the SAVE button.
Your changes have been successfully saved.
Method: Delete a section or a question
icon next to the item you wish to delete in the section or question
• Select the Delete
grid
• A system message will display as follows:
14
Questionnaires Engine Manual
•
Select the YES button to delete the item, OR select the NO button to cancel.
The selected item will be deleted and will no longer display under the sections or questions grid.
Publish an Internal Questionnaire
Once you satisfied that your questionnaire is correct it can be issued
To do so, select the Publish link from the Buyer Questionnaire menu on the “Load a Buyer
Questionnaire” main form as follows:
Figure: RFI main screen
The Publish a Questionnaire form will display as follows:
15
Questionnaires Engine Manual
Figure: Publish a Questionnaire form
The Questionnaire Type and Questionnaire fields will default with the information of the
questionnaire that was selected on entry to the “Load a Buyer Questionnaire” form.
Method: Publish an Internal Questionnaire
• Select what type of issue it is by selecting either the Closed or Open radio box next to the
Issue Type field.
• Select the specific roles within the organisation to whom the questionnaire should be
published to.
• Select the OK button.
The Publish a Questionnaire form will now display a message that the questionnaire was issued
successfully.
•
Select the OK button
You will be returned to the main form.
PLEASE NOTE The questionnaire will be published to a local website. The
selected buyers can respond to the questionnaire via the website.
Publish an External Questionnaire
To do so, select the Publish link from the External Questionnaire menu on the “Load Intenda
questionnaire” main form as follows:
16
Questionnaires Engine Manual
Figure: PQQ main screen
The Publish an Intenda Questionnaire form will display as follows:
Figure: Publish a Questionnaire form
The Questionnaire Type and Questionnaire Type Code fields will default with the information of
the questionnaire that was selected on entry to the “Load Intenda Questionnaire” form.
Method: Publish an External Questionnaire
• Select whether to publish the questionnaire to the Web or to Print Out by selecting the
relevant radio box.
• Select what type of issue it is by selecting either the Closed or Open radio box next to the
Issue Type field.
• Select the OK button.
The questionnaire document as it appears to the suppliers will be displayed.
17
Questionnaires Engine Manual
•
Close the document
The Publish a Questionnaire form will now display a message that the questionnaire was issued
successfully.
•
Select the OK button
You will be returned to the main form.
PLEASE NOTE The questionnaire will be published to the GlobalERFx
website.
website.
Registered suppliers can respond to the questionnaire via the
18
Questionnaires Engine Manual
Capture Responses
Internal Questionnaire
When a questionnaire is published to a specific role, the user linked to the role should sign into
the Questionnaire module to view the questionnaires intended for response by the specific role.
This implies that a user will only be able to see questionnaires published to the role linked to their
user id.
External Questionnaire
Suppliers / buyers can respond to external published questionnaires by accessing the GlobalErfx
or local WEB, registering and responding directly via the WEB. The responses captured through
the WEB will automatically be taken into consideration during evaluation of Suppliers.
Suppliers / buyers who do not have the facility to register on the GlobalErfx WEB may respond
using conventional communication methods i.e. fax, mail etc. In the case where conventional
methods of response were used by suppliers, the requesting organisation will delegate a person
to capture the responses on the Questionnaire module locally.
Capture Response for Internal Questionnaires.
Select the View Questionnaire link from the main Internal Questionnaire menu.
•
The View questionnaire grid display:
•
Click on the Select
icon to view the published questionnaire
The Questionnaire Window displays:
19
Questionnaires Engine Manual
Figure: View Questionnaire Window
•
Capture the information in the field provided
•
Select the Save details
•
Click on the Close
icon to save the entered information.
icon.
Capture Response for Eternal Questionnaires.
Publish method – WEB
Method: Capture response for a web based publishes Questionnaire:
•
•
•
•
•
•
•
If the questionnaire is published to the web, access the Globalerfx site via
www.globalerfx.com.
On Globalerfx enter the ZAH registration number, user name and password in the login
section:
Select the required community
The side dashboard will display with the published questionnaires.
Select the questionnaire that you would like to capture responses.
The questionnaire opens and you will be able to capture all the relevant information.
Select the SAVE DETAIL button when done and close the window.
Publish method – print
If the questionnaire was set to print when it was publish the user can capture the Reponses on
behalf of the supplier. Please refer to the steps below:
20
Questionnaires Engine Manual
Method: Capture response on behalf of a supplier:
•
Select the Capture Suppliers Responses option from the Administration menu
The following form will be displayed:
Figure: Select a Questionnaire
Method: Capture Responses
icon next to the Supplier field.
• Select the Lookup
A grid listing displays listing all the suppliers to whom the questionnaire was issued. At
the top of the grid as filter box will display as follows:
•
•
•
•
•
•
•
•
•
Capture the name of the suppliers whose response you have received.
Select the APPLY button.
The grid will change and list the suppliers whose name most closely resembles the
one you supplied.
icon next to the relevant supplier.
Click on the Select
The Select a Questionnaire form will display with the name of the selected supplier
populated in the Supplier field.
Select the OK button.
The issued questionnaire will display.
Complete all of the necessary fields.
If the supplier has given you a document on an CD or a disk that they would like to
include in their submission, select the
The View Attachment form will display:
21
button at the top of the screen
Questionnaires Engine Manual
•
•
•
•
•
Select the ADD button
The Add Attachments form will display.
Select the Browse button and locate the file that needs to be attached. When you
have found it, select the OK button.
You will be returned to the View Attachment form. Select the SAVE button and the
selected attachment will be added to the suppliers response.
Select the SAVE AS button at the bottom of the questionnaire form.
You will now have successfully captured the suppliers / buyers response.
Evaluate a Buyer Questionnaire
Once the closing date for a questionnaire has been reached, and the suppliers / buyers have
responded to it, the questionnaire can be evaluated.
To do so, select the Evaluate link from the Buyer Questionnaire menu on the “Load a Buyer
Questionnaire” main form as follows:
The Evaluate a Questionnaire form will display as follows:
Figure: Evaluate a Questionnaire form
22
Questionnaires Engine Manual
You will be able to see how the responses to the questionnaire have been evaluated by the
information that is displayed on the form.
•
•
If you are satisfied with the evaluation of the questionnaire select the PROCESS button to
change the status of the questionnaire to process.
Select the SAVE button to complete the evaluation process.
You will be returned to the “Load a Buyer Questionnaire” main form.
Integrate a Buyer Questionnaire
This section is applicable to the internal and external questionnaire. Once the responses were
evaluated the different responses can be set to integrate with other systems.
To do so, select the Integrate link from the Buyer Questionnaire menu on the “Load a Buyer
Questionnaire” main form as follows:
Figure: Workspace of specific Intenda Questionnaire.
The Integrate a Questionnaire form will display as follows:
Figure: Integrate a Questionnaire screen.
The radio button is set by default on Not set as integrated displaying all the responses that was
not set to integrate in the evaluation step.
•
•
icon to view the details of the answers given by a specific supplier.
Select the View
Select the OK button to minimise the Detail for Questionnaire screen.
23
Questionnaires Engine Manual
•
•
•
•
•
•
•
•
Select the REJECT RECOMMODATION button to reject the questionnaire or select the
ACCEPT RECOMMODATION button to accept the questionnaire.
After selecting the relevant button the questionnaire will no longer be listed in the grid.
Change the radio button to indicate to Set as integrated.
All the responses that was set to integrate will display in the grid.
icon to view the details of the answers given by a specific supplier.
Select the View
Select the OK button to minimise the Detail for Questionnaire screen.
Select the REJECT RECOMMODATION button to reject the questionnaire or select the
ACCEPT RECOMMODATION button to accept the questionnaire.
After selecting the relevant button the questionnaire will no longer be listed in the grid.
24
Questionnaires Engine Manual
Delete a Buyer Questionnaire
Should a questionnaire become obsolete for whatever reason, you have the option to delete it
from the system.
To do so, select the Delete link from the Administration menu on the “Load a Buyer
Questionnaire” main screen as follows:
Figure: Delete entry point
PLEASE NOTE The system will automatically delete the questionnaire /
notice you are currently working with. Therefore be careful to ensure that you
have loaded the correct questionnaire.
A questionnaire cannot be deleted once it has been issued.
Once you have selected the Delete Questionnaire link, the following form will display:
Figure: Delete screen
•
•
Select the DELETE button
A message asking you to verify your choice will display:
25
Questionnaires Engine Manual
•
Select the YES button
The questionnaire will be deleted. Because you have deleted the active questionnaire, you will
be returned to the “Would you like to” main screen of Internal Questionnaire.
Copy a Buyer Questionnaire
If you need to duplicate a questionnaire you are able to do so by simply copying the questionnaire
you want to reproduce.
To do so, select the Copy link from the Administration menu on the “Load a RFI” main screen as
follows:
Figure: Copy entry point
Once you have selected the Copy Questionnaire link, the following form will display:
26
Questionnaires Engine Manual
Figure: Copy a screen
•
•
•
Capture a questionnaire code for the new questionnaire in the New Questionnaire Code field
Select the COPY button
A message asking you to verify your choice will display:
•
Select the YES button
The system will automatically return you to the workspace of the original questionnaire.
You will need to select the HOME button to return to the Buyer Questionnaire Home Page where
you can then select the copied questionnaire and maintain it.
PLEASE NOTE All copied questionnaires must be maintained as all fields
will need to be amended to suite the requirement for the new questionnaire.
The Possible Answers are not copied; therefore new possible answers will
have to be created for the copied questionnaire.
Close / Extend a Buyer Questionnaire
If you wish to close a questionnaire for further responses, or if you wish to extend the closing date
of a questionnaire, this can be done here. One screen is used to do both actions.
To do so, select the Close/Extend link from the Administration menu on the “Load a Buyer
Questionnaire” main form as follows:
27
Questionnaires Engine Manual
The Close / Extend Questionnaire form will display as follows:
Figure: Close/Extend Questionnaire
Method: Close a Questionnaire
•
•
Select the Lookup
icon next to the Change Status To field.
A grid will display listing all of the statuses that are available for selection as follows:
•
•
Click on the Select
icon next to the relevant status.
The Change Status To field will be automatically populated with the selected
information.
Capture the reason the status is being changed in the Reason field
Select the SAVE button.
•
•
28
Questionnaires Engine Manual
•
A message will display on the same form confirming that the status has been
changed.
•
Select the OK button and you will be return to the main screen.
The status of your questionnaire has now changed to CLOSED.
Method: Extend a Questionnaire
• Select the Date Picker
icon next to the Extend Date To field.
• A calendar will display as follows:
Figure: Calendar
•
•
•
•
•
•
Select the relevant date by clicking on it.
The Extend Date To field will be automatically populated with the selected
information.
Capture the reason the status is being changed in the Reason field.
A message will display on the same screen confirming that the date has been
changed.
Select the SAVE button.
Select the OK button and you will be return to the main form.
29
Questionnaires Engine Manual
Create a Questionnaire Template
A template can be created and used over again only changing the section of the template to the
requirements of the question
To create a template, select the Create Template from the Internal Questionnaire main form as
depicted below:
The blank Questionnaire header will display as follows:
Complete the form the same as explained in Creating a Questionnaire.
30
Questionnaires Engine Manual
Maintain a Buyer Questionnaire Template
Once you have created a questionnaire, and selected it from the Load a Template link on the
main form of Buyer Questionnaire, it can be maintain at any given time before it is issued.
The questionnaire header with its associated sections and questions will display as follows:
Figure: Maintained questionnaire
You can then make any changes that are allowable to the questionnaire header and select the
SAVE button once you are finished.
Method: Edit a section or a question
•
•
•
•
Select the Edit
icon next to the item you wish to edit in the section or question grid
The selected section or question will display.
Edit the details as required
Select the SAVE button.
Your changes have been successfully saved.
31
Questionnaires Engine Manual
Method: Delete a section or a question
icon next to the item you wish to delete in the section or question
• Select the Delete
grid
• A system message will display as follows:
•
Select the YES button to delete the item, OR select the NO button to retain the item.
The selected item will be deleted and will no longer display under the sections or questions grid.
Delete a Template
Should a questionnaire become obsolete for whatever reason, you have the option to delete it
from the system.
To do so, select the Delete Template link from the main Internal Questionnaire screen as follows:
Figure: Delete entry point
PLEASE NOTE The system will automatically delete the questionnaire /
notice you are currently working with. Therefore be careful to ensure that you
have loaded the correct questionnaire.
A questionnaire cannot be deleted once it has been issued.
Once you have selected the Delete Template link, the following form will display:
32
Questionnaires Engine Manual
Figure: Delete screen
•
•
Select the DELETE button
A message asking you to verify your choice will display:
•
Select the YES button.
The questionnaire will be deleted. Because you have deleted the active questionnaire, you will
be returned to the “Would you like to” main screen of Internal Questionnaire.
33
Questionnaires Engine Manual
Copy a Questionnaire from a Template
You can create a Questionnaire from a template that was created in advanced.
To do so select the Create a Questionnaire for a Template link from the main Internal
Questionnaire menu.
•
•
•
Chose the template that you want to copy by selecting the Lookup
template field.
Type in the code of the new RFI
Select the OK button.
icon next to the
The new Internal Questionnaire is created and can be located by selecting the “load Buyer
Questionnaire” link.
34