1
WeatherSkiMaster : Instruction Manual
Project no: art05-054 Version: 1.0 File name: 05-054 Manual 002.CDR Prepared by: C.K Lau Copyright: Latitude Limited Date: 6 Jun 2005
130 mm
90 mm
130 mm
Size:130 X 90mm
Type: book type
saddle wire
Cover: 4 pages
Color: 1C+0 (Black)
Paper: 100gms white wood free paper
Body Copy: 40 pages
Color: 1C+1C (Black)
Paper: 100 gms white wood free paper
Blinding: Saddle wire
Paper: Wood free paper
Paper weight: 100 gms
Language: English
folding line
Project:
Release for:
Prepared by:
Date:
Checked by:
Date:
Approved by:
Date:
WEATHERSKIMASTER
Instruction Manual
Back Cover
Front Cover
1.0 Introduction
2.0 Buttons and Its Functions - Part B
Thank you for purchasing of this Watch. Your
Wa t c h f e a t u r e s e l e c t r o n i c s e n s o r s w h i c h
measures and shows the outdoor conditions:
weather forecast, temperature, pressure, altitude
and compass directions.
Yo u r W a t c h a l s o p r o v i d e s t h e e s s e n t i a l
information at the time during you are skiing, and
these data can be further logged into a logbook
for later review.
Your Watch also includes current time, daily
alarm, chronograph, timer and dual time function.
[S/S]
[EL]
[M]
[L/R]
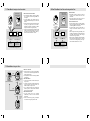
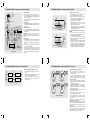
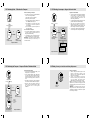
! Auto-backlight function
Key Lock ON
[SR]
! Hold down the [EL] button to turn ON or OFF
this function.
! When this function is ON, the auto-backlight
indicator '
' will appear, pressing any
key will turn ONthe EL back light too.
Key Lock Function
! Hold down the [M] button and then hold down
the [S/S] button (keep holding the [M] button at
the same time) to turn ON or OFF this function.
! When this function is ON, the key lock
indicator '
' will appear, pressing any key
will NOT activate any function until key lock is
turned OFF.
[S/S]
[EL]
[M]
[L/R]
Auto-backlight ON
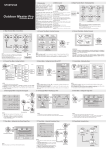
3.0 Major Function Modes - Timekeeping Mode and Sensor Mode
2.0 Buttons and Its Functions - Part A
[SR]
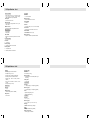
EL Button [EL]
! To turn on the EL back light for about 3 seconds.
To g e t t h e m o s t o f y o u r p u r c h a s e , i t i s
advisable to use this stopwatch in conformity
with the below notes:
! Be sure to carefully read this manual and keep
it on hand for later reference when necessary.
! A v o i d e x p o s i n g y o u r Wa t c h t o e x t r e m e
conditions for an unreasonable time.
! Avoid rough usages or severe impacts to your
Watch.
! Do not open the Watch's case unless a certified
service agency because your Watch contains
precise electronic sensors and components.
! Clean your Watch with a soft cloth occasionally
that working for a longer use life of your watch.
! Keep your Watch away from magnets or the
appliances which contains magnetic objects
such as mobile phones, speakers and motors.
! Store your Watch in a dry place when it is not
in use.
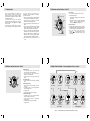
Mode Button [M]
! To select among Current Time, Daily Alarm,
Chronograph, Timer and Dual Time Mode.
! To s e l e c t a m o n g S k i , S k i R e c a l l , A l t i m e t e r,
Barometer and Compass Mode.
! To select among the setting items during setting
display.
Sensor Button [SR]
! To select between Sensor Mode and Timekeeping
Mode.
Start/Stop Button [S/S]
! To select between functional displays under the
same mode.
! To activate the 'start' or 'stop' chronograph function
during chronograph mode.
! To toggle Yes/No.
! To increase the digits during setting display.
Lap/Reset Button [L/R]
! To activate the 'lap' or 'reset' chronograph function
during chronograph and timer mode.
! To move the cursor to left by one during History
recalling display.
! To decrease the digits under setting display.
! To toggle Yes/No.
[SR]
]M[
Barometer Mode
[M]
Compass Mode
]M[
Current Time Mode
[M]
Daily Alarm Mode
Chronograph Mode
]M[
[M]
]M[
]M[
[M]
[M]
m/h
Altimeter Mode
Ski Recall Mode*1
Sensor Mode
Ski Mode
Dual Time Mode
Timer Mode
Timekeeping Mode
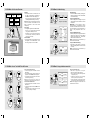
Remark 1: The Ski Recall Mode will be skipped If NO Ski Data was recorded.
4.0 Current Time Mode - Functional Display
day of week
weather forecast
temperature
[S/S]
current time
date
Temperature Display
Day of Week Display
[S/S]
[S/S]
Sea Level
pressure
tendency
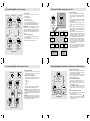
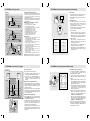
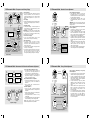
Functional Display
! The Current Mode includes four kinds of
functional display:
! Day of Week Display,
! Temperature Display,
! Altitude Tendency Display and
! Sea Level Pressure Tendency Display.
! To select among different functional display, press
the [S/S] button following the adjacent diagram.
IMPORTANT: If the user intends to get an
accurate reading of air temperature, the user
must taken off the watch from the wrist for 20 to
30 minutes before the actual measurement. It
allows no body temperature effect on the
Watch.
Automatic Display Switching
! To activate the automatic switching feature, hold
down the [S/S] button.
! As long as the button is hold, one of the four
functional displays will appear one by one.
altitude
tendency
[S/S]
4.2 Current Time Mode - Setting the Current Time
digits have been
selected (flashing)
Current Time Display
[M]
second
[M]
[M]
12/24
hour format
Cloudy
[M]
[M]
day
Month/Day
Hold
[S/S] / [L/R]
Increase/Decrease
the number at
a higher speed
Increase/Decrease
the number
4.1 Current Time Mode - Weather Forecast Feature
Weather Forecast Symbols
month
[M]
[S/S] / [L/R]
Current Time Mode
Rain
year
Current Time Setting Sequence
Altitude Tendency
Display
Partly
Cloudy
[M]
hour
Key
Beep
[M]
Sunny
[M]
minute
[M]
LCD
Contrast
Sea Level Pressure
Tendency Display
Current Time Setting Display
Hold
[M]
Hold
[M]
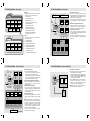
Weather Forecast Feature
! A special feature of the Watch is the weather
predicting function. It works by analyzing the
changes of the past air pressure.
How to Indicate the Coming Weather
! The Watch provides four different symbols to
indicate the forecast weather, which includes:
! Sunny
! Partly Cloudy
! Cloudy
! Rain
! The weather forecast feature can be shown in the
Current Time Mode and Dual Time Mode only.
IMPORTANT: Since the Watch predicts the coming
weather by using the data of the changes in the air
pressure, it is highly recommended that staying at the
same altitude for at least 8 hours for a higher accuracy
predication.
IMPORTANT: The Watch predicts the weather by
adopting general weather prediction principles, it is
NOT capable to reflect a dramatic changing of weather
within a very short period of time.
How to Set Current Time
! To select the setting display, hold down the [M]
button for about 2 seconds in Current Time Mode.
In setting display, the flashing "SET" icon will
appear.
! In setting display, press the [M] button to change
the selection following the adjacent Current Time
Setting Sequence.
! When the second digits are flashing (selected),
press the [S/S] or [L/R] button to reset the digits
to "00".
! When the digits are flashing (selected), press the
[S/S] or [L/R] button to increase / decrease the
number. (Hold down the button change the number
at a higher speed).
! When month-day order setting is selected, press
the [S/S] or [L/R] button to select between monthday and day-month format. When 12/24 hour
format setting is being selected, press the [S/S]
button to select between 12 and 24 hour format.
! When LCD contrast is selected, press the [S/S] or
[L/R] button to increase / decrease the contrast
level (1 to 10). When key beep setting is selected,
press the [S/S] or [L/R] button to select between
ON and OFF the beep.
! When the set is completed, hold down the [M]
button to exit the setting display. The Watch will
also exit the setting display if NO key-stoke has
been activated for 1 minute.
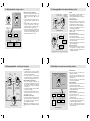
5.0 Daily Alarm Mode - Daily Alarm 1, Daily Alarm 2 and Chime Display
[S/S]
Daily Alarm 1 Display
[S/S]
[S/S]
Daily Alarm 2 Display
Hourly Chime Display
Daily Alarm Mode
Daily Alarm 1 and Daily Alarm 2
! The Watch includes two daily alarms: Daily Alarm
1 and Daily Alarm 2. The Daily Alarm 1 and Daily
Alarm 2 are working independently.
! Press the [S/S] button to switch among the Daily
Alarm 1, Daily Alarm 2 and Chime Display
following the adjacent diagram.
How to Turn ON/OFF the Daily Alarm
! To turn ON or OFF the Daily Alarm 1 (2), press
the [L/R] button in Daily Alarm 1 (2) Display.
! When the Daily Alarm 1 (2) is ON, the alarm
indicator '
' will appear.
! If the alarm indicator is appeared, the Watch will
sound at the preset alarm time every day. When
the alarm sounds, press any button to stop the
beep.
How to Turn ON/OFF the Hourly Chime
! To turn ON/OFF the Hourly Chime, press the [L/R]
button in Chime Display.
! When the chime is ON, the chime indicator '
'
will appear. If the Chime indicator is appeared,
the Watch will beep once at the hour every hour
ie. 1:00, 2:00, 3:00 etc.
6.1 Chronograph Mode - Recording and Recalling Lap Time
5.1 Daily Alarm Mode - Setting the Alarm
digits have been
selected (flashing)
SET
SET
Daily Alarm 1 Display
Setting Display
hold
[M]
hold
[M]
[M]
Minute
How to Set the Alarm 1 and Alarm 2
! To select the setting display, hold down the
[M] button for about 2 seconds in Alarm 1 (2)
Display, then the flashing "SET" icon will
appear.
! In setting display, press the [M] button to
change the selection between minute and
hour.
! When the digits are flashing (selected), press
the [S/S] or [L/R] button to increase /
decrease the number. (Hold down the button
change the number at a higher speed).
! When the set is completed, hold down the [M]
button to exit the setting display. T h e W a t c h
will also exit the setting display if NO keystoke has been activated for 1 minute.
the digits
is running
the lap
number
the lap time
will freeze
for 10 seconds
[L/ R]
10
seconds
Chronograph
Counting Display
Chronograph
Lap Display
Lap Time Recording
Hour
[S/S]*
[S/S]*
the 1st
lap memory
Daily Alarm Time Setting Sequence
Hold
[S/S] / [L/R]
[S/S] / [L/R]
the next lap
memory
Increase/Decrease
the number at
a higher speed
Increase/Decrease
the number
Total Time
Display
the last
lap memory
[S/S]*
[S/S]*
[S/S]*
Lap Time Re call Seq uenc e
Lap Time
! The chronograph can measure elapsed time
without stopping the counting - lap time.
! The Chronograph Mode allows recording lap
time up to 10 laps.
How to Record Lap Time
! When the chronograph is counting, press the
[L/R] button once to record a lap time (this
key operation will not affect the counting).
! The lap number and lap time will appear on
the display for 10 seconds, and it returns to
counting display automatically.
! Repeat the steps mentioned above to get
another lap time.
How to Recall Lap Times
! To recall lap times, hold down the [M] button
in the Chronograph Display.
! When the Total Time Display is appeared,
press the [S/S] or [L/R] button to check the
next / previous lap time.
! Hold down the [M] button any time to back to
the Chronograph Display.
How to Reset Lap Time
! To record a new set of lap time, hold down
the [L/R] button for 2 seconds to reset the
chronograph to 'All Zeros' display when the
chronograph was stopped.
*Press [L/R] button will move the selection in the reverse direction
6.0 Chronograph Mode - Start/Stop the Chronograph
1/10s
indicator
Total
Time
minutes
hours
[S/S]
seconds
1/100 sec
Chronograph
'All Zero' Display
Digits
running
Chronograph
Counting Display
[S/S]
Elapsed
time
the digits
stop counting
hold
[L/R]
[S/S]
Chronograph Stop Display
Chronograph Mode
! The Watch includes a function to measure
elapsed times, accumulative elapsed time and
lap times - Chronograph Mode.
! The display shows the 'All Zeros' display
when the chronograph is being selected the
first time or the chronograph has been reset.
How to Start/Stop the Chronograph
! When the chronograph is stopped (not
counting), press the [S/S] button once to start
the chronograph (counting); press the [S/S]
button once again to stop the chronograph
(not counting).
! The elapsed time between the two keystrokes
will appear on the display.
! Repeat the above mentioned steps to get t h e
accumulative elapsed time of which the
chronograph is running.
How to Reset the Chronograph
! To record a new set of elapsed time, hold
down the [L/R] button for 2 seconds to reset
the chronograph to 'All Zeros' display when
the chronograph was stopped.
NOTE: When the chronograph is reset, the
recorded lap time(s) will be deleted at the same
time.
7.0 Timer Mode - Countdown Timer and the Quick-Set-Values
the indicator
flashing
the time which the
timer will countdown from
(hour, minute and second)
Current Time
Timer Display
[L/R]
3 min
[L/R]
5 min
10 min
[L/R]
[L/R]
[L/R]
User
Preset
Value
(UPV)
[L/R]
45 min
15 min
Quick-Set-Value (QSVs)
Timer Setting Sequence
Countdown Timer
! The Watch includes a countdown timer
feature: the Timer Mode.
! The Timer starts down-counting from the
target time (hour, minute and second) to zero
and stops at zero.
! The target time can be set by the Quick-Set
Value and User-Preset Value.
The Quick-Set Value
! The Quick-Set-Value is a set of value which
CAN NOT be changed by the user.
! Five Quick-Set Values (3,5,10,15 and 45
minutes) was installed in the Watch for setting
the target time more easily.
The User-Preset Value
! The User-Preset Value is a target time value
which can be set by the user.
! The setting range is up to 99 hours 59
minutes 99 seconds.
! Once a User-Preset Value has been set, such
as 30 minutes, that value will be stored into
the Watch for setting the target time.
! To set the User-Preset Value check the
coming section "How to Set the User-Preset
Value" for more detail.
7.1 Timer Mode - Setting the User Preset Value
digits have been
selected (flashing)
SET
Timer Display
hold
[M]
Setting Display
hold
[M]
[M]
[M]
hour
minute
Second
How to Set the User Preset Value
! To select setting display, hold the [M] button
for 2 seconds, and the flashing "SET" icon
will appear.
! In setting display, press the [M] button to
change the selection among hour, minute and
second.
! When the digits are flashing (selected), press
the [S/S] or [L/R] button to increase /
decrease the number. (Hold down the button
change the number at a higher speed).
! When the set is completed, hold down the [M]
button to exit the setting display. T h e W a t c h
will also exit the setting display if NO keystoke has been activated for 1 minute.
8.0 Dual Time Mode - Dual Time and Setting the Dual Time
digits have been
selected (flashing)
SET
Dual Time Mode
hold
[M]
Setting Display
hold
[M]
[M]
minute
hour
[M]
[S/S] / [L/R]
[S/S] / [L/R]
hold [S/S] / hold [L/R]
Increase/ decrease
the number
Increase/ decrease
the number
Increase/decrease
the number at
a higher speed
7.2 Timer Mode - Using the Timer
digits start
counting
[S/S]
Real Time
Clock
Counting Display
[S/S]
digits stop
counting
[L/R]
Stop Counting Display
[S/S]
Increase/decrease
the number at
a higher speed
User Preset Value Setting Sequence
User Preset Value Setting Sequence
Timer Display
(Timer sets as 10 minutes)
hold [S/S] / hold [L/R]
digits start
counting
again
Counting Display
How to Use the Timer
! When the Timer is set, press the [S/S] button
to start the timer. Press the [S/S] button once
again to stop the timer.
! The elapsed time will be continuously updated
to the display.
Timer Alarm Sound
! In the last 10 minutes, the Watch will beep for
every minute.
! In the last one minute, the Watch will beep for
every 10 seconds. In the last 5 seconds, the
Watch will beep for every second.
! At 0, a beep sound will last for 30 seconds.
Press any button in this period will terminate
the beep sound prematurely.
How to Reload the Timer
! The last target time will be reloaded
automatically at the end of the 30-second
beep sound.
! To start a new counting by using a new target
time, set the timer again by QSV or UPV.
Dual Time Mode
! The Watch includes a function to show the
current time for a second time zone - Dual
Time Mode.
! The second digits of the dual time will be
associated with the Current Time Mode.
How to Set the Dual Time
! To select setting display, hold down the [M]
button for 2 seconds in Dual Time Mode, and
the flashing "SET" icon will appear.
! In setting display, press the [M] button to
change the selection between hour and
minute.
! When the digits are flashing (selected), press
the [S/S] / [L/R] button to increase / decrease
the number. (Hold down the button change
the number at a higher speed).
! When the set is completed, hold down the [M]
button to exit the setting display. T h e W a t c h
will also exit the setting display if NO keystoke has been activated for 1 minute.
9.2 Ski Mode - Ski Mode Display
9.0 Ski Mode - Ski Function Overview
Current
Temperature
Travel Time
Period
Current
Altitude
Accumulative
Ascent
Accumulative
Descent
Current
Ski Speed
Ski Log
Function
Ski Mode Function
Flashing
m/h
Ski Mode
Ski Function ON
Record 1
Ski Mode
! Once the Ski Function is turned ON, the 'Ski'
icon '
' will start flashing. The Watch will:
! Exhibit the current ski data on display, and
! Log (the Ski Log Function) the ski data into
the Ski Logbook automatically or manually.
NOTE: The Watch will log ski data continuously
once the Ski Function is turned ON even if the
Watch is switched to other function mode
subsequently.
Ski Logbook
! The Logbook organizes the ski data as follows:
! Ski Lap - The ski data which was stored
during the skier start/stop a ski run.
! Ski Record - The ski record which stored a
series of Ski Lap, and hence it provides the
summary on all Ski Lap.
Ski Recall Mode
! The logged ski data can be reviewed from the
Ski Logbook in the Ski Recall Mode. Check
the coming chapter 10.0 for more detail.
Not
Flashing
[S/S]
m/h
current temperature
current altitude
Change the Top Row Display
Flashing
Ski Mode
[L/R]
current
decent speed
total elapsed
time
[L/R]
[L/R]
m/h
[L/R]
accumulative
ascent
Flashing
accumulative
descent
Ski Mode
Ski Function ON
Change the Middle Row Display
Lap 1
hold
[L/R]
Ski Lap
m/h
current time
Ski Record
Flashing
Ski Logbook
SE T
hold
[M]
Not
Flashing
Ski Function OFF
hold
[S/S]
SE T
SE T
hold
[S/S]
SE T
hold
[M]
m/h
Flashing
Ski Function ON
How to Turn ON the Ski Function
! Hold down the [M] button in Ski Mode to flash the
'ON' indicator.
! When the 'ON' indicator is flashing, hold down the
[S/S] button until the 'dONE' indicator is appeared.
! Then the Ski Function is turned ON, and the ski icon
will be flashing on the display.
NOTE: The Ski Function will be turned OFF
automatically after it has been turned ON for 12 hours.
How to Turn OFF the Ski Function
! Hold down the [M] button in Ski Mode to flash the
'OFF' indicator.
! Hold down the [S/S] button until the 'dONE' indicator
is appeared.
! Then the Ski Function is turned OFF, and the ski
icon will be stop flashing on the display.
current lap no.
Change the Bottom Row Display
Ski Mode
9.1 Ski Mode - How to Turn ON/OFF the Ski Function
Ski Mode Display
! Once the Ski Mode is selected, performing the
below key operations to select the Ski Mode
sub-functional displays.
Change the Top Row Display
! Press the [S/S] button to change the top row
display between Current Altitude and Current
Temperature.
IMPORTANT: If the user intends to get an
accurate reading of air temperature, the user
must taken off the watch from the wrist for 20 to
30 minutes before the actual measurement. It
allows no body temperature effect on the
Watch.
Change the Middle Row Display
! Press the [L/R] button to change the middle row
display among Ski Run's Current Descent
Speed, Total Elapsed Time, Accumulative
Descent and Accumulative Ascent.
NOTE: This changing can be functioned only if
the Ski Function is turned ON.
Change the Bottom Row Display
! Hold down the [L/R] button to change the
bottom row display between Current Time and
Current Lap.
NOTE: This changing can be functioned only if
the Ski Function is turned ON.
9.3 Ski Mode - Change the Measurement Unit
m (meter)
hold
[S/S]
ft (feet)
8C (Celsius)
hold
[S/S]
8F (Fahrenheit)
Not
Flashing
m/h
m/h
(mile per hour)
Flashing
Ski Mode
Ski Function ON
hold
[S/S]
Km/h
(Kilometer per hour)
Change the Measurement Unit
Change the Measurement Unit
! Hold down the [S/S] button to change the
measurement unit as the adjacent diagram:
! Distance measurement unit interchange between
m (meter) and ft (feet).
! Temperature measurement unit interchange
between 8C (Celsius) and 8F (Fahrenheit).
! Speed measurement unit interchange between
m/h (mile per hour) and Km/h (kilometer per hour).
NOTE: These changings can be functioned even if
the Ski Function is turned OFF.
9.6 Ski Mode - What are Slope Setting and Sensitivity Setting
9.4 Ski Mode - Ski Log Function
Ski Record 1
Ski Lap 1
meter
800
600
Turn ON the
ski function
at point (a)
on 11 Jun,
AM 10:00
b
400
AM 11:00
sk
il
meter
800
ap
1
600
AM 1 1 : 05
c
400
358
a
200
200
d
0
0
Ski Lap 2
meter
800
AM 1 2 : 00
600
f
sk
i la
meter
800
p2
AM 1 2 : 05
600
g
400
400
358
e
200
200
h
0
0
Ski Lap 3
PM 2 : 00
sk
meter
800
il
ap
j k
600
meter
800
3
PM 2 : 05
Turn OFF
ski function
at point (m)
o n 11 Jun,
P M 3 :00
400
600
400
358
i
200
m
l
0
200
0
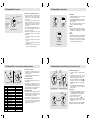
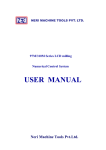
An Example to Illustrate Ski Log Function
! Assume a user enjoyed three ski runs within a day as it
is outlined by the adjacent diagram. To enjoy the Ski
Log function, the user needs to turn ON the Ski
Function before the ski runs.
! The Watch will log the below ski data into Ski Logbook
automatically, and these ski data can be reviewed in
Ski Recall Mode later.
Ski Record (the info and summary of all ski laps)
! The record date = 11 June.
! The record started time = AM10:00 00.
! The total travel time = 5: 00 00.
! The total number of ski lap recorded = 3 ski laps.
! The total descent time = 0:15 00.
! The accumulative descent = 1200m.
! The accumulative ascent = 1200m.
! The maximum descent speed = 15 Km/h*.
! The highest altitude reached = 700 m.
! The lowest altitude reached = 200 m.
! The slope of the ski course = 358
Ski Lap (ski data)
! The lap started time = AM 11:00 00 (Lap 1), AM
12:00 00 (lap 2 ), PM 2:00 00 (Lap 3).
! The total descent time = 0:05 00 (Lap 1), 0:05 00
(Lap 2), 0:05 00 (Lap 3).
! The maximum descent speed = 9 Km/h* (Lap 1),
11 Km/h* (Lap 2), 15 Km/h* (Lap 3).
! The average descent speed = 6 Km/h (Lap 1), 8
Km/h (Lap 2), 10 Km/h (Lap 3).
! The highest altitude reached = 500 m (Lap 1), 600
m (Lap 2), 700 m (Lap 3).
! The lowest altitude reached = 200 m (Lap 1),
200 m (Lap 2), 200 m (Lap 3).
! The altitude change = 300 m (Lap 1), 400 m (Lap
2), 500 m (Lap 3).
! The descent altitude change graph for every lap.
NOTE:*These maximum speeds are dummy figures,
the maximum speed can be logged in a real case only.
Turn OFF the
ski function,
the ski
record
is saved.
Turn ON the
ski function,
the ski
record
is created.
Auto or
manual start
the ski lap,
the ski lap
is created
Ski Lap 1
AM 11:00
sk
meter
800
600
b
400
il
Auto or
manual stop
the ski lap,
the ski lap
is saved
800
ap
1
600
AM 1 1 : 05
c
400
358
200
a
e
d
0
200
0
Flashing
m/h
Ski Function ON
188
Slope Setting
Ski Mode
Ascending Sensitivity
Descending Sensitivity
Fast
Fast
Normal
Normal
Slow
Slow
Sensitivity Setting
9.7 Ski Mode - Slope Setting and Sensitivity Setting
9.5 Ski Mode - How a Ski Lap is Logged
Ski Record 1
188
slope angle
Slope Setting
! The slope setting is the setting that inputs the
slope angle of the ski field into the Watch.
! Most of the ski fields post that figure to skier on
the ski field.
Sensitivity Setting
! The Watch will activate the ski lap function
(start the descent timer and create a ski lap)
automatically when a ski run is started (a
significant altitude loss is detected).
! Sensitivity setting is the setting that adjusts the
accuracy for above auto-activation.
! Type of Sensitivity
! Ascending sensitivity setting: Adjust the
sensitivity for altitude ascend auto-activation.
! Descending sensitivity setting: Adjust the
sensitivity for altitude descend auto-activation.
! Level of Sensitivity
! Fast Sensitivity: If sometimes false autoactivation is observed, select this setting to
improve the performance.
! Normal Sensitivity: If the auto-activation is
functioned normally, keep this setting.
! Slow Sensitivity: If the auto-activation can not
be functioned, select this setting to improve
the performance.
How to Log a Ski Lap
! When the Ski Function is turned ON:
! The Watch will create a Ski Record to log the
starting time and date into the Ski Logbook.
! When a ski run is started subsequently, the
Watch will create a Ski Lap automatically or
manually to log the ski data into the Ski
Logbook.
How to Activate a Ski Lap Automatically
! To start a Ski Run: When a ski run is started and a
significant altitude loss is detected, the decent
time timer will start counting automatically, and a
new ski lap is created .
! To stop a Ski Run: When a ski run is stopped and
the altitude loss is not significant, the decent time
timer will stop counting automatically, and the
current ski lap is saved.
How to Activate a Ski Lap Manually
! Press the [M] button once in the Ski Mode to
select 'MANUAL' Display, then the Watch is ready
for manual start/stop a ski lap.
! To start a Ski Run: Press the [S/S] button once
and start the ski run at the same time, then the
decent time timer will start counting from 0
seconds, and a new ski lap is created.
! To stop a Ski Run: Press the [S/S] button once
again when the ski run is stopped, then the decent
time timer will stop counting, and the current ski
lap is saved.
[M]
Hold
[M]
Slope
Setting
Ski Function
ON/OFF
[M]
Flashing
[M]
m/h
Hold
[M]
Ski Mode
Ski Function ON
Descending
Sensitive
Setting
[M]
Ascending
Sensitive
Setting
Ski Mode Setting Sequence
How to Set the Slop and Sensitivity
! To select the setting display, hold the [M] button
for about 2 seconds in Ski Mode, then the
flashing "SET" icon will appear.
! In setting display, press the [M] button to
change the selection following the adjacent
diagram.
! When the 'ON' or 'OFF' is flashing, hold
down the [S/S] button for about 2 seconds will
turn ON ('ON' is flashing) or OFF ('OFF' is
flashing) the Ski Function.
! When Slope angle is flashing, press the [S/S]
or [L/R] button to increase / decrease the
angle. (Hold down the button change the
angle at a higher speed).
! When the 'rAtE AS' (Ascending sensitive rate)
appear, press the [S/S] or [L/R] button to
change the setting among 'FAST' (Fast),
'SLOW' (Slow) and 'NORM' (Normal).
! When the 'rAtE DS' (Descending sensitive
rate) appear, press the [S/S] or [L/R] button to
change the setting among 'FAST' (Fast),
'SLOW' (Slow) and 'NORM' (Normal).
! When the set is completed, hold down the [M]
button to exit the setting display. The Watch will
also exit the setting display if NO key-stoke has
been activated for 1 minute.
10.0 Ski Recall Mode - Ski Logbook
Record X
Record 2
Record 1
the
record date
the record
started time
The total no.
the total
of ski lap
travel period
recorded
the
the
the maximum
the total
descend
descent time accumulative accumulative
descent
ascent
speed
the highest
altitude
reached
the lowest
altitude
reached
the slope
of the ski
course
Ski Record (the data summary of all stored ski lap)
Lap X
Lap 2
Lap 1
the lap
started time
the total
descent time
the maximum
descent
speed
the average
descent
speed
the highest
altitude
reached
the lowest
altitude
reached
the
altitude
change
the descent
altitude
change graph
Ski Lap (the data summary of a particular ski lap)
10.2 Ski Recall Mode - Ski Lap Recall
Ski Record
! The Ski Record logs a series of Ski Laps, and it
provides the summary of these ski laps:
! The record date,
! The record started time,
! The total travel period,
! The total number of ski lap recorded,
! The total descent time,
! The accumulative descent,
! The accumulative ascent,
! The maximum descent speed,
! The highest altitude reached,
! The lowest altitude reached and
! The slope of the ski course.
Ski Lap
! The Ski Lap logs the data of a particular ski
lap, and it includes:
! The lap started time
! The total descent time
! The maximum descent speed,
! The average descent speed,
! The highest altitude reached,
! The lowest altitude reached,
! The altitude change, and
! The descent altitude change graph.
10.1 Record Data
Selection Sequence
10.1 Record Selection
Sequence
[M]
hold [M]
the
recall
mode
indicator
[L/R]
RUN
RUN
Start Time Lap 4
Start Time Lap 3
[L/R]
[L/R]
[L/R]
the
lap no.
(flashing)
RUN
Lap Start
Time Display
the
lap
starting
time
RUN
RUN
Start Time Lap 2
Start Time Lap 1
Lap Selection Sequence
(Four Laps were Logged)
[S/S]
[M]
[S/S]*
[S/S]
Ski Descent
Altitude Change Graph
Altitude Change
Total
Descent Time
[S/S]*
[S/S]*
[S/S]*
Lowest Altitude
Reached
[S/S]*
How to Select the Ski Lap
! When one of the target record data (except
Slope Review Display) is displayed, hold down
the [M] button will enter the selection to select
a target lap among the logged laps.
! To exit the lap selection sequence and back to
Ski Recall Mode by pressing the [M] button
once.
How to Select among Different Ski Lap s
! During the Lap Start Time Display, p ress the
[L/R] button to select a target lap among the
logged laps following the adjacent diagram.
How to Review the Lap Data
! When a target lap is displayed, press the [S/S]
to re view different lap data displays following
the adjacent diagram.
! To exit the lap selection sequence and back to
Ski Start Time Display by pressing the [M]
button once.
[S/S]*
Highest Altitude
Reached
[S/S]*
Average
Descend Speed
Maximum
Descend Speed
The Lap Data (the data summary of one ski lap) Selection Sequence
*Press [L/R] button will move the selection in the reverse direction
10.1 Ski Recall Mode - Ski Record Recall
current
record no.
(flashing)
the
recall
mode
indicator
total no.
of record
[L/R]
Start Time
Record 4
Start Time
Record 3
[L/R]
[L/R]
[L/R]
the
record
started
time
the
record
date
Start Time - Record 4
Ski Recall Mode
Start Time
Record 1
Record Selection Sequence
(Four Record was logged)
[S/S]
[S/S]*
Highest Altitude
Reached
[S/S]*
[M]
[S/S]*
[S/S]*
Lower Altitude
Reached
[S/S]*
Maximum
Descent Speed
Start Time
Record 2
[S/S]*
Accumulative
Ascent
Total
Travel Time
[S/S]*
Slope
Review
[S/S]*
Accumulative
Descent
Total
Descent Time
The Record Data (the data summary of all ski laps) Selection Sequence
*Press [L/R] button will move the selection in the reverse direction
hold [M]
[M]
10.2 Lap Selection Sequence
10.3 Ski Recall Mode - Delete the Ski Record
Ski Recall Mode Display
! When the Ski Recall Mode is selected:
! The total number of logged record will be
appeared on the top row of the display.
! The starting time and date of the displayed
record will be appeared on the middle and
bottom row of the display respectively.
How to Select among Different Ski Records
! P ress the [L/R] button to select a target record
among the logged records following the
adjacent diagram.
How to Review the Record Data
! When a target record is displayed, press the
[S/S] to re view the different record data . During
the review, press the [M] button once to return
to previous display.
How to Select the Ski Lap
! Check the coming chapter 10. 2 for more detail
on how to select a target l ap among the logged
laps.
NOTE: The slope angle can be changed (even
after the ski record has been stored) as following:
! Hold down the [M] button in the Slope Review
Display to select setting display, then press
[S/S] and [L/R] button to change the angle.
When the setting is completed, hold down the
[M] button to exit the setting display.
! All speed related data will be updated
automatically after the changing.
Hold
[M]
Hold
[M]
Ski Recall Mode
'ONE'
Delete
the current
record
[M]
'ALL'
Delete
all record
Ski Record Deletion Sequence
Hold
[S/S]
Confirm
the deletion
How to Delete the Ski Record
! Hold down the button in the Ski Recall Mode to
select the Record Deletion Display.
! In Record Deletion Display, press the [M] button
to change the selection between 'ONE' (delete
the current record) and 'ALL' (delete all record)
following the adjacent Diagram.
! When the 'ONE' or 'ALL' is flashing (selected),
hold down the [S/S] button to confirm the
deletion or hold down the [M] button to abort
the deletion and exit the setting display.
NOTE: When the Ski Function is turned ON, the
current ski record can not be deleted.
11.0 Altimeter Mode - Temperature and History Display
Functional Display
current
temperature
! T h e Wa t c h i n c l u d e s t w o A l t i m e t e r f u n c t i o n a l
current
altitude
current time
Temperature Display
[S/S]
[S/S]
cursor moving current
direction
time
- 23
hour
Altitude
History
graph
altitude
history
[L/R]
the 1st record
at the hour
(flashing cursor)
A LT I
record time
(flashing)
History Display
(1st Record at the hour)
History Display
(Current Time)
[L/R]
[L/R]
History Display
(-2 to -23 hour)
[L/R]
Altitude
History Review
Altimeter Mode
displays: Temperature and History Display. One of
the two functional displays will be appeared on the
top row of the display.
! Press the [S/S] to select between Temperature and
History Display.
Fast sampling
! During the Altitude Mode, hold down the [L/R] button
will activate fast sampling (sample per second) for
five minutes.
Temperature Display
! In Temperature Display, the top display shows the
current temperature in degree Celsius (8 C) or degree
Fahrenheit (8 F).
IMPORTANT: To get an accurate reading of air
temperature, you must remove the watch from the
wrist that allows no body temperature effect on your
watch.
History Display
! The Watch records the altitude reading automatically
every hour at the hour, i.e 1:00, 2:00, 3:00 and etc.
These records will be plotted into a altitude record
graph.
! In History Display, the altitude record graph shows
on the top row of the display.
! To review the altitude records of the last 23 hours,
press the [L/R] button to move cursor left cyclically,
at the same time, the respective altitude record and
its recording time (flashing) will appear on the
display.
11.1 Altimeter Mode -Measurement Unit Selection
hold
[S/S]
hold
[S/S]
8 F (Fahrenheit)
8 F(Fahrenheit)
hold
[S/S]
ft (Feet)
hold
[S/S]
8 C (Celsius)
m (Meter)
m (Meter)
hold
[S/S]
11.2 Altimeter Mode - Absolute and Relative Altitude
8 C (Celsius)
ft (Feet)
Measuring Unit Selection Sequence
180m
180m
absolute
80m
altitude
absolute
altitude
80m
0m
(sea level)
Absolute Altitude
180m
100m
80m
100m
relative
altitude
0m
(where the
altimeter was
adjusted to zero)
0m
(sea level)
Relative Altitude
Absolute and Relative Altitude
! Absolute altitude is the vertical distance between
your current altitude and Sea Level (0 m).
! Relative altitude is the vertical distance between
your current altitude and the altitude of a specific
level at which you set the altimeter to zero.
! An example of using relative altitude:
! The altitude difference between the starting
point and the finish point of a trek can be
measured by Relative Altitude.
! Set the altitude to 'Zero' at the starting point,
while the Watch will show the altitude difference
at the finish point of the trek.
How to Switch between Absolute and Relative
Altitude
! Check the coming chapter 'Zero Altitude
Adjustment' Chapter for more detail on how to set
the current altitude to zero altitude.
! An 'r ' indicator will be shown with the altitude
reading as long as the Altitude has been adjusted
by the 'Zero' adjustment.
! To switch the Watch back to absolute altitude
measurement, employ one of the following altitude
adjustments: Factory Default Adjustment, Sea
Level Pressure Adjustment and Absolute Altitude
Adjustment. Check the respective chapters for
more detail on how to employ the adjustment.
11.3 Altimeter Mode - Altimeter Adjustment Overview
How to Switch between Measurement Units
! The Watch display altitude either in meter (m) or
feet (ft).
! The Watch display temperature either in deegree
Celsius ( 8 C) or degree Fahrenheit ( 8 F).
! To switch among different unit, hold down the
[S/S] button to change the units following the
adjacent diagram.
SET
Zero Altitude
Display
SET
Factory Default
Display
Absolute Altitude
Display
SET
Sea Level
Pressure Display
Adjustment Displays
Why the Altimeter Need to be Adjusted ?
! As the absolute altitude is calculated from air
pressure, the change of air pressure would affect
the altitude reading.
! To achieve a more accurate result, the Watch
needs to be calibrated from time to time as
pressure may change gradually even within hours.
Altimeter Adjustment
! There are 4 kinds of adjustment method: Zero
Altitude, Absolute Altitude, Sea Level Pressure and
Factory Default Adjustment.
! Zero Altitude: Adjust altitude mandatory to zero for
relative altitude measurement. If the altimeter is
adjusted by Zero Adjustment, an " r " indicator will
be appeared on the display.
! Absolute Altitude: Set altitude to known value and it
can recall for next setting.
! Sea Level Pressure: Input a specific sea level
pressure which get from official site.
! Factory Default: Restore the Watch to default
factory setting where assume Sea Level Pressure
is 1013.2 mb
NOTE: When the Ski Function is turned ON, Altimeter
Adjustment function is prohibited.
NOTE: Altitude is calibrated independently on each
mode. For example, if absolute altitude is selected,
the effect of the previous sea level pressure setting
will be ignored.
NOTE: The Watch includes an automatic Sea Level
Pressure comparison feature, this smart feature
allows NO fluctuation altitude readings will be
recorded when staying at the same altitude.
11.4 Altimeter Mode - Zero Altitude Adjustment
2 seconds
Done Display
Altimeter Mode
hold
[M]
hold
[M]
Hold [M]
[M]
[M]
[M]
[M]
Zero Altitude Display
Altitude Adjustment
[S/S]
Adjust the Altimeter by Using Zero Altitude
Adjustment
! To select the Adjustment Display, hold the [M] button
in Altimeter Mode. Then press the [M] to select
among the Zero Altitude, Absolute Altitude, Sea
Level Pressure and Factory Default Adjustment.
! To adjust the Watch by using Zero Altitude
Adjustment , press the [S/S] button in Zero
Altitude Display, and the indicator "NO" will
appear.
! When the indicator "NO" is appeared, press the
[S/S] or [L/R] button to select between "YES"
(reset the Watch to zero) or " N O " ( a b o r t t h e
resetting). When "YES" or "NO" is selected, hold
the [M] button to confirm the setting.
! To exit Adjustment Display, hold the [M] button
for 2 seconds, and then the Watch will go back
to Altimeter Mode.
If the "YES" Display is
selected when exiting the Adjustment Display, the
"DONE" Display will appear for 2 seconds prior
to the normal operation.
! To restore the Watch to factory default, please
refer to the coming section "Altimeter Mode Factory Default Adjustment" for more detail.
11.6 Altimeter Mode - Sea Level Pressure Adjustment
Altimeter Mode
hold
[M]
hold
[M]
[M]
[M]
[M]
Sea Level
Pressure Display
Altitude Adjustment
[S/S]
[S/S]/[L/R]
SET
Increase / Decrease
the number
[S/S] / [L/R]
hold
[S/S]/[L/R]
NO Display
Yes Display
Zero Altitude Adjustment
Altimeter Mode
hold
[M]
[M]
[M]
[M]
[M]
Absolute Altitude Display
Altitude Adjustment
[S/S]
[S/S]/[L/R]
hold
[S/S]/[L/R]
Absolute Altitude Display
Increase / Decrease
the number
at a higher speed
Absolute Altitude Display
11.5 Altimeter Mode - Absolute Altitude Adjustment
hold
[M]
[M]
Why Need to adjust the Sea Level Pressure
! As altitude is calculated from air pressure
changes, so the sea level pressure changing or
using the Watch in a place which has a different
sea level pressure will affect the altitude reading.
! To achieve a more accurate reading, sea level
pressure need to be updated from place to p l a c e
and from time to time.
How to Adjust the Altimeter by Using Sea Level
Pressure Adjustment
! The Watch can adjust the current altitude reading by
sea level pressure adjustment by the following:
! To select the Adjustment Display, hold the [M]
button in Altimeter Mode. Then press the [M]
button to select among the Zero Altitude,
Absolute Altitude, Sea Level Pressure and
Factory Default Adjustment.
! To adjust the Watch by using Sea Level
Pressure Adjustment , press the [S/S] button in
Sea Level Pressure Display, and the sea level
pressure reading will appear.
! When sea level pressure reading is appeared,
press the [S/S] or [L/R] button to increase or
decrease the number to the target number.
(Hold down the button changes the number at a
higher speed).
! If the adjustment is completed, hold the [M]
button to confirm adjustment and exit the
adjustment display.
Increase / Decrease
the number
Increase / Decrease
the number
at a higher speed
Before Adjusting the Altitude
! Adjusting the altimeter at a place where the
altitude is known, such as sea level (0m) or
beside an altitude sign pole (e.g., 89 m).
! That altitude will be inputted into the Watch during
the adjustment.
IMPORTANT: Input an incorrect altitude during the
adjustment, it results a mistaken altitude in future.
To Adjust the Altimeter by Using Absolute
Altitude Adjustment
! The Watch can adjust the current altitude reading
to an absolute altitude value by the following:
! To select the Adjustment Display, hold the [M]
button in Altimeter Mode. Then press the [M]
button once again to select among the Zero
Altitude, Absolute Altitude, Sea Level Pressure
and Factory Default Adjustment.
! To adjust the Watch by using Absolute Altitude
Adjustment , press the [S/S] button in Absolute
Altitude Display, and the altitude reading will
appear.
! When the altitude reading (the last setting) is
appeared, press the [S/S] or [L/R] button to
increase or decrease the number to the target
one. (Hold down the button changes the number
at a higher speed).
! If the setting is completed, hold the [M] button
to confirm setting and exit the adjustment
display.
NOTE: Once you have adjusted the altitude by
using absolute alitutde adjustment at a place (e.g.
your office where the altitude is 100m), the Watch
will store that figure (100m) into the memory for
your to adjust the altitude the next time at the same
place.
11.7 Altimeter Mode - Factory Default Adjustment
2 seconds
A LT I
"DONE" Display
Altimeter Mode
hold
[M]
hold
[M]
[M]
[M]
[M]
SET
[M]
Altitude Adjustment
[S/S]
Factory Default Display
SET
SET
[S/S] / [L/R]
BARO
BARO
Hold
[M]
"NO" Display
"YES" Display
Factory Default Adjustment
How to Adjust the Altimeter by Using Factory
Default Adjustment
! The Watch can also adjust the altitude reading
calculation back to using factory default value by
the following:
! To select the adjustment display, hold the [M]
button in Altimeter Mode. Then press the [M] to
select among the Zero Altitude, Absolute
Altitude, Sea Level Pressure and Factory
Default Adjustment.
! To adjust the Watch by using factory default
adjustment (restore to factory default by
assuming the sea level pressure is 1013.2mb),
press the [S/S] button in Factory Default
Display, and the indicator "NO" will appear.
! When the indicator "NO" is appeared, press the
[S/S] or [L/R] button to select between "YES"
(reset the Watch to factory default) or "NO"
(abort the resetting).
! To exit Adjustment Display, hold the [M] button
for 2 seconds, and then the Watch will go back
to Barometer Mode. If the "YES" Display is
selected when exiting the Adjustment Display,
the "DONE" Display will appear for 2 seconds
prior to the normal operation.
12.0 Barometer Mode - Temperature and History Display
Current
Sea level
pressure
current
temperature
[S/S]
current
ambient
pressure
current
time
Temperature Display
Sea Level Pressure Display
[S/S]
[S/S]
Sea level
pressure
history
current
ambient
pressure
[L/R]
[L/R]
History Display
(-2 to -23 hour)
[L/R]
- 23
hour
cursor moving
direction
History Graph Display
(Current Time)
current
time
[L/R]
Sea level
pressure
flashing cursor
history
(1 st record at the hour)
record time
Sea Level Pressure History Graph Display (flashing)
(1st Record at the hour)
History Review
12.2 Barometer Mode - Absolute Pressure Adjustment
Functional Display
! The Watch includes three Barometer functional
displays: Temperature, Sea Level Pressure and
History Graph Display. One of the three functional
displays will be appeared on the top row of the
display.
Fast sampling
! During the Altitude Mode, hold down the [L/R] button
will activate fast sampling (sample per second) for
five minutes.
Temperature Display
! In Temperature Display, the current temperature in
degree Celsius (8 C) or degree Fahrenheit (8 F) shows
on the top row of the display.
IMPORTANT: If you want to have an accurate reading
of air temperature, you must remove the Watch from
the wrist (for 20 to 30 minutes) that allows no body
temperature effect on your watch.
Sea Level Pressure Display
! In Sea Level Pressure Display, the sea level
pressure shows on the top row of the display.
History Graph Display
! The Watch records the pressure reading
automatically every hour at the hour, i.e 1:00, 2:00,
3:00 and etc. These records will be plotted into a
pressure record graph.
! In History Display, the pressure record graph shows
on the top row of the display.
! To review the pressure records of the last 23 hours,
press the [L/R] button to move cursor left cyclically,
then the respective pressure record and its
recording time (flashing) will appear on the display.
Barometer Mode
hold
[M]
hold
[M]
[M]
Absolute Pressure Display
Factory Default Display
[S/S]
[S/S]/[L/R]
hold
[S/S]/[L/R]
Absolute Pressure Display
Increase (decrease)
the number
Increase (decrease)
the number
at a higher speed
Before Calibrating the Barometer
! Before calibrate the Barometer, you must have
the absolute pressure of your current position,
because that pressure value will be inputted into
the Watch during the adjustment.
! Consult the nearest observatory station to get
the ambient barometric pressure of your current
position.
IMPORTANT: Input a incorrect pressure during the
calibration procedure, it results a mistaken pressure
reading in future.
How to Adjust the Barometer by Using Absolute
Pressure Adjustment
! The Watch can adjust the current pressure
reading to a absolute pressure value.
! To select the Adjustment Display, hold the [M]
button in Barometer Mode. Then press the [M]
button to select between the Absolute Pressure
Adjustment and Factory Default Adjustment.
! To adjust the Watch by using Absolute Pressure
Adjustment , press the [S/S] button in Absolute
Pressure Display, and the pressure reading will
appear.
! When pressure reading is appear, press the [S/S]
or [L/R] button to increase / decrease the
number. ( Hold down the button changes the
number at a higher speed).
! If the setting is completed, hold the [M] button to
confirm setting and exit the adjustment display.
Barometer Mode
12.1 Barometer Mode - Measurement Unit Selection and Barometer Adjustment
hold
[S/S]
hold
[S/S]
8F (Fahrenheit)
inHg
hold
[S/S]
8C (Celsius)
inHg
hold
[S/S]
8F(Fahrenheit)
mb/hPa
hold
[S/S]
8C (Celsius)
mb/hPa
Measuring Unit Selection Sequence
Absolute Pressure
Display
Factory Default
Display
Adjustment Displays
12.3 Barometer Mode - Factory Default Adjustment
How to Switch between Measurement Units
! The Watch can display pressure in mb/hPa or
inHg; the Watch can display temperature in
degree Celsius ( 8 C) or degree Fahrenheit ( 8 F).
To switch among different unit, hold down the
[S/S] button to change the units following the
adjacent units selection sequence.
Why the Barometer Need to be Adjusted
! The Watch was calibrated for you in the factory.
For normal use, you need not to calibrate the
Barometer.
! But for vigorous users, the Watch includes a
adjustment procedure.
Barometer Adjustment
! There are 2 kinds of Barometer adjustment
method: Absolute Pressure and Factory Default
Adjustment.
! Absolute Pressure: Input the known atmospheric
pressure into the Watch directly.
! Factory Default: Restore the Watch to factory
default setting.
! For in-depth information for each of the adjustment
methods, it will be given in the coming sections.
NOTE: When the Ski Function is turned ON,
Barometer Adjustment function is prohibited.
2 seconds
!
"DONE" Display
Barometer Mode
hold
[M]
hold
[M]
SET
SET
[M]
Absolute Pressure Display
Factory Default Display
[S/S]
[S/S] / [L/R]
hold
[M]
"NO" Display
"YES" Display
Factory Default Adjustment
How to Adjust the Barometer by Using Factory
Default Adjustment
! The Watch can also adjust the pressure reading
calculation back to using factory default value.
! To select the Adjustment Display, hold the [M]
button in Barometer Mode. Then press the [M] to
select between Absolute Pressure Adjustment
and Factory Default Adjustment.
! To adjust the Watch by using factory default
adjustment, press the [S/S] button in Factory
Default Display, and the indicator "NO" will
appear.
! When the indicator "NO" is appeared, press the
[S/S] or [L/R] button to select between "YES"
(reset the Watch to factory default) or "NO"
(abort the resetting).
! To exit Adjustment Display, hold the [M] button
for 2 seconds, and then the Watch will go back
to Barometer Mode. If the "YES" Display is
selected when exit the Adjustment Display, the
"DONE" Display will appear for 2 seconds prior
to the normal operation.
13.0 Compass Mode - Precautions
13.2 Compass Mode - Compass Mode
navigation direction
compass direction
bearing direction
of navigation
direction
magnetic north pole
pointer
COMP
current time
Digital Compass Mode
The Precautions when Using the Compass
! Keep your Watch away from magnets or the
appliances which may contain magnetic
objects such as mobile phones, speakers,
motors and etc.
! The Watch, like most magnetic compass,
points to the magnetic north which is slightly
different from the true north. Check the
'What is Magnetic Declination' section for
more detail.
! Perform the compass calibration from time to
time, because the calibration reinforces the
precision of the compass.
! To achieve a accurate result, you should
avoid measuring direction on the following
conditions:
1) The watch is placed close to a magnetic
objects,
2) The watch is placed close to a metal
objects,
3) The watch is placed close to an electrical
appliances, and
4) The watch is placed inside a moving
object or a ferroconcrete building.
13.1 Compass Mode - Compass Directions and Bearing Directions
N
object D
NW
N
E
object B
SE
object C
Compass Directions
SSW
SW
WSW
W
WNW
NW
NNW
08
object D
3158
point A
Marks
N
NNE
NE
ENE
E
ESE
SE
SSE
S
08
angular
difference
Compass Directions
North
North Northeast
Northeast
East Northeast
East
East Southeast
Southeast
South Southeast
South
South Southwest
Southwest
West Southwest
West
West Northwest
Northwest
North Northwest
908
object B
point
A
1358
object C
Bearing Directions
Bearing Directions
3498 - 118
128 - 338
348 - 568
578 - 788
798 - 1018
1028 - 1238
1248 - 1468
1478 - 1688
1698 - 1918
1928 - 2138
2148 - 2368
2378 - 2588
2598 - 2818
2828 - 3038
3048 - 3268
3278 - 3488
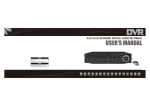
The Direction of an Object
! The direction of an object from a point can
be specified in either compass directions or
bearing directions.
! The Watch includes both compass d i r e c t i o n s
and bearing directions.
The Compass Directions
! The compass directions are shown on the
adjacent table.
! For example, in the figure on the left, the
compass direction of object B from point A is
East. The compass direction of object C from
point A is Southeast. The compass direction
of object D from point A is Northwest.
The Bearing Directions
! The Bearing direction of an object is defined
as theangular difference between North and
theobject. (Assume 0 8 for North, and the
measuring range is from 0 8 to 359 8 ).
! For example, in the figure on the left, the
bearing direction of object B from point A is
90 8 . The bearing direction of object C from
point A is 135 8 . The bearing direction of
object D from point A is 315 8 .
Normal Display
Compass Mode
! In the Compass Mode, the top of the display
shows the compass direction.
! The middle display shows the bearing direction.
! The bottom display shows the current time in
hour and minute.
! The pointer encircled the display shows the
direction of magnetic North analogically.
IDLE Mode
! If no any key operation for about 1 minute, the
Watch will go to the IDLE Mode automatically.
To activate the compass again, press any
button.
Distortion
! If distortion is detected, the indicator "OFF
CAL" with flashing direction digits will appear.
! Please refer to the coming section "Calibrating
the Compass" to restore the compass to
normal operation when distortion occur.
Idle Display
Distortion display
Compass Mode
13.3 Compass Mode - Backward Bearing Direction and Compass Lock
3058
backward
bearing
direction
normal
bearing
direction
08
08
[S/S]
08
backward
bearing
indicator
Norm al Bearin g Dire ctio n
1258
Backward Bearin g Dire ctio n
compass
lock indicator
[L/R]
Dire ctio n Unlo cked
Dire ctio n Locked
Backward Bearing Direction
! The Watch includes a backward bearing
function.
! The backward bearing direction is the
bearing d i r e c t i o n t h a t o n t h e o p p o s i t e
direction from normal bearing direction.
! When the 'Backward Bearing' indicator "
"
is appeared, the Watch is showing the
backward bearing direction of the navigation
direction.
! In Compass Mode, press the [S/S] button to
select between normal and backward
bearing direction.
Compass Lock
! The Watch includes a compass lock function
that locks the important direction readings.
! in Compass Mode, press the [L/R] button to
lock/unlock the direction readings,
! When the "Lock" indicator, "
" is
appeared, the compass direction, bearings
direction and the magnetic north pole pointer
are locked.
NOTE: The Compass Lock will be released
automatically when the Watch enter IDLE Mode.
13.4 Compass Mode - Applications of the Compass
0
mountain A
2708
mountain B
point A
1358
Check Current Position By Backward Bearing
point E
(finish point)
0
3120 m
3158
point C
2258
point D
08
4110 m
3158
point B
2120 m
A Sample Trail on a Map
point A
(starting point)
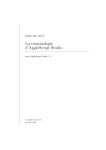
Check your position by Backward Bearing
Directions
! Spot two distant identifiable landmarks such as
mountains, light-house, fort and building of your
current position, for example the mountain A and B.
! Check out the backward bearing directions of
mountain A and B of your current position, such as
1358 from mountain A and 2708 from mountain B.
! Use a ruler to draw the line 1358 on the map which
starting from the mountain A. Draw the lines 2708
on the map which starting from the mountain B.
! Your current position on the map will be the
intersection point (point A) of the lines 1358 and
2708
Check the Trek Course Correct
! During a trekking, the Watch can keep your course
correct. For example, the correct trail starts from
point A and finishes at point E as it is drawn on the
adjacent map.
! Mark the points (identifiable landmarks) where the
trail turns its direction or the trail branches its way,
such as the point A, B, C, D and E on the adjacent
map.
! Find out the bearing directions of point B from
point A (315 8 ), point C from point B (0 8 ), point D
from point C (225 8 ), and then point E from point D
(315 8 ).
! During the trekking, make sure that the heading
direction is 315 8 from point A to point B. Performing
the similar checking in other sections of the trail.
IMPORTANT: If you are in doubt of the directions and
positions of the trail, consulting the park administration
office before starting the trekking.
13.5 Compass Mode - Magnetic Declination
13.6 Compass Mode - Magnetic Declination Compensation
magnetic
north
magnetic
declination
238 W
true north
08
true
bearing
3008
object B
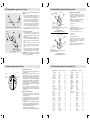
Magnetic Declination Compensation
! To compensate an object's bearing by subtract
westerly (W) magnetic declination or add
easterly(E) magnetic declination with the
magnetic bearing.
! Example 1: Westerly magnetic declination 23 8
and the compass needle points 323 8 .
! TB = MB - W. While MB = 323 8 ; W =23 8
magnetic
bearing
3238
! TB = 323 8 - 23 8
point A
Tru e Bearin g (T B) =
Magneti c Bearin g (M B) - Weste rly Magneti c Decli nati on (W )
300 8 (T B) = 3238 (M B) - 23 8 (W )
Compensate th e Bearin g
with Weste rly (W ) Magnetic Declin atio n
true north
08
magnetic
declination
228 E
! TB = 300 8
! The true bearing will be 300 8 .
!
! TB = MB + E. While MB = 278 8 ; E = 22 8
! TB = 278 8 + 22 8
! TB = 300 8
magnetic
north
! The true bearing will be 300 8 .
!
object B
true
bearing
3008
magnetic
bearing
2788
Example 2: Easterly magnetic declination 22 8
and the compass needle points 278 8 .
!
The Watch allows you compensate the compass
bearing at a place where the magnetic
declination is either Westerly declination or
Easterly declination.
Check the coming chapters "Calibrating the
Compass" for more detail of the setting.
point A
Tru e Bearin g (T B) =
Magneti c Bearin g (M B) + Easte rly Magneti c Decli nati on (E )
3008 (T B) = 2788 (M B) + 228 (E )
Compensate th e Bearin g
with Easte rly (E ) Magnetic Declin atio n
13.7 Compass Mode - Magnetic Declination at Major Cities
What is Magnetic Declination
! The Magnetic North Pole which is slightly different from
True North
Magnetic
North
Magnetic
Declination
Magnetic
Declination
the True North Pole.
! This Watch, like most magnetic compass, points to the
Magnetic North Pole. On the contrary, everything
measure from a map is related to the True North Pole.
! The angular difference between Magnetic North Pole
and True North Pole is called magnetic declination. Its
amount (degrees and minutes) and direction (easterly
and westerly) depend on where you are in the world.
! For serious compass user or who intends to perform
accurate navigation, compass must be adjusted for
magnetic declination.
! The Watch also includes a compensation setting for
Magnetic Declination. Check the coming section
"Calibrating the compass - Magnetic Declination Mode"
for more detail.
Magnetic Declination Information
! Most topographic maps include a small arrow which
shown magnetic north pole and or the magnetic
declination information.
! For the benefit of user, this user manual includes the
magnetic declination for some major cities. Check the
coming section 'Magnetic Declination at Major Cities' for
more detail.
! For those cities whose names are not included in the list, you
can input that city's latitude and longitude into one of the
below magnetic declination calculation websites (as at 28
Oct 2005) to get the magnetic declination:
1) http://gsc.nrcan.gc.ca/geomag/index_e.php
2) http://www.ngdc.noaa.gov/seg/geomag/declination.shtml
No. Country/Place
Major City
1
2
3
4
5
6
7
8
9
10
11
12
13
14
15
16
17
18
19
20
21
22
23
24
25
26
27
28
29
30
31
32
Kabul
Canberra
Vienna
Manama
Dhaka
Brussels
Brasilia
Ottawa
Santiago
Beijing
Hong Kong
San Jose
Havana
Prague
Copenhagen
Cairo
Helsinki
Paris
Berlin
Athens
Budapest
New Delhi
Jakarta
Jerusalem
Rome
Tokyo
Amman
Nairobi
Seoul
Kuala Lumpur
Mexico City
Kathmandu
Afghanistan
Australia
Austria
Bahrain
Bangladesh
Belgium
Brazil
Canada
Chile
China
China
Costa Rica
Cuba
Czech Republic
Denmark
Egypt
Finland
France
Germany
Greece
Hungary
India
Indonesia
Israel
Italy
Japan
Jordan
Kenya
Korea
Malaysia
Mexico
Nepal
Declination
2-E
12-E
2-E
2-E
0
1-W
19-W
14-W
5-E
6-W
2-W
0
3-W
2-E
1-E
3-E
6-E
1-W
1-E
3-E
4-E
1-E
1-E
3-E
1-E
7-W
3-E
1-E
7-W
1-E
6-E
0
No. Country/Place Major City
33
34
35
36
37
38
39
40
41
42
43
44
45
46
47
48
49
50
51
52
53
54
55
56
57
58
59
60
61
62
63
64
Netherlands
New Zealand
Norway
Pakistan
Philippines
Portugal
Russia
Singapore
South Africa
Spain
Sweden
Switzerland
Taiwan
Thailand
UAE
United Kingdom
United States
Declination
Amsterdam
Wellington
Oslo
Islamabad
Manila
Lisbon
Moscow
Singapore
Cape Town
Madrid
Stockholm
Bern
Tai-pei
Bangkok
Abu Dhabi
London
Washington, DC
Juneau
Phoenix
Little Rock
Sacramento
Denver
Atlanta
Honolulu
Boston
Saint Paul
Jackson
Santa Fe
Oklahoma City
Salem
Harrisburg
Salt Lake City
1-W
22-E
0
2-E
1-W
5-W
9-E
0
23-W
3-W
3-E
0
3-W
0
1-E
3-W
10-W
25-E
12-E
2-E
16-E
10-E
4-W
10-E
16-W
2-E
1-E
10-E
6-E
18-E
11-W
14-E
13.8 Calibrating Mode - Calibration the Compass
Compass Mode
Hold [M]
Hold [M]
[M]
Rotation
Calibration Display
Magnetic
Declination Display
When to Calibrating the Compass
! The Watch has to employ a compass calibration
in one of the following conditions:
1) The Watch is using for the first time,
2) The battery has been replaced,
3) The bearing direction digits are flashing, and
the "OFF CAL" indicator appear,
4) The compass use in a location that is apart
from the place in which the compass had
been calibrated,
5) The user intends to regulate the precision of
the digital compass.
How to Calibrate the Compass
! The compass calibration includes two different
processes: Rotation Calibration Mode and
Magnetic Declination Setting.
! It is advisable to carry out them both from time
to time, that achieves a more accurate reading.
IMPORTANT: If the Watch has not been calibrated,
the direction made by the Watch may be a
inaccurate direction.
13.10 Calibrating the compass - Magnetic Declination Mode
Magnetic Declination Mode
! Check the coming section "Magnetic Declination
at Major Cities" to get the magnetic declination
of the city which is close to your current
position. That angle will b e i n p u t t e d i n t o t h e
Watch during the calibration.
! To select Magnetic Declination Display, press the
[M] button in Rotation Calibration Display.
! When the current magnetic declination is
appeared, press the [ S / S ] o r [ L / R ] b u t t o n t o
increase / decrease the number. (Hold down the
button changes the number at a higher speed).
! If the setting is completed, hold the [M] button to
confirm setting and exit the adjustment display.
Compass Mode
Hold [M]
Hold [M]
SE T
[M]
Magnetic
Declination Display
Rotation Calibration
Stop Display
hold [S/S]/[L/R]
Compass Calibration
[S/S]/[L/R]
Increase / Decrease
the number
Increase / Decrease
the number
at a higher speed
Compass Calibration
13.9 Calibrating the Compass - Compass Rotation Calibration Mode
Rotation Calibration Display
! To select the Rotation Calibration Display, hold
the [M] button in Compass Mode.
! To start rotation calibration, press [S/S] button
once. The pointers will start rotating, turning the
watch (keep parallel to the horizon) in the same
direction of the rotating pointers for more than 2
turns.
! Press [S/S] or [L/R] button to stop the calibration
when the 2-turn rotation calibration is completed.
! When the pointer stop rotating, hold the [M]
button to back to the Compass Mode or press
the [M] button once to set the magnetic
declination.
Compass Mode
Hold [M]
Hold [M]
[M]
Rotation Calibration
Stop Display
[S/S]
Magnetic
Declination Display
[S/S] / [L/R]
pointers
rotated at
15 seconds
per turn
Rotation Calibration
Turning Display
Compass Calibration
Magnetic
Declination Display
14.0 Battery - Battery Low Indication and Battery Replacement
Batte ry - Low
In dic ato r
Battery Low Detection
! When the battery-low indicator appears on the
display, it means that the capacity of the
battery is low. It is recommended to replace the
battery with a new CR2032.
! However, if the appearance of battery-low
indicator is caused by using the Watch under
very cold condition, the indicator will be
disappeared when normal temperature returns.
NOTE: It is recommended to complete the battery
replacement by a certified service agency, because
this Watch contains precise electronic sensors and
components.
IMPORTANT: If the battery has been replace, all
memory will be cleared. Follow the previous chapter
"Calibrating the Compass" to calibrate the compass
before using the Compass.
15.0 Specifications - Part A
Current Time Mode
! Hour, minute, second, am, pm, month, date, and
day of week or barometer pressure history
display, altitude history and temperature
Time System
! 12-hour or 24-hour format
Calendar System
! Auto-Calendar pre-programmed from the year
2004 to 2099
Weather Forecast
! 4 symbols to indicate the predicated weather
Daily Alarm Mode
! 2 daily alarms
! Hourly chime
Alarm Sounds
! Sounds for 30 seconds at preset time of real time
clock
Chronograph Mode
Resolution
! 1/100 second
Measuring Range
! 99 hours 59 minutes 59.99 seconds
Measuring Mode
! 100 lap memories
! Recall lap memories and total time
Timer Mode
Resolution
! 1 second resolution
Measuring range
! 99 hours 59 minutes 59 seconds
Operation Mode
! Countdown
Quick Set
! 5 quick set Values (3, 5, 10, 15 and 45 minutes)
Timer Sounds
! Sounds for 30 seconds when count to zero
Dual Time Mode
! Hour, minute, second, am, pm
Weather Forecast
! 4 symbols to indicate the predicated weather
15.0 Specifications - Part B
Ski Mode
! Ski Lap trigger: Automatic or Manual
! Ski Slope setting: 5 8 to 9 08
Sensitivity type: Ascending and Descenting
Sensitivity Level: Fast, Normal and Slow
Altitude range: -706m to 9164m (-2316ft to
30066ft)
! Tr a v e l Ti m e : M a x i m u m 9 9 m i n u t e s , 5 9 . 9 9
seconds.
! Ski Lap memory: 47 ski lap
Altimeter Mode
Resolution
! 1m (1ft)
Measuring range
! -706m to 9164m (-2316ft to 30066ft)
History Recall
! Last 24 hours
!
!
!
Barometer Mode
Resolution
0.1 hPa/mbar (0.01 inHg)
Measuring Range
! 300 hPa/mbar to 1100 hPa/mbar (8.85 inHg to
32.48 inHg)
History Recall
! Last 24 hours
Compass Mode
Resolution
! 18 display (digital); 1 of 60 pointers (graphical)
Measuring range
! 08 to 3598 (digital); 1 to 60 pointer (graphical)
Others
! Digital bearing reading Lock
! Digital backward bearing
Thermometer
Resolution
! 0.1 8C (0.18F)
Measuring range
! -10.0 8C to 60.0 8C (14.0 8F to 140.0 8F)
Backlight
! Electro-Luminescent (EL) backlight
Battery
! Single 3V lithium battery (CR2032)
Battery Low Detection
! Battery voltage low indicator