1
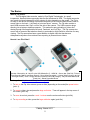
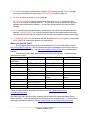
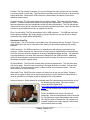
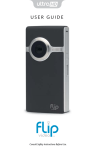
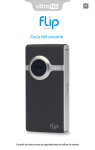
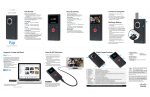
Flip Video: A White Paper Casey Davis [email protected] Date Completed: March 5, 2011 This white paper was written as an assignment for Dr. Marshall G. Jones’s EDUC 651 class at Winthrop University, Rock Hill, SC. All rights reserved by the author. Permission is granted to use this white paper provided the user notifies the author in writing prior to use. The Basics What is Flip Video? The Flip digital video recorder, made by Pure Digital Technologies, is a small, inexpensive, handheld video camcorder that was first introduced in 2006. The digital camcorder can record and store between 60 to 240 minutes of video depending on the model. The Flip is an easy to use device containing a lens and microphone on the front and basic buttons used to record video on the back. It is literally a “point and shoot” camera. The Flip also contains a small USB connector that “flips” out from the side of the camera. The USB connector plugs directing into a laptop or desktop computer. This makes for easy uploading of videos and sharing through other applications like email, Facebook, and YouTube. The Flip camera also comes with a connector that attaches directly to a standard or High Definition television for easy viewing. The Flip camera has been a great addition to digital video that has become widespread everywhere from national news reporting to personal home videos. How do I use Flip Video? 1 - Power Button, 2 - Wrist Lanyard, 3 - Battery Compartment Lock, 4 - Threaded Hole for a Tripod, 5 Speaker / Microphone, 6 - Latch to open USB Attachment, 7 – HDMI, 8 – Screen, 9a - [Red Dot] - Record / Stop Recording. 9b [Up and Down Arrows] - Zoom (When Recording) / Volume (When Viewing), 9c [Left and Right Arrows) - Look Through Different Recorded Videos, 9d [Triangle] - Play Recorded Movies, 9e [Trash Can] - Delete Recorded Movies Image from: http://www.d102.org/kbase/entry/108/ 1. To turn on the Flip video camera, press or slide (depending on the model) the power button (point 1). 2. To record a video, aim and press the large red button. Timer will appear in the top corner of the screen (point 9a). 3. To zoom in and out, press the + and – buttons near the red record button (point 9b). 4. To stop recording a video, press the large red button again (point 9a). Casey Davis 2011 2 5. To watch a previously recorded video, press the play button (point 9d). To scan through previously recorded videos, press the left and right arrow buttons (point 9c). 6. To delete a video, press the trashcan (point 9e). 7. To view, edit, and share a previously recorded video on a computer, plug in the USB connector to a laptop or desktop (point 6). You can then choose to upload the FlipShare software that comes with the camera. You can then edit and share the video from this software. 8. To view a previously recorded video on the television, turn off both the television and the camera. Connect the RCA cable into the video out port on the camera and the television. Turn the television and the Flip camera on and find the correct channel sourcing the videos. 9. To charge the batteries in a Flip video camera, purchase new batteries (point 3) or purchase power adapter to connect the camera to a power outlet. Where can I find Flip Video? The Flip digital video recorder can be purchased from The Flip Video Store found at http://store.theflip.com/en-us/. The Flip camera can also be purchased in retail stores such as Wal-mart, Target, and Best Buy. Visit http://www.theflip.com/en-us/buy/ for a complete list of retailers. A buyer may choose from three versions of the Flip video recorder. Listed below are specifications of each. Ultra HD Mino HD Slide HD *Suggested Retail *Starting at $149.99 *Starting at 179.99 *Starting at 229.99 Price, 2011 Memory 4 GB or 8 GB 4 GB or 8 GB 16 GB Record Time 60 or 120 minutes 60 or 120 minutes 240 minutes Video Quality 720 p HD (30 of 60 720p HD (60fps) 720p HD ()30fps) fps) Image Stabilization Yes (select models) Yes No Zoom/Lens Digital Zoom-2x Digital Zoon-2x Digital Zoom-3x Battery Battery Pack Internal Lithium-ion Internal Lithium-ion Battery Battery Screen Size 2 inch 2 inch 2 inch widescreen 3.94” x 1.97“ x 0.63” 4.13" x 2.17" x 0.98" Camera Dimensions 4.16” x 2.11“ x 0.88” or 4.25” x 2.19“ x 1.17” Weight Designable 4.5 oz. or 5.7 oz. Yes 4.1 oz. Yes 5.9 oz. Yes These and other specific information can be found at http://www.theflip.com/enus/products/specs.aspx Flip Video also has a portion of their company that is devoted to helping educators “Shoot, Share, Educate”. They offer discounts for educators across all grade-levels. To find out more about their dedication to schools, visit http://www.theflip.com/en-us/buy/Educators.aspx. Casey Davis 2011 3 Schools and Flip Video Implications for the Classroom Project-based Learning: The Flip video recorder can be used in connection with project-based learning. Project-based learning is an instructional approach where students create projects and investigations from content presented in the classroom. The Flip camera can be integrated to a variety of projects. One way to use the Flip camera with project based learning is for the teacher to pre-record steps to a project. The teachers can play the clip for the students while he/she walks around and monitors their progress. Students can also use the Flip camera to enhance their personal projects. For examples, in connection with a science weather unit, students can record weather broadcasts versus reading the forecast to the class. The Flip video enhances this project but allowing students to dive in the job of a meteorologists as they would be recorded. Reading Fluency: In primary grades, reading fluency is a large portion of students’ reading instruction. In upper elementary grade, reading fluency plays a significant role in students’ abilities to comprehend text. In centers, students can record each other reading stories and then play them back to help answer comprehension questions. Reader’s theater activities are also strategies for helping students improve reading fluency. Reader’s theater is a way to present literature in a dramatic form without sets, costumes, and memorization. Students can record themselves, using the Flip camera, completing a reader’s theater activity and then play it back to listen to their pace and fluency. Finally, read-aloud is a component of a balanced literacy program that is intended to help with fluency. The teacher can prerecord him or herself reading a book orally. The teacher can also prerecord guest speaks and parents reading a book orally. The teacher can then play this video for students to view while he/she is completing clerical tasks such as writing notes home or taking attendance. Outside the Classroom: The Flip camera can provide valuable footage of the real-world and bring it into the classroom. On an actual trip, students can take recordings and clips of their experience. When students return to school, students can use their videos to reflect on their trip. The Flip camera can also provide virtual field trips. Sometimes, field trips are luxury for students because of budget restraints. The teacher can take a Flip camera and record outings that he/she takes. When a student takes a family trip, a Flip camera is a device that allows students to share their experiences with the teacher and class. A Flip camera can also be used as a successful tool between community and schools. Parents and community members can be asked to use a Flip camera to record their everyday experiences. For example, instead of traveling to a news channel station, a meteorologist could be asked to use a Flip camera to record his life in the newsroom. Students can then view the film in connection with a science unit. Student-led Conferences: Parent-teacher communication is critical to the success of students in the classroom. It is often very difficult for parents to schedule a time to attend a parent-teacher Casey Davis 2011 4 conference that coincides with the teacher’s schedule. Students can also play a role in these conferences. With the Flip camera, the teacher can record a teacher-student conversation about their progress, behavior, and future goals. The teacher then also can record a message for the parents. The students can then take this video home for the parents to view. New Approach to Homework: Traditional homework is filled with worksheets and rote practice. These sheets are often returned to school incomplete or filled with unclear answers. The Flip camera can document students’ approaches to homework. The film can then help the teacher identify errors and misconceptions that students are making while completing homework. The Flip camera can also allow the teacher to assign more interactive homework. For example, the teacher can assign a mathematics game for students to play each night. Students can record the playing of the game with the Flip camera. The video can be used as evidence of actual completion of the game as well as a tool for teacher to view strategies that students are using at home. While this can be time consuming for the teacher to view all of the students’ videos, providing interactive homework assignments can be beneficial. The teacher could also assign Flip camera to certain students and rotate to avoid an abundance of videos. Assessments: Assessments are critical to understanding students’ strengths and weaknesses. It is often difficult to find time to properly administer and score assessments. While the Flip camera can be allow students to practice reading fluency, the teacher can also use the Flip camera to assess student fluency. Students can read to the Flip camera. The teacher can then use this piece for a running record and documentation of fluency and accuracy. The Flip camera can also be used as a more innovative way to assess students on content instead of a paper-pencil test. Students can be asked to record a video report of a topic or a book. The Flip camera is an outlet to make assessments more authentic. Journaling and Blogging: Journaling and blogging has become a part of schooling. Journaling and blogging allow students to freely discuss topics learned in the classroom as well as other social and behavior aspects. Students can use the Flip camera to record video journals and blogs. It would be simple for a teacher to set-up a literacy centers where students can record a journal entry with the Flip camera. The teacher can then view the journal and respond with the Flip camera for the students to view later. Website Tutorials: After a lesson on new content, students often have a hard time remembering specific parts. Teachers can use the Flip camera to record tutorials. For example, the teacher can use a tripod to record the Promethean board/Smart or himself/herself explaining how to solve a specific mathematics problem. The teacher can then post this tutorial on a teacher website for students to access at home or when they have access to a computer. The Flip camera will allow for the students to have access to the teacher’s lesson at the touch of a finger instead of only looking at lesson notes and using their memory. Other Ideas: http://www.freetech4teachers.com/2010/03/many-ways-to-use-flip-cameras-in.html Richard Byrne shares many ways to use a Flip camera in the classroom on his blog “Free Technology for Teachers. On March 12, 2010, he posted a short Google presentation to illustrate ways to use this technology. http://echucaelearning.wikispaces.com/Flip+Camera E-Learning: Learning Ecosystem is a wikispace that is dedicated to the use of technology. The above link is a space for Flip Cameras. The pages listed a variety of Casey Davis 2011 5 links to help all users interested in the Flip camera. There is a space for educators to browse a variety of links consisting of Google documents, PowerPoint presentations and Word documents, as well as blogs and websites. These sites have a multitude of ideas for teachers to easily incorporate the Flip camera into their instruction. The Flip Solves Problems Building Background Knowledge: Many students are lacking background knowledge that is applicable to the standards presented in the classroom. This can cause problems in the classroom because some students have no schema to build new content upon. By having personal experiences, students are able to make valuable connections and therefore retain more information. The Flip camera can make it easy to bring real-world experiences directly into the classroom with a push of a button. The teacher can bring concrete experience straight to the students. For example, if students are studying decimals the teacher can video prices in the grocery store, different gas station price, and people using a cash register to pay for goods. Having students view these experiences can help them to understand why decimals are so meaningful. Differentiation of Instruction: Classrooms are full of students of all different levels. The use of Flip cameras allows teachers to assign a variety of assignments that meet a multitude of needs and learning styles. No matter the content, teachers can create an assignment using the Flip cameras that allow students to use the creativity and knowledge. Also, the teacher can record center instruction or small group lessons that can meet the needs of small groups of students. For example, the teacher can create a literacy center lesson that applies to what they are learning. The teacher can then record instructions and model an activity for high, middle, and low learners. Students can then view the video in the group that suits their instructional level. Authentic Assessment: Each teacher strives for meaningful assessment tools that tie to real world events. The Flip video camera can allow the teacher to create projects where the students must synthesize classroom instruction and create new product using higher order thinking skills. Parent Tutorials: Parents have expressed their need for additional assistance with how to help their child at home. The teacher can use the Flip camera to model strategies for the parents. For example, the teacher might record himself or herself showing the parents how to use a particular division strategy. The teacher can then post this video on his or her website for the parents to view. This can help bridge the gap between school and home. National Educational Technology Standards (NETS) NETS for Students The Flip Video Cameras Creativity and Innovation Students can use the Flip cameras to record Students demonstrate creative responses to readings and content. For example, Casey Davis 2011 6 thinking, construct knowledge, and develop innovative products and processes using technology. Students create original works as a means of personal or group expressions. Communication and Collaboration Students use digital media and environments to communicate and work collaboratively, including at a distance, to support individual learning and contribute to the learning of others. Research and Information Fluency Students apply digital tools to gather, evaluate, and use information. Critical Thinking, Problem Solving, and Decision Making Students use critical thinking skills to plan and conduct research, manage projects, solve problems, and make informed decisions using appropriate digital tools and resources. NETS for Teachers Facilitate and Inspire Student Learning and Creativity Teachers use their knowledge of subject matter, teaching and learning, and technology to facilitate experiences that advance student learning, creativity, and innovation in both face‐to‐face and virtual environments. Design and Develop Digital‐Age Learning Experiences and Assessments Teachers design, develop, and evaluate authentic learning experiences and assessment incorporating contemporary tools and resources to maximize content learning in context and to develop the knowledge, skills, and attitudes when students are learning about the Westward Movement and the Gold Rush is Social Studies, they can record diary entries of how a pioneer would feel traveling across the Wild West. This promotes higher order thinking skills where students must evaluate a situation. Students can use the Flip cameras as a means of creating individual and group projects. For example, students can take their information that they learned during a severe weather unit and create public service announcements of how to stay safe during these storms. Students can use a Flip camera to document their “thinking” and exploration of a topic. For example, during a mathematics lesson students can be presented with a mathematical problem. The students can then use their Flip camera to illustrate their exploration of solving the problem through research and use of different strategies. Students can then state their solution and why it is reasonable. Flip cameras can take experiments to a whole new level. For example, scientific process and inquiry skills are a large portion of many state’s science standards. Using the Flip camera, students can record a science experiment designed by them. Using the Flip camera and other devices, students can state their problem, research, and hypothesis, record their experiments and results, and display their data collection and conclusion. The Flip Video Cameras Teachers can use the Flip camera in variety of ways to facilitate and inspire student learning through virtual environments. For example, teachers can post a blog about classroom content, world news, and opinions. The teacher can respond to the topic and post his/her response. The students can then record their responses with the Flip camera and post theirs as well as respond to others. Flip cameras and project-based learning can be easily tied together. For example, the teacher can have students work with novels in guided reading groups or literature circles. As a culminating activity of the book study, students can create a video trailer of the book using the Flip camera. The teacher can use a rubric to set requirements on the project so that the students are creating an authentic assessment of reading comprehension. Casey Davis 2011 7 identified in the NETS. Model Digital‐Age Work and Learning Teachers exhibit knowledge, skills, and work processes representative of an innovative professional in a global and digital society. Teachers can use the Flip camera to bridge the gap between the community and schools. For example, the teacher can create a video newsletter to send home to parents or post a teacher website to keep parents informed. Teacher can also record parent conference information for parents who are unable to attend a face-to-face meeting. Also, teachers can use the Flip camera to model lessons for other teachers. Environmental Factors Zoom: All Flip cameras only have a 2x zoom. This can cause the images to become blurry and jumpy. While filming, students need to have the ability to get physically close to the subject they are filming. If students are unable to get close to the object being recorded, the Flip camera may not be the device for the project. Lighting: Since the Flip cameras are compact, there is not a space for a light. For the best quality of film, students should record in a well-lit area. If students are in a poorly lit area, the Flip camera may not be the device for the project. Length of Video: Most Flip cameras film and store one hour to two hours of footage depending on the model. Students can film one long consecutive video. There is no pause button so once the students begin filming a particular length, students cannot pause and begin again where they left off. If students need to film something longer that one to two hours or require a video that must be paused, the Flip camera may not be the device for the project. Editing Video: Flip Share, the software that accompanies the camera, does not provide much editing tools. If students need to edit their recordings, students will have to use other programs such as Windows Movie Maker or iMovie. Teacher will have to take this into consideration because they will also have to teach their students how to use these programs. Access to Multiple Cameras: Even though the Flip camera is relatively inexpensive, it may be difficult for a school budget to afford a class set. Students may be unable to each has access to a personal Flip camera. Many uses for the Flip camera can be adapted to sharing a device. Benefits and Drawbacks of the Flip Benefits of the Flip Easy to Use: The Flip camera is simple for students and teachers to use. The user can operate this simple device without reading through a cumbersome user manual. There are minimal buttons and equipment to confuse the user. The viewing and sharing of videos is equally as simple. Inexpensive: Compared to other digital camcorders, the Flip cameras cost considerably less. Casey Davis 2011 8 Portable: The Flip camera is compact. It is not much larger that most cell phones and fits easily in a purse, pocket, or book bag. The Flip camera can easily travel with the user to wherever the action takes them. Because the USB connector is stored within the camera, there are no additional cords to carry. No disks or tapes: The Flip camera does not use tapes or disks. This makes the Flip camera portable. This also eliminates the hassle of worrying about blank tapes. Unfortunately, without tapes and disks the user can accidentally record over stored information. The Flip camera has a feature that will not let the user tape over previously recorded information. Also, the user does not have to spend additional money on supplies for the Flip. Easy Connect-ability: The Flip camera has a built-in USB connector. The USB then connects to any laptop or desktop. By simply plugging in these connections, the user is able to simply upload the video, begin editing and sharing. Drawbacks of the Flip Small Screen: The LCD screens on all models of the Flip cameras are only 2 inches. This can make it difficult for the user to view their video directly on the camera, especially the visually impaired. USB Connection: The USB connection is on a plastic arm that is directly connected to the computer. With a computer, the camera can end up “hanging” suspended from the plastic arm. Over time, this can cause the equipment to become damaged and stop working. It is important to prompt students to not allow their cameras to dangle from the USB connector. Additional cords can be purchased to ensure this does not occur but these cords are not a necessity for the camera to properly upload videos. No Pause Button: The Flip video camera does not have a pause button. The user must stop and record again. Once the user is recording if the large red button is pushed, it will end that current video. This can cause an issue if a video must be one continuous stream. The user must continuously record footage. Recordable Time: Each Flip video camera only stores one to two hours of video. Because there are not tapes or disks, this is the maximum amount of video that can be filmed before it must be uploaded to a computer and then deleted from the Flip camera. Access at schools: Some schools do not already own Flip cameras which can make the use of the technology impossible. Flip Video works in connections with Digital Wish (http://www.digitalwish.com/dw/digitalwish/product?id =4310) to help teachers find funding for technologies in schools. Privacy and Behavioral Issues: Like with any technology, rules and expectations must be sent with the Flip camera to ensure that students stay on task will using the device. Because the Flip camera is so compact, students can easily disguise it and record others without them knowing. Casey Davis 2011 9 Resource 7 Things You Should Know about Flip Camcorders: http://net.educause.edu/ir/library/pdf/ELI7043.pdf This is an easy to read article on the basics of Flip Camcorders. It discuss the ins and outs of the Flip Camera from “What it is”, “Where it is going”, and implications for teachers. Casey Davis 2011 10