1
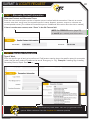
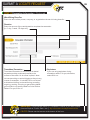
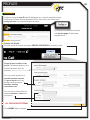
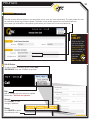
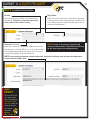
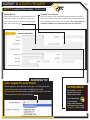
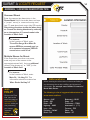
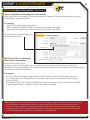
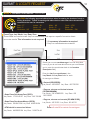
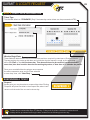
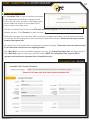
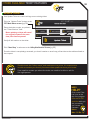
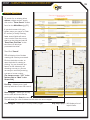
MAPPING VERSION
ITIC USER MANUAL
Your comprehensive guide for
using ITIC to process Locate
Requests on-line.
UPDATED JULY 25th 2013
INTRODUCTION
WELCOME, USER!
Welcome to ITIC!
You will find a comprehensive step-by-step guide for processing your locate requests online in the following
pages. We have included a detailed description of the innovative tools and features that have been added to
this newly revised version of ITIC.
We have designed this manual to provide the knowledge required for the efficient submission of
accurate ITIC locate requests. We’ve packed a lot of information into these pages, and
have arranged it in a streamlined, user-friendly format. It is loaded with visual examples and helpful
hints. We think it is best to read it from beginning to end before you start, but the design also facilitates
quick references to specific subject matter.
So, what are you waiting for? Let’s get started! And remember, our skilled operators are here to help.
Assistance is available through the telephone, e-mail, and our newest feature, ITIC Live Help Chat!
That’s right, you can get live help while you are processing your locate requests! See page 03 for details.
*An important word from the editor: This document contains many color drawings,
actual screenshots, and color-coded information. For best results, we recommend that
this document be printed in COLOR
01
TABLE OF CONTENTS
02
INTRODUCTION01
TABLE OF CONTENTS02
LIVE CHAT03
SUBMIT A LOCATE REQUEST
READY04
GET SET05
GO05
ITIC USER INFORMATION06
EXCAVATOR INFORMATION06
STEP 1: Alternate Contact Information07
STEP 2: Excavation Information 07 - 08
PROFILES09 - 10
STEP 3: Location Information
11 - 18
STEP 4: MAP IT
THE MAP 19 - 20
FINDING THE CORRECT LOCATION ON THE MAP21 - 25
POLYGONS26 - 28
STEP 5: START DATE INFORMATION / SUSPENDING A TICKET 29
UTILITY NOTIFICATION LIST/SUBMITTING LOCATE REQUEST
30
OTHER AVAILABLE TICKET FEATURES
INCOMPLETE TASK31
UPDATE TICKET32
TICKET SEARCH33
HELP PAGES/APPENDIX
SUGGESTED ABBREVIATION LISTA1
DISTANCES AND MEASUREMENTSA2
GOOGLE - POSITIONAL SHIFT - EXAMPLEA3
GOOGLE - FLOATING POLYGON - EXAMPLEA4
JOB LIMITS FOR: WORK ON/ALONG THE ROAD - EXAMPLESA5
WORK OFF PROPERTY AND ROADS - EXAMPLEA6
LIVE CHAT
03
INTRODUCING ITIC LIVE HELP!
Keep getting an “Incomplete Ticket” notice? Need help setting up multiple accounts? Having difficulties
describing your work area? ITIC Live Help is here for you!
ITIC Live Help is an interactive chat program created to assist ITIC users in real time.
ITIC Live Help has many benefits. Here are a few:
Speed & Accessibility: Access ITIC Live Help from the same ITIC page used to file the locate request, so you
get help the moment you most need it. Our ITIC experts will assist you immediately while you continue working
on your locate request. Many users prefer ITIC Live Help to waiting for a return call or email.
Reduced Repetition: ITIC Live Help is in a simple text format, which can easily be shared between several ITIC
experts. There’s no need to explain a problem to several representatives; if more than one ITIC expert assists
you, they can quickly familiarize themself with your situation by reviewing the conversation.
Easy Documentation: With ITIC Live Help, you can easily copy, paste, and save the session for later reference.
ITIC Live Help can even email a transcript of the conversation to you!
Education & Training: The more you correspond with our ITIC experts, the better you will become at filing
locate requests online. As your ITIC skills grow, so will the number of your tickets that are released directly
from review!
ITIC Live Help is available Monday through Friday from 8am-5pm.
If Live Help is not available, you may leave a message
and an ITIC expert will respond as soon as possible.
ITIC LIVE HELP
LOGGING IN TO ITIC
04
READY
First, navigate to the Kansas One Call
home page (www.kansasonecall.com).
Then identify yourself by clicking on
‘Excavator’ or ‘Utility,’ whichever is
appropriate.
On the next page, click
‘File a Locate Request Now!’
Enter your email address and
password then click “Login.”
If you have forgotten your
password, click “Forget your
Password?” and we will
email it to you.
FYI
By logging in, you agree to the Terms and Conditions. You can read
the full text by clicking the “Terms and Conditions” link.
SUBMIT A LOCATE REQUEST
05
The ITIC Main Menu appears upon login.
GET SET
In this section you will learn
to prepare STANDARD
locate requests.
GO!
Click “Submit a Locate Request”
NEED
HELP?
Click on the ‘Chat
Live’ icon at the
top of any page to
chat with an ITIC
operator while you
are processing
your locate
requests.
Hours:
Mon - Fri 8a - 5p
Each field has a pop-up help box
listing the field definition/requirement.
Activate pop-ups by clicking on the
field titles.
FYI
The ITIC system will not allow you to enter special characters such as
* \ ~ ‘ or “. %
SUBMIT A LOCATE REQUEST
06
ITIC USER INFORMATION
Phone Number and Ext.
These fields will auto-fill with the
information associated with your login.
User Name
Enter YOUR first and last name as
the ITIC user entering the information.
Click the ‘Main Menu’ icon at the
top of the page, then click the
“Edit Account” button to update
your main phone number.
EXCAVATOR INFORMATION
This section will auto-fill with your company information.
To update your company information, click the ‘Main Menu’ icon at the top of the page, then click the
“Edit Account” button to make changes.
FYI
IMPORTANT! Do not use the ‘BACK’ or ‘FORWARD’ buttons of your web browser
(Internet Explorer, Firefox, Safari, etc...). Any information already entered will be
DELETED. Please use the buttons at the bottom of the form.
SUBMIT A LOCATE REQUEST
07
STEP 1: Alternate Contact Information
Alternate Contact and Alternate Phone
Enter the name and cell phone number of another person involved with the excavation. If there is an on-site
contact, enter their name here. Use a specific person’s name; dispatch, operator, anyone or unknown are
not acceptable entries. [The utilities will contact this person if additional information about the site is needed.]
If there is no alternate contact, enter “Same” in the Alt. Contact field.
NOTE: See PROFILES section (page 09)
to auto-fill your routinely used information
STEP 2: Excavation Information
Type of Work
Enter the specific type of work to be performed. Field locators need to know the specific reason for excavation
rather than the work method. Do not use the words ‘Emergency’ or ‘Dig’. Examples: Installing Sign, Installing
Secondary Electric, Repair Gas Service...
FYI
Use keyword searches! Type keywords (install, water, main, etc.) to generate a list of
options. Make a selection from the dropdown list whenever possible
SUBMIT A LOCATE REQUEST
08
STEP 2: Excavation Information - Continued...
Work Being Done For
Enter the name of the person, company, or organization the work is being done for.
Duration
Enter the amount of time anticipated to complete the excavation.
(I.e. 1 day, 1 week, 10 days, etc.).
Trenchless Excavation
Explosives
Trenchless Excavation is sub-surface horizontal
excavation activity conducted parallel to the
surface of the earth. As its name implies, it does
not use trenching or vertical digging as the primary
means of excavation. It includes, but is not limited
to directional drilling, horizontal boring, tunneling,
auguring, pushing, ramming or geo-probing below
ground that is not readily visible from the surface.
Select Y for yes, N for no.
If you are using explosives during
excavation select Y for yes, otherwise,
select N for no.
FYI
IMPORTANT! Do not use the ‘BACK’ or ‘FORWARD’ buttons of your web browser
(Internet Explorer, Firefox, Safari, etc...). Any information already entered will be
DELETED. Please use the buttons at the bottom of the form.
PROFILES
PROFILES
Profiles are used to auto-fill specific fields with your routinely used information.
Utilizing the ‘Profiles’ feature will enable ITIC to ‘remember’ your information saving you time in the Locate Request process.
Profiles are located at the top of
the second page of the locate
request form.
Create Job Profile
Click the profile drop-down and select CREATE JOB PROFILE to create a profile.
Create a name or title for the
profile. The title will appear in the
profile drop-down menu for
selection.
You can create profiles for a
specific foreman/contact,
or type of work which may
always include the same
duration, marking
instructions, etc.
You can also create profiles for
specific counties or cities that
you work in.
ALL FIELDS ARE OPTIONAL
Click SUBMIT when complete.
09
PROFILES
10
PROFILES - Continued
The title of the profile will appear in the drop-down menu once you have submitted it. The new profile can now
be used when preparing a locate request. The fields on the locate request form will auto-fill with the
information you entered for that specific profile when you choose it from the drop-down list.
NEED
HELP?
Click on the ‘Chat
Live’ icon at the
top of any page to
chat with an ITIC
operator while you
are processing
your locate
requests.
Hours:
Mon - Fri 8a - 5p
Edit & Delete
To edit or delete an existing profile, select EDIT
JOB PROFILE from the “Profiles” drop-down.
Edit
Add or change any information as needed.
Remember - All fields are optional
Submit
Click SUBMIT to save
changes/additions
Delete
Click DELETE to delete
the selected profile
SUBMIT A LOCATE REQUEST
11
STEP 3: Location Information
County
City/Place
Choose the county in which all of the work will
take place. Complete a separate ticket if the
work extends into another county.
Enter the name of the city or place where the work
is taking place. If work is taking place outside of city
limits, enter the name of the nearest city to where
the work is taking place.
House # (Address)
NOTE: Be sure to choose the city physically
closest to the worksite. This will not necessarily
be the same city as the mailing address.
Enter the number of the address where the work will
take place. Lot, building, PO box or rural route numbers
are not addresses and should not be used. If there is
no physical address, leave this field blank.
NOTE: If the work area involves multiple addresses, leave this field blank, and reference the addresses
in the Location of Work field.
NEED
HELP?
Click on the ‘Chat
Live’ icon at the
top of any page to
chat with an ITIC
operator while you
are processing
your locate
requests.
Hours:
Mon - Fri 8a - 5p
SUBMIT A LOCATE REQUEST
12
STEP 3: Location Information - Continued
Multiple Worksites
If you are working on multiple worksites, you must file a separate ticket for each work site. In other words, if you
are installing 15 different sewer laterals at 15 different addresses, you must file 15 separate tickets, since
they are not part of one continuous dig.
Continuous Dig
Many major projects (such as utility main line construction or pole line installation) can be completed on one
ticket. In order to file a large work area on a single ticket, the job/worksite must match the following criteria:
• All work is taking place in one county
• All (excavation) work can be completed within the normal 15 calendar day window
• All work is a continuous excavation*
• All work is on a single road*
• No work extends beyond 1 mile in length.*
*Exceptions are as follows:
• If the type of work involves road signs, it is considered a ‘continuous dig’ in this context, so you may do multiple sign installations/replacements on a single ticket, as long as it meets the other criteria (single road,
1 mile maximum, etc.)
• If the type of work involves pole work, it is also considered a ‘continuous dig’ in this context, so you may
do multiple pole installations/replacements on a single ticket, as long as it meets the other criteria (see
above). Additionally, the maximum length for a ticket of this type is 1 1/8 mile (instead of 1 mile as with other
types of work)
• If the type of work involves a Main utility line (water main, gas main, etc.) you may file a single ticket even if
the work turns down another road. Remember - the other conditions still apply
IMPORTANT:
NEED
HELP?
Click on the ‘Chat
Live’ icon at the
top of any page to
chat with an ITIC
operator while you
are processing
your locate
requests.
Hours:
Mon - Fri 8a - 5p
There is no such thing as a “Blanket Ticket.” If you are a subcontractor and
you are excavating, protect yourself and your company by filing a locate
request. A general contractor’s ticket does not apply to anyone except the
general contractor. Similarly, a property owner’s ticket does not protect a
professional excavator from liability.
SUBMIT A LOCATE REQUEST
13
STEP 3: Location Information - Continued
Street Name
Closest Cross Street
Enter the street name associated with the
address. If there is no address, enter the
name of the street in which the digging will
take place on or along.
Enter the name of the intersecting street closest to where
the work will take place. The closest intersecting street may
not necessarily be a major intersection. This information is
required if there is no address listed for the worksite.
ADDRESS TIP
Use keyword searches!
Start typing in the Street name (ex. ‘ch’) to generate
a list of street name options. Select from the
drop-down lists whenever possible but only if correct.
This works for both street fields!
REMEMBER
Do not list multiple
street names in a
single street field.
If you would like
to list nearby
major intersections,
reference them in the
Location of Work field.
SUBMIT A LOCATE REQUEST
14
ADDRESS / LOCATION DESCRIPTION TIPS
Unnamed Street
Enter the appropriate description in the
Street Name field if the street does not have
a “proper” name (i.e. unnamed county road,
hwy 71 west bound exit ramp, alley, RR tracks).
Give driving directions to the site when doing
so. Format the driving directions by referring
to an intersection of 2 named roads in the
Location of Work field.
For Instance:
In the Location of Work, enter “From Elm Ave go N on Main St
approx 400ft to unnamed road, go
w on unnamed rd approx 350ft to
vacant lot on n side of rd.”
Multiple Names for Street
If the street has more than one name,
enter only one of the names in the
appropriate street field. List any additional
names (“also known as,” or “AKA”) in the
Location of Work field.
For Instance:
In the Location of Work, enter
Main St / Us Hwy 14 - This
information should be entered as
‘Main St aka Us Hwy 14’
NEED
HELP?
Click on the ‘Chat
Live’ icon at the
top of any page to
chat with an ITIC
operator while you
are processing
your locate
requests.
Hours:
Mon - Fri 8a - 5p
Abbreviations
When entering the information in the street fields you
can abbreviate the street modifiers and directional
information. For example: enter N Main St instead of
North Main Street.
The following is a list of suggested abbreviations for
street name modifiers.
Avenue – AVE
Circle – CIR
Drive – DR
Highway – HWY
Lane – LN
Parkway – PKWY
Road – RD
Boulevard – BLVD
Court – CT
Traffic way – TFWY
Interstate – I (I 70)
Terrace – TER
Place – PL
Street – ST
SUBMIT A LOCATE REQUEST
15
STEP 3: Location Information - Continued
Location of Work
Enter marking instructions and any
driving directions in this field. Below are
a few things to remember when
formatting your instructions.
All locate requests require
MARKING INSTRUCTIONS in the
Location of Work field.
Marking instructions should be as
complete and accurate as possible, so the utilities know where any excavation will be taking place. Marking instructions must
describe the entire area where the
excavation will take place - NOT what utilities need to be marked.
IMPORTANT: Please provide driving directions from a known intersection any time the dig site does not have a
numerical address or is not located at an intersection. Driving directions must include approximate distance and specific
direction (N, S, E, W, NW, NE, SE, or SW). Example - “FROM MAIN ST GO N ON 1ST ST 1000FT, THEN LOCATE 20FT OUT
ON W SIDE OF 1ST ST GOING N TO MONROE ST.”
Work Taking Place at an Address
Enter the address number in the address field, and the street associated with it in the street name field.
For example:
- Mark entire front half of lot.
- Mark 10ft radius of house
- Mark from front corners of house
to rear lot line, for width of lot
Be sure to clearly describe the entire
extent of the work area.
FYI
IMPORTANT! Please do not use ( ‘ ) or ( “ ) for feet & inches as some printers
can’t print these characters. It’s best to use feet, ft., foot, and inches or in.
SUBMIT A LOCATE REQUEST
16
STEP 3: Location Information - Continued
Work Taking Place (or Starting) At an Intersection
If work begins at the intersection, no driving directions are required. Simply describe how far and in what
direction(s) the work will take place.
For example:
- Mark 100ft radius of (above) intersection
- Mark a square area 25ft N and W from NW corner of above intersection
- Mark entire W rd right of way of Elm Ave going N from Main St for 250ft
Be sure to clearly describe the entire
extent of the work area.
Work Taking Place (or Starting)
Away from an Intersection
If work does not begin at the
intersection, and is not taking place at an address, provide driving directions to the worksite from an
intersection of two named roads. (This method may also be used if work is taking place at an address, but you
do not have the address information).
For example:
- From Elm Ave go W on Main St approx 800ft to vacant lot on N side of rd. Mark entire vacant lot.
- From Jones Rd go N on Oak Ave 450ft. At that point, mark entire rd right of way of Oak Ave, going
further N 250ft.
- From Main St go N on Elm Ave approx 500ft to unnamed rd, then go W on unnamed rd approx 250ft
to white flag on N side of unnamed rd. Mark 10ft radius of white flag.
Note: Regardless of which of the method you use to describe your work area, be sure to enter the name
of the rd that work is actually taking place on in the “Street Name” field. If work is taking place on an
unnamed rd, list ‘unnamed rd’ in the street name field, and enter the nearest road to intersect the dig
street (‘unnamed rd’) in the intersecting street field. In the last example, you would enter ‘unnamed rd’
in the Street Name field, and Elm Ave in the Closest Cross Street field.
SUBMIT A LOCATE REQUEST
STEP 3: Location Information - Continued
FYI
Use ONLY the following approved abbreviations when formatting the location of work or
driving directions. Tickets formatting with abbreviations other than those shown will be
returned to the user for correction.
Feet – FT
Inches – IN
Miles – MI
Yards – YDS
East – E
North – N
South – S
West – W
Northeast – NE
Northwest – NW
Southeast – SE
Southwest – SW
Coord Type, Lat/North, Lon/East, Zone
These fields are used to enter Lat/Lon coordinates and require a specific format to obtain
accurate results. This information is not required.
*All necessary information is required if Lat/Lon coordinates are entered.
Select the correct coordinate type from the drop-down
menu. (If you do not know which format your coordinates
are in, enter the coordinates back in the Location
Description field.)
Enter the Lat/Lon coordinates in the
Lat/North and Lon/East fields for each
format type as follows:
• Decimal (DD.DDDDD):
Lat/North: 40.56000 Lon/East: -92.709722
• State Plane Coordinate-Feet (SPCS):
Lat/North: 1721245.57 Lon/East: 441728.68
• State Plane Coordinate-Meters (SPCS):
Lat/North: 524647.84 Lon/East: 482239.34
• UTM should be entered as follows:
Lat/North: 4489955.24 Lon/East: 524574.44
• Degrees, minutes and decimal minutes
(DD MM.MMMM):
Lat/North: 38 34.885833 Lon/East: -92
12.474000
• Degrees, minutes and seconds (DD MM SS.SS):
Lat/North: 40 33 36 Lon/East: -92 42 35
Zone will auto-fill for certain format types
17
SUBMIT A LOCATE REQUEST
18
STEP 3: Location Information - Continued
Township, Range and Section (TRSQ)
These fields are used to enter Township, Range and Section-Quarter Information (TRSQ). You will need to
enter the information in the correct format for accurate results. This information is not required.
Do not enter zero before any Township, Range or Section-Quarter number. If on any locate the excavation site
travels into a different township or range, please put the first set of TRSQ information in the TRSQ fields, then
put the second set of TRSQ information in the Location of work field. (Be sure to clearly separate any additional
information from the marking instructions)
For example:
T: 27S
T: 26S
T: 7S
T: 34S
R: 2E
R: 1W
R: 38W
R: 20E
S-Q: 3-NE-NW S-Q: 2-NE-NW, 11-SE-SW
S-Q: 1
S-Q: 4, 5, 6
Caller Provided TRSQ
Enter Y if you provided Township Range and Section-Quarter on this locate. Enter N if you did not provide this
information.
FYI
The ITIC system will not allow you to enter special characters such as
* \ ~ ‘ or “. %
SUBMIT A LOCATE REQUEST
19
STEP 4: MAP IT
A Brief Introduction
In this section you will learn, in detail, how to use the mapping application to draw the excavation polygon.
FYI
REMINDER: Not all KOC members see the map. The map & polygon
are used to determine which member utilities will receive the ticket.
The map will automatically search by the address, intersection, TRSQ or Lat/Lon provided once you have entered the required ticket information. If the location is found, it will be displayed in the center of the map. Otherwise, you may need to search manually for the correct area. Once the correct area is found, you will need to
draw a polygon to encompass the entire area of excavation, which will determine the utilities to be notified.
Search Results
THE MAP
Requested Location
This field will auto - fill the data entered
from “Location Information”.
If ITIC finds one or more matches for your site, the
options will be listed here. Click the drop down list to
view all options and select the correct location.
(Not seen in Google View)
*TOP PORTION of ITIC MAP
Street/Address Search
Lat/Lon Search
TRSQ
Use this button to manually search for a
Use this button to manually
Use
this
button
to
manually
specific address, street, intersection, and/or
search for Lat/Lon coordinates.
search for Township, Range
city. (see page 23 for more details)
and Section-Quarter
Changing the information in the Street/Address Search box WILL NOT change the information
FYI entered in the Location Information fields. Make changes to Location Information fields separately.
NEED
HELP?
Hours: Mon - Fri
8a - 5p
Click on the ‘Chat Live’ icon at the
top of any page to chat with a live
ITIC specialist while you are
processing your locate requests.
SUBMIT A LOCATE REQUEST
20
STEP 4: MAP IT - THE MAP Continued
View
Directional
Button
Change the image of the map to the OCC
map view (pictured), Satellite view
(See page 28 for example), or Google map
view. (See page 25 for example)
Click the directional
button in the direction
you would like the
map to move.
[You can also “grab”
and move the map by
holding down the left
mouse button.]
Zoom ‘In’ & ‘Out’ Bar
Zoom in for more detail
by clicking on the plus (+)
sign or by dragging the
marker up on the bar.
Zoom out for an
increased overall view by
clicking on the minus (-)
sign or by dragging the
marker down on the bar.
[You can also zoom in
and out by using the
middle rolling button
on your mouse when
your mouse point is
on the map.]
Change Shape/Size
Used to change the shape & size
of the default polygons.
Draw
Identify
Measure
Use this function to place
points and lines on the
map and create an
excavation polygon
around the your dig site.
Use this function to identify roads,
highways, rivers, creeks, etc., on the
map that may not show a name. The
name will appear in the bottom section
of the map next to “Highlight.” Zooming
in on the map makes more
names visible.
Use this function to measure
the distance between points
on the map. Using this tool
regularly ensures proper
coverage of excavation
areas and confirms
distances along roads.
SUBMIT A LOCATE REQUEST
STEP 4: MAP IT - Continued
FINDING THE CORRECT LOCATION ON THE MAP
Automatic Address Search
If the system finds an exact match for the address provided, the map displays a
polygon already drawn (default polygon). Check the following to confirm the system
has found the correct location:
The street name is spelled correctly.
The nearest intersecting street provided is the closest intersecting street to the jobsite.
The city provided is the city the polygon is located in.
The Search Results drop down for multiple matching options.
MAP: Automatic Address Search
NEED
HELP?
Click on the ‘Chat
Live’ icon at the
top of any page to
chat with an ITIC
operator while you
are processing
your locate
requests.
Hours:
Mon - Fri 8a - 5p
21
SUBMIT A LOCATE REQUEST
STEP 4: MAP IT - FINDING THE CORRECT LOCATION ON THE MAP Continued
Automatic Intersection Search
If there is no address or the address was not found, ITIC automatically performs an intersection
search. If the intersection is found, the map displays a default polygon on the intersection.
Check the following to confirm the system has found the correct location:
The street names are spelled correctly.
The nearest intersecting street provided is the closest intersecting street to the jobsite.
The city provided is the city the polygon is located in.
The Search Results drop down for multiple matching options.
MAP: Automatic Intersection Search
NEED
HELP?
Click on the ‘Chat
Live’ icon at the
top of any page to
chat with an ITIC
operator while you
are processing
your locate
requests.
Hours:
Mon - Fri 8a - 5p
22
SUBMIT A LOCATE REQUEST
23
STEP 4: MAP IT - FINDING THE CORRECT LOCATION ON THE MAP Continued
Manual Street/Address Search
The map will center in the
county listed on the ticket.
Use the Street Search
feature to manually
search for the area.
In the Street Search box, the fields default with the information entered in the Location Information. This
information can be changed in order to search for different areas on the map. Changing this information does
NOT change the information in the Location Information fields; it only changes your search criteria. You may
enter a single street with the city, another intersection with the city, or just the city itself. If the new data
entered is found, it will be centered on the map.
If you are working on a street or road with “State”, “County”, or “Hwy” in the name, and it
has an alternate name, use the alternate name to expedite the map search.
If you have a number in the street name (hwy or county road) search only the number.
Changing the information in the Street/Address Search box WILL NOT change the information
FYI entered in the Location Information fields. Make changes to Location Information fields separately.
NEED
HELP?
Hours: Mon - Fri
8a - 5p
Click on the ‘Chat Live’ icon at the
top of any page to chat with an ITIC
operator while you are processing
your locate requests.
SUBMIT A LOCATE REQUEST
STEP 4: MAP IT - FINDING THE CORRECT LOCATION ON THE MAP Continued
Search by Latitude/Longitude
ITIC will automatically search accurate coordinates provided on the ticket.
If you wish to do a manual Lat/Lon search click the “Lat/Lon Search” button.
Enter the coordinates in the correct format.
The map will center the coordinates on
the screen with a point if they are found within
the county you have provided.
TRSQ
ITIC will automatically search accurate
Township, Range & Section ¼ (TRSQ)
information provided on the ticket.
If you wish to do a manual TRSQ search,
click the “TRSQ” button.
Enter the TRSQ in the correct format. The grid will appear
in the center of the screen, if it is found within the county you
have provided.
NEED
HELP?
Click on the ‘Chat
Live’ icon at the
top of any page to
chat with an ITIC
operator while you
are processing
your locate
requests.
Hours:
Mon - Fri 8a - 5p
24
SUBMIT A LOCATE REQUEST
STEP 4: MAP IT - FINDING THE CORRECT LOCATION ON THE MAP Continued
Manual Google Map Search
If the location is not found automatically by ITIC, you may choose to search Google.
Click on the Google button to change the map view.
The Search Results drop-down box will be replaced with a Google Search field. The information
in this field is copied from the Requested Location. Click the search button to the right of this field to
search the location on the Google map.
To search a different intersection, remove the address, street and intersecting street, and leave the city.
Then enter the new intersection preceding the city in the format shown below:
After the location is found,
you can draw the polygon
on the Google map.
Guidelines for drawing a
polygon on page (27)
*If you draw the polygon
on the Google map, you
must click the “OCC”
(view button) to verify
the polygon on the ITIC
map before submitting.
NEED
HELP?
Click on the ‘Chat
Live’ icon at the
top of any page to
chat with an ITIC
operator while you
are processing
your locate
requests.
Hours:
Mon - Fri 8a - 5p
MAP: Manual Google Map Search
25
SUBMIT A LOCATE REQUEST
26
STEP 4: MAP IT - Continued
POLYGONS
Using Default Polygons
Default polygons are displayed only if an exact
match for an address is found during the
automatic search.
In counties without parcel data, the polygon may
appear block to block off one side of the road
or along the section of road that includes the
address range.
In counties with parcel data, there will also be a
place mark displayed on the on the exact parcel,
or along the road at the approximate location of
the parcel.
Use the “Change Shape” and “Change Size”
buttons to toggle through various shapes and
sizes to find a polygon that completely covers
the entire area of excavation.
If the entire area of excavation
CANNOT be included within one
of the default polygons, click the
“Clear”button and hand draw
the polygon.
(See next page for ‘Hand Drawing
the Polygon’ Instructions)
FYI
CAUTION: Default polygons only represent an area where
ITIC thinks the site is located.
SUBMIT A LOCATE REQUEST
STEP 4: MAP IT - POLYGONS Continued
Hand Drawing the Polygon
Select “Draw” and make a single click on the map
where you would like to set your first point.
(Do not ‘drag’ the cursor after making a point; you’ll move the
map. Click and release to make points as you go.)
Continue setting points
until you completely
encompass the entire
area of excavation.
To close/complete
the polygon, simply
click the same square
point where you began.
POLYGON
POINTERS
• Enclose the entire
area described on your
ticket with the polygon.
• Always include the
dig street within the
polygon except when
describing a dig site
with a distance off
a street. If you are
unsure, enclose
both sides of
the street.
Segment Length
& Total Length
Segment Length
tells you the length
of the polygon
segment you’re
working with,
Total length tells
you the length of
the entire polygon
SO FAR.
• The polygon should
ALWAYS cover the
entire distance off the side(s) of the road that
the work will extend when digging takes place
in or along the road.
HERE’S A TIP
Always check “Place” displayed at the bottom left
corner of the map. This will show the city/place
your mouse pointer is in. If your cursor is in an
off-white area the “Place” will be blank
representing that you are outside city limits.
• Knowing the side of the road (N, E, S or W)
and the direction from the nearest intersecting street will assist you
in finding the dig site and drawing an accurate polygon.
27
SUBMIT A LOCATE REQUEST
28
STEP 4: MAP IT - POLYGONS Continued
Measuring to a specific point
You can use the draw or measure function to determine distances on the map. Place the first point at the
intersection, then click to make points following the road to the end point. Watch ‘Total Length’ indicator at the
bottom of the map. Once you have measured the appropriate distance, click on “draw” (or “clear” if you used
the “draw” tool to measure) and draw the polygon to encompass the entire worksite at that point.
If you find that the distance measured on the map is different than the distance you have
entered in the Location Description, correct the distance in the Location desciption.
Modifying the Polygon
Place your cursor on any small square found on the polygon border(s) you wish to modify (the modification
point). Continue holding the mouse button and stretch the polygon by dragging the point to another position
- or Click and release to detach the point from the polygon and move the point to a new area on the map.
Click the mouse button (right or left) to set the new point. Repeat these steps until you have re-shaped
the polygon to encompass the entire excavation area
Using the “Satellite” Option to Verify the Location
If you wish to see an aerial view of the site location, click on the “satellite” view button after drawing the polygon
on the OCC or Google map. The Satellite view can help you verify that the polygon is large enough and has been
placed in the correct location. Make changes by clicking the “clear” button and redrawing the polygon.
NEED
HELP?
Click on the ‘Chat
Live’ icon at the
top of any page to
chat with an ITIC
specialist while you
are processing
your locate
requests.
Hours:
Mon - Fri 8a - 5p
SUBMIT A LOCATE REQUEST
STEP 5: START DATE INFORMATION
Ticket Type
This field will default to “STANDARD” (Only 2 business-day notice tickets can be processed via ITIC)
Work to Begin Date
These fields will default to the minimum start date and time required by state law on Standard tickets.
The two working day notice period does not include the day the request is made, so the start time
will be 12:15am on the third business day. This date and time may be modified, but will not allow a
start date/time that is earlier than the two working day notice, or later than a 15 calender day notice.
Once you are satisfied that the polygon encompasses
the entire excavation area and you have selected
a start date/time, click “Next Step”.
SUSPENDING A TICKET
Suspend
At this point you may also elect to suspend the ticket. Clicking
‘Suspend’ will place the ticket in the suspend file, where it will
remain until the end of the current business day.
FYI
Tickets sent to review after 9pm CT Monday - Friday and all tickets received on weekends and
holidays will be processed as though it was received on the following business day.
29
SUBMIT A LOCATE REQUEST
30
UTILITY NOTIFICATION LIST / SUBMITTING YOUR LOCATE REQUEST
After clicking “Next Step” you will be presented with the Utility Notification screen.
The list of utilities notified is based on the location where the excavation polygon is drawn. If there
are any utilities in the area that are not listed on the ticket, you MUST notify them directly.
Submit, cancel, or suspend the ticket by choosing one of the options a the bottom of the page.
If you choose “Cancel”, the ticket will NOT be submitted and you will be returned to the ITIC main menu.
Clicking “Go Back” will return you to the location information and map page of the request. Clicking ‘Suspend’
will place the ticket in the suspend file, where it will remain until the end of the current business day.
If you are ready to submit your ITIC locate request, click
the “Next Step” button on the bottom of the screen.
ATTENTION:
The call center will send you a confirmation copy of your completed locate request. Please note that it is
your responsibility to verify that ALL information is accurate upon the receipt of a completed request.
There is a link located on confirmation email. Click this link and view the map one more time to ensure the
entire excavation area is included within the polygon drawn. REMEMBER: Tickets submitted to review after
9pm will be reviewed the next business day. If you find any errors, call 800-344-7233 to correct the ticket.
If a ticket you have submitted for review lacks required information or contains errors, we will send you
an email. The email will contain additional instructions on how to correct your ticket. It includes an
“incomplete task identifier” to help you find your unfinished ticket.” See the Incomplete Task Section (pg 31)
If you do not receive a copy of the completed locate request it is your responsibility to re-submit the request.
No excavation should take place until you receive a copy of the completed locate request and ALL utilities
have responded.
POST - SUBMITTING A LOCATE REQUEST
31
INCOMPLETE TASK
An ‘Incomplete Task’ is used to resubmit incomplete
(returned) tickets online without retyping the information.The call center provides an explanation of the
issue involved and assigns an Incomplete Task ID
Number when returning a ticket.
Click the “Incomplete Task” button at the ITIC main menu screen (pg 05), and enter the Incomplete Task
Identifier Number. Click “Continue” to open the ticket.
Review the comments from the center before making any changes to the ticket. Verify all of the information
on the ticket. Do NOT change information that does not need to be changed. Remove all void notes from the
Location Description field.
Re-map the area of excavation after completing the requested changes. Please take extra care with this step
if your ticket was returned due to a mapping problem.
Click “Next Step” once you are satisfied mapping is correct. The “Utility Notification List” will appear (pg 31).
Click “Next Step” again to submit your ticket for review. NOTE: The “Incomplete Task” process will be
repeated until the ticket is submitted free of identifiable errors.
Incomplete Task - Sample
OTHER AVAILABLE TICKET FEATURES
32
UPDATE TICKET
Use Update Ticket to renew markings on an existing ticket.
Click the “Update Ticket” button at the
ITIC Main Menu screen (pg 05)
Enter the ticket number to update in
the “Ticket Number” field.
Note: updating a ticket will cancel
the original request if the start
date/time has not passed
Verify all information on the ticket.
Click “Next Step” to advance to the Utility Notification Screen (pg 30)
Once the ticket is completely processed, you should receive an email copy of the ticket at the address listed on
the request.
FYI
Double check the “caller name” and make sure it is yours. It’s important to
be able to contact you directly if someone has questions about your locate.
If we need to contact you about the ticket, we need to be able to ask for
the right person.
NEED
HELP?
Click on the ‘Chat
Live’ icon at the
top of any page to
chat with an ITIC
specialist while you
are processing
your locate
requests.
Hours:
Mon - Fri 8a - 5p
POST - SUBMITTING A LOCATE REQUEST
TICKET SEARCH
To search for an existing ticket
without a ticket number, simply
click on the “Ticket Search” button
found on the Main Menu (pg 05).
If you wish to search for your
tickets, enter your name or Caller
ID number (or both). Entering
fewer search fields will return
more results. Enter the county
that is on the ticket and set the
“Start Date/End Date” to the
time frame in which you
processed the ticket.
Then Click “Search”.
ITIC will display a list of tickets
meeting the criteria you entered.
Click on the ticket number to
open the ticket for viewing or
printing. You can broaden your
search to ALL tickets by not
choosing a county, or you can
narrow your search by entering
a street or house number.
(For Instance: enter “101” in the
address field or “Main” in the
Street field.)
Pan Map – Allows you to ‘grab’
the map with the curser and move it.
Draw Polygon – Allows you to map
out an area, which can then be
evaluated using the Search button.
This will show you a list of tickets that fall within the area mapped.
Clear Polygon – Clears your currently drawn polygon.
Map Help Popup – Will display a list of
helpful notes.
33
HELP PAGES / APPENDIX
SUGGESTED
A1
ABBREVIATION LIST
The following is a list of suggested
abbreviations. Please spell out the complete
word when time and space are available.
Also known as – AKA
Information - INFO
Approximately – APPX or APPROX
Intersection - INTER
Between – BTWNMile - MI
Building – BLDGPedestal - PED
Cable Television – CATV
Property - PROP
NEED
Construction – CONSTR
Railroad - RR
Click on the ‘Chat
Live’ icon at the
top of any page to
chat with an ITIC
operator while you
are processing
your locate
requests.
Hours:
Mon - Fri 8a - 5p
HELP?
Electric – ELECRight of Way – R/W
Excavate/Excavator – EXCAV
Subdivision - SUBDIV
Foot – FTTelephone - TEL
Highway – HWYUnderground - UG
Inches – IN
Avenue – AVE
Boulevard – BLVD
Business – BUS
Expressway – EXPY
Circle – CIR
Court – CT
Drive – DR
Traffic way – TFWY
Highway – HWY
Interstate – I (I 70)
Lane – LN
Terrace – TER
Parkway – PKWY Place – PL
Road – RD
Street – ST
HELP PAGES / APPENDIX
A2
DISTANCES
and
MEASUREMENTS
1/10 OF A MILE =
0.10 MILE =
528 FEET
2/10 OF A MILE =
0.20 MILE =
1056 FEET
3/10 OF A MILE =
0.30 MILE =
1584 FEET
4/10 OF A MILE =
0.40 MILE =
2112 FEET
5/10 OF A MILE =
0.50 MILE =
2640 FEET
6/10 OF A MILE =
0.60 MILE =
3168 FEET
7/10 OF A MILE =
0.70 MILE =
3696 FEET
8/10 OF A MILE =
0.80 MILE =
4224 FEET
9/10 OF A MILE =
0.90 MILE =
4752 FEET
1/16 OF A MILE =
110 YARDS=
330 FEET
1/8 OF A MILE =
220 YARDS=
660 FEET
1/4 OF A MILE =
0.25 MILE =
1320 FEET
1/3 OF A MILE =
0.33 MILE =
1760 FEET
3/8 OF A MILE =
660 YARDS=
1980 FEET
1/2 OF A MILE =
0.5 MILE =
2640 FEET
2/3 OF A MILE =
0.66 MILE =
3520 FEET
3/4 OF A MILE =
0.75 MILE =
3960 FEET
1MILE =1760
YARDS=5280
FEET
NEED
HELP?
Click on the ‘Chat
Live’ icon at the
top of any page to
chat with an ITIC
specialist while you
are processing
your locate
requests.
Hours:
Mon - Fri 8a - 5p
HELP PAGES / APPENDIX
A3
GOOGLE - POSITIONAL SHIFT EXAMPLE
When drawing the excavation polygon on the Google map, click the
“OCC” button to verify the polygon on the ITIC map before submitting.
The polygon alignment may be different between the two maps.
Polygon - GOOGLE MAP
You must adjust or modify
the polygon to cover the
entire excavation area as it is
depicted on the OCC map.
(The OCC map is the map that determines which utilities will be notified.)
In this example the work area is
located on the E side of
William St, between
Franklin St and Lorene St.
For help see page 27.
Polygon - OCC MAP
Adjusted CORRECT Polygon
HELP PAGES / APPENDIX
A4
GOOGLE - FLOATING POLYGON EXAMPLE
When drawing the excavation polygon on the Google map, click the “OCC” button to verify the
polygon on the ITIC map before submitting. If the area on the Google map is not on the OCC map, it
will appear as a ‘floating polygon’ - if it appears in the correct area - it is acceptable.
Polygon - GOOGLE MAP
‘Floating Polygon’ - OCC MAP
NEED
HELP?
Click on the ‘Chat
Live’ icon at the
top of any page to
chat with an ITIC
operator while you
are processing
your locate
requests.
Hours:
Mon - Fri 8a - 5p
HELP PAGES / APPENDIX
A5
JOB LIMITS FOR: WORK ON/ALONG THE ROAD EXAMPLES
Example
In the following example, work extends 50ft from edge of curb on both sides of 118th st, from
Washington road going west to Wellman Road. The distance is 1½ miles, so the work area must
be split into at least 2 tickets.
“Starting at Washington Road
and going 1 mile west.”
1
“Starting 1 mile west of Washington Road
and continuing ½ mile to Wellman Road.”
2
NEED
HELP?
Click on the ‘Chat
Live’ icon at the
top of any page to
chat with an ITIC
operator while you
are processing
your locate
requests.
Hours:
Mon - Fri 8a - 5p
Another option for the
2nd ticket would be
starting the location of
work description at the
intersection of 118th
Street and Wellman Road,
and continue east ½ mile
to meet up with the
1st ticket.
HELP PAGES / APPENDIX
WORK OFF PROPERTY & ROADS EXAMPLE
If the work area is taking place on (or along) a map/geographical
feature (creeks, railroad tracks, etc...), use the same method as
work taking place on a roadway. However, you must include
driving directions to the feature.
As always, the driving directions must start at an intersection
of 2 named roads, and must include approximate distance
and direction (from the intersection) to the work area.
Example
The excavator is working in the creek and 10ft on both sides of
the creek, for approximately 200ft. Driving directions should be
given as follows:
“From the intersection of CO RD 243A and
Patterson St, travel west on Patterson St
approximately 875ft to the unnamed creek.
Travel north following the creek 450ft.
At this point, locate in creek and 10ft on
both sides of creek going north for 200ft.”
NEED
HELP?
Click on the ‘Chat
Live’ icon at the
top of any page to
chat with an ITIC
operator while you
are processing
your locate
requests.
Hours:
Mon - Fri 8a - 5p
A6