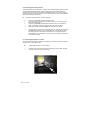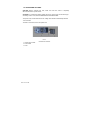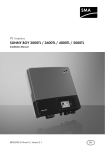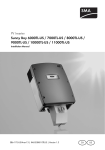
1
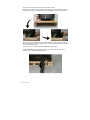
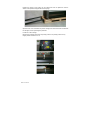
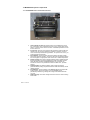
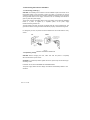
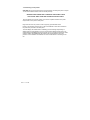
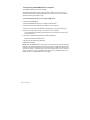
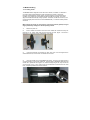
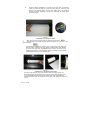
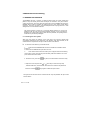
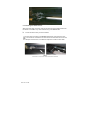
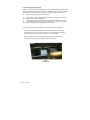
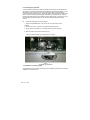
User’s Manual
Rev 003
Seite 1 von 24
FCC Notice
The MultiMax 6ds have been tested and found to comply with the limits for Class A
digital devices, pursuant to Part 15 of the FCC Rules. These limits are designed to
provide reasonable protection against harmful interference when the equipment is
operated in a commercial environment. The cutters generate, use and can emit radio
frequency energy and, if not installed and used in accordance with the instruction
manual, may cause harmful interference to radio communications. Operation of the
cutters in a residential area is likely to cause harmful interference, in which case the
user will be required to correct the interference at his own expense.
Caution!
Changes or modifications not expressly approved by Max Meyer, which is
responsible for FCC compliance, could void the user’s authority to operate this
equipment.
DOC Notice
The MultiMax 6ds do not exceed the Class A limits for radio noise for digital
apparatus set out in the Radio Interference Regulations of the Canadian Department
of Communications.
Notice
Max Meyer reserves the right to modify the information contained in this User
Manual at any time without prior notice. Unauthorized copying, modification,
distribution or display is prohibited. All rights reserved.
Waste Electrical and Electronic Equipment (WEEE) Directive
Directive 2002/96/EC of the European Parliament and of the Council
The symbol (right) is shown on this product. It indicates that the
product should not be disposed of with regular household waste,
but should be disposed of separately. Electrical and electronic
equipment can contain materials that are hazardous to the
environment and human health and therefore
should be disposed of at a designated waste facility or returned to
your retailer for the appropriate recycling to take place.
If you wish to dispose of this product and the product still functions, please consider
recycling/reusing it by donating it to a charity shop, selling it or part-exchanging it
with your retailer.
Copyright © 2008 Max Meyer
Seite 2 von 24
Welcome
Congratulations on your purchase of the new MultiMax 6ds!
The MultiMax 6ds is the ultimate label and decal production unit, combining high
image durability and precision contour cutting into one device.
The MultiMax 6ds uses thermal transfer technology. This is a dry transfer printing
process that uses heat and pressure to create a durable bond with the resin-based
inks and the media. The resin inks are supplied on ribbons containing densely
packed pigments suspended in a solid plastic carrier. This high pigment density
results in images that are highly abrasion resistant, and it provides a long term UV
and water resistance with a long outdoor durability without laminations.
Thermal transfer printing produces no fumes at all, creates no mess and does not
require maintenance or the use of cleaning chemicals.
Every aspect of the MultiMax 6ds has been designed for simplified operation. Media
loading is child’s play, thanks to auto media alignment. Ribbons are a snap to refill,
and can’t be loaded improperly.
This manual is a reference guide for installing and operating the MultiMax 6ds.
1 Setup
1.1 Unpacking the MultiMax 6ds
NOTE: Save the shipping box and any other packaging items in case the printer needs
to be moved. Do not transport the printer without first completely repacking it in its
original packaging.
CAUTION: For safety reasons, no fewer than two people should be involved in
unpacking the printer.
Before unpacking, make sure to have at least 4 meter of space at one side of the box,
because the printer will be rolled down a ramp
Remove the straps and open the flaps of the box, take out the 4 foam blocks. Then
remove the box from the pallet; this must be done in a room that is at least 2.5 meter
high.
Remove the protective bag then cut all the straps and cable ties. Next, set aside the
accessories box.
Seite 4 von 24
The printer is secured to the base at each side with a bracket.
Remove the 4 nuts (# 17 mm) located at each side. Next, lift the brackets up and out
by pulling the bottom part backwards under the MultiMax 6ds, and then remove them.
FIG 1-2 UNPACKING
MULTIMAX 6DS STAGE 2
Remove the two foam blocks from underneath the stand. Do this using the two ramps,
which are screwed to the pallet. Slide the ramp under the stand, closest to the end with
the foam suspension blocks.
From this point on, two people ARE REQUIRED for safety reasons.
Lift the MultiMax 6ds from each side, just high enough so the foam blocks can be
pulled out from underneath the MultiMax 6ds.
FIG 1-3 UNPACKING
MULTIMAX 6DS STAGE 3
Seite 5 von 24
Position the ramps so the printer can be rolled down from the pallet. Be sure the
wheels of the printer are aligned with the ramp legs.
FIG 1-4 UNPACKING MULTIMAX
6DS FINAL STAGE 4
Open the front cover and loosen the printer carriage, then remove the foam underneath
the carriage, which is protecting the printhead.
Loosen the cutter carriage.
Remove the protective sheet from the printing surface. The printing surface is very
fragile, please read section 5.1.6.
Seite 6 von 24
1.2 MultiMax 6ds printer components
1.2.1 The MultiMax 6ds as viewed from the front
FIG 1-5 MULTIMAX
6DS, FRONT VIEW
1
2
3
4
5
6
7
Seite 7 von 24
Control Panel and LCD: All printer activity can be initiated from the 8
key control panel. The LCD informs the user on the current status of the
printer, or actions, which need to be taken. A detailed explanation can be
found in section 4.
Front Cover: The front cover protects the media from dust and also the
operator from any moving parts during operation. Therefore, the front
cover must be kept closed during operation. To open the front cover, you
must first pause the machine.
Pinch Rollers: The pinch rollers clamp the media to the drive system
and insure necessary tracking. The pinch rollers are electrically powered
from the keypad. The right pinch roller can be set in 2 different positions.
Printer Carriage: The printer carriage holds the ribbon cassette and the
thermal printhead. The thermal printhead is made from fragile ceramic
glaze; DO NOT TOUCH THE PRINTHEAD as oil or moisture can
corrode the surface. The printhead can also be VERY HOT, just after
printing.
Cleaning Plate: The cleaning plate is used to clean the thermal
printhead. While printing, the printhead cleans itself automatically and at
regular intervals.
Front Wheels: The front wheels of the MultiMax 6ds are equipped with
locking brakes. Secure the brakes, once the MultiMax 6ds is
permanently installed, by pressing the locking wheel brake down with
your foot.
Cutter Carriage: The cutter carriage is the mount for the contour cutting
knife holder.
1.2.2 The printer as viewed from the back
FIG 1-6 MULTIMAX
6DS, REAR VIEW
1.
Power Entry Module: The fuse box, the AC power cord receptacle and the
on/off switch are located in the power entry module. See section 1.4.3. for power up
procedure and section 1.4.3. for information about changing the fuse.
CAUTION: For continued protection against risk of fire, replace only with the same type
and rating of fuse.
Media Load push buttons: On the right side there are two push buttons,
1
conveniently located to make the loading process easy. For further explanation, see
section 1.6.1.
2
USB port: This interface is based on the standards specified in Universal
Serial Bus Specifications Revision 1.1. It allows for high-speed bi-directional serial
communication between the host computer and the MultiMax 6ds.
3
Cable clamp: These two cable clamps provide a neat path for the
communication cables.
4
Cassette station latch: Two latches are located at the back, in order to
open up the cassette station. Open only when the machine is paused or switched
off.
5
Media supply rollers: The two back rollers are part of the media supply
system.
6
Media Supply Sensor: The media supply sensor enables the motorized
media supply rollers. - Do not place any objects in front of the sensor.
Seite 8 von 24
1.3 Ideal Operating Environment
Environmental conditions can significantly affect the printer’s performance. High
humidity, high temperatures, direct sunlight and airborne contamination (dust) can
adversely affect print quality. The printer should be located away from windows and
doors, preferably within a clean interior room of a building.
Check for the following conditions when installing the MultiMax 6ds:
Surface must be level without vibration
Operating temperature should be stable, between 15 - 27 degrees Celsius
(60 to 80 degrees Fahrenheit).
Operating humidity should be stable, between 30% and 75%.
Area should not be prone to static electricity (no carpeted floors).
Be sure to allow enough space surrounding the printer for changing media
rolls and ribbons. At least 500mm (24 inches) on both sides, and 1000mm (40
inches) behind and in front of the printer.
The printer uses a universal power supply that can operate from 100 to 240
volts with a line frequency of 50 or 60 Hz.
Seite 9 von 24
1.4 Connecting the Printer to the Mains
1.4.1 Grounding (“Earthing”)
CAUTION: An insulated ground conductor must be installed as part of the branch circuit
that supplies power to the wall outlet to which the printer is connected. The ground
conductor must have the same size, insulation material and thickness as the grounded
and ungrounded branch circuit supply conductors, but the insulating seat should be
green or green with yellow striping.
The ground conductor described above must be grounded at the electrical distribution
board or, if power is supplied by a separate system, at the power supply
transformer/motor generator set.
The wall sockets into which the printer is plugged must be of the grounded type. The
grounded conductors serving the wall socket must be properly connected to the ground.
For emergency access, the printer should be installed near the socket-outlet for easy
access.
1.4.2 Operating voltage
CAUTION: Before changing the fuse, make sure that the printer is completely
disconnected from its power source.
CAUTION: For continued protection against risk of fire, replace only with the same type
and rating of fuse.
Fuse Rate: T4.0A, 250V SCHURTER SPT OR EQUIVALENT.
The power supply detects the line voltage and switches automatically between 110V
and 230V.
Seite 10 von 24
1.4.3 Powering-on the printer
CAUTION: Be sure the power switch is turned off before connecting the power cord (the
“0” side of the ON/OFF rocker switch should be pressed).
WARNING KEEP FINGERS AND OTHER BODY PARTS AWAY FROM
THE CUTTING AREA. THERE ARE HAZARDOUS MOVING PARTS.
Plug the female end of the AC power cord into the receptacle located in the power
entry module on the printer’s rear panel.
Plug male end of the AC power cord into a properly grounded wall socket.
Power on the printer by pressing the “I” side of the ON/OFF rocker switch located on
the power entry module on the rear panel.
The LCD display will activate and an initializing process will begin. Depending on
whether there is media loaded or not, the process will be different. When there is no
media loaded, the MultiMax 6ds will prompt the user for a media load procedure. When
media is loaded, the MultiMax 6ds will measure the media width and check the
presence of the cassettes and estimate how much usable ribbon is remaining on the
roll
Seite 11 von 24
1.5 Connecting the MultiMax 6ds to a Computer
The MultiMax 6ds support bi-directional USB.
The USB cable should be 5 meters (16 feet) or less in length. The connector on the
printer side of the cable should be USB series B 4-pin. The connector on the computer
side of the cable should be USB A 4-pin. .
1.5.1 Connecting the printer to a PC using a USB cable:
1. Power off the MultiMax 6ds.
2. Insert the MultiMax 6ds CD into the computer’s CD-ROM drive.
3. Connect one end of the USB cable to a USB port on the computer.
4. Connect the other end of the USB cable to the USB port on the back of the printer.
5. Power on the printer (see section 1.4.3) and return to the computer.
The Found New Hardware Wizard should appear on the computer screen and ask
for the USB driver.
6. Click “OK” and follow the instructions provided by the Wizard.
Windows will find and install the driver.
7. Remove the CD from the CD-ROM drive.
8. Restart the computer.
NOTE: When the MultiMax 6ds is connected to a computer for the first time using the
USB cable, the computer will detect the printer and ask for the USB driver. The driver is
included on the CD containing this user’s manual. Failure to install the USB driver the
first time the printer is connected may result in the computer listing it as an “unknown
device.” Then the only way to install the driver properly is to uninstall the device or to
update the driver using the Windows device manager.
Seite 12 von 24
1.6 Media Handling
1.6.1 Loading media
The MultiMax 6ds is designed to work with rolls of media, not sheets. It is advised to
use cotton gloves while loading the media, otherwise the surface of the media
becomes contaminated by oil from fingers, and the beginning of the printout will be
unusable. Two media core end holders are delivered with the machine. The printer
aligns the media automatically during operation. Therefore, the left side of the vinyl roll
must be straight (seen from the front of the MultiMax 6ds). To load the media proceed
as follows:
While loading the media, do not touch the gray printing surface (platen)! Doing so
might permanently damage the delicate printing surface.
1.
Switch the printer on.
2.
Insert a media core holder in each end of the media roll. Check first if they are
loosened. If not, loosen them with the black knob at the side. Figure 1-10 shows a
loosened (1) core holder and an expanded (2) core holder.
3.
Insert the loosened core holders into each end of the roll. Then tighten them
with the black knob, be sure both core holders are secured.
4.
Place the media roll on the MultiMax 6ds rollers. The right core holder guide is
at a fixed position on the supply rollers bar. The left guide is adjustable. Make sure the
media roll is positioned as in figure 1-8. Guide the beginning of the vinyl around the
second supply roll (1). Then make a big loop underneath and behind the two roller
bars, and pull it upwards and into the machine.
Seite 13 von 24
5.
Press the bottom pushbutton (1), located on the right side, to unwind the
media roll. Hold the media so it does not touch the floor. Insert the vinyl
between the cassette station and the base. Make sure it is loaded far
enough so that the beginning of the vinyl is underneath the clamp. Press
pushbutton again.
FIG 1-12 LOADING ROLL AT THE BACK
OF MULTIMAX 6DS
1
Next, return to the front of the machine. Hold the vinyl and push
2
Align the edge of the media using the alignment markers (1), on the front of the
base, then push
Just before the MultiMax 6ds starts to print, it will test the media alignment
and the position, relative to the origin, before it starts printing. If the media is
to far from the origin, then the MultiMax 6ds will “Park” the media on the
starting point (origin). If it is not loaded straight, it will align it automatically
(unless OptiTrac is set to ‘white background).
The pinch rollers will now come down and the media is properly loaded. The
machine will remain paused until the front cover is closed. After closing the front
cover, the MultiMax 6ds will measure the media width. If the media width has
changed, then the printer will prompt the user to check if the right pinch roller is set
correct.
Seite 14 von 24
1.7 Loading ribbon cassettes
1.7.1 Loading and removing the cassettes
The MultiMax 6ds can take up to 5 cassettes. The cassettes can be loaded or removed
from the cassette station at any time, even during printing. If the printer is missing a
color, then it will give a message on the LCD just before it needs the color. The
machine automatically detects the end of a ribbon. If the machine runs out off a certain
ribbon color while printing, then it will pause until the operator inserts a new ribbon. As
soon as the machine detects a new ribbon roll, it will continue to print and complete the
image. ALWAYS load or remove cassettes from behind the printer. To remove a
cassette, open the rear cover by puling down both latches simultaneously.
FIG 1-15 REAR CASSETTE
STATION COVER
To remove a cassette, lift it enough to pass over the rubber bumper, then pull it
backwards and out of the printer. To load a cassette, push it gently into an open
location, until it just passes the rear bumper, then press it down and pull it backwards
against the bumper.
FIG 1-16 REMOVING A
CASSETTE
FIG 1-17 LOADING A
CA&SSETTE
Close the rear cover. After the media is loaded, MultiMax 6ds will take the cassette and
estimate the amount of ribbon in the cassette available for printing.
The printer will not check the cassettes if no media is loaded
! CAUTION ! Do not insert empty cassettes,
without ribbon.
Seite 15 von 24
1.8 Knife Installation
SAFETY WARNING: The MultiMax 6ds uses razor-sharp vinyl cutting
knives. The knife blades may cause serious personal injuries if handled
without proper caution. Use extreme care when operating the cutter; and
when installing, removing or handling the cutter’s knife blade!
1.8.1 Removing the drag knife
1
Loosen the head clamp screw (1), swing the clamp arm back and remove
the knife holder from the clamp (2).
2
Turn the knurled adjustment knob (3) clockwise to push the knife (4) out of
the holder (5).
3
Carefully pull the knife from the holder.
Seite 16 von 24
1.8.2 Installing the drag knife
1.
Remove the aluminum plunger from the plastic knife holder (5) by turning
the knurled adjustment knob (3) counterclockwise until the plunger comes out of
the holder.
2.
Insert the conical, non-cutting end of the knife into the opening in the narrow
end of the holder; gently push the knife all the way in.
3.
Turn the holder upside down and tap it lightly on a solid surface to ensure
that the knife is completely inserted.
4.
Slowly turn the knurled knob clockwise until the tip of the blade extends the
distance required for the desired cutting media (t) as shown in figure below.
FIG 1-23 KNIFE LENGTH
ADJUSTMENT
5.
Insert the knife holder into head clamp, seating it
firmly.
FIG 1-24 CLAMP
DRAG HEAD
6. Close the clamp and tighten the clamp screw.
Seite 17 von 24
2.8 Preparing the MultiMax 6ds for long print-outs
The MultiMax 6ds has a fixed position at the rear for the rollerguiding of the flange. It
is possible that some types of vinyls are not wound up even (e.g. the core sticking
out). This results in a forcing of the path of the vinyl in a wrong direction. Following
procedure can help to solve that problem:
1
Load media in the machine as described in section 1.6.1.
2
Print out a small test of 2 or 3 band-passes high.
3
Check the path of the media. The distances, marked with the white arrows and
the same number, should all be the same. The middle arrow of the second photo points
to the roll itself
4
If not, check first if the media has moved from its place of origin. If so reload
with a maximum loop at the back.
5
If it did not move, then reposition the rollerguide, so that the path of the vinyl is
as shown above. Make also sure that the flange is flush to the core.
Seite 18 von 24
5 Maintenance and Cleaning
5.1 GENERAL INFORMATION
The MultiMax 6ds has a number of sliding surfaces made of smooth metals and
plastics. They are virtually friction-free and require no lubrication. They will, however,
collect dust and lint, which may affect the performance of the MultiMax 6ds. Keep the
MultiMax 6ds as clean as possible by keeping the front cover always closed. When
necessary, clean the unit with a soft cloth dampened with isopropyl alcohol or mild
detergent. Do not use abrasive cleaners.
The printing surface is made out of a special cellular material. Do not touch it!
Cleaning it with any kind of fluid will permanently damage it. Also if pressure is
applied to the surface with anything other than the printhead, the printing surface
could also be permanently damaged.
5.1.1 Cleaning the drive system
After time and usage, the sleeves of the drive drum may become clogged with
accumulated residue from the media liner. This situation may affect traction, as the
media will tend to slip between the pinch rollers and the drive sleeves.
To clean the drive sleeves, proceed as follows:
1.
Power down the MultiMax 6ds and remove media and cassettes. Switch
it back on.
2. Wait until it is initialized and open the front cover.
3.
Cover the front and rear sensor with a piece of paper. Remove the backing
from a piece of vinyl. Place the vinyl with the tacky side down between one of the
pinch rollers and a drive sleeve.
4. Close the cover, press the
key twice, and wait until the machine is ready.
5. Open the cover and press the
or
arrow keys to move the vinyl strip
, adhesive side down, back and forth. Be careful not to lose the strip within the
machine. Press the
key again to release the pinch rollers.
The figure shows the front sensor covered and the vinyl strip between the pinch roller
and the sleeve.
Seite 19 von 24
5.1.2 Cleaning the media sensors
After a time and usage, the sensor may become dirty with accumulated residue from
the media. This situation may cause malfunctioning of the MultiMax 6ds.
To clean the sensor area, proceed as follows:
1. The front sensor is located on the MultiMax 6ds left side, right next to the pinch
roller. The rear sensor is located on the same line as the front sensor but on the rear
plate.
2. To keep the sensors clean, it is sufficient to wipe them out with a cotton swab.
FIG 5-2 POSITION OF THE FRONT AND REAR MEDIA
SENSOR
Seite 20 von 24
5.1.3 Cleaning the cleaning pad
Located on the left side of the MultiMax 6ds is a printhead cleaning pad. The printer
cleans the head periodically on this pad. It is possible that after a while some dust will
accumulate on this pad. Therefore it is advised to clean this pad from time to time.
To clean the cleaning pad, proceed as follows:
1
Take a piece of scrap vinyl that is a bit larger than the cleaning pad. Remove
the backing and stick it on the cleaning pad.
2
Gently apply equal pressure on the vinyl, pressing the adhesive on the pad.
3
Remove the vinyl and check the back of the vinyl. If it is dirty do the procedure
again, until the vinyl does not show dirt from the cleaning pad.
If the cleaning pad starts turning white, it is worn out and should be replaced.
The cleaning plate should be cleaned every week or after each change of roll
vinyl which ever come first. Every five rolls of vinyl, the cleaning pad should be
replaced (or turned once – mark used side so it is not used twice).
Using not approved material can raise the need to perform these actions.
Cleaning pad should be changed if the printhead is changed.
FIG 5-3
CLEANING PAD
Seite 21 von 24
5.1.4 Cleaning the printhead
The printhead accumulates dust, debris and resin residue, which can all degrade the
print quality. The printer will automatically self-clean the printhead (see section 4.3.13).
While this procedure removes much of the residue and debris, the printhead will
sometimes require manual cleaning, particularly after a ribbon breakage because large
pieces of ribbon material might be caught underneath the carriage. Do not clean the
printhead just after printing. The printhead is still hot after printing. Touching it too soon
after printing might cause injuries. Do not clean the printhead above the printing
surface.
To clean the printhead, proceed as follows:
1. Power off the MultiMax 6ds. Open up the rear cover and take out the
cassette.
2. Use a lint free cloth, or gauze, moistened with isopropyl alcohol.
3. Gently wipe the printhead (1), the release plate (2) and the rollers (4).
4. Note the position of the ribbon end sensor (3).
Clean the printhead after every change of roll of ribbon.
FIG 5-4 CLEANING THE
PRINTHEAD
5.1.5 OptiPrint™ cleaning system
The maintenance of the system is described in the installation guide which was packed
separate in the accessory box.
Seite 22 von 24
5.1.6 Cleaning the printing surface
The printing surface is very delicate. It is made out of cellular material. Oil and moisture
from fingers damages the surface, therefore great care should be taken when the
printing surface is uncovered. DO NOT TOUCH SURFACE. In rare cases it might be
necessary to clean the printing surface. It is not recommended to do it, but sometimes it
is the only safe way to remove dirt.
To clean the printing surface, proceed as follows:
1.
2.
3.
Power off the MultiMax 6ds and remove the vinyl.
Cut a piece of vinyl, the size of the printing surface (1 x 0.14m) and stick it
onto the printing surface.
Power on the MultiMax 6ds and load the media. Print out a rectangle full
width and height, consisting out of two colors app 20% coverage.
5.
Remove the media from the MultiMax 6ds and turn off the power.
4.
Carefully remove the vinyl from the printing surface. This test has been done
with Max Meyer white vinyl. Do not attempt to use any other vinyl to clean
the printing surface. The reaction of the adhesive on the printing surface
might damage it. Do not leave the vinyl on the printing surface longer than is
necessary for this test.
5.1.7 Cleaning the OptiTrac™ sensor
The sensor will collect dust. Therefore, the small hole in the sensor should be cleaned
regularly with a cotton-tipped swab.
1
2
Cleaning the OptiTrac™ sensor system:
Locate the hole in the sensor holder at the right side of the printer carriage.
Clean by wiping it out with cotton swabs.
Seite 23 von 24
5.2 OPERATING VOLTAGE
CAUTION: Before changing the fuse, make sure that the cutter is completely
disconnected from its power source.
CAUTION: For continued protection against risk of fire, replace only with the same type
and rating of fuse: T4.0A, 250V SCHURTER SPT OR EQUIVALENT.
The power entry module detects the line voltage and switches automatically between
110V and 230V.
The fuse is at the back, next to the power inlet.
FIG 5-6
POWER ENTRY MODULE
1. Power entry module
2. Fuse holder
3. Fuse
.
Seite 24 von 24