1
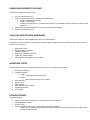
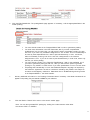
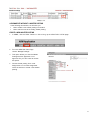
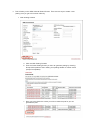
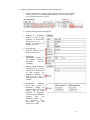
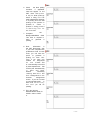
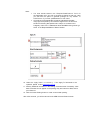
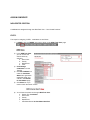
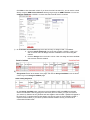
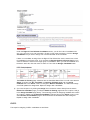
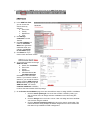
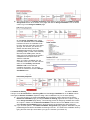
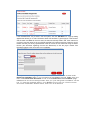
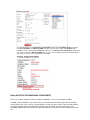
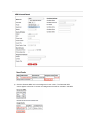
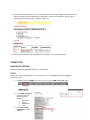
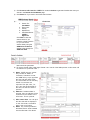
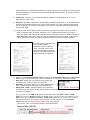
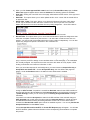
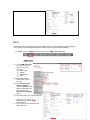
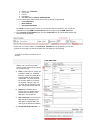
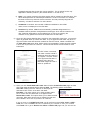
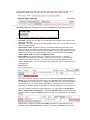
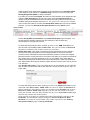
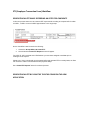
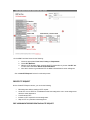
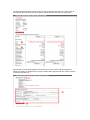
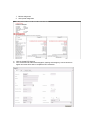
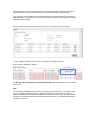
WHAT IS ARM? ............................................................................................................................................1 GETTING STARTED IN ARMS (ACADEMIC RESOURCE MANAGEMENT SYSTEM)..............................................1 GENERAL REQUIREMENTS FOR ARMS ..........................................................................................................2 HIGH LEVEL PROCESS (CUPE WORKFLOW) ...................................................................................................2 WORKFLOW STATES ....................................................................................................................................2 DETAILED PROCESS......................................................................................................................................2 POST ASSIGNMENTS ....................................................................................................................................3 POSTED POSITIONS .............................................................................................................................................................................................. 3 ASSIGNMENTS WITH A MASTER POSTING ...................................................................................................................................................... 4 ASSIGNMENTS WITHOUT A MASTER POSTING ............................................................................................................................................. 6 ASSIGN CANDIDATE................................................................................................................................... 12 NON-POSTED POSITION .................................................................................................................................................................................. 12 CUPE 1 ..................................................................................................................................................................................................................... 12 CUPE 2 ..................................................................................................................................................................................................................... 14 NRAs (NOTICE OF RECOMMENDED APPOINTMENT) ........................................................................................................................ 18 OFFER LETTER............................................................................................................................................ 20 NON-POSTED POSITION .................................................................................................................................................................................. 20 CUPE 1 ..................................................................................................................................................................................................................... 20 CUPE 2 ..................................................................................................................................................................................................................... 28 ETF (Employee Transaction Form) Workflow .............................................................................................. 33 GENERATING AN ETF WHILE RECORDING AN OFFER FOR CANDIDATE .................................................................................. 33 GENERATING AN ETF BY USING THE TASK TAB FOUND ON THE ARM APPLICATION ....................................................... 33 CREATE ETF REQUEST ..................................................................................................................................................................................... 34 EDIT ASSIGNMENT BEFORE CREATING AN ETF REQUEST .................................................................................................................. 34 WHAT IS ARM? ARM is the Academic Resource Management System that is used by faculties at York University. It is a web-based system used to manage end-to-end academic resource planning and the part-time faculty/TA hiring process. GETTING STARTED IN ARMS (ACADEMIC RESOURCE MANAGEMENT SYSTEM) There are several things you need to do before getting started in ARMS: Request access for ARM requires Passport York https://arm.cns.yorku.ca/ (ARM Link – Preferred Browser Firefox) Read the following documentation o ARMS Workflow: Posted Positions and ARMS Workflow: Non-Posted Positions. o ARM Universal Task View and ARM Search View. Contact your faculty representative if you have any questions regarding process, if you don‟t know your faculty representative, information can be found at http://www.yorku.ca/armhelp/help.htm 1 GENERAL REQUIREMENTS FOR ARMS Instructors are classified under four types 1. YUFA for full time instructors 2. CUPE which represents CUPE-1, CUPE-2 and CUPE-Exempt a. CUPE-1 grad students that teach b. CUPE-2 contract faculty c. CUPE-E not part of the union, contract faculty working in a professional program or exempt from the collective agreement 3. Faculty of Ed Secondee: Teachers from schools that oversee York Students 4. Retirees: retired YUFA faculty HIGH LEVEL PROCESS (CUPE WORKFLOW) Administrators that work with the ARM System follow the CUPE Workflow. The process of hiring contractors is constrained by collective bargaining agreement with CUPE 3903. Below is the high-level summary of the workflow: Assignment created Posting Created + Published Candidate Assigned CUPE1 only: Candidate Approved CUPE2 only: NRA published Offer Published + Accepted + ETF Generated WORKFLOW STATES Each assignment (once course assignment has been done) has one of these workflow states 1. 2. 3. 4. 5. 6. 7. 8. No Candidate Assigned Candidate Assigned a. CUPE1 i. Candidate Approval through FGS b. CUPE2 i. NRA Published (except for non-posted) Offer Published Offer Accepted Offer Rejected Offer Revoked (after accepted) Assignment Revoked ETF Created DETAILED PROCESS The detail process is: Create unnamed CUPE assignment or named/un-named YUFA assignment. Create/edit Master Posting Publish Posting Identify candidate CUPE names, one per assignment (Name Candidate) o CUPE1 only: all candidate assignments must be approved (Some are auto-approved based on FGS (Faculty Graduate Students) criteria 2 o CUPE2 only: generate NRA (Notice of Recommended Appointments) Grievance date is 4 weeks or NRAs have a grievance deadline of 28 days. Non-posted candidate assignment o Go to ARM Task View o Click on Non-Posted Position o Under “Candidate Status” - Choose No Candidate o Clicks assign candidate and select candidate. Generate Offer Letter o CUPE1 and CUPE2: generate offer letter Both CUPE1 and CUPE2 get offer letters For CUPE1, only approved or auto approved can be selected For CUPE2, warning if NRA grievance date has not passed; no active grievances. o To generate offer letter you must do the following: User goes to ARM Task View Click on Offer Letters: CUPE-1/2/E User chose under Actions Create an offer letter for “CUPE-1” or “CUPE-2” User clicks Create Offer for the particular Candidate Search User enters the information from the offer letter template. Create Approved letter Generate PDF o Non-posted: generate offer letter CUPE-E and YUFA-Retirees get offer letters Go to ARM Task View Click on Non-Posted Position Under “Candidate Status” - Choose Candidate Assigned User clicks Create Offer for the particular Candidate Search User enters the information from the offer letter template. Create Approved letter Generate PDF Accept Offer Letter (Record Offer) o User goes to ARM Task View o Click on Offer Letters: CUPE-1/2/E o User click Status “Published” o User selects the letters they wish to Accept and choses Bulk Record Offer Acceptance. Reject Offer Letter o Select offer letter o Click on declined When offer is accepted instructor names are pushed to SIS (some positions have delayed “push” dates) ETF is then created. POST ASSIGNMENTS POSTED POSITIONS The CUPE posting process starts with a master posting. A master posting is a template that contains: Course details Position details Responsibilities Qualifications Dates Notes 3 Note: Master postings are not directly published but rather serve as the source to generate CUPE-1 and CUPE-2 postings. If your department submitted Excel templates that contain posting information, you will see a number of master postings already created in ARMS. These master postings are created based on position type (such as Course Director, Tutorial Leader) and instructional format (such as LECT, TUTR, LAB). On the other hand, you will need to create a new master postings in cases where: Your department has not submitted an Excel template Some information such as instructional format of a course is missing in your Excel template. You are adding a new course. Regardless of whether you have master postings created or need to create new ones in ARMS, it is important to note that postings can be created only if the appropriate CUPE teaching assignments have been made in ARMS. Once you have your master postings done, you can generate PDF postings, download them and then follow your department procedures to post them. This may mean posting them on your department website or on a bulletin board. ASSIGNMENTS WITH A MASTER POSTING If master postings have been pre-created i n ARMS for your department, you need to review them and make necessary c h a n g e s before generating P DF postings. REVIEW AND/OR UPDATE A MASTER POSTING 1. In ARMS, click the TASK TAB m e n u link to bring up the AR M T AS K V I E W page. 2. From the ARM Task View Page choose “Manage Postings” 3. You can filter your search by choosing the Posting Status and the Approved Status. 4. You can also create postings from meet assignments and non-meet assignments by clicking onto Actions: Create posting from meet assignments and non-meet assignments. 5. Click the “Not Approved” to view the Postings of a Position either in Normal Posting Status or the Emergency Posting Status. This will take you to the ARM Search Screen where you will be able to click the master posting number of a course and a position you wish to review. The posting details page appears. The information in the posting is from the submitted Excel spreadsheet or a previously created master posting. 4 6. Click the Edit Details link. The posting details page appears. If necessary, edit the appropriate fields in the master posting. Note: 7. 8. You must include content in the “Responsibilities” field in order to generate a posting. You must enter information in the PDF Document; also if you have completed the qualifications f i e l d for both Units, you will have the option to generate a posting for each Unit even if you have only created an assignment f o r one of them. This is a functionality to be used by those departments t h a t need to post simultaneously i n Unit-1 and Unit-2, without necessarily c r e a t i n g both Unit 1 and Unit 2 assignments i n the Courses assignments s c r e e n . If you do not need to post simultaneously i n both Units, select only the Unit you will be posting. You must include content in the “Required Qualifications” field for the applicable unit if you wish to generate a posting for that unit. Later you will have the option to generate posting for only CUPE-1 or CUPE-2 even if you have qualifications c o n t e n t for both units. All postings will automatically i n c l u d e the standard boilerplate language as required by the Collective Agreements as well as a sentence indicating that positions are subject to enrolment and budgetary restrictions. Statements a b o u t WHMIS training should go either in the Responsibilities o r the Notes section. Add any additional information i n the Posting Comments area if necessary. Note these comments do not appear on the posting, they are internal to ARMS for your reference. Click the Back t o Search link to return to the search results page. Note: You can also generate PDF postings by clicking the number amount under either the column CUPE-1 or CUPE-2. 5 ASSIGNMENTS WITHOUT A MASTER POSTING In the following two sections, we will show you: How to create a new master posting from scratch. How to add a course to an existing master posting. CREATE A NEW MASTER POSTING 1. In ARMS, click the TASK TAB m e n u link to bring up the AR M T AS K V I E W page. 2. From the ARM Task View Page choose “Manage Postings” 3. This option allows you view the Master Postings that are approved or not approved. So you don‟t need to choose this option. 4. Choose Create posting from: meet assignments or non-meet assignment under the Actions to create a new master posting. 6 5. This will take you the ARM Universal Search Screen. There are two ways to create a new posting once you get to this screen either by: 1. Bulk Posting Creation a. Click onto Bulk Posting Creation. b. From the Create Posting Screen you then can generate posting by choosing: Group similar positions when creating new postings based on content source (except for templates). c. Once you have chosen the course you wish to create the post for you can generate the post. 2. Finding a position within the Results for Meet Assignments a. Find a position within the search results that you want to create a Master Posting for that has no existing Master Posting #, and click the Create P o s t i n g link in the Action column. b. Edit the following fields as appropriate: 1. Number of positions defaults to “One or more positions” for assignmentbased p o s i t i o n s or “Based on enrolment” for Number of hours. 2. Instructional Format defaults to the Meet the Posting is. 3. Projected Enrolment defaults to the highest maximum enrolment for the course(s). 4. Date of posting defaults to “02/01/201X for summer postings and “04/22/201X” for F/W postings. The application deadline (14 days from the date of posting) will b e a d d e d o n the PDF. 5. Emergency Posting: check this checkbox if applicable. Change the date of posting to when the position will be made available to applicants. Then change the application deadline date and timestamp based on 48 business hours. “Emergency Post” will appear on the PDF. PAGE 6. 7. Check the New posting checkbox if applicable. “New” will appear on the PDF. Note: This o p t i o n is only for those p osti ngs where a hiring u n i t has made substantive changes to a posting since the last posting for the position in question, or where a position i s being p o s t e d i n the h i r i n g u n i t f o r t h e f i r s t time. the Complete Responsibilities field. This field is required i n order to generate a posting. 8. Enter information in the PDF Document; also if you have completed the qualifications field for both Units, you will have the option to generate a posting f o r each U n i t e ve n if you have only created an assignment for one of them. This is a functionality to be used by those departments that need to post simultaneously in Unit-1 and Unit-2, without necessarily c re a tin g both Unit 1 and Unit 2 assignments i n the Courses assignments screen. If you do not need to post simultaneously in both Units, s e l e c t o n l y t h e U n i t you will be posting. 9. Fill in the relevant Qualifications fields for CUPE-1 and/or CUPE2. PAGE Note: You must include content in the “Required Qualifications” f i e l d for the applicable unit if you wish to generate a posting for that unit. Later you will have the option to generate postings for only CUPE-1 or CUPE-2 even if you have qualifications for both units. All postings will automatically include the standard boilerplate l an gu ag e as required by the Collective Agreements as well as a sentence indicating that positions are subject to enrolment and budgetary restrictions . Statements about WHIMIS training should go either in the Responsibilities of Notes Section. 10. Under t h e A p p ly field i f n e c e s s a r y . I f t h e Apply T o field needs t o b e u p d a t e d , please contact i t h e l p @ y o rk u . c a 11. Add any additional information in the Posting Comments area if necessary. Note these comments do not appear on the posting; they are internal to ARM, and for your reference. 12. Click the Create Posting button to create a new master posting. After a few seconds, you will be returned to the ARM Universal Search screen ADD TO “EXISTING” MASTER POSTING If you wish to add additional course assignments t o a posting already created, the assignment should contain the same responsibilities, qualification requirements, position type, and instructional format as the existing posting: 1. In ARMS, click the TASK TAB m e n u link to bring up the AR M T AS K V I E W page. 2. From the ARM Task View Page choose “Manage Postings” 3. This option allows you view the Master Postings that are approved or not approved. So you don‟t need to choose this option. 4. Choose Create posting from: meet assignments or non-meet assignment under the Actions to create a new master posting. 5. This will take you the ARM Universal Search Screen. 3) Find the course that you want to add to an existing Master Posting, and click the Add to Existing link in the Action column. A dialog box appears and prompts you for the Master Posting number to link to. 4) Enter the Master Posting number to link this course to and click the Search button. More information appears to help you determine whether it is the correct master posting. ASSIGN CANDIDATE NON-POSTED POSITION Candidates are assigned through the ARM Task View – “Non Posted Positons” CUPE 1 The steps for assigning CUPE-1 candidates are as follows: 1) In ARMS, click the TASKS menu link to bring up the ARM Task View page. 2) In the ARM Task View, you can choose the search criteria by selecting: a. Fiscal Year b. Faculty c. Department d. Term 3) Click Manage Candidates from the Task list 4) Click No Candidate link under the Candidate Status list to get search results that meet your criteria in the Results for Candidates page. 5) Click Show link if you need to check the search criteria 6) You will see the criteria set through ARM Task View. e. Search For: Candidates f. Fiscal Year g. Faculty h. Department i. Candidate Status: No Candidate Identified. Click Hide to close the search criteria. If you know the criteria to search for, you can set the criteria directly using the ARM Universal Search without going through the ARM Task View. You can set Candidate CUPE Unit to CUPE-1 to narrow the search results CUPE-1 postings. 7) On the Results for Candidates page, there are two ways to assign CUPE-1 candidates. a. Click the master posting # of a course that contains a CUPE-1 posting you wish to review. User can assign and save candidate one at a time using this method. b. Click the Assign link in the Action column. User can assign and save candidate one at a time using this method. 8) If you choose option a, the Details for Posting page appears. Scroll down to the CUPE-1 Posting Assignments section at the bottom of the page, and click the Assign Candidate link in the Action column to go to the Assign Candidate page. On the Assign Candidate page, make sure under Candidate CUPE Unit CUPE-1 is selected. S earch the candidate name by typing their last name (the more letters you type, the narrower your search is). Please note only students who are eligible to hold a CUPE-1 position will appear in the name pool. If a student has Part-time status, they will only show up under CUPE-2 (CUPE-1 requires Full-time status). If you notice a problem with the student's record, you should be in contact with FGS about this. Under the Right of First Refusal Candidates section, you will find a list of candidates who are in the Priority Pool and have held a TA-ship in this course previously. Click the Assign Candidate link if you wish to assign one of these individual as the candidate. If there is no candidate to assign from the Right of First Refusal list, use the search box to look for candidates in the Priority Pool. If you uncheck the Restrict Search to Priority Pool box you can then extend the search to the larger group of candidates. When you find the candidate from the search result list, click their name to select it. Then click the Assign Candidate button. The Details for Posting page refreshes with the Candidate Name filled. You will notice that the Status changes from No Candidate to Awaiting FGS Approval and the Assign Candidate link in the Action column is changed to Remove Candidate. The status will change once FGS updates the assignment. Repeat to assign other candidates. 9) If you choose option b by clicking the Assign link in the Action column directly from the search Results for Candidates page, you skip the Details for Posting page as shown in option a and go to the Assign Candidate page directly. The remaining process for assigning candidate is the same as in option a. Please note the Remove Candidate link doesn‟t show in the Action column on the search Results for Candidates page for those sections that candidates have been assigned. Repeat to assign other candidates. CUPE 2 The steps for assigning CUPE-2 candidates are as follows: 1) In ARMS, click the TASKS menu link to bring up the ARM Task View page. 2) In the ARM Task View, you can choose the search criteria by selecting: a. Fiscal Year b. Faculty c. Department d. Term 3) Click Manage Candidates from the Task list 4) Click No Candidate link under the Candidate Status list to get search results that meet your criteria in the Results for Candidates page. 5) Click Show link if you need to check the search criteria 6) You will see the criteria set through ARM Task View. a. Search For: Candidates b. Fiscal Year c. Faculty d. Department e. Candidate Status: No Candidate Identified. Click Hide to close the search criteria. If you know the criteria to search for, you can set the criteria directly using the ARM Universal Search without going through the ARM Task View. You can set Candidate CUPE Unit to CUPE-2 to narrow the search results CUPE-2 postings. 7) On the Results for Candidates page, there are three different ways to assign CUPE-2 candidates. c. Click the master posting # of a course that contains a CUPE-2 posting you wish to review. User can assign and save candidate one at a time using this method. d. Click the Assign link in the Action column. User can assign and save candidate one at a time using this method. e. Click the Assign Displayed CUPE-2 link above the search results table. This method allows for saving multiple candidates assignments at a time. Please note this method only available to CUPE-2 assignment. 8) If you choose option a, the Details for Posting page appears. Scroll down to the CUPE-2 Posting Assignments section at the bottom of the page, and click the Assign Candidate link in the Action column to go to the Assign Candidate page. On the Assign Candidate page, make sure under Candidate CUPE Unit CUPE-2 is selected. S earch the candidate name by typing their last name (the more letters you type, the narrower your search is). Please note that name pool for the candidate assignment is contract faculties (including CUPE-1, CUPE-2 and CUPE-E) that exist in the ARM system, and the name pool is not restricted to the CUPE-2 candidate even the option button for CUPE-2 is selected. When you find the candidate from the candidate name pool, click their name to select it. The Summary of Current CUPE-2 Load for the selected candidate will appear. You need to review the load before click the Assign Candidate button. The Details for Posting page refreshes with the Candidate Name filled. You will notice that the Status changes from No Candidate to Awaiting NRA and the Assign Candidate link in the Action column is changed to Remove Candidate. Repeat to assign other candidates if any for the same posting. 9) If you choose option b by clicking the Assign link in the Action column directly from the search Results for Candidates page, you skip the Details for Posting page as shown in option a and go to the Assign Candidate page directly. The remaining process for assigning candidate is the same as in option a. Please note the Remove Candidate link doesn‟t show in the Action column on the search Results for Candidates page for those sections that candidates have been assigned. 10) If you choose option c, the CUPE-2 Candidate Assignments page appears. Remember only the posted assignments without candidates are showing on the list. T h e Search the candidate name by typing their last name (the more letters you type, the narrower your search is). If the candidate does not yet exist in the HR system, click the Add New link. A pop-up dialog appears that allows you to enter information about this candidate. Type the payno or SIN number and hit search and ARM will check to see if the instructor already exists in HR. If the instructor is not found, enter the name for the new CUPE and ARM will create a temporary instructor record. Please note that your faculty representative needs to convert the new resources using the admin function (see document regarding Convert new Resources) to link the payno number from Peoplesoft system to the record of the new candidate. When you are finished assigning a l l t h e candidates, click the Save button to return to the Results for Candidates page. If yo u ha d assi gn ed c an did at es th rou gh Ta sk s vie w, t he f ilt e r of N o C a ndi da te Ide ntifi ed is still o n a nd the Re s ul ts for Ca ndida te pa ge refreshes w i t h t h e t h o s e a s s i g n m e n t s t h a t y o u j u s t a s s i g n e d c a n d i d a t e s o f f t h e list. To see the updated status, click Show to bring up the criteria screen and leave Candidate Status blank, and then click Search You will notice that on the Results for Candidates page the Candidate Status changes from No Candidate to Awaiting NRA. Please note you don‟t have the Remove link available in the corresponding Actions column on the Results for Candidates page and you need to click the Awaiting NRA link to get to the Posting Assignment Details page if you need to remove the candidate at this stage. NRAs (NOTICE OF RECOMMENDED APPOINTMENT) Once you complete assigning a batch of CUPE-2 candidates, you can now generate the NRAs. In ARMS, click the SEARCH menu link to bring up the ARM Universal Search page. Search for NRA‟s. Choose Fiscal Year, Term, Faculty, and Department from the drop-down menus. Click the Search button. The Search Results show you all the NRAs that have been generated. If there have been any more candidates assigned since the last time you generated NRA‟s, you will see a new item added to the results list. 4) Click the Generate NRA link in the Assignment Count column. The Generate NRA screen appears with a list of courses and assignments that will be included in this NRA. 5) Click the Generate NRA button. The screen refreshes with your NRA details. Important Note: The date on the NRA will be the date that it is generated. Therefore it is imperative that you do not generate the NRA until the day you plan to send it out. 6) Click the View PDF link to view the NRA and save and/or print the PDF document. OFFER LETTER NON-POSTED POSITION Offers are created using the ARM Task View – “Offer Letters” CUPE 1 Please note, before an offer letter can be created, the Unit 1 candidate must first be assigned, approved by FGS. 1) 2) In ARMS, click the TASKS menu link to bring up the ARM Task View page. In the ARM Task View, you can choose the search criteria by selecting: j. Fiscal Year k. Faculty l. Department m. Term 3) Click Offer Letters: CUPE-1/2/E from the Task list 4) Click Create an offer letter for: CUPE-1 link under the Actions to get search results that meet your criteria in the Results for Candidates page. 5) Click Show link if you need to check the search criteria 6) You will see the criteria set through ARM Task View. a. Search For: Candidates b. Fiscal Year c. Faculty d. Department e. Candidate Status: CUPE-1: Approved. Click Hide to close the search criteria. If you know the criteria to search for, you can set the criteria directly using the ARM Universal Search without going through the ARM Task View. 7) 8) On the Results for Candidates page, click the Create Offer link for the candidate whose offer letter should be generated. Fill out the Create Offer Letter page. Please note: Not all of the fields present on this screen will be relevant for a particular offer. a) Name: CUPE resource names are provided to ARM in a “lastname, firstname” format, and ARM will try to pre-populate the first and last name fields. The name field can be manually edited if corrections are required. Title (Mr., Mrs., Dr., etc.) may also be specified by the user, but the Title field is optional. b) Address: If address data is entered, then an address will be inserted into the header of the offer letter. This is optional. c) d) Offer Letter Date: You can pick the date that will be displayed on the offer letter; the default date is the current date. Notes: Any content provided in the Notes section will be inserted into the offer letter. This allows the departments to customize/personalize the content of the letter. For example, the Notes content may welcome back an instructor who had previously taught at the University, or extend a welcome to a new instructor. e) Comments: Comments are recorded in ARM and available to other ARM users, but are not displayed on the offer letter. f) Positions: By default, ARM shows all outstanding candidate assignments for a candidate within a particular faculty/session/contract type, which will be included in the offer. Particular assignments can be omitted from an offer by unchecking the checkbox for any position that should be omitted from the offer letter. 9) Once all of the relevant data has been entered on the Create Offer Letter form, you have the option to generate either a) a Draft offer letter, or b) an Approved offer letter. Any Draft or Approved Offer Letter that has been created can then be viewed, edited or deleted through the View Offer Letter page. Note: Offers should only be deleted if a letter has been created in error and not yet sent to an instructor. Please see the Revoke function below for more information. The PDF version of the draft offer letter contains a DRAFT watermark and has a status of „Draft‟. The PDF version of the approved offer letter is rendered using the York letterhead insignia and has a status of „published‟. a) When you click Create Draft Offer Letter button from the Create Offer Letter page, the View Offer Letter page will appear with t h e s t a t u s a s D r a f t . T h e f o l l o w i n g options are available. View PDF: Clicking the View PDF link on that page will download a PDF version of the draft offer letter. Edit Offer: This option allows you to make updates and/or s a v e current offer as a draft offer or an approved offer. Delete Offer Letter: This option allows you to delete the draft offer letter. Offer letters should only be deleted if a letter has been created in error and not yet sent to an instructor. If you go back to the AR M Task View you will notice that under Offer Letter: CUPE 1/2/E, the count for Draft has been increased by the number of offer you created. Click Draft link to get to Results for Offers: CUPE -1/2/E page and you will see the record of the draft offer letter just created. Click the offer number will get you to View Offer Letter page with the view; edit and delete offer letter options. b) When you click Create Approved Offer Letter button from the Create Offer Letter page, the View Offer Letter page will appear with the status as Published. The following options are available. View PDF: Clicking the View PDF link on that page will download a PDF version of the approved offer letter. Edit Offer: This option allows you to make updates and/or s a ve current offer as a draft offer or an approved offer. Delete Offer Letter: This option allows you to delete the approved offer letter. Offer letters should only be deleted if a letter has been created in error and not yet sent to an instructor. Delete offer letter will not remove candidate from the posting assignment. . Once Offer Letter is deleted, you will not able to find the record of Offer Letter in the search results. Record Offer: This option allows you to record the received date of particular assignments that have been accepted or declined by the instructor. If an offer letter contained more than one position, you must record the acceptance/rejection of each position independently. You can also capture any assignment-specific comments in the comments box. If the offer is declined, you must remove the candidate through Posting Assignment Details p a g e , and then proceed to assign a new candidate either on the same page, or as candidates are normally assigned. It is important that units record the offer letter as it may impact a FGS funding commitments and instructor information in SIS. Once you record the response for each assignment, you need choose to Accept Offer Only or Accept Offer and Create ETF. Choose Accept Offer Only, the View Offer Letter page will appear. Under the Positions section, the status for each assignment is updated. Please note if a position is recorded as On Hold, the status for CUPE workflow of the meet will change to Offer On Hold; if a position is recorded as Declined, status for the CUPE workflow of the meet will change to No Candidate and the Instructor Name of the assignment will change to **(CUPE Posting)** where you can click to get to the Posting Assignment Details to Assign Candidate.; If a position is recorded as Accepted, the status for CUPE workflow of the meet will change to Offer Accepted and you will notice the name under the Instructor Name is in regular font style and not italicized with two leading and trailing asterisks. Please note once the Offer Letter is recorded, the Revoke Offer Letter option will not be available anymore. You can only Decline the Accepted Position from the Action column. Choose Accept Offer and Create ETF, the Create ETF Request page will appear. You will start the ETF Workflow, please follow the instruction of the corresponding documentation to complete this process. To check offer letters that have been recorded, go back to the ARM Task View you will notice that under Offer Letter: CUPE-1/2/E, the count for status as Received has been increased by the number of offer you recorded. Revoke Offer Letter: Hiring Unit can revoke the offer if the assigned Candidate changes status and does not qualify for the CUPE-1 position to void offer. User needs to be aware that if the appointment has been offered in writing and the Hiring Unit decides to cancel the appointment for reasons of insufficient enrolment, and no reasonable and equivalent alternative position is found for the assigned part-time instructor, he/she shall receive one-eighth of the salary for the position as severance pay. Please refer to collective agreement 12.16.1 for more details. Note: Offers that are extended and subsequently revoked should use this Revoke option, rather than deleting the offer. Offers should only be deleted if a letter has been created in error and not yet sent to an instructor. Click Revoke Offer Letter to bring up a dialog where you can describe why the offer has been revoked, and document that an offer has been revoked by the hiring unit, and is no longer valid. To check offer letters that have been revoked, go back to the ARM Task View you will notice that under Offer Letter: CUPE-1/2/E, the count for status as Revoked has been increased by the number of offer you revoked. Click Revoked link to get to Results for Offers: CUPE1/2/E page and you will see the record of the offer letter just revoked. Click the Offer number will get you to View Offer Letter page with the view, delete offer letter options. Once the offer is revoked, the assignment status automatically changes to No Candidate, and Candidate‟s status changes to Cancelled Because Offer Revoked. If the meet is not cancelled, user needs to go back to the Posting Assignment Details page to Assign Candidate. Comparable Criteria Using Task View and Universal Search ARM Task View ARM Universal Search Task: To Assign Candidate CUPE-1 CUPE-2 To Create a Draft Offer Letter CUPE-1 CUPE-2 To Publish an Offer Letter CUPE-1 CUPE-2 To Record an Offer CUPE-1 CUPE-2 To Revoke an Offer CUPE-1 CUPE-2 CUPE 2 Please note, before an offer letter can be created for CUPE-2, the candidate must first be assigned and a “Notice of Recommended Appointment” (NRA) must be generated and published. 1) In ARMS, click the TASK menu link to bring up the ARM Task View page. 2) In the ARM Task View you can choose the search criteria by selecting: a) Fiscal Year b) Faculty c) Department d) Term 3) Click Offer Letters: CUPE-1/2/3 from the Task list 4) Click Create an offer letter for: CUPE-2 under the Actions to get search results that meet your criteria in the Results for Candidates page. 5) Click Show link if you need to check the search criteria 6) You will see the criteria set through ARM Task View. a. Search For: Candidates b. Fiscal Year c. Faculty d. Department e. Candidate Status: CUPE-2: NRA Published You can narrow down search results even further by setting the appropriate: Course Attributes Meet Attributes Assignment Attributes Click Hide to close the search criteria. If you know the criteria to search for, you can set the criteria directly using ARM Universal Search without going through the ARM Task View. 7) On the Results for Candidates page, click the Create Offer link for the candidate whose offer letter should be generated. Please note for CUPE-2 Offer, if the Grievance Deadline has not yet passed, you can still generate an offer letter, but will be prompted with the following warning dialog. 8) Fill out the Create Offer Letter page. Please note: Not all of the fields present on this screen will be relevant for a particular offer. a) Name: CUPE resource names are provided to ARM in a “lastname, firstname” format and ARM will try to pre-populate the first and last name fields. The name field can be manually edited if corrections are required. Title (Mr., Mrs., Dr., etc.) may also be specified by the user, but the Title field is optional. b) Address: If address data is entered, then an address will be inserted into the header of the offer letter. This is optional. c) Offer Letter Date: You can pick the date that will be displayed on the offer letter; the default date is the next day of the Grievance Deadline. d) Requested Response Date: A requested response date for the offer can be specified. This is optional, and is only applicable to CUPE-2 positions. (See CUPE Articles 12.12 and 12.13) e) Notes: Any content provided in the Notes section will be inserted into the offer letter. This allows the departments to customize/personalize the content of the letter. For example, the Notes content may welcome back an instructor who had previously taught at the University, or extend a welcome to a new instructor. f) Comments: Comments are recorded in ARM and available to other ARM users, but are not displayed on the offer letter. g) Positions: By default, ARM shows all outstanding candidate assignments for a candidate within a particular faculty/session/contract type, which will be included in the offer. Particular assignments can be omitted from an offer by unchecking the checkbox for any position that should be omitted from the offer letter. 9) Once all of the relevant data has been entered on the Create Offer Letter form, you have the option to generate either a) a Draft offer letter, or b) an Approved offer letter. Any Draft or Approved Offer Letter that has been created can then be viewed, edited or deleted from the View Offer Letter page. Note: Offers should only be deleted if a letter has been created in error and not yet sent to an instructor. Please see the Revoke function below for more information. The PDF version of the draft offer letter contains a DRAFT watermark and has a status of „in progress‟. The PDF version of the approved offer letter is rendered using the York letterhead insignia and has a status of „published‟. a) When you click Create Draft Offer Letter button from the Create Offer Letter page, the View Offer Letter page will appear with the status as Draft. The following options are available. View PDF: Clicking the View PDF link on that page will download a PDF version of the draft offer letter. Edit Offer: This option allows you to make updates and/or s a v e current offer as a draft offer or an approved offer. Delete Offer Letter: This option allows you to delete the draft offer letter. Offer letters should only be deleted if a letter has been created in error and not yet sent to an instructor. If you go back to the AR M Task View you will notice that under Offer Letter: CUPE 1/2/E, the count for Draft has been increased by the number of offer you created. Click Draft link to get to Results for Offers: CUPE-1/2/E page and you will see the record of the draft offer letter just created. Click the offer number will get you to View Offer Letter page with the view, edit and delete offer letter options. b) When you click Create Approved Offer Letter button from the Create Offer Letter page, the View Offer Letter page will appear with the status as Published. The following options are available. View PDF: Clicking the View PDF link on that page will download a PDF version of the approved offer letter. Edit Offer: This option allows you to make updates and/or s a ve current offer as a draft offer or an approved offer. Delete Offer Letter: This option allows you to delete the approved offer letter. Offer letters should only be deleted if a letter has been created in error and not yet sent to an instructor. Delete offer letter will not remove candidate from the posting assignment. Once Offer Letter is deleted, you will not able to find the record of Offer Letter through Offer Letters: CUPE -1/2/E Task item in the ARM Task View. Record Offer: This option allows you to record the received date of particular assignments that have been accepted or declined by the instructor. If an offer letter contained more than one position, you must record the acceptance/rejection of each position independently. You can also capture any assignment-specific comments in the comments box. If the offer is declined, you must remove the candidate through Posting Assignment Details p a g e , and then proceed to assign a new candidate either on the same page, or as candidates are normally assigned. . Please be mindful that you will have to generate an NRA before you can create another offer letter. It is important that units record the offer letter per deadline specified under CUPE-2 collective agreement 12.13.1 and 12.13.2 Once you record the response for each assignment, you need choose to Accept Offer Only or Accept Offer and Create ETF. Choose Accept Offer Only, the View Offer Letter page will appear. Under the Positions section, the status for each assignment is updated. Please note if a position is recorded as On Hold, the status for CUPE workflow of the meet will change to Offer On Hold; if a position is recorded as Declined, status for the CUPE workflow of the assignment will change to No Candidate and the Instructor Name of the assignment will change to **(CUPE Posting)** where you can click to get to the Posting Assignment Details to Assign Candidate. If a position is recorded as Accepted, the status for CUPE workflow of the assignment will change to Offer Accepted and you will notice name under the Instructor Name is in regular font style and not italicized with two leading and trailing asterisk which means the candidate has become assigned instructors f o r t h e p a r t i c u l a r a s s i g n m e n t . Please note once the Offer Letter is recorded, the Revoke Offer Letter option will not be available anymore. You can only Decline the Accepted Position from the Action column. Choose Accept Offer and Create ETF, the Create ETF Request page will appear. You will start the ETF Workflow, please follow the instruction of the corresponding documentation to complete this process. To check offer letters that have been recorded, go back to the ARM Task View you will notice that under Offer Letter: CUPE-1/2/E, the count for status as Received has been increased by the number of offer you recorded. Revoke Offer Letter: User needs to be aware that if the appointment has been offered in writing and the Hiring Unit decides to cancel the appointment for reasons of insufficient enrolment, and no reasonable and equivalent alternative position is found for the assigned part-time instructor, he/she shall receive one-eighth of the salary for the position as severance pay. Please refer to collective agreement 12.16.1 for more details. Note: Offers that are extended and subsequently revoked should use this Revoke option, rather than deleting the offer. Offers letters should only be deleted if a letter has been created in error and not yet sent to an instructor. Click Revoke Offer Letter to bring up a dialog where you can describe why the offer has been revoked, and document that an offer has been revoked by the hiring unit, and is no longer valid. To check offer letters that have been revoked, go back to the ARM Task View you will notice that under Offer Letter: CUPE-1/2/E, the count for status as Revoked has been increased by the number of offer you revoked. Click Revoked link to get to Results for Offers: CUPE-1/2/E page and you will see the record of the offer letter just revoked. Click the Offer number will get you to View Offer Letter page with the view, delete offer letter options. Once the offer is revoked, the assignment status automatically changes to No Candidate, and Candidate‟s status changes to Cancelled Because Offer Revoked. If the meet is not cancelled, user needs to go back to the Posting Assignment Details page to Assign Candidate ETF (Employee Transaction Form) Workflow GENERATING AN ETF WHILE RECORDING AN OFFER FOR CANDIDATE In this new process users now can create an ETF request while recording an accepted offer for either a CUPE-1, CUPE-2 or some CUPE-E appointments in one single step: On the View Offer Letter Screen do the following: 1. 2. Chose the “Accept Offer and Create ETF” Once clicked the Create ETF Request screen will appear. For CUPE-E, YUFA overload and YUFA Retirees you must have assigned a candidate prior to creating the ETF request. Please note: Hiring units should record accepted offers and generate ETFs on a daily basis, as offers are received in order to avoid bottlenecks and payment delays. See “Create ETF Request” below for continued process. GENERATING AN ETF BY USING THE TASK TAB FOUND ON THE ARM APPLICATION On the ARM Task View Screen do the following: 1. 2. 3. 4. Chose the appropriate Fiscal Year, Faculty and Department. Chose ETF Workflow. Within the ETF Workflow Page, generate the ETF request either by chosen “No ETF Yet” or under Action that states Search for ETF Workflow. Once this is chosen to generate the ETF the ARM Universal Search screen will appear. See “Create ETF Request” below for continued process. CREATE ETF REQUEST On the Create ETF Request screen, you can do the following: Edit Assignment before creating an ETF request. Create one or more ETFs for a candidate that has been assigned to one or more assignments within the same department. Track External ETFs. Indicate no ETF required for a meet assignment. Skip an ETF for a particular meet assignment. EDIT ASSIGNMENT BEFORE CREATING AN ETF REQUEST To edit an assignment before creating an ETF request chose either the Course (1) or the Job Id (2). For example, this functionality may be required to edit the start and end date of an assignment. This will take you to the meet assignment screen where you will be able to edit the assignment. Please note: editing an assignment may require a Dean‟s Office approval and may require re-issuing of an NRA, offer letter, etc. 1. Edit the Assignment 2. Click Update Assignment 1. 2. Click the Create ETF Request. Once clicked this will enable the demographic, banking and emergency contract screens to appear and users will be able to complete the ETF transaction: If the candidate is a re-hire, this information will be pre-populated based on information available in PeopleSoft. Users should review this information for accuracy and make required changes. If the information is not provided, users can enter the information, please note that if you provide the employee number or social insurance number it will pull any information from PeopleSoft and compare if this is the same candidate. Once information has been inputted, save the record and a confirmation screen will appear: A user can view a printable copy of the ETF from the above confirmation screens. Once confirmed, ARM will be updated: The ETF Type, Rec’d by CUPE Hiring and PeopleSoft Status will be updated as the moves through the process. Note: The new system will handle changes to ETFs in the same way as it does today. If a change is made prior to an upload to PeopleSoft, users can make the change and re-submit the ETF request. If a change is required after the upload to PeopleSoft, users will need to print the ETF and make manual changes to the printed document and submit the paperwork to payroll; e.g. maternity/parental leaves, cancelled contracts, etc.