1
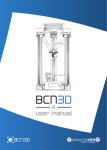
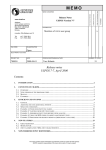
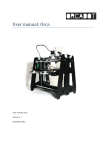
Pangu I3-C 3D Printer user manual
RP3D technology co.ltd
Select rp3d technology co.ltd , play 3D printing!
http://www.rp3d.com
2014/6/4
V1.0
Shenzhen RP3D Technology Co.Ltd
Tele: 0755-28700806
PanguI3-C user manualV1.0
Pangu I3-C 3D Printer user manual
By: William(e-mail: [email protected])
CATALOG
catalog.......................................................................................................................................................................... 1
一、Preface.................................................................................................................................................................. 4
1.Introduction................................................................................................................................................... 5
2.Main parameters........................................................................................................................................... 6
3. Main improvements........................................................................................................................................ 6
二、Packing list........................................................................................................................................................... 7
1. Open the box.................................................................................................................................................... 7
2.Pangu I3-C BOM.............................................................................................................................................7
3.Printed Parts................................................................................................................................................ 10
4.Pangu I3-C Tool box.................................................................................................................................... 12
三、Assembly 3D printer......................................................................................................................................... 14
1. Assemble the Y axis....................................................................................................................................... 14
1.1Assemble the Y axis base ................................................................................................................... 14
1.2 Install the Y axis motor....................................................................................................................... 17
2. Assemble pmma-frame ............................................................................................................................. 18
2.1 Install Printed Parts of pmma-frame ............................................................................................ 19
2.2 Install the Z axis motor and couplings.............................................................................................. 21
1
Shenzhen RP3D Technology Co.Ltd
Tele: 0755-28700806
PanguI3-C user manualV1.0
2.3 Fixed pmma-frame..............................................................................................................................22
3. Assemble the hot bed.................................................................................................................................... 23
3.1 Assembly hot bed accessories............................................................................................................ 23
3.2 Connect hot bed and the Y axis base................................................................................................. 25
3.3 Install the Y axis belt........................................................................................................................... 26
4. Assemble the X axis....................................................................................................................................... 28
4.1 Assemble K-Extruder......................................................................................................................... 28
4.2 Assemble the X axis motor-holder and End_Idler............................................................................ 34
4.3 Assemble the X belt............................................................................................................................. 39
5. Assemble the Z axis....................................................................................................................................... 40
5.1 Install the Z axis Smooth rods AND threaded rods.......................................................................... 40
6. Install the End_stops..................................................................................................................................... 41
6.1 :Install the X axis End_stops............................................................................................................ 42
6.2:Install the Y axis End_stops............................................................................................................. 42
6.1.3:Install the Z axis End_stops.......................................................................................................... 42
7. Fixed power supply....................................................................................................................................... 43
8. Fixed PCB....................................................................................................................................................... 44
9. install the Filament_holder........................................................................................................................... 45
10. Connect the 3 d printer............................................................................................................................... 46
10.1 wiring of The Z axis motor Z............................................................................................................ 46
2
Shenzhen RP3D Technology Co.Ltd
Tele: 0755-28700806
PanguI3-C user manualV1.0
10.2 wiring OF 3 d printer....................................................................................................................... 46
10.3 PCB wiring PCB................................................................................................................................. 47
10.4 The power supply wiring................................................................................................................. 47
四、 install the Software.......................................................................................................................................... 48
1. install RepetierHost...................................................................................................................................... 48
2. install driver...................................................................................................................................................52
2.1 On the desk , right-click “my computer” choose “device manager” , Enter the device
management interface.............................................................................................................................. 52
2.2 CHOOSE USB CompoSite Device , RIGHT-CLICK, CompoSite Device........................................... 52
3. parameters setting........................................................................................................................................ 54
3.1 On the desk , double-click RepetierHost.exe , enter RepetierHost_0.95F user interface............ 54
3.2 click print setting , select “115200 Baud Rate”, click “user Ping-Pong communication............ 54
3.3 set the default extrusion head , hot bed temperature...................................................................... 55
3.4 click “printer form” set the printer actually print area................................................................... 55
3.6 click “Print Settings”setting layers thickness..............................................................................56
3.8 print speed setting............................................................................................................................. 57
五、test 3D printer 3D..............................................................................................................................................61
1.suppressed zero.......................................................................................................................................... 61
2. test prints...................................................................................................................................................... 66
六、3D print 3D........................................................................................................................................................ 68
3
Shenzhen RP3D Technology Co.Ltd
Tele: 0755-28700806
PanguI3-C user manualV1.0
1. use PC print.................................................................................................................................................... 68
2. use SD card print........................................................................................................................................... 71
七、related matters.................................................................................................................................................. 73
八、Contact us........................................................................................................................................................... 74
一、PREFACE
Thank you for purchasing Pangu I3 product series-Pangu I3-A 3D printer.It is a wood-frame, base, extruder ,
heated bed assembled.Before purchase, please look rp3d manufacturers -Shenzhen rp3d technology co.ltd.
rp3d technology co.ltd is the first professional 3D printer and peripheral products development , production
and sales of technology limited company in Shenzhen.The company has a strong technical force and strong
product quality, we can provide you with a 3D printer for professional services.
Select rp3d technology co.ltd , play 3D printing!
4
Shenzhen RP3D Technology Co.Ltd
Tele: 0755-28700806
PanguI3-C user manualV1.0
1.INTRODUCTION
The Pangu I3-C is an improvement of the prusa i3, with the Melzi electronics and K extruder. It
belongs to series of Pangu I3 and was released in May 2014.
2.MAIN PARAMETERS
Host software: Repetier-host or Pronterface
Firmware: All of the Pangu I3-C’s firmware has finished packing, you need not prepare any
firmware.
Build volume: 210x200x195mm, Overall size:440x420x380mm
Printing materials: ABS、PLA、 3mm or 1.75mm diameter thermoplastic.
Build surface: PCB-heated bed to reduce complexity of assembly and to ensure parts do not warp.
5
Shenzhen RP3D Technology Co.Ltd
Tele: 0755-28700806
PanguI3-C user manualV1.0
Computer interface: USB
Motion: Linear ball bearings on X and Y and Z axes
Pre-soldered electronics with built-in microSD card slot for standalone printing.
Enhancements to the printed parts to improve the ease of assembly.
3. MAIN IMPROVEMENTS
The following is a list of the main improvements made on the original Prusa :
This is a frame created from PMMA, with a thickness of 5 mm / 0.197 inch.
Enhanced frame rigidity , easy to assembly.
Increase frame vertex foot ,Heated bed move more flexible
All are linear bearings
Square M3 Nuts(new improvements from 2014.1.9)
Preassembled MK2 Heated bed and K Extruder
The belts were GT2 belts and professional belt pulleys
GT2The belts were GT2 belts and professional belt pulleys
Professional Couplings
The Z axis is M6 threaded rod
X ends were redesigned for M6 threaded rod and the X endstop
二、PACKING LIST
1. OPEN THE BOX
Use a knife to open the Pangu I3-C boxes in which are boxes/packages .
6
Shenzhen RP3D Technology Co.Ltd
Tele: 0755-28700806
PanguI3-C user manualV1.0
2.PANGU I3-C BOM
Item
Description
Qty.
Unit.
Remark.
1
Extruder
1
Kit
Pre-assembled K Extruder with Nozzle
and Fan.
2
Heated bed
1
Kit
Pre-assembled Mk2b with glass and
Thermistors.
3
Power supply
1
PCS
Mean well NES-200-12
4
Melzi Electronics
1
PCS
Firmware is ready
5
PMMA-Frame
1
Kit
Drawing number: 20140306
6
Printed parts
1
Kit
For Pangu I3-C.
7
M6 threaded rods
2
PCS
About 295mm, for Z.
8
M8 threaded rods
4
PCS
About 215mm, for base、Filament
9
M8 threaded rods
3
PCS
About 290mm, for base、Filament
10
M8 threaded rods
2
PCS
About 415mm, for base.
11
Ø8 Smooth rods
2
PCS
About 384mm, for X axis.
7
Shenzhen RP3D Technology Co.Ltd
Tele: 0755-28700806
PanguI3-C user manualV1.0
12
Ø8 Smooth rods
2
PCS
About 405mm, for Y axis.
13
Ø8 Smooth rods
2
PCS
About 320mm, for Zaxis.
14
Nylon spacer
4
PCS
For the Melzi Electronic
15
Winding tube
4
M
For finishing wires
16
625 Bearing
4
PCS
For XY idler
17
Linear Bearings
10
PCS
18
Motor
4
PCS
LM8UU, Pre-assembled into the
printed parts
LM8UU 轴承,已安装在打印件内
X、Y axis with one ,Z axis two
19
Couplings
2
PCS
With hollow screws, 2kits
20
Belt
2
M
GT2-6mm,X、Y axis with one meter.
21
Pulley
2
PCS
For X and Y, with hollow screws.
22
Endstops
3
PCS
With wires
23
USB cable
1
PCS
Used to connect the computer.
24
wire connector
2
PCS
25
Zip tie
20
PCS
26
Power line
1
PCS
27
Red and black wire
2
PCS
28
M5 nut
2
PCS
Connect the power and Melzi
Electronics.
连接电源和 Melzi 电路板
For X、Y axis idler
29
M5*20 bolt
2
PCS
For X、Y axis idler
30
M4*20 bolt
2
PCS
To fix the extruder on the X carriage
31
M4 nut
2
PCS
To fix the extruder on the X carriage
32
M4*10 bolt
4
PCS
For Z axis motor wires series
connection
Z 轴马达串联接线
Connect the power supply
To fix the power supply on the PMMAframe
固定电源在亚克力板框架上
8
Shenzhen RP3D Technology Co.Ltd
Tele: 0755-28700806
PanguI3-C user manualV1.0
33
M8*30 washer
4
PCS
To fix the PMMA-frame and the base
34
M8 Locknut
10
PCS
For base.
35
M8 nut
28
PCS
For base.
36
M8 washer
38
PCS
For base.
37
M3*10 bolt
6
PCS
38
M3*12 bolt
8
PCS
39
M3*16 bolt
24
pcs
40
M3*20 bolt
4
PCS
To fix the X motor.
41
M3 nut
14
PCS
To fix the PMMA-frame.
42
M3 Locknut
4
PCS
To fix the Melzi Electronics.
43
M3 nut
16
PCS
To fix the PMMA-frame
44
M3 flat washer
30
PCS
To fix the PMMA-frame.
45
M3 spring washer M3
10
PCS
To fix the PMMA-frame
46
M3*25bolt
1
PCS
Z-axis end stop is triggered by it.
47
M2 *16 bolt
6
PCS
To fix the end stop.
48
M2 nut
6
PCS
To fix the end stop.
49
M6 nut
2
PCS
For Z axis M6 threaded rods.
50
Big spring
1
PCS
For extruder spare springs
To fix the Z axis motorto and the
PMMA-frame
To fix the Y axis motor and Melzi
Electronics.
To fix the Z axis motorto and the
PMMA-frame
3.PRINTED PARTS
The [pangu i3B stl] for the pangu I3-Chas all the STL files you need in order to make the printer.
The following is a list of what needs to be printed:
9
Shenzhen RP3D Technology Co.Ltd
Item
Photo
0
Printed Parts
Tele: 0755-28700806
STL name
PanguI3-C user manualV1.0
Qty.
RP3D P/N
02020000
1
Y_Idler.stl
1
02020001
2
Y_Motor_Mount.stl
1
02020002
3
Y_Busing.stl
3
02020003
4
Endstop_Holder.stl
2
02020004
5
Y_Belt_Clamp.stl
1
02020005
6
X-End_Motor.stl
1
02020006
7
X_End_Idler.st
1
02020007
8
X_Carriage_Belt_Clamp.st
l
1
02020008
9
X_Carriage.stl
1
02020009
10
Bar-clamp .stl
2
02020010
11
K_Extruder_base.stl
1
02020011
10
Shenzhen RP3D Technology Co.Ltd
Tele: 0755-28700806
PanguI3-C user manualV1.0
12
K_Extruder_
Spring_Holder.stl
1
02020012
13
K_Extruder_
Bearing_Holder.stl
1
02020013
14
Y_Corners.stl
4
02021001
15
Filament_holder.stl
2
02023001
16
Z-axis-bottom-cut1
1
02023002
17
Z-axis-bottom-cut2
1
02023003
11
Shenzhen RP3D Technology Co.Ltd
Tele: 0755-28700806
PanguI3-C user manualV1.0
4.PANGU I3-C TOOL BOX
Item
Name
Qty.
Unit.
Specification.
1
Hexagon wrench
1
PCS
1.5mm
2
Hexagon wrench
1
PCS
2.0mm
3
Hexagon wrench
1
PCS
2.5mm
4
Watch opener
1
SET
5
High-temperature adhesive
tape
1
Spool
5mm
6
High-temperature adhesive
tape
1
Spool
50mm
7
Three pieces of wood carving
knife
1
SET
8
Tape
1
PCS
9
Cutting nipper
1
PCS
10
Nipper pliers
1
PCS
11
Open spanner
1
SET
12
Nipper
1
PCS
13
Grease
1
bottle
1.5m
Only in China
12
Shenzhen RP3D Technology Co.Ltd
Tele: 0755-28700806
PanguI3-C user manualV1.0
2GB,with fat file system,
support off-line print, user
manual, driving
programm, STL,
control software inside.
14
SD card
1
PCS
15
Card Reader
1
PCS
16
USB wire
1
PCS
Included in the list of I3CBOM
17
Zip tie
20
PCS
Included in the list of I3CBOM
18
Winding tube
4
M
Included in the list of I3CBOM
19
Clip
4
PCS
Have been assembled in
the heated bed.
20
Leather working gloves
1
SET
21
Filament
3
M
22
Drill bit
1
PCS
0.4mm
23
Drill bit
1
PCS
3mm
24
Back-up screws and nuts
1
BAG
ABS Ø3mm
13
Shenzhen RP3D Technology Co.Ltd
Tele: 0755-28700806
PanguI3-C user manualV1.0
三、ASSEMBLY 3D PRINTER
Before you begin
This document will guide you through putting together your Pangu I3-C3D Printer. Please read it
through briefly before starting your build, and make sure you have everything you need to continue. It’s
frustrating to be stuck with a half-finished machine because you are missing a part or tool.
1. ASSEMBLE THE Y AXIS
1.1ASSEMBLE THE Y AXIS BASE
Things needed:
English
1 x Y-motor-bracket
1 x Y-Idler
4 x Y-corner
22 x M8 nuts
12 x M10 nuts
22x M8 washers
4x M10*30 washers
8x M10 washers
4 x M8 215mm threaded rod
2 x M10 415mm threaded rod
14
Shenzhen RP3D Technology Co.Ltd
Tele: 0755-28700806
PanguI3-C user manualV1.0
1.1.1 STEP ONE : ASSEMBLE THE Y_MOTOR_MOUNT
1.1.2 STEP TWO : ASSEMBLE THE Y_CORNER
1.1.3 STEP THREE : TIGHTEN THE NUT , FIXED FRAME FOOT ,TO ENSURE THAT THE GASKET IN THE
TWO-FOOT DISTANCE IS 150MM
15
Shenzhen RP3D Technology Co.Ltd
Tele: 0755-28700806
PanguI3-C user manualV1.0
1.1.4 STEP FOUR :ASSEMBLE THE Y-IDLER
1.1.5 STEP FIVE : ASSEMBLE THE Y-CORNER
1.1.6 STEP SIX : FIXED FRAME FOOT ,TO ENSURE THAT THE GASKET IN THE TWO-FOOT DISTANCE IS
150MM , TIGHTEN THE NUT.
1.1.7 STEP SEVEN : USE TWO M10*415MM THREADED RODS TO CONNECT THE ASSEMBLED
Y_CORNER
16
Shenzhen RP3D Technology Co.Ltd
Tele: 0755-28700806
PanguI3-C user manualV1.0
1.1.8 STEP EIGHT : ADJUST THE DISTANCE FROM FRONT- BACK OF Y_CORNER , MAKE THEM TO PUT IN
THE SMOOTH RODS JUST TWO Ø8*405MM ,TIGHTEN THE NUT
1.2 INSTALL THE Y AXIS MOTOR
Things needed:
English
1 x Y-motor
1 x Pulley
2 x M3*4 Jackscrew
2 x M3*10 bolts
17
Shenzhen RP3D Technology Co.Ltd
Tele: 0755-28700806
PanguI3-C user manualV1.0
1.2.1 STEP ONE: INSERT PULLEY IN Y-MOTOR
hole perpendicular D surface
1.2.2 STEP TWO : SCREW THE JACKSCREW INTO BOLT’S HOLE, ONE OF A BOLT HOLE PERPENDICULAR
MOTOR D SURFACE
Tighten jackscrew
1.2.3 STEP THREE : USE BOLT TO ASSEMBLE THE ASSEMBLED MOTOR AND FIXED ON Y_MOTOR_MOUNT
( MOTOR DIRECTION AS FOLLOWING PICTURE)
tighten the bolt
2. ASSEMBLE PMMA-FRAME
18
Shenzhen RP3D Technology Co.Ltd
Tele: 0755-28700806
PanguI3-C user manualV1.0
2.1 INSTALL PRINTED PARTS OF PMMA-FRAME
Things needed:
English
1 x PMMA-frame
1 x Z-axis-bottom-cut1
1 x Z-axis-bottom-cut2
16 x M3*16 nuts
16 x M3*16 bolts
6 x M3*12 bolts
6 x M3*10bolts
6 x M3 nuts
2.1.1 STEP ONE : THE FRAME AND SIDE EDGES, COVER CONNECTED TO THE M3 SQUARE NUTS (SEE THE
FOLLOWING PICTURE)
19
Shenzhen RP3D Technology Co.Ltd
Tele: 0755-28700806
PanguI3-C user manualV1.0
2.1.2 STEP TWO: ASSEMBLE THE BOTTOM PRINTING 1 (BEFORE ASSEMBLE PLEASE CHOOSE THE
APPROPRIATE DRILLBIT A HOLE THROUGH IT PRINTS)
2.1.3 STEP THREE : ASSEMBLE THE BOTTOM PRINTING 2
20
Shenzhen RP3D Technology Co.Ltd
Tele: 0755-28700806
PanguI3-C user manualV1.0
2.2 INSTALL THE Z AXIS MOTOR AND COUPLINGS
Things needed:
English
2 x Z-motor
2x Couplings
6 x M3*10 bolts
6x M3 washers
10x M3 spring washer
1 2.2. STEP ONE: ASSEMBLE THE ELECTRIC MOTOR 1
tighten the bolt
21
Shenzhen RP3D Technology Co.Ltd
Tele: 0755-28700806
PanguI3-C user manualV1.0
2.2.2 : STEP TWO: ASSEMBLE THE ELECTRIC MOTOR 2
tighten the bolt
2.2.3 STEP THREE : ASSEMBLE THE COUPLINGS, JACKSCREW PERPENDICULAR D SURFAC
tighten the bolt
2.3 FIXED PMMA-FRAME
Things needed:
English
1 x Assembly Y-base
2x Assembly Alu-frame
2.3.1 STEP ONE : PUT THE BASE INTO THE WOOD FRAME, ENSURE THAT THE DISTANCE BETWEEN THE
TWO GASKET FOR 110MM, TIGHTEN THE SCREW
22
Shenzhen RP3D Technology Co.Ltd
Tele: 0755-28700806
PanguI3-C user manualV1.0
Tighten the nut
3. ASSEMBLE THE HOT BED
3.1 ASSEMBLY HOT BED ACCESSORIES
Things needed:
English
1 X 220*200*5mm glass
1X 220*200*3mm PMMA
1 X Hot-bed-PCB
1 XAlu- base-board
3X Y_Busing
1 X Y_Belt_Clamp
12 X M3 nuts
8 X M3*16 bolts
2 X M3*12 bolts
4X M3*25 bolts
8x M3 washers
23
Shenzhen RP3D Technology Co.Ltd
Tele: 0755-28700806
PanguI3-C user manualV1.0
4x Ø6*25 Spring
3.1.1 STEP ONE : INSTALL THE HOT BED PRINTING
tighten the bolt
3.1.2 : STEP TWO : INSTALL THE HOT BED TEMPERATURE PROBE
3.1.3 STEP THREE : FIXED HOT BED PCB BOARD AND PMMA BOARD
tighten the bolt
24
Shenzhen RP3D Technology Co.Ltd
Tele: 0755-28700806
PanguI3-C user manualV1.0
3.1.4 STEP FOUR : USE NIPPER TO FIXED GLASS, CONNECT THE WINDING TUBE
3.2 CONNECT HOT BED AND THE Y AXIS BASE
Things needed:
English
1 X assembled-hotbed
1X assembled –Y base
2 X Ø8 Smooth rods
4X Zip tie
3.2.1 STEP ONE : PUT SMOOTH ROD THOUGH HOT BED LINEAR BEARINGS, INSERT Y BASE
25
Shenzhen RP3D Technology Co.Ltd
Tele: 0755-28700806
PanguI3-C user manualV1.0
3.2.2 STEP TWO : USE ZIP TIE TO FIXED SMOOTH ROD
3.3 INSTALL THE Y AXIS BELT
Things needed:
English
1X GT2-6mm belt
26
Shenzhen RP3D Technology Co.Ltd
Tele: 0755-28700806
PanguI3-C user manualV1.0
3.3.1 STEP ONE : ADJUST Y_MOTOR_MOUNT AND Y-IDLER’S POSITION, MAKE IT IN THE SAME DIRECTION
WITH HOT BED BELT_CLAMP
Bottom view
3.3.2 STEP TWO : STUCK THE BELT ON THE BELT_CLAMP, TIGHTEN THE NUT
27
Shenzhen RP3D Technology Co.Ltd
Tele: 0755-28700806
PanguI3-C user manualV1.0
4. ASSEMBLE THE X AXIS
4.1 ASSEMBLE K-EXTRUDER
1.Things needed:
Assemble the 623zz bearing
English
1 x K-Extruder-Bearing-Holder
1 x 623zz bearing
1 x M3x16 flat head screw
1 x M3 Washer
1 X M3 Spring Washer
1 x M3 nut
4.1.1 STEP ONE : ASSEMBLE THE 623ZZ BEARING
tighten the bolt
2.Things needed:
Install the driving gear
English
1 x Motor
1 x extruder driving gear
1 x M3x4 Hollow-lock socket set screw
28
Shenzhen RP3D Technology Co.Ltd
Tele: 0755-28700806
PanguI3-C user manualV1.0
4.1.2 STEP TWO : INSTALL THE DRIVING GEAR
Insert the gear on the mostors axis, make sure the distance from the gear to the motor is 6.25mm.
tighten the bolt
3.Things needed:
install the extruder spring holder
English
1 x extruder spring holder
1 x M3x16 screw
4.1.3 STEP THREE : INSTALL THE EXTRUDER SPRING HOLDER
Fix the spring holder with a M3x16 bolt.
tighten the bolt
4.Things needed:
install the extruder bearing holder
English
1 x M3x16 screw
29
Shenzhen RP3D Technology Co.Ltd
Tele: 0755-28700806
PanguI3-C user manualV1.0
4.1.4 STEP FOUR : INSTALL THE EXTRUDER BEARING HOLDER
Fix the bearing hoder with a M3x16 bolt.
tighten the bolt
5.Things needed:
Install the extruder spring
English
2 x extruder spring
4.1.5 STEP FIVE : INSTALL THE EXTRUDER SPRING HOLDER
Put the spring between the spring holder and the bearing holder. Maybe you need parallel 2 PCS spring to
push the filament on the gear.
6.Things needed:
Install the extruder spring
English
2x M3x16 screws
30
Shenzhen RP3D Technology Co.Ltd
Tele: 0755-28700806
PanguI3-C user manualV1.0
4.1.6 STEP SIX : INSTALL THE EXTRUDER FAN
Fix the fan with the M3x16 screws. Please note the label of the fan face to the holder.
7.Things needed:
Install the X-Carriage
English
1 x k-Extruder–Motor-Holder
1 x X-Carriage
2 x M3x16 screws
2 x M3 nuts
1 x M3x14 screws
1 x X-Carriage-Belt-Clamp
4.1.7 STEP SEVEN : INSTALL THE X-CARRIAGE
Fix the X-Carriage with the M3x16 screws. Please note the back of the X-Carriage face to the extrudermotor-holder. Fix the X-Carriage with the M3x14 screws. The screw don’t need to tighten.
31
Shenzhen RP3D Technology Co.Ltd
8.Things needed:
Tele: 0755-28700806
PanguI3-C user manualV1.0
Install the extruder motor
English
2 x M3x30 screws
2 x M3 washer
2 x M3 spring washer
4.1.8 STEP EIGHT : INSTALL THE EXTRUDER MOTOR
tighten the bolt
9.Things needed:
Assemble the J head nozzle
English
1x J-Head Nozzle
1 x Nozzle Holder
1 x Heat Cartridge
1 x PTFE liner
1 x Thermistor
1 x Hollow-lock socket set screw
2 x PTFE tube 0.5mm
2 x Wire to wire terminal
2 x 60cm wires for thermistor
32
Shenzhen RP3D Technology Co.Ltd
Tele: 0755-28700806
PanguI3-C user manualV1.0
4.1.9 STEP NINE : ASSEMBLE THE J HEAD NOZZLE
It is the MKII. Please refer to for more information. It include the nozzle, nozzle holder, ptfe tube, heater,
sensor and so on.
J head nozzle assembling picture
J head nozzle image photo
4.1.10 STEP TEN : ASSEMBLE THE K-EXTRUDER
10.Things needed:
assemble the K-extruder
English
和挤出机
2 x M3x30 screw
tighten the bolt
33
Shenzhen RP3D Technology Co.Ltd
Tele: 0755-28700806
PanguI3-C user manualV1.0
4.2 ASSEMBLE THE X AXIS MOTOR-HOLDER AND END_IDLER
1.Things needed:
Assemble the line bearing
English
1xEnd-Motor-holder
2x line bearing
4.2.1 STEP ONE : ASSEMBLE THE LINE BEARING
Put in bearing
2.Things needed:
Assemble X motor
English
1 x motor
1x Pulley
2 x M3*4 Jackscrew
4.2.2 STEP TWO : ASSEMBLE THE END_IDLER
Insert the End_Idler into motor , one of the bolt hole perpendicular D surface
34
Shenzhen RP3D Technology Co.Ltd
Tele: 0755-28700806
PanguI3-C user manualV1.0
hole perpendicular D surface
Tightening the jackscrew into the bolt’s hole . Tighten the jackscrew.
Tighten the jackscrew.
3.Things needed:
assemble the X-motor
English
1 x Motor (step2)
1 x End-Motor-holder (step1)
4 x M3x20 flat head screw
1 x M6 nut
4.2.3 STEP THREE : ASSEMBLE THE X-MOTOR
Put the motor into the X-motor holder’s hole , tighten the bolt.
tighten the bolt
35
Shenzhen RP3D Technology Co.Ltd
4.Things needed:
Tele: 0755-28700806
PanguI3-C user manualV1.0
assemble the X_End_Idler line bearing.
English
1x X_End_Idler
2x line bearing
4.2.4 STEP FOUR : ASSEMBLE THE X_END_IDLER LINE BEARING.
Put in bearing
5.Things needed:
assemble the 623zz bearing
English
1x X_End_Idler (step4)
2x 623zz bearing
1x M5*20 nuts
1x M5 nuts
4.2.5 STEP FIVE : ASSEMBLE THE 623ZZ BEARING
Put the two bearing into the following picture’s position , insert the screw , tighten the nut.
36
Shenzhen RP3D Technology Co.Ltd
Tele: 0755-28700806
6.Things needed:
PanguI3-C user manualV1.0
assemble the nut
English
2x M6 nut
1 x X_End_Idler (step5)
1 x End-Motor-holder (step3)
4.2.6 STEP SIX : ASSEMBLE THE NUT
Put two M6 nut into the X_End_Idler and the X_ End-Motor-holder’s hole, in order to avoid the nut falling off,
please use 502 glue around the edges , take care to avoid the glue inflow to the threads.
X_Motor_Mount.
7.Things needed:
X_End_Idler
assemble the X –axis
English
2x Ø8*400mm Smooth rods
1 x X_End_Idler (step6)
1 x End-Motor-holder (step6)
1x K Extruder (step4.1)
4.2.7 STEP SEVEN : ASSEMBLE THE X –AXIS
insert two smooth rods into the End_Idler ‘s two holes.
37
Shenzhen RP3D Technology Co.Ltd
Tele: 0755-28700806
PanguI3-C user manualV1.0
4.2.8 STEP EIGHT: PUT IN THE K-EXTRUDER ALONG THE SMOOTH
4.2.9 STEP NINE : PUT IN THE END_IDLE ALONG THE SMOOTH RODS
4.2.10 STEP TEN : ADJUSTING THE DISTANCE BETWEEN THE CENTER OF THE TWO BEARING
After installed, Adjusting the distance between the center of the two bearing for 361mm.
38
Shenzhen RP3D Technology Co.Ltd
Tele: 0755-28700806
PanguI3-C user manualV1.0
4.3 ASSEMBLE THE X BELT
1.Things needed:
Assemble the line bearing
English
1x Belt 1m/pcs
4.3.1 INSTALL THE BELT.
Use the Belt_Clamp to clamping the belt, please note the belt to straighten ,not too loose.
39
Shenzhen RP3D Technology Co.Ltd
Tele: 0755-28700806
PanguI3-C user manualV1.0
5. ASSEMBLE THE Z AXIS
5.1 INSTALL THE Z AXIS SMOOTH RODS AND THREADED RODS
Things needed:
English
1x assembled frame
1x assembled X –axis
1x Ø8 *320 mm Smooth rods
1x M6*295mm threaded rods
5.1.1 STEP ONE : FIXED THE TWO SMOOTH RODS
The Smooth rods through the top frame printing , X- line bearing, and the bottom frame printing; Smooth
rods flush with the top frame printing, and require X –axis should move up and down smoothly.
40
Shenzhen RP3D Technology Co.Ltd
Tele: 0755-28700806
PanguI3-C user manualV1.0
5.1.2 STEP TWO : FIXED THE TWO THREADED RODS
Twist the threaded rods to make it through the M6 nut and Couplings tighten the jackscrew.
tighten the jackscrew.
6. INSTALL THE END_STOPS
Things needed:
English
3 x End_stops with wires
6x M2 *16 Bolts
6 x M2 nuts
6.1 :INSTALL THE X AXIS END_STOPS
41
Shenzhen RP3D Technology Co.Ltd
Tele: 0755-28700806
PanguI3-C user manualV1.0
6.2:INSTALL THE Y AXIS END_STOPS
6.1.3:INSTALL THE Z AXIS END_STOPS
7. FIXED POWER SUPPLY
Things needed: 所需零件:
English
1x Power
3x M3 *10 Bolts (1st Power )
3x M4 *10 Bolts (2nd Power)
42
Shenzhen RP3D Technology Co.Ltd
Tele: 0755-28700806
PanguI3-C user manualV1.0
Put the power supply in the back of Motor_Mount’s wood frame, tighten the bolts.
tighten the bolt
8. FIXED PCB
Things needed:
English
1x Power
4x Nylon spacer
4x M3 *16 Bolts
4x M3 nuts
Put the PCB into the correspond hole , add a Nylon spacer, screw the bolt , and tighten the nut, Please
note the PCB direction.
43
Shenzhen RP3D Technology Co.Ltd
Tele: 0755-28700806
PanguI3-C user manualV1.0
tighten the bolt
9. INSTALL THE FILAMENT_HOLDER
Things needed:
English
2x Bar-clamp
2x Filament-holder
3x M8 *290 threaded rods
4x M8 nuts
4x M8 washer
44
Shenzhen RP3D Technology Co.Ltd
Tele: 0755-28700806
PanguI3-C user manualV1.0
Follow the following picture to install the filament_holder, make sure filament is not be touched
10. CONNECT THE 3 D PRINTER
10.1 WIRING OF THE Z AXIS MOTOR Z
After connected, put the Pressure line on wire connector, compressed with piler
45
Shenzhen RP3D Technology Co.Ltd
Tele: 0755-28700806
PanguI3-C user manualV1.0
10.2 WIRING OF 3 D PRINTER
One thousand individuals have one thousand kinds of wiring connection. Wiring principle: we must have
enough travel, but also beautiful, simple operation
back
front
10.3 PCB WIRING PCB
Connect wire from left to right: X_motor line ---Y_motor line----Z_motor line---E_motor line---power supply
line---hot bed line---fan line---X_endstops line---Y_endstops line---Z_endstops line ---hot bed temperature
probe line---extruder temperature probe line. Connect wire follows color.
10.4 THE POWER SUPPLY WIRING
46
Shenzhen RP3D Technology Co.Ltd
Tele: 0755-28700806
PanguI3-C user manualV1.0
Connect the power supply blue—N brown—L
Connect the red and black wire red—V+ black—V-
四、 INSTALL THE SOFTWARE
1. INSTALL REPETIERHOST
There is RepetierHost_V0.84 software installer and user manual on the SD card, which wrote details. V0.84
version is stability, good compatibility, it is recommended to use the V0.84 version. Considering user will
upgrade using, xiao bian here to give you an example with WIN7 32 system to introduce
RepetierHost_0.95F’s install.
Way 1 : You can click RepetierHost_V0.84 menu----help window----check upgrade
RepetierHost.
then upgrade
47
Shenzhen RP3D Technology Co.Ltd
Tele: 0755-28700806
PanguI3-C user manualV1.0
Way 2 : you can insert website : http://www.repetier.com/download/ download the latest
epetierHost to the software install catalog.
SETUP ONE: DOUBLE CLCK SETUPREPETIERHOST_0_95.EXE , ENTER THE SETUP INTERFACE.
SETUP TWO: CLICK NEXT
48
Shenzhen RP3D Technology Co.Ltd
Tele: 0755-28700806
PanguI3-C user manualV1.0
SETUP THREE: SELECT AGREEMENT
SETUP FOUR: SELECT FILE SETUP CATALOG
SETUP FIVE: CLICK NEXT
49
Shenzhen RP3D Technology Co.Ltd
Tele: 0755-28700806
PanguI3-C user manualV1.0
SETUP SIX: CLICK NEXT
SETUP SEVEN: CLICK INSTALL
安装 8. 等待安装完成后,点”完成”。
SETUP EIGHT: WAIT FOR THE INSTALLATION IS COMPLETED, CLICK "FINISH"
50
Shenzhen RP3D Technology Co.Ltd
Tele: 0755-28700806
PanguI3-C user manualV1.0
2. INSTALL DRIVER
2.1 ON THE DESK , RIGHT-CLICK “MY COMPUTER” CHOOSE “DEVICE MANAGER” , ENTER
THE DEVICE MANAGEMENT INTERFACE.
2.2 CHOOSE USB COMPOSITE DEVICE , RIGHT-CLICK, COMPOSITE DEVICE.
2.3 IN THE DIALOG WINDOW SELECT DRIVER SOFTWARE
51
Shenzhen RP3D Technology Co.Ltd
Tele: 0755-28700806
PanguI3-C user manualV1.0
2.4 SELECT FIDI USB DRIVERS , CLICK NEXT
2.4 WAIT FOR FINISHED SETUP , CLOSE
52
Shenzhen RP3D Technology Co.Ltd
Tele: 0755-28700806
PanguI3-C user manualV1.0
3. PARAMETERS SETTING
3.1 ON THE DESK , DOUBLE-CLICK REPETIERHOST.EXE , ENTER REPETIERHOST_0.95F USER
INTERFACE.
3.2 CLICK PRINT SETTING , SELECT “115200 BAUD RATE”, CLICK “USER PING-PONG
COMMUNICATION
53
Shenzhen RP3D Technology Co.Ltd
Tele: 0755-28700806
PanguI3-C user manualV1.0
3.3 SET THE DEFAULT EXTRUSION HEAD , HOT BED TEMPERATURE
Click “printer” , select “ task interruption then close motor (ABS 230/110 ℃ PLA 190/60 ℃)
3.4 CLICK “PRINTER FORM” SET THE PRINTER ACTUALLY PRINT AREA.
54
Shenzhen RP3D Technology Co.Ltd
Tele: 0755-28700806
PanguI3-C user manualV1.0
3.5 CLICK “CODE GENERATOR ”, SELECT CONFIGURE PARAMETER DEVICE
3.6 CLICK “PRINT SETTINGS”SETTING LAYERS THICKNESS
pangu 0.5mm nozzle and filament 3mm ABS for material.
55
Shenzhen RP3D Technology Co.Ltd
Tele: 0755-28700806
PanguI3-C user manualV1.0
3.7 INFILL PROPORTION SETTING
“ “1” for 100% solid fill , “0.5” for 50% solid fill.
3.8 PRINT SPEED SETTING
The speed for 30mm/s is the safest.
56
Shenzhen RP3D Technology Co.Ltd
Tele: 0755-28700806
PanguI3-C user manualV1.0
3.9 SKIRT AND BRIM SETTING.
3.10 SUPPORT MATERIAL .SETTING.
Check there is support, not checked without support.
57
Shenzhen RP3D Technology Co.Ltd
Tele: 0755-28700806
PanguI3-C user manualV1.0
3.11 AFTER PRINT SET , SAVE IT.
3.12 FILAMENT SETTING
Select filament window setting, filament diameter setting , number of extruder heads , extruder
temperature and heated bed temperature, save it after finished . Filament diameter is 3mm and 1.75mm
ABS filament extruder temperature : 230℃
Heated bed temperature : 110℃
PLA filament extruder temperature : 90℃
Heated bed temperature : 60℃
58
Shenzhen RP3D Technology Co.Ltd
Tele: 0755-28700806
PanguI3-C user manualV1.0
3.13 PRINT SETTING
Select print setting , set the bed size and print center.
3.14 NOZZLE SETTING
Nozzle is 0.3,0.4,0.5mm, according to the size of nozzle to set the diameter , save it
五、TEST 3D PRINTER 3D
59
Shenzhen RP3D Technology Co.Ltd
Tele: 0755-28700806
PanguI3-C user manualV1.0
1.SUPPRESSED ZERO
1.1 USE BUS DATA WIRE TO CONNECT COMPUTER AND 3D PRINTER
1.2 OPEN THE REPTEIER-HOST, THE COMPUTER WILL AUTOMATICALLY INSTALL THE DRIVER , WAIT
UNTIL THE INSTALLATION IS COMPLETED , SELECT “ PRINT SETUP”.
1.3 IN THE PRINT SETTING , CHOOSE “COMMUNICATION PORT “ DROP-DOWN MENU SELECT
THE PORT AND UPDATE IT , AFTER APPLICATION CONFIRM IT.
60
Shenzhen RP3D Technology Co.Ltd
Tele: 0755-28700806
PanguI3-C user manualV1.0
1.4 TRIAL THE X-AXIS DIRECTION AND ZERO
Click respectively
、
and
to control X-motor and to trial the x-
motor-axis direction and zero;
1.5 TRIAL THE Y-AXIS DIRECTION AND ZERO
Click respectively
、
and
to control the Y-motor and to trial the Y-
motor-axis direction and zero;
61
Shenzhen RP3D Technology Co.Ltd
Tele: 0755-28700806
PanguI3-C user manualV1.0
1.6 TRIAL THE Y-AXIS DIRECTION AND ZERO
、
Click respectively
and
to control the Y-motor and to trial the Y-axis-
motor direction;
1.6 TRAIL THE HEATED BED AND EXTRUDER TEMPERATURE
CLICK RESPECTIVELY
LIGHT BUTTON
( BUTTON LIGHT IS OPEN) , OPEN THE TEMPERATURE CURVE TO VIEW THE CHANGE CURVE OF THE
EXTRUDER HEAD AND HEATED BED.
ABS FOR EXAMPLE, EXTRUDER HEAD TEMPERATURE
FLUCTUATION AT 230℃, THE HEATED BED TEMPERATURE FLUCTUATION AT 110℃.
1.7 TEST EXTRUDER MOTOR
Click respectively
and
check the
extruder motor rotation (parameter can be set)
62
Shenzhen RP3D Technology Co.Ltd
Tele: 0755-28700806
PanguI3-C user manualV1.0
1.8 ADJUST THE BALANCE OF Z-AXIS AND HEATED BED
1.8.1
Click respectively
and
, adjust the X、Y position , move the nozzle to the
heated bed center surface on ①.
1.8.2 Click
move the nozzle down , adjusting it to connect just on the heated bed center surface ①
1.8.3 Adjusting endstops position which is just press the endstops. Click
to press the nozzle just
on the heated bed center surface ①, the distance is about a sheet of A4 paper thickness;
63
Shenzhen RP3D Technology Co.Ltd
1.8.4 Double-click
Tele: 0755-28700806
PanguI3-C user manualV1.0
arrow position ‘s first gird, move the nozzle up 0.2mm , to observe the
distance a of the nozzle and heated bed’s center surface ①
1.8.5 Click
the back arrow ‘s third gird , move the nozzle from left 100mm , which is
moving to the heated bed surface on ②, to observe the distance b of the nozzle and heated bed surface ②,
if b higher than a, contratotate to left of the couplings. Make b and a are equal; if b less than a . Clockwise
rotation to left of the couplings. Make b and a are equal.
1.8.6 Double click
the back arrow ‘s third gird, move the nozzle from right 200mm, which is
moving to the heated bed surface on ③,to observe the distance c of the nozzle and heated bed surface
③ ,if c higher than a, contratotate to right of the couplings , Make c and a are equal; if c less than a;
Clockwise rotation to left of the couplings. Make c and a are equal.
1.8.7 Click
,
move the nozzle around left-right to heated bed surface on ①、
②、③, To observe the three points whether on the same plane; if it is not on the same plane, please repeat
operation 1.8.4——1.8.5, adjust it till to the same plane, then the three points and heated bed of the distance
from the surface for a.
surface on ②, then the ② and heated bed of the distance from the surface for a. Click
the back
arrow ‘s third gird, move the nozzle from front 100mm, which is moving to the heated bed surface on ⑤, to
observe the distance d of the nozzle and heated bed surface ⑤, ,if d higher than a, tighten the heated bed
screw at the bottom, make d and a are equal; if d less than a , loose the heated bed screw at the bottom,
make d and a are equal.
64
Shenzhen RP3D Technology Co.Ltd
1.8.9 Double click
Tele: 0755-28700806
PanguI3-C user manualV1.0
the back arrow ‘s third gird, move the nozzle from front 200mm, which is
moving to the heated bed surface on ⑧, to observe the distance f of the nozzle and heated bed surface
⑧, ,if f higher than a, tighten the heated bed screw at the bottom, make f and a are equal; if f less than a ,
lose the heated bed screw at the bottom, make f and a are equal.
1.8.10 Click
,
move the nozzle around front-back to heated bed surface on ②、⑤、⑧, To
observe the three points whether on the same plane; if it is not on the same plane, please repeat operation
1.8.t——1.8.8, adjust it till to the same plane, then the three points and heated bed of the distance from the
surface for a.
1.8.11 In the same way, move the nozzle around front-back to heated bed surface on ③、⑥、⑨, ensure
that the three points and nozzle of the distance from the surface for a. Then the seven point of ①、②、
⑤、⑧、③、⑥、⑨ distance are equal with heated bed surface, Z-axis is balance with heated bed.
1.8.12 Click
let three directions of X、Y、Z origin on one point. Click arrow X、Y, for X、Y in any
direction is balanced.
2. TEST PRINTS
2.1 PRE-TEST PREPARATIONS
2.1.1 Put the filament which are to be printing into J-head nozzle, click
The extruder rise to the heated bed surface on a certain level, heating extruder head and heated bed.
65
Shenzhen RP3D Technology Co.Ltd
Tele: 0755-28700806
PanguI3-C user manualV1.0
2.1.2 Wait for the extruder reaches a high enough temperature , click
check the extruder discharge material whether is smooth.
2.2 OPEN THE BOX DOCUMENT STL .
2.3 SELECT THE APPROPRIATE SETTING, TO GENERATE G-CODE
66
Shenzhen RP3D Technology Co.Ltd
Tele: 0755-28700806
PanguI3-C user manualV1.0
2.4 WAITING FOR THE CODE GENERATED , RUNNING TASKS
Wait for being finished printing , test box size is :20*20*10mm
六、3D PRINT 3D
1. USE PC PRINT
1.1 USE USB WIRE CONNECT 3D PRINTER WITH COMPUTER
67
Shenzhen RP3D Technology Co.Ltd
Tele: 0755-28700806
PanguI3-C user manualV1.0
1.2 OPEN REPETIER-HOST, SELECT “PRINT SETTING
1.3 UPDATED 3D PRINTER PORT, USE IT AND CONFIRM IT
68
Shenzhen RP3D Technology Co.Ltd
Tele: 0755-28700806
PanguI3-C user manualV1.0
1.4 OPEN THE STL FILE WHICH YOU ARE PRINTING
1.5 SELECT APPROPRIATE SETTINGS, AND GENERATES THE G-CODE
69
Shenzhen RP3D Technology Co.Ltd
Tele: 0755-28700806
PanguI3-C user manualV1.0
1.6 WAIT FOR THE CODE IS GENERATED , CLICK “RUNNING TASKS” THEN COMPUTER CAN PRINT.
2. USE SD CARD PRINT
Use SD card print is called off-line printing, rational use off-line which can effectively improve print
efficiency .
2.1 SD CARD INSERT IN COMPUTER THROUGH THE CARD READER , SAVE THE G-CODE ON SD CARD.
70
Shenzhen RP3D Technology Co.Ltd
Tele: 0755-28700806
PanguI3-C user manualV1.0
Way 1 : Put the G-code file on the SD card , in Repetier-Host select start printing file on the SD card, then
you can plug-off USB wire.
Way 2: Rename the G-code file to init.g which you are printing , put it under the SD card catalog, restart
printing, press the reset key-press or power-down and on again , the printer will automatically print G-code
init.g.
71
Shenzhen RP3D Technology Co.Ltd
Tele: 0755-28700806
PanguI3-C user manualV1.0
2.2 INSERT THE SD CARD TO ELECTRONICS, DIAL THE USB WIRE WHICH CONNECT WITH COMPUTER,
FOLLOW THE ABOVE TWO METHODS CAN OFF-LINE PRINT.
七、RELATED MATTERS
1、What to do if filament is running out ?
Heated to 230, stop the motor , pick up spring , pull out the old one and change the new one.
2、If the material is not attached on the board , which fail to stick , run with nozzle , how to solve it ?
1、Please check the heated bed temperature is enough, PLA is ℃, ABS is 110℃
2、Please check the first layer of wire, it should be flattening on the heated bed. If it is not enough flat,
please adjust a bit trigger position of the Z-axis endstop , make the nozzle distance closer to the heated bed.
3、But do not too flat , the first layer thickness is compressed about half the stander layer thickness.
4、What to do if nozzle is in a jam? What to do if extruder idle? What to do if it is not discharge material.
There are two drill bit , one is 3mm , and drill nozzle feed back into the big hole ; another is 0.4mm, the way
to slove the in jam of drill front nozzle small hole is : remove the nozzle , use nipper plier grip drill, handoperation drill, when heated to 230℃, to simulate the process of nozzle , drill big hole ( note: use drill bit to
pick up the waste and garbage in several times), drill small hole, and operation again , then the nozzle would
be a new one.
72
Shenzhen RP3D Technology Co.Ltd
Tele: 0755-28700806
PanguI3-C user manualV1.0
八、CONTACT US
Shenzhen RP3D Technology Co. Ltd is a leader of open-source 3D printer in domestic, the pioneers and
practitioners of open source hardware concept, Pangu designers , manufacturers of open source 3D printer.
Company address: Firstfloor,Building D, Ganghua Technology Park,Lixin Road, Danzhutou, Longgang
Telephone: 0755-28700806
Mobile:13316560709
Contact person : Chris
Website:
http://www.rp3d.com/Alibaba: http://szrp3d.1688.com/
Taobao shop :http://shop34058874.taobao.com/
73