1
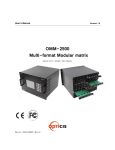
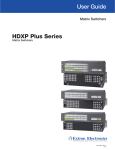
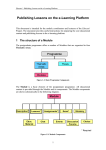
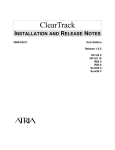
Content Management System (CMS) User Manual CMS – User Manual © Young Digital Planet SA 2009 Young Digital Planet SA, ul. Słowackiego 175, 80-298 Gdańsk tel. +4858 768 22 20, fax +4858 768 22 11 e-mail: [email protected] www.ydp.eu © Young Digital Planet 2009 CMS – User Manual Table of contents Introduction ________________________________________________________4 System requirements ____________________________________________________ 4 CMS – browsing through content __________________________________________ 5 Recommended structure of folders in a project ______________________________ 5 Operations on folders / files ______________________________________________ 6 Source ______________________________________________________________________ Download ___________________________________________________________________ CExp _______________________________________________________________________ LOM _______________________________________________________________________ SCORM _____________________________________________________________________ Creating a SCORM package ____________________________________________________ 6 6 7 7 7 7 CMS Bugtrack ______________________________________________________8 Reporting and monitoring bugs ___________________________________________ 8 Reporting bugs _______________________________________________________________ 8 Printscreen _________________________________________________________________ 10 Editing the reported bugs ______________________________________________________ 11 Browsing through reported bugs _________________________________________________ 12 Filtering the bugs (e.g. option ‘Show restrictions’) ___________________________________ 13 Bugtrack homepage __________________________________________________________ 13 NonLeo Bugtrack ____________________________________________________________ 14 Reindex ____________________________________________________________________ 15 Reporting___________________________________________________________________ 16 Administrator options ______________________________________________17 Shares _______________________________________________________________ 17 Restrictions _________________________________________________________________ 17 Creating new share ___________________________________________________________ 17 Share list ___________________________________________________________________ 18 Bugtracks ____________________________________________________________ 19 Restrictions _________________________________________________________________ Creating new bugtrack ________________________________________________________ Bugtrack list_________________________________________________________________ Remarks ___________________________________________________________________ © Young Digital Planet 2009 19 19 21 21 3 CMS – User Manual Introduction CMS stands for Content Management System. It is an application for browsing and managing resources which are located on project disks. CMS enables the user to: • browse the structure of folders located on project disks; • browse content; • oversee proper folder structure in the projects; • report and control bugs in products; • create SCORM packages for course files. System requirements The system requirements for CMS are as follows: • Operating System: Windows 98/NT/2000/XP, Mac OSX 9 and above, Linux; • processor: depends on the Operating System; • RAM: 64 MB or more; • Internet Browser: Internet Explorer 6 and later, Mozilla Firefox 2.0 and later; • screen resolution for optimal work: from 1152x864; • other: JavaScript, enabled cookies, enabled CSS. © Young Digital Planet 2009 4 CMS – User Manual CMS – browsing through content After launching the CMS home page the user will see the main structure of project folders. After clicking on elements from this list the user will gain access to sub-folders. The current path to the folder is displayed in the top part of the screen – by choosing an appropriate folder from the path the user can display its content. In the upper part of the page there is a bar with the main options available in the system: • CMS – link forwarding to the CMS start page • Content Management System – the name of the application • Logged user – information on the user logged • Logout – link logging out of the system • Admin – administrator options (available only for the administrators of the application) • Services – link to the related application (AMS) Recommended structure of folders in a project The structure of folders and files in individual projects should, as much as possible, correspond to the recommended structure. This will help to maintain order in projects and fully benefit from the options available through bugtrack. In the recommended structure the project folder contains the following subdirectories: current; release_(date: yyyy_mm_dd). The current folder contains: • app – application (to launching courses); • course – course files (zpg, page, media); • demo – demo versions; • documents – project documentation; • resources – source files (e.g. psd, fla); • scorm – contains SCORM packages. The release folder contains the subsequent versions of the project. Subfolders are named with the dates of releasing a new version. © Young Digital Planet 2009 5 CMS – User Manual Operations on folders / files Folders and files are displayed in the CMS in the form of a table. The following information is displayed: • name (folder or file); • type (file or 'folder' for folders); • date of last modification; • size (file, for folders size = 0); • actions (options: Source, Download, Cexp, LOM). Below is an example of a project folder with its sub-folders, files and possible actions: Source Source option allows the user to view the source content of the file. Download Download option allows the user to download the file and save it on the hard disk. To save the file, click on the Download button and indicate the path. © Young Digital Planet 2009 6 CMS – User Manual CExp Cexp option allows the user to create AICC and SCORM packages for the selected .course file (see the chapter SCORM). LOM LOM option defines the flo metadata in accordance with IEEE LOM v1.0standard. SCORM CMS allows to create SCORM packages basing on the .course files. Creating a SCORM package In order to create a SCORM package a relevant .course file has to be found. The .course files should be located in project folders. Next, a text file should be created. The text file must have a name which is the same as the .course file name, but with 'cms' extension, e.g. project01.course.cms. The file contains information about additional catalogues attached to SCORM package, e.g. grammar, dictionary, etc. The 'common' catalogue and lesson folders are not additional catalogues and do not have to be added to the file. There should be only the word 'scorm:' in the first line of the .cms file, 'include:' in the next line (accepted with ‘enter’), and then relative links to catalogues which are to be included in the SCORM package. The catalogue names should be divided by commas, without spaces e.g.: scorm: include: basisstof/common,extra_basisstof/common We either use CExp option in Actions column to export the .course file to SCORM package or start the *.course file and choose Create scorm option. Once one of the options has been chosen, CMS switches to a page with detailed information about the export. Three tabs can be seen: • Course content with the course structure. Lessons which shouldn't be included in the SCORM package should be deselected, and those which should – selected © Young Digital Planet 2009 7 CMS – User Manual • Course description with the course information (Course name, Duration, Content structures, Description, Icon). By default the fields are filled in with data from *.course file) • SCORM information with Export name field to be filled with the SCORM name (the zip file) Create SCORM Package button on SCORM information tab should be clicked to execute the export. The export takes some time, depending on the course size. After the export is completed, the user logged in to CMS will be informed (by an email sent form the system) about the completion of the export process and the location of the SCORM package. CMS Bugtrack CMS Bugtrack is a tool used for reporting and controlling mistakes (bugs) that occur in the material. Appropriate usage of the tool will improve the control of correcting mistakes in the content. Note that CMS Bugtrack constitutes official documentation of projects' corrections, therefore, all reported mistakes/changes/comments should be brief and exact. In the project folder, all bugs reported for the same '.flo' will be visible in all of the lessons with the same name if they are in different folders (bugs reported for '*.flo' with the name name.flo will be visible in all of the lessons with the name name.flo). Reporting and monitoring bugs Any user browsing through lessons (.flo files) can report bugs noticed on the lesson pages. Reporting bugs To report a bug: • click on the New issue option (available on the left below the .flo); • fill in the bug report form; • confirm by clicking on Report issue below. © Young Digital Planet 2009 8 CMS – User Manual The bug report form is available below the displayed lesson. At the top, both the name of the lesson and the name of the person reporting the bug are visible. Below is a description of all fields available in the bug report form: Field Description of field Description Here, a brief but exact description of the bug should be typed in. The text can be formatted (the following tools are available: bold, italics, underlined, lower index, upper index, numbered list, bulleted list) Page The number of page in the .flo file where the bug is situated; this page number is read by CMS automatically. It is possible that a reported bug does not apply to any page – then, one of the following options should be chosen: General – a general bug, Flo – the bug applies to the whole lesson, Panel – the bug applies to the lesson's panel Localization The location of the bug (e.g. tab, tab in tab, etc.) Object The object in which the bug occurs (e.g. animation, text, illustration, etc.) Type The type of report (bug, change, comment) Severity The severity of the reported bug (C – critical, M – main, I – inconvenient, T – trivial) Priority The priority of the report (N – normal, L – low, H – high; the high-priority reports are marked in bold) Assign to Field specifying who the bug is assigned to (who is responsible for fixing it); here type in the correct login or leave empty. AMS resource Field specifying the id of the resource in AMS, which is connected with the id described bug (if the field is filled, the id of the resource is copied in the form of a link to the beginning of the field 'Description') Mailing Field allowing the user to activate the auto mailing option (option unavailable for outside clients); in the Cc field the list of the mail addressees (logins) can be provided. The logins should be separated by “;”. © Young Digital Planet 2009 9 CMS – User Manual Files The possibility of adding additional files to the reported bug; to add a file: click on Browse to choose a suitable file, describe the file, click on Add file After filling in the bug report form correctly, click on the Report issue button below – the bug will be added to the list of reported bugs. Printscreen CMS Bugtrack allows to attach screenshots to the bug reports. To do this: • open the form of reporting a bug below the .flo; • use the printscreen tool; • report the bug (Report issue). The printscreen tool Below the displayed .flo, the printscreen tool is available. Available options (from the left): • marking an area to be printscreened; • a marker to draw on the printscreen; • resetting the tool's settings (undoes the drawing and zeroes the area); • making a printscreen by clicking on the button; © Young Digital Planet 2009 10 CMS – User Manual • making a printscreen by using the Shift + Insert combination (e.g. when the mouse is needed for executing the 'on mouse over' action); • choosing the marker's thickness; • choosing the marker's colour; • the 'description' field allows the user to add a description to the printscreen. Note that to save the printscreen you need to have the bug report form opened. To make a printscreen you also need to mark a proper area (button with an arrow). Editing the reported bugs By clicking on the bug description in the table, CMS directs the user to a detailed view of the bug. Here, the user can edit each field (the description of which you can find in 'Reporting bugs') as well as add a comment. Additionally, a field is displayed, that indicates the status of the bug. Available statuses: • new – assigned to fixing; • fixed; • invalid (the bug was reported incorrectly); • closed. • Pending – status available only in the external CMS; the bugs on this status are not visible in the internal CMS. The client reports the bug to the YDP team changing the status from 'Pending' to 'New'. All changes need to be confirmed by clicking on Update issue at the bottom of the page. To return to the list of bugs click on Bugtrack (above the table with the details of the bug). © Young Digital Planet 2009 11 CMS – User Manual Browsing through reported bugs Bugs in CMS Bugtrack are displayed in a table with the following information: • the page number on which the bug occurs; • the location of the bug (e.g. tab); • the object in which the bug occurs (animation, illustration, etc.); • the description of the bug; • the severity of the bug; • the person reporting the bug (Reported by); • the assignee of the bug (Assigned to); • the status of the bug. After clicking on a .flo file in CMS (on the list of available files), the program opens the lesson. Below the lesson, there is a list of bugs reported for this lesson. While viewing the flo the user has access to the following bugtrack options: • Bugtrack – displays a list of bugs for a given .flo. When browsing through the bugs different options of bug display are available: • My reports/All reports Displays only the bugs reported by logged user/ Displays all bugs. • My issues/All issues Displays only the issues assigned to the currently logged user/Displays all issues. • Client's issues/Mixed issues Displays only the issue reported by clients/Displays all issues. • Edit multiple issues/View flo issues Makes it possible to make basic changes in the table displaying the issues (without the need to edit each issue separately). • View all descriptions/Hide all descriptions Displays full descriptions of the bugs in the table/ Hides full descriptions of the bugs in the table. • Legend Switches on/off the legend describing the use of colours in the bug tables. • Show restrictions/Hide restrictions Displays extra bug searching filters/Hides extra bug searching filters. • Export to xml Option exporting the bug list to xml. © Young Digital Planet 2009 12 CMS – User Manual Filtering the bugs (e.g. option ‘Show restrictions’) Available filters CMS Bugtrack provides access to a number of filters that facilitate the filtering and displaying only those bugs which are of interest to the user. The following filtering criteria are available: • Type; • Status; • Client status; • Object; • Severity; • Reported by; • Assigned to; • Mailing; • Reported; • Modified. You need to check the chosen options and click on Apply (on the right). The checked options may be reset by clicking on Reset (on the right). Bugtrack homepage It is possible to view the whole bugtrack – not only for the current lesson but also for all .flo files. To do so, a catalogue with the courses included in the bugtrack should be located and View bugtrack option (upper right corner) clicked. In the bugtrack main view an additional menu is available: First piece of information is the current bugtrack name. 'Bugtracks' links to the bugtracks list. 'Go to directory' option guides the user to the main directory in which a main bugtrack is built. 'View report' option moves the user to the screen with current bugtrack reports. 'Export to xml' option enables the user to export the list of bugs to .xml file. © Young Digital Planet 2009 13 CMS – User Manual The individual lessons are displayed on cross fields in this view. The name of the .flo and lesson statistics (error count, changes, comments) are available on the fields. By default the fields are minimized and the bugs are not displayed. The field can be maximised and minimised again to gain access to bug lists. Use >> button to minimise and maximise the fields. Apart from the bug list display options such as browsing the bugs in a selected lesson, other options are available: • Report general issue Opens the report form of general bugs which are not connected with *.flo and *.page files (NonLeo Bugtrack) • Expand lessons/Collapse lessons Expands/collapses bars (folds/unfolds bugs for particular flo.) NonLeo Bugtrack CMS Bugtrack can also be used to report bugs in projects that do not use .flo files (bugs are not related to any pages in .flo). To add bugs to such a Bugtrack: • find a project folder in CMS in relation to which the Bugtrack was created; • display the Bugtrack by clicking on the View bugtrack link (upper right corner of the screen); • report 'general issue' by clicking on the Report general issue link (under the filter set); fill in the bug report form and save it by clicking on the Report general issue link. NOTICE: • 'General issue' bugs can be reported for each bugtrack unless they are related to *.flo and *.page file. © Young Digital Planet 2009 14 CMS – User Manual • 'General issue' bug report form is similar to a standard bug report form (the 'page' field is unavailable). • When submitting a 'general issue' the tool for making screenshots is not available. • 'General issues' bugs are located in the bugtrack, on the top of the site and under the .flo bugs (if there are any). Reindex When creating a lesson, the order of the added lessons may sometimes change, new pages may be created, some of the pages may be removed, etc. If there are any changes to the structure of the lesson to which the bugs have already been reported, the assignment of 'bug – page' will become invalid. All new reported bugs will be assigned correctly and formerly assigned bugs will contain misleading information. To eliminate that problem, the reindexing of the pages is necessary. To do this: • display bugtrack general view • choose 'Reindex option' from the lesson bar (the one which we want to reindex) At this point 'bug – page' connections will be updated. NOTICE: In Bugtrack bugs are assigned to specific pages in .flo. Bugs are connected to .page file not to the position in .flo where the specific page appears. Therefore, the 'Reindex pages' function will not work when we change the order of pages in .flo while also changing names of the files that contain those pages. To make 'Reindex' work properly, do not change the names of .page files connected to .flo © Young Digital Planet 2009 15 CMS – User Manual Reporting The option 'View report', which is available in the view of the whole bugtrack, makes it possible to switch to the page with reports concerning the current bugtrack. The menu on this screen is the following: Clicking on the option 'List of bugtracks' switches to the screen with the list of bugtracks. Clicking on 'Browse bugtrack' switches to the main view of the whole bugtrack and clicking on 'Go to directory' switches to the main folder where the bugtrack has been created. The screen with the view of the report is divided into three sub-tabs: • General – this tab contains general information about the bugtrack: – Bugtrack name – the name of the bugtrack; – Created – the date the bugtrack has been created; – Browse – link to the main view of the bugtrack; – CMS project path – link to the folder where the bugtrack has been created (the path via CMS); – Real path – link to the folder with project files (not in CMS) – The oldest issue – the date of the first bug; – The youngest issue – the date of the latest bug. Total issues – this tab contains tables with information about the bugs reported; all tables contain the number of bugs according to their types (Bug, Comment, Change, Total): – orderings to the course elements (Total, General, Page, Flo, Panel) – Issue Numbers Table; – severity of a given bug (Critical, Major, Inconvenient, Trivial, no parameter) – Severity Table; – bug status (New, Fixed, Closed, Invalid) – Status Table. • User statistics – this tab contains two tables displaying the information on the number of issues, depending on the type of issue, status and type of issue and the total number of issues for: – reporter – Issues per reporter; – assignee – Issues per assignee. • Object statistics – this tab contains a table displaying the number of issues assigned to different objects on page (Activity, Animation, Audio etc.) © Young Digital Planet 2009 16 CMS – User Manual Administrator options CMS administrator can create new project folders (Shares) and Bugtracks. Both options are available in the 'Admin' on the left side of the page. Shares The 'Shares' option makes it possible to browse through, edit, create and delete new shares. Restrictions In the 'Restrictions' area the user can filter the displayed shares. The following options are available in this area: • Content name – name of the share • Path – path to the share's main folder • Client's Release – displaying only public shares (Yes), only private shares (No), displaying all shares. • User – displaying shares assigned to external users (external) Creating new share Below the 'Restrictions' area there is 'Create new share' link. Clicking on this link will open a form to open new share: © Young Digital Planet 2009 17 CMS – User Manual This form contains the following options: • Content name – name of the share; • Content real path – real path to the share's main folder; • Description; • Is release? – option providing access to the share in the external CMS; • Client's access – list of external users who can have access to the share. After completing the form click on Create to open new share. Share list The share list contains the following columns displaying the available information and options: Name – name of the share (clicking on the name of the selected share switches to the share's main folder); • Path – path to the share's main folder; • Created – the date the share has been created; • Is clientRelease – information whether the share is accessible in the external CMS (release); • Users – list of the external users assigned to the share; • Actions – list of available actions (Details, Edit, Remove): © Young Digital Planet 2009 18 CMS – User Manual o Details – displays all data on the share's details: Content name – name of the share; Content path – path to the share's main folder; Description – share's description; Is client's path – information whether the share is accessible in the external CMS (release); Client's users – list of the external users assigned to the share; Created – the date the share has been created; Modified – the date the share has last been modified. o Edit – displays the share's edition form with the same options as when creating new share. o Remove – removes the selected share. Bugtracks 'Bugtracks' option makes it possible to browse through, edit, create and remove new bugtracks. Restrictions In the 'Restrictions' area the user can filter the displayed bugtracks. The following options are available in this area: • Name – name of the bugtrack; • Content Path – path to the bugtrack’s main folder (the cms path to the foldername to which the bugtrack is assigned) Creating new bugtrack Below the 'Restrictions' area there is a 'Create new bugtrack' link. Clicking on this link will open a form to create new bugtrack: © Young Digital Planet 2009 19 CMS – User Manual This form contains the following options: • Content Bugtrack name – name of the bugtrack; • Content cms path – cms path to the bugtrack’s main folder • Users permissions – here users can be assigned to bugtrack on one of five levels of access; Options available according to the assigned access are presented in the table below: 0 1 2 3 4 x x x x x Report new bugs x x x x Edit bug x x x x Change status to Fixed, Invalid x x x x Change status to Closed x x x Edit 'Assigned to' field x x x View bugtrack • Client's users permissions – here external users can be assigned to bugtrack; After completing the form, click on Create to create new bugtrack. © Young Digital Planet 2009 20 CMS – User Manual Bugtrack list The bugtrack list contains the following columns displaying the following information and options: • Name – name of the bugtrack (clicking on the name of the selected bugtrack switches the user to the bugtrack homepage); • Content path – path to the bugtrack’s main folder (the cms path to the folder to which the bugtrack is assigned) • Created – the date the bugtrack has been created; • Actions – list of the available actions. In this column, after clicking on 'Edit', the user can change the settings of the selected bugtrack with the aid of the same form as when creating new bugtrack. Remarks • When creating new bugtrack with the option of reporting bugs by external users, one has to make sure that inside the folder (share) where the bugtrack is being created, there is a share, which had been made accessible for external use (release). • Please remember that a bug is assigned to specific flo, therefore a bug reported to a specific flo will be displayed next to all the flo files with the same name located inside the folder with the bugtrack. Please make sure that different flo files have unique names. • Before creating new Bugtrack on given folder, make sure that it will not interfere with another bugtrack. © Young Digital Planet 2009 21