1
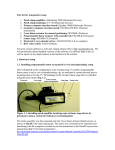
E²dish User Manual
A NEW APPROACH TO ELECTROPHYSIOLOGY
FOR YOUR NEURONAL CULTURES
E²dish User Manual
For technical support contact:
[email protected]
For new orders/order status enquires:
[email protected]
© Aleria Biodevices
March 2009
Contents
1. Materials supplied
4
2. Introduction to E²dish technology
5
5
Conventional micropipette electrophysiology is cumbersome
5
E² technology automates electrophysiology by integrating
the micropipette in the substrate
5
Use your proven protocols. No need to change to new substrates
6
Advantages of the E²dish
3. Quick start guide to using the E²dish
7
Procedure overview
7
On the day of seeding
9
On the day of recording
4. E²soft and driver installation manual
10
System requirements
10
E²soft installation
12
Driver installation
7
10
5. E²soft Tutorial
13
6. Troubleshooting
17
7. Frequently Asked Questions
18
Annex A. Theory of operation of E²dish technology
19
Annex B. E²drive amplifier datasheet
21
Annex C. E²dish-substrate alignment template
22
1. Materials supplied
E²drive benchtop amplifier
CO2Chamber kit
Units
Component description
Reference
Units
Component description
Reference
1
E²drive 600A amplifier
020.0001
1
060.0004
1
Plastic cover with electrodes
020.0003
CO2 minichamber
(base, cover and valve, 2.15 L)
1
AC/DC adapter
060.0001
1
Chamber plate
060.0005
1
USB cable
060.0002
1
Silicone tube (2 m, 5 mm ID)
061.0002
1
Polyurethane antivibration pad
(170x170x30 mm)
061.0001
1
Silicone tube (2 m, 8 mm ID)
061.0003
1
Silicone tube (0.10 m, 8 mm ID)
061.0004
1
Electric cable with crocodile clips
060.0003
1
0.2 μm gas filter
060.0006
1
E²soft Installation CD
–
1
Tube clamp
060.0007
1
E²dish User Manual
–
CO2 gas cylinder (optional)
4
Units
Component description
Reference
1
CO2 gas cylinder with pressure
regulator (2 L)
020.0002
2. Introduction to E²dish Technology
A NEW APPROACH TO ELECTROPHYSIOLOGY FOR YOUR NEURONAL CULTURES
The E²dish aims at making electrophysiology on
neuronal cultures simple, cost-effective and highthroughput for the research and drug screeningoriented neuroscience community.
How it all works
Conventional micropipette
electrophysiology is cumbersome
In conventional electrophysiology a micropipette is painstakingly manipulated to approach the membrane of a cell. A short
distance (≤50µm) between micropipette and membrane suffices for extracellular recordings whereas physical contact and
seal are needed for loose-patch, whole-cell or cell-attached
single-channel patch-clamp measurements. Common to all
configurations is the need for the flow of transmembrane current to be constrained by a seal or alternatively by the intrinsic
resistivity of the extracellular medium, in order to generate
measureable signals.
micropipete
electrode
The E² (electrophysiology-enabling) product family of Aleria Biodevices offers a simpler method for all neuroscience labs to
gather electrophysiological data from their cultures. The core
concept can be summarized as: “let the cells in your culture
do the hard work and approach the micropipette rather than
the other way around”.
The E² technology involves cell culture wells with integrated
microchannels acting as embedded micropipettes (patent
pending). Effectively, the micropipette of conventional electrophysiology (Fig. 1), which usually approaches the cell at
approximately 45 degrees, is laid horizontally and integrated
with the cell culture substrate in the E2dish (Fig. 2) by using
microfabrication technology. The integrated micropipette is located at the level of the culture so that a subset of nearby cultured neurons will sprout axons that will spontaneously enter
the microchannel. At this point, a loose-patch electrophysiology configuration is spontaneously established avoiding
the use of micromanipulators. Then, AgCl macroelectrodes
are lowered into the wells and recordings can be easily performed with the E2drive amplifier.
Use your proven protocols.
No need to change to new substrates.
neuron
culture substrate
FIGURE 1. Conventional electrophysiology requires manipulation of
micropipettes with micrometer resolution
Approaching the cell with a micropipette and obtaining electrophysiological measurements is a low throughput process
requiring trained personnel and expensive micromanipulation and electronics instrumentation.
E²dish well I
E² technology automates
electrophysiology by integrating
the micropipette in the substrate
Integrated micropipette
Aleria Biodevices provides the integrated micropipettes of
the E² technology in the form of multiwell silicone units:
the E²dish. The wells are 6 mm in diameter and 7 mm deep.
Each pair of wells is connected by integrated micropipettes
implemented as 3.5 µm high x 25 µm wide x 1mm long microchannels on the bottom side of the polymer unit (Fig. 3).
These E² wells are placed on the cell culture substrate, be it
glass coverslips, polystyrene dishes or other types of plastic
substrates (Fig. 3). The cells are seeded in the two wells to
E²dish well II
Polymer
Polymer
neuron
MICROCHANNEL
Polymer
FIGURE 2. The E²dish employs
substrate-integrated microchannels that function as electrophysiological micropipettes.
The cell spontaneously sprouts
axons into the microchannel to
attain a loose-patch configuration.
culture substrate
5
Aleria Biodevices
microchannel
A
microchannel
B
microchannel
FIGURE 3. The integrated micropipette connects the wells of the E²dish (A). The E²dish can be attached on your preferred cell culture substrate with the microchannel facing down (B).
1-2 weeks (Fig. 4). The culture should be checked regularly under the microscope for growth inside the micropipette. Single
cell and population activity can be easily recorded over a long
time period by placing the culture inside the E²drive amplifier.
Advantages of the E²dish
FIGURE 4. Growth inside the microchannel (E16 mouse hipoccampus, 14DIV).
adhere to the substrate and grow along the microchannel. As
sprouting axons enter the embedded micropipette, a loosepatch recording configuration is spontaneously achieved after
6
1. Simple to use. Undergraduate students can seed the cells
and record neuronal activity without supervision and with
very little training.
2. Single-unit and population activity can be recorded.
3. Your cultures grow on your preferred substrates (plastic or
glass) using your standard protocol.
4. With our multiwell arrays, high-throughput electrophysiological screening is possible and cost-effective.
E²dishes are available in two-well and twelve-well versions.
3. Quick start guide to using the E²dish
This section will provide you with important
information on how to handle the E²dish.
Procedure Overview
2. Sterilize the E²dish
Once the E²dish has been removed it can be placed on a culture dish with the microchannel side facing up. Sterilize it under UV for 15 minutes.
3. Mount the E²dish on the culture substrate
REMOVE E²DISH
FROM PACKAGING
STERILIZE E²DISH
MOUNT E²DISH ON SUBSTRATE
GLASS SUBSTRATES
PLASTIC SUBSTRATES
EXPOSE TO CO2
FILL WELLS WITH MEDIA
PLATE CELLS
GROW CELLS
RECORD ACTIVITY
On the day of seeding
Note: Stages 1-5 must be carried out in a laminar
flow hood and nitrile or latex gloves should be
worn as it is very important that the E²dish is not
exposed to dust and moisture from your fingers.
This would have a negative effect on the adhesion
to the substrate.
Note: 60 mm culture dishes must be used with
the E2dish in order to fit the E2drive amplifier.
1. Remove the E²dish from the packaging
Before removing the E²dish from the packaging note the side
that is labeled “microchannel”. Cut open the packaging and
remove the E²dish, carefully holding it with flat-ended tweezers. Do not touch the microchannel side of the E2dish to keep
it clean.
The E²dish can now be attached to a clean and dry substrate
on which the culture will be performed. It is important that
the microchannel side is down forming an enclosed channel
when attached to the substrate (see Fig. 3). To remove any
air bubbles in the microchannel the E²dish should be gently
pressed, using tweezers, from the central to the outer part
of the device. Once the E²dish is attached to your substrate
do not move it or re-attach it to the same substrate as this
might disturb and unbind your cell adhesion promoter (e.g.
poly-lysine). In addition, if you re-attach the E2dish to a new
clean substrate you may experience adhesion problems due to
the residues of the cell adhesion promoter from the previous
treated substrate.
Tip: If you don’t remember which side contains the
microchannel, place the E²dish in a clean sterile dish
(watch out for dust) and check under the microscope.
Tip: The geometry of a 60 mm cell culture dish is
optimal to attach a 12 well E²dish and so it is important
to adequately centre the E²dish on the substrate. Make
sure that the corners of the E²dish are not touching the
walls of the culture dish and are equidistant from the
sides. It is recommended that you use the included
template (see Annex C) as an aid to aligning the E²dish.
The template has been designed for the twelve reservoir E²dish but the two channel reservoir E²dish can be
placed on any of the six available positions.
4. Fill wells with cell culture media
There are two different protocols depending on which type of
substrate you will be using for the attachment of the E²dish.
Glass substrates. If you are using glass substrates, cell culture medium (≈100 µL) can be directly pipetted into the wells.
The microchannel(s) will fill spontaneously with the culture
media. This can be easily tested using a standard multimeter
and measuring the resistance (approximatelly 10-20 MOhms)
of the channel or by a visual check using a microscope.
Plastic substrates. For plastic substrates, prior to filling with
culture media, the E²dish should be exposed to CO2 gas using
the CO2 chamber in order to prevent blockage of the microchannels with air bubbles. CO2 is highly soluble in aqueous
media and will replace the less soluble air (mostly N2) in the
microchannels. This will result in the spontaneous filling of
the microchannel with cell culture media.
7
Aleria Biodevices
A
valve off
pressure
regulator
B
valve on
0.2 µm filter
0.2 µm filter
valve on
three-way valve
CO2 chamber
pressure
regulator
valve off
vacuum
source
three-way valve
CO2 gas
cylinder
vacuum
source
CO2 gas
cylinder
CO2 chamber
FIGURE 5. To fill the microchannels in the E²dish with culture medium, first apply vacuum (A) and then fill the chamber with CO2. (B).
If you are using Aleria Biodevices CO2 minichamber, proceed
as indicated in the next section. If you have other CO2/vacuum systems, proceed similarly. Contact [email protected]
for further support on this issue.
4.1. Connections of the CO2 chamber
Assemble the CO2 minichamber (Ref. 060.0004 and
060.0005). Place the black O-ring supplied in the groove
of the base and connect the three-way valve to the chamber cover. The 2 m/5 mm ID tubing (Ref. 061.0002) should
be connected to the CO2 gas cylinder pressure regulator
and to the “IN” port of the 0.2 µm filter (Ref. 060.0006).
Next, the 0.1 m/8 mm ID tubing (Ref. 061.0004) should
be connected to the second port of the filter and to the
top port of the three-way valve on the chamber cover. Use
the tube clamp (Ref. 060.0007) to secure the 0.1 tubing to
the three-way valve. Finally, the 2 m/8 mm ID tubing (Ref.
061.0003) should be connected between the side port of
the three-way valve on the chamber cover and the vacuum
source in your laboratory.
dium. The microchannel will fill spontaneously without
bubbles blocking the channel.
Tip: After opening the chamber, the microchannels remain filled with CO2 for just a few seconds. Make sure
the wells are filled swiftly (20 seconds maximum).
5. Plate neurons in the wells
Once the wells have been filled with medium, you can seed
the cells. Good results are obtained with 50x10³ to 105 cells
per well when plating with Aleria Biodevices cryopreserved
E16 hippocampus neurons on poly-L-lysine coated polystyrene substrates. Seeding densities for other neuron types and
substrates should be adjusted to obtain channel-guided axons
after 1-2 weeks. With wells pre-filled with 50 µL of medium,
you should add up to 50-70 µL of cell suspension to reach the
desired seeding density.
A
B
4.2. Expel the air from the chamber
Once the cover has been removed, place the 60 mm culture dish with the attached E2dish inside the CO2 chamber on the chamber plate. Turn on the vacuum pump for
30 seconds in order to expel air from the chamber. Once
this has been done check that the chamber cover cannot
be removed as vacuum is holding it down.
4.3. Fill the chamber with CO2
To turn on the CO2 gas turn the blue knob on the gas
bottle to the open position and then turn the black lever
to the up position. Fill the chamber for 40 seconds. When
the chamber has completely filled you will hear a small
“pop” sound as the chamber cover is released. Turn the
black lever to close the gas cylinder. Repeat the cycle expel air/fill with CO2 three times to ensure the complete
exposure of the E2dish to CO2 (stages 4.2 and 4.3).
4.4. Fill the wells with medium
Open the chamber and fill the wells with cell culture me8
FIGURE 6. Schemes of an E²dish filled with culture media (A) and of
an amplifier cover with electrodes (B). Note the two arrows showing
the locating dowels to align the cover of the amplifier to the device.
6. Cell growth
Wait until the axons have sprouted into the channel (usually
10-14 days).
A new approach to electrophysiology for your neuronal cultures E²dish
drilled holes
A
holding keys
B
C
D
FIGURE 7. The device has six drilled holes on its base (A). The E²dish should be placed so that the reservoirs are on either side of the drilled
holes (B). As a result, the microchannel will sit over them so that you will be able to be observed using an inverted microscope (C). Finally,
place the electrode cover on top of the amplifier making sure that the two locating dowels align with each other (see Fig. 6B). Secure the
cover with the white holding keys (D).
On the day of recording
1. Connect the E²drive amplifier
Connect the E²drive amplifier to your computer using the USB
cable and connect the provided power supply.
E²dish as this will affect the quality of the recordings. Lightly
push down the electrode cover and make sure it seats correctly on the face of the amplifier. While maintaining light finger pressure on the cover the three white holding keys can be
turned to keep it in place.
5. Recording
FIGURE 8. USB and power connections.
The amplifier must sit on the polyurethane pad provided (Fig.
9) for vibration isolation. Turn off the hood lights and fan to
avoid electrical and mechanical interference. The electrical activity will be visible on the screen. It can be saved and later
analysed using the data analysis functions of the E²soft package (see software guide for details).
2. Start E²soft
Start E²soft on your PC. You should see 6 signal traces on your
screen picking up electrical noise as the device has not been
connected to the amplifier yet.
3. Place the E2dish in the amplifier
Take out the dish from the incubator and place it in the E²drive
amplifier. There are 6 holes in the amplifier dish holder (Fig.
7A). Position the dish so that each hole in the base is aligned
between the two reservoir holes in the E²dish (Fig. 7C). This
way the holes will be underneath each of the 6 microchannels
so that they can be observed using an inverted microscope.
Tip: If you are using the E²drive for the first time,
remember to chloride the electrodes of the device.
A simple chloriding procedure is to submerge the electrodes in a bleach solution for about 20 minutes.
The wires should turn from a bright metal to a uniformally blackened colour once coated with the solution
FIGURE 9. The amplifier must sit on the antivibration pad provided
during recording.
Tip: If you are recording data with a drifting or unstable baseline this could be due to a silver chloride electrode that requires re-coating (electrodes should be
rechlorided every few weeks depending on frequency
of use or any subsequent damage).
4. Position the amplifier’s cover
The cover, with the integrated AgCl electrodes, can now be
positioned over the top of the amplifier dish holder and into
the respective reservoirs of the E²dish (Fig. 7D). Check that
the electrodes are not touching the reservoir walls of the
Tip: If you have a noisy baseline, check that the
electrodes are not touching the reservoir walls of the
E²dish.
9
4. E²soft and driver installation manual
This section provides system requirements and
instructions for installing the Aleria E²soft software
and the device driver on a Windows computer.
System requirements
Operating
system
Windows XP 32-bit (Service Pack 2 and higher)
Windows XP 64-bit (Service Pack 2 and higher)
Minimum
processor
Pentium 4, 2.4 GHz
Minimum RAM
512 MB
Minimum
disk space
20 MB
(An additional disk space of 186 MB is required
if the Microsoft .NET 2.0 Framework is not
present on the target machine. In most cases
the Microsoft .NET 2.0 Framework is already
installed).
Recommended
display settings
A minimum screen resolution of 1280 x 1024
pixels with a 32-bit color depth is recommended.
Note: When using a laptop, make sure it has a
power supply with a 3 pin AC adapter (with earth
connect). Alternatively, Aleria Biodevices provides a cable with crocodile clips that should be
connected to one of the three non-painted metallic
screws of the E²drive and to a metallic structure in
your lab grounded to the main building earth.
E²soft Installation
Note: Do not connect the E²drive before finishing
the installation of the software.
1. Loading E²soft
Insert the E2soft Installation CD into your computer’s CDROM drive. If the installer does not load automatically, go to
My Computer and double-click the CD-ROM drive icon.
10
2. Automatic check of files
The installer will automatically check if the Visual C++ Runtime Libraries and the .NET 2.0 Framework are present on your
system. If they are not, the installer will ask your permission
to install them. Please follow the procedure described below.
2.1. Visual C++ Runtime Libraries
If the Visual C++ Runtime Libraries are not present on
your system, the installer presents you with the screen
shown below. Click Install to install the Visual C++ Runtime Libraries.
2.2. Microsoft .NET 2.0 Framework
If the Microsoft .NET 2.0 Framework is not installed on
your system, the installer presents you with the screen
depicted below. Click Accept to install the .NET 2.0 Framework.
A new approach to electrophysiology for your neuronal cultures E²dish
3. E²soft Setup Wizard
After all pre-requisites have been installed, the Welcome to
the Setup Wizard screen appears. Follow the instructions
given to proceed successfully with the installations of the
software.
user on the system. If you do not want this to happen,
then click Just me.
3.4. Click Next and the Installing screen appears for the installation process to begin.
3.1. Click Next. The License Agreement appears.
3.2. Select I Agree after reading the license agreement and
click Next to proceed. The Select Installation Folder screen
appears.
3.5. The Installation Complete screen appears. You are reminded to use Windows Update to check for any critical updates to the .NET Framework. Please do so as Windows
Update may include important security and performance
updates. Click Close to exit the Installation Wizard.
3.3. Select the folder to which you want to install Aleria E²soft.
To view the available drives that you can install to, along
with each drive’s available disk space, click Disk Cost.
Installing Aleria E²soft for Everyone ensures that a Start
menu folder and a Desktop shortcut is created for each
11
Aleria Biodevices
Driver installation
Note: Now you can connect the E²drive to the
USB port. Make sure the power supply is also
connected.
When the E²drive is connected to the PC for the first time, it
is necessary to select the appropriate driver software. During
installation, this driver software has already been copied to
your machine. This makes installation straightforward. To select the correct device driver follow the steps below.
1. Connect the E²drive to the PC
3. Driver version
If you already connected the device prior to or during installation of the software you must disconnect and reconnect the
device. A notification balloon appears, followed by the Found
New Hardware Wizard screen, as shown below.
If more than one device driver exists on your machine, for
instance an older version, you may be presented with the
screen shown below. Select the latest version of the Aleria
E²drive device driver and click Next. This installation may take
up to a minute on slower machines.
2. Installing driver software
4. Completing installation
Since the driver software is already present on your system,
Windows can install the software automatically. Select Install
the software automatically (Recommended) and click Next.
Windows will now search for the device driver.
Once the device driver has been installed correctly, you will
be presented with the screen shown below. If you receive an
error notification, click here. Otherwise, click Finish to exit the
Found New Hardware Wizard.
2.1. If the driver is located automatically, proceed to step 3. If
the driver software is not found, click Back and proceed
to step 2.2.
2.2. Check Install from a list or specific location (Advanced)
and click Next.
2.3. In the following screen, click Browse and select the folder Installation folder/Driver. Click OK and then click Next.
2.4. Depending on your Windows version and security settings, you may be presented with a Security Alert similar
to the one shown below. Click Yes to proceed with the
installation.
12
Note: Please be aware that this procedure must be
repeated for each USB port the E²drive is connected to. Once the device driver is installed, you can
use the E²drive unimpededly with that USB port.
5. E²soft tutorial
This quick-start tutorial demonstrates how you can
use the Aleria E²soft software to view realtime
data, make a recording and load the recording for
further analysis. Please follow the steps below.
similar to the one shown below. You can also manually
specify the voltage range by typing directly into the text
boxes next to Range. After changing the value in a text
box, press Enter to apply the change.
Note: This tutorial assumes that the Aleria E²soft
software and the E²drive device driver have been
successfully installed. If this is not the case, please follow the installation procedure of the previous
section prior to starting this tutorial.
1. Loading the software
Connect the E2drive and Load Aleria’s E²soft by double-clicking
on the desktop icon or by selecting on your Start menu Start >
Programs > Aleria > E²soft. The main window appears (Fig. 10).
2. Viewing real-time data
The six graphs visualize real-time activity of channels 1 to 6.
Each graph displays a hundred milliseconds of activity and is
refreshed ten times per second. By default, the Y axis displays a voltage range from -200 to 200 microvolts.
2.1. Changing the voltage range of a channel
Change the voltage range of channel 1 by clicking the
Auto button located below the graph. The software automatically computes an appropriate range based on the
last 10 seconds of activity. The graph should now look
2.2. Changing the voltage range of all channels
Change the voltage range of all channels simultaneously
by clicking the Autoscale button (shown below) located
just above the first graph. Notice how all graphs exhibit
the same voltage range which facilitates comparison of
activity across channels.
FIGURE 10. E²soft main window
13
Aleria Biodevices
2.3. Freezing image
Freeze the graphs by clicking the Freeze button (shown
below). Real-time visualization is stopped until you click
the Freeze button again.
3.2. Saving the recordings
By default, recordings are saved to the folder <Installation folder>/My Recordings. In this case, we will save our
recording onto the Desktop.
3.2.1. In the Record to disk panel, click the browse button
shown below.
2.4. Creating screenshots
Create a screenshot of the graphs by clicking the Printscreen button (shown below). The screenshot is automatically saved to the My Screenshots folder in JPEG format.
By default, this folder is located in <Installation folder>/
My Screenshots.
3.2.2. In the Browse For Folder dialog that appears, select the Desktop node and click OK. The Location
text box should now contain a folder path similar to
C:\Documents and Settings\<User>\Desktop.
3.3. Changing the name of the recording
Next, change the name of the recording into Tutorial recording and add This is a test recording as a description.
3.4. Setting the duration of the recording
Set the duration of the recording to one and a half minutes. To do so, check the Predefined length radio button
and then enter 1 in the text box designated for minutes
and 30 in the text box designated for seconds. The Record to disk panel should now look like the one shown
below.
3. Making a recording
The next steps demonstrate how to make a recording.
3.1. Choosing the channels from which to record
By default, all channels are activated for data acquisition.
To record from channels 1, 3 and 5 only, deactivate channels 2, 4 and 6 by clicking the corresponding buttons in
the Select channels panel. Your panel should now look
like the one displayed below.
3.5. Starting the recording
Start the recording by clicking Start recording. The data
from channels 1, 3 and 5 is now being saved to disk. During the recording, a flashing recording indicator displayed in the status bar reminds you that a recording is in
progress (shown below). Wait until de recording finishes.
3.6. Ending of a recording
A message will appear indicating that the recording has
finished, as shown below. Click OK.
Note that by deactivating channels 2, 4 and 6, the sampling frequency for channels 1, 3 and 5 is doubled. The
E²drive automatically redistributes its sampling power
over the number of active channels.
14
A new approach to electrophysiology for your neuronal cultures E²dish
3.7. Verifying the file was correctly saved
To verify that the recording exists in the folder you specified, open the folder in Windows Explorer. Inside the
folder you should see two files, a data file (Episode_1.adf)
and a header file (RecordingDescription.ahf). The data
file contains the raw data of the recording; the header
contains the recording parameters such as the sampling
frequency and the number of activated channels.
3 and that the SamplingFrequency property should equal
20000. The recording properties also include the date of
recording, the start time and end time and the total number of samples saved per channel.
4. Loading a recording
The next steps demonstrate how to load a recording and display the data.
4.3. Displaying data of a specific channel
Click Display recording in the Load recording panel to display the data recorded and wait until the progress bar
completes. The recording is plotted as shown below.
Note: This tutorial assumes you have followed the
previous steps of the E²soft tutorial.
4.1. Load a file
Switch to the analysis window by clicking the Analysis tab
(shown below). In the Load recording panel, select the
node Tutorial recording located under the Desktop node.
You will notice that an
entry is added to the
Episodes box and the
Display recording button
is enabled, as shown
below.
4.2. Inspection of
properties
Inspect the properties
of the recording in the
Recording
properties
panel. The panel should
look like the one displayed. If you have correctly followed the steps in the section “Making a recording”, the NumberOfChannels property should equal
Remove a channel from the graph by clicking on one of
the numbered buttons located above the graph. Using
these buttons you can toggle the appearence of a channel in the dataset. Add the channel again to the plot by
clicking on the same button..
4.4. Zooming
Zoom into a portion of the dataset by left-clicking in the
main graph and –while holding the mouse button– dragging out a rectangle. Release the mouse button to zoom
into the region you selected.
15
Aleria Biodevices
4.5. Un-zooming
Right-click within the main graph to return the previous
zoon level.
5. Analyzing a data
The Analysis panel contains functionality to filter your data
and apply a burst detection algorithm.
removal and click OK. In the Analysis panel, your newly
created filter is now selected. Click the Apply button to
apply the filter to the data. The plot is automatically updated. Depending on the size of your data and the number
of active channels in the graph, the filtering may take up
to several seconds.
5.3. Performing a burst detection
Perform a burst detection by selecting the Burst detection option in the Analysis panel and click Run to filter and
analyze your data. Depending on the size of your recording, this operation may take up to a minute
The graph will be updated to show the lowpass filtered
signal on which the threshold detection is performed as
well as the threshold that has been automatically computed on the basis of the noise in each channel.
5.1. Reducing noise
Reduce noise in your recording by applying one of the
already provided filters to your data or create a new filter
of your own.
5.2. Creating a Filter
Apply a 100-3000 Hz bandpass filter to the data. To do so,
click the New… button to display the Filter design screen
to create a new digital filter.
In the Filter design screen, set the Design method to IIR
Butterworth, the Response type to Bandpass, the Filter
order to 8 and the Low and High cutoff frequency to 100
and 3000, respectively. Click the Realize model button to
view the frequency response of the filter and then click
Save. In the dialog that appears, type Bandpass noise
16
5.4. Change the threshold values
In the screen that pops up, you are able to change the
value for each threshold and the graph is automatically
updated to show the new position of the threshold. While
the popup screen is shown, you can continue to use the
zooming functionality of the graph. You can also specify
for each channel the minimum amount of time the signal
has to remain above the threshold in order for a burst to
be detected. Change the values of the thresholds and
click Recompute to perform the burst detection based on
the new parameters. Note how the number of detected
bursts changes.
6. Troubleshooting
The Aleria E²drive is not recognized or is
not installed correctly
4. Select the Hardware tab and click Device Manager. This
opens up the Device Manager, as shown below.
The Aleria E²drive needs a custom driver to be installed in
your system in order to work properly. Normally, this driver
is copied to your system during installation of the E²soft software and is installed right after you connect the E²drive to
your PC for the first time. The driver may not have been correctly installed or may have disappeared from your system
after installation. In that case, the E²drive might not be recognized by Windows or might not work properly.
Follow the procedure below to check the status of the E²drive
and its driver.
1. Ensure that the E2drive is disconnected to the PC. Check
that the USB port works properly by attaching a USB memory stick or some other USB device like a mouse or keyboard.
2. Attach the E2drive. You may receive one of the following
message boxes:
2.1. USB Device Not Recognized
In case a message box appears that informs you that
the USB device is not recognized (like the one shown
below), the cause of the problem is hardware related.
In that case, contact the technical support of Aleria Biodevices.
5. You should see a node Aleria E²drive attached to a node
Aleria USB amplifiers or Other devices. If this is not the case,
go to Action > Scan for hardware changes to detect the Aleria
E²drive. Return to step 2.2.
6. Right-click the node Aleria E²drive and select Properties. The
Aleria E²drive Properties screen appears, as shown below.
2.2. Found New Hardware
In case a message box appears that informs you that new
hardware is found (like the one shown below), wait until
the New Hardware Found wizard is shown. Then, follow
the procedure described in the E²soft and driver installation manual. If the New Hardware Found wizard does not
appear automatically, proceed to step 3.
3. Open the System Properties window by right-clicking the
My Computer icon and choosing Properties. Alternatively,
open My Computer and click View system information in the
System Tasks panel.
7. Select the Driver tab and click Update Driver to start the
driver installation procedure. Then follow the steps described
in the E²soft and driver installation manual.
17
7. Frequently asked questions
Q: Can
I reuse the E²dish?
A: Generally speaking no. Bubble-free attachment of the
E²dish to the substrate and clean non-blocked integrated
micropipettes are important to achieve successful recording. Once used for culture, the E²dish often retains debris
within the microchannel. Moreover, repeated handling leads
to attachment of particles on the bottom side, precluding adequate seal against the substrate. Cleaning procedures with
solvents often result in toxicity due to leaching during culture
of the solvent used for cleaning.
Q: I
don’t remember on which side of the
E²dish is the microchannel?
A: Place the E²dish in a clean and sterile dish and check under
the microscope.
Q: There
are bubbles in the microchannel,
what can I do?
I record with my amplifier inside the
incubator?
A: When placing the E²dish on the substrate of your culture,
make sure you press gently the device from the centre to the
outer part in order to remove air bubbles. If you still have bubbles, make sure that you remove the cover of the culture dish
before you place the E²dish in the CO2 minichamber as this
would result in an inadequate CO2 exposure.
A: It is not recommended. High humidity will shorten the life
of your amplifier.
Q: Which
Q: Can
Q: Is
it important that the E²dish is centrally
placed in the culture dishes?
A: Yes, this is very important otherwise the reservoir holes
will not line up with the electrodes which will either result in
unstable recordings (due to the electrodes touching the walls
of the reservoir) or damaged electrodes. Use the template
supplied in annex C.
Q: I
have trouble aligning the E²dish using
the alignment template?
A: The alignment template has been designed to use with a
60 mm culture dish and small size deviations may cause problems. If you downloaded the alignment template from Aleria
Biodevices web, make sure you select the No scaling option
of the printer settings.
Q: What
can I do if I bend the electrodes?
A: If an electrode is slightly bent it can be easily straightened
with tweezers. However, after straightening it is likely that the
silver chloride coating will be damaged and so the electrode
will have to be recoated. If the electrodes are damaged at higher levels, please contact [email protected].
Q: My
recordings are unstable/noisy?
A: First check that the fan and lights have been switched off
inside the cabinet before starting recordings. Make sure the
electrodes are not touching the walls of the reservoirs and
are not damaged. If you still record a noisy signal you should
make sure that the E2drive is connected to the main building
earth. Check with the building maintenance personal if you
are unsure about this.
18
should be the final volume of
culture medium for each well?
A: The maximum volume the wells of the E²dish admit is approximately 120 µL.
Q: While
recording, is my culture sterile?
A: The cover of the amplifier should maintain the sterility of
your culture. However, it is highly recommended that you always work under the flow hood.
Q: How
long can I record from the E²dish?
A: The E² technology does not limit the recording time. This
will only depend on your experimental conditions and on the
remaining disk space left on your computer.
Q: I
have trouble aligning the E²dish using
the alignment template?
A: The alignment template has been designed to use with a
60 mm culture dish and small size deviations may cause problems. If you downloaded the alignment template from Aleria
Biodevices web, make sure you select the No scaling option
of the printer settings.
Annex A
Theory of Operation of E²dish Technology
T
Electrical activity in neurons is associated with the transmembrane flow
of ions, mostly Na+, K+ and Ca2+, in
the millisecond time-scale, resulting
V
in a relatively fast change in membrane voltage – the action potential (AP). Most electrophysiological
techniques attempt to measure this
change in membrane potential (current-clamp modes) or the
actual ionic currents underlying it (voltage-clamp modes).
During an action potential the membrane can depolarize up to
100 mV above its resting value for approximately 1ms as a result of the inflow of positive charges (Na+). The actual charge,
Q,displaced into the cell to produce the rising phase of an
action potential depends on multiple parameters but a first
estimate can be calculated as,
Q = C xV
where C is the capacitance of the cell and V de magnitude of
the action potential (AP). Although the values for C and V vary
from cell to cell, we can use 100 pF and 100 mV as physiologically plausible values for capacitance and AP size, resulting in
Q= 10 picoCoulombs.
This AP-generating charge, Q, flows into the cell during a
short period of time, T, during which the membrane potential
is driven from resting potential to the peak AP value. Assuming T=500 µs, we can estimate that the generation of an AP
in a neuron with a capacitance of 100 pF requires a pulse of
inward Na+ current of a magnitude of
I = Q /T
Axon Hillock
or I=20 nA. The ionic current I flows
along closed loops, partly inside and
partly outside the cell, and with a generator locus believed to reside at the
axon hillock.
Electrophysiological recordings typically involve either accessing the intracellular space to measure V or confining I to
measure its magnitude.
The biophysical basis of E²dish measurements can be easily
related to more conventional techniques.
Extracellular electrophysiology
Usually a glass micropipette with an
internal metal wire, often Ag/AgCl, is
used as the sensing electrode. The tip
of the micropipette is positioned in the
proximity of a cell, not necessarily in
physical contact with its membrane.
Because the current, I, must flow partly along the extracellular medium, and this path possesses a non-zero electrical
resistance (given by the intrinsic resistivity, ρ, of the medium),
an extracellular potential Ve arises and is sensed by the microelectrode. The magnitude of the extracellular potential Ve can
be estimated using Ohms Law:
Ve = R x I
where Re is the resistance along the extracellular path of the
current, which can be estimated at several KOhms. The resulting Ve is then in the order of 10-100 μV, i.e. several orders
of magnitude below the intracellular action potencial V. Yet individual action potentials can be seen above noise.
Whole-cell
Patch-clamp techniques
For patch-clamp recordings the micropipette actually contacts
the membrane and electrically isolates a patch, typically as
small as 1 μm². Suction is commonly used to attach the micropipette to the cell and achieve a good seal. The resistance of
the seal is at least 1 GOhm, compared to several KOhms with
extracellular measurements. With such high seal resistances,
little current leaks through the micropipette-membrane gap.
Loose-patch techniques
The loose-patch method can be considered an intermediate
configuration between extracellular and patch-clamp. The micropipette isolates a patch of membrane but the seal does not
reach 1 GOhm but remains in the range 10-50 MOhms.
Loose-patch is used for rapid screening of cells in a culture.
The moderate seal resistance precludes measurements of intracellular potential but allows detection of action potentials.
19
Aleria Biodevices
E²dish as an automated loose-patch configuration
The measurement techniques above require the confinement
of a patch of membrane and the presence of the tip of the
pipette acting as a sensor. The electrical resistance of the
confinement varies amongst techniques, from a few KOhms
in extracellular recordings (confinement effected by the extracellular medium itself), to 10-50 MOhms in loose-patches
(confinement by the pipette loosely attached to the cell) and
up to several GOhms in gigaseal patch-clamps (confinement
by tight physical contact between pipette and membrane).
Common to all the techniques
above is the need to manually manipulate the micropipette in close
proximity to the cell. E²dish follows
an alternative strategy shown in
figures A, B and C. A micropipette
B
(A) can be integrated in a substrate
using microfabrication technology
(B) and neurons cultured in the vicinity of the tip will sprout randomly
into the integrated micropipette/miC
crochannel (C). The patch of membrane grown in the microchannel
is usually larger than the confined
patch in conventional patchclamp.
For example, for a L=200 µm long
axon inside the microchannel, with a radius of R=0.5 µm, the
total confined membrane is
A
Confined
membrane
path
Surface = 2 x π x R x L = 628 µm²
compared to ~1 µm². In general, the more membrane surface
is confined the larger the expected signals. To a first approximation, the signal size can be expected to increase with the
20
product of the confined surface and seal resistance, following
Ohms law,
Voltage signal size = S x J x R seal
where S is the surface of the membrane patch in the microchannel, J the current density per unit of surface and Rseal the
resistance of the seal. Yet as axons grow into the microchannel, a gap remains between the membrane and the walls of
the microchannel, so that a gigaseal is rarely achieved. The
resistance of the microchannel measured end-to-end is typically in the range 10-20 MOhms and the voltage signal size
is in the order of hundreds of µV (see screen capture below
from E16 hippocampus cultures). Action potentials can clearly
be seen above noise.
ACTION POTENTIALS FROM E16
HIPPOCAMPUS 14-DIV
Annex B
Amplifier Datasheet
Component description
USB connection
Device Geometry
Circular
USB cable (standard)
Male – Male / A – Mini B
Dimensions (diameter x high)
165 mm x 30 mm (39 mm
with plastic lockers)
Length
2m
Weight
660 g (without plastic cover),
710 g (with plastic cover)
Electrical characteristics
Operating Temperature
10ºC to 60ºC
Supply Voltage (from external AC/DC
adaptor)
12V DC ± 2%
Supply Current (from external AC/DC
adaptor)
400 mA / 500 mA
Number of channels
6
Maximun Input Signal (peak to peak)
2.2 mV
Maximum Output Signal per-ADC
(peak to peak)
5.0 V
Bandwidth (-3dB of maximun gain)
0.8 Hz – 3.9 kHz
Gain
2300 (67 dB)
Input Noise Voltage (grounded channel)
< 1 μVRMS
Noise density (grounded channel)
18 nV/√Hz
Spring-Loaded Pin – Max. Number of
cycles
1,000,000
Electrodes
Ag
Electrodes-spring-loaded pin
interconnection material
Stainless Steel
Spring-loaded pin material (shell plating)
20 μm Gold over Nickel
Inverted Microscope compatibility
Yes(1)
Header (row)
5 square pins
Pitch
2.54 mm (0.1 inches)
The physical distribution of the channels to be used with the
E²soft Software is shown in the figure below. The ground pins
are connected internally, then all channels have a common
reference ground (Fig. 11).
ORIENTATION SIGNAL
CH1
Notes: (1) Depending on microscope stage dimensions
Data acquisition
GND
GND
CH6
CH2
GND
GND
CH5
CH3
GND
GND
ORIENTATION
SIGNAL
CH4
FIGURE 11. Plastic cover spring-loaded pin distribution
Output jack (ext/int/length)
5.5 mm / 2.1 mm / 9 mm
Positive pin
Center
CH5
CH4
CH3
NOT USED
CH6
400 mA/500 mA
NOT USED
Max. output current
J7
12V DC
J6
Output voltage
1
J5
EU mains/UK mains
2
1
J4
Plug-in
2
J3
MASCOT 8613 regulated 12V /
MASCOT 9793 regulated 12V
J2
Power supply
CH2
60 ksps
CH1
Max. sampling frequency (only
one channel acquired)
The number of channels used (from 1 to 6) depends on the
user application. It is possible to ground any channels by hardware using the jumpers installed on the printed circuit board
(PCB).
J1
10 ksps/channel
J0
Sampling frequency (all channels
acquired)
CH
16
GND
Number of bits
External AC/DC Adaptor
ICSP (In-Circuit Serial Programming) PCB connection
FIGURE 12. Jumper settings for channel connection inside PCB
21
Annex C
E²dish-substrate alignment template
Download the template at
www.aleriabio.com
22
Notes
23
Parc Científic de Barcelona
c/ Baldiri Reixac 15-21 | 08028 Barcelona, Spain
www.aleriabio.com | [email protected]


![Descargar - index [revista.cnic.edu.cu]](http://vs1.manualzilla.com/store/data/006273898_1-89efab09a622fdfc6ec934b030e2e15f-150x150.png)