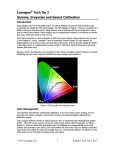
1
Radiance 2123 TM and Radiance 2143TM Video Processor Owner’s Manual Limited one (1) year warranty on Lumagen, Inc. products. Lumagen, Inc. (“Lumagen”) warrants (the “Warranty”) only to the original retail purchaser (“You”), only that this Lumagen product (the “Product”) will be free from defects in material and workmanship for a period of one (1) year from the date of original retail purchase from a Lumagen franchised dealer (the “Dealer”). Lumagen makes no Warranty for Products purchased from other than a Lumagen Dealer. FAILURE TO RETURN THE WARRANTY CARD MAY MATERIALLY AFFECT YOUR RIGHTS UNDER THIS WARRANTY. The defective Product must be shipped in the original shipping container, together with a description of the problem, plus Your contact information and proof of the date of purchase, prepaid and insured, to Lumagen. Risk of loss during shipping is borne by You. Purchase date is subject to confirmation with the Dealer. You must contact Lumagen or the Dealer for shipping instructions. Lumagen will examine the Product. If Lumagen determines, in its sole opinion, that the Product is defective in materials or workmanship during the Warranty period, Lumagen will, at its option, repair, or replace with an equivalent, or better, Product at no additional cost, or refund the net original purchase price. All parts that are replaced become the property of Lumagen. If Lumagen determines that the Product is defective in materials or workmanship during the Warranty period, the Product will be returned to You within a reasonable time after it has been repaired or replaced, freight prepaid. If Lumagen determines the Product is not defective in materials or workmanship during the Warranty period, You will be charged for the examination, and the Product will be returned to You, within a reasonable time, C.O.D. for an amount that includes the examination, C.O.D. and shipping charges. This Warranty does not include service or parts to repair damage caused by, in Lumagen’s sole opinion, acts of God, acts of war, accident, misuse, negligence, inadequate packing or shipping procedures, applied voltage in excess of rated maximum, appearance of cabinetry not directly attributable to defects in materials or workmanship, for any modifications to the Product, or if the serial number has been removed or defaced. THIS WARRANTY IS IN LIEU OF ALL OTHER WARRANTIES, EXPRESSED OR IMPLIED. IF THE PRODUCT IS DEFECTIVE IN WORKMANSHIP OR MATERIALS DURING THE WARRANTY PERIOD, THE SOLE REMEDY SHALL BE REPAIR OR REPLACEMENT AS SPECIFIED ABOVE. IN NO EVENT SHALL LUMAGEN BE LIABLE FOR AN AMOUNT MORE THAN THE ORIGINAL PURCHASE PRICE OF THE PRODUCT. LUMAGEN SHALL NOT BE LIABLE FOR OMISSIONS OR ERRORS IN ITS DOCUMENTATION OR SOFTWARE. LUMAGEN RESERVES THE RIGHT TO MAKE CHANGES TO ITS PRODUCTS AND DOCUMENTATION WITHOUT NOTICE. TO THE EXTENT NOT PROHIBITED BY LAW, IN NO EVENT SHALL LUMAGEN, ITS SUPPLIERS, OR ITS DEALERS, BE HELD LIABLE FOR ANY LOST REVENUE, LOST PROFIT, SPECIAL, INCIDENTAL, INDIRECT, CONSEQUENCIAL, OR PUNITIVE DAMAGES, HOWEVER CAUSED, REGARDLESS OF THE THEORY OF LIABILITY, RESULTING FROM THE USE OF, OR INABILITY TO USE, THIS PRODUCT, EVEN IF LUMAGEN, ITS SUPPLIERS, OR ITS DEALERS, HAS BEEN ADVISED OF THE POSSIBILITY OF SUCH DAMAGE. Some jurisdictions do not allow exclusion or limitation of consequential damages, so the above limitations may not apply to You. All implied warranties are expressly disclaimed. If held otherwise by a court of law, all implied warranties are limited to the duration of this express Warranty. Some jurisdictions do not allow the limitation on how long an implied Warranty lasts, so the above limitation may not apply to You. This Warranty gives You specific legal rights, and You may also have other rights, which vary from jurisdiction to jurisdiction. Cut on line below and mail completed Warranty registration to Lumagen. WARRANTY REGISTRATION Name: ______________________________ Address: Email: Product name: Serial Number: Purchase date: Dealer name: Place in envelope and mail to: Lumagen, Inc. 14025 SW Farmington Rd Suite 280 Beaverton, OR 97005-2513 LEGAL NOTICES: TO THE EXTENT NOT PROHIBITED BY LAW, IN NO EVENT SHALL LUMAGEN, ITS SUPPLIERS, OR ITS DEALERS, BE HELD LIABLE FOR INJURY TO PERSONS OR PROPERTY, ANY LOST REVENUE, LOST PROFIT, SPECIAL, INCIDENTAL, INDIRECT, CONSEQUENCIAL, OR PUNITIVE DAMAGES, IMPAIRMENT OF OR DAMAGE TO OTHER GOODS, HOWEVER CAUSED REGARDLESS OF THE THEORY OF LIABILITY, RESULTING FROM THE USE OF, OR INABILITY TO USE, THIS PRODUCT, EVEN IF LUMAGEN, ITS SUPPLIERS, OR ITS DEALERS, HAS BEEN ADVISED OF THE POSSIBILITY OF SUCH DAMAGE. LUMAGEN SHALL NOT BE LIABLE FOR OMISSIONS OR ERRORS IN ITS DOCUMENTATION OR SOFTWARE. LUMAGEN RESERVES THE RIGHT TO MAKE CHANGES TO ITS PRODUCTS AND DOCUMENTATION WITHOUT NOTICE. DarbeeVision Inc. - End User License Agreement (E.U.L.A) for DARBEE Visual Presence™ Technology in Lumagen Radiance Products: This product provides the ability to turn off DARBEE Visual Presence (DVP™) processing, because the DVP technology processing feature in this product is not intended for commercial broadcast or theatrical presentation applications. By using this product, you accept that the DVP technology ingredient is intended for personal or small network use and should be switched off if this video processor system is used to process video for commercial broadcast or commercial theatrical viewing applications. You may not record the DVP processed output of this video processor system. You may use DVP in this product to process video for up to six end user displays, within any video system application, provided the DVP processed output video of this system is not being sold to an end viewer or user. An additional commercial license is available from DarbeeVision, Inc. for larger video network, distribution, commercial applications. You may not reverse engineer or otherwise deconstruct the DVP algorithm, which is the sole intellectual property of DarbeeVision, Inc., and protected by patents and trade secrets. This E.U.L.A. is not intended to limit the use of this product or its features, when the video processor is used with DVP off. This equipment has been tested and found to comply with the limits for a class B digital device, pursuant to Part 15 of the FCC rules, Canadian ICES-003, and CISPR 22. These limits are designed to provide reasonable protection against harmful interference in a residential installation. This equipment generates, uses, and can radiate radio frequency energy and, if not installed and used in accordance with the instructions, may cause harmful interference to radio communications. However, there is no guarantee that interference will not occur in a particular installation. If this equipment does cause harmful interference to radio or television reception, which can be determined by turning the equipment off and on, the user is encouraged to try to correct the interference by one or more of the following measures: Reorient or relocate the receiving antenna. Increase the separation between the equipment and receiver. Connect the equipment into an outlet on a circuit different from that which the receiver is connected. Consult the dealer or an experienced radio/TV technician for help. - Unauthorized modifications to this equipment may void Lumagen’s limited warranty and the user’s authority to operate this equipment. Lumagen is a registered trademark of Lumagen, Inc. Radiance, Vision, and other Lumagen product names, are trademarks of Lumagen, Inc. Darbee™ and DarbeeVision™ are trademarks of DarbeeVision Inc. Other trademarks are the property of their respective owners. WARNINGS: • Do not defeat the safety features of the power supply or power cord, such as, but not limited to, removing the ground pin connection. • Do not open, insert objects into, or spill liquid into, this equipment. • Do not block the cooling vents, and make sure there is adequate cooling around unit. • Do not program an output resolution that exceeds the maximum specified refresh rate of the attached television, or projector. • Improperly set gray-bar intensity may accelerate screen burn-in. Consult a hometheater specialist for help setting gray-bar intensity. Table of Contents Contents SECTION 1 – INTRODUCTION .................................................................................................................................. 1 Document Conventions and Menu Navigation .......................................................................................................... 2 Unpacking ................................................................................................................................................................. 2 Verify that your box contains the following items ..................................................................................................... 2 Remote Control Battery Installation ......................................................................................................................... 2 Installation Guidelines .............................................................................................................................................. 2 SECTION 2 – OVERVIEW ........................................................................................................................................... 3 FRONT PANEL ................................................................................................................................................................ 3 REAR PANEL .................................................................................................................................................................. 3 HDMI CONNECTIONS..................................................................................................................................................... 3 MISCELLANEOUS CONNECTIONS ..................................................................................................................................... 3 Remote Control ......................................................................................................................................................... 4 Block Diagram .......................................................................................................................................................... 5 Configuration Memories ........................................................................................................................................... 6 SECTION 3 – QUICK START GUIDE ........................................................................................................................ 7 INSTALLATION INSTRUCTIONS ........................................................................................................................................ 7 System Configuration Examples................................................................................................................................ 8 Source Device Connection Examples ........................................................................................................................ 9 SECTION 4 – BASIC COMMANDS .......................................................................................................................... 10 Power ...................................................................................................................................................................... 10 Input Selection ........................................................................................................................................................ 10 Configuration Memory Selection ............................................................................................................................ 10 Input Aspect Ratio Selection ................................................................................................................................... 10 Image Zoom ............................................................................................................................................................ 10 Status Screen ........................................................................................................................................................... 11 On-Screen Help....................................................................................................................................................... 11 Quick Keys .............................................................................................................................................................. 11 SECTION 5 – VIDEO CONFIGURATION ............................................................................................................... 12 VIDEO OUTPUT SETUP MENU ....................................................................................................................................... 12 CUSTOM MODES MENU ................................................................................................................................................ 12 Output Mode – Global Presets ................................................................................................................................ 13 Exact Output Timing ............................................................................................................................................... 13 CMS MENU ................................................................................................................................................................. 13 Gamma Factor ........................................................................................................................................................ 13 Color Gamut ........................................................................................................................................................... 13 Grayscale and Gamma............................................................................................................................................ 13 Color Decoder ........................................................................................................................................................ 13 Black Level.............................................................................................................................................................. 13 White Level ............................................................................................................................................................. 14 STYLES MENU .............................................................................................................................................................. 14 Output HDMI Format ............................................................................................................................................. 14 Rate Match .............................................................................................................................................................. 14 Color Format .......................................................................................................................................................... 14 Dither ...................................................................................................................................................................... 14 Mask........................................................................................................................................................................ 14 Shrink ...................................................................................................................................................................... 14 Gray Level............................................................................................................................................................... 14 Screen Aspect Ratio ................................................................................................................................................ 15 Graybar Intensity .................................................................................................................................................... 15 3D Glasses Adjust ................................................................................................................................................... 15 Soft Edge ................................................................................................................................................................. 15 MISC. OUTPUT SETTINGS.............................................................................................................................................. 15 3D Output EDID Configuration.............................................................................................................................. 15 Sync Polarity ........................................................................................................................................................... 15 Table of Contents Copy Output Settings .............................................................................................................................................. 15 HDMI Input Setup ................................................................................................................................................... 16 HDMI Virtual to Physical Input Mapping .............................................................................................................. 16 HDMI Video Type ................................................................................................................................................... 16 HDMI Level ............................................................................................................................................................ 16 Video EDID Display Information for HDMI inputs ................................................................................................ 16 HDMI Input Hotplug Mode..................................................................................................................................... 16 HDMI Auto Aspect .................................................................................................................................................. 17 INPUT PICTURE CONTROLS ........................................................................................................................................... 17 Black and White Levels ........................................................................................................................................... 17 Color Format .......................................................................................................................................................... 17 Color and Hue ........................................................................................................................................................ 17 Y/C Delay ................................................................................................................................................................ 17 INPUT SIZE CONTROLS ................................................................................................................................................. 18 Scale Bias................................................................................................................................................................ 18 Input Sizing ............................................................................................................................................................. 18 Vertical Shift ........................................................................................................................................................... 18 Non-linear Stretch ................................................................................................................................................... 18 Input Masking ......................................................................................................................................................... 19 INPUT CONTROL MENU ................................................................................................................................................ 19 Deinterlacing Mode ................................................................................................................................................ 19 Inter Frame Motion Detection (IFMD) ................................................................................................................... 19 Deinterlacing Field Flip ......................................................................................................................................... 19 Genlock ................................................................................................................................................................... 19 Game Mode ............................................................................................................................................................. 19 Reinterlace .............................................................................................................................................................. 20 INPUT ENHANCEMENT CONTROLS................................................................................................................................. 20 Sharpness ................................................................................................................................................................ 20 Noise Reduction ...................................................................................................................................................... 20 Adaptive Contrast ................................................................................................................................................... 20 Copy Enhancement Settings .................................................................................................................................... 20 MISCELLANEOUS INPUT CONTROLS .............................................................................................................................. 20 Input Label .............................................................................................................................................................. 20 Copy Input Settings ................................................................................................................................................. 20 Selecting an Output Configuration for an Input Memory ....................................................................................... 20 SECTION 6 – AUDIO CONFIGURATION ............................................................................................................... 21 Introduction to the Audio Menu .............................................................................................................................. 21 Audio Menu Navigation .......................................................................................................................................... 22 Audio Menu Selections ............................................................................................................................................ 22 Audio Menu Structure ............................................................................................................................................. 22 Audio User EDID.................................................................................................................................................... 23 Input Memory Specific Audio EDID ....................................................................................................................... 23 SECTION 7 - CALIBRATION .................................................................................................................................... 24 SECTION 8 – MISCELLANEOUS COMMANDS.................................................................................................... 25 SYSTEM SETTINGS ........................................................................................................................................................ 25 Menu Mode ............................................................................................................................................................. 25 Timeouts.................................................................................................................................................................. 25 OSD Enable ............................................................................................................................................................ 25 Input Reselect .......................................................................................................................................................... 25 Menu Placement...................................................................................................................................................... 25 Input Menu .............................................................................................................................................................. 25 Initial Power State .................................................................................................................................................. 25 Initial Input State .................................................................................................................................................... 25 On/Off Message ...................................................................................................................................................... 26 Message Control ..................................................................................................................................................... 26 Test Patterns ........................................................................................................................................................... 26 Remote Control Arrow Buttons ............................................................................................................................... 26 LED Setup ............................................................................................................................................................... 26 RS-232 Setup ........................................................................................................................................................... 26 3D Glasses .............................................................................................................................................................. 27 Zoom Step ............................................................................................................................................................... 27 Table of Contents Quick Keys .............................................................................................................................................................. 27 Configuration Memory Usage................................................................................................................................. 27 SAVING THE CONFIGURATION ....................................................................................................................................... 27 Save ......................................................................................................................................................................... 27 Undo ....................................................................................................................................................................... 28 Restore ISF calibration ........................................................................................................................................... 28 Revert To Factory Settings ...................................................................................................................................... 28 SECTION 9 – 3D SUPPORT ....................................................................................................................................... 29 3D TYPES..................................................................................................................................................................... 29 Frame Packed ......................................................................................................................................................... 29 Side-by-Side ............................................................................................................................................................ 29 Top-Bottom ............................................................................................................................................................. 29 Frame Sequential .................................................................................................................................................... 29 Separate Left and Right........................................................................................................................................... 30 3D OUTPUT SETTINGS .................................................................................................................................................. 30 3D Output Setup Menu............................................................................................................................................ 30 3D Output Mode = Auto ......................................................................................................................................... 30 3D Output Mode = Specific Format ....................................................................................................................... 30 3D Output Type = Auto........................................................................................................................................... 30 3D Output Type = Specific 3D Type ....................................................................................................................... 30 3D EDID Configuration.......................................................................................................................................... 31 3D SETUP PROCEDURES ............................................................................................................................................... 31 Normal Setup .......................................................................................................................................................... 31 Display Optimization .............................................................................................................................................. 31 Setup for Non-Compliant Displays ......................................................................................................................... 31 Setup for Non-Compliant 3D Video Sources ........................................................................................................... 32 SECTION 10 – DARBEE VISUAL PRESENCE™ ................................................................................................... 33 DARBEE MENU ............................................................................................................................................................. 33 Darbee menu control .............................................................................................................................................. 33 Gain ........................................................................................................................................................................ 33 Mode ....................................................................................................................................................................... 33 Enabled ................................................................................................................................................................... 33 View ........................................................................................................................................................................ 33 SECTION 11 – COMMAND INTERFACE ............................................................................................................... 34 DIRECT COMMANDS ..................................................................................................................................................... 34 Output Vertical Resolution...................................................................................................................................... 34 Output Mode Commands ........................................................................................................................................ 34 Output Vertical Rate ............................................................................................................................................... 34 Output Aspect Ratio ................................................................................................................................................ 34 Miscellaneous Commands....................................................................................................................................... 34 MENU SHORTCUTS ....................................................................................................................................................... 34 IR COMMAND LIST ....................................................................................................................................................... 34 ASCII COMMAND LIST ................................................................................................................................................ 34 SECTION 12 – SPECIFICATIONS ............................................................................................................................ 35 Section 1 – Getting Started Section 1 – Introduction Thank you for purchasing a Lumagen® Radiance™ video processor. The award winning Lumagen Radiance video processor family boasts the highest-performance video switching, processing and calibration available. This makes it ideal for premium quality high-definition home and commercial theater applications. Lumagen’s Radiance series refines and enhances the video images presented by high definition front projectors, top-level rear-screen and flat-panel displays. The Radiance family offers 10-bit front-end, and 12-bit back-end, processing, per-pixel standard definition (SD) and high definition (HD) video de-interlacing with adaptive diagonal filtering, No-Ring™ scaling technology that does not add ringing (unlike competing products), MPEG mosquito and block artifact ® reduction plus “3D” temporal noise reduction for both SD and HD sources. It supports HDMI 1.4 “3D” and uncompressed audio formats for Dolby-Digital TrueHD™ and DTS Master-Audio™ bitstream formats. At the same time Radiance processors can function as a central switching hub for the audio video system. For these reasons, the Radiance™ processor family sets the industry benchmark for switching, calibration and video processing performance. Key Features • • • • • • • • • • • • • • • • • • • • • • • • • • • • • • • Output resolution from 480p to 1080p60 (2123) or up to 4k60 8-bit 4:2:0 for 2143, plus 1080i Proprietary Lumagen No-Ring™ scaling Darbee Digital Visual Presence™ (DVP™) enhancement technology Full CMS (Color Management System) using a 729-point 3D linear-gamma RGB color palette 21-point parametric grayscale and Gamma 10-bit processing for deinterlacing plus a 12-bit calibration pipeline ® Support for HDMI 1.4 “3D” including anamorphic lens scaling Convert common optional 3D formats to a required 3D format that is supported by the display Each input has 4 user configuration memories Each input user configuration memory has 8 resolution sub-memories (for HD inputs) Each resolution sub-memory is linked to one of 8 output configurations. 2:2, 3:2 and 3:3 pull-down for SD/HD film sources Per-pixel SD/HD video de-interlacing Adaptive diagonal filtering MPEG mosquito and block artifact reduction Temporal noise reduction for SD and HD sources Output resolution from 480p to 1080p60 (2123) or 4k60 8-bit 4:2:0 (2143), plus 1080i User programmable non-linear-stretch (NLS) mode 4:3, LBOX, 16:9, 1.85, 2.35, 2.40 and NLS input aspect ratios Programmable output aspect ratio from 1.10 to 2.50 Extensive support for anamorphic lenses for both 2D and 3D video Large suite of test patterns Programmable input/output color-space Y/C-delay calibration CUE and ICP filtering Eight channel audio up to 192 kHz, DD True-HD™ 5.1, and DTS Master Audio™ Bitstream IR and RS232 control inputs (See Tech Tip 11 and 12 on the Lumagen.com support page) Internal USB-to-serial adaptor for command input or software updates. Wired IR format command input Universal, 100-240V, ~50/60Hz external 12 VDC power supply Optional rack mounting ears Copyright 2009-2014 Lumagen, Inc. 1 Radiance 2123 and 2143, Rev 041614 Section 1 – Getting Started Document Conventions and Menu Navigation Commands are selected with the supplied infrared remote or the RS232 serial port. To prevent possible command conflict, only one of these methods of command should be used at a time. See the Serial RS232 Command Interface section for information on serial commands. The infrared remote control command notation is described below: • Remote buttons are named as shown in a bold font. Example: MENU. • For comma separated lists, press the buttons in the sequence shown. • For parenthesized lists, select one button from the list. • For square-bracketed lists, press the buttons as needed. Example: For the list [, , , ], press the arrow keys as needed. • For menu commands press the MENU button. The and arrow keys are used to select the function. The arrow key (or OK) is used to enter sub-menus. This is shown as: MENU → MenuItem → MenuItem. Generally, the arrow key (or EXIT) steps up one menu level. • Numerical entries are listed as value. For numerical entries, the arrow key acts as backspace. • Some commands are activated immediately without the need to press OK. Other commands must be explicitly accepted by pressing OK. If needed, OK is listed as part of the command, and will complete the command and return the menu to one level higher in the menu system. Note that, at default settings, pressing OK when it is not required will bring up the Radiance Status Screen. • For many commands, pressing EXIT cancels a partially completed command and returns to one level higher in the menu system. For advanced commands changes are completed from within the command and EXIT just returns to one level higher in the menu system. • There are four independent configuration memory types for each input (MEMA, MEMB, MEMC and MEMD). The input setup and output resolution/timing can be set independently for each memory. To program an input memory, first select the input, then select the desired configuration memory and use the menu system to configure. • Some menu commands are only available when their associated input is selected. • Before changes are saved, they can be discarded by entering standby (STBY) mode. • A Save must be performed after any changes or all changes will be discarded the next time the unit enters standby (STBY), or power is lost. To save press MENU, , OK, OK, OK. Unpacking • • Unpack the box. Save the box and packing materials in case you need to ship your Radiance. Verify that your box contains the following items • • • • • • • Lumagen Radiance video processor. Universal, 100-240V, ~50/60Hz, 12 VDC power supply Remote control. AAA Batteries (2). Owner’s Manual. USB cable. If purchased, the optional 19 inch rack-mount ears. Remote Control Battery Installation 1. 2. 3. 4. 5. Locate the battery compartment on the back of the remote control. Move the locking tab to open the door. Remove the old batteries (if applicable). Install two new AAA batteries, observing the battery polarity shown in the battery compartment. Replace the battery compartment cover. Installation Guidelines • • • • • • • Select a cool, well-ventilated, dry location. Install the Radiance on a flat, level surface such as a table or shelf. Alternately the Radiance can be installed in an equipment rack by using the optional rack ears. Verify that the cooling vents are clear of obstructions to provide convection cooling. Only use the Lumagen approved power supply. Avoid sudden temperature changes, temperature extremes and excessive humidity. Unplug power to the Radiance before cleaning. Copyright 2009-2014 Lumagen, Inc. 2 Radiance 2123 and 2143, Rev 041614 Section 2 – Overview Section 2 – Overview Front P anel The front panel has a light-emitting-diode (LED) indicator, which is red when the unit is in “standby” and, by default, is green when the unit is “on.” Note: The green “on” indicator can be turned off if preferred. Rear P anel There are eight HDMI inputs. There are two HDMI audio/video outputs. Video can be output on one or both of the HDMI outputs. Audio can be output on one or both of the HDMI outputs. Additional connections are provided for a wired IR command input (38 KHz IR format), RS232 command input/update, Internal USB to serial adaptor for command/update, plus the 12 VDC power input. These connections are described on the following page. HDM I Connections 2 8 HDMI Outputs. Up to 1080p60 for the 2123. Up to 4k60 in 8-bit 4:2:0 mode for 2143 (output 2 only). Outputs support HDMI 1.4a audio formats. HDMI Inputs. Supports HDMI 1.4a with resolutions up to 1080p60 Note: CEC pass-through is connected from the HDMI inputs to HDMI Output 1. M iscellaneous Connections 1 1 1 1 IR format command input (See Tech Tip 9 on the Lumagen.com website). RS232 for commands and software update (See Tech Tip 6 & 11). Internal USB-to-serial adapter for commands and software update (See Tech Tip 6 & 11). Power Input (12 Volt DC) Copyright 2009-2014 Lumagen, Inc. 3 Radiance 2123 and 2143, Rev 041614 Section 2 – Overview Remote Control Note: PiP/PoP is not available for this product. Power / Standby ON Power On STBY Standby Navigation Control CLR Clear menu or partial commands HELP Display context-sensitive help EXIT Go back one menu level OK Enter/Accept command, display info screen Menu navigation / zoom in Menu navigation / zoom out Menu navigation / input aspect Menu navigation / input aspect Misc Buttons INPUT Precedes input # selection ZONE <not implemented> ALT Alternate info screens PREV Previous output Configuration Memories MEMA Memory A MEMB Memory B MEMC Memory C MEMD Memory D Numeric Entry 1-9 Input 1 to 9 +10 Input 10 and greater Picture-In-Picture (PIP) OFF Not applicable SEL Not applicable SWAP Not applicable MODE Not applicable Copyright 2009-2014 Lumagen, Inc. Input Aspect Ratio 4:3 4:3 (1.33) aspect ratio LBOX Letterbox 16:9 16.9 (1.78) aspect ratio 1.85 1.85 aspect ratio 2.35 2.35 aspect ratio NLS Non-Linear-Stretch 4 Radiance 2123 and 2143, Rev 041614 Section 2 – Overview Block Diagram The function of the Radiance is to act as a video switch, process the selected video source and then output video in the appropriate format and resolution. Standard definition (SD), enhanced-definition (ED), and high-definition (HD) video inputs, are supported. Video inputs are converted to progressive video, if necessary, and are then scaled to the video output resolution. Interlaced video has been in use for more than 50 years and is still a common video format. It displays half of the lines of picture information each sixtieth (or fiftieth) of a second. Each half of the image is called a field and displays either all the even lines, or all the odd lines. So, an entire image, called a frame, takes a thirtieth (or twenty-fifth) of a second to display on the screen. An “i” suffix on the resolution specification is used to indicate interlaced formats. In contrast, progressive video presents each frame as a whole. A “p” suffix on the resolution specification is used to indicate progressive formats. Converting interlaced video to progressive video is referred to as “deinterlacing.” The Radiance is comprised the following major functional sections: • • • • Video/Audio input selection Video deinterlacing (if required) Video processing and scaling Video/Audio output The functional blocks are shown below. If the video input is interlaced, it is first deinterlaced into a progressive format. User enabled noise reduction algorithms are then applied. Proprietary No-Ring™ scaling algorithms are used to scale the resulting progressive video to the optimal size for the display. Copyright 2009-2014 Lumagen, Inc. 5 Radiance 2123 and 2143, Rev 041614 Section 2 – Overview As part of the scaling process, digital filtering is used to enhance the image detail. This enhancement allows standard definition inputs, such as DVDs, to appear to be much higher resolution. This is especially valuable when standard-definition sources are viewed on the large screen sizes common in home theaters. Commands can be sent to the Radiance by infrared remote or via the serial RS232 port. The RS232 port is also used for software updates. Setup is done with the on-screen menu. User functions (e.g. select input) use direct commands. Configuration Memories To understand how the Radiance functions, it is important to note that setup and calibration parameters are split into “input memories” and “output configurations.” Input memories control the video source setup. Output configurations control the display setup and calibration. The Output configurations are specified by selecting a Mode, CMS and Style for each input, input memory, input resolution, and 2D/3D mode. The Radiance has four input memories (MEMA, MEMB, MEMC and MEMD). Each input memory has eight sub-memories that are automatically selected for input resolutions of 480, 576, 720p, 1080i50, 1080i60, 1080p24, 1080p60 and Other. The “Other” memory is reserved as a “catch-all” for unspecified resolutions. Each Input sub-resolution memory can be independently linked to any one of the eight Output Modes, eight CMS memories, and eight Style memories. These store setup data for the video display setup and calibration. In the factory default condition all input sub-resolution memories are linked to “Mode 0,” “CMS 0,” and “Style 0.” To change these enter MENU → Output → Output Setup → (2D/3D) → OK → (Mode, CMS, Style). These settings can be changed for each input sub-resolution memory. To “Save” new settings, enter MENU → Save → Save → OK. Default “Input Memory” and “Output ” configuration selection Copyright 2009-2014 Lumagen, Inc. 6 Radiance 2123 and 2143, Rev 041614 Section 3 – Quick Start Guide Section 3 – Quick Start Guide I nstallation I nstructions 1. Install two AAA batteries in the Lumagen Remote Control. 2. Disconnect all power in the system before connecting any A/V cabling to minimize the chance of damaging equipment. 3. Connect audio/video sources as appropriate. NOTE: The default configuration is to connect Radiance HDMI Output 1 to the AVR and HDMI Output 2 to the display. Lumagen strongly recommends that the Radiance be used as the switching device for ease of operation and best video quality. Default connections for System with AVR plus display/projector 4. Connect the Radiance outputs. If using only one Radiance output, use Output 1 if the Radiance needs to pass audio, or Output 2 if the Radiance does not need to pass audio. If using an AVR, or audio PrePro, connect it to Radiance Output 1 and the display/projector to Output 2. NOTICE: When using an AVR for audio, connect it to Output 1 and the display/projector to Output 2 as shown above. To save effort, do NOT connect the display/projector to Output 1 for this case, as it would require additional setup to function properly. 5. Connect/reconnect power. Plug the DC power cord from the Radiance power supply into the DC power jack on the back of the Radiance. Then connect the power cord to the Radiance power supply and plug it into a wall outlet. 6. Turn the other equipment on and use the Radiance remote control to turn the Radiance on. 7. Select the desired Radiance input using the Radiance remote control. The four video inputs are numbered 1 to 4. To select and input press the “Input” button and then press the corresponding number button on the remote. 8. Make sure the appropriate HDMI input on the display/projector is selected, and the selected source device is outputting active video. 9. You should now have an image on your display/projector. Note: The Radiance automatically selects the appropriate output resolution and frame rate for HDMI/DVI displays and projectors (including 24p when supported by the display/projector), when connected according to these instructions. 10. The default output aspect ratio is 16:9 (i.e. 1.78:1). No output aspect ratio selection is needed for 16:9 displays or projectors. For other output aspect ratios, please see the User Manual. Copyright 2009-2014 Lumagen, Inc. 7 Radiance 2123 and 2143, Rev 041614 Section 4 – Basic Commands System Configuration Examples The most common configurations using the Radiance are shown below. 1. Receiver after Radiance. The default configuration is to connect all the video sources to an input of the Radiance. Connect your receiver, or preamp, to Radiance HDMI Out 1, and your display/projector to Radiance HDMI Out 2. Only after all audio and video connections have been made, connect the power cable and turn everything on. The Radiance automatically detects the video EDID and the audio EDID and reports the EDID modes back to the source devices. This configuration can improve switching delays by using the Radiance’s fast input switching and guarantees that the receiver does not degrade the video. It also minimizes the work needed to configure the Radiance since, for output 2, audio is turned off by default. Note: Some amplifiers do not accept audio for non-standard video rates, such as 768p, or at any rate above 720p/1080i, and some amplifiers will not report EDID back to the Radiance unless the amplifier’s HDMI output is turned off, or is driving a display. 2. Audio and Video routed separately. Route the audio and video separately to the Radiance and a receiver. Connect the display to Radiance HDMI Output 2. This output has its audio turned off by default and so is correct by default for this case. 3. Receiver in front of Radiance. Use a receiver in front of the Radiance to switch the video sources. Lumagen recommends against using this configuration because some receivers add artifacts to the video. Connect the display to Radiance HDMI Output 2. This output has its audio turned off by default and so is correct by default for this case. Copyright 2009-2014 Lumagen, Inc. 8 Radiance 2123 and 2143, Rev 041614 Section 4 – Basic Commands 4. Receiver in front of and after the Radiance. Connecting the Radiance both in front of and after the AVR is not recommended, but can be used in special circumstances. This connection scheme can cause HDCP authentication loops, which cause power up and switching issues in some systems. Connect the AVR’s HDMI video output to an appropriate Radiance video input, and connect the Radiance’s Output 1 to an appropriate AVR input. Connect the display’s HDMI input to the Radiance’s HDMI Output 2. Change the Audio EDID in the main Audio menu to “User1 EDID.” Source Device Connection Examples The following illustrations show the types of cables, which can be used to connect typical video sources to the Radiance. Multiple possibilities are shown for some sources, but only a single connection is required. Bluray / Set Top Box / dVHS / Networked Media Player PC Copyright 2009-2014 Lumagen, Inc. 9 Radiance 2123 and 2143, Rev 041614 Section 4 – Basic Commands Section 4 – Basic Commands Power Turn power on by pressing the ON button. Place the Radiance in standby-mode by pressing STBY. Input Selection To select an input press the INPUT button and then press the corresponding number button on the remote. Shortcut: I f the m enu is not displayed on the screen, inputs can be selected by just pressing the corresponding num ber button on the rem ote. If desired, the INPUT button can be programmed to display a screen with the inputs listed as a menu-table. Then the desired input can be selected either with the number keys, or by using the arrow keys to highlight the desired input and then pressing the OK button. The command to enable the input menu is: MENU → Other → Menu control→ Menu Options → Input Menu → (Off, On) Configuration Memory Selection Each input has four configuration memories. These are referred to as memory “A,” “B,” “C,” and “D.” To select one of these memories press MEMA, MEMB, MEMC, or MEMD, respectively. Note, RS232 codes are provided to directly access these memories. Each input memory has eight input “sub-memories” that are automatically selected based on the input resolution and 2D/3D input video format. Each configuration memory, and sub-memory, is independent of the other memories. To allow the memories to be used for mode selection (e.g. day/night), by default, the memory type remains unchanged when a new input is selected. (i.e. If input 2 memory B is active, pressing “INPUT, 3” selects input 3 memory B). Input Aspect Ratio Selection The input source aspect ratio can be selected by pressing one of the 4:3, LBOX, 16:9, 1.85, or 2.35 buttons. To use the NLS feature, press “4:3, NLS”, “16:9, NLS”, or “1.85, NLS”. • • • • • • • Use 4:3 for standard definition full-screen material. Use LBOX for “letterbox” standard definition material, such as analog-television movies shown with black bars above and below the image. Use 16:9 for material labeled as “Enhanced for 16:9 televisions”. Use 1.85 for material labeled as “Aspect ratio 1.85”. Use ‘Alt’ 1.85 for material that is “Aspect ratio 1.85 letterboxed in a 16:9 (1.78) window”. Use 2.35 for material labeled as “Aspect ratio 2.35”. Use NLS to apply a horizontal non-linear stretch, to stretch 4:3 to 16:9, or 16:9 or 1.85 to 2.35. N OTE: M ake sure the “display aspect ratio” setting is 16:9 in the setup m enu of all video sources (e.g. Bluray players or set top boxes), even if your display is not 16:9. Image Zoom After the input aspect ratio has been selected, the image can be zoomed in to better fit the screen. The zoom function uses the and arrow buttons. When the menu is off, by default, the arrow button zooms in and the arrow button zooms out. Copyright 2009-2014 Lumagen, Inc. 10 Radiance 2123 and 2143, Rev 041614 Section 4 – Basic Commands Status Screen Pressing “OK” when the menu is off displays an on-screen information message as shown in the example below. Radiance 2143 Info Pg 1 (for Pg 2 press Ok) SW Rev.xxxxxx Serial:xxxxxxxxx Input 1A Out1 Out2 Resolution: Refresh: Color Fmt: HDCP: 480i 59.94Hz YCbCr 422 On 1080p 59.94Hz RGB Off 1080p 59.94Hz RGB On Pressing “OK” when the information screen is displayed, will display a second status screen as shown in the example below. Radiance 2143 Info Pg 2 Audio:HDMI1 In asp=16:9 Out asp=1.78 Zoom=0% X scaler: Off AdjInHres: 1920 OutHRes:1920 Y scaler: Off AdjInVres: 1080 OutVRes:1080 Genlock: currently off Deinterlacing:NA Game mode:Off On-Screen Help Pressing, “HELP” when the menu is displayed, displays on-screen help information for the currently highlighted menu item for many of the menu options. Quick Keys Provides a menu to use for basic remotes that have limited buttons, The ‘Quick Keys’ menu has buttons for input aspect ratio (4:3, LBOX, 16:9, 1.85, 2.35, NLS), set zoom (Zoom+, Zoom-) and select the user memory (MemA, MemB, MemC, MemD). The “Quick Keys” menu duplicates the function of pressing the corresponding buttons on the Lumagen remote. There are also buttons to control 3D (off, SbyS, TopB). MENU → Quick Keys → (4:3, LBOX, 16:9, 1.85, 2.35, NLS, Zoom+, Zoom-, MemA, MemB, MemC, MemD, ‘3D’Off, ‘3D’Sbys, ‘3D’TopB) Copyright 2009-2014 Lumagen, Inc. 11 Radiance 2123 and 2143, Rev 041614 Section 5 – Video Configuration Section 5 – Video Configuration By default the output is set to “Auto 2,1.” The selection “Auto 2,1” means the Radiance automatically reads the video EDID for the devices connected to both outputs, giving priority to Output 2, and automatically selects the appropriate output resolution. That is, if an active device is connected to output 2, the EDID from that device is read to determine the optimal video output resolution and the Radiance automatically selects the specified resolution. If no device is connected to output 2, or the device connected to output 2 does not respond, the Radiance uses the EDID from the device connected to Output 1 and sets the output resolution appropriately. For “Auto” modes the output vertical rate is selected based on the input vertical rate. For example, input formats 480i60, 720p60, 1080i60 automatically select a vertical output rate of 60 Hertz. Input formats 576i50, 720p50, and 1080i50 automatically select a vertical output rate of 50 Hz. For a 1080p24 input format, a 24 Hz output vertical rate is selected if the display supports a 24 Hz output vertical rate, otherwise a 60 Hz rate is selected. For displays that do not support EDID, the output mode must be selected using the commands shown below. Video Output Setup M enu The Video Output Select Menu is used to select output settings (Mode, CMS, and Style) based on the input number, input memory, and input video mode. The Video Output Select Menu does not affect the audio settings. See the Audio Configuration section for information on configuring audio modes. Once selected, the parameters for the Mode, CMS, and Style are changed using the MENU → Output Setup → (2D/3D) → Ok → (Mode, CMS, Style) menu. The same menu can also be accessed at MENU →Input → Video Setup → [Resolution] → (2D/3D) → Ok → (Mode, CMS, Style). First highlight the ‘2D’ or ‘3D’ row and press “Ok” to edit. In Condition -> Video Output Selection 3D *2D: In Mode 1A 1080p24 Mode -> VidOut Type CMS Style 1 2 0 0 Y Y 0 0 Y Y Custom0 (Auto 2,1) 3D: 1A 1080p24 -> Auto 2,1 Auto Next highlight the input condition entry that you want to edit. Press the and buttons to set the input number, input memory, and input mode. N OTE: For any of the 3 input conditions you can press “4” button to enter ‘All’ as the condition. This allows you to apply the output setup to multiple input conditions. When making settings that apply to multiple input conditions you can leave any of the output settings unchanged by selecting the ‘---‘ option for that output setting. 2D In Condition -> 2D Video Output Selection 3D In# Mem Mode 1 A 1080p24 Mode -> Type VidOut CMS Style 1 2 0 0 Y Y Custom0 (Auto 2,1) (Input to edit output settings of) Press ‘4’ for ‘All’, ‘5’ to see current <> Select, ^v Change, OK to set, Exit quits Custom M odes M enu The Custom Modes store settings for the timing of HDMI video mode that drives the display. There are menus to select standard HDMI modes or custom timings for HDMI modes Copyright 2009-2014 Lumagen, Inc. 12 Radiance 2123 and 2143, Rev 041614 Section 5 – Video Configuration Output Mode – Global Presets This command is not generally needed. However, it can be useful when driving displays that do not report EDID and where no video is visible until a specific format is sent. It changes the Output Mode for all Inputs and input memories. Select the Output Mode from the table below. The command is: MENU → Output → Custom Modes→ [Custom] → Select Mode → OK The direct commands to select output resolution are: 480p60: MENU 0 2 1 OK 540p60: MENU 0 2 2 OK 720p60: MENU 0 2 4 OK 768p60: MENU 0 2 5 OK 1080p60: MENU 0 2 7 OK Exact Output Timing After selecting a Custom Output Mode, its timing can be modified on a pixel basis. Do not change the timing using this menu unless it is really needed. Some digital displays lose picture if timing is changed by even a single pixel. The command is: MENU → Output → Custom Modes → [Custom] → Timing → Mode Timing CM S M enu The Color Management System (CMS) stores settings used to calibrate the color of the display. There are menus to calibrate the position of the primary/secondary color points, calibrate grayscale tracking, calibrate the gamma curve, and compensate for red/green push errors. Gamma Factor The Gamma Factor adjusts the gamma of the video output up or down. Since the Radiance is in the middle of the video chain, its default goal is to not affect the image Gamma and so the default Radiance gamma is 1.00. Changing the Gamma Factor allows the Radiance a “coarse correction” control for display Gamma. It should be set to (Desired_Gamma / Measured_Gamma). The command is: MENU → Output → CMS’s → [CMS] → Gamma Factor → OK Color Gamut Allows primary and secondary color point calibration, or calibration of 729-points throughout the linear-Gamma RGB color cube, using a linear-Gamma 3D color lookup table. A color probe and appropriate calibration software is necessary for proper adjustment. The command is: MENU → Output → CMS’s → [CMS] → Color Gamut Grayscale and Gamma Allows the parametric adjustment of 2, 5, 11, 12 or 21 color temperature points to adjust the grayscale and gamma for the display. The command is: MENU → Output → CMS’s → [CMS] → Gray/Gamma Color Decoder Used to correct color decoder errors in the display that have red and/or green push. This adjustment should generally not be used in conjunction with Color Gamut. The command is: MENU → Output → CMS’s → [CMS] → Color Decoder Black Level Used to set the black level for the display. Normally the “Brightness” or “Black Level” control in the display is used to set the black level. However, some displays cannot be set accurately. This command allows for accurate calibration when the display controls are not adequate. It is recommended that the Radiance Contrast Pattern 2 (dark contrast) be used to set the display’s black level. This command is also useful when a second black level is desired (using a second output CMS) for a “day” or “night” mode. The command is: MENU → Output → CMS’s → [CMS] → Black → Ok Copyright 2009-2014 Lumagen, Inc. 13 Radiance 2123 and 2143, Rev 041614 Section 5 – Video Configuration White Level Sets the white level for the display. Normally the “Contrast” control on the display is used to set the white level. It is recommended that the Radiance Contrast Pattern 1 (White and Black squares pattern) be used to set the display’s white level. The command is: MENU → Output → CMS’s → [CMS] → White → Ok Styles M enu The Style memory stores settings for the HDMI format used to drive the display. There are menus to set the HDMI format, size, position, aspect ratio, and graybars for the image on the display. Output HDMI Format You can specify the digital output range as “RGB-PC level” (e.g. for 8-bit 0 to 255) or “RGB-Video level” (e.g. for 8bit 16 to 235). “YCbCr 422” is the recommended output format. For the HDMI RGB output, setting the level as video allows blacker-than-black and whiter-than-white levels to be output from the Radiance. The command is: MENU → Output → Styles → [Style] → HDMI Format → Type → (RGB-Video level, RGB-PC level, YCbCr444, YcbCr422, RGB/36bpp Dual Out) Rate Match Some material may be sourced at 24.00/60.00 Hertz refresh rates instead of the standard 23.98/59.94 Hertz rates. It is desirable to slightly alter the output rate to match the input rate as long as the display works with these different rates. The default setting is 'Off.' Use 'Off' if your display will not accept these rates. The command is: MENU → Output → Styles → [Styles] → HDMI Format → Rate Match → (No, Yes) Color Format Sets the outputs color format. It should be set to Auto except to correct for a color format error in the display. Normally Bt.601 is use for SD/ED modes and Bt.709 is used for HD modes. Auto should be used for RGB sources. The command is: MENU → Output → Styles → [Style] → HDMI Format → Color Format → (Auto, Bt.601, Bt.709) Dither Some fixed pixel displays show contouring on images that have gradients because the physical pixel depth of each pixel is limited. The dither control can be used to enhance the resolution of the display and reduce contouring. Dither position sets the bit size of the pixel for dithering. Orientation controls the frame-to-frame randomization and can be fixed of dynamic. Masking can be turned on to clear the lowest bits after the dither addition. The command is: MENU → Output → Styles → [Style] → HDMI Format → Dither Mask Allows you to “blank” the edges of the video image on the output without changing its position or scaling. This is useful to blank bad pixel data from the source that shows on screen, when you want to keep the “pixel perfect” setup (i.e. no scaling). The command is: MENU → Output → Styles → [Styles] → Mask/Shrink → Mask Shrink Adjust the image size to fit inside a screen masking system. This command is useful for rear-screen and flat-panel displays when the manufacturer uses too much “overscan”. The command is: MENU → Output → Styles → [Styles] → Mask/Shrink → Shrink Gray Level Sets the gray level of borders created by the shrink or output mask commands. The gray level is adjustable from black to white in sixteen steps. The command is: MENU → Output → Styles → [Styles] → Mask/Shrink → Gray Level Copyright 2009-2014 Lumagen, Inc. 14 Radiance 2123 and 2143, Rev 041614 Section 5 – Video Configuration Screen Aspect Ratio Selects the screen aspect ratio. The screen aspect ratio range is 1.10 to 2.50 and is entered in units of hundredths (e.g. 16:9 is entered as 1 7 8). If you have a normal fixed aspect display, select the “Single output aspect” which is the default setting. If you have a movable anamorphic lens, select “Output aspect per input aspect.” For the “Output aspect per input aspect” mode, there is a special case when you use NLS. When the input aspect is 4.3+NLS the output aspect assigned to the 16:9 entry is used. When the input aspect is LBOX+NLS, 16:9+NLS, or 1.85+NLS the output aspect assigned to the 2.35 entry is used. The command is: MENU 0 6 (Single output aspect, Output aspect per input aspect) OK xxx OK Or MENU → Output → Styles → [Style] → Aspect Ratio → (Single output aspect, Output aspect per input aspect) → Ok → xxx → Ok Graybar Intensity N OTE: Consult a hom e theater specialist for assistance setting the graybar intensity. Some degree of burn-in will occur on any susceptible displays, but this command can help minimize it by allowing the intensity of the graybars to be adjusted. Set to “0” for black. The command is: MENU → Output → Styles → [Style] → Graybar → (Sides, Top/bottom) 3D Glasses Adjust When using the Radiance to control 3D glasses timing, such as with a CRT projector, this setting adjusts the timing offset of the 3D glasses. This delay is combined with the global delay setting under the MENU → Other → I/O Setup → 3D Glasses menu. This command has no effect if the 3D display is controlling the 3D glasses. The command is: MENU → Output → Styles → [Styles] → 3D Adjust Soft Edge Rounds off the outside edges of the video, which gives movies a bit more of a theater look and can hide some issues at edges of displays. The command is: MENU → Output → Styles → [Styles] → Soft Edge M isc. Output Settings 3D Output EDID Configuration By default the display’s 3D capability is automatically detected using its EDID information. However, some 3D displays do not properly report their 3D capability in their EDID. This command allows the 3D output capability to be manually set. The command is MENU → Output → 3D Options→Out1/Out2 is 3D Capable →(Off, Auto, On). For a dual projector 3D setup using two Radiances, each Radiance can be set to output only the right or left eye. The command is MENU → Output → 3D Options→If 3D show → (Both Eyes, Left Eye Only, Right Eye Only). Sync Polarity By default the output sync polarity is selected automatically. This command allows the user to override the automatic selection for each output. The command is MENU → Output → SyncPolarity. Copy Output Settings This command copies the current output Mode/CMS/Style settings to the selected output Mode/CMS/Style. The command is: MENU → Output → Copy→ OK Copyright 2009-2014 Lumagen, Inc. 15 Radiance 2123 and 2143, Rev 041614 Section 5 – Video Configuration HDMI Input Setup After the output is configured, calibrated, and saved, you can calibrate the first input. N ote, generally no input calibration is needed. After calibrating the first input, you can copy that configuration to all the other configuration memories if desired. Then calibrate other inputs. To program one of the independent input memories, select the input, then select the configuration memory and use the menu to configure the input. Hint: If memory A has been calibrated and a second configuration is needed, start by copying Memory A to memory B for that input to reduce setup time for the second configuration. HDMI Virtual to Physical Input Mapping If desired the input selection for HDMI sources can be assigned to different physical HDMI inputs. This “Virtual Input” feature can be useful if a receiver or HDMI switcher is used to switch several HDMI sources to a single input on the Radiance. Different settings and calibrations for several virtual HDMI inputs can be stored for the same physical HDMI input. The command is: MENU → Input → HDMI Setup → Physical In → (1, 2, 3, 4, 5, 6, 7, 8) HDMI Video Type By default the HDMI input format is detected automatically. For DVI sources, the Auto mode selects RGB format. For sources that do not report their format correct, the input format can be selected manually. The command is: MENU → Input → HDMI Setup → Type→ (Auto, RGB, YCbCr 422, YCbCr 444, RGB-fixup601) HDMI Level This command specifies if RGB HDMI inputs use video levels or PC levels. The input video level should be set to match the expected range of your video source. A mismatch can cause the image to be too dark or bright. An output video level mismatch can also have the same effect. The command is only applicable for the RGB input format. The command is: MENU → Input → HDMI Setup → Level → (Video, PC) Video EDID Display Information for HDMI inputs N OTE: Lum agen recom m ends using the default video EDI D or a user-defined video EDI D. This enables the Radiance to report video EDI D back to the sources even w hen the display is off, and it can also im prove pow er-up and sw itching speed. EDID is information that can be read over DVI/ HDMI cables to influence how source devices deliver video, which helps produce an optimal picture. There are 4 settings for the Lumagen EDID interface. The default setting enables all of the display modes the Radiance supports. The User defined setting allows the user to individually select which capabilities will be advertised to the source. You can scroll through the list of capabilities with the up/down arrows and toggle advertising the feature with the left/right arrows. With the Passback setting, the Radiance will read the EDID from the display/AVR connected to the selected output and pass that back to the source. The command is: MENU→ Input→ HDMI Setup→ Video EDID→ (Default, User defined, Passback Out2, Passback Out1) HDMI Input Hotplug Mode N OTE: Do not set Hotplug to “alw ays on” unless necessary since this elim inates the ability of the Radiance to inform the source of a change in the EDI D data. The Hotplug signal is part of a HDMI/DVI interface. Hotplug alerts a DVI/HDMI source device to downstream EDID changes when toggled. For some devices, such as a PC, it may be necessary to keep Hotplug high at all times. The Radiance provides two Hotplug settings, "Normal" and "Always On". The "Normal" behavior is to toggle the Hotplug signal sent back to the HDMI source when the EDID information needs to be updated. The source will then read the EDID and make any necessary changes. If the device connected to the Radiance output toggles the Hotplug to the Radiance then there may be some new EDID information to pass back to the sources and, if Hotplug is set to "Normal", Hotplug on all Radiance inputs would be toggled to inform the sources of the change. Copyright 2009-2014 Lumagen, Inc. 16 Radiance 2123 and 2143, Rev 041614 Section 5 – Video Configuration Some sources, such as PC's, stop sending video on HDMI/DVI, or enter sleep mode, when the Hotplug signal is not asserted, so setting Hotplug on the Radiance to "Always On" is a potential solution. As mentioned above, generally Hotplug should be set to “Normal.” Sometimes the connectivity of a system can cause a "HDCP Hotplug authentication loop." An example of this is when connecting the Radiance output to an audio receiver and then hooking the HDMI output of the receiver to one of the Radiances' inputs. Then, if the Radiance toggles its Hotplug back to the receiver’s output, the receiver would check the Radiance’s EDID and then toggle its Hotplug back to the Radiance to inform it about this new EDID. The Radiance again toggles Hotplug in response. This can create a continuing loop of HDMI activity. MENU→ Input→ HDMI Setup→ Hotplug mode→ (Normal, Always On) HDMI Auto Aspect For HDMI sources (not DVI), aspect information may be sent from the source. Enabling HDMI Auto-Aspect allows the source to select the input aspect ratio. You can set “NLS when applicable” (non-linear stretch) in order to stretch the width to fill the screen based on the input and output aspect ratios. The Automatic input aspect ratio selection can be overridden by manually selecting an input aspect ratio. If the “Sticky aspect override” is on, this new aspect will be used until the input is reselected, the Input button is pressed, or a memory button is pressed. If the “Sticky aspect override” is off the next time a different HDMI auto aspect is received the aspect will change to that input aspect ratio. The command is: MENU→ Input→ HDMI Setup→ Auto Aspect→ (On, Off) I nput P icture Controls Black and White Levels To set the input’s black-level (also referred to as brightness) and white-level (also referred to as contrast) using the Lumagen controls, use a test pattern generator or select a PLUGE pattern. Note that the input memory black and contrast are intended to compensate for variations in video source output levels. Use a Radiance contrast pattern and the display’s controls to set the display’s black and white levels. The command is: MENU → Input → Video Setup → [Resolution] → Picture→ (Black, White) Color Format Inputs 1 through 8 are HDMI. By default the appropriate color space is automatically selected (i.e. “Auto” mode) for standard-definition “Bt.601” or high-definition “Bt.709.” The “Auto” mode is generally best, but some upscaling sources do not convert the color format to Bt.709 as they should and so “Bt.601” would be manually selected for these if they are programmed to output HD formats. Bt.601 is used for SD/ED modes and Bt.709 is used for HD modes. The command is: MENU → Input → Video Setup → [Resolution] → Picture → Color Format → (Auto, Bt.601, Bt.709) Color and Hue N OTE: Set the display’s Color and Hue to their default values. Use a test pattern generator, or a test disc test pattern, to set Color and Hue if necessary. Normally not used if the Color-Gamut is calibrated using the Radiance CMS system, unless the source has an error in its color decoder. The command is: MENU → Input → Video Setup → [Resolution] → Picture→ ColorDecoder→ (Color Offset, Hue Offset, Color Red, Hue Red, Color Green, Hue Green) Y/C Delay Adjust the horizontal Chroma timing in relation to Luma. It is suggested that you use a Y/C-delay calibration image from a test pattern generator of test disc to calibrate the Y/C-delay. The CB and CR channels are adjusted independently. The command is: MENU → Input → Video Setup → [Resolution] → Picture → YC Delay → (Cr, Cb) Copyright 2009-2014 Lumagen, Inc. 17 Radiance 2123 and 2143, Rev 041614 Section 5 – Video Configuration I nput Size Controls This menu has controls for the capture window of the video input. There are settings for the input aspect ratio, size, shift and masking. Scale Bias Scaling is normally on to adjust the source to exactly fit the output resolution. If the scale bias is set to “On”, scaling is enabled unless the input and output resolution match exactly. If the scale bias is set to “Off” scaling is disabled if the input and output resolutions are close. Scaling is disabled/enabled independently for horizontal and vertical. When the bias is off there can be small borders on the edges of the image. If these areas have bad video the output Mask command can be used to blank that portion of the image. The second page of the on-screen status information indicates whether scaling is active (Press OK on the remote twice when no Menu is displayed). MENU → Input → Video Setup → [Resolution] → Size → [Aspect ratio] → Scale Bias → OK Input Sizing Input sizing can be used to compensate for active image size differences between sources. Note: The input size command does not affect the output size or position. Rather, it affects which input pixels are captured for processing. Use the Crop TopLeft command to select the top-left-most active input pixel. Use the Crop BotRight command to select the bottom-right-most active pixel. For standard-definition sources you should set these controls so that overscan is about 1.5% on all four sides. For digital high-definition sources, overscan may not be required. Cable and Satellite Boxes may require more overscan due to size differences between channels. Select the scanline using the and arrows, and the pixel using the and arrows. The command is: MENU → Input → Video Setup → [Resolution] → Size → [Aspect ratio] → (Crop TopLeft, Crop BotRight) Vertical Shift The vertical shift is an easy way to move the image up and down without changing the Input Sizing settings. There are 15 vertical settings that are shared between all input memories. Select the vertical shift setting and then the shift value. The command is: MENU → Input → Video Setup → [Resolution] → Size → [Aspect ratio] → Vert Shift → OK Non-linear Stretch Non-linear-stretch (NLS) is used to horizontally stretch a 4:3 aspect ratio source to fit a 16:9 aspect-ratio display or to stretch a 16:9/1.85 source to fit a 2.35 aspect-ratio display. The image is stretched by a constant amount in the center section, and by an increasing amount approaching the left and right edges. This eliminates the black sidebars normally seen when viewing smaller aspect material on a higher aspect display. To use non-linear stretch press the “4:3”, “16:9” or “1.85” button and then press the “NLS” button. The goal is to stretch the image to fill the screen in a way that looks as natural as possible. The Lumagen NLS command is very flexible and allows the image to be adjusted to user preferences to achieve this goal. The NLS adjustments are center width, center stretch, top cropping and bottom cropping. The center section of the image is stretched by a constant ratio from 100% to 124%. The width of the center section can be set from 15% to 70% of the display width. By programming the center section width and stretch amount, the amount of non-linear stretch in the left and right sections can be optimized. In addition, the top and bottom cropping can be set from 0 to 12%. Increasing the amount of cropping reduces the amount of stretch near the left and right edges of the image. When setting the cropping parameters, it is recommended that the satellite/cable box menu be checked to assure that critical parameters remain visible. Some 4:3 sources fill the entire source image (e.g. DVD 16:9 movies), but other sources place a 4:3 image in the center of a 16:9 image (e.g. HDTV with up-scaled SD source). This latter case is seen as a “pillar-boxed” image with black bars on the left and right. The “PILLARBOXED” parameter must be enabled for this case. The Lumagen will then crop the pillbox bars and stretch the active 4:3 image. For a 16:9 display, when 4:3 NLS is enabled, the image will fill the screen with a 4:3 (1.33) source for any output aspect ratio up to 1.85. If the output aspect ratio is greater than 1.85, software limits the maximum width to the equivalent of 1.78 and adds left and right sidebars. Copyright 2009-2014 Lumagen, Inc. 18 Radiance 2123 and 2143, Rev 041614 Section 5 – Video Configuration For a 2.35 display, when 16:9 NLS is enabled, the image will fill the screen with a 16:9 or 1.85 source for any output aspect ratio up to 2.40. If the output aspect ratio is greater than 2.40, software limits the maximum width to the equivalent of 2.40 and adds left and right sidebars. Select the parameter to adjust using the and arrows, and change the value of the selected parameter using the and arrows. The command is: MENU → Input → Video Setup → [Resolution] → Size → [Aspect] → NLStretch → OK Input Masking The masking command allows you to cover up the sides of the video source. It is different then cropping in that the video is not stretched to fill the screen. It can be used for pass-through modes, where you do not want the Radiance to scale the picture, to cover up some video noise on top/bottom/side of the picture. Another situation is to cover up and change the gray level of the black bars added by a video source, surrounding a letterboxed image. When you select the command you must first select which mask number you wish to use. There are 15 available masks that can be shared among different input memories. After selecting the mask number, you can adjust how much the mask covers the 4 sides of the input. The last step is to alter the gray level for the 4 sides. If an input mask is on, its gray level takes precedence over the gray level of the aspect bar. The aspect bar gray level can be adjusted under Output→Configs→[Config]→Other→Graybar. Also, if aspect bars are requested (via differing input and output aspects) the masking is added to the aspect bar width. The command is: MENU → Input → Video Setup → [Resolution] → Size → [Aspect ratio] → Masking → OK I nput Control M enu Deinterlacing Mode The default deinterlacing mode is “Auto.” This mode automatically switches between video and film deinterlacing and is best for mixed-mode sources that can change between video and film. For sources that are known to be interlaced-video, choosing “Video” deinterlacing mode can improve image quality. For sources that are known to be film sources, choosing 'Film' deinterlacing mode can improve image quality. For 60Hz interlaced film sources the output rate must be 24, 48, 60, or 72 Hertz. For 50Hz interlaced sources the output rate must be 50 Hertz. For “Film” mode, Sharpness, Noise Reduction and Adaptive Contrast settings are not available. The command is: MENU → Input → Video Setup → [Resolution] → Control → Deint → Mode→ (Auto,Video,Film) Inter Frame Motion Detection (IFMD) For deinterlacing video sources (not applicable for film) the IFDM control trades-off between minimizing combing artifacts (small values) verses maximizing detail (larger values). The default setting is 6. This control is most effective with “Video” deinterlacing mode. The command is: MENU → Input → Video Setup → [Resolution] → Control → Deint → IFMD→ (0-15) Deinterlacing Field Flip Some source devices do not follow conventions for the order of video fields. This can be seen as excessive combing in the video. While generally not required, this command allows the input fields to be swapped so these out-of-spec sources can be properly deinterlaced. The command is: MENU → Input → Video Setup → [Resolution] → Control → Deint → Field → (On, Off) Genlock Genlock is used to minimize video delay, for 480i/1080i to 24Hz conversion, and to avoid an occasional dropped or repeated frame. It can slow down source and mode changes, so Lumagen recommends setting Genlock to ‘off’ for cable and satellite set top boxes. The command is: MENU → Input → Video Setup → [Resolution] → Control → Genlock → (Auto, Disabled) Game Mode Minimizes video processing latency, when playing video games. Interlaced sources 480i/576i/1080i are treated as 240p/288p/540p. Deinterlacing, and Enhance settings are not available. Typically game mode is enabled for a specific input memory that is then selected while playing games. For games that have a vertical rate that matches the Radiance output vertical rate, turning “Genlock” on can further minimize video latency. Game mode is not intended for video/film program material, such as television shows. The command is: MENU → Input → Video Setup → [Resolution] → Control → Game Mode → (On, Off) Copyright 2009-2014 Lumagen, Inc. 19 Radiance 2123 and 2143, Rev 041614 Section 5 – Video Configuration Reinterlace Converts 480p and 576p sources back to interlaced so the Radiance can do the deinterlacing. This can provide dramatic improvements to a picture that has been poorly deinterlaced, prior to coming into the Radiance. Reinterlacing also allows for taking in 480p/576p movies and going out at 24/48/72Hz. With this command you can "allow" or "disallow" quick remote key control for a particular resolution as well as turn it on/off. If "Reinterlace <> Keys" are set to ‘allow’ the left/right arrow buttons on the remote can then be used to control reinterlacing. The left arrow toggles reinterlacing on/off and the right arrow toggles the field order. Depending on how the picture was deinterlaced, the field order may or may not be important, but it can be quickly toggled to see if there is any difference. The command is: MENU → Input → Video Setup → [Resolution] → Control → Reinterlace I nput Enhancem ent Controls Sharpness Adjusts the sharpness for all inputs. There are controls for horizontal edges, vertical edges, diagonal edges and texture (fine detail). It is generally best to leave these controls at the default setting of 0 or to use moderate settings. Using higher settings can introduce image artifacts. Some people prefer having all 6 settings set the same. Other people prefer only using the diagonal parameters. The command is: MENU → Input → Video Setup → [Resolution] → Enhance → Sharpness → OK Noise Reduction Mosquito noise and block artifact noise are both seen in compressed material. The Radiance has both temporal and special noise reduction to help reduce the noise level these artifacts introduce into the image. Block artifact reduction is also supported and can be useful with overly compressed video. The command is: MENU → Input → Video Setup → [Resolution] → Enhance → Noise Red. → OK Adaptive Contrast Varies the contrast based on the average level of the central 60% of the picture. When you adjust the contrast the effect is shown in a centered window for evaluation. The command format is: MENU → Input → Video Setup → [Resolution] → Enhance → AdapContrast → OK Copy Enhancement Settings You can copy the local enhancement settings to other resolutions and memories. The command is: MENU → Input → Video Setup → [Resolution] → Enhance → Copy → OK M iscellaneous I nput Controls Input Label Each input configuration memory can be named. Follow the on-screen directions. The and arrows select which input to change and then which character to change. The and arrows change the selected character. The command is: MENU → Input → Label → OK Copy Input Settings Copies all user memory parameters to one, or more, input or user memory. Copying an input memory to another input memory, copies each resolution sub-memory to the respective resolution sub-memory of the other input(s). The command is: MENU→ Input→ Copy→ OK Selecting an Output Configuration for an Input Memory The output-Mode, CMS and Style for each input resolution sub-memory can be set independently. This is done in the Output setup menu. See the “Video Output Setup” Menu section for additional information on connecting an input memory to an output Mode, CMS and Style. Copyright 2009-2014 Lumagen, Inc. 20 Radiance 2123 and 2143, Rev 041614 Section 6 – Audio Configuration Section 6 – Audio Configuration The Radiance video processor supports the HDMI 1.4 audio formats. This means that Dolby Digital TrueHD™ and DTS Master-Audio™ “bitstream” formats are available. By default the audio EDID from the device connected to HDMI Output 1 is passed back to all source devices. There are two methods that can be used to change this. Typically the audio menu (M EN U → Audio ) is used to program the audio EDID mode. For most cases the audio menu is all that is needed to setup the audio EDID. However, in some cases a specific input, or input memory, may need to use a different audio EDID. In this case the audio EDID for each input memory can be changed (M EN U → Audio → Audio EDI D settings ). Introduction to the Audio Menu The Audio menu configures the Audio EDID reported back to HDMI sources and is independent of the Video EDID mode. In addition it selectively enables audio outputs based on the specified conditions. Many common system configurations can use the default Audio mode settings. Some examples of these are: • • • • HDMI television (with audio) connected to HDMI Out 1 HDMI receiver connected to HDMI Out 1 and (non-audio) display connected to HDMI Out 2 HDMI receiver connected to HDMI Out 1 with a display connected to the receiver’s HDMI output Non-audio display connected to HDMI Out 2. N OTE: 1. Associating an audio input w ith a video input is done using the I nput m enu M EN U → I nput → Audio Setup → Source → (audio source) → OK . 2. The Audio EDI D m ode is independent of the Video EDI D m ode. 3. For best sw itching, and pow er-on, tim es you can m anually select the output resolution and select “USER1 EDI D” for the audio m ode. For exam ple, for a 1080p60 display pressing M EN U 0 2 7 OK selects 1080p60 and elim inates the need for the Radiance to read the display video EDI D. Selecting “Alw ays”, and “USER1 EDI D” in the Audio m enu elim inates the need for the Radiance to read the audio EDI D inform ation from the AVR/ TV. See the Output Configuration Com m ands section, and Audio section, for m ore inform ation. Rem em ber to save any changes. Some important concepts for selecting the audio configuration are: • Audio can be routed to one or both of the HDMI outputs. • HDMI audio EDID reported back to the HDMI sources can be passed-back from either of the two HDMI outputs, passed back from the common elements of the two outputs (i.e. only features supported by both outputs are enabled), or specified by the user (User EDID). • The audio EDID reported back to sources can change dynamically, as configured by the user, based on which HDMI output has active video, and/or audio EDID selected in the input memory. NOTE: Some sources update their EDID information only when they are powered on, or do not properly reread EDID when the HDMI Hotplug signal is toggled. If you have a source that reads EDID only at power-on, or does not respond properly to Hotplug, a single EDID mode should be used (e.g. select “always report user EDID” as described below). • Selecting “User1 EDID” is the recommended practice. This allows the Radiance to report the EDID back to the HDMI sources even when the display or receiver is turned off. However, in this case, care must be taken to select only audio modes that the audio processor supports. • Default “User EDID” mode is 2-channel PCM and Dolby-Digital 5.1 only. The user can change the “User EDID” to include any audio modes supported by the Radiance and the audio processor. • You can over-ride the global Audio EDID for a particular HDMI input by selecting M EN U → I nput → Audio Setup → Audio EDI D → Custom → OK . Set the audio modes to “Y” (yes) that you want to report back the source for that input. • Audio is muted when changes are detected on the input. Some audio receivers need to be muted longer to avoid noise. M EN U → I nput → Audio Setup → M ute Control → Long → Ok Copyright 2009-2014 Lumagen, Inc. 21 Radiance 2123 and 2143, Rev 041614 Section 6 – Audio Configuration Audio Menu Navigation Navigate to the item using the remote’s arrow buttons and then press the OK button. The item will begin flashing to indicate it is active for change. Use the arrow buttons to change the setting. Press the OK button to accept the setting or the EXIT button to cancel. The highlight will stop flashing and a new item can be selected. Audio Menu Selections Each line of the audio menu can have up to 6 entries. These are: Conditional Audio EDID to Report User Mode Select Always If Out1 video on If Out2 video on Else Merged Out1&Out2 EDID Out1 EDID Out2 EDID User1 EDID User2 EDID User3 EDID PCM 2Ch 44.1Khz PCM 2Ch 48Khz PCM 2Ch 96Khz PCM 2Ch 192Khz PCM 5.1 44.1Khz PCM 5.1 48Khz PCM 5.1 96Khz PCM 5.1 192Khz PCM 7.1 44.1Khz PCM 7.1 48Khz PCM 7.1 96Khz PCM 7.1 192Khz DD 5.1Ch DD 7.1Ch DD+ 5.1Ch DD+ 7.1Ch DTS 5.1Ch DTS 7.1Ch DD HD 5.1Ch DD HD 7.1Ch DTS HD 5.1Ch DTS HD 7.1Ch Y Y Y N N N N N N N N N Y N N N N N N N N N HDMI1 HDMI2 SPDIF On Off On Off On Off Audio Menu Structure Audio setup is global using an “If – Then – Else” structure based on which HDMI output has active video. In contrast, the video EDID is selected in the input memory “EDID Setup” on a “per-input-memory” basis, and the audio EDID is globally selected based on which HDMI output has active video. The net effect of this method is that the video EDID capability can be passed back from one of the HDMI outputs, or user defined. The audio EDID capability can be passed back from the same HDMI output, the other HDMI output, or user defined. N OTE: By default, Output 1 has both video and audio enabled, and Output 2 has only video enabled. So, the default configuration for a system w ith an AVR and a projector is that the AVR is connected to Output 1 and the projector is connected to Output 2. Exam ples below illustrate how to change this if desired. The “If” Conditional The first parameter on each command line can be an “Always” clause, an “If” conditional, or an “Else” clause. If there is more than one line, the last line will always contain an “Else” clause. The “Always” or “Else” clauses do not have conditionals. There are two options for an “If” conditional: • If Output 1 is enabled for video output • If Output 2 is enabled for video output The “then” Clause The second parameter is the “then” clause. If the “If” conditional is true the “Then” clause is used, otherwise control is passed to the next command line. The options are: • User Defined • Pass-through audio EDID from Output 1 • Pass-through audio EDID from Output 2 • Pass-through the common audio modes from Output 1 and Output 2 Copyright 2009-2014 Lumagen, Inc. 22 Radiance 2123 and 2143, Rev 041614 Section 6 – Audio Configuration Audio Example 1 (Default Audio Configuration) Always passback the audio EDID from the AVR on Output 1 to the HDMI sources. Output 1 drives a receiver that has audio capability. Output 2 drives a display that you don’t use for audio. This is the default case, and can be set as shown: Condition uses Audio EDID Always Audio Outputs HDMI1 HDMI2 SPDIF Passback Out1 EDID On Off On Norm Audio Example 2 A single line case with “User EDID” is shown below. Because an HDMI device should not output audio to a particular output if it is beyond the capability of the device attached to that output, each line has a user selectable field to independently enable each audio output. These fields cover HDMI output 1 and HDMI output 2. So the default case has HDMI output 1 turned on. You should change the settings of the User EDID to match your system. When you set the audio EDID to “User EDID,” a “User EDID settings” menu is shown (this is the “PCM 2 Ch 48KHz Y” entry below). You can use the “User EDID settings” menu to select which audio modes will be advertised by the audio EDID. By default 2-channel PCM and DD 5.1 modes are enabled. Other modes must be enabled using the menu commands. Condition uses Audio EDID Always User EDID Audio Outputs HDMI1 HDMI2 SPDIF PCM 2Ch 48Khz Y On On On Norm Audio User EDID When selecting specific audio modes, the up and down arrow keys select an entry and the right arrow key is used to turn that mode on or off. Input Memory Specific Audio EDID If an input, or input memory, requires a specific EDID, it can be configured in the audio setup menu. Each input memory can be configured to use the global audio EDID, or a specific list of audio modes to report back to the source. The command is: MENU → Input → Audio Setup → Audio EDID Copyright 2009-2014 Lumagen, Inc. 23 Radiance 2123 and 2143, Rev 041614 Section 7 – Calibration Section 7 - Calibration Your theater system needs to be calibrated. To brighten the image in the show room, most display manufacturers intentionally change the display calibration away from industry standards. Unfortunately most displays do not have the controls necessary to undo these errors, and even many of those with calibration controls are not mathematically correct, making proper calibration impossible without an external calibration device such as the Radiance. Correcting these intentional errors, and other unintentional errors, so the image appears, as the director intended, is a primary function of the Radiance. The Radiance has a host of features dedicated to this task. It is recommended that a professional calibrator be hired to perform the calibration. An experienced professional calibrator has the necessary tools and experience to extract the best performance from your theater. However, you can improve your picture without hiring a professional if you prefer. You will need to learn how to use the Lumagen test patterns. Then you need to spend time learning how various calibration controls interact and how they affect image quality, with the most important being proper adjustment of the Black level in the display or projector menu. To understand Radiance calibration, it is important to note that setup and calibration parameters are split into “input memories” and “output configurations.” Input memories are for source specific setup and calibration. Output configurations deal with display setup and calibration. These are covered elsewhere in this manual. It is recommended that the internal Lumagen test patterns be used to calibrate the output configuration. This will assure that any variance between sources do not affect the calibration of the display. The recommended Lumagen calibration sequence is discussed in TechTip 2 on the Lumagen support “Manuals and TechTips” page at http://www.lumagen.com/testindex.php?module=manuals. Please check out this and other TechTips for information on setup and calibration. After you have completed changes, make sure to save your configuration as shown below: MENU → Save → OK → OK→ OK Copyright 2009-2014 Lumagen, Inc. 24 Radiance 2123 and 2143, Rev 041614 Section 8 – Miscellaneous Commands Section 8 – Miscellaneous Commands System Settings Menu Mode The menu mode controls what settings can be changed in the menu. In Locked mode nothing can be changed in User Mode, Service Mode (temporary) and Service Mode (permanent). The default setting is User Mode, which allows access to all the basic controls. The Service Mode allows access to all controls including the color gamut controls. The configuration can be locked to prevent unintended changes. When locked, input selection functions normally, but setup parameters are fixed. The command is: MENU → Other → Menu control→ Menu Mode → (Locked, User mode, Service mode temporary, Service mode permanent) Timeouts In the “Normal” setting the menu and test patterns will timeout in approximately three minutes. The “Slow” setting extends the timeout by x10. Test patterns also have a setting for “Never” timeout. The command is: MENU 0 9 0 5 (Normal, Slow) Ok or MENU → Other → Menu control→ Timeouts → (Normal, Slow, Never) OSD Enable On-Screen-Display (OSD) shown after each user command. Shows the selected input, input aspect ratio, and zoom. The command is: MENU → Other → Menu control→ OSD enable → (On, Off) Input Reselect When the currently active input is reselected the input will be reinitialized and the input number will be displayed. The command is: MENU → Other → Menu control→ In Reselect → (On, Off) Menu Placement In the “Standard” placement the menu is in the center of the screen. Choose “Center open” to move the menu so that the center of the screen is open for display calibration measurements. The command is: MENU → Other → Menu control→ OSD enable → Menu placement → (Standard, Center open) Input Menu Displays a list of inputs you can select when the “Input” button is pressed on the remote. The command is: MENU → Other → Menu control→ Menu Options → Input Menu → (Off, On) Initial Power State When power is connected, the unit will turn “on” automatically, or go to “standby-mode”. The command is: MENU → Other → OnOff Setup → Auto On → (Standby, Turn On) Initial Input State Sets which input and input memory is selected when the unit is turned on, either after power has been removed or the unit has been put into standby. The command is: MENU → Other → OnOff Setup → Input Select→ (After Power Removed, After Standby) Copyright 2009-2014 Lumagen, Inc. 25 Radiance 2123 and 2143, Rev 041614 Section 8 – Miscellaneous Commands On/Off Message A programmable string can be sent to another device via the RS-232 connector to turn the device on or off. The command is: MENU → Other → OnOff Setup → (On Message, Off Message) Message Control This sets the RS-232 parameters that are used for sending a power on/off message to another device. The command is: MENU → Other → OnOff Setup → Message Ctl Test Patterns Warning: Some test patterns can burn plasma and CRT displays if left on for more than a few seconds. The user can select from a large selection of test patterns. Similar test patterns are organized into “Test Pattern Groups.” Reference test patterns are only affected by the output PC/Video level setting and are the same as the patterns produced by a video test pattern generator. Adjustable patterns allow viewing the effect of the output color management settings. The Warm Up test pattern displays a 20 IRE to 50 IRE gray screen. The command is: MENU → Other → Test Pattern→ Pattern → (Reference, Adjustable, Warm up) and arrows step to the previous or next Test Pattern Group. and arrows can adjust the intensity of many test patterns from 0 to 100 IRE. “HELP” Pressing the HELP button brings up a Help Menu. “4” Pressing the number 4 steps through the patterns within the current Test Pattern Group. “Prev” Toggle between the source and the pattern. “OK” Exit the test pattern command but leave the pattern on-screen. You can then adjust various parameters to judge their effect on the pattern. “ALT” Jump back into the pattern command. Note: “PREV” and “Alt” functions are only valid if you leave the pattern on-screen by pressing “Ok.” Remote Control Arrow Buttons Changes the default command usage of the arrow buttons on the remote. By default the Up/Down arrow buttons can be used to control zoom. The Right/Left arrow buttons can be used to select the input aspect ratio. There is an option to use the right arrow button to control the auto aspect feature. You can turn off these additional functions by selecting “Off”. The command is: MENU→Other→I/O Setup→Remote Ctl→(Up/Down arrows, Rt/Left arrows)→(On, Off) LED Setup Controls the operation of the Green LED on the front panel. The LED can be set to “Green” to be a power on indicator or set to “Dark” so that it is off when the Radiance is operating. The command is: MENU → Other→ I/O Setup → LED Setup → (Green, Dark) RS-232 Setup With echo on the Radiance will echo all characters sent to it. With echo off the Radiance will only send a message at power on/off. With echo set to off with status, the power on/off messages are changed to status responses. See Tech Tip 11 for delimiter usage and more details. The command is: MENU → Other → I/O Setup → RS-232 Setup → (Echo, Delimiters) → (On, Off) Copyright 2009-2014 Lumagen, Inc. 26 Radiance 2123 and 2143, Rev 041614 Section 8 – Miscellaneous Commands 3D Glasses NOTE: Generally the display controls the 3D glasses. In this case the 3D Glasses command is not used. These settings control the Lumagen CRT-3D Eyeglass Adapter when it is connected the HDMI output on the Radiance. The delay setting adjusts when the shutter-glasses switch eyes. If the 3D effect doesn’t look correct it may be that the left and right eyes are swapped. Changing the polarity would then correct this. The command is: MENU → Other → I/O Setup → 3D Glasses → (Delay, Polarity, Enable) Zoom Step Sets the size of the Zoom step to 5% or 15%. The command is: MENU → Other → Zoom step → (5%, 15%) Quick Keys Adds an optional top-level menu called “Quick Keys” that gives access to functions that are normally selected using buttons on the Lumagen remote. This menu can be used with programmable remotes that have limited buttons. You can use the arrow buttons on the remote to highlight one of the functions and press “Ok” to execute the function. Alternately you can use a number button on the remote to highlight one of the functions and then press “Ok” to execute the function. (0)4:3, (1)LBOX, (2)16:9, (3)1.85, (4)2.35, (5)NLS), (6)Zoom+, (7)Zoom-), (8)MemA, (9)MemB, (n/a)MemC, (n/a)MemD, (n/a)3D Off, (n/a)3D SbyS, (n/a)3D TopB. The command is: MENU → Quick Keys → (function) → Ok Configuration Memory Usage By default, when a configuration memory (A-D) is chosen the selection applies to all inputs. For example if input 1A is active, then input 2 is selected followed by selecting “MemB,” if input 1 is again selected, it would use configuration memory 1B. This is called the “Common” configuration memory mode. Generally this mode is used when specific day and night calibrations are desired and used for all inputs. You can set the memory usage to be “Per Input.” That is the configuration memory selection is independent for each input. In this mode, using the example above, starting with input 1A, changing to input 2, pressing “MemB” and finally selecting input 1, results in using configuration memory 1A. The command is: MENU → Other → Memory Usage → (Common, Per Input) Saving the Configuration Save N OTE: I f a Save com m and is not executed after m aking changes, the changes w ill be lost w hen the unit is put into standby pow er m ode, or if pow er is interrupted. Permanently save the current configuration. Note that, once saved, the configuration is retained even if the unit is disconnected from power. The configuration from the previous save is retained to allow one level of save-undo. You can use the Radiance Configuration Utility found on the Lumagen.com support page to store a configuration file on your PC. The command is: MENU → Save → Save → OK → OK Copyright 2009-2014 Lumagen, Inc. 27 Radiance 2123 and 2143, Rev 041614 Section 8 – Miscellaneous Commands Undo Revert to the configuration over-written by the last SAVE command. Repeating the Save Undo command toggles between the last two saved configurations. The command is: MENU → Save → Undo → OK Restore ISF calibration During calibration, the video technician can save the resulting Lumagen configuration to a special hidden configuration memory. This command restores that configuration in the event that the user inadvertently changes the configuration. A SAVE is required to make the restore permanent. The command is: MENU → Save→ Restore ISF→ OK Revert To Factory Settings Set all parameters to factory defaults. A SAVE is required to make the settings permanent. The command is: MENU 0 9 9 9 Or MENU → Save→ FactoryReset → OK Copyright 2009-2014 Lumagen, Inc. 28 Radiance 2123 and 2143, Rev 041614 Section 9 – 3D Support Section 9 – 3D Support The Radiance supports HDMI 1.4 “3D”. This includes 3D video source switching, 3D processing, 3D scaling, 3D aspect ratio control, and a number of 3D format conversions. The Radiance can stretch 3D images for a 2.35 screen on systems that use an anamorphic lens. The Radiance can accept HDMI 1.4 “3D” material and output either the left-eye or right-eye image, for dual projector 3D systems that use passive 3D glasses. The Radiance can also be used to display 3D on many 2D displays, such as a CRT display or projector. If HDMI Output 1 on the Radiance is connected to a non-3D AVR the Radiance can automatically turn off video on that output when selecting a 3D video source. Most or all non-3D AVR’s get confused if you try to send them a 3D video signal. Any HDMI cable, with good electrical characteristics, will work for displaying HDMI 1.4 3D video on 3D displays. 3D Types The Radiance can receive all the commonly used 3D types. The Radiance has options to convert 3D types, which are not supported by your 3D display, to a format supported by the display. For example the Radiance automatically converts optional 3D formats into required 3D formats. For CRT displays all supported 3D formats are converted to 3D Frame Sequential. This allows 2D CRT displays/projectors to display 3D images. Frame Packed The 1080p24 3D frame-packed mode consists of a frame that contains a full resolution left eye image, 45pixel active buffer, and a full resolution right eye image. Bluray movies use this 3D type and are stored on the disk at 1920x2205/24. Side-by-Side Consists of a frame that contains Side-By-Side sub-frames for the left eye and right eye images. Set top boxes and PC’s use this 3D type. Top-Bottom Consists of a frame that contains Top-Bottom sub-frames for the left eye and right eye image. Set top boxes and PC’s use this 3D type. Frame Sequential Consists of individual frames of left eye and right eye images that are transmitted sequentially. Some 2D CRT and other 2D digital displays can be driven with this 3D type in order to display 3D images. For this case, an external IR Glass Driver is needed to drive the 3D active glasses. Copyright 2009-2014 Lumagen, Inc. 29 Radiance 2123 and 2143, Rev 041614 Section 9 – 3D Support Separate Left and Right The Radiance can accept HDMI 1.4 “3D” video and output either the left-eye or right-eye image for a dual projector 3D system that uses passive 3D glasses. This 3D system configuration uses two Radiance video processors. 3D Output Settings The Radiance has support for all of the commonly used 3D video sources. If you connect a HDMI 1.4a compliant 3D video source and compliant 3D display, to the Radiance, you should automatically get a 3D image, using the Radiance default settings. The Radiance has settings that you can use to display 3D video, using non-compliant 3D video sources and displays. The Radiance has settings to optimize the video on your 3D display. The Radiance also has settings to display 3D video on some 2D displays (See section titled “3D Support for 2D Displays” for further details). 3D Output Setup Menu You can select the 3D output settings based on the input number, input memory, and input video mode. For any of the three input conditions you can select ‘All” to apply the output setup to multiple input conditions. When making settings that apply to multiple input conditions you can leave any of the output settings unchanged by selecting the ‘---‘ option for that output setting. Press “4” for ‘All’ and press “5” to see the current settings. The command is: MENU → Output → Output Setup → 3D → Ok 3D Output Mode = Auto By default the output is set to “Auto 2,1.” The selection “Auto 2,1” means the Radiance automatically reads the EDID for the devices connected to both outputs, giving priority to Output 2, and automatically selects the appropriate output resolution. That is, if an active device is connected to output 2, the EDID from that device is read to determine the optimal video output resolution and the Radiance automatically selects the specified resolution. If no device is connected to output 2, or the device connected to output 2 is turned off, the Radiance uses the EDID from the device connected to Output 1 and sets the output resolution appropriately. Output 1 can have priority by selecting “Auto 1,2” from the Video Output Select Menu. For “Auto” modes the output vertical rate is selected based on the input vertical rate. For example, input formats 480i60, 720p60, 1080i60 automatically select a vertical output rate of 60 Hertz. Input formats 576i50, 720p50, and 1080i50 automatically select a vertical output rate of 50 Hz. For a 1080p24 input format a 24 Hz output vertical rate is selected if the display supports a 24 Hz output vertical rate, otherwise a 60 Hz rate is selected. If the priority output is connected to a 3D device, and the secondary output’s device is not 3D, when a 3D source is detected the Radiance automatically disables video to the 2D output. For analog displays and digital displays, that do not properly support EDID, the output mode must be selected. 3D Output Mode = Specific Format The Radiance will convert all 3D input formats to the specified 3D output format. For example all 3D input modes can be converted to a 1080p60 side-by-side output mode. 3D Output Type = Auto The Radiance has support for all of the commonly used 3D Types (Frame Packed, Side-by-Side, TopBottom, and Frame Sequential). When the output ‘Type’ is set to ‘Auto’ the Radiance will convert all 3D modes and types to HDMI 1.4a mandatory 3D format. 3D Output Type = Specific 3D Type The Radiance will convert all 3D input types to the specified 3D output type. i.e. All 3D input types can be converted to 3D Frame Sequential to drive a CRT display/projector. Copyright 2009-2014 Lumagen, Inc. 30 Radiance 2123 and 2143, Rev 041614 Section 9 – 3D Support 3D EDID Configuration By default the display’s 3D capability is automatically detected using its EDID information. However, some 3D displays do not properly report their 3D capability in their EDID. This command allows the 3D output capability to be manually enabled (or disabled). The command is MENU → Output → 3D Options → (Out1, Out2) → (Auto, Yes, No) 3D Setup P rocedures Normal Setup For most new 3D video sources and displays, just connect the source and display to the Radiance. You will get a 3D image, with the Radiance default settings of 3D output ‘Mode=Auto’ and 3D ‘Type=Auto’. 1. If starting with a unit in an unknown state, press “MENU 0999” to restore factory default settings and save the new settings by pressing “MENU → Save → Save → OK → OK”. 2. Connect the Radiance outputs. If using only one Radiance output, use Output 1 if the Radiance needs to pass audio, or Output 2 if not. If using an AVR, or audio Pre/Pro, connect it to Radiance Output 1 and the display to Output 2. 3. Connect a video source that supports 3D to a HDMI input on the Radiance. 4. Turn on power to the display and video source. 5. You should now have a 3D image on your display. Display Optimization To get the best quality 3D image, on some displays, it is necessary to convert some or all of the 3D video modes to a specific 3D output mode. Research the display specifications, to determine the optimum 3D modes and types for your display. For example; If a display shows 720p 3D video as a letterboxed image. You can set the Radiance to convert 720p 3D video to 1080p60 Side-by-Side 3D video, which is shown full screen on the display. 1. Set the appropriate Radiance output to “3D Capable” by pressing “MENU → Output → 3D Options → Ok → (Out1/Out2) → Yes → Ok”. 2. For example; to set the Radiance 3D output to “1080p60” “Side-by-Side”, press “MENU → Output → Output Setup → 3D → Ok → Mode → 1080p60 → Type → SbyS → Ok”. Note: You need to select a 3D output mode before you can select a specific 3D output type. 3. Save the new settings by pressing “MENU → Save → Save → OK → OK”. Setup for Non-Compliant Displays The Radiance also has settings to display 3D video on non-compliant displays. 1. If starting with a unit in an unknown state, press “MENU 0999” to restore factory default settings. 2. Connect the Radiance outputs. If using only one Radiance output, use Output 1 if the Radiance needs to pass audio, or Output 2 if not. If using an AVR, or audio Pre/Pro, connect it to Radiance Output 1 and the display to Output 2. 3. Connect a video source that supports 3D to a HDMI input on the Radiance. 4. Turn on power to the display, Radiance and video source. 5. Set the appropriate Radiance output to “3D Capable” by pressing “MENU → Output → Output Setup → Ok → (Out1/Out2) → Yes → Ok”. 6. Save the new settings by pressing “MENU → Save → Save → OK → OK”. Copyright 2009-2014 Lumagen, Inc. 31 Radiance 2123 and 2143, Rev 041614 Section 9 – 3D Support Setup for Non-Compliant 3D Video Sources The Radiance also has settings to display 3D video using 3D video from non-compliant video sources. It is only necessary to manually set the 3D input mode on the Radiance if the video source doesn’t transmit that it’s displaying a 3D mode. 1. If starting with a unit in an unknown state, press “MENU 0999” to restore factory default settings. 2. Connect the Radiance outputs. If using only one Radiance output, use Output 1 if the Radiance needs to pass audio, or Output 2 if not. If using an AVR, or audio Pre/Pro, connect it to Radiance Output 1 and the display to Output 2. 3. Connect a video source that supports 3D to a HDMI input on the Radiance. 4. Turn on power to the display, Radiance and video source. 5. The Quick Key Menu has settings to set the Radiance input to 2D, 3D Side-by-Side, or 3D Top Bottom mode, press “MENU → Quick Keys → (3D Off, 3D SbyS, 3D TopB) → Ok”. 6. The direct commands to set the Radiance input to 2D, 3D Side-by-Side, or 3D Top-Bottom is: 2D “MENU 030” 3D Side-by-Side “MENU 031” 3D Top-Bottom 7. “MENU 032” This setting isn’t saved. Use the Quick Key Menu or a direct command to set the 3D input mode on the Radiance, when using a non-compliant 3D video source. Copyright 2009-2014 Lumagen, Inc. 32 Radiance 2123 and 2143, Rev 041614 Section 10 – Darbee Video Enhancement Section 10 – Darbee Visual Presence™ The Darbee Visual Presence (DVP™) feature can improve the perceived visual quality of an image. It does this by adding definition and contrast to the image. Darbee DVP can be used with the other Radiance video enhancements, especially the edge enhancement “Sharpness” control, to further enhance the image. By default, the Darbee video enhancement is turned on at a low level. You can experiment with the gain setting to find the appropriate level, for your video source and display. Many users find that “HD” mode with a “Gain” setting in the range of 25, to 55, provide the best overall results. N OTE: The Darbee video processing is autom atically turned off w hen a Radiance test pattern is displayed. W hen using an external test pattern, turn off DVP by setting “Enabled” to “N o” in the Darbee m enu. Darbee m enu There are two ways to access the Darbee menu as shown below: That is, press the right-arrow while menu is not displayed. N OTE: This is the default behavior, but this can be changed by the user to perform a different function. or MENU → Input → Video Setup → [resolution] → Enhance → Darbee → Ok Darbee menu control Press , or , arrow buttons as needed to select the setting to modify. Press the up and down arrow buttons to change the selected setting. Press the EXIT button to leave the Darbee menu. Gain The gain control range is from 0 to 120. Most people prefer a gain from 25 to 55 but the optimum setting varies for different video sources, displays, and based on personal preference. A gain setting of 0 effectively turns Darbee off, and has the same effect as setting “Enabled” to “Off”. Mode • HD The “High Def” mode can be used for watching high definition video. It has the least • Full The “Full-Pop” mode can be used for watching low-resolution or lower-quality video. It has aggressive processing and is virtually free from processing artifacts. This is also a good generalpurpose mode to use for all types of video content. the most aggressive processing and isn’t appropriate to use for watching high definition video or games. You may notice more image artifacts than Game Mode. • Game The “Game” mode can be used for playing video games. It is also a good mode to use for watching Computer Generated Imagery (CGI) and other clean video sources. Enabled Set “Enabled” to “Yes” or “No” to turn the Darbee video enhancement on or off. Use this control to compare an image with and without the Darbee video processing. View Set “View” to “Full” for normal viewing with Darbee processing. Set “View” to “Split” to display a split-screen image, with Darbee processing on the right half of the screen. The split-screen can be used to demonstrate or evaluate Darbee DVP processing. Copyright 2009-2014 Lumagen, Inc. Radiance 2123 and 2143, Rev 041614 33 Section 11 – Command Interface Section 11 – Command Interface Direct Com m ands Direct Commands are entered by using the Lumagen remote control or RS232 interface. See Radiance Tech Tip 13 “Direct Commands and Menu Shortcuts” which contains a complete list commands. This Tech Tip is available for download at http://www.lumagen.com. Output Vertical Resolution 480p: 540p: 720p: 768p: 1080p: 1080i: MENU MENU MENU MENU MENU MENU 0 0 0 0 0 0 2 2 2 2 2 2 1 2 4 5 7 8 Progressive with 480 active scanlines Progressive with 540 active scanlines Progressive with 720 active scanlines Progressive with 768 active scanlines Progressive with 1080 active scanlines Interlaced with 1080 active scanlines Output Mode Commands Output 2D Output 3D-SBS Output 3D-TB MENU 0 3 0 MENU 0 3 1 MENU 0 3 2 Set output mode to 2D Set output mode to 3D Side-By-Side Set output mode to 3D Top-Bottom Output Vertical Rate Set vertical rate: MENU 0 4 (50Hz, 60Hz) OK Output Aspect Ratio Output aspect ratio: MENU 0 6 value OK Example: For 16:9 enter178 Miscellaneous Commands Menu timeout Service Mode Reinterlace Off Reinterlace On Toggle field order Unlock menu Output defaults Factory defaults MENU MENU MENU MENU MENU MENU MENU MENU 0 0 0 0 0 0 0 0 9 9 9 9 9 9 9 9 0 1 4 4 4 1 9 9 5 0 0 1 2 5 8 9 Toggle menu timeout. Short (default) or long (saved) Toggle SERVICE MODE. (not saved) Turns reinterlacing off Turns reinterlacing on Toggles field order for reinterlacing Can also be selected using menu Reset current output to default for current resolution Reset to factory default (Must “Save” to make permanent) M enu Shortcuts See Radiance Tech Tip 13 “Direct Commands and Menu Shortcuts” which contains a complete list commands. This Tech Tip is available for download at http://www.lumagen.com. I R Com m and List See Radiance Tech Tip 12 “IR Command Interface” which contains a complete list of IR commands. This Tech Tip is available for download at http://www.lumagen.com. ASCI I Com m and List See Radiance Tech Tip 11 “RS232 Command Interface” which contains a complete list of RS232 commands. This Tech Tip is available for download at http://www.lumagen.com. Copyright 2009-2014 Lumagen, Inc. 34 Radiance 2123 and 2143, Rev 041614 Section 12 – Specifications Section 12 – Specifications Inputs ® • 8 HDMI 1.4a with 3D at up to 1080p60 Processing • • • • • • • • • • • • • • • • • • • • • • • Proprietary Lumagen No-Ring™ scaling Darbee Digital Visual Presence™ (DVP™) enhancement technology 10-bit processing for deinterlacing plus a 12-bit calibration pipeline ® Support for HDMI 1.4 “3D” including anamorphic lens scaling Convert common optional 3D formats to a required format support by the display Each input has 4 user configuration memories Each input user configuration memory has 8 resolution sub-memories (for HD inputs) Each resolution sub-memory is linked to one of 8 output configurations. 2:2, 3:2 and 3:3 pull-down for SD/HD film sources Per-pixel SD/HD video de-interlacing Adaptive diagonal filtering MPEG mosquito and block artifact reduction Temporal noise reduction for SD and HD sources User programmable non-linear-stretch (NLS) mode 4:3, LBOX, 16:9, 1.85, 2.35 and NLS input aspect ratios Programmable output aspect ratio from 1.10 to 2.50 Extensive support for anamorphic lenses for both 2D and 3D video Large suite of test patterns Full CMS (Color Management System) using a 729-point 3D linear-gamma RGB color palette 21-point parametric grayscale and Gamma calibration Programmable input/output color-space Y/C-delay calibration CUE and ICP filtering Outputs • • • • • Output resolution from 480p to 1080p60 (2123) or up to 4k60 8-bit 4:2:0 for 2143, plus 1080i 2 HDMI 1.4a, with 3D Eight channel audio at 192 kHz Supports DD True-HD™, and DTS Master Audio™ bitstream formats Each HDMI output can provide “stand-by” power to an external device of +5V at 50 mA total including the display and any devices that harvest power from the HDMI connection. Miscellaneous • • • • • IR and RS232 control (See Tech Tip 11 and 12 on the www.lumagen.com website) Wired IR format command input Universal, 100-240V, ~50/60Hz external 12 VDC power supply Power consumption: 25 Watts including external power supply Optional rack mounting ears Copyright 2009-2014 Lumagen, Inc. 35 Radiance 2123 and 2143, Rev 041614