1
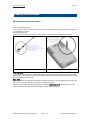
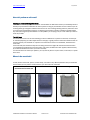
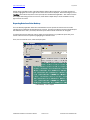
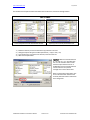
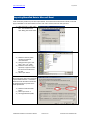
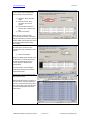
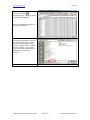
CardScribe® User Manual for use
with CardTool® Card Reader
WWW.TOKENWORKS.COM
3/13/2003
Limited Warranty
TokenWorks, Inc. (hereinafter “TokenWorks”) warrants this TokenWorks product IN ITS ENTIRETY, to be in
good working order for a period of 90 days from the date of purchase from TokenWorks. Should this product
fail to be in good working order at any time during this warranty period, TokenWorks will, at its option, repair
or replace this product at no additional charge except as set forth below. Repair parts and replacement
products will be furnished on an exchange basis and will be either reconditioned or new. All replaced parts
and products become the property of TokenWorks. This limited warranty does not include service to repair
damage to the product resulting from accident, disaster, misuse, abuse, or non-TokenWorks modification of
the product.
Limited Warranty service may be obtained by sending the product during the warranty period to TokenWorks.
Before sending material, please obtain an RMA number by requesting one from TokenWorks. To obtain
additional return and contact information, visit www.tokenworks.com. If this product is delivered by mail,
you agree to insure the product or assume the risk of loss or damage in transit, to prepay shipping charges to
the warranty service location and to use the original shipping container or equivalent.
ALL EXPRESS AND IMPLIED WARRANTIES FOR THIS PRODUCT, INCLUDING THE
WARRANTIES OF MERCHANTABILITY AND FITNESS FOR PARTICULAR PURPOSE, ARE LIMITED IN DURATION
TO A PERIOD OF 90 DAYS FROM THE DATE OF PURCHASE, AND NO WARRANTIES, WHETHER EXPRESS OR
IMPLIED, WILL APPLY AFTER THIS PERIOD, EXCEPT AS PROVIDED IN THE PRECEDING SENTENCE. EACH
PURCHASER UNDERSTANDS THAT THE TOKENWORKS PRODUCT IS OFFERED AS IS.
IF THIS PRODUCT IS NOT IN GOOD WORKING ORDER AS WARRANTED ABOVE, YOUR SOLE REMEDY SHALL
BE REPAIR OR REPLACEMENT AS PROVIDED ABOVE. IN NO EVENT WILL TOKENWORKS BE LIABLE TO YOU
FOR ANY DAMAGES, INCLUDING ANY LOST PROFITS, LOST SAVINGS OR OTHER INCIDENTAL OR
CONSEQUENTIAL DAMAGES ARISING OUT OF THE USE OF OR INABILITY TO USE SUCH PRODUCT, EVEN IF
TOKENWORKS HAS BEEN ADVISED OF THE POSSIBILITY OF SUCH DAMAGES, OR FOR ANY CLAIM BY ANY
OTHER PARTY.
THIS WARRANTY GIVES YOU SPECIFIC LEGAL RIGHTS, AND YOU MAY ALSO HAVE OTHER RIGHTS, WHICH
VARY FROM STATE TO STATE.
CARDSCRIBE USER MANUAL FOR CARDTOOL READER
PAGE 2 OF 35
COPYRIGHT 2003 TOKENWORKS INC.
WWW.TOKENWORKS.COM
3/13/2003
Copyright
Printed in the United States of America
3511 Silverside Rd.
Suite 105
Wilmington, DE 19810
www.TokenWorks.com
[email protected]
Copyright 2002 & 2003 TokenWorks, Inc.
Information in this document is subject to change without notice. No part of this document may be
reproduced or transmitted in any form or by any means, electronic or mechanical, for any purpose, without
the express written permission of TokenWorks, Inc.
TokenWorks, CardScribe and CardTool are registered trademarks of TokenWorks, Inc.
Visor and Handspring are trademarks of Handspring Inc.
Document Information
EVOLUTION OF THE DOCUMENT
Version
UM-031202-CC-R0
UM-031202-CC-R1
Date
3/12/2002
3/13/2002
Author
CC
CC
Evolution
First draft
Updated Hotsync section for Palm Desktop 4.0, added
Button Remapping tip and appending notes to MemoPad
Note: Visit the TokenWorks web site to obtain the latest version of this document.
CARDSCRIBE USER MANUAL FOR CARDTOOL READER
PAGE 3 OF 35
COPYRIGHT 2003 TOKENWORKS INC.
WWW.TOKENWORKS.COM
3/13/2003
Table of Contents
LIMITED WARRANTY............................................................................................................................................. 2
COPYRIGHT................................................................................................................................................................ 3
DOCUMENT INFORMATION ................................................................................................................................ 3
TABLE OF CONTENTS............................................................................................................................................. 4
ABOUT THIS DOCUMENT...................................................................................................................................... 6
IMPORTANT FEATURES OF CARDSCRIBE .................................................................................................... 6
INSERTING THE CARDTOOL............................................................................................................................... 7
CARDTOOL REMOVAL .......................................................................................................................................... 7
SWIPING CARDS........................................................................................................................................................ 8
MAINTENANCE AND GENERAL CARE............................................................................................................. 8
BATTERY LIFE........................................................................................................................................................... 9
HELPFUL HINTS...................................................................................................................................................... 10
SCREEN BACKLIGHTING FEATURE............................................................................................................................ 10
CONFIGURATION TIP - FRONT BUTTONS .................................................................................................................. 11
CARDSCRIBE APPLICATION INSTALLATION ............................................................................................ 12
MAIN SCREEN DESCRIPTION ..................................................................................................................................... 12
CARDSCRIBE CONFIGURATION SCREEN .................................................................................................... 12
TRACKS SETTINGS ..................................................................................................................................................... 12
DECODING OPTIONS .................................................................................................................................................. 13
MEMO PAD ................................................................................................................................................................ 14
DATA OPTION ............................................................................................................................................................ 14
CONFIRM NEW MEMO PAD ENTRY OPTION............................................................................................................. 14
LAUNCH MEMO PAD AFTER SWIPE........................................................................................................................... 14
TIP - ADDING NOTES TO MEMOPAD DATA .............................................................................................................. 15
DELIMITERS SET UP.............................................................................................................................................. 17
EDIT MENU................................................................................................................................................................ 18
FREQUENTLY ASKED QUESTIONS.................................................................................................................. 19
WHAT IS THE RESET TOOL IN MY STYLUS?................................................................................................................ 19
HOW DO I PERFORM A SOFT RESET?.......................................................................................................................... 20
WHERE'S THE RESET HOLE?....................................................................................................................................... 20
CARDSCRIBE USER MANUAL FOR CARDTOOL READER
PAGE 4 OF 35
COPYRIGHT 2003 TOKENWORKS INC.
WWW.TOKENWORKS.COM
3/13/2003
HOW DO I PERFORM A SYSTEM RESET?..................................................................................................................... 21
HOW DO I PERFORM A HARD RESET? ........................................................................................................................ 22
HOTSYNCING THE ERROR IDS FROM MEMO PAD...................................................................... 24
EXPORTING DATA FROM PALM DESKTOP ................................................................................................................ 25
IMPORTING MEMOPAD DATA TO MICROSOFT EXCEL ........................................................................ 28
APPENDIX A – 7 & 5 BIT CHARACTER SETS................................................................................................. 31
7 BIT CHARACTER SET .............................................................................................................................................. 31
5 BIT CHARACTER SET .............................................................................................................................................. 32
APPENDIX B ISO ENCODING.............................................................................................................................. 33
APPENDIX C GRAFFITI TABLE ......................................................................................................................... 34
CARDSCRIBE USER MANUAL FOR CARDTOOL READER
PAGE 5 OF 35
COPYRIGHT 2003 TOKENWORKS INC.
WWW.TOKENWORKS.COM
3/13/2003
About This Document
The document is a user manual for the CardScribe® application that works in conjunction with the
CardTool® 3-Track Magnetic Card Springboard Module from TokenWorks® Inc.
This application is intended to be the new demonstration application for the CardTool® reader and contains
many improvements over the original CardDemo application that ships with the CardTool reader.
Important Features of CardScribe
There are several improvements to the previous demonstration application for the CardTool reader. The
major improvements are;
Store the magnetic track data in the built in Palm OS Memo Pad application,
Change magnetic track data delimiters by setting up to five pairs of search/replace characters,
Using the Hotsync feature of the Palm Desktop application, export/import track data to MSFT Excel/Access
Time stamp the track data by appending data/time information
With the above functionality, the CardTool reader can be used in a number of applications without
developing custom software. The balance of this document describes how to set up and operate the
CardTool reader with the CardScribe application.
CARDSCRIBE USER MANUAL FOR CARDTOOL READER
PAGE 6 OF 35
COPYRIGHT 2003 TOKENWORKS INC.
WWW.TOKENWORKS.COM
3/13/2003
Inserting the CardTool
To insert the CardTool, align the unit with the Handspring expansion slot (see figure 1) and gradually
insert the unit. It should insert smoothly until it makes contact with the expansion slot stops. Do not
force the unit into the expansion slot. If resistance is significant, withdraw CardTool and ensure there
are no foreign objects in the expansion slot and that CardTool is properly aligned with the Visor
expansion slot.
CardTool Removal
To remove the CardTool, either use the thumb stop on the back of the unit to gradually push it out of the
expansion slot or grab the CardTool at the base of the card slot and pull it away from the Handspring Visor
in the same plane as the expansion slot. Try not to grab the CardTool by the top and bottom but rather
each side at the base of the card slot. Grabbing the top and bottom of the CardTool will generate a force
component, which will increase
the friction and make it harder to
remove.
When the CardTool is removed
from the Handspring Visor,
applications
that
were
automatically installed when the
CardTool was inserted are
automatically uninstall from the
Visor application menu.
Note: If the Visor is turned off,
removal of the CardTool (or any
other module) turns the Visor on.
CARDSCRIBE USER MANUAL FOR CARDTOOL READER
PAGE 7 OF 35
COPYRIGHT 2003 TOKENWORKS INC.
WWW.TOKENWORKS.COM
3/13/2003
Swiping Cards
1. With the Cardscribe application running on the screen of the Handspring Visor, hold the unit in either
the left or right hand. If the Cardscribe is not active, select the Cardscribe application icon from the
‘desktop’ or ‘home’ screen that shows all the application icons.
2. Using your other hand, position a magnetic card with the magnetic stripe (black stripe on back of card)
facing the Handspring Visor at either end of the CardTool’s card slot.
3. While ensuring that the magnetic card’s edge remains in contact and parallel to the base of the card
slot, swipe the card completely through the card slot.
4. It does not matter which way the card is swiped, but it is important that the card not be skewed during
the swipe. Skewing occurs if the card is tilted or rotated as it is swiped through the slot. Tip: hold the
magnetic card in the center and maintain pressure on the edge as it travels through the slot.
Experiment with the orientation of the Handspring Visor. Some find it easier to hold the Handspring
Visor with the screen facing left or right and swiping the card vertically through the card slot.
5. The ‘Cardscribe’ application will update its display after a successful swipe and store relevant
information in its database.
Maintenance and General Care
The CardTool is not waterproof. Do not expose to rain or moisture
Do not drop the CardTool or subject it to strong impact.
Protect it from temperature extremes. Do not leave on the dashboard of a car on a hot day and
keep it away from heaters and other heat sources. Do not use when temperature are below
freezing.
Do not store or use your CardTool in any location that is extremely dusty, damp or wet.
Ensure the magnetic heads are occasionally cleaned with commercially available magnetic cleaning
cards.
Clean exterior of case with dry lint free cloth and do not use abrasive cleaning products.
CARDSCRIBE USER MANUAL FOR CARDTOOL READER
PAGE 8 OF 35
COPYRIGHT 2003 TOKENWORKS INC.
WWW.TOKENWORKS.COM
3/13/2003
Battery Life
The CardTool does not have its own battery but instead uses the main batteries of the Handspring Visor.
When the CardTool is installed in the Handspring Visor, it will draw current from the main batteries and thus
reduce the life of these batteries. Every effort has been made to reduce the power consumption of the
CardTool and this section should help users understand how the CardTool will change the normal life
expectancy of the Handspring Visor’s main batteries.
To conserve batteries, it is suggested that:
When not planning to read a card, either power off the Handspring Visor or select another
application such as the address book, memo pad, etc. This will put the CardTool into its sleep
mode.
If not planning to use the Handspring Visor for an extended period of time, remove the CardTool
and/or the Handspring’s main batteries (if applicable). Informal testing has shown that the normal
8-week alkaline battery life is shortened to approximately 3 weeks if this suggestion is not applied.
For Handspring Visors with built -in rechargeable Lithium Ion batteries (Prism, Edge, Pro), return the
unit to the charging base whenever not in use. Note: This is the normal operating procedure
suggested by Handspring to ensure these models get their batteries constantly topped off.
For Handspring Visors using alkaline batteries, consider purchasing rechargeable NiMH AAA
batteries. A list of batteries/chargers is provided on the TokenWorks web site in the support
section.
CARDSCRIBE USER MANUAL FOR CARDTOOL READER
PAGE 9 OF 35
COPYRIGHT 2003 TOKENWORKS INC.
WWW.TOKENWORKS.COM
3/13/2003
Helpful Hints
Tapping the contrast icon with the stylus controls the contrast of the LCD display. The contrast icon is the
small black and white circle in the lower left corner of the pull down menu square; tap it and a sliding bar will
pop up to allow you to adjust the contrast.
The contrast icon is here
Adjust the contrast by using
the stylus to “grab” the slider
bar on the contrast pop up.
Screen Backlighting Feature
There is a backlighting feature on the Visor, press and hold the power button down after you turn the unit on.
The backlighting is helpful in low light conditions.
CARDSCRIBE USER MANUAL FOR CARDTOOL READER
PAGE 10 OF 35
COPYRIGHT 2003 TOKENWORKS INC.
WWW.TOKENWORKS.COM
3/13/2003
Configuration Tip - Front Buttons
Configure the application buttons on the Visor to turn
on and launch the CardScribe Application. Ensure
Cardscribe is never more than a button click away!
The four round silver buttons shown above (Date
Book, Address Book, To Do List and Memo Pad) are
normally associated with their respective built in Palm
application. The Buttons Preferences screen enables
you to change the association of the buttons to the
Cardscribe Verification application.
Insert the CardTool reader into the Visor and follow the
steps shown below:
Note: The graphics show ‘CardVisor’ as the
application, just substitute ‘CardScribe’ for ‘CardVisor’
Note: Substitute CardScribe for CardVisor in above image
Once complete, hit the newly reconfigured button(s) and CardScribe will be up and running, whether the
Handspring Visor is powered on or off!
CARDSCRIBE USER MANUAL FOR CARDTOOL READER
PAGE 11 OF 35
COPYRIGHT 2003 TOKENWORKS INC.
WWW.TOKENWORKS.COM
3/13/2003
CardScribe Application Installation
After plugging in the CardTool, CardScribe automatically installs and welcome screen appears. Click the OK
button to launch the main screen of CardScribe, is shown below.
Main Screen of CardScribe Demo
Main Screen Description
The main screen is where the magnetic card data is displayed after each swipe. In addition to displaying the
data on the screen, the application saves the last ten ‘swipes’ in a 10 record database. The two arrow
buttons on the bottom of the screen provide database navigation. The clear button simply clears the screen
and the settings button displays the current configuration of the magnetic head decoder. When first
installed, the settings will default to reading track one only using the ISO decoding algorithm.
CardScribe Configuration Screen
Via the configuration item in the main pull down menu, the user may configure how the CardTool decodes
the data on the magnetic stripe and stores the resulting information. The top two options on the
configuration screen determine how the CardTool reads and decodes the information on the magnetic stripe.
Tracks Settings
Main Pull Down Menu
Configuration Screen
Tracks Options List
Shown above is the sequence of selecting the configure item on the main menu, the main configuration
screen and the Tracks options. There are six options available in tracks, representing the most common
track configuration options. If the application is configured to read data from a non-existent track, then a
CARDSCRIBE USER MANUAL FOR CARDTOOL READER
PAGE 12 OF 35
COPYRIGHT 2003 TOKENWORKS INC.
WWW.TOKENWORKS.COM
3/13/2003
decode error will be displayed on the screen. If unsure how to set this, start with track one or track two since
most cards typically have one or the other. Below are some common configuration options.
Decoding Options
The decoding options while determine which decoding algorithm is used on each track. The first three
options are probably the most common options used on magnetic stripe cars. They are;
ISO - decodes data using 7 bits/char. on track 1, 5 bits/char. on track 2, and 5 bits/char. on track
777 - decodes data using 7 bits/char on tracks 1, 2 and 3. It is common at Trade Shows.
AAMVA - decodes data according to the American Association of Motor Vehicle Administers specification with
7 bits/char. on track 1, 5 bits/char. on track 2, and 7 bits/char. on track
Decoding Options List
The other options shown on the list indicate the number of bits / character used on each track. In the
Appendix, the character sets for both 5 and 7 bits characters is provided.
CARDSCRIBE USER MANUAL FOR CARDTOOL READER
PAGE 13 OF 35
COPYRIGHT 2003 TOKENWORKS INC.
WWW.TOKENWORKS.COM
3/13/2003
Memo Pad
CardScribe can save the track data to built-in Palm OS Memo Pad. By storing track data in this way, it may
be easily copied to a PC and subsequently imported into PC desktop applications. This section explains the
various options available when using the Memo Pad.
Data Option
The Data Option determines if the track data will be stored only in the 10 record internal database or if it will
also be stored in the Memo Pad application. Track Data is always saved to the 10 record internal database.
Data Option Screen
Confirm New Memo Pad Entry Option
If the Save to Memo Pad Option is selected, then each new entry or memo can be confirmed prior to its
addition to the Memo Pad. Conversely, if the Save to Internal DB is selected, the confirm option will
disappear.
Confirm New Memo Pad Entry
Confirmation Screen after each
swipe if Confirm New Memo
Categorize New Memo Pad Entry
if Confirm New Memo
An important feature of the confirmation screen is the ability to categorize each new Memo. For example,
one card swipe may represent a prospect for one product while a second may represent a different product.
Launch Memo Pad after Swipe
If the Confirm New Memo Option is selected, then the Launch Memo Pad option will appear. Conversely, it
will disappear if Hide Confirmation is selected. As one might guess, if the Launch after swipe option is
selected, then after each new memo is confirmed, the Memo Pad application will be launched.
CARDSCRIBE USER MANUAL FOR CARDTOOL READER
PAGE 14 OF 35
COPYRIGHT 2003 TOKENWORKS INC.
WWW.TOKENWORKS.COM
Launch Memo Pad Option
3/13/2003
Confirmation Screen after swipe
New Memo with Track Data ready
for editing
The benefit of launching the Memo Pad application after each swipe is that additional information may be
appended to the track data such as notes or follow up actions. Notice that the date and time have been
appended to the track data in the Memo Pad screen shot. This feature is presently hard coded into the
application but future versions may have the configuration options, including disabling this function.
Tip - Adding Notes to MemoPad Data
After a card has been swiped, it is possible to add one or more comments that will be uploaded to one or
more columns in the Excel spread sheet. This is a great way to mark a card with additional notes such as
email addresses or phone numbers. Whenever the Excel import wizard sees the ^ character, it puts the
following data into the next column of the spreadsheet. At the end of each string in the Memo, there is the
carat (^) character. Just tap the stylus at the end of the line and start making notes. Notes can be made
using the keyboard or via Graffiti (see Graffiti chart in this manual). Shown below are some screen shots
showing how Memos created by the CardVisor ID Scanner application can have comments appended to
them. The same holds true for Cardscribe data.
MemoPad with cursor after last
carat (^) character
Memo data entry using
KeyPad
CARDSCRIBE USER MANUAL FOR CARDTOOL READER
PAGE 15 OF 35
Memo after adding VIP
designation
COPYRIGHT 2003 TOKENWORKS INC.
WWW.TOKENWORKS.COM
3/13/2003
Additional columns will be added to the spreadsheet by appending
additional ^ characters. See the Graffiti chart on how to write this
character. Note: It is not necessary to have a carat symbol as the last
character in the memo. Excel will put the last field in the proper
column with or without a carat symbol at the end.
Card ID with two notes (VIP
status & email address) after
data/time information
CARDSCRIBE USER MANUAL FOR CARDTOOL READER
PAGE 16 OF 35
COPYRIGHT 2003 TOKENWORKS INC.
WWW.TOKENWORKS.COM
3/13/2003
Delimiters Set Up
The delimiters set up screen allows up to five characters to be replaced in the track data stream. By using a
consistent set of delimiters, subsequent import into programs such as Excel are facilitated. Shown below is
the default delimiters screen. Each scan for/replace with pair can be enabled as needed but checking the
enable check box.
Delimiters Screen
Delimiter Highlighted & showing
short cut – paste/copy/cut option
Delimiter highlighted and being
edited with keyboard feature
Each delimiter field is only one character and can be any ASCII character in the PalmOS character set. By
setting and enabling these parameters and reviewing the track swipe data on the main screen, it is possible
to create a record that has delimiters in the appropriate locations in the card data stream.
To edit a delimiter character, just highlight it and either graffiti in the new character or select one of the
keyboard items (abc or 123) in the graffiti area to launch the keyboard. It is also possible to cut and paste
characters into these fields using the standard Palm OS copy/cut/paste features.
If the character in question is not available on the keypad, either copy it from the track data or find it in
another application and again cut and paste. A quick way to copy/cut/paste characters from any application
(including CardScribe) is to use the short-cut graffiti stroke in the graffiti area (slash character drawn from the
bottom left up to the top right). For hard to find characters, a shareware program called Asciichart is
available at http://astro.uchicago.edu/home/web/valdes/pilot/AsciiChart/ that provides the entire
ASCII character set.
Original Character in Track Data
%
=
?
+
;
Converted Memo Pad Character
^
^
^
^
^
CARDSCRIBE USER MANUAL FOR CARDTOOL READER
PAGE 17 OF 35
Track 1 Start Sentinel
Track 2 delimiter
End Sentinel
Track 3 Start Sentitnel
Track 2 Start Sentinel
COPYRIGHT 2003 TOKENWORKS INC.
WWW.TOKENWORKS.COM
3/13/2003
Edit Menu
CardScribe also contains the standard edit menu which is common in most Palm applications. Shown below
is the pull down menu. The most useful feature of the edit menu is the ability to use the shortcut graffiti
stroke and launch the keypad.
Edit Menu on Main Screen
CARDSCRIBE USER MANUAL FOR CARDTOOL READER
PAGE 18 OF 35
COPYRIGHT 2003 TOKENWORKS INC.
WWW.TOKENWORKS.COM
3/13/2003
Frequently Asked Questions
What is the reset tool in my stylus?
Most styli have a little secret.
If you unscrew the tip (the end you write with), you'll notice a blunt plastic pin, which happens to fit exactly into
your handheld's reset hole.
We designed it that way.
So now, if you need to perform a reset on-the-fly, you don't have to search for a paper clip to unbend.
Visor Edge stylus
In order to conform to the thin form factor with the sleek metal stylus clipped to the right edge, the Visor Edge
doesn't have a reset tool. We recommend you employ the tried-and-true unbent paper clip method for pushing
the reset button on your handheld.
Extra credit
This one's for Visor, Visor Deluxe, Visor Platinum, Visor Neo and Visor Pro: Try unscrewing the other end of your
stylus (the one you don't write with). You'll notice an additional surprise.
Please remember that unscrewing the back of your handheld voids the warranty. Unscrewing the tip of the
stylus to access the reset tool or other tool, however, will not void the warranty.
CARDSCRIBE USER MANUAL FOR CARDTOOL READER
PAGE 19 OF 35
COPYRIGHT 2003 TOKENWORKS INC.
WWW.TOKENWORKS.COM
3/13/2003
How do I perform a soft reset?
Keeping your data safe during a Soft Reset
Soft Resets do not affect your personal data on the handheld. The Soft Reset restarts your handheld just like a
desktop computer reboot. Soft Resets are safe to perform as long as your batteries are not so low that you are
receiving warnings. Change the batteries even if there is an error message showing and then perform the reset
if you have been seeing battery warnings. It is always a good practice to perform a HotSync operation before
any reset (assuming that synchronization is not the problem you are trying to fix) or to use a Backup module to
store all your data.
The Soft Reset
Your handheld can be on or off when resetting; it makes no difference. To perform a soft reset, use the tip of
an unfolded paper clip (or similar object without a sharp tip), to gently press the reset button inside the hole on
the back panel of your handheld. For a picture of the reset hole for each of our handhelds, see Where's the
reset hole?
A soft reset tells your handheld to stop what it's doing and start over again. All records and entries stored in
your handheld are retained with a soft reset. After a soft reset, the Welcome screen appears, followed shortly
by the General Preferences screen (to set time and date).
If a soft reset does not resolve your problem, you may need to perform a system reset, a hard reset, or a power
down reset.
Where's the reset hole?
A reset, whether it's the soft, system, or hard variety, can resolve many different problems with your handheld
device. Before you can perform a reset, however, you need to find the reset hole.
Visor, Visor Solo, Visor Deluxe,
Visor Platinum and Visor Neo
CARDSCRIBE USER MANUAL FOR CARDTOOL READER
Visor Prism and Visor Pro
PAGE 20 OF 35
Visor Edge
COPYRIGHT 2003 TOKENWORKS INC.
WWW.TOKENWORKS.COM
3/13/2003
How do I perform a system reset?
A system reset tells your handheld to stop what it's doing and start over again, bypassing any system
extensions. No records or entries stored in your handheld are deleted when you properly perform a
system reset.
To perform a system reset:
1. Press the up scroll button on the front panel of the device.
2. While pressing the up scroll button, use an unfolded paper clip (or similar object without a sharp
tip) to gently press the reset button. For help finding the reset hole see Where's the reset hole?
3. The Palm Computing Platform screen will appear. Release the up scroll button when you see it.
4. See if you can turn on Beam Receive in the General Preferences dialog. If you cannot, your
handheld was system reset correctly.
5. Perform a soft reset to restore beam receive.
What does a System Reset do?
In addition to bypassing third-party extensions that may be causing problems, a system reset will bypass
the Palm OS system extensions that enable your handheld to beam and perform other functions. Once
you have removed the problem software, be sure to perform a soft reset to restore these functions.
What if a System Reset doesn't solve the problem?
If all else fails, perform a hard reset. If you own an Alkaline powered Visor handhelds, you can also try a
power down reset as a last resort.
Be sure that your data is backed up, because both the hard reset and the power down reset will erase
all records and entries on your handheld.
CARDSCRIBE USER MANUAL FOR CARDTOOL READER
PAGE 21 OF 35
COPYRIGHT 2003 TOKENWORKS INC.
WWW.TOKENWORKS.COM
3/13/2003
How do I perform a hard reset?
Warning: A hard reset will erase everything on your device.
REPEAT WARNING A HARD RESET WILL ERASE ALL TRANSACTION DATE
All your personal data and third-party applications will be removed. The Cardscribe application resides in
the flash memory of the CardTool reader and therefore is unaffected by a hard reset. However, don't
perform a hard reset unless you've backed up your data, or you're willing to lose everything.
To perform a hard reset:
1. Hold down the power (on/off) button on your device.
The power button on Visor organizers is on the front. The power button on Treo devices is on the
top of the unit next to the antenna. We recommend that you close the flip lid on a Treo to make
the power button easier to press and hold.
2. While holding down the power button, turn over your device so that you can see the back of it.
Using the reset tool, an unfolded paper clip or a similar small blunt-tipped object, gently press
the reset hole on the back.
See Where's the reset hole?
3. When the device's screen displays the Palm Computing Platform logo, release the power button.
4. A message will appear warning that you are about to erase all the data stored on your handheld. In
response, do one of the following:
o
Press the up scroll button on the front panel of your handheld to complete the hard reset,
erasing everything on your device
or
o
Press any other button to begin a soft reset, leaving your data intact.
5. Your device will then take you through a series of screens to calibrate the digitizer and verify the time
and date.
CARDSCRIBE USER MANUAL FOR CARDTOOL READER
PAGE 22 OF 35
COPYRIGHT 2003 TOKENWORKS INC.
WWW.TOKENWORKS.COM
3/13/2003
Note: A hard reset does not delete the current date and time. It does restore other settings to the factory
default.
Important: Recovering after a hard reset
If you backed up your data by synchronizing it to your desktop computer, you can restore it now by
performing a HotSync operation. See What should I do after a hard reset?
Never perform a hard reset unless neither a soft reset nor a system reset solves the problem.
Unsuccessful
If a hard reset does not resolve your problem and your handheld uses removable alkaline batteries, you
may benefit from a power down reset (which works with handhelds that use replaceable batteries).
If your Visor handheld is rechargeable, you can't do a power down reset. Power-down resets are not
required for Visor Pro; a soft reset performs the same function. For a Visor Prism, you can leave the
power drain completely to have the same effect or you may wish to contact Handspring product support.
Additional questions and answers available on the web in the CardScribe section of the TokenWorks web
site. Visit http://www.tokenworks.com/_private/discussions/default.asp and visit the CardScribe forum
where you can post questions and review posts from other users.
CARDSCRIBE USER MANUAL FOR CARDTOOL READER
PAGE 23 OF 35
COPYRIGHT 2003 TOKENWORKS INC.
WWW.TOKENWORKS.COM
3/13/2003
HotSyncing the Error IDs from Memo Pad
The Palm Desk Top Application ships with the Handspring Visor on the Green CD, contains
software that synchronizes PC applications and the Handspring Visor. It is called the Hotsync Manager and if
properly installed, the blue and red icon shown above should appear in the task bar in the bottom right
corner of your screen. If not, please make sure the Palm Desk Top application is properly installed. For the
latest version, visit the Palm web site for a free copy at
http://www.palm.com/support/downloads/win_desktop.html. For information and questions on installing
the software on the Green Handspring CD, visit the Handspring web site support section at :
http://support.handspring.com/esupport/start/hsWelcome.jsp and click on ‘new users start here.’ It is also
advisable to read the ‘Advanced HotSync Operations’ chapter in the Handspring User Guide that is also on
the Handspring CD. BEFORE HOTSYNC ANY DATA, MAKE SURE THE HOTSYNC PROGRAM IS PROPERLY
CONFIGURED AND ALL IMPORTANT DATA IS BACKED UP.
Also included on the Green Handspring CD is a program called Pocket Mirror that which will optionally install
when installing the Palm Desk Top. It causes HotSync to use Microsoft Outlook INSTEAD of the Palm Desk
Top application. These instructions require that Pocket Mirror IS NOT been installed. If it has,
it is possible to remove the application by going to the control panel, selecting add/remove programs, and
removing it. It can be installed again from the CD if needed.
Main Screen of the Palm Desk Top showing the Memo Pad
CARDSCRIBE USER MANUAL FOR CARDTOOL READER
PAGE 24 OF 35
COPYRIGHT 2003 TOKENWORKS INC.
WWW.TOKENWORKS.COM
3/13/2003
Shown above is the Main screen of the Palm Desktop with the Memo Pad active. On the left, the first of 5
records is highlighted and on the right contents of the first record are displayed. Notice the Category is set to
‘CardVisor’ which selects only those memos (records) from the MemoPad application. Also note that if there
are multiple Visors being used on the same PC, there will be multiple Hotsync names available in the top
right corner of the screen.
Exporting Data from Palm Desktop
The Palm Desktop application allows all or selected Memos to be exported in several common formats
including comma delimited, tab delimited format, and text. This document will use text since Cardscribe puts
field delimiters in the data (^ character) which the import wizard of Excel and Access can recognize.
To start the process, first select the memos, which are to be exported. It is possible to export all or just a
subset of the memos to be exported by highlighting the desired memos.
Then, from the main File menu, select the Export option.
Palm Desktop –> File -> Export
CARDSCRIBE USER MANUAL FOR CARDTOOL READER
PAGE 25 OF 35
COPYRIGHT 2003 TOKENWORKS INC.
WWW.TOKENWORKS.COM
3/13/2003
This will launch the Export As window that determines the file name, format and storage location.
Export As Window
Export to File Window showing MemoPad Archive
Comma Separated Format and selected Records
1.)
2.)
3.)
4.)
Export to File Window using Text (*.txt) as the file
Export type and currently selected Records
Select the directory to store the data in the top pull down menu box
Change the Export file type from Memopad Archive (*.mpa) to Text (*.txt)
Type the file name (e.g. export.txt or data.txt) in the File name box
Click on the Export button.
Important: Make sure the file extension
is “ .txt” and not “ .csv” since files with
the “csv” file extension will not cause
the Excel import wizard to launch. If
accidentally used, the csv file extension
can be rename to txt by the file
manager and no harm will be done.
Note: To export all the information, click
on the ‘All’ radio button instead of the
‘Currently selected records’ radio button
in the Range field.
CARDSCRIBE USER MANUAL FOR CARDTOOL READER
PAGE 26 OF 35
COPYRIGHT 2003 TOKENWORKS INC.
WWW.TOKENWORKS.COM
3/13/2003
After hitting the Export button, the program will ask which field of the Memo Pad should be exported. There
are three fields in the Memo Pad application; Memo, Private and Category. The Memo field contains the
track data, the private field indicates whether the Palm OS should treat the record as private, and the last
field is the category. For this example, only the track data will be exported so just check the Memo items.
Specify only the Memo Pad field for Export
1.) Check the Memo item
2.) Uncheck the Private and Category items
3.) Hit the OK button
After this window closes, the data will be
exported and saved to the export file. The
Export complete message box should be
displayed.
The next step is to import the information into Excel or Access. For this example, Excel will be used, as it is
familiar to more people than Microsoft Access. However, the import wizards for both products are very
similar so these instructions would also apply to Access.
CARDSCRIBE USER MANUAL FOR CARDTOOL READER
PAGE 27 OF 35
COPYRIGHT 2003 TOKENWORKS INC.
WWW.TOKENWORKS.COM
3/13/2003
Importing MemoPad Data to Microsoft Excel
Excel and Access provide very nice data import wizards. These instructions were based on Excel, but should
apply to ACCESS. To use these wizards, from the main menu of Excel, select the File, Open item.
1.) Click on the File -> Open menu
item. This will launch the
Open Dialog box shown below.
2.) Select the directory which
contains the exported
memoPad data.
3.) Change the file type to Text
Files (*.prn, *.txt, *CSV)
4.) Select the correct file (e.g.
export.txt) or type the correct
file name into the file name
text box.
5.) Hit the open button.
After pushing the Open button the Excel
import wizard will launch. This Wizard
determines how the data in the file will
be interpreted when imported in the
Excel spreadsheet.
1.) Select the Delimited radio
button
2.) Start import at row 1
3.) File Origin Windows (ANSI)
CARDSCRIBE USER MANUAL FOR CARDTOOL READER
PAGE 28 OF 35
COPYRIGHT 2003 TOKENWORKS INC.
WWW.TOKENWORKS.COM
3/13/2003
In the second step, the Wizard asks
how the fields are to be delimited.
1.) Check the ‘Other’ delimiter
option
2.) Uncheck the tab, space,
semicolon, and comma
options.
3.) Type the carat character ‘^’
into the ‘Other’ delimiter text
box
4.) Hit the next button
Note: Once you enter the carat
character into the text box, the Wizard
will put vertical lines in the Data preview
window. Make sure the lines are shown
in the appropriate locations before
proceeding.
The final step in the process is to
indicate the format of the data in each
column.
1. Hit the Finish Button
Note: For mailing labels, General is fine
on all columns. If certain information
should be treated differently, this
screen allows it to be formatted
appropriately.
That is basically it. After hitting the
finish button the data now has been
imported into Excel.
Shown here is what the imported data
will look like in Excel.
Note that the first name is in column A,
the last name in column B, address in
column C. Also note each entry is in its
own row and that in this example there
are blank rows between each row of
license data.
CARDSCRIBE USER MANUAL FOR CARDTOOL READER
PAGE 29 OF 35
COPYRIGHT 2003 TOKENWORKS INC.
WWW.TOKENWORKS.COM
3/13/2003
To remove the empty rows in the data,
just hit the sort button
.
Or select the Data -> Sort menu item to
sort the entire spreadsheet.
Here is the spreadsheet after the sort
button has been pushed.
The final step in the process is to save
the new Excel spreadsheet. Select the
File -> Save As menu item. This will
launch the Save As dialog window
shown on the right. Enter the desired
file name and type. In the example
shown, the file type is Microsoft Excel
Workbook (*.xls) and name is
‘export.xls.’
CARDSCRIBE USER MANUAL FOR CARDTOOL READER
PAGE 30 OF 35
COPYRIGHT 2003 TOKENWORKS INC.
WWW.TOKENWORKS.COM
3/13/2003
Appendix A – 7 & 5 Bit Character Sets
7 Bit Character Set
** ANSI/ISO ALPHA Data Format **
Alphanumeric data can also be encoded on magstripes. The second ANSI/ISO data format is ALPHA
(alphanumeric) and involves a 7-bit character set with 64 characters. As before, an odd parity bit is added to
the required 6 data bits for each of the 64 characters.
ANSI/ISO ALPHA Data Format
* Remember that b1 (bit #1) is the LSB (least significant bit)!
* The LSB is read FIRST!
* Hexadecimal conversions of the Data Bits are given in parenthesis (xH).
------Data Bits------- Parity
b1 b2 b3 b4 b5 b6 b7 Character Function
0
1
0
1
0
1
0
1
0
1
0
1
0
1
0
1
0
0
1
1
0
0
1
1
0
0
1
1
0
0
1
1
0
0
0
0
1
1
1
1
0
0
0
0
1
1
1
1
0
0
0
0
0
0
0
0
1
1
1
1
1
1
1
1
0
0
0
0
0
0
0
0
0
0
0
0
0
0
0
0
0
0
0
0
0
0
0
0
0
0
0
0
0
0
0
0
1
0
0
1
0
1
1
0
0
1
1
0
1
0
0
1
space (0H) Special
! (1H) "
" (2H) "
# (3H) "
$ (4H) "
% (5H) Start Sentinel
& (6H) Special
' (7H) "
( (8H) "
) (9H) "
* (AH) "
+ (BH) "
, (CH) "
- (DH) "
. (EH) "
/ (FH) "
0
1
0
1
0
1
0
1
0
1
0
0
1
1
0
0
1
1
0
0
0
0
0
0
1
1
1
1
0
0
0
0
0
0
0
0
0
0
1
1
1
1
1
1
1
1
1
1
1
1
0
0
0
0
0
0
0
0
0
0
0
1
1
0
1
0
0
1
1
0
0 (10H) Data (numeric)
1 (11H) "
2 (12H) "
3 (13H) "
4 (14H) "
5 (15H) "
6 (16H) "
7 (17H) "
8 (18H) "
9 (19H) "
0
1
0
1
0
1
1
0
0
1
0
0
1
1
1
1
1
1
1
1
1
1
1
1
1
0
0
0
0
0
0
1
0
1
1
: (1AH) Special
; (1BH) "
< (1CH) "
= (1DH) "
> (1EH) "
CARDSCRIBE USER MANUAL FOR CARDTOOL READER
PAGE 31 OF 35
COPYRIGHT 2003 TOKENWORKS INC.
WWW.TOKENWORKS.COM
3/13/2003
1 1 1 1 1 0
0 0 0 0 0 1
0
0
? (1FH) End Sentinel
@ (20H) Special
1
0
1
0
1
0
1
0
1
0
1
0
1
0
1
0
1
0
1
0
1
0
1
0
1
0
0
1
1
0
0
1
1
0
0
1
1
0
0
1
1
0
0
1
1
0
0
1
1
0
0
1
0
0
0
1
1
1
1
0
0
0
0
1
1
1
1
0
0
0
0
1
1
1
1
0
0
0
0
0
0
0
0
0
0
1
1
1
1
1
1
1
1
0
0
0
0
0
0
0
0
1
1
1
0
0
0
0
0
0
0
0
0
0
0
0
0
0
0
1
1
1
1
1
1
1
1
1
1
1
1
1
1
1
1
1
1
1
1
1
1
1
1
1
1
1
1
1
1
1
1
1
1
1
1
1
1
1
0
1
0
0
1
1
0
0
1
0
1
1
0
1
0
0
1
0
1
1
0
0
1
1
A (21H)
B (22H)
C (23H)
D (24H)
E (25H)
F (26H)
G (27H)
H (28H)
I (29H)
J (2AH)
K (2BH)
L (2CH)
M (2DH)
N (2EH)
O (2FH)
P (30H)
Q (31H)
R (32H)
S (33H)
T (34H)
U (35H)
V (36H)
W (37H)
X (38H)
Y (39H)
Z (3AH)
Data (alpha)
"
"
"
"
"
"
"
"
"
"
"
"
"
"
"
"
"
"
"
"
"
"
"
"
"
1
0
1
0
1
1
0
0
1
1
0
1
1
1
1
1
1
1
1
1
1
1
1
1
1
1
1
1
1
1
0
1
0
0
1
[ (3BH)
\ (3DH)
] (3EH)
^ (3FH)
_ (40H)
Special
Special
Special
Field Separator
Special
***** 64 Character 7-bit Set *****
43 Alphanumeric Data Characters
3 Framing/Field Characters
18 Control/Special Characters
5 Bit Character Set
ANSI/ISO BCD Data Format
* Remember that b1 (bit #1) is the LSB (least significant bit)!
* The LSB is read FIRST!
* Hexadecimal conversions of the Data Bits are given in parenthesis (xH).
--Data Bits-- Parity
b1 b2 b3 b4 b5 Character Function
0
1
0
1
0
0
0
1
1
0
0
0
0
0
1
0
0
0
0
0
1
0
0
1
0
0 (0H) Data
1 (1H) "
2 (2H) "
3 (3H) "
4 (4H) "
CARDSCRIBE USER MANUAL FOR CARDTOOL READER
PAGE 32 OF 35
COPYRIGHT 2003 TOKENWORKS INC.
WWW.TOKENWORKS.COM
1
0
1
0
1
0
1
0
1
0
1
0
1
1
0
0
1
1
0
0
1
1
1
1
1
0
0
0
0
1
1
1
1
0
0
0
1
1
1
1
1
1
1
1
1
1
0
0
1
1
0
1
0
0
1
3/13/2003
5 (5H)
6 (6H)
7 (7H)
8 (8H)
9 (9H)
: (AH)
; (BH)
< (CH)
= (DH)
> (EH)
? (FH)
"
"
"
"
"
Control
Start Sentinel
Control
Field Separator
Control
End Sentinel
***** 16 Character 5-bit Set *****
10 Numeric Data Characters
3 Framing/Field Characters
3 Control Characters
Appendix B ISO Encoding
Track Name
RECORDING DENSITY
(bits per inch)
0.110" Track 1 IATA
210BPI
CHARACTER
CONFIGURATION
(including parity bit)
7 BITS PER CHARACTER
0.110" Track 2 ABA
0.110" Track 3 Thrift
75BPI
210BPI
5 BITS PER CHARACTER
5 BITS PER CHARACTER
CARDSCRIBE USER MANUAL FOR CARDTOOL READER
PAGE 33 OF 35
INFORMATION CONTENT
(including control characters)
79 APHANUMERIC
CHARACTERS
40 NUMERIC CHARACTERS
107NUMERIC CHARACTERS
COPYRIGHT 2003 TOKENWORKS INC.
WWW.TOKENWORKS.COM
3/13/2003
Appendix C Graffiti Table
CARDSCRIBE USER MANUAL FOR CARDTOOL READER
PAGE 34 OF 35
COPYRIGHT 2003 TOKENWORKS INC.
WWW.TOKENWORKS.COM
3/13/2003
Appendix D Customer Feedback
Use this form to describe any problems you may be having with the Cardscribe software or any
suggested product improvements you may have. Your input is valued and necessary for us to continue
provided up to date age verification and data collecting functions.
When new versions of Cardscribe are developed, we will notify you via our web site and newsletters
that a updated version of the program is available. The program can be E-mailed and will automatically reflash the CardTool memory with the latest revision.
Name:
___________________________
Phone: _________________________________
Company:
___________________________
Address:_________________________________
Email:
___________________________
City: _____________ State_________ Zip______
Describe suggestion or problem below:
CARDSCRIBE USER MANUAL FOR CARDTOOL READER
PAGE 35 OF 35
COPYRIGHT 2003 TOKENWORKS INC.


![IDVisor Hardware User Manual [Rev 1.1]](http://vs1.manualzilla.com/store/data/005787323_1-ba2f62bd59c5cdea456b5da531a1d222-150x150.png)