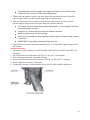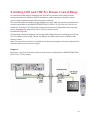
1
Intertech Technician Training Manual Table of Contents Introduction to Intertech Installation o Dishes; 7-16 o Mounting; 17-46 o Receivers; 47-49 o Connectivity; 80-104 o SHS; 105-119 o Trouble Shooting; 120-128 o Customer Education; 129-30 o DishNET; 131-168 o Legacy; 169-171 CSAT; 172-173 Grounding; 174-182 Connectors; 183-187 Job Aids; 188-200 Policies/Forms; 201-217 1 Introduction to Intertech What is Intertech? Intertech is a RSP (Regional service provider) for Dish Network. Intertech covers parts of Western NY, Northwestern PA, Vermont, and Massachusetts. This is an exciting, constantly changing industry. The business provides many opportunities for individuals who have a desire to grow and learn about electronics and the dynamic businesses of entertainment and information delivery. You have an exciting role at Intertech. Customers have chosen to buy Dish products and services – and you are the one who arrives at the customer’s home and brings them the products and services that they want to have in their home. The customer will remember your conversation, your care of the customer’s personal property, your knowledge of programming services, your appearance, your performance, and your ability to treat the customer’s home “as if it were your own”. As a Technician, you set the tone of the customer’s future relationship with the company. For these reasons, you will need both technical and social skills. A positive attitude and enthusiasm are the basic ingredients of successful customer service. They help to create the professional image your customer will appreciate and remember. Dish procedures and standards are designed to provide an installation where the cabling, connectors and grounding should not need replacement for at least 10 to 15years. The information you will be provided in training reflects new standards that are designed for the current and future dish equipment. The purpose of standards is to establish consistent practices and procedures. With uniformity, you will deliver safe, efficient, and quality services. These standards will help you work in a manner that satisfies customers. As an RSP we are expected to install new customers and maintain all current customers to include upgrades to existing systems and service or maintaining existing systems. We also provide Internet service via DishNET. Intertech is also an authorized retailer to sell and service Dish. 2 Team Leader Phone numbers Gino Sposito On call Monday 716-583-4768 Hugo Tavarez On call Tuesday 716-574-1613 Austin Gartley On call Wednesday 716-923-5568 Jason Knepshield On Call Thursday 716-583-4750 Rick Delregno On call Friday 716-583-2456 Dave Schroeder On call Saturday 716-583-4727 Hugo or Austin On call Sunday 3 Orbital Location by Dish Antenna Choose the correct dish antenna based on orbital locations needed. DBS 61.5 110 119 DISH 500* X X DISH 1000 X X DISH 500+ X X DISH 1000+ X X X DISH 1000.2 X X X DISH 1000.4 (WA) X X X DISH 500AK (Alaska) X X DISH 500HW (Hawaii West) X X DISH 1000.4 (EA) DISH 500 HE/PR (Hawaii East, Puerto Rico, U.S. Virgin Islands) X 72.7 X 77 FSS 129 105 118.7 121 X X X X X X *The DISH 500 is also used as a single orbital dish or wing dish and can be pointed to any one DBS satellite. See these options on page 2-2. 4 Tool List Company Supplied Tools VAN Cell Phone 20'-24' Ladder 32' ladder Shovel Post Hole Digger Fire Extinguisher First Aid Kit Traffic Triangle/ Road Flares 1/2" Drill Bit Auger 5/8" Drill Bit Auger 3/4" Drill Bit Auger 1/2" Masonry Bit 5/8" Masonry Bit 3/4" Masonry Bit 3/8" Masonry Bit for lag shields 3/8" Steel Drill Bit Phone Step Ladder - 1ft Technician's Personal Tools Tool Belt/Pouch Wire Cutters Pliers (Needle nose or other) Flat Head Screw Driver Philips Head Screw Driver 7/16 Opened End Wrench 1/2 Opened End Wrench 7/16 Socket and Ratchet Bubble Level(Magnetic) Wire Strippers/ Razor Blade Flashlight GPS Hammer Phone Crimpers(4 Pin) Cordless Hammer Drill 1/2" Driver 7/16" Driver 3/8" Driver 1/4" Driver Sight Finder(Suunto) Signal Meter(Super buddy) Connector Compression Tool Coax Wire Stripper Non Adjust Blade Philips/Flat Screw Lag Driver Line Toner Back-up Meter 3/8" Opened End Wrench Hack Saw/ Pipe Cutter Outlet Tester Stud Finder Drywall Saw Tape Measure Glow Rods/Fish Tape Small Mirror 5 Gallon Bucket ****Italicized items are available through Intertech 5 6 DISH Pro Plus 500 + LNBF Features ••DPP 500+ LNBF is used with the original DISH 500+ antenna to receive 110°W, 118.7°W, and 119°W. ••Three receiver output ports support direct connection to either three single-tuner receivers or three DISH Pro Plus (dual-tuner) receivers (when used with a DPP Separator), or a combination of these receivers. ••Includes an LNB In port to connect a fourth orbital location. ••Default output ports of the DPP 500+ LNBF are 119°W on Port 1, 110°W on Port 2, and 118.7°W on Port 3. ••Upgrade the DPP 500+ LNBF to a DPP 1000+ LNBF assembly by attaching the bracket for 129°W (included in the kit) and a DP Dual or DP Single LNBF (not included). ••DPP 500+ LNBF is backwards compatible with the original DISH 500+ LNBF mounting bracket. If desired, the new DPP 500+ LNBF can be mounted on the old bracket once the FSS/DBS Dual Band LNBF and DP Dual LNBF are removed. Installation Considerations ••The peaking angles used for pointing a DISH 1000+ are slightly different than the DISH 500+. Use the correct angles from the Installation Instructions. ••Peak on 118.7°W (Port 3) using a meter. Run a check switch, and then verify the signal on 110°W, 119°W, and 118.7°W (and 129°W for DISH 1000+) within the receiver’s Point Dish screen. A software download and second check switch may be required to see all of the orbital locations. ••If your peaking meter does not output at least 600 mA of current, connect a receiver to 110°W (Port 2) of the LNBF to power the LNBF while peaking. ••A separate DP Dual LNBF is used for the 129°W orbital location; the DPP 500+ kit includes the LNBF mounting bracket. ••The only switch compatible with the DPP 500+ LNBF is the DPP44 Switch. The LNBF’s LNB In port is disabled when connected to the switch. ••The DPP 500+ can be used for up to three receivers; for more than three receivers, use a DPP44 Switch 7 DISH 500 Antenna Assembly Assembly Instructions 1. Align the square bolt holes in the reflector with the bolt holes on the skew plate. 2. Insert flat head/carriage bolt into each of the 4 square bolt holes in the reflector. 3. Secure the bolts in place by threading a lock nut onto each bolt on the skew plate side. 4. Securely tighten all 4 bolts with an open end wrench or a socket wrench. 5. Slide the Y-bracket onto the end of the LNBF arm with the nut insert on the top. 6. Place the nut from the hardware pack into the inset. 7. Insert the long screw from the bottom of the Y-bracket through the LNBF arm and secure it with the nut. 8. Hold on to the last 2 long screws they will be used to attach the LNBF to the Y-bracket Pointing and Peaking 1. Enter the correct equipment information. 2. Enter the ZIP Code. 3. Set the Skew and Elevation. 4. Connect an RG-6 coaxial cable jumper between the Super Buddy, satellite meter and the switch or LNBF. 5. Power the LNBF. 6. Point the dish. 7. Peak the dish using Limit Scan 8. Obtain a maximized and locked signal on the verified correct satellite locations. 9. Complete a Proof of Performance Scan and save the results. 8 DISH 1000.2 Antenna Assembly Assembly Instructions 1. 2. 3. 4. 5. 6. Align the square bolt holes in the reflector with the bolt holes on the skew plate. Insert flat head/carriage bolt into each of the square bolt holes in the reflector. Secure the bolts in place by threading a lock nut onto each bolt on the skew plate side. Securely tighten all 4 bolts with an open end wrench or a socket wrench. Split the LNBF bracket into the top and bottom halves. Reconnect the LNBF bracket onto the end of the LNBF arm with the round tabs into the guide holes on either side of the arm with the raised text on the top. 7. Place the nuts from the hardware pack into the inserts. 8. Insert the medium length screws from the bottom of the LNBF bracket and secure them with the nuts. 9. Hold on to the 3 long screws they will be used to attach the LNBF to the LNBF bracket. Pointing and Peaking 1. 2. 3. 4. 5. 6. 7. 8. 9. Enter the correct equipment information. Enter the ZIP Code. Set the Skew and Elevation. Connect an RG-6 coaxial cable jumper between the Super Buddy, satellite meter and the switch or LNBF. Power the LNBF. Point the dish. Peak the dish using Limit Scan Obtain a maximized and locked signal on the verified correct satellite locations. Complete a Proof of Performance Scan and save the results. 9 DPP EA Twin Orbitals Outputs Inputs Switch Max Receivers 61.5°, DPP 3 single tuners or 3 dual tuners (Hopper 3 No 72.7° 44 capable) Reflectors 1000.2 DPP 1000.2 WA Orbitals Outputs Inputs Switch 110°, 3 119°, 129° Yes DPP 44 Max Receivers Reflectors Notes 3 single tuners or 3 Unlike DP 500+/1000+ a dual tuners (Hopper 500+ switch is not required for capable) operation. 10 1000.4 Dish Antenna Assembly Assembly Instructions 1. Find Azimuth/Elevation/Skew angles for your location. 2. Find a location for the dish antenna with a clear line of sight and a sturdy mounting surface. 3. Mount the mast, making sure it is absolutely vertical. Attach struts to the mast, using the strut instructions. 4. Assemble the dish antenna, setting the skew and elevation angles in the process. 5. Mount the dish antenna on the mast and point the dish to the azimuth angle. 6. Run cables between the dish antenna and the receiver(s), leaving a service loop around the dish mounting bracket and attaching cables to the mast using zip ties. Point and Peak Instructions Rough Point and Peak 1. Using a peaking meter attached to the DPP 1000.4 LNBF PORT 2, rough peak the dish on 72.7°W using transponder 13, 19, or 21 for maximum strength. Lock the mast clamp bolts and re-confirm signal. Fine-Tuning Elevation and Azimuth 1. Using the elevation rod, fine-tune the elevation angle to achieve maximum signal using the following sweep and count method. Using a 1/2” wrench, loosen the top elevation nut to allow the dish to be moved up and down in elevation. Turn the bottom nut in one direction until the signal drops off the meter. Reverse the direction of the wrench while counting the number of turns it takes to have the signal drop off in the opposite direction. 11 Turn the adjuster back once again in the opposite direction by one-half the total number of turns to center the dish on the signal beam. 2. Tighten the top elevation rod nut, and then tighten the side elevation bolts. Reconfirm signal using the push pull method after tightening all elevation bolts. 3. With the signal meter still connected, using the azimuth fine-tune cam, fine-tune the azimuth angle to achieve maximum signal using the following method. First, loosen the three azimuth plate bolts labeled with a ‘T’ just enough to allow the two azimuth plates to rotate. Using the 1/2” wrench slowly turn the cam adjuster clockwise. Watch the signal meter for value changes. Rotate the cam clockwise until the highest possible signal is reached, repeat rotations if necessary. IMPORTANT: Do not tighten the azimuth fine-tune cam. 4. Tighten the three azimuth plate bolts labeled with a ‘T’ and reconfirm signal using the push pull method. Complete Assembly 1. Connect the receiver cable(s) to the DPP 1000.4 LNBF PORT 1 (and PORT 2 and PORT 3, as necessary). 2. Run Check Switch test and confirm 61.5°W, 72.7°W, and 77°W reception. 3. Take a software download, if you didn’t already. 4. Run a second Check Switch test and confirm 61.5ºW, 72.7ºW, and 77° reception. 5. Install additional receiver(s), if necessary. 6. If applicable, connect a second satellite dish to the DPP 1000.4 LNBF’s LNB IN port. 12 DPP 1000.4 Orbitals Outputs Inputs Switch 61.5°, 3 72.7°, 77° Yes DPP 44 Max Receivers Reflectors 3 single tuners or 3 1000.4 or dual tuners (Hopper 500+ repoint capable) kit Notes When connected to a DPP 44 the LNB In Port is disabled. 13 DISH 500+/1000+ Antenna Assembly Assembly Instructions 1. Add the skew plate and LNBF arm to the reflector. 2. Place the four skew bolts and tighten them. 3. Add the bracket to the end of the LNBF arm. 4. Place the bracket screw and tighten it. 5. Add the LNBF to the end of the bracket. 6. Connect the coaxial cable to port 1 of the LNBF. 7. Place the LNBF screw and tighten it 8. Adjust the skew angle 9. Adjust the elevation angle Pointing and Peaking 1. Enter the correct equipment information. 2. Enter the ZIP Code. 3. Set the Skew and Elevation. 4. Connect an RG-6 coaxial cable jumper between the Super Buddy, satellite meter and the switch or LNBF. 5. Power the LNBF. 6. Point the dish. 7. Peak the dish using Limit Scan 8. Obtain a maximized and locked signal on the verified correct satellite locations. 9. Complete a Proof of Performance Scan and save the results 14 Site Survey Customer Meet and Greet Did You… Yes/No Check direction house faces in relation to southern satellite signal Y ___ N ___ Check for an installed antenna that you can see from the street Y ___ N ___ Check for obstructions on the property to the Southern sky Y ___ N ___ Have the work order with you Y ___ N ___ Have the Site survey with you Y ___ N ___ Introduce yourselves Y ___ N ___ Identify they are with DISH Network Y ___ N ___ Explain why they were there Y ___ N ___ Ask if the customer is home owner Y ___ N ___ Identify the installation job they were there to perform Y ___ N ___ Confirm the programming the customer had ordered Y ___ N ___ Verify the equipment they had ordered Y ___ N ___ Discuss receiver locations with customer Y ___ N ___ Interior Site Survey Checklist Interior: Did You… Yes/No Check the receiver locations Y ___ N ___ Check the receiver model numbers Y ___ N ___ Determine usable existing interior cable Y ___ N ___ Plan for cable routing Y ___ N ___ Check for phone line or Cat-5 Ethernet per receiver Y ___ N ___ Check for electrical outlet for each receiver Y ___ N ___ Determine no plumbing, HVAC or wiring interference Y ___ N ___ Determine if customer has any existing TV services that need to be maintained or integrated Y ___ N ___ Determine need for drilling or possible damage to the customer home Y ___ N ___ Check for safety concerns Y ___ N ___ List items to discuss with customer Y ___ N ___ 15 Site Survey Exterior Site Survey Exterior: Did You… Yes/No Check if existing exterior cables usable Y ___ N ___ Check for grounding location Y ___ N ___ Determine mounting options Y ___ N ___ Check for Line of Sight Y ___ N ___ Check for safety concerns Y ___ N ___ Check for accessibility Y ___ N ___ Consider aesthetics Y ___ N ___ Consider customer preferences Y ___ N ___ Develop two mounting locations if possible Y ___ N ___ Determine what antenna and mount type to use Y ___ N ___ Determine if switch is needed Y ___ N ___ Record all concerns on your Installation Plan at the bottom under, Items to Discuss with Customer Y ___ N ___ Installation Plan Presentation to Customer Checklist Did You… Yes/No Display customer service skills Y ___ N ___ Explain two possible installation locations Y ___ N ___ Explain location of cable runs Y ___ N ___ Explain why these locations are required Y ___ N ___ Explain concerns about customer maintaining antenna Y ___ N ___ Address concerns about aesthetics Y ___ N ___ Comments Time Saving Tip: While conducting your site survey, utilize the site survey form, and take detailed notes specifically on what items you’ll need to complete the install. For example, how many bushings, wall plates, barrels, connector, type, and quantity of cable fasteners. Note any “specialty items” needed. Once back at the van use these notes as a “job inventory” sheet. Knowing exactly what you’ll need for the entire job and stocking yourself accordingly can save you from making multiple trips to back to the van - saving time. Time Saving Tip: Make sure that the customer agrees to all parts of your installation plan before you bring out any equipment, cabling, tools, and start mounting the antenna. This will save you time moving or re-routing cable if the customer does not like where the antenna is mounted or how the cables run. 16 Mounting Direct to Wall 1. Locate the stud using the approved stud finder Locate the center of the stud Do not mount the dish near the edge of the stud 2. Position and hold the footplate so it is centered on a stud Use a level to ensure the footplate is vertical With a pencil, mark all six holes of the footplate to pilot-drill Mark the four outermost round corner holes Mark the two center holes 3. Remove the footplate and pilot-drill the holes Use the 7/32” drill bit in the cordless hammer drill Drill the center holes to a 2 ½” depth Drill the corner holes to a 1 ½” depth 4. Fill each pilot-drilled hole approximately ¾ of the way full with silicone sealant 5. Place the footplate back on the wall 6. Insert the ½” nut driver into the cordless drill Select the drill icon and set to slow speed 7. Tighten the lag screws to secure the footplate to the wall 8. Use 3” x 5/16” lag screws for the center holes 9. Use 2” x 5/16” lag screws for the corner holes Remember the center lag screws must be in the stud. 10. Do the final tightening of the footplate screws with a wrench or ratchet and tighten until they are snug against the footplate 11. Attach and plumb the mast to the footplate 17 Brick, Cinderblock, and Concrete 1. Place the footplate against the wall in the desired location Do not place more than two holes per block/brick If the wall is brick, place the footplate as close to the center of bricks as possible 2. Using the torpedo level, vertically level the footplate 3. Using a marker or pencil, mark the four outermost round corner holes 4. Remove the footplate 5. Drill the marked holes Use cordless drill; set to hammer drill and high-speed selections Use ½-inch masonry bit Drill holes to a 3-inch depth 6. Hammer a lag shield into each hole until it is flush with the surface A lag shield is used under the foot /mast assembly to seal and protect the mounting holes An expansion anchor shield used with lag screws A metal shield guide used when drilling into masonry surface 7. Completely fill the holes with clear silicone 8. Place the footplate against the wall; align the four corners to the holes 9. Mount the footplate Use a ½-inch socket and ratchet Use 2-inch x 5/16-inch lag screws Tighten the lag screws slowly 10. Plumb the mast Level the mast from at least two sides 11. Install support struts on dish antennas DISH 500+ and larger Install the struts after mount installation is complete Where should you not mount the strut? Do not mount on or around the mortar 18 Mount: Telescoping Wall 1. Using a stud finder, locate a stud 2. Place the mounting base at the desired location Define where the base plate on the mounting insert should be mounted, high or low High mounted base plate The base plate is mounted high if the mounting holes closest to the insert post face down Low mounted base plate The base plate is mounted low if the mounting holes closest to the insert post face up 3. Level the mounting base 4. Mark the base with marker or pencil 5. Remove the mounting base 6. Pre-drill the marked holes 7. Fill holes ¾ full with silicone 8. Mount the mounting base 9. Install the mounting insert 10. Mount the footplate to the base plate on the mounting insert using the included hardware Be sure to secure the footplate snugly against the wall surface so the installation remains safe and secure Plumb the mast/footplate Tighten the mast/footplate set screws on the mounting base 19 Mount: VERSATILETM 1. Place the base plate in the desired location Locate along the roof eave, accessible from a ladder Affixed on tiles located two or more rows from the roof eave, having an unencumbered roof tile surface area of at least sixteen square feet NEVER affix the VERSATILE Mount on any existing cracked, broken, or cut tiles, or on tiles located within three (3) feet of metal flashing, or along hips, ridges, or valleys of the roof body 2. Install the support tongues Gently lift the tiles in the row above the area you selected for the Base Plate, and slide a Support Tongue under them until the Support Tongue’s back hook reaches the back edge of the tile below it Lower the Support Tongue then pull it back towards you until the hook has seated itself to the tile below Repeat with other supplied Support Tongues 3. Install the base plate Place Base Plate so its center is above the joint of the two tiles below it Slightly lift the tiles below the Base Plate and slide its hooks under the tile Install the stiffener bars and fasten together Place Stiffener Bar on top of Support Tongues The center of each Stiffener Bar should be above the joint of the two tiles below it. Line up Te pre-drilled holes in the Stiffener Bar and Support Tongue Insert supplied hardware into holes of Base Plate, Support Tongues, and Stiffener Bars Tighten with a wrench until the mounting assembly is level and clamped firmly in place 4. Attach the footplate to the VERSATILE Mount 20 Mount: Soffit Overview Using the Mounting Priority Chart, you’ll find that almost all singlefamily home installations can be completed by using one of the first seven options: direct to wall, overhang, the fascia mounts, angled fascia, under eave, the direct to brick mount, or the telescoping mount. In rare situations, we may need to use the eighth option on the priority chart, which is the soffit wall mount. If you have reached this option, doublecheck that you’ve considered all line of sight options for higher priority mounts. What Changed The standards for mounting have not changed; however, mounting continues to be one of the most common fail points for the standard installation. Out of all QA inspections, more than 20 percent have mounting failures. Mounting is also responsible for 20 percent of all Trouble Calls. Why It’s Important A proper dish mount is one of the best ways to ensure our customers enjoy trouble‐ free DISH service at their homes. A sturdy, properly installed mount will: •Help prevent damage to the customer’s home •Minimize the need for return visits to remedy signal loss •Improve the customer’s overall service experience What I Need to Do Assembly Assemble the mount at the back of the van. Align the mounting insert with the insert at the top. Then align the footplate with the mounting insert. Use the supplied hardware to attach the footplate, and tighten all of the hardwa Before leaving the vehicle, be sure you have everything you’ll need. For the soffit mount, you’ll need silicone, the 6inch Phillips head drill bit, fivewood screws (which come packaged with the mount). 21 Mounting To install the soffit mount, you first need to locate and mark the rafter. Use the stud finder or visual cues such as gutter mounts and nails to help locate a rafter properly. •After marking the rafter, apply silicone around the five holes on the bottom of the soffit base •Drive in a 3inch wood screw into the rear center hole. Then, drive a 3inch wood screw into the holes • Next, slide the mounting insert into the soffit base and level the mast •Tighten the set screws with the 5/32'' Allen wrench •Make sure the mast is level and tighten the hardware with the 7/16'' wrench •Finally, place the dish on the mast 22 Mount: Under Eave 1. Locate a rafter stud 2. Place soffit mounting base away from house Face front of soffit mounting base away from house Touch front of soffit mounting base to edge of fascia board Center front of soffit mounting base over stud Center back of soffit mounting base over stud. 3. Mount the soffit mounting base. Place and halfway tighten one #10 3-inch wood screw in rear center hole. Place and halfway tighten the one #10 3-inch wood screw in each of four angled holes of soffit mounting base Tighten front screws Tighten back screws 4. Using included bolts, washers, and nuts, attach footplate to base plate on mounting insert 5. Attach footplate to mounting insert 6. Install mounting insert Slide mounting insert with attached dish mast into soffit mounting base until desired depth is achieved Vertically level dish mast Tighten both mast screws on soffit mounting base 23 Mount: Eave/Gable Fascia Eave Fascia Installation Instructions 1. Locate the end of the roof rafter behind the fascia board and mark the centerline of the roof rafter on it 2. Position the mounting plate on the fascia board just below the roof flashing IMPORTANT: The flat side of the fascia mount must be against the fascia board The center holes in the mount plate must be placed over the centerline of the roof rafter previously marked 3. Place a level on the side of the mounting plate, level and mark the top two corner holes and top three center holes over the rafter end Note: Depending upon the width of the fascia board, the bottom center hole may not be used to attach the plate to the structure 4. Drill a pilot hole on each of the marked mounting holes using a 7/32” drill bit for the 5/16” X 3” lag screws supplied 5. Using the machine bolts, washers, and nuts supplied, attach the dish foot plate to the Fascia Mounting Plate using the two lower corner holes and the bottom center hole if it is not used to attach the plate to the fascia At this time, hand tighten the hardware only 6. Position the dish foot plate and mounting plate assembly over the mounting locations 7. Using the lag screws and washers supplied, thread the lag screws into the previously drilled pilot holes and tighten 8. Tighten the remaining machine bolts installed in step 5 to connect the dish mounting base to the mounting plate Gable Fascia Installation Instructions 1. Position the mounting plate on the fascia board just below the roof flashing IMPORTANT: The flat side of the fascia mount must be against the fascia board. 2. Place a level on the side or across the bottom edge of the mounting plate, level, and mark the top two corner holes and top three center holes on the fascia board. Note: Depending upon the width of the fascia board, or pitch of the roof, the bottom center hole may not be used to attach the plate to the structure. 3. Drill a pilot hole on each of the marked mounting holes using a 7/32” drill bit for the 5/16” X 3” lag screws supplied 4. Using the machine bolts, washers, and nuts supplied, attach the dish foot plate to the Fascia Mounting Plate using the two lower corner holes and the bottom center hole(s) if it is not used to attach the plate to the fascia At this time, hand tighten the hardware only 5. Position the dish foot plate and mounting plate assembly over the mounting locations 6. Using the lag screws and washers supplied, thread the lag screws into the previously drilled pilot holes and tighten 7. Tighten the remaining machine bolts installed in step 4 to connect the dish mounting base 24 to the mounting plate Installation Tips When you can only screw into the fascia board, use 1.5” lag screws In the center holes, use 3” lag screws to screw into a rafter or stud Use the 5/16” hardware (included in the kit) for the lower portion of the mounting plate In the center hole, if possible, insert a 3” lag screw into a rafter or stud Make sure that the flat side of the fascia mount is against the mounting surface and the raised lip edges are facing away from the structure Installing Eave/Gable/Fascia Mount to a 4 X 4 post on an existing support structure: 1. Evaluate the 4 X 4 post and existing support structure Note: If the structure or post does not meet these specifications, it is not an acceptable mounting solution 4 X 4 post is secured in concrete Structure and 4 X 4 post is in good condition, not rotted, especially at the base 4 X 4 post does not restrict pedestrian walkways or create a safety hazard 25 Do NOT use the following: Free standing 4 x 4 posts Fence posts 2. Fully discuss all possible mounting options with the customer before selecting the final mounting location 3. Position the mounting plate on the 4 x 4 wooden post at the desired height For aesthetic purposes, point the plate up The ribs must be facing away from the post 4. Verify the mounting plate is level using a torpedo level 5. Mark four mounting holes on the 4 x 4 wooden post Two center and two outer 6. To ensure you don’t split the wood, drill a pilot hole for each of the marked mounting holes using a 7/32” wood bit 7. Fill the pilot holes with silicone sealant, making sure not to over fill past the hole opening 8. Attach the mast foot plate to the Fascia/Gable Mount’s outer holes using the bolts, washers, and nuts included with the mount 9. Position the mounting plate and mast footplate over the pre drilled holes 10. Use four 3 inch lags to secure the mounting plate and mast footplate to the 4 x 4 wooden post 26 Mount: Angled Fascia 1. Locate the end of the roof rafter behind the fascia board 2. Mark the centerline of the roof rafter on the fascia board 3. Position the angled fascia mounting plate on the fascia board just below the roof flashing 4. Verify that the mounting plate is level using a torpedo level 5. Mark the six mounting holes on the fascia board 6. Pilot drill a hole on each of the marked mounting holes using a 7/32” wood bit 7. Fill the pilot holes with silicone sealant, making sure not to over fill past the hole opening 8. Position the angled fascia mounting plate over the pilot drilled holes 9. Using the provided lag bolts and washers, thread the lag bolts into the drilled holes and tighten them Two lag bolts run through the center of the mount and mast. The bottom lag bolt secures the mast to the mount. The top lag bolt secures the mast in position once plumbed 10. Use the remaining carriage bolts to attach the arm or mast to the angled fascia plate 11. Plumb the mast on a minimum of two sides. 27 Mount: Asphalt Roof 1. Using a stud finder, locate a rafter 2. Place footplate against roof in the desired location on rafter 3. Using torpedo level, vertically level footplate 4. Using a marker or pencil, mark all six holes 5. Remove footplate. 6. Pilot drill marked holes Use cordless drill Use 7/32-inch drill bit Drill center holes to 2½-inch depth Drill corner holes to 1½-inch depth 7. Cover each hole with a large piece of pitch patch 8. Place footplate against roof, aligned to holes 9. Mount the footplate Use ½-inch socket and ratchet Use 3-inch x 5/16-inch lag screws for center holes Use 2-inch x 5/16-inch lag screws for corner holes 10. Tighten lag screws slowly, so don’t damage/strip lag screws 11. Plumb mast 12. Using a torpedo level, vertically level mast 13. Struts must be installed on dish antennas DISH 500+ and larger 14. Mount footplate to roof 28 29 30 31 Mount: Pole 1. Dig the Hole a minimum 7 inches wide and 3 feet deep (or below the local frost line) 2. Prepare the Pole To prevent twisting prepare a pole for mounting by Pounding the base of the pole into an oval shape Drilling two or three 3 inch lag screws in base of pole below cement line Drill two 3/16-inch holes in pole 3 inches up from ground level to allow water to drain out of pole 3. Add Concrete Always follow proper safety procedures while using cement Eye Protection, gloves, and dust mask Mix concrete in a 5-gallon bucket with shovel/or pour the mix into the hole and add water Place mixed cement into hole Pat surface of concrete with backside of shovel until all rocks are pushed into concrete, concrete tapers down from pole 2 inches above ground, and surface of concrete is smooth 4. Level the Pole Take readings from two locations 90 degrees apart on side of pole to ensure complete leveling of pole Check readings periodically while cement is drying Immediately wash your hands after working with cement While waiting at least 40-60 minutes (depending upon type of concrete mix used) for cement to dry, work on other aspects of installation before mounting dish to pole. (You must completed step 5 before cement dries.) 5. Attach PVC Angle (Sweep) While cement is still wet, attach a piece of PVC (90° elbow) 1 inch in diameter to pipe where cable enters ground, commonly referred to as a sweep 6. Route Cable Route cable through sweep conduit to provide protection from lawn mowers, weed eaters, squirrels, etc. Route cable from dish by attaching coaxial cable to pole using cable ties Dig a trench to house for burial cable Dig to depth established by local underground utilities Direct burial cable (orange cable) is required in all applications requiring the buried cable when not in conduit 32 Mount Pole Work Order Process Initial Truck Roll: 1. Install a permanent pole mount only if DNS standards are met including marked utilities and the hole already dug to required dimensions 2. Call FSM for approval to complete a temporary mount 3. Contact the Underground Utility Company (UUC) if utility lines are not marked 4. Contact Dispatch to set up subsequent pole mount work order after completion of temporary mount install 5. Install a temporary mount if approved 6. Notate the customer account Subsequent Truck Roll: 1. Confirm utility markings 2. Install a permanent pole mount 3. Return temporary mount to office 33 Utiltity Marker Flags Once the need to dig or trench has been determined: 1. Identify two potential installation locations at least seven feet apart at both the proposed pole location and the point where the cable reaches the house 2. The technician will inform the customer that white flags will be placed in their yard to mark the proposed excavation site for the dish and cable trenching prior to marking by the Underground Utility Company Explain that two locations have been marked to help prevent the need for a reschedule if there is a conflict due to utility lines Explain that it is very important not to move or remove these flags prior to utility marking 3. Place one white marker flag at the proposed location of the pole mount one at the house and one flag approximately every six feet in between There should be a minimum of three flags for each marked location The flags should be inserted into the ground a minimum of four inches In snowy conditions, ensure the flag has penetrated the ground and not just the snow layer 4. Contact the Underground Utility Company (811) to have utility lines marked 5. Continue with temporary mount installation Truck roll to complete permanent installation: 1. Confirm utility markings 2. Retrieve white marker flags 3. Install permanent pole mount 4 inches minimum Ground level 34 Mount: Non-Penetrating Roof Overview Using the Mounting Priority Chart, you’ll find that almost all single-family home installations can be completed by using one of the first seven options: direct to wall, overhang, fascia mounts, under eave, the direct to brick mount, or the telescoping mount. In rare situations, where the landlord requires that no holes are drilled into the home, and if the home has a flat roof, consider using the 10th option on the priority chart; the NonPenetrating mount. Before installing this mount, double-check that you’ve considered all line of sight options for higher priority mounts. What Changed The standards for mounting have not changed; however, mounting continues to be one of the most common fail points for the standard installation. Out of all QA inspections, more than 20 percent have mounting failures. Mounting is also responsible for 20 percent of Trouble Calls. Why It’s Important A proper dish mount is one of the best ways to ensure our customers will enjoy trouble-free DISH service at their homes. A sturdy, properly installed mount will: • Help prevent damage to the customer’s home • Minimize the need for return visits to remedy signal loss • Improve the customer’s overall experience What I Need to Do 1. Take out the mount, the mat and the appropriate number of blocks from the vehicle o The D500 and 1000.2 require 6 blocks o The 1000.4 requires 7 blocks o The D500+/D1000+/Super Dish require 9 blocks 2. Assemble the mount at the vehicle 3. Attach the mast/footplate to the mount 4. Find a suitable location to place the non-pen mount 5. Place the mat at the mounting location 6. Place the mount on the mat 7. Place the blocks on the mount as shown on the next page 35 8. Level the mast and tighten hardware using a 7/16” wrench 9. Place the dish on the mast Note: • In the event that a non-pen is placed on the ground over grass or a dirt surface for a temp mount, the black rubber mat is not required • Temporary mounts and mats must be returned to the office once the permanent mount is placed • The D500/1000.2/1000.4 must be used with a short mast • Using D500+ with a non-pen is only to be used as the last possible mounting option • The 500+/1000+/Super dish require a long mast and struts 36 Mount: Rail 1. Determine proper location for Rail Mount on railing Recommended location: where vertical rails intersect with either bottom or top horizontal rail NEVER affix Rail Mount on railing rusted, bent, cracked, has deficient or broken welds/connections to top or bottom horizontal rails, or railing not structurally stable in connection to building 2. Place Plate #1 on top of Plate #2 Place first external tooth lock washer and then flat washer onto the ¼” x 20 x 1.5” Bolt Then insert bolt/lock washer/flat washer assembly through slot in Plate #1 and thread into Plate #2 3. Set assembled plates at install location on railing Adjust two plates so as to “lightly clamp” opposing edges of plate assembly to vertical rails and then tighten securely four ¼” x 20 x 1.5” bolts 4. Align Plate #3 with Plate #1/#2 on other side of railing Ensure part label for Part #3 identifying “UP” is in proper direction Insert slots of Plate #3 onto ¼” x 20 bolts from Plate #1/#2 assembly Level Plate #3 and secure mount to railing by threading onto ¼” x 20 x 1.5” bolts, provided ¼” x 20 serrated hex nut Securely tighten hardware on assembly and ensure both Rail Mount and railing are structurally sound 5. Lastly, seat mounting foot (not included) onto Plate #3 using the ¼” x 20 x 1/2” bolts with the external tooth lock washer and securely tighten 37 Mount Chart Mount Mount Type Acceptable Surfaces Mount Locations Atenna Rating Safety Concerns Standard Mast Fiber board, wood, brick, cinder block, concrete, asphalt roof Approved vertical, horizontal or asphalt roof surface All dishes Note: Struts required for 1000.4 Dish, DISH 500+/1000+ Structure should be solid, mast could be a bump hazard, ladder possibly needed Short Mast Fiber board, wood, brick, cinder block, concrete, asphalt roof Approved vertical, horizontal or asphalt roof surface Prescribed for the 1000.4 Dish only Structure should be solid, mast could be a bump hazard, ladder possibly needed Pole Mount In ground Approved inground location Could hit a gas/electrical line, possible tripping hazard Telescoping Wall Mount Fiber board, wood, brick, concrete, cinder block Approved vertical surface All dishes Note: Must call Dig Safe (811) before installation Up to DISH 1000.2 Soffit Mount Roof truss or other structural member under the soffit Soffits Up to DISH 1000.2 Structure should be solid, mast could be a bump hazard, ladder needed Under Eave Mount Mounts to exposed under-eave rafter. Soffit framing members must be exposed Soffits Up to DISH 1000.2 Structure should be solid, ladder possibly needed Structure should be solid, mast could be a bump hazard, ladder needed Type Acceptable Surfaces Mount Locations Atenna Rating Safety Concerns Angled Fascia Mount Mount to stud, rafter tail, or structural member behind an angled fascia board Angled fascia board Up to DISH 1000.2 Structure should be solid, mast could be a bump hazard, ladder needed Eave/Gable Mount Mount to stud, rafter tail, or structural member behind a fascia board, Fascia board on end or gable, 4 x 4 wooden post (part of Up to DISH 1000.4 with short mast Structure should be solid, mast could be a bump hazard, ladder needed existing support structure) 38 Railing Mount Balcony rail Balcony/ porch rail Up to DISH 1000.4 with short mast Structure should be solid Quick Pipe Adapter Existing 2” or greater in diameter pole or pipe C-Band or Prime Star antenna masts Up to DISH 1000.2 Structure should be solid, not for use on vent pipes Universal NonPenetrating Mount Any flat surface Flat roof All dishes Structure should be solid, ladder needed Non-Penetrating Patio Mount Limited to semiinclosed areas Patios/decks All dishes Structure should be solid, requires proper block use VERSATILE Mount High-profile, lowprofile, flat concrete roofs Concrete roof Up to DISH 1000.2 Structure should be solid, mast is a bump hazard, ladder needed 39 40 41 Cabling Coaxial Cable The satellite antenna’s LNBF and the customer’s receiver are connected to each other by a special configuration of conductors that are located within a cable. The cabling used for Dish Networks home satellite system is different from most of the other wires and cables that are used in a home. Single wires of copper or aluminum are adequate for conducting electricity or for distributing signals at relatively low frequencies. However, when high-frequency bandwidths, such as EchoStar’s 950 to 1450 MHz and 1650 to 2150 MHz bandwidths, are used, RG-6 coaxial cable must be used to prevent loss or degradation of the received signal. The 950 to 1450 MHz bandwidth is used in EchoStar’s original “Legacy” receivers. The 950 to 1450 MHz and 1650 to 2150 MHz bandwidths are used in Dish Network’s new DishPro & Dish Pro Plus systems. When routing cable, certain techniques must be followed to reduce signal loss: • Do not bend the cable. When changing the direction of the cable, the cable must be gradually looped with a minimum 4-inch radius. • Minimize the length of the cable and the number of F-connectors used in the installation. The cable length between the antenna and its distribution point is very important for signal quality. • Do not kink, smash or damage the cable. Damaged cable will degrade the signal. • If a portion of cable in the box or on the reel is damaged, do not use it. Inspect the cable while pulling it off the reel or spool. Look for bends, kinks, squishes or anything that appears to be faulty. • Remove cable from the box or spool carefully. Coaxial cable is not like a garden hose. Do not bend or twist it. Stand in front of the reel or spool and pull it directly off the reel or spool. Do not stand to the side and pull the cable. Messenger Cable A special type cable that combines the coaxial cable with the grounding wire – all in one cable – is available from Intertech warehouses. This cable – messenger cable – will be discussed later in this module. Grounding with messenger cable – a one-wire grounding system. RG-6 “must” be used in all Dishnetwork installations. It is the only cable approved by EchoStar for use between the dish and the receiver. Terminating Cable F-connectors 1. Use the correct hand tool for cutting cable to the correct length, cutting squarely across the cable. 2. Use the cable preparation (“cable prep”) tool to 42 remove the cable’s outer sheathing. 3. Use fingernails to scrape the dielectric off of the core wire. 4. Examine the base of the center conductor for nicks caused by the cable prep tool. 5. Fold back the protective braid, exposing the center conductor. 6. Carefully slide the coax into the connector until dielectric becomes perfectly flush with the base. (This step is sometimes referred to as “filling the cup with milk.” This description is a reminder that it is extremely important to not leave a gap in the cable.) 6. Place the F-connector into the crimping tool and squeeze until the Fconnector is tightened snugly to the cable. 7. Clip excessive core copper conductor wire to be within 1/16-inch of the end of the F-connector. 9. When terminating F-connectors, tighten ALL outdoor connections with a wrench. Routing on the Home Exterior Routing of the cable is a consideration when selecting the location for mounting the dish. If possible, the dish should be located as close as possible to the entry point(s) of the residence. When identifying point(s) of entry, keep in mind that each entry: • Must be as close as possible to the receiver(s), keeping in mind that the receivers may be located on an inside wall. • Must avoid gas lines, electrical wires, and other dangers. • Must avoid heating ducts, water lines and other undesirable obstacles. When designing a cable run, utilize Dishnetwork standards to design appropriate external routing from the dish(es) to the point(s) of entry: Determine the shortest route possible between the dish and the entry point(s). Again, review the point of entry for hazards. • Design the routing so that the run is parallel to the house so that as little cable shows as possible. Examples of preferred locations include hiding cable under the gutter or eaves or under the bottom of acceptable surfaces of siding. Service loops allow trouble call or service call work on connectors to be completed without replacing an entire cable run. (The service loop provides excess cable that can be used to replace a connection.) Each service loop must be at least 4 inches in radius so the coaxial cable does not become crimped and damaged. Typically three screw-in clips are used to hold the loop in place. The screw-in clips are equally spaced around the loop. Drip Loops Drip loops are similar to service loops. However, the difference is that the drip loop provides protection from rain and other moisture. Drip loops are made at the ground block, at the point of entry, and at component locations – when any of these locations are exposed to potential moisture. 43 44 45 46 Key 1 Dual Tuner 1 Dual Tuner + 1 Single Tuner 47 2 Dual Tuners 1 Single Tuner 48 2 Dual Tuners and 1 Single Tuner 3 Dual Tuner 49 1 Dual Tuner and 2 Single Tuners 2 Single Tuners 50 Receivers Receiver Model Families Model Families Hopper with Sling Models Description TV1 HD TVs DVR Hopper with Sling Whole-Home HD DVR 1 x x Hopper Whole-Home HD DVR 1 x x Joey Whole-Home HD DVR 1 x x ViP922 SlingLoaded DVR SlingLoaded DVR 1 x x ViP622, ViP722, ViP722k HD Duo DVR 2 x x DISH Player-DVR 522, DISH Player-DVR 625 Duo DVR 2 x - ViP222, ViP222k HD Duo 2 - x DISH 322 Duo 2 - - ViP612 HD Solo DVR 1 x x DISH DVR 512 Solo DVR 1 x - ViP211, ViP211k, DISH 411 HD Solo 1 - x DISH 311, DISH 381 Solo 1 - - Hopper Joey 922 622 522 222 322 612 512 211 311 51 Legacy Receivers Receiver HD/SD Tuners TVs DVR Recording Time Remote Type 1000/1500 SD Single 1 IR 2700/2800 SD Single 1 IR 3000/3500/3700/3900 SD Single 1 IR 4000 SD Single 1 IR or UHF 4700/4900 SD Single 1 IR 5000 SD Single 1 IR or UHF 6000 SD/HD Single 1 IR or UHF 7100/7200 SD Single 1 IR JVC IRR SD Single 1 IR or UHF DISH 111 SD Single 1 IR DISH 301 SD Single 1 IR DISH 501 SD Single 1 x Up to 35 hours IR or UHF DISH 508/510 SD Single 1 x Up to 60 hours IR or UHF Up to 180 hours SD DISH Player-DVR 921 SD/HD Dual 1 x IR or UHF Pro Up to 25 hours HD Up to 180 hours SD DISH Player-DVR 942 SD/HD Dual 2 x Up to 25 hours HD 52 YOUR HOPPER USING YOUR HOPPER WHOLE-HOME DVR Learn how to master all of your Hopper's basic and advanced features. Basic PrimeTime Anytime Advanced PrimeTime Anytime o Enabling PrimeTime Anytime o Setting Up PrimeTime Anytime o Disabling PrimeTime Anytime o o Accessing PrimeTime Anytime Saving a PrimeTime Anytime Recording to your DVR - Individual Recording o Saving a PrimeTime Anytime Recording to your DVR - Series Collapsible Channels in the TV Guide o Expanding Collapsible Channels o Collapsing Already Expanded Channels TV Viewing Status Screen o Accessing the TV Viewing Status Screen o Watching DVR Content o Watching On Demand Content Remote Locator Multi-Channel Recall o Disabling Multi-Channel Recall TV Viewing Status Screen o Joining a Live Program in Progress o Joining a Recording in Progress o Joining a PrimeTime Anytime Recording in Progress Watching a Program in One Room and Finishing it in Another o Finishing Live TV o Finishing a Recorded Program from Your DVR 53 PrimeTime Anytime Recording with PrimeTime Anytime is an optional feature that only uses one tuner to record ABC, CBS, FOX and NBC. Eastern, Pacific Central, Mountain Mon-Sat 8-11pm 7-10pm Sun 7-11pm 6-10pm Enabling PrimeTime Anytime 1. Press MENU on your remote 2. Select the PrimeTime Anytime icon 3. Select Enable and then save your selection 54 Disabling PrimeTime Anytime 1. Select Settings 2. Select DVR Defaults 3. Select PrimeTime Anytime 55 4. Select Do Not Enable and then save your selection Setting Up PrimeTime Anytime 1. Select Settings 2. Select DVR Defaults 56 3. Select PrimeTime Anytime 4. Select PrimeTime Setup Select the channels and days of the week that you would like to include in PrimeTime Anytime or increase/decrease the number of days to keep your PrimeTime Anytime 5. events. Select Done to save your settings *Note: Removing one or more channels will not free up additional tuners. 57 Accessing PrimeTime Anytime PrimeTime Anytime recordings can be accessed three ways: 1. Press the DVR button on your remote and Select the PrimeTime Anytime icon on the My Recordings page 2. Press the GUIDE button on your remote and select a channel being recorded by PrimeTime Anytime. (Only if PrimeTime Anytime is currently recording) 3. Press the red button in the middle of your remote to bring up the TV Viewing Status screen and then select the PrimeTime Anytime icon Saving a PrimeTime Anytime Recording to your DVR - Individual Recording PrimeTime Anytime recordings are saved for 8 days. If you would like to permanently save a PrimeTime Anytime recording, you need to save the recording to your DVR. 1. Select the recording you would like to save and then select Save The recording will have an S icon in the upper right 2. indicating you successfully saved the recording 58 3. Go to the My Recordings folder in your DVR to view your saved recordings Saving a PrimeTime Anytime Recording to your DVR - Series Select the series you would like 1. to save and then select Save Series Episodes will be automatically 2. saved to the My Recordings folder in your DVR every week 59 Multi-Channel Recall You have the ability to recall any of the last four channels you watched using the RECALL button on your remote. 1. Press RECALL on your remote 2. The last four channels you were watching will appear. Highlight and select the channel you would like to return to Disabling Multi-Channel Recall 1. Press MENU on your remote 2. Select Settings 60 3. Select Guide Settings 4. Select Format Guide Select Off in the Multi-Channel 5. Recall section and then save your selection 61 Collapsible Channels in the TV Guide The Hopper TV Guide uses collapsible channel ranges to group similar channels together all on one channel. When navigating through the TV Guide, a collapsible channel range is designated with a plus sign icon. Expanding Collapsible Channels Select a channel with a plus sign icon to reveal all of the channels contained in that collapsible channel range. Once expanded, you can navigate like you normally would in the TV Guide. Collapsing Already Expanded Channels There are two ways to collapse a channel range back to one channel: 1. There is a specific channel, designated with a minus sign icon, associated with the expanded channel range. Select this channel to collapse the channel range 2. While you are navigating through the expanded channels in the TV Guide, press the blue button in the middle of your remote to collapse the channels TV Viewing Status Screen The TV Viewing Status screen is your place to see how the system's tuners are being used. Accessing the TV Viewing Status Screen There are two ways to access this screen: 1. Press the red button in the middle of your remote when watching live TV or a recording 2. Turn on a receiver when all the Hopper’s tuners are already in use If fewer than three tuners are being used, you can watch TV as you normally would by typing in a channel number or pressing GUIDE on your remote to access the TV Guide. If all three tuners are being used, you can join something in progress 62 Joining a Live Program in Progress Highlight the event you 1. would like to join and press SELECT The other user will receive a notification letting them 2. know you are now watching with them Joining a Recording in Progress Highlight the event you 1. would like to join and press SELECT 63 Joining a PrimeTime Anytime Recording in Progress 1. Highlight the event you would like to join and press SELECT You always have the option to watch content from your DVR or On Demand, regardless of how many tuners are in use. Watching DVR Content Select the DVR icon or press 1. the DVR button on your remote 64 Watching On Demand Content 1. Select the On Demand icon Remote Locator Finding your remote has never been easier with the Remote Locator feature offered with the Hopper and Joey receivers. Press the Locate Remote button on the front of your 1. receiver (the front panel will need to be opened on the Hopper) The remote will start beeping 2. and the top four buttons will light up 65 Watching a Program in One Room and Finishing it in Another When you have multiple TVs linked to your Hopper, you have the ability to stop a program in one room and pick it up in another. Finishing Live TV 1. Room A: Pause the program using your remote. Do not turn off the receiver 2. Room B: Bring up the TV Viewing Status screen by pressing the red button in the middle of your remote 3. Highlight the event you just paused and press SELECT 4. The show will begin playing from where you paused Finishing a Recorded Program from Your DVR 1. Room A: Turn off the receiver Room B: Turn on the receiver 2. and go to the My Recordings page in your DVR 66 Select the program you were 3. just watching and then Resume Highlight the bookmark that represents where you 4. previously stopped watching and press SELECT 67 ViP®922 SlingLoaded™ DVR Remote Viewing Requirements PC Requirements Mac Requirements Browser Specifications HD Streaming (on home network) Intel 2.4 GHz Core 2 duo class processor with 2 GB of RAM, DXVA support desirable on graphics card SD/QVGA streaming (anywhere) Pentium IV class Operating System Microsoft XP, Vista, or Windows 7 HD Streaming (on home network) Intel 2.8 GHz Core 2 duo class processor with 2 GB of RAM SD/QVGA Streaming (anywhere) Intel 2.8 GHz Core 2 duo class processor with 2 GB of RAM Operating System OS 10.5.7 or higher Internet Explorer Version 7 or higher Firefox Version 3.0 or higher Safari Version 4.0 or higher 32.0 Hot Keys Hot Keys Red Yellow Blue JUMP Quick Clicks Feature Settings Broadband Setup JUMP On Demand Settings Broadband Setup Settings’ Menu JUMP System Info Live TV Main Menu Green Point Dish Broadband Setup 68 Receiver Substitution Matrix Overview Model families are based on receiver features and capabilities. Receivers within the same model family can be substituted without a call to the CSC if the receiver on the work order is not available. Requirements Use the same model receiver when possible If a receiver has no allowable substitution, the CSC must be called for return authorization (RA) or upgrade options Discontinued receivers have no allowable substitutions; if the receiver is not listed in the matrix below, the technician must call the CSC for upgrade options Matrix Receiver Allowable Substitutions Model Family Model Family Description Hopper with Sling Hopper with Sling Hopper with Sling Whole-Home HD DVR Hopper Hopper Hopper Whole-Home HD DVR Joey Joey Joey Whole-Home HD DVR 211 211, 211k, 211z 211 HD Solo Receiver 211k 211, 211k, 211z 211 HD Solo Receiver 211z 211, 211k, 211z 211 HD Solo Receiver 222 222, 222k 222 HD Duo Receiver 222k 222, 222k 222 HD Duo Receiver 301 311, 311k 311 Solo Receiver 311 311, 311k 311 Solo Receiver 311k 311, 311k 311 Solo Receiver 322 322 322 Duo Receiver 381 311, 311k 311 Solo Receiver 411 211, 211k, 411 211 HD Solo Receiver 510 512 512 Solo DVR Receiver 512 512 512 Solo DVR Receiver 522 522, 625 522 Duo DVR Receiver 612 612 612 HD Solo DVR Receiver 622 622, 722, 722k 622 HD Duo DVR Receiver 69 622HZ 625 722 722k 922 722, 722k 625 722, 722k 722, 722k 922 622 522 622 622 922 HD Duo DVR Receiver Duo DVR Receiver HD Duo DVR Receiver HD Duo DVR Receiver SlingLoaded DVR Last Modified: Wednesday, March 20, 2013 70 Receivers and Remotes Limited Mode Power Scan Limited Mode 1. Hold TV Mode button until all mode lights flash 2. Enter 5001# using number pad 3. Perform powerscan as normal Easy Limited Mode 1. Ensure remote is programmed to TV 2. Press and hold TV Mode button until all Mode lights flash 3. Press Page Up once then # Standard Limited Mode 1. Identify Remote Code 2. Enter TV Code and add a 1 to the end (7-4-2-1) Retrieve Remote Code 1. Hold Mode button until all lights flash 2. Press # # (Pound Twice) 3. Count blinking lights on selected mode button Note: Fast Blink = 0 Slow Blink = 1 Aux Volume Control 4. Hold Aux Mode button until all mode Lights flash 5. Press # 6. Press Volume up 7. Press 0 8. Press # TY Volume Control 1. Hold TV Mode button until all mode Lights flash 2. Press # 3. Press Volume up 4. Press 0 5. Press # Enable Sat Auto-Tune Feature 1. Program remote to TV 2. Program Recover Button 3. Press and Hold Sat button until all mode lights Flash 4. Press * - Volume Up - # Disable Sat Auto-Tune Feature 1. Press and Hold Sat button until all mode lights Flash 2. Press * - Volume Up - # Set Recover Button 1. Hold down TV button until all Mode lights flash 2. Press * - then the 3-digit channel number - # (*-0-6-0-#) 71 Programming the Aux Button 1. Retrieve code from User’s Manual 2. Hold Aux Mode button until all mode lights flash 3. Press 0 for a second TV, 1 for a second VCR, 2 for a tuner or amplifier 4. Enter device code from manual 5. Press # Extend Remote Address (17-31) Open the system info screen on the receiver 6. Press and hold SAT button until all mode buttons flash 7. Press # then press the channel up arrow key 8. Input a number between 1 & 15 (the remote automatically adds 16 to the result), Example: 1 = 17, 2 = 18, 3 = 19, 4 = 20, etc. 9. Press # then press the RECORD key Using the Learning Remote 1. Place Dish Network remote and original equipment remote on a Flat Stable Surface 2. Press and hold the Mode button for the device you are teaching until all Mode lights Flash 3. To start learning commands for this remote If a code is programmed into the remote press and release RECALL then hold RECORD for three seconds If you have not programmed a code for that device, press and hold RECORD for three seconds 4. Point the front of the original device remote to the small square on the front, left-hand side of the Dish Network remote 5. On the Dish Network remote control press the button you want to teach 6. On the original device remote control, press and hold the button you want learned If the Dish Network remote learns the command, the mode light blinks off and then back on If the mode light blinks three times or remains lit, the Dish Network remote did not learn the command 7. Repeat steps 5 & 6 until all commands have been learned 8. To end the learning sequence Press one of the mode buttons, this saves all of the commands To cancel learning process, do not press any buttons for 30 seconds, this will cause the remote to time out Retrieve Remote Code 1. Hold mode button until all lights flash 2. Press #-# (# twice) Fast Blink = 0 Slow Blink = 1 72 Extending UHF and UHF Pro Remote Control Range This section provides ways of extending UHF and UHF Pro remote control range to make remote controls work reliably in difficult installations, where attempts to improve remote control range have been unsuccessful using easier methods. The solutions shown use additional approved parts to “back-feed” the remote control antenna onto the same cable as the HOME DISTRIBUTION (CH 21-69 or 73-125) Out or CH 3-4 Out for the distant TV location. This allows the remote control antenna to be placed in the room with the TV, extending the range of the UHF or UHF Pro remote control. Installation Diagrams The following installation diagrams are the approved configurations for extending the UHF and UHF Pro remote control range. Choose the diagram that best matches your installation and follow it closely. Note: If an over-the-air antenna is installed, the remote control signal cannot be combined onto the same cable as the over-the-air signal. Diagram 1: Dual-tuner, two-TV receiver with remote control antenna combined with HOME DISTRIBUTION (Ch 21-69 or 73-125) output. 73 Diagram 2: Single-TV receiver with UHF or UHF Pro Remote Control and remote control antenna combined with CH 3-4 output . Diagram 3: Dual-tuner, two-TV receiver with remote control antenna, HOME DISTRIBUTION (Ch 21-69 or 73-125) output, and Satellite In combined on a single cable. 74 Diagram 4: Dual-tuner, two-TV receiver with remote control antenna combined with HOME DISTRIBUTION (Ch 21-69 or 73-125) output. Over-the-Air antenna and Satellite In combined using diplexers on a separate cable. Extending UHF and UHF Pro Remote Control Range Diagram 5: Single-TV receiver using IR-UHF Pro or IR-UHF Upgrade Kit and remote control antenna combined with CH 3-4 output 75 UHF Remote Interference If an approved external device is connected to a DISH Network ViP receiver and you notice degradation in the response of the receiver to the UHF remote control, try the following steps, in the order presented, to correct the issue. After performing each step, try using the remote again to see if operation has improved. 1. Placement and Cables Placement: External devices should not be placed on top of the receiver, as close proximity can cause UHF remote interference. Move the external device away from the receiver and the UHF remote antenna connection points. Increase the separation between the receiver and the external device Place the device on a separate shelf from the receiver Place the Sling Adapter flat on the rubber feet off to the side of the receiver Do not position an accessory so that it will block the ventilation openings on the receiver As a general rule, the further apart you can get the attached device and the UHF antenna the better. USB Extension Cables: Sling Adapter and External Hard Drive: USB extension cables can increase interference if used on a Sling Adapter or an external hard drive Do not use USB extension cable with these devices Wi-Fi Adapter The USB extension cable can be used with the Wi-Fi Adapter One USB extension cable is included with the device 2. Change the frequency band for the UHF remote control to use UHF Pro Band B as follows: On a 6.3 or 6.4 remote control: Remove the battery cover and slide the small switch inside the compartment to position B, changing the transmitted RF characteristics of the remote control Replace the battery cover and re-link the remote with the receiver using the System Information screen See the Remote Control User Guide for detailed instructions On a 21.0 remote: Select an even-numbered remote address (for example, address 2, 4, or 6) which sets this remote to Band B and re-link the remote with the receiver using the System Information screen See the Remote Control User Guide for detailed instructions Note: This step does not apply to ViP211 or ViP211k receivers. It applies to the ViP612 DVR receiver only if a UHF remote control is being used 76 3. UHF Remote Antenna Move the UHF antenna away from the externally connected device and the receiver using a UHF remote-antenna extension cable Use a coaxial jumper cable to relocate the antenna RG-6 or RG-59 cable This jumper should be four to six feet in length Use a barrel connector to attach the UHF antenna to the jumper You may need to try several locations for the UHF remote antenna to find the one that works best in your installation Route the cable and place the antenna in such a way that it is aesthetically pleasing to the customer Remember when relocating the UHF antenna to be careful not to damage the customer’s furnishings 4. USB Port If an external device is connected to the USB port on the receiver’s rear panel, try plugging the device into the front-panel USB port instead Make sure the IR sensor on the front of the receiver is not blocked 5. Customer Education Educate the customer on the actions you have taken to improve their Remote Control’s operation Inform the customer that the interference could re-occur if they rearrange the devices 6. If none of these actions corrects the problem, refer to your manager. 77 Remote Key Overview The available keys are shown and explained in the following chart. It’s important to note that the 6.2/6.3/6.4 tabs are not interchangeable with 4.0/6.0 tabs. So in the instance where a customer receives a 6.4 tab to replace their 6.0 tab, they can not use the original tab on the new remote. Receivers 211, 211k, 411, 222, 322, 522, 625 TV1 222, 222k, 622, 722, 722k, only TV1 322, 522, 625 only TV1 222, 522, 622, 625, 722, TV2 501, 508, 510 381, 612 Color Green key with green 1 Green key with black 1 and UHF Pro icon Green key with green 1 and UHF Pro icon Blue key with black 2 and UHF Pro icon Black key with UHF icon Silver key with UHF Pro icon SAT mode Sends Out: IR UHF Pro only UHF Pro only UHF Pro only UHF & IR UHF Pro only SAT In AUX Mode Sends Out: IR UHF & IR UHF & IR UHF & IR UHF & IR UHF & IR The tabs can be broken down into the following: TV1 IR: Used for any IR configuration. TV1 UHF Pro: Used for TV1 of duo receivers when there is something preventing an IR remote from working correctly; this can include instances of IR interference or a customer having the receiver in a different room from the TV. There are two different TV1 UHF Pro tabs. Green ‘1’ and UHF Pro Icon: This tab should be used for setting up TV1 UHF Pro on a 322, 522 or 625 only. This tab sends out the same signals as a TV2 tab, relying on the receiver’s TV1 UHF PRO Setup to recognize it as a TV1 command. Black ‘1’ and UHF Pro Icon: Used for setting up TV1 UHF on VIP Duo receivers. No menu setup is required. TV2 UHF Pro: Used to program a remote for TV2 on any Duo receiver. UHF Pro: Used for any uhf pro receiver. This should normally be used for UHF Pro solo receivers, but can also be used for duo receivers; this should be avoided so as to prevent confusion stemming from the lack of numbers on the tab. 78 IR/UHF: Used for receivers that support UHF rather than UHF Pro. With this tab, the remote sends out both UHF and IR signals in satellite mode. This allows the remote to be used with any IR receiver if we are unable to locate the TV1 IR tab. Remote A/B Switch Overview The internal A/B switch allows selection between two frequencies to help in instances of UHF interference; this can include conflicts with another UHF Pro remote or UHF interference in general. The A/B toggle is located in the battery compartment of the remote control. Band A: In band A, the remote uses the 369.5 MHz frequency for TV1, while using 375.3 MHz for TV2. This is the band of UHF Pro recognized by all Dish Network UHF Pro receivers. With 21.0 remotes, odd remote addresses use band A. For this reason, when addressing a remote to a non-VIP receiver we need to ensure the switch is in the ‘A’ position or if we are using a 21.0 remote we need to ensure we use an odd remote address. Band B: In band B, the remote uses the 394.3 MHz frequency for TV1, while using 388.3 MHz for TV2. With 21.0 remotes, even remote addresses use band B. This band is only recognized by VIP series receivers. 79 Connectivity Benefits Better Technology Customize Your TV Experience Pay your bill and manage your account. Caller ID on your TV screen. Remote DVR access: access your ViP® DVR remotely via computer or iPhone™. Access Pay-Per-View with the Touch of a Button Rent movies without leaving your home, right through your TV. No processing charges/fees, and no need to call. Pay for your Pay-Per-View purchase on your next bill. Access Additional Programming, Games, and More Thousands of movies and TV shows are available on demand. Interactive Applications: Play games, check weather, news, sports, even shop. Better Customer Experience Quality Service Diagnose technical problems: connected receivers can track, log and notify us of any problems. Access customer support application: get easy troubleshooting tips for the most common problems. Privacy Your privacy is guaranteed: connecting your receiver will not compromise your privacy. Additional Savings and Flexibility Stay Connected Plugging in your receiver will not interrupt your phone line or Internet connection. All required accessories are included at no additional cost. 80 Connectivity Process Step 1 2 Task Process Owner Technician Evaluate the customer's Internet connection during the site survey Technician Determine the best way to connect their ViP receiver Educate the customer on the benefits of connecting the receiver to their home network while discussing the installation plan 3 Technician 4 Technician 5 6 "Connecting your DISH Network ViP® series DVR receiver to your broadband home Internet service allows you instant access to thousands of on-demand movies and television shows. Plus you'll have the ability to order Pay-Per-View movies and events using your remote control, and even manage your DVR directly from your remote computer or compatible mobile device." Inform them that you will provide the devices and/or accessories to complete the connection free of charge Complete the installation and connect the ViP receiver to the customer's Technician network Confirm connectivity by performing the STBH Live Confirmation or Send Status test Technician STBH Live Confirmation o Confirms the broadband connection by finding the IP address o Checks the receiver signal strength o Prompts the data transmission and ensures the confirmation code is received Without completing this important step, it is possible the connection is not working properly STB Health Live Confirmation is available on the 211, 211k, 222k, 512, 522, 625, 622, 722 Sent Status test (for receiver models not supported by STB Health Live Confirmation o Transmits data back to the server just like STB Health Live Confirmation, but does not provide a confirmation code 81 Configuring Receivers Step 1 2 Process Using the DISH remote control for the receiver that is connected to the home network, access the Network Setup screen by pressing MENU, selecting System Setup, Installation, Broadband Setup and then Network Setup Verify the IP address is populated (not all 0s) If the IP address is all 0s, select Reset Connection An Attention 875 message will display briefly and then you will return to the Network Setup screen Verify the Connection Status on the Network Setup screen shows Connected Online and that the IP address does not show all 0s 3 4 5 6 If the IP address shows all 0s or the Connection Status shows Not Connected, refer to the Installer Reference Handbook Select Done to exit the Network Setup screen Verify the receiver can successfully connect to DISH by pressing MENU on the remote control, selecting System Setup, then Diagnostics Select Connection to test the Internet connection The Connection option also test the phone line, if connected. The results should display Broadband Connection OK If a phone line is not connected to the receiver, connection results will display Phone Connection Failure. This is okay 82 Connectivity Device Hierarchy Use the matrix below to determine the correct connectivity device to use. Receiver Configuration Hopper with Sling and Joey on account Hopper and Joey on account 1 ViP receiver on account 2+ ViP receivers on account No ViP receivers on account Preference Order 1. Ethernet connection to Hopper with Sling 2. Built in Wi-Fi 3. HIC 1. Ethernet connection to Hopper 2. HIC if existing coaxial cable can be used for HIC connection 3. Wi-Fi Adapter 4. HIC with a new coaxial cable run for the HIC 1. 2. 3. 4. 5. Ethernet SlingLink Wireless Adapter Phone line DishCOMM Modem 1. 2. 3. 4. 5. SlingLink Ethernet Wireless Adapter Phone line DishCOMM Modem 1. Phone line 2. Phonex 83 Modem What is a Modem? A network device that converts a broadband cable or DSL line into a single Ethernet cable with access to the internet A modem by itself provides internet access to only 1 device (usually a computer) To connect multiple devices to the internet, a modem must be connected to a router Adding a switch to a modem without a router does not work Some modems have router capabilities - these devices are knows as Gateways Identifying a Modem There are 2 types of modems: CABLE and DSL Generally, the word "Modem" will be printed on the device A modem will have a cable or DSL line connected to it and only 1 Ethernet out port o A modem may also have a USB port but only 1 Ethernet out port Sometimes it is difficult to tell the difference between a modem and a modem with router capabilities Connecting a DISH Network Receiver Connecting a receiver to the internet using an Ethernet cable or a SlingLink requires an open Ethernet out port A modem by itself only has 1 Ethernet out port which is usually connected to a computer If a receiver is connected to a modem’s only Ethernet out port the customer’s computer will no longer have internet access Adding a switch to a modem does not work – only a router can be added to a modem to add additional Ethernet out ports A modem must be connected to a router with an open Ethernet out port to connect a receiver to the internet Use an open Ethernet out port on the router to connect the Ethernet cable or SlingLink 84 85 Router What is a Router? A network device connected to a modem that splits the internet from a single Ethernet out port to multiple ports If a customer only has a modem, a router is required If a there are no open Ethernet out ports on a router, a switch needs to be installed to increase the number of open ports Identifying a Router There are 2 types of routers: Wireless (WiFi) and Wired (Non-WiFi) Generally, the word “Router” will be printed on the device Both types of routers have Ethernet out ports that provide Ethernet cable connections to other equipment Typically, a router will have 5 ports (1 in and 4 out) Connecting a DISH Network Receiver A modem must be connected to a router to connect a receiver to the internet Most routers require software to work properly with the customer’s computer, it is usually packaged with the router 86 87 Wireless Adapter Prior to Installation Before proceeding with the wireless adapter installation perform the following: Follow the Connectivity Hierarchy Matrix (See appendix) Attempt to install direct Ethernet cable Attempt to install SlingLink If neither option works, confirm the receiver you wish to connect is compatible with the wireless adapter (622,722,722K) Confirm the customer has broadband and a wireless router or gateway Confirm the customer has the password to their network (WEP or WPA encryption key or WPA2 pass phrase) Let the customer know you will need them present during parts of the installation Installing the Wireless Adapter 1. Complete the receiver installation and initial software download before attempting to connect the wireless adapter. 2. Plug in the Wi-Fi adapter to the rear USB port on the receiver using the USB extension cable. Never insert the adapter directly into the receiver, always use the supplied cable. This will allow you to position the adapter for the best possible reception. 3. Do not secure with the plastic cradle and Velcro until after you have completed the wireless setup. You will need to reposition the adapter once setup is complete to get the strongest possible signal. 4. Once the receiver recognizes the adapter the following screen will be displayed. Select Setup to enter the wireless adapter setup Wizard. 5. The wireless setup wizard will start. First, it will scan for available networks. 6. Wireless networks displaying two or three bars are preferable. Networks only displaying one bar will not provide the best customer experience due to slower connection rates. 7. Select the name (SSID) of the desired wireless network from the list and select Done. You will need to confirm with your customer which network is the correct one if more than one option appears. To proceed with this next step the customer must be present. The customer will need to have their Job Aid WEP or WPA encryption key or WPA2 pass phrase available, if any. Do not enter this data yourself. The customer must enter it to ensure their network remains 88 secure. 8. Have your customer enter the encryption key or passphrase using the remote and onscreen keypad. Advise them the password is case sensitive. 9. Once the customer has input the wireless network encryption key, select Done. 10. The system will begin testing the network onnection. The following screens will be displayed. 11. When testing is successfully completed, the following screen will be displayed. SelectDone. If this test fails, refer to the troubleshooting section of this Job Aid. 12. The wireless adapter signal strength screen will display 13. Move the USB adapter to achieve the maximum signal strength. If the signal strength is below 40, skip ahead to the ‘If there are signal strength issues’ section of this job aid. 14. Once the signal strength is acceptable (maintaining higher than 40) select OK. 89 15. Next, perform send status to ensure your connection is working properly Menu System Setup Diagnostics Analysis Send Status 16. Click Send Status 17. If send status fails go to the troubleshooting section of this job aid 18. Once signal is at an acceptable level and send status is completed, obtain the customers permission and secure the plastic mini-cradle using the included Velcro. Do not secure to a finished surface or to the customer’s television. 90 Signal Strength Issues If you cannot achieve signal strength of at least 40 at the time of connection, do not continue with the wireless adapter option. Use another connectivity solution for the customer if possible and fill out the Connectivity Tracker to capture your experience. Disconnecting the Adapter If the wireless adapter is disconnected during setup, a popup will be displayed. When the wireless adapter is reconnected, the following popup will be displayed. Select Setup to proceed, you will be taken to the wireless setup screens again. If you need to access the Wireless Setup menu at a later time select: 1. MENU button 2. System Setup – Option 6 3. Installation – Option 1 4. Broadband Setup – Option 8 5. Wireless Setup – Option 1 91 Troubleshooting Adapter not recognized If the adapter isn’t recognized or you don’t have the wireless set up option it means the receiver does not have the most current software version. Wireless test fail If the wireless test fails, go through the wireless setup process one more time to make sure the correct network was selected and the correct passwords were entered. If the test fails again, perform the following steps: - Reset the router - Reset the modem - If you complete these steps and test again and it still fails, the wireless adapter is not a good solution for this customer. Connect using a different connection method. Send status fail If send status fails, follow the same steps as the wireless test fail 92 Connectivity Troubleshooting Matrix Broadband Troubleshooting 1 Check Broadband Configuration 2 Reset Receiver Check that the wiring between your DISH receiver and your broadband source is configured properly using dish.com/wiring. If the issue is only on ONE receiver, unplug the DISH receiver for 10 seconds and plug back in. It may take up to 5 minutes for the reset process to be completed. 3 Reset Broadband Router/Modem Unplug your broadband router or modem for 10 seconds and plug back in. 4 Check LED lights Check the DSL light is steady green and the Internet light is steady or flashing green. If there is no light or the light is red, have the customer contact their ISP. 5 Perform “Send Status” MENU 6 - “System Setup”, 3 - “Diagnostics” and select “Analysis” and “Send Status”. Check for confirmation of call out success or a confirmation code from STBH Live with all circles under “Status” showing green. 6 Access Internet Using For DISHOnline, Sling, or DISH Remote Access issues, have the Home Computer customer access the IP based feature from their home computer. 7 Transfer to Broadband Transfer the call to Broadband. 8 Try different port on Router Connect the Ethernet cable from the current port on the router to a different known working port. 9 Bypass Router and Connect to Modem Bypass the router and connect the computer directly to the modem; if the computer cannot access the Internet, have the customer contact their ISP. 10 Check the LAN connection is enabled Windows: Start - Settings - Network Connections - verify Local Area Connections is enabled; if the connection shows Disabled, right click on the connection icon, and select Enable. Mac: System Preferences - Network Preferences - Built in Ethernet is disp 93 11 Contact Manufacturer Contact the manufacturer of the device directly if you are unable to resolve the issue. Broadband Troubleshooting — Wireless Adaptor 1 Check Adapter Connected to Receiver Check that wireless adapter’s extension cable is connected to the DISH receiver’s USB port. 2 Check Connected to correct Network Verify the DISH receiver is connected to the correct wireless network. 3 Reset Receiver If the issue is only on ONE receiver, unplug the DISH receiver for 10 seconds and plug back in It may take up to 5 minutes for the reset process to be completed.. 4 Reset Broadband Router/Modem Unplug your broadband router or modem for 10 seconds and plug back in. 5 Check LED lights Check the DSL light is steady green and the Internet light is steady or flashing green. If there is no light or the light is red, have the customer contact their ISP. 6 Check Another Port on the DISH Receiver Connect the Wireless Adaptor’s Extension Cable to another port on the DISH receiver. 7 Access Internet Using Home Computer For DISHOnline, Sling, or DISH Remote Access issues, have the customer access the IP based feature from their home computer. 8 Connect Hard Wire to Router If you are able to do so, direct connect the DISH receiver to the home network’s router using an Ethernet cable. 9 Perform “Send Status” MENU 6 - “System Setup”, 3 - “Diagnostics” and select “Analysis” and “Send Status”. Check for confirmation of call out success or a confirmation code from STBH Live with all circles under “Status” showing green. 10 Transfer to Broadband Transfer the call to Broadband. 11 Connect Wireless Adaptor to your Home Computer Connect Wireless Adaptor to your Home Computer and test for connectivity. 12 Create Wireless Adaptor RA Create RA for Wireless Adaptor. 94 ON-SCREEN SETUP HOPPER/922 After physically connecting the Wi-Fi Broadband Connector to the receiver, follow these instructions to properly configure Configure Wi-Fi Broadband Connector "Attention 396" will display automatically. Select "Wizard" 1. Select the desired wireless network (from the list on the "SSID Scan" screen) and select "Next" 2. Enter wireless network password (WEP or WPA encryption key) and select "Done" 3. 95 The receiver will complete a network connection test 1. If the test fails, select "Home," then "Wizard" to re-enter the desired wireless network and network password. If the problem persists, troubleshoot. 4. 2. If the test is successful, select "Home" to go to the "USB Wireless" screen The "USB Wireless" screen will display the signal strength. If it is not above 40, attach the USB extension cable and move to a different location to acheive stronger signal. Select "Close" 5. 96 Test Wi-Fi Broadband Connection Press the MENU button on the remote 1. Select "Broadband Setup" 2. Select "USB Wireless" 3. The screen will advise the user of the connection status, and strength 1. If the connection has failed, troubleshoot 2. If the receiver is connected, select "Close" 4. 97 HOPPER INTERNET CONNECTOR A connectivity device that provides a direct connection to all Hopper and Joey devices over coax cabling. Only to be used for Hopper/Joey. Hopper Internet Connector Front Back Physical Setup 98 Direct Ethernet Connection • • • Direct Ethernet cable connection from router/switch to Hopper is always the preferred connection if the router is nearby o Hopper manages the features that are IP-dependent (IPVOD, On-Demand, etc.) Least degradation to bandwidth for TV Everywhere If Hopper is IP-connected, it shares connection with all linked Joeys so they can enjoy IP features as well Hopper Internet Connection (HIC) – Use Existing Cable New connectivity device that uses coaxial wiring feeding Hoppers and Joeys to connect them to the Internet Used with existing pre-wired cable or when using the PASS-THRU to a Joey Preferred method of connectivity if customer wants to use TV Everywhere USB Wi-Fi Adapter on Hopper Wi-Fi Adapter offers convenient, fast installation to connect Hopper Hopper shares connections with all linked Joeys so they can enjoy IP features as well If customer isn’t likely to use TV Everywhere, achieves minimum connectivity needs (Order PPV with remote) 99 Primarily an offer to existing DISH customers, but used on new installations Hopper Internet Connector (HIC) – Running New Cable New connectivity device that uses coaxial wiring feeding Hoppers and Joeys to connect them to the Internet Used when running to cable to the HIC/Router location Preferred method of connectivity if customer wants to use TV Everywhere 100 SlingLink Installation Considerations When using a SlingLink you must test the circuits you will be using the Home Plug Tester as you have been trained to do already If a surge protector is used, it must be approved for use with SlingLink (or HomePlug), and the adapter or satellite receiver must be plugged into the SlingLink outlet of the surge protector You may also use the 3-Plug Outlet Adapter (Outlet Splitter - P/N 156672) to provide additional plugs on the circuit if required. The SlingLink and any networked receiver must be on the same home electrical circuit to work o In some homes, customers have multiple electrical circuits (more than one electrical breaker box in the house) o A single SlingLink may not always crossover multiple home electrical circuits Conneting Receivers Using SlingLink 1. Test the outlet in question using the Home Plug Adapter to ensure the SlingLink will work 2. Connect one end of an Ethernet cable to an available ETHERNET (LAN) port on the router, gateway, or Ethernet switch 3. Connect the other end of the Ethernet cable to the ETHERNET port on the SlingLink 4. Plug the SlingLink into an electrical outlet located near the router The SlingLink and the DISH Network satellite receiver’s power cord should both be plugged directly into an electrical wall outlet Do not plug the adapter or satellite receiver into an outlet that is controlled by a wall switch or into GFI electrical outlets 5. Verify function by checking adapter lights 6. Plug the receiver Configure Receiver into the Network 1. How to Configure the Receiver into the Network 2. Using the DISH Network remote control for the receiver that is connected to the home network, access the Network Setup screen by pressing MENU, selecting System Setup, Installation, Broadband Setup, and then Network Setup 3. Verify the IP address is populated (not all 0s) If the IP address is all 0s, select Reset Connection An Attention 875 message will display briefly, and then you will return to the Network Setup screen 4. Verify the Connection Status on the Network Setup screen shows Connected Online, and that the IP address does not show all 0s If the IP address shows all 0s or the Connection Status shows Not Connected, refer to the Installer Reference Handbook 5. Select Done to exit the Network Setup screen 101 6. Verify the receiver can successfully connect to DISH Network by pressing MENU on the remote control, selecting System Setup, then Diagnostics 7. Select Connection to test the Internet connection The Connection option also tests the phone line, if connected. The results should display Broadband Connection OK If a phone line is not connected to the receiver, connection results will display Phone Connection Failure. This is OK 102 Sling Adapter Sling Adapter Installation 1. Connect the USB connector on the Sling Adapter to the back of the DISH Network receiver 2. The Sling logo on the top of the Sling Adapter should illuminate to indicate it is powered on 3. Click OK on any on-screen messages If you do not receive this message, ensure the ViP722 DVR or ViP722k DVR has the latest software 4. Set the Sling Adapter on the top of the receiver Note: The Sling Adapter can also be connected to the front USB connection on the DISH Network receiver. This should be the last installation option used as it is not aesthetically pleasing. Using Remote Viewing Using their computer customer should: Log in to My Account on dish.com Click on DISH Remote Access (located at the left of the screen) Note: If the customer does not have an account, then assist them to creatie one. Once logged in, there are a few initial steps to complete before watching live TV. 1. Ensure the receiver with the Sling Adapter connected is listed at top of the screen, if not, select the appropriate receiver 2. Click Watch Live TV (located at the top of the screen) This button appears once the Sling Adapter is connected to the DISH Network receiver 3. Click Accept on the Terms of Use 4. Follow the on-screen instructions to download the plug-in On-screen instructions can change without our knowledge but should always be followed and read completely Setup example: Click the yellow bar and select Install Active X Control Note: This bar may not appear depending on the customer’s computer settings 5. Click Install 6. Select the desired program via EPG or on-screen controls Click Watch on Web Educate the customer on how they access TV Everywhere features on their compatible mobile device. Customers must: Download the DISH Remote Access App to their compatible mobile device: o iPhone / iPod touch – iTunes Store o Blackberry – link available on dish.com/tveverywhere/remoteaccess o Android – Droid App Market Log into the DRA app using the same login to access their DISH account on dish.com 103 Select a live or DVR event to remote view on their mobile device Sling Adapter FAQs Q: What receiver models are compatible with the Sling Adapter? A: Only the 722 and 722k are compatible; the 622 model is not compatible with the Sling Adapter. Q: If I have a Sling Link am I ready for remote viewing? A: No, a Sling Link (which is an Ethernet through power-line adapter, also known as a HomePlug) is a connectivity device. The Sling Adapter is an additional device that is needed for Remote Viewing. Q: Can existing customers order a Sling Adapter for the Technician to deliver and install? A: No, the Sling Adapter must be ordered through the CSC or at www.Dish.com. The product will then be shipped to the customer for self installation. Do not call to modify an existing customer work order. Q: Can I modify a New Connect work order to add a Sling Adapter? A: Yes, New Connect work orders are the only work orders that can be modified to add the Sling Adapter. Once the modification is complete the Technician may deliver and install the product. Q: Is it possible to use both a Wi-Fi adapter and a Sling Adapter at the same time? A: Yes, there are front and rear USB ports on the 722 and 722k receivers. Both of these ports may be used simultaneously for a Wi‐Fi adapter, a Sling Adapter, or external hard drive. Q: Can a USB hub be connected to the USB port of a 722 or 722k to connect multiple accessories? A: No, USB hubs are not currently supported for connection to DISH Network receivers. 104 ACCESSORIES. Don't have everything you need to complete your home theater? We have you covered. DISH offers high-quality components at low prices.. AVAILABLE ITEMS. 15' HDMI cable – $29 30' HDMI cable – $59 6' optical cable – $19 12' optical cable – $29 Speaker mount – $20 Set up TV on Stand - $99 TV Full Motion Bracket – $49 (TV sizes larger than 32") TV Tilt Bracket – $79 (TV sizes between 24" and 40") TV Tilt Bracket – $99 (TV sizes between 41" and 80") TV Full Motion Bracket - $199 (TV sizes between 32" and 70") Screen cleaner – $15 Component Integration - $49 Wireless Network Setup - $99 Power Relocation - $149 Surge Protector - $29 105 Overview HDMI (High-Definition Multimedia Interface) is a compact audio/video cable that connects audio and video components, such as DISH receivers, Blu-ray players, or game systems to HDTVs. HDMI cables provide the best picture quality possible. What Changed A new Smart Home Services product is now available: an 8-foot HDMI DISH-branded cable for just $19. This is an excellent price, especially when compared to store costs of $50 or more. All HD or ViP DISH receivers are HDMI-capable, allowing viewers to see programming in high definition. DISH currently provides one 7-foot HDMI cable with each HD or ViP receiver to ensure customers get the best picture quality possible from the receiver to their television. Appropriate times to offer the 8-foot or longer HDMI Cables for purchase from DISH: The customer may need more than one cable in order to complete the hook-up, such as in the case of an A/V receiver The customer has additional components that could utilize an HDMI cable for better picture quality If you notice that a customer is not currently using an HDMI cable with their Blu-ray player, for example, you can now offer customers an 8-foot HDMI DISH-branded cable The customer’s equipment is far enough from the TV that it requires a longer cable Selling Features of the 8-foot DISH HDMI Cable: The new 8-foot HDMI DISH-branded cable for $19 is a high-speed-rated cable (HDMI 1.4), capable of handling full 1080p video (including 3D), digital audio, and Ethernet for improved picture and audio quality o It features gold tips and shielded wires with a mesh covering to allow for flexibility while still protecting the inner part of the cable and reducing interference o It supports Audio Return Channel-enabled televisions and can either send or receive audio via HDMI, both upstream and downstream 106 What I Need to Do Smart Home Services’ 4-Step Process Step 1: Identify needs and opportunities Step 2: Inform your customer of what you identified Step 3: Offer the customer your solution Step 4: Respond to the customer Helpful hints for using the 4-step process to ASK customers about the 8-foot HDMI DISHbranded cable for $19: Step 1 Look at customers’ TV setups and cables when performing the Site Survey It is a great ASK opportunity when: o Customers have equipment that support HDMI but they are currently using something else o Connecting components as part of a Smart Home Services installation for which the customer does not have the necessary cables Step 2 Let customers know they will enjoy better picture and sound quality when using equipment such as their Blu-ray player if they upgrade to an 8-foot HDMI DISH-branded cable for $19 Step 3 Ask the customer if they would like to purchase an 8-foot HDMI DISH-branded cable for $19 Buying the cable from you will save them a trip to their local retailer to purchase a cable. Additionally, many local retailers sell HDMI cables for as much as $50 or even more Step 4 Add the item to the customer’s bill or take immediate payment, using the Tech Store on your mobility device Attach the new 8-foot HDMI DISH-branded cable 107 INSTALL 2 SPEAKERS. Expand from 5.1 to 7.1 surround sound. Add speakers outdoors or in another room. On or in-wall speaker installation. Wiring concealed in-wall. Integrate speakers with A/V receiver. 108 HOME THEATER INSTALLATION. Optimize your TV with a surround-sound speaker system. DISH Smart Home Services will install your speakers, conceal wires in the wall or with paintable wire molding, calibrate the audio, and integrate your speakers with an A/V receiver; we provide the speaker wire. NO IN-WALL WIRING. Two front, two rear, one center, one subwoofer (5.1) Wiring concealed in paintable wire molding. Connect and configure your A/V receiver. 109 HOME THEATER INSTALLATION. Optimize your TV with a surround-sound speaker system. DISH Smart Home Services will install your speakers, conceal wires in the wall or with paintable wire molding, calibrate the audio, and integrate your speakers with an A/V receiver; we provide the speaker wire. IN WALL WIRING. Two front, two rear, one center, one subwoofer (5.1). Wiring concealed in-wall. Connect and configure your A/V receiver. 110 TELEVISION SETUP. From tabletop setup to custom wall mounts, DISH Smart Home Services help you enjoy TV from every point of view. We'll install the wall brackets, connect and configure audio and video components, neatly tie or conceal wires, and even set up remote control programming. Call 1-888-615-3724 ON A STAND. Place TV on stand Set up video sources Education on setup and use n 111 Overview Smart Home Services is offering four new TV brackets with added features and compatibility with a greater number of televisions to meet our customers’ needs. These new TV brackets take up less space in the vehicle and will replace our current brackets. Updated Smart Home Services brochures will be released later this spring. Until those brochures are released, refer to this training on DNSPortal if you have questions about TV bracket features. What Changed The four new TV brackets will replace the brackets that we currently offer and will be offered for the same price. The size ranges for the new brackets are slightly different but are compatible with TVs up to 80 inches, as illustrated in the chart below. These new brackets also come with extensions to accommodate TVs with larger VESA patterns. Previous Bracket New Bracket Price Max TV Weight Installation Service Full motion bracket < 32” Full motion bracket <32” $49 TV wall install 40” or smaller Full motion bracket 42”-65” Full motion bracket 32”-70” $199 125 lbs Varies by TV size Tilt bracket 32”-46” Tilt bracket 24”-40” $79 100 lbs TV wall install 40” or smaller Tilt bracket > 47” Tilt bracket 41”-80” $99 150 lbs TV wall install 41” or larger 35 lbs 112 What I Need to Do The installation steps for the new TV brackets are similar to the previous brackets except for a few added features. When installing these brackets, refer to this training and the packaging instructions. Full motion brackets: • The large bracket can mount to all stud bays up to 24” with an extension bar. If the stud bay is wider than 17”, contact your manager for the extension bar Full motion bracket 32”-70” Full motion bracket < 32” To extend the large full motion bracket to accommodate larger VESA patterns, use the included hex wrench to remove the end caps from the horizontal rails, screw in the included extension rails and replace the hex screws. Tilt brackets: Tilt bracket is collapsed for smaller packaging • The tilt brackets are collapsible, pull the bracket open with your hands until it is fully expanded and all joints are at a 90 degree angle • Hand straps allow you to mount the rails to the wall plate easily. Pull the strap to release the tab that locks the brackets in place, release the strap to lock the tab. o Customers can use a pad lock to lock the rails for added security 113 Before you mount a TV: Make sure that the wall plates are not wider than the TV. The bracket should not be visible once the TV is mounted. If the bracket is too wide, consider a smaller bracket if possible. Ensure that the TV does not exceed the bracket’s weight requirements. 114 COMPONENT INTEGRATION. Connect Internet ready devices. (IPTV, computer, gaming systems). Wireless or wired connection. Education on setup. 115 WIRELESS NETWORK. Installation of wireless router. Password protect network. Connect Internet ready devices (IPTV, computer, gaming systems). Education on setup. 116 Metal Conduit Power Relocation kit Overview To comply with national and local electrical codes, Smart Home Services technicians must now use a Metal Conduit Power Relocation Kit (PN: DN003963) on all appointments in New York City, Long Island, the City of Chicago, and for certain types of structures, including any building with metal studs. What Changed The Metal Conduit Power Relocation kit offers added protection from possible electrical damage by using metal shielding around the power cable and should be used exclusively in the following situations: • On all appointments in New York City, Long Island, and the City of Chicago (check the appointment address on the work order to know if the appointment is in those cities.) • When the customer’s home/business is constructed with metal studs • On all Commercial and Public/Private property Metal conduit shields the power jumper that connects the two cut-in boxes 117 Why It’s Important Electrical insulation is required when providing power relocation for any structure with metal studs. In addition, New York City, Long Island, Chicago, and any Commercial/Public/Private property have higher standards for electrical code compliance. The Metal Conduit Power Relocation Kit meets these higher standards. Recommended Actions Use the Metal Conduit Power Relocation Kit instead of standard power relocation: • On any appointments in New York City, Long Island, and Chicago. o Use the address of the appointment in ETAdirect to determine if it is inside the City of Chicago, Long Island, or New York City • The customer’s home is constructed with metal studs o Use the stud finder to determine the stud material • On all Commercial and Public/Private structures All offices should carry enough metal conduit power relocation kits to support the appointments that require them. To install the Metal Conduit Power Relocation Kit, follow the exact same steps as you would for standard power relocation. The only installation difference with the metal conduit kit installation is that the brush plate comes pre-assembled, saving you the extra step of attaching it to the cut-in box. Power Relocation installation instructions can be found on DNS Portal. 118 GE Surge Protector Overview As an industry leader in home entertainment solutions, DISH Smart Home Services is always searching for ways to meet consumer needs. One of the biggest needs when it comes to providing these solutions is finding available power outlets for TVs, soundbars, receivers, and other electronics. Perhaps more importantly, these power outlets need to deliver electricity securely to protect the expensive electronics from dangerous electrical spikes. That’s why DISH Smart Home Services is proud to add this GE Surge Protector to its extensive lineup of customer solutions! Product Description DISH Smart Home Services offers this surge protector at a retail price of just $29 to customers and features: • 10 power outlets • 2 USB ports • 6 foot power cable • Protection for up to 3000 joules • GE warranty for up to $400,000 • Integrated Circuit Breaker • Outlet safety covers Recommended Actions To offer this product, follow the 4-step ASKing Process: • Step 1: Identify needs and opportunities • Step 2: Inform your customer of what you identified • Step 3: Offer the customer your solution • Step 4: Respond to the customer Here are some suggestions for using the 4-step process to ASK customers about surge protectors: Step 1: Identify • Customers with a limited number of available electrical outlets are a great fit for surge protectors. • Customers with multiple electronic devices can benefit from the added security protection of a surge protector over a standard wall outlet. Step 2 and 3: Inform and Offer Let the customer know that you have a surge protector you can offer them for $29 which will help protect their valuables. Tell them about all the great features such as the 10 outlets, USB ports, and manufacturer warranty. Step 4: Respond If your customer would like to purchase the surge protector, contact Work Order Modifications to complete the purchase. 119 1. Preparation Ensure the SBSM is charged Review the account notes Contact customer if Call History shows no contact was made or you require directions or security gate access 2. Customer Confirmation Bring the SBSM when greeting the customer o "I understand you are having an issue with _______. Can you show me where you are having this issue?" Ask probing questions such as: o "Is the issue on all TVs or just one TV?" o "Is the issue constant or intermittent?" o "Have you recently moved/relocated the system?" 3. Initial Troubleshooting with Customer Attempt to recreate the problem (if possible) At both TV1 and TV2: Verify all devices are plugged in and turned on Verify all cables are secured properly Verify the TV is on the correct input/channel If applicable, verify the smart card is inserted properly If receiver is operational: Ensure the remote is programmed properly (codes, address, etc.) Ensure the remote and receiver are communicating properly Check the system info screen for errors 4. Set Up Limit Scan Unplug the receiver from the power outlet Power on the SBSM Set the SBSM configuration to match the dish/switch configuration Unhook the satellite feed from the receiver Attach the SBSM to the satellite feed 120 5. Limit Scan Behind the STB with Customer On the SBSM, press MENU and then press LIMIT SCAN Press LNB OFF soft key to cycle through orbitals Look for a PASS or FAIL alert o FAIL A failed limit scan will occur if: At least one transponder's IRD is less than the Req At least one transponder is less than -50.0 dBm Inform the customer: "There seems to be an issue with the signal path. I will do further research tests and will let you know once the issue is resolved." Go to Step 6a - Signal Troubleshooting o PASS A passed limit scan will occur if: All transponders' IRD is greater than the Req All transponders' dBm is greater than -50.0 dBm This means the issue is isolated between the STB and TV. Inform the customer: "The signal strength is good and the issue seems to be isolated to this area. I will do further tests and will let you know once the issue is resolved." Go to Step 6b - STB to TV Troubleshooting 6a. Signal Troubleshooting Step Does the wall plate have a low a. frequency barrel in it? b. Limit scan at STB side of ground block/switch Limit scan at dish side of ground/block switch d. Limit scan at dish c. Fail Pass Replace Next step and retest Check and replace any defective Next step components between ground block/switch and STB. Then go to (f) Replace ground block/switch. Then go Next step to (f) Next step Check and replace any defective 121 components between dish and ground block/switch. Then go to (f) Verify the mount is secure and positioned properly f. Repeat the limit scan behind STB Test outlet, plug in the receiver and run g. a check switch Perform a limit scan behind all other h. STBs. If no other STBs exist, continue to Step 7 - Final Quick Checks e. 6b. STB to TV Troubleshooting Step Run limit scan around each a. component (ex. diplexer, separator or triplexer) Secure and Replace the LNBF, then go to (f) peak dish Go to (b) Go to (g) Go to Step Go to (h) 6b, (a) Return to (a) Go to Step 7 - Final Quick Checks Fail Pass Reconnect coaxial cable and go to Replace any defective next step components. Reconnect *A separator/triplexer will only components and go to show odd or even transponders, (h) which will display "fail" on SBSM Test outlet, plug in receiver and b. see if the TV picture is coming in Go to (d) clear and consistent Address error message Ensure TV picture contains no c. and, if needed, replace error message the receiver Try using the same cable in a d. Next step different port on the TV e. Try using a replacement cable Without downgrading, try using a different kind of cable f. connection (ex. If HDMI, try using component cable) Reset the TV's factory settings, g. with customer approval Plug in another device into the h. same port on TV, if possible Perform a limit scan behind all other STBs. If no other STB, i. continue to Step 7 - Final Quick Checks Next step Go to (c) Go to (i) Use the same cable in the different port. Then go to (i) Use a replacement cable. Then go to (i) Next step Use a new cable connection. Then go to (i) Next step Go to (i) Possible TV issue, test on another TV Replace the receiver. Then go to (i) Go to Step 6a, (a) Go to Step 7 - Final Quick Checks 122 7. Final Quick Checks 1. Dish and Mount o Clear line of sight o Secure mount and lags o Enough lag screws o Level mast o Ground mast 2. Cabling and Components o Cable RG-6 and in good condition o DNS approved hardware o All fittings secure and torqued o Drip loops installed properly 3. Grounding o Approved ground block o Approved ground source o Grounding component installed properly 4. Connectivity and Customer Education o Verify connectivity is present and functioning o Review troubleshooting findings with customer o Ensure customer is confident with system/remote o Review and quiz customer on 5 troubleshooting steps 123 UHF REMOTE INTERFERENCE Overview If an approved external device is connected to a DISH Network ViP receiver and you notice degradation in the response of the receiver to the UHF remote control, try the following steps, in the order presented, to correct the issue. After performing each step, try using the remote again to see if operation has improved. 1. Placement and Cables Placement External devices should not be placed on top of the receiver, as close proximity can cause UHF remote interference. Move the external device away from the receiver and the UHF remote antenna connection points. Increase the separation between the receiver and the external device Place the device on a separate shelf from the receiver Place the Sling Adapter flat on the rubber feet off to the side of the receiver Do not position an accessory so that it will block the ventilation openings on the receiver As a general rule, the further apart you can get the attached device and the UHF antenna the better. USB Extension Cables Sling Adapter and External Hard Drive: USB extension cables can increase interference if used on a Sling Adapter or an external hard drive. Do not use USB extension cable with these devices o Wi-Fi Adapter The USB extension cable can be used with the Wi-Fi Adapter One USB extension cable is included with the device 2. Change the frequency band for the UHF remote control to use UHF Pro Band B as follows: On a 6.3 or 6.4 remote control: o Remove the battery cover and slide the small switch inside the compartment to position B, changing the transmitted RF characteristics of the remote control o Replace the battery cover and re-link the remote with the receiver using the System Information screen o See the Remote Control User Guide for detailed instructions On a 21.0 remote: o Select an even numbered remote address (for example, address 2, 4 or 6), which sets this remote to Band B, and re-link the remote with the receiver using the System Information screen o See the Remote Control User Guide for detailed instructions o Note: This step does not apply to ViP211 or ViP211k receivers. It applies to the ViP612 DVR receiver only if a UHF remote control is being used 124 3. UHF Remote Antenna Move the UHF antenna away from the externally connected device and the receiver using a UHF remote antenna extension cable Use a coaxial jumper cable to relocate the antenna o RG-6 or RG-59 cable o This jumper should be four to six feet in length o Use a barrel connector to attach the UHF antenna to the jumper You may need to try several locations for the UHF remote antenna to find one that works best in your installation o Route the cable and place the antenna in such a way that it is aesthetically pleasing to the customer o Remember when relocating the UHF antenna to be careful not to damage the customer's furnishings 4. USB Port If an external device is connected to the USB port on the receiver's rear panel, try pluggin the device into the front panel USB port instead Make sure the IR sensor on the front of the receiver is not blocked 5. Customer Education Educate the customer on the actions you have taken to improve their remote control's operation Inform the customer that the interference could re-occur if the rearrange the devices 6. If none of these actions corrects the problem, refer to your manager 125 MoCA Systems Software Download Recovery Procedure In the event that a Hopper installation has trouble downloading software at either the Hopper or Joey location, a few steps should be taken to recover the receiver before reauthorizing the unit. By performing the steps outlined below, technicians can help reduce the 70% No Problem Found (NPF) rate on Joeys and the 50% NPF rate on Hoppers. Initial Steps The first step in troubleshooting software download issues is to perform a complete end-to-end check of both the signal path and the MoCA path. A quick end-to-end check will allow technicians to verify the signal path and the MoCA path are both up to DNS standards and do not include unapproved cable runs and/or unnecessary/unapproved hardware. This step is crucial when working in prewired homes as well as when working with prewired Joey locations where unapproved parts and damaged cable/components can be overlooked or difficult to find. Each component in the MoCA system (e.g., Hopper, Joey, HIC, etc.) must be able to communicate with one another in order to ensure a stable communication pathway (i.e., devices must “see” each other so they do not utilize overlapping frequency ranges for communication). If technicians are confident that the signal path and MoCA path are both up to DNS standards, move to the recovery steps listed below. Joey Download Recovery Reports from the field indicate that Joeys occasionally “freeze” during the software download — typically when the download is roughly 48% complete. In the event that technicians encounter this difficulty, the following steps can be utilized to attempt to recover the Joey and re-execute the software download. Solution Steps 1. Power off the Joey a. This should be accomplished by tapping the Power button, but in the event it does not: i. Unplug the Joey for five seconds and then plug it back into the power supply ii. When the wizard appears, tap the Power button b. When a receiver is powered off, it will do only one of three things: i. Download a software update ii. Execute an event timer iii. Send status (provided it is connected to a phone or broadband connection) 126 The “Help Tips” screen should show briefly, and it should then transition to the “Software Update” screen for three minutes. 2. Complete the Joey setup a. If the wizard appears, complete the indicated steps b. If the wizard does not appear, manually set the resolution and program the remote 3. Program the remote to the Joey 4. If by this point the programming did not happen: a. Press the SYS INFO button on the Joey b. Press the SAT button on the remote Hopper Download Recovery In the rare event an installation has both satellites 119 and 61.5 on the same switch matrix, the software download may “freeze” on the Hopper with Sling during initial installation as a result of factory software that predates S060. Showroom locations and installation offices are most likely to encounter this problem, but it also occurs on rare installations that require the satellites point at both Eastern Arc (EA) and Western Arc (WA) when installing a Hopper with Sling. If a download was attempted on the Hopper with Sling while both 119 and 61.5 were connected but it ultimately failed, take the following actions: 1. Disconnect the Hopper with Sling from power 2. Disconnect either the 119 or 61.5 satellite feed from the DPP switch or integrated LNBF input 3. Power on the Hopper with Sling and run a check switch test 4. After the check switch test, the disconnected satellite will disappear from the switch matrix and the software will download normally 5. After the download is complete, reconnect either the 119 or 61.5 feed and run a check switch test 6. Proceed with the installation as usual Actions When technicians perform a new Hopper with Sling installation, if the 119 and 61.5 configurations are on the same switch matrix, they should follow the above-listed steps. 127 128 Standardized Customer Education All sections of Customer Education MUST be completed in the order below on every install! 1. Hand Customer Remote ••Show “Getting Started with Dish” guide (GSG) and reference throughout education 2. Remote Layout ••Explain remote key 1 or 2 on bottom of remote ••Point out remote sticker on back of remote ••Explain tip about SAT mode 3. Turning your TV On and Off ••Have customer: turn TV On and Off ••Explain screensaver that appears (receiver is off but TV still on) ••Have customer: turn TV back On 4. Turning your Receiver On and Off ••Have customer: оо Turn the receiver On and Off оо Turn receiver back on 5. Staying on the Correct TV Input or Channel ••Explain the importance of being on the correct input or channel ••Show the correct input or channel on the GSG and show remote sticker оо Show what the incorrect input or channel looks like 6. Fixing a Black, Blue, or Snowy Screen ••Have customer: ••Get back onto correct input or channel ••Press SAT mode button to ensure the TV is in SAT mode 7. Changing Channels ••Explain the 3 ways to change channels ••Have customer: оо Press 110 (Food Network) on the keypad оо Press CHANNEL UP until on 112 (HGTV) оо Press CHANNEL DOWN until on 110 (Food Network) оо Press GUIDE button and use the CHANNEL UP button to get to 120 (History Channel) оо Press GUIDE button and use PAGE DOWN button to get to 110 (Food Network) оо Explain how PAGE UP and PAGE DOWN buttons work 8. Selecting a Favorites List to Display on Your Program Guide ••Explain Favorites Lists ••Explain 3 pre-programmed Favorites Lists ••Have customer: оо Press GUIDE button to display Favorites List Options screen оо Select All Sub favorites list оо Select All Chan favorites list 9. Exiting On-Screen Menus ••Explain VIEW LIVE TV button ••Explain Cancel button ••Have customer: оо Exit a MENU screen using the VIEW LIVE TV button оо Exit a MENU screen using the Cancel button 129 Additional Tips ••Ask customer if they are interested in Parental Controls or losed captioning ••If so, program settings for them and point out in GSG where steps are located If customer does not have a DVR, skip to Troubleshooting 1. Using your DVR while Watching Live TV ••Explain what a DVR is and show “Getting Started with your DVR” guide ••Have customer: оо Press PAUSE to pause live TV оо Press PLAY to resume watching TV оо Press SKIP BACK to jump back 10 seconds оо Press SKIP FWD to jump ahead 30 seconds оо Press VIEW LIVE TV to get back to live TV 2. Recording a TV Program ••Explain that you can record a program now or in the future ••Explain the record frequency (all episodes, new episodes, once) ••Have customer: оо Press RECORD to record program that is currently on оо Press STOP to stop recording program оо Use GUIDE to record a program in the future (create a scheduled timer) оо Choose recording frequency 3. Watching a Recording ••Have customer: ••Access my recordings by pressing the DVR button ••View program that was just recorded 4. Deleting a Recorded Program ••Have customer: ••Access my recordings by pressing the DVR button ••Delete program that was just recorded 5. Deleting a Scheduled Timer (Future Recording) ••Have customer: оо Access My Recordings by pressing the DVR button оо Select schedule, then select timers оо Delete scheduled timer that was just created 6. Troubleshooting ••Explain that 75% of all calls received for technical issues are solved with the 5 troubleshooting steps: ••Have customer: оо Press the SAT mode button (Step 1) оо Get the TV back on the correct input or channel (Step 2) оо Change the Favorites List from one to another (Step 3) оо Explain that removing objects obstructing the signal to the dish (only when safe) or waiting for a storm to pass could solve the issue (Step 4) оо Explain that resetting the receiver by unplugging it from the wall for 10 seconds could solve the issue (Step 5) 7. Ask customer if they have any questions 8. Staying on the Correct TV Input or Channel on TV2 (or other TVs) ••Take customer to TV2 and show the correct Input or Channel on the GSG ••Show remote sticker and point out that TV2 is on a different Input or Channel than TV1 ••Show what the incorrect Input or Channel looks like ••Have customer: get TV2 back to the correct Inpu 130 ViaSat: SB1 Installation Dish Preparation Dish Assembly • Go back to the vehicle • Set up a work area at the back of the vehicle • Gather and arrange equipment Antenna back bracket Skew plate Elevation bracket Reflector Sub‐reflector Boom arms (x2) Footplate and mast TRIA • Construct the Az/El Assembly by fastening the skew plate to the front of the elevation bracket, through the antenna back bracket Use the 5/16” carriage bolts, washers, spring washers, and hex nuts Align the A‐arrow on the skew plate to the top of the Az/El Assembly Set the Skew to 90 • Slide the sub‐reflector feet over the ends of the boom arms that do not have notches Insert a 1/4" serrated flange nut into the encapsulation cut out on the top of each sub‐reflector foot Ensure the flange nut is between the boom arm and the top of the sub‐reflector foot For each foot, place a 1/4" washer and spring washer onto a 1/4" hex head tap bolt Insert the bolt through the bottom of the sub‐reflector foot into the flange nut and tighten • Attach the boom arms to the Az/El Assembly by sliding the notched ends of the boom arms into assembly From the bottom of the Az/El Assembly, insert one 1/4" hex head tap bolt into each of the four screw holes and tighten Do not damage/crush the boom arms by over‐tightening the screws • Attach the TRIA to the boom arms Insert the four long Phillips head bolts into the holes in the boom arms and then through the Transceiver Spacers Align the bolts with the mounting holes on the top of the TRIA and tighten Ensure Feed Horn is facing the sub‐reflector Do not damage/crush the boom arms by over‐tightening the screws 131 • Attach the reflector to the Az/El Assembly Use the 1/4" carriage bolts and serrated flange nuts • Attach a dual ground lug to the footplate of the mast Pre‐Pointing Adjustments • Loosen the three bolts on the bottom of the Az/El Assembly • Align the Fine Azimuth Fine Adjust cam with the notch on the assembly • Tighten the three bolts on the bottom of the Az/El Assembly • Set the Elevation (reference the work order) • Cabling Preparation • Cut and prep the solid‐copper dual messenger RG‐6 cable Based on the measured estimate between the dish and the ground block Separate enough messenger wire to reach the dual ground lug on the • footplate • Connect the Transmit cable to the TX port on the TRIA Torque the connection to 30‐inch pounds • Attach messenger wire to the dual ground lug on the footplate • Prep both ends of the solid‐copper dual/single messenger RG‐6 jumper When possible, re‐use a previous jumper • Cut the estimated length of ground wire • Transport Materials • Load your tool belt with mounting supplies • Gather the solid‐copper dual messenger RG‐6 cable, dish assembly, ground wire, solid‐ copper dual/single • messenger RG‐6 jumper, mast, and solid‐copper dual messenger RG‐6 box • Bring all materials to the mount site • If a ladder is needed, make a second trip to the vehicle Dish Installation Dish Mount and Dish Assembly • Follow all mounting steps for the chosen mount Install the mast higher than 4 feet from the ground The bottom of the reflector must be a minimum of 5 feet from the ground • Install the required struts The struts should form a triangle with the footplate on the mounting surface The majority of the assembly’s weight should be positioned over the mast and not over the struts • Attach the dish assembly to the dish mount • Grounding and Cabling • Fasten the solid‐copper dual messenger RG‐6 cable along the proposed path from the mount to the ground • block location Ensure the Transmit cable is connected to the TX port on the TRIA Do not connect the Receive cable to the RX port on the TRIA • Install a ground block 132 • • • • • • • • • • • • • • Connect the cable and messenger wire to the ground block Connect the ground wire to the ground block Install the grounding component Run the ground wire to the grounding component and connect Run new solid‐copper dual messenger RG‐6 cable from the ground block to the penetration location Remove the messenger wire from the cable between the ground block and the penetration location Drill the penetration Flat cable can be used where wall penetrations are impractical or not allowed Equivalent to 10 feet of RG‐6 cable in impedance and dBm loss Feed the cable through the bushing and then apply silicone Interior Cabling Install a cut‐in box and a dual‐wall plate Run interior cable to the modem Remove the messenger wire from all interior cabling Unplug the modem from AC power Connect the solid‐copper dual messenger RG‐6 cable to the modem Receive cable to the RX port on modem Transmit cable to the TX port on modem Plug the modem into AC power Wait for the LAN LED to start flashing before continuing Point and Peak Super Buddy Satellite Meter (SBSM) Setup • Push the SYST soft‐key • Arrow up and select the appropriate region of the installation • Select Other Providers from the Select Service menu • Select Wild Blue from the Select System menu • Choose the correct satellite from the Select LNB menu (reference the work order) Anik F2 Wild Blue 1 (WB1) AMC‐15 • Ensure SWITCH TYPE is set to none • Select DONE • Push the ZIP soft‐key • Enter the Zip Code of the installation • Select the EXIT soft‐key • Point Elevation and Skew • Slightly loosen the elevation bolts in the arched slots • Loosen the top nut on the elevation rod • Set the inclinometer on top of the boom arm • Adjust the bottom nut on the elevation rod until the inclinometer reading matches the boom arm angle 133 • (reference the work order) Hand tighten the nuts on the elevation rod • Set the Skew (reference the work order) Point and Peak Azimuth and Elevation • Connect a solid‐copper dual/single messenger RG‐6 jumper between the SBSM and the RX port on the TRIA • Coarse‐point the antenna to the highest signal level for both azimuth and elevation Tighten the three collar nuts on the mast (top to bottom) • Fine‐point the antenna to the highest signal level for azimuth Loosen the three bolts on the bottom of the Az/El Assembly Use the Fine Azimuth Fine Adjust cam on the bottom of the Az/El • Assembly • Only rotate the cam clockwise (tightening motion), NEVER • counter‐clockwise Tighten the three bolts on the bottom of the Az/El Assembly • Fine‐point the antenna to the highest signal level for elevation Slightly loosen the elevation bolts in the arched slots Loosen the top nut on the elevation rod Adjust the bottom nut on the elevation rod Tighten all hardware on the Az/El Assembly • Push/Pull Test • From behind the Az/El Assembly, gently push and pull the top, bottom, left side, and right side of the reflector The signal level should drop every time pressure is applied and return when pressure is released If the signal level rises, re‐peak the dish If the signal level does not return when pressure is released, re‐point and re‐ peak the dish • Remove the solid‐copper dual/single messenger RG‐6 jumper and SBSM from the system • Connect the Receive cable to the RX port on the TRIA Modem Swaps Cabling and Modem Lock • Shut down (power off) the computer that is connected to the existing modem • Unplug the existing modem power supply from the power source • Disconnect the Transmit cable from the TX port on the existing modem • Disconnect the Receive cable from the RX port on the existing modem • Connect the Transmit cable to the TX port on the replacement modem • Connect the Receive cable to the RX port on the replacement modem • Unplug the Ethernet cable from the existing modem Do NOT connect the Ethernet cable to the replacement modem at this time • Plug in the replacement modem power supply to the power source • The replacement modem will boot up and obtain Modem Lock 134 The PWR light will come on and remain solid The RX light will start blinking Modem Lock occurs when the RX light remains solid Provisioning Replacement Modems (From the customer’s computer) • Connect the Ethernet cable to the replacement modem • Restart (power on) the computer that is connected to the replacement modem • Open a new Web browser The Provisioning Portal should automatically load If it does not, navigate to activate.wildblue.com • On the Service Activation Welcome page, click the Click here to Continue button • On the 1. Login page: Enter the account’s primary e‐mail address in the User ID field (customer provided) • If the customer cannot provide this, contact Broadband Help Desk Enter the e‐mail account password in the Password field (customer provided) • If the customer cannot provide this, contact Broadband Support Leave the Installer ID field blank Click the Submit button • On the 2b. Swap Modem page, click the Replace button • When the 3 of 3. Reset Modem page displays, the modem will automatically reboot • After the modem reboots, it will obtain Modem Lock • Restart the computer once the modem obtains Modem Lock • After the computer restart, the Web browser should open the default home page 135 ViaSat: SB2 Installation Preparation • Perform all pre‐arrival and arrival tasks described in the IJA • Gather materials SB2 modem Wireless router (temporarily provided by the technician) Mobile device Receptacle tester • Perform the customer confirmation tasks described in the IJA Confirm dishNET package Indoor Site Survey • • • • • • • • Identify the modem location Test outlet with receptacle tester May require the customer to shut down the computer Restart the computer after the receptacle test Plug the modem and router into AC power Identify potential cable routes and a penetration location This provides time for the modem and router to boot up Connect the wireless router to the modem Using the mobile device: Turn on Wi‐Fi detection Connect to the wireless network May require turning off mobile data (3G/4G) Using a Web browser, verify access to the Modem Browser Interface (192.168.100.1/install) Exterior Site Survey • • • • • • • • • Determine grounding option(s) Determine Line of Sight Determine mount location Determine mount type Direct to Wall Direct to Brick Direct to Overhang Non‐Pen If it’s a temporary mount solution, it can be installed at ground level Use the same ballast requirements as with 500+/1000+ dishes (9 cap blocks) Pole Requires the use of the Pole Adapter Direct to Roof (requires management approval) Determine cable route 136 • • Must be fewer than 150 ft. Must exceed 25 ft. Measure/estimate the solid‐copper single messenger RG‐6 coaxial cable needed Measure/estimate the ground wire needed (from the ground block to the ground source) Must be fewer than 20 ft. Pre‐Install Customer Walk Through Inside • Inform the customer of the modem’s placement with proper ventilation, cable route, and penetration Outside • Inform the customer of the mount location, cable route, and penetration • Gain approval and estimate job duration Dish Preparation Dish Assembly • Return to the vehicle • Set up a work area at the back of the vehicle • Gather and arrange equipment Antenna back bracket Skew plate Elevation bracket Reflector Boom arms (x2) Footplate and mast TRIA and TRIA bracket • Construct the Az/El Assembly by fastening the skew plate to the front • of the elevation bracket, through the antenna back bracket Use the short carriage bolts, washers, spring washers, and hex nuts Align the A‐arrow on the skew plate to the top of the Az/El Assembly Set the Skew to 90 • Attach the reflector to the Az/El Assembly Use the short carriage bolts and serrated flange nuts • Attach the boom arms to the Az/El Assembly Use the short bolts and washers • Attach the TRIA bracket to the boom arms Use the long carriage bolts, washers, spring washers, and hex nuts • Attach the TRIA to the TRIA bracket Use the small bolts and small spring washers • Attach a dual ground lug to the footplate of the mast Scrape the paint if necessary Pre‐Pointing Adjustments • Loosen the three bolts on the bottom of the Az/El Assembly Do not loosen the two bolts on the back of the Az/El Assembly, they support 137 • the fine Azimuth adjustment mechanism • Turn the Fine Azimuth adjustment nut until the front • right bolt is centered in the slot • Tighten the three bolts on the bottom of the Az/El Assembly • Set the Elevation (reference the work order) • Cabling Preparation • Cut and prep the solid‐copper single messenger RG‐6 cable Based on the measured estimate between the dish and the ground block Ensure there’s enough length for the 6‐inch service loop at the Az/El Assembly Separate enough messenger wire to reach the dual ground lug on the footplate • Connect the cable to the TX port on the TRIA Torque the connection to 30‐inch pounds Place a 75‐ohm terminator on the RX port on the TRIA Fasten the solid‐copper single messenger RG‐6 cable to a boom arm (Zip ties) • Attach messenger wire to the dual ground lug on the footplate • Cut the estimated length of ground wire • Transport Materials • Load your tool belt with mounting supplies • Gather the solid‐copper single messenger RG‐6 cable, dish assembly, ground wire, mast, and solid‐copper single • messenger RG‐6 box • Bring all materials to the mount site • If a ladder is needed, make a second trip to the vehicle Dish Installation Dish Mount and Dish Assembly • Follow all mounting steps for the chosen mount Install the mast greater than 4 feet above the ground The bottom of the reflector must be a minimum of 5 feet above the ground • Install the required struts The struts should form a triangle with the footplate on the mounting surface The majority of the assembly’s weight should be positioned over the mast — not over the struts • Attach the dish assembly to the dish mount Ensure the Azimuth is not pointed near the orbital location Grounding and Cabling • Fasten the solid‐copper single messenger RG‐6 cable along the proposed path from the mount to the ground • block location Create a 6‐inch service loop at the Az/El Assembly • Install a ground block • Connect the cable and messenger wire to the ground block • Connect the ground wire to the ground block 138 • • • • • • • • • • • • Install the grounding component Run the ground wire to the grounding component and connect Run new solid‐copper single messenger RG‐6 cable from the ground block to the penetration location Remove the messenger wire from the cable between the ground block and the penetration location Drill the penetration Flat cable can be used where wall penetrations are impractical or not allowed Equivalent to 10 feet of RG‐6 cable in impedance and dBm loss Feed the cable through the bushing and then apply silicone Interior Cabling Install a cut‐in box and a single‐wall plate Run interior cable to the modem Remove the messenger wire from all interior cabling Unplug the modem from AC power Connect the solid‐copper single messenger RG‐6 cable to the modem Plug the modem into AC power Wait for the LAN LED to start flashing before continuing Point and Peak Modem Browser Interface (done from the mobile device within range of the wireless network) • Using a Web browser, navigate to 192.168.100.1/install • On the Installation Configuration screen, enter the 16‐digit Modem Key (reference the work order) • Tap the large forward arrow in the lower‐right corner of the screen Do NOT press Enter, as this makes the modem exit the Installation mode • The Installation Configuration screen changes The RX and LAN LEDs on the modem should be flashing The TRIA should be emitting the “heartbeat” tone • Point Elevation and Skew • Slightly loosen the elevation bolts in the arched slots • Loosen the top nut on the elevation rod • Place the inclinometer bracket over the boom arms • Set the inclinometer on top of the inclinometer bracket • Adjust the bottom nut on the elevation rod until the inclinometer reading matches the boom arm angle • (reference the work order) The boom arm angle can be determined by subtracting 19.4 from the elevation • Set the Skew (reference the work order) Point Azimuth • Ensure the dish is NOT pointed at the orbital location (TRIA is emitting the “heartbeat” tone) • Sweep the dish toward the orbital location until the TRIA emits the “ring‐ring” tone The “ring‐ring” tone will be immediately followed by a single beep 139 • • • • • • • • • • • • • • • • • • • • • • This single beep indicates the correct satellite was found The single beep will be immediately followed by the “low/slow” tone Continue to sweep in the same direction until the TRIA emits the “heartbeat” tone The following pattern of tones indicates the dish is being swept through the satellite signal: Low/slow High/fast (only heard if the sweep is done slowly) High/steady High/fast (only heard if the sweep is done slowly) Low/slow Heartbeat This completes the first sweep (of the three required) to lock the modem into the beam Sweeping in the opposite direction, the following pattern of tones indicates the second sweep (of the three required) is complete Ring‐ring (followed by a single beep) Low/slow High/fast (only heard if the sweep is done slowly) High/steady High/fast (only heard if the sweep is done slowly) Low/slow Heartbeat Reverse the sweep until the TRIA continually emits the “high/steady” tone This completes the third required sweep Tighten the three collar nuts on the mast (top to bottom) If the “high/steady” tone is lost, adjust the bottom nut on the elevation rod to regain the “high/steady” tone Peak Azimuth Loosen the three bolts on the bottom of the Az/El Assembly Do not loosen the two bolts on the back of the Az/El Assembly, they support the fine Azimuth adjustment mechanism Using the Fine Azimuth adjustment nut, sweep the dish in one direction until the TRIA emits the “low/slow” tone The tone will cycle from “high/steady” to “high/fast” to “low/slow” Using the Fine Azimuth adjustment nut, sweep the dish in the opposite direction until the TRIA emits the “low/slow” tone The tone will cycle from “low/slow” to “high/fast” to “high/steady” to “high/fast” to “low/slow” Using the Fine Azimuth adjustment nut, reverse the sweep until the TRIA continually emits the “high/steady” tone The tone will cycle from “low/slow” to “high/fast” to “high/steady” 140 • Tighten the three bolts on the bottom of the Az/El Assembly If the “high/steady” tone is lost, re‐peak the Azimuth Peak Elevation • Using the bottom nut on the elevation rod, sweep the dish in one direction until the TRIA emits the “low/slow” • tone The tone will cycle from “high/steady” to “high/fast” to “low/slow” • Using the bottom nut on the elevation rod, sweep the dish in the opposite direction until the TRIA emits the • “low/slow” tone The tone will cycle from “low/slow” to “high/fast” to “high/steady” to “high/fast” to “low/slow” • Using the bottom nut on the elevation rod, reverse the sweep until the TRIA continually • emits the ‘high/steady’ tone The tone will cycle from “low/slow” to “high/fast” to “high/steady” • Tighten all hardware on the Az/El Assembly If the “high/steady” tone is lost, re‐peak the Elevation • Push/Pull Test • From behind the Az/El Assembly, gently push and pull the top, bottom, left side, and right side of the reflector The “high/steady” tone should drop every time pressure is applied and return when pressure is released If the tone rises, re‐peak the dish If the “high/steady” tone does not return when pressure is released, re‐point and re‐peak the dish • Modem Lock – (done near the modem location) • In the MBI, confirm that a green checkmark appears in the last box If no, return to the antenna and do the Push/Pull Test • Click the large forward arrow in the lower‐right corner of the screen • Watch the modem LEDs Modem Lock occurs when all four LEDs are solid This is a momentary display of the LEDs and is easy to miss • Point‐and‐Peak Reset (if necessary) • If you need to restart the point‐and‐peak process: Block the TRIA for 20 seconds • Hold the inclinometer bracket against the Feed Horn to do this Ensure dish is NOT pointed at the orbital location Provisioning (from the mobile device) • • • • • Restart the SB2 modem Open a new Web browser The Provisioning Portal should load automatically If it does not, navigate to 192.168.100.1/install Enter the Customer Code and tap Continue (reference the work order) 141 • • • • • • • • • • • • • • • • On the Customer Confirmation screen, enter your Installer ID and tap Confirm The Quality Of Install (QOI) page displays The QOI test can take up to one minute to complete When the QOI test completes: If QOI passes, tap Next If QOI fails, fix anything indicated and run QOI again by tapping Run QOI If QOI is unavailable, advance provisioning by tapping Continue The Service Activated page displays The modem will reboot automatically Verify that the modem resumes normal operation Navigate to the www.mydish.com landing page Check the SVT tab of the Support Portal to ensure a quality installation Show the customer the www.mydish.com landing page using your mobile device to demonstrate Internet connectivity Disconnect the wireless router Connect the SB2 modem directly to the customer’s computer Explain the completed work to the customer Allow the customer to access the Internet briefly from their computer Refer the customer to their PC support if their computer does not access the Internet Since you verified Internet access from your mobile device, if the customer’s computer will not connect, the issue is with the computer and not the modem Return materials to the vehicle Get the vacuum Finalize Appointment • • • • • Clean up any mess using the vacuum Enter work notes and/or paperwork Have the customer sign the agreement(s) Thank the customer Ensure you have all your tools and equipment: Vacuum Wireless router • Return to the vehicle • Update the appointment status to Complete • Depart 142 Jupiter Installation Job Aid Preparation • • • Perform all pre‐arrival and arrival tasks described in the IJA Gather materials Jupiter modem Wireless router (temporarily provided by technician) Mobile device Receptacle tester Perform the customer confirmation tasks described in the IJA Confirm dishNET package Indoor Site Survey • • • • • • • • Identify the modem location Test outlet with receptacle tester May require the customer to shut down the computer Restart the computer after receptacle test Plug the modem and router into AC power Identify potential cable routes and penetration location Provides time for the modem and router to boot up Connect wireless router to the modem Using the mobile device Turn on Wi‐Fi detection Connect to the wireless network May require turning off mobile data (3G/4G) Using a Web browser, verify access to Hughes System Control Center (192.168.0.1) Exterior Site Survey • • • • • • Determine grounding option(s) Determine line of sight Determine mount location Determine mount type Direct to Wall Direct to Brick Direct to Overhang Non‐Pen If temporary mount solution, can be installed at ground level Same ballast requirements as 500+/1000+ dishes (9 cap blocks) 143 • • • • • • Pole Requires the use of the Pole Adapter Direct to Roof – Requires management approval Use the GPS app on your mobile device to get Lat/Long coordinates at the mount location Note these coordinates (used later in HSCC) Determine cable route Measure/estimate the solid copper single messenger RG‐6 coaxial cable needed This is the permanent cable path from the TRIA to the ground block Measure/estimate solid copper single messenger RG‐6 jumper needed This is the shortest distance between the TRIA and the ground block Measure/estimate the ground wire needed (from ground block to ground source) Must be fewer than 20 ft. Pre‐Install Customer Walk Through Inside • Inform the customer of modem placement with proper ventilation, cable route, and penetration Outside • Inform the customer of mount location, cable route, and penetration • Gain approval and estimate job length Dish Preparation Hughes System Control Center (HSCC) – (done from the mobile device within range of the wireless network) • Using a Web browser, navigate to 192.168.0.1 • Click on the “i” icon in the upper right of the screen • Expand Installation and then click Install • Enter the Lat/Long coordinates obtained at the mount location • Select EchoStar‐XVII from the Satellite drop‐down menu and click Submit • Note the Azimuth, Elevation, Tilt Angle (skew), and polarization settings If a negative Tilt Angle is listed, subtract it from 90 and use the resulting number for the skew setting • Example: Tilt Angle: ‐12 • 90 ‐ 12 = 78 (set skew to 78) If a positive Tilt Angle is listed, add it to 90 and use the resulting number for the skew setting • Example: Tilt Angle: 12 • 90 + 12 = 102 (set skew to 102) Dish Assembly • Go back to the vehicle • Set up a work area at the back of the vehicle • Gather and arrange equipment 144 • • • • • • • • • • • • • • • • • • • • Az/El Assembly DishNET reflector Boom arm TRIA and TRIA bracket Adjust azimuth, elevation, and skew on Az/El Assembly Attach Az/El Assembly to reflector Attach boom arm to Az/El Assembly Ensure either the signal absorption tape OR V‐channel is facing up TRIA Assembly Secure the Feed Horn to the LNB Set the polarity by aligning the R or L engravings with the arrow engravings Ensure the O‐ring is properly seated Cut the solid copper single messenger RG‐6 cable Based on the measured estimate between the dish and the ground block Prep one end of the solid copper single messenger RG‐6 cable Separate enough messenger wire to reach the ground screw Feed the solid copper single RG‐6 cable through the boom arm Attach the TRIA bracket to the boom arm Attach the TRIA to the TRIA bracket Connect the cable to the TRIA Torque the connection to 30‐inch pounds Attach messenger wire to the ground screw on the Az/El Assembly Prep both ends of the solid copper single messenger RG‐6 jumper (based on the measured estimate) When possible, re‐use a previous jumper Cut the estimated length of ground wire Transport Materials Load your tool belt with mounting supplies Gather the DAPT 2, solid copper single messenger RG‐6 jumper, dish assembly, ground wire, mast, and solid copper single messenger RG‐6 box Bring all materials to the mount site If a ladder is needed, make a second trip to the vehicle Dish Installation Dish Mount and Dish Assembly • Follow all mounting steps for the chosen mount Install the mast higher than 4 feet from the ground The bottom of the reflector must be a minimum of 5 feet from the ground • Install the required struts The struts should form a triangle with the footplate on the mounting surface The majority of the assembly’s weight should be positioned over the mast and not over the struts 145 • Attach the dish assembly to the dish mount Cabling • Place the solid copper single messenger RG‐6 cable along the proposed path from the mount to the ground • block location Do not fasten the cable to the home at this time Length CANNOT exceed 150 feet Length MUST exceed 25 feet • Prep the other end of the solid copper single messenger RG‐6 cable If necessary, cut to the appropriate length • Install a ground block DAPT 2 Setup • Attach the solid copper single messenger RG‐6 cable from the TRIA to the LNB port on the DAPT 2 • Attach the jumper between the IDU port on the DAPT 2 and the ground block • Grounding and Cabling • Connect the ground wire to the ground block • • • Install the grounding component Run the ground wire to the grounding component and connect Run the new solid copper single messenger RG‐6 cable from the ground block to the penetration location Remove the messenger wire from the cable between the ground block and the penetration location • Drill penetration Flat cable can be used where wall penetrations are impractical or not allowed • Equivalent to 10 feet of RG‐6 cable in impedance and dBm loss • Feed cable through bushing and apply silicone Interior Cabling • Install a cut‐in box and a single‐wall plate • Run interior cables to the modem 146 Remove the messenger wire from all interior cabling • Unplug the modem from AC power • Connect the solid copper single messenger RG‐6 cable to the modem • Jumper • Plug the modem into AC power Pointing and Peaking • Go outside to the DAPT 2 location • Ensure HSCC displays the Pointing screen – (from the mobile device) • Verify the DAPT 2 is correctly inline on the cable • Take the DAPT 2 to the mount location Be cautious of unfastened cables Do not damage unfastened cables • DAPT 2 displays voltage (48 VDC), press Advance (3) • DAPT 2 displays software version, COMM Startup, Logging VoltMeas, • followed by Logging Done, press Advance (3) • Coarse‐point the antenna to the highest SQF for both azimuth and elevation The number on the left is the highest SQF achieved The number on the right is the current SQF being received If the current SQF reading won’t settle on a value, use the Toggle button (2) • to smooth out the atmospheric effects on SQF • Fine‐point the antenna to the highest SQF for both azimuth and elevation Tighten the coarse pointing bolts Use the fine adjustment azimuth and elevation bolts and nuts to peak the dish • Lock down all azimuth and elevation bolts and nuts • Press Advance (3) to display STORE Results • Press Advance (3) to display StoreYes Adv=Yes • Press Advance (3) to display Pointing Exit • Press Toggle (2) to exit pointing • From the HSCC, click Next Wait for Ranging, Registration, Associating with Network, and Configuration to complete “Onsite Validation Tool” and “Terminal Activation” links will appear • Finalize Cable Route • While waiting, fasten the permanent cable between the dish and ground block to the home • Leave the DAPT 2 and the jumper installed Provisioning (from mobile device) • • • • • • Click the “Terminal Activation” link Enter the SAN and PIN (reference the work order) Click Continue Click Confirm Wait for the “Terminal Activation Successful” screen to display Open a new Web browser and navigate to the HSCC (192.168.0.1) 147 • • • • • Click the “Service_Activation” link on the left side of the screen Wait for the “Your satellite internet service has been activated” message to appear Open a new Web browser and navigate to the www.mydish.com landing page Return materials to the vehicle Get the vacuum Finalize Appointment • • • • Go to the modem location Unplug the modem from AC power Clean up any mess using the vacuum Go to the ground block location Remove the DAPT 2 and jumper cable from the system Connect the solid copper single messenger RG‐6 cable to the ground block Connect the messenger wire to the ground block Torque the connections to 30‐inch pounds • Go to the modem location • Plug the modem into AC power • Enter work notes and/or paperwork • Show the customer the www.mydish.com landing page using your mobile device • to demonstrate Internet connectivity • Disconnect the wireless router • Connect the Jupiter modem directly to the customer’s computer • Explain the work completed to the customer • Allow the customer to access the Internet briefly from their computer Refer the customer to their PC support if their computer does not access the Internet Since you verified Internet access from the mobile device, if the customer’s computer • will not connect, the issue is with the computer and not the modem • Have the customer sign agreement(s) • Thank the customer • Ensure you have all your tools and equipment: Vacuum Wireless router DAPT 2 Jumper • Go back to the vehicle • Update the appointment status to Complete • Depart 148 dishNET: Installation Tips Overview Since the launch of dishNET on 10/01/12, we have identified several installation tips from technician feedback and analysis when completing dishNET installations. • dishNET ETAdirect Procedures for All Services • Latitude & Longitude Coordinates for Hughes • Calculating Elevation and Skew for All Services • TRIA Polarity for Hughes • Pointing and Peaking ViaSat SurfBeam 2 • Key Areas of Focus for All Services • Two‐Step Jupiter Provisioning Process Why It’s Important Some issues have been identified that have negatively impacted dishNET completions, customer experience, and work order completions. We are sharing various pitfalls to avoid and installation tips that assist in addressing these issues. Installation Tips dishNET ETAdirect Procedures for All Services Issue: Closing a work order in CSG is not the same as completing an appointment in ETAdirect. CSG requires accurate dishNET equipment information from ETAdirect to properly close work orders. ETAdirect allows the completion of appointments even if the dishNET equipment was added incorrectly. Impact: Multiple dishNET work orders are failing to close in CSG. This means: The work order will remain open and will not be credited as a completed job Technician and office PPH and completion rates will be negatively impacted Billing will not be correct, resulting in service interruptions and unnecessary truck rolls Procedure: If you receive the following message while activating equipment in ETAdirect: 149 Tap Cancel and verify: • Equipment and services match Correct: ViaSat equipment on ViaSat installations o Incorrect: ViaSat equipment on Hughes installations or vise‐versa o Correct serial numbers were entered Do NOT use DISH serial numbers for Hughes or ViaSat installations o Serial numbers were entered correctly Serial numbers were entered correctly o Using the letter “O” instead of zeros or vise‐versa Serial numbers on Hughes modems may contain both zeros and the letter “O” Serial numbers on all other dishNET equipment can contain zeros, but not the letter “O” • Quantity is always set to one (1) Remember, there are three different processes to correctly add equipment to appointments. 1. Automatic o Use this process as the primary method to add equipment to appointments 2. Manual • Use this process when the automatic process is not available or failed, for example: o The serial numbers are not listed in the Equipment tab Equipment must be added to vehicle inventory by 2:00 a.m. to show in the Equipment tab • Assigned the appointment after leaving the office and equipment delivery is required 3. DASH o Use this process when you are out of connectivity range Latitude & Longitude Coordinates for Hughes Issue: A GPS must be used to determine the exact latitude and longitude coordinates for Hughes antenna mounting locations. When the wrong GPS format is used and entered into the HSCC (Hughes System Control Center) incorrect azimuth, elevation, and skew are displayed. Impact: Using the incorrect GPS format results in increased installation time and incorrect installation parameters. 150 Procedure: • The required GPS (Lat/Long Coordinates) information for Jupiter and SpaceWay must be displayed in degrees, minutes, and fractional minutes Fractional minutes must display to three significant digits Required HSCC format: DDD:MM.MMM or N 39° 32.758' W 77° 51.353' If you mistakenly use the wrong GPS format [e.g. DDD.DDDDD or DDD:MM:SSSSSS], you will get incorrect installation parameters from the HSCC for the location you are actually installing SpaceWay HSCC Jupiter HSCC Calculating Elevation and Skew for All Services Issue: The method of calculating elevation and skew settings vary by system, and in several instances technicians are not matching the correct procedure to the system they are installing. Impact: Not setting the elevation and/or skew correctly has various consequences, including: • Not being able to locate the satellite signal • Poor signal quality This can result in the system drawing excessive bandwidth, depleting the signal strength for other customers supported by the same beam • Poor customer experience • Trouble Calls 151 Procedure: SurfBeam 2 (Universal dish assembly) o Boom arm angle can be determined by subtracting 21.2 from the elevation listed on the work order o Skew can be determine by subtracting the skew listed on the work order from 180 SurfBeam 2 (Proprietary dish assembly) o Boom arm angle can be determined by subtracting 19.4 from the elevation listed on the work order o Use the skew listed on the work order Jupiter & SpaceWay o If a negative Tilt Angle is listed in the HSCC, subtract it from 90 and use the resulting number for the skew setting If a positive Tilt Angle is listed in the HSCC, add it to 90 and use the resulting number for the skew setting • This is a clockwise rotation of the skew plate TRIA Polarity for Hughes Issue: TRIAs for both Jupiter and SpaceWay require manual adjustment to set the correct right or left hand polarity. In many cases technicians are skipping and/or forgetting this step. Impact: If the TRIA polarity is not set correctly, it will negatively affect point and peak procedures, the system SQF (Signal Quality Factor) and generate Trouble Calls. Example: Tilt Angle: –12 90 – 12 = 78 (Set skew to 78) Example: Tilt Angle: 12 90 + 12 = 102 (Set skew to 102) Procedure: • TRIA polarity on Jupiter and SpaceWay systems must be manually set at the time of installation o SurfBeam 2 does not have a manual TRIA polarity setting Pointing and Peaking ViaSat SurfBeam 2 (SB2) Issue: SurfBeam 2 systems require the use of the three‐sweep procedure to successfully program the modem and achieve signal lock. 152 Impact: It is vital to follow the directed procedures to point and peak SurfBeam 2 systems. There have been several instances where technicians didn’t follow the procedure and when shortened and/or skipped it can result in various consequences, including: Not locating the satellite False modem and TRIA programming Poor signal quality This can result in the system drawing excessive bandwidth, depleting the signal strength for other customers supported by the same beam Poor customer experience Trouble Calls Changing Jupiter TRIA Polarity Procedure: You MUST sweep SurfBeam 2 dishes three times each for Point Azimuth, Peak Azimuth, and Peak Elevation during the point and peak process o This is the ONLY way SurfBeam 2 modems learn their frequency set 1st sweep locates the correct satellite and locks modem into the beam Tones heard during 1st sweep: o Heartbeat o Ring‐ring (followed by a single beep) o Low/slow o High/fast (only heard if the sweep is done slowly) o High/steady o High/fast (only heard if the sweep is done slowly) o Low/slow o Heartbeat 2nd sweep locates the width and center of the beam 153 Tones heard during 2nd sweep: o Heartbeat o Low/slow o High/fast (only heard if the sweep is done slowly) o High/steady o High/fast (only heard if the sweep is done slowly) o Low/slow o Heartbeat 3rd and final sweep achieves signal lock Tones heard during 3rd sweep: o Heartbeat o Ring‐ring (followed by a single beep) o Low/slow o High/fast (only heard if the sweep is done slowly) o High/steady Key Areas of Focus for Pointing and Peaking for All Services SurfBeam 2 o Extremely reliant on accurate boom arm angle adjustments to effectively start pointing o SurfBeam 2 is very sensitive to fine‐elevation adjustments Jupiter and SpaceWay o Hughes systems are very sensitive to fine‐azimuth adjustments Two‐Step Jupiter Provisioning Process Issue: To provision a Jupiter modem you must complete "Terminal Activation" and then "Service Activation". A number of technicians are skipping step two (Service Activation) because they forget to open a new browser after Terminal Activation. Impact: When technicians skip step two, "Service Activation" will not be accomplished. This will prevent the customer’s modem from being tied to a DISH account, thus not granting access to the Internet service and generating Trouble Calls. Procedure: • Step 1: Click the "Terminal Activation" link Wait for the "Terminal Activation Successful" screen to display This is after entering the SAN and PIN 154 Step 2: Click the "Service Activation" link in a new browser Wait for the "Your satellite internet service has been activated" message to appear Related Information All of this information is covered in the dishNET training aids, which are located on DNS Portal: Home >> Tech Corner >> Installation >> Install >> dishNET. 155 Onsite Validation Tool (OVT) Use OVT on all HughesNet service calls and after service activation on new installations, before closing the work order. 1. From the mobility device, access OVT (https://dwayinstalls.hns.com) 2. Place a checkmark in the Mobile Dev box 3. Select “Medium (600-1000) Tablet” from the Screen Size drop-down 4. Select “DISH” from the Auth System drop-down 5. Enter your ETAdirect User Name and Password 6. Tap Log In 7. In the Quick Actions pane, tap “OnSite Validation Tool” 8. Enter the SAN and tap Launch OVT (Reference Appt Info in ETAdirect) 9. Tap Launch OVT 156 10. Select the .69 m radio button 11. Select the mount type used on the installation 12. Tap Proceed 157 13. If Diagnosis reads OK, tap Signoff (Proceed to step 14) o This indicates the installation is good 13b. If Diagnosis does not read OK, perform the Recommended Actions, and tap Complete Action o Repeat this process until Diagnosis reads 158 15. Copy the Signoff ID in the upper right of the screen It is a requirement to enter the Signoff ID into ETAdirect Do NOT close this window; if it is closed before capturing the Signoff ID in ETAdirect, repeat the process again to get the Signoff ID Completing Appointments in ETAdirect 1. From the appointment in ETAdirect, tap Site Work 159 2. Fill out site work information and tap dishNET 3. Paste the Signoff ID in the OVT Code field 4. Tap OK 160 SPACEWAY Preparation •Perform all pre‐arrival and arrival tasks described in the IJA •Gather materials o SpaceWay modem o Wireless router (temporarily provided by the technician) o Mobile device o Receptacle tester •Perform the Customer Confirmation tasks described in the IJA o Confirm dishNET package Indoor Site Survey •Identify the modem location o Test outlet with the receptacle tester require the customer to shut down the computer the computer after the receptacle test •Plug the modem and router in to AC power •Identify potential cable routes and a penetration location o Provides time for the modem and router to boot up •Connect the wireless router to the modem •Using the mobile device: o Turn on Wi‐Fi detection o Connect to the wireless network require turning off mobile data (3G/4G) o Using a Web browser, verify access to Hughes System Control Center (192.168.0.1) Exterior Site Survey •Determine grounding option(s) •Determine Line of Sight •Determine mount location •Determine mount type o Direct to Wall o Direct to Brick o Direct to Overhang o Non‐Pen temporary mount solution, can be installed at ground level the same ballast requirements as with 500+/1000+ dishes (9 cap blocks) o Pole the use of the Pole Adapter o Direct to Roof (requires management approval) 161 •Use the GPS app on your mobile device to obtain Lat/Long coordinates at the mount location o Note these coordinates (for use later in HSCC) •Determine the cable route •Measure/estimate the solid‐copper dual messenger RG‐6 coaxial cable needed o This is the permanent cable path from the TRIA to the ground block •Measure/estimate the solid‐copper dual messenger RG‐6 jumper needed o This is the shortest distance between the TRIA and the ground block •Measure/estimate the ground wire needed (from the ground block to the ground source) o Must be fewer than 20 ft. Pre‐Install Customer Walk Through Inside •Inform the customer of the modem placement with proper ventilation, cable route, and penetration Outside •Inform the customer of the mount location, cable route, and penetration •Gain customer approval and estimate job duration Dish Preparation Hughes System Control Center (HSCC) (done from the mobile device within range of the wireless network) •Using a Web browser, navigate to 192.168.0.1 •Click the wizard icon in the upper right of the screen •Enter the SAN in the Terminal Site Name field (Reference the work order) •Select 0949505 from the A code drop‐down menu •Select 0749 from the B code drop‐down menu •Select 000103 from the C code drop‐down menu •Select A from the U code drop‐down menu •Enter the Lat/Long coordinates obtained at the mount location •Click the Submit Installation Parameters button oA box may appear informing you that the modem needs to modify the GPS coordinates by . 001 o If this happens, click OK and then click Submit Installation Parameters again •Note the Azimuth, Elevation, Tilt Angle (skew), and polarization settings oIf a negative Tilt Angle is listed, subtract it from 90 and use the resulting number for the skew setting Tilt Angle: ‐12 ‐ 12 = 78 (set skew to 78) 162 oIf a positive Tilt Angle is listed, add it to 90 and use the resulting number for the skew setting Tilt Angle: 12 + 12 = 102 (set skew to 102) Dish Assembly •Return to the vehicle •Set up a work area at the back of the vehicle •Gather and arrange equipment o Az/El Assembly o DishNET reflector o Boom arm o TRIA and TRIA bracket •Adjust azimuth, elevation, and skew on the Az/El Assembly •Attach the Az/El Assembly to the reflector •Attach the boom arm to the Az/El Assembly o Ensure either the signal absorption tape OR the V‐channel is facing up TRIA Assembly •Secure the Polarizer Waveguide to the LNB using either collar o Set the polarity by aligning the R or L engravings with the COM engraving o Ensure the O‐ring is properly seated •Secure the Feed Horn to Polarizer Waveguide using the remaining collar o Ensure the O‐ring is properly seated •Cut the solid‐copper dual messenger RG‐6 cable o Based on the measured estimate between the dish and the ground block •Prep one end of the solid‐copper dual messenger RG‐6 cable o Separate enough messenger wire to reach the ground screw •Feed the solid‐copper dual RG‐6 cable through the boom arm •Attach the TRIA bracket to the boom arm •Attach the TRIA to the TRIA bracket •Connect to each port on the TRIA oUse the messenger line (previously attached to the messenger wire) on the IFL(transmit) port o Use the non‐messenger line on the receive port o Torque each connection to 30‐inch pounds o Wrap each connection with Rescue Tape •Attach messenger wire to the ground screw on the Az/El Assembly •Prep both ends of the solidcopper dual messenger RG6 jumper (based on the measured estimate) o When possible, re‐use an existing jumper o Attach the barrel connector to the non‐messenger receive line on the jumper •Cut the estimated length of ground wire 163 Transport Materials •Load your tool belt with mounting supplies •Gather the DAPT 2, Squinter, solid‐copper dual messenger RG6 jumper, dish assembly, ground wire, mast, and solid‐copper dual messenger RG‐6 box •Bring all materials to the mount site •If a ladder is needed, make a second trip to the vehicle Dish Installation Dish Mount and Dish Assembly •Follow all mounting steps for the chosen mount o Install the mast higher than 4 feet from the ground o The bottom of the reflector must be a minimum of 5 feet from the ground •Install the required struts oThe struts should form a triangle with the footplate on the mounting surface oThe majority of the assembly’s weight should be positioned over the mast — not over the struts •Attach the dish assembly to the dish mount Cabling •Place the solid‐copper dual messenger RG‐ 6 cable along the proposed path from the mount to the ground block location o Do not fasten the cable to the home at this time o Length CANNOT exceed 150 feet o Length MUST exceed 25 feet •Prep the other end of the solid‐copper dual messenger RG‐6 cable o If necessary, cut the cable to the appropriate length •Install a ground block DAPT 2 Setup •Attach the non‐messenger (receive) line to the LNB port on the DAPT 2 •Attach the messenger (transmit) line to the barrel connector on the jumper •Attach the nonmessenger (receive) line of the jumper between the IDU port on the DAPT 2 an d the ground block •Attach the messenger (transmit) line of the jumper between the barrel connector and the ground block 164 Jumper Grounding and Cabling •Connect the ground wire to the ground block •Install the grounding component •Run the ground wire to the grounding component and connect •Run the new solidcopper dual messenger RG6 cable from the ground block to the penetration location ORemove the messenger wire from the cable between the ground block and the penetration location •Drill the penetration •Feed cables through the bushing and then apply silicone Interior Cabling •Install a cut‐in box and a dual‐wall plate •Run interior cables to the modem o Remove the messenger wire from all interior cabling •Unplug the modem from AC power •Connect the messenger line to the SAT OUT (transmit) port on the modem •Connect the non‐messenger line to the SAT IN (receive) port on the modem •Plug the modem into AC power Pointing •Go outside to the DAPT 2 location •Ensure HSCC displays the Terminal Pointing Info screen – (from the mobile device) •Verify the DAPT 2 is correctly inline on the receive cable •Take the DAPT 2 to the mount location o Be cautious of unfastened cables o Do not damage unfastened cables •DAPT 2 displays voltage (approx. 11.7 VDC), press Advance (3) 165 •DAPT 2 displays software version, COMM Startup, Logging VoltMeas, followed by Logging Done, press Advance (3) •Coarse‐point the antenna to the highest SQF for both azimuth and elevation o The number on the left is the highest SQF achieved o The number on the right is the current SQF being received oIf the current SQF reading won’t settle on a value, use the Toggle button (2) to smooth out the atmospheric effects on SQF Peaking (Must be done in the order outlined below) 1.Place the Squinter on the Feed Horn in either of the two azimuth positions and wait for the S QF reading to settle on a value o Placed to block the left or right hemisphere of the Feed Horn o Note the current SQF reading 2.Rotate the Squinter 180° on the Feed Horn to the opposite azimuth position and note the SQF reading 3.Compare the two azimuth SQF readings oThe readings should be within two or three SQF points of each other oAdjust the azimuth fine‐tune cam and repeat Steps 1– 3 until the two azimuth numbers are within two or three SQF points of each other 4.Lock down all azimuth bolts 5.Place the Squinter on the Feed Horn in either of the two elevation positions and wait for the SQF reading to settle on a value o Placed to block the top or bottom hemisphere of the Feed Horn o Note the current SQF reading 6.Rotate the Squinter 180° on the Feed Horn to the opposite elevation position and note the SQF reading 7.Compare the two elevation SQF readings oThe readings should be within two or three SQF points of each other oAdjust the elevation fine tune nuts and repeat Steps 5– 7 until the two elevation numbers are within two or three SQF points of each other 8.Lock down all elevation bolts and nuts 9.Remove the Squinter and press Advance (3) oFind Sys Status 0 should appear and change to FindSys done within two minutes 10.Press Advance (3) to display Center 1 166 11.Press Advance (3) to display SQNT AZ1 12.Place the Squinter on the Feed Horn in either of the two azimuth positions and press Advance (3) o The DAPT 2 displays WAIT AZ1 and will then auto‐advance to SQNT AZ2 13.Rotate the Squinter 180° on the Feed Horn to the opposite azimuth position and press Advance (3) o The DAPT 2 displays WAIT AZ2 and will then auto‐advance to AZ Test Pass 14.Press Advance (3) to display SQNT EL1 15.Place the Squinter on the Feed Horn in either of the two elevation positions and press Advance (3) o The DAPT 2 displays WAIT EL1 and will then auto‐advance to SQNT EL2 16.Rotate the Squinter 180° on the Feed Horn to the opposite elevation position and press Advance (3) o The DAPT 2 displays WAIT EL2 and will then auto‐advance to EL Test Pass 17.Remove the Squinter and press Advance (3) to display Center 2 18.Press Advance (3) to display STORE Results 19.Press Advance (3) to display Store=Yes Adv=Yes 20.Press Advance (3) to display Point Exit 21.Press Advance (3) to indicate Yes and complete the peaking process 22.Wait for the HSCC to display state code 25 – (from the mobile device) Finalize Cable Route •While waiting for State Code 25, fasten the permanent cable between the dish and ground bl ock to the home •Leave the DAPT 2 and the jumper installed Provisioning (from the mobile device) •Open a new Web browser and navigate to 192.168.0.1 •Click the “Activate ‐ On customer’s computer” link •Enter the SAN and PIN (reference the work order) •Click Continue 167 •Click Continue again o This redirects you to the www.dish.net landing page •Return materials to the vehicle •Get the vacuum Finalize Appointment •Go to the modem location •Unplug the modem from AC power •Clean up any mess using the vacuum •Go to the ground block location o Remove the DAPT 2, barrel connector, and jumper cable from the system o Connect the solid‐copper dual messenger RG‐6 cable to the ground block o Connect the messenger wire to the ground block o Torque the connections to 30‐inch pounds •Go to the modem location •Plug the modem into AC power •Enter work notes and/or paperwork •Show the customer the www.dish.net landing page using your mobile device to demonstrate I nternet connectivity •Disconnect the wireless router •Connect the SpaceWay modem directly to the customer’s computer •Explain the completed work to the customer •Allow the customer to access the Internet briefly from their computer oRefer the customer to their PC support if their computer does not access the Internet oSince you verified Internet access from your mobile device, if the customer’s comp uter will not connect, the issue is with the computer and not the modem •Have the customer sign the agreement(s) •Thank the customer •Ensure you have all your tools and equipment: o Vacuum, wireless router, DAPT 2 o Jumper and barrel connector •Return to the vehicle •Update the appointment status to Complete and depart 168 Legacy Switches Just like an LNBF, alternates the polarity in a Legacy installation, combines and switches signal from multiple satellite locations. SW21 Switch ••Supports up to 2 orbital locations ••1 tuner output ••2 LNBFs inputs ••Can also be used to cascade a twin and dual LNBF for three orbital locations. SW64 Switch ••Supports up to 3 orbital locations ••3 even LNBF inputs ••3 odd LNBF inputs ••4 tuner outputs ••A power inserter must be connected to output to receiver port 1, labeled To Power Inserter Power Inserter ••Must be installed for SW44 and SW64 switches, by connecting the cable in the tuner output labeled 1 ••These switches need the power from the power inserter because of their large power requirements ••Only install the power inserter indoors Legacy Technology ••Legacy technology was the first generation technology used by DISH Network, but is no longer installed. ••You will come across Legacy components in the field ••You need to know how to recognize, install upgrades, and troubleshoot the customer’s issues ••It is recognized by the old DISH Network logo Legacy technology is based on transponders and polarity. ••Transponders are the part of the satellite that sends a signal to earth using a specific frequency range ••Polarity is the direction of the signal in either a left-hand circular or right-hand circular direction 169 оо Even numbers transponders use: left-hand polarity оо Odd numbered transponders use: right-hand polarity Polarity allows us to broadcast twice the number of channels in a specific frequency range. ••In Legacy installations, the switch or LNBF alternates the two polarities allowing us to reuse the same frequency ••Uses the 950-1450 frequency range and one polarity at a time, without a switch ••If only one coax cable per satellite location is used, such as with an SW21 switch, the LNBF must switch polarities ••If only one polarity is available at a time, the SW21 can support only one set top box Legacy LNBF Single LNBF ••1 orbital location ••1 output ••Directly connects to 1 solo receiver ••Usually used alone with a DISH 300 (single orbital location dish antenna) Dual LNBF ••1 orbital location ••2 outputs ••Directly connects up to 2 solo receivers or 1 duo receiver ••Can be used to see only 1 orbital location and for direct connections of up to 2 receivers ••Two dual LNBFs are used in conjunction with a multi-dish switch to view multiple orbital locations Twin LNBF ••2 orbital locations, 110° and 119° ••2 outputs ••Directly connects up to 2 solo receivers or 1 duo receiver ••Used only with a DISH 500 ••Has internal switch, and therefore cannot be used with any other switch except an SW21, to receive signals from three orbital locations when used with a second dish Quad LNBF ••2 orbital locations (110° and 119°) ••4 outputs ••Directly connects up to 4 solo receivers or 2 duo receivers or 2 solo and 1 duo receiver 170 Single->Dual->Twin->Quad 171 CSAT What is CSAT? CSAT stands for Customer Satisfaction, which businesses use to measure how well their products and services meet and exceed the customer's expectations. Additionally, there is a strong correlation between Customer Satisfaction and Customer Loyalty. In today's marketplace where competition is fierce, customer satisfaction is critical in differentiating DISH from other pay-television providers. DISH has the best technology. DISH has the best value in programming. It is critical that we regain our place at the top of the pay-television industry with the best in class service. CSAT Survey Questions Scale: Please rate each question on a scale of 1 through 10, with 1 being very dissatisfied, and 10 being very satisfied. New Connect/Re-connect Trouble/Service Call (TC/SC) (NC/RC) (Listen to the survey) (Listen to the survey) Press "1" if you were Press "1" if you were the person home during the person home the service during the service appointment, or "2" if it appointment, or "2" if it was someone else in was someone else in your household your household Upgrade/Mover Survey (UP/MV) (Listen to the survey) Press "1" if you were the person home during the service appointment, or "2" if it was someone else in your household Please rate DISH on keeping you updated on the technician's arrival time. Please rate DISH on keeping you updated on the technician's arrival time. Please rate DISH on keeping you updated on the technician's arrival time. Please rate the technician on their appearance and professionalism. Please rate the technician on their appearance and professionalism. Please rate the technician on their appearance and professionalism. Please rate the technician on how well Please rate the technician on how well 172 they discussed dish placement, cabling, and receiver locations with you prior to the work being done they discussed dish placement, cabling, and receiver locations with you prior to the work being done Please rate the technician for verifying that the DISH Network system and programming works properly Please rate the technician for verifying that the DISH Network system and programming works properly Please rate the technician on explaining the basic features of the remote control and how to use the DISH Network system Please rate the technician on explaining the basic features of the remote control and how to use the DISH Network system Please rate the technician on explaining the basic features of the remote control and how to use the DISH Network system Please rate the technician on respecting your home and cleaning up after the service was completed Please rate the technician on respecting your home and cleaning up after the service was completed Please rate the technician on respecting your home and cleaning up after the service was completed Please rate how likely you would recommend this technician to friends or family if they were to have the same service performed Please rate how likely you would be to recommend this technician to friends or family if they were to have the same service performed Please rate how likely you would recommend this technician to friends or family if they were to have the same service performed Press “1” if the technician completely resolved your issue or “2” if you feel your issue was not resolved 173 Grounding the System The importance of proper grounding cannot be overemphasized. It will minimize the potential for damage to the system and maximize safety. Grounding is probably the source of the greatest confusion in understanding electrical distribution in general – and this confusion has been even greater in relationship to DBS systems. According to the National Electric Code (NEC), the purpose of grounding is to “limit voltages due to lightning, line surges or unintentional contact with higher voltage lines to stabilize voltages and to provide a path in order to facilitate the operation of over-current devices.” Note that the purpose of grounding cited by the NEC does not mention the protection of equipment. The intent of the NEC grounding provisions is to ensure that electrical systems are as safe as possible for the humans who use them. For more information, refer to the National Electrical Code (NEC) and local electrical codes. You can find the entire NEC at your local library. The Dishnetwork satellite system is grounded for several reasons: 1. Grounding is an NEC requirement. NEC Code 250.52 states: (A) Electrodes Permitted for Grounding. (1) Metal Underground Water Pipe. A metal underground water pipe in direct contact with the earth for 3.0 m (10 ft) or more (including any metal well casing effectively bonded to the pipe) and electrically continuous (or made electrically continuous by bonding around insulating joints or insulating pipe) to the points of connection of the grounding electrode conductor and the bonding conductors. Interior metal water piping located more than 1.52 m (5 ft) from the point of entrance to the building shall not be used as a part of the grounding electrode system or as a conductor to interconnect electrodes that are part of the grounding electrode system. 2. The ground point shunts to ground any electromagnetic interference, i.e. voltage, in the outer “shield,” preventing it from reaching the inner conductor. Grounding the shield serves to nullify the effects of stray signals by “grounding out” – or reducing to a zero potential, the voltage which is picked up by the outer shield. This prevents much of the signal from potentially reaching the inner wire core. 3. The ground block dissipates electrical charge to ground. ARTICLE 810 Radio and Television Equipment 810.1 Scope This article covers antenna systems for radio and television receiving equipment, amateur radio transmitting and receiving equipment, and certain features of transmitter safety. This article covers antennas such as multi-element, vertical rod, and dish, and also covers the wiring and cabling that connects them to equipment. This article does not cover equipment and antennas used for coupling carrier current to power line conductors. Masts and metal structures supporting antennas shall be grounded. Material The grounding conductor shall be of copper, aluminum, copper-clad steel, bronze, or similar corrosion-resistant material. Aluminum or copper-clad aluminum grounding conductors shall not be used where in direct contact with masonry or the earth or where subject to corrosive conditions. Where used outside, aluminum or copper-clad aluminum shall not be installed within 450 mm (18 in.) of the earth. 174 Ground Screw To simplify the installation process, we are now using the green ground screw in place of the ground lug for most install situations. This will now be the preferred method for providing continuity between the dish mast and messenger cable in the grounding system. In the future, the green ground screw will come pre‐installed on masts to further simplify installations. Why It’s Important The green ground screw simplifies installations and reduces installation cost. Unlike the ground lug, technicians no longer need to scrape paint off the mast to ensure electrical continuity. This will save time and effort. What I Need to Do Install the Green Ground Screw Begin by threading the green ground screw into one of the small holes located on the footplate (Fig. 1/Fig. 2). Thread the green ground screw (Fig. 3) using the ¼” driver of your 6‐in‐1 screwdriver (Fig, 4). Tighten the green ground screw just enough so that the messenger wire can still fit behind it. Figure 1: Correct (footplate, small‐hole side) Figure2:Wrong(footplate,large‐ holeside) Figure 3: Ground screw threaded Figure 4: ¼” Driver on 6‐in‐1 screwdriver 175 Prepare the Messenger Cable Separate a short section of the messenger wire from the cable and strip the plastic coating off the end (Fig. 5). Once the coating has been peeled off, create a “U” shape with the bare end of the messenger wire. This “U” shape will be used to wrap around the ground screw. Figure 5: Messenger wire separated Figure 6: “U” shape Finish the Green Ground Screw Installation Now take the “U”‐shaped end of the messenger wire and hook it around the green ground screw (Fig. 7). The wire should extend from the cable to the ground screw in as straight a manner possible with no twisting or sharp bends. Hooking the “U” shape so that the end is in a clockwise orientation will allow for the best results. Then tighten the ground screw, making sure that the messenger wire is pinched between the head of the screw and the foot plate (Fig.8). Figure 7: Hooked Clockwise (when the screw is tightened, it “grabs” the messenger wire) Figure 8: Tighten the green ground screw 176 Note: Each green ground screw is intended for a single messenger wire. The green ground screw will be available for use in most instances; however there are times that a ground lug will still be necessary. As a result, DNS will continue to provide ground lugs for those specific situations (e.g. when installing wing dishes and mounts that do not utilize a foot plate). Every DISH installation is required to be grounded based on NEC requirements. There are five main steps needed to ground a DISH installation. This document outlines the steps, components and how to use them. 177 1 Dish Bonding • Messenger wire must be attached to foot plate with either a dual terminal ground lug or green self-tapping ground screw • If dual ground lug is used, scrape the paint on the foot plate to ensure metal to metal contact and connect the messenger wire to an open port • If self-tapping green ground screw is used, it must be tightly secured to the foot plate • If using a wing dish: • Must use a dual ground lug on the first dish • Attach a green ground wire from the wing dish’s dual ground lug or green ground screw to the first dish’s dual ground lug Ground Lug Ground Screw 2 Dish to Ground Block Wiring • Messenger wire must be a continuous run from the foot plate to ground block or switch • Wire CANNOT be spliced • Maximum total cable run of 200 ft. between LNBF and receiver must be taken into consideration 3 Ground Block Bonding • The ground block must be placed on the exterior of the home and within 20 ft. of the ground source • One ground block can be used to connect up to two receivers • Receivers can be any combination of single or dual tuners • If multiple ground blocks are needed: • The ground blocks must be bonded together with a small piece of ground wire • Each ground block must be secured with its own two screws • The following switches can also be used as ground blocks if they have the gray coating and UL stamp: • DP34 switch 178 • DPP33 switch • DPP44 switch Single Ground Block Multiple Ground Blocks 4 Ground Block to Ground Source Wiring • Run 10 gauge green copper ground wire from the ground block to the ground source • Ground wire must be as straight as possible • Ground wire CANNOT exceed a maximum of 20 ft. from the ground block to the ground source 5 Ground Source Bonding There are six possible sources to bond a DISH installation to ground. They are listed in order of easiest to install/locate. 1. Intersystem Bonding Terminal The intersystem bonding terminal is a terminal that is provided as a grounding site by the electrician that wires the house. • Commonly found near the exterior meter box and cable/ phone distribution located on the side or rear of the home • Ground wire can be directly connected to one of the open terminals No component is needed 179 2. Meter Box, Service Equipment/Power Service/AC Disconnect Enclosure The meter box, service equipment, power service and AC disconnect enclosures include any metal enclosure, as long as it is connected visually with rigid conduit to the grounding electrode conductor. • Commonly found on the exterior side or rear of the home • Component cannot impede the opening/closing of the enclosure Corner Clamp Side Clamp Strap (limited use) 3. Rigid Electrical Conduit The rigid electrical conduit is a metal enclosure housing electrical wiring. • Commonly found in various locations on the exterior of the home and near the meter box • Conduit Must be continuous to meter box Steel Pipe Strap 4. Grounding Electrode Conductor The grounding electrode conductor is a #6 copper or aluminum wire running from the grounding electrode to the meter box. • Commonly found near the exterior meter box on the side or rear of the home Split Bolt 180 5. Interior Grounded Cold Water Pipe The interior copper cold water pipe is part of the home’s water distribution system. • Commonly found near the home’s utilities which could be in the basement or utility closet • Ground location must be on the interior of the building within 5 ft. of the water pipes entrance • External water spigots are not an acceptable ground source Copper Pipe Strap 6. Building Grounding Electrode or Conductor The building ground electrode system includes the ground rod and structural frame of the home. • Usually difficult to locate and rarely exposed The ground rod - Minimum of 1/2 inch diameter and buried 8 ft. into the earth • Commonly found near the exterior meter box and grounding electrode conductor The structural mainframe of a building - Metallic I-beams • Commonly found in the basement, crawl space or under a mobile home Ground Rod Clamp I-Beam Clamp 181 182 Approved as Compatible PPC Connectors EX6XL • The XL is stamped on the black sleeve of the barrel (Note - when used in a system, the connectors must be compressed) • The number that follows the marking on the connector (e.g. PPC EX6 - 04) is the year the connector was manufactured (the 04 in this example). Compressed Uncompressed CMP6 • Has a blue colored end (Note – when used in a system, the connectors must be compressed) • Can also be identified by the metal mesh sleeve in the middle of the connector Compressed Uncompressed 183 Unapproved PPC Connectors EX6 (Short) The black sleeve in the middle of the barrel is much shorter than the approved XL version and does not have the XL stamp It is common to find EX6 short connectors uncompressed as it requires an adjusted compression tool Compressed Uncompressed EX6XL Plus The difference between these and the approved EX6XL is the design of the nut used to torque the connection The PLUS or the Signaltight are not stamped anywhere on the connector; the stamping looks exactly like the non-Signaltight versions Compressed Uncompressed 184 EX6 Plus (Short) The difference between these and the approved EX6XL is the design of the nut used to torque the connection The PLUS or the Signaltight are not stamped anywhere on the connector; the stamping looks exactly like the non-Signaltight versions Compressed Uncompressed EX6XLWS (Aquatight) Neither the WS nor the Aquatight are stamped on the connector; the manufacturer stamping looks exactly like the non- Aquatight versions The two distinguishing factors are the rubber grommet and the round mesh threading on the nut for torquing the connector Compressed Uncompressed 185 EX6WS (Short Aquatight) Neither the WS nor the Aquatight are stamped on the connector; the manufacturer stamping looks exactly like the non-Aquatight versions The two distinguishing factors are the rubber grommet and the round mesh threading on the nut for torquing the connector Compressed Uncompressed EX6WS (Short) Torn Neither the WS nor the Aquatight are stamped on the connector; the manufacturer stamping looks exactly like the non-Aquatight versions This is an example of a torn EX6WS Short that might be encountered in the field; the rubber grommet has been removed Compressed Uncompressed 186 Side-by-Side Comparison APPROVED AS COMPATIBLE In this example, the PPC connector being used is the approved EX6XL. The connector is compressed, and the “XL” is clearly labeled on the sleeve This is a closeup of the approved EX6XL connector. Notice that the nut is smooth and angular, compared to the unapproved EX6XL Plus. UNAPPROVED CONNECTORS In this example, the connectors being used are the unapproved EX6, or EX6 Short connectors. These are not compressed, and the uncompressed sleeves are much shorter than their EX6XL counterparts. In this closeup of the unapproved EX6XL Plus, note the distinct shape of the nut. Instead of smooth, flat angles, the nut is ridged. 187 188 189 190 191 192 193 194 195 196 197 198 199 200 ACCIDENT OR INCIDENT REPORTING In case of an accident or incident involving a customer, visitor, or employee, administer appropriate first aid and/or notify emergency personnel, depending on the seriousness of the injury. All accidents or incidents must be reported immediately to your manager and the Human Resource Department, even if there is no apparent injury. An Accident Report needs to be filled out and returned to your manager. They are available in the warehouse, dispatch, human resource or see your manager for a form. Each employee should be familiar with where these are located. Submit Employee Accident Reports to your manager. Failure to report an on-the-job injury or accident will result in progressive discipline up to and including termination. 201 CELL PHONE POLICY While at work, you are expected to refrain from using personal cell phones, including texting unless on an authorized break or lunch. Camera cell phones are prohibited in Intertech facilities. Cell phones provided by Intertech are the property of the organization. If your phone is lost or damaged, please notify your manager immediately. If you leave our employment for any reason, the phone must be returned. Company cell phones are to be used for business purposes only. Employees are responsible for keeping track of their cell phone usage and will be required to reimburse the Company for any excess charges. Information regarding the specifics of cell phone plans will be provided when the phones are distributed. In the interest of personal safety, any employee driving a Company vehicle or personal vehicle for Company business is expected to refrain from using a cell phone while driving unless they use a headset or other "hands-free" method. Regardless of the circumstances, including slow or stopped traffic, employees are expected to pull off the road and safely stop the vehicle before placing or accepting a call. Any employee caught using a Company provided cell phone while driving will be subject to disciplinary action up to and including termination. 202 EARLY CLOSING/EMERGENCY CLOSING Unless otherwise announced, Intertech is open for business and all employees are expected to make every effort to get to work on time and to work a full day. Employees should allow extra time for travel, both for his/her own safety and to ensure that (s)he reaches work on time. Non-exempt employees who arrive late for work will not be paid for time not worked. Employees who fail to report to work will be required to take PTO or unpaid leave from work. If adverse weather conditions disrupt normal transportation routes to the extent that it would be extremely difficult for the majority of employees to reach home safely, an early closing may be warranted. This decision will be made by the President and announced by a member of the senior management. Employees are expected to remain at work until such an announcement is made. 203 E-MAIL POLICY Use of Company E-Mail E-mail may be used only for Company business. It is a violation of Company policy to use the Company e-mail system for any personal purposes. Prohibitions on Use of E-mail Employees may not use Company e-mail or electronic messaging systems to infringe the copyright or other intellectual property rights of third parties, to distribute defamatory, fraudulent or harassing messages, or otherwise to engage in any illegal or wrongful conduct. Access and Disclosure Authorized managers and supervisors may access or disclose private electronic messages or files of an employee for any valid business purpose. Employees will be so informed and required to consent to such access as a condition of employment. Monitoring The Company may engage in monitoring of electronic mail messages or other electronic files created by employees for valid business purposes, including employee supervision. All employees will be informed of such monitoring and will be required to consent to such monitoring as a condition of employment. Encryption Employees may encrypt their e-mail and files only with the use of software approved by the Company. This software may provide for retention by the Company of any key necessary to access encrypted messages, or may otherwise limit the degree of protection provided by such encryption. 204 EMPLOYEE CONDUCT AND WORK RULES POLICY Intertech's interest lies in ensuring fair treatment of all employees and in making certain that disciplinary actions are prompt, uniform, and impartial. The major purpose of any disciplinary action is to correct the problem, prevent recurrence, and prepare the employee for satisfactory service in the future. Although employment with Intertech is based on mutual consent and both the employee and Intertech have the right to terminate employment at will, with or without cause or advance notice, Intertech may use progressive discipline at its discretion. Progressive discipline is not a contract, either implicit or implied, that any employee should consider that they have an "entitlement" to any or all disciplinary action steps. Management reserves the right at all times to select the consequence relative to the act and previous employment history. Disciplinary action may call for any of the following steps - documented verbal warning, written warning, suspension without pay, reduction in bonus or termination of employment - depending on the severity of the problem and the number of occurrences. There may be circumstances when one or more steps are bypassed. During an employee's introductory period, any disregard for Intertech rules will be cause for immediate discharge. Intertech recognizes that there are certain types of employee problems that are serious enough to justify either suspension or, in extreme situations, termination of employment, without going through the usual progressive discipline steps. While it is impossible to list every type of behavior that may be deemed a serious offense, the Employee Conduct and Work Rules policy includes examples of problems that may result in disciplinary action, up to and including, termination. These listed work rules will be applied uniformly on a non-discriminatory basis, and are not intended to be all inclusive. Any past practices concerning such conduct shall be considered void and will not excuse non-compliance with the work rules contained herein. In the best interest of all parties, Intertech has formulated a code of conduct to ensure a harmonious employee-employer working relationship. The principle objective of any disciplinary action shall be to improve performance and efficiency of the employee. 205 ANY VIOLATION OF THE FOLLOWING RULES AND PRACTICES SHALL RESULT IN PROGRESSIVE DISCIPLINE UP TO AND INCLUDING DISCHARGE: 1. Overstaying authorized meal and/or rest periods. 2. Poor work performance, inattention to duties, or carelessness, causing damage to Intertech, employee, or customer property. 3. Failure to be at your work area at the start of the shift. 4. Leaving your assigned place of work without permission during working hours, except for scheduled meal periods and rest breaks. 5. Discourtesy toward a member of management, co-employee, customer or member of the public on Intertech premises or while engaging in Intertech business. 6. Excessive absenteeism and/or tardiness. 7. Unauthorized solicitation of contributions on Intertech premises or assigned job site. 8. Wasting time or loitering during working hours. 9. Failure to follow verbal or written instructions. 10. Smoking on Company premises. 11. Unauthorized operation of equipment or machinery. 12. Contributing to unsanitary and unhealthy conditions. 13. Disregarding personal appearance, dress, or hygiene. 14. Unauthorized personal phone calls. 15. Activities, such as horseplay, tricks, pranks, or disregard for the health, comfort, or safety of others. 16. Failure to adhere to the call-in procedure in the event of absence/tardiness. 17. Posting, defacing or removing notices, signs or writing on bulletin boards without authorization of management. 18. Creating or contributing to unsafe working conditions, failing to report unsafe acts or conditions, and failure to comply with Company safety rules. 206 19. Interfering with other employees or supervision in the discharge of their duties. 20. Concealing or failure to report an error or mistake. 21. Failure to immediately report on-the-job injury or accident to self or coemployees. 207 RESIGNATION/TERMINATION POLICY Employment at Intertech is for no specified time, regardless of length of service. Just as you are free to leave for any reason, the Company reserves the same right to end the employment relationship with you at any time, with or without notice, for reasons not prohibited by law. Upon termination from employment, either voluntarily or involuntarily (e.g., layoff, discharge), an employee will be paid for the number of hours worked in the pay period plus accrued, unused vacation provided a minimum of two weeks notice is given and honored with out any disciplinary action incurred during period after notice is given. Health insurance credit is forfeited unless the employee is employed as of January 31, and is otherwise eligible. Although our Company is sorry to lose any good employee, we realize that personal circumstances may make your resignation necessary. The management of the Company reserves the right to either continue such employee's 'position through the effective date of resignation, or accept such resignation immediately. Under the latter circumstances, the employee is not entitled to payor benefits beyond the effective date 208 REQUEST FOR STOP PAYMENT OF PAYROLL CHECK EMPLOYEE INSTRUCTIONS 1. Use this form to request a stop payment on a lost payroll check and to request a replacement check. Please contact Intertech Digital Entertainment Inc at 716-625-8555 and ask for Human Resources prior to submitting and completing this form. 2. Complete Section I below. 3. Stop Payment requests will not be accepted until three (3) business days after payday. Example: Stop Payment Requests will be accepted beginning the Wednesday following a Friday payday. 4. Forms may be mailed or faxed. Fax completed form to 716-625-8464, or mail completed form to Intertech Digital Entertainment Inc, 6523 South Transit Road, Lockport, NY 14094. The replacement check will be mailed to your home address on file or picked up at Intertech Digital Entertainment Inc.. Hours of operation are Monday through Friday, 9:00 am – 5:00 pm. 5. To avoid similar problems in the future, choose to have your pay directly deposited to a banking institution. To participate in direct deposit for future pay, please complete Direct Deposit Authorization Agreement and submit to Intertech Digital Entertainment Inc. SECTION I (To be Completed by Employee) _____________________________________________________________________________________________ ___ Employee Name (Please Print First, MI, Last) _____________________________________________________________________________________________ ___ Street Apt. No. City State Zip Employee No. |___|___|___|___|___|___| or Last 4 Digits of SS No. |_X_|_X_|_X_| – |_X_|_X_| X_| – |___|___|___|___| Reason for check reissue (check one): Lost in Mail Lost After Receipt Stale Dated Check Please call when check is available for pickup: Phone No. ____________________ Please mail reissued check For consideration of a duplicate payment, the undersigned agrees to indemnify and hold harmless, Intertech Digital Entertaiment Inc, 6523 South Transit Road, Lockport, NY 14094, for the amount of the original check in the event payment thereof be held against Intertech Digital Entertainment Inc. In the event the original check is received, you must return it immediately to Intertech Digital Entertainment Inc 6523 South Transit Road, Lockport, NY 14094, with no attempt to cash it under penalty of fraud. I acknowledge receipt of no benefit from check dated ___/___/______. ______________________________________________________________ ______________________________ Signature of Payee SECTION II Date (Payroll Use Only) Address Change Submitted 209 Check No. ____________________ Net Amount $ __________.____ Pay Period No. ____________________ ___/___/______ Beginning Date ___/___/______ Prepared by ____________________ Date ___/___/______ Checked by ____________________ Attached _______ Date ___/___/______ Ending Date Payroll Preview Copy 210 Phone Program Rules 1. You are responsible for the safety and security of your phone and stylus at all times. Always keep it in your sight unless it is either in a monitored charging station, locked and hidden in your truck or in a supervisor’s care. 2. The phone must remain in its case whenever it is in the field (including travelling to and from Intertech and the customer site). 3. Food crumbs and spilled drinks damage phones. Take care to not leave your phone where food or drink can be spilled on it. 4. Screens are very sensitive. Do not place anything on top of or near the phone that could put pressure on the screen. Be careful not to scratch your screen and do not remove the screen protector. 5. Be careful when writing on the phone screen: Only a tablet stylus should be used. Using a pen or pencil to write or sign on the phone will cause permanent damage to the phone. 6. The phone can be damaged, even though it is in a protective case. Be careful how you handle your phone. Never bump, drop, or toss it. 7. Do not remove the phone from the protective case. The case is there to minimize the risk of damage during daily use. 8. Keep your passwords private. Do not share them with anyone. Do not write them down where others may find and use it. 9. Extreme temperatures can damage your phone. Don't leave it in a hot or cold vehicle for extended periods of time. If your phone has been exposed to extreme temperature, please allow it to return to room temperature before turning it on. 10. No stickers or personal decorations of any kind may be adhered to the exterior of the phone. 13. You are not permitted to install games, music and software on the phone. Applications like limewire, frostwire, kazaa or bit torrent are strictly prohibited. If technician installed programs cause system errors, it will be necessary that the phone be re-imaged. 14. The phones are for work-use only; refrain from using the phone to make personal calls. Minute and data usage will be monitored and any excessive use will be addressed. 211 15. All software installed by Intertech must remain on the phone at all times, and attempts to disable installed software or settings are a violation of the Acceptable Use Policy. 16. Do not hack. Any attempt to gain unauthorized access to other computer systems through the Intertech network or to go beyond your authorized access to the network is prohibited. This includes attempting to log in through another person's account or access another person's files. Tampering with or changing any hardware or software settings of any Intertech computer or phone is prohibited. 17. Some activities are expressly prohibited by federal, state, or local laws and ordinances. Other activities are inappropriate, as defined by the supervisors. Intertech will cooperate fully with local, state, or federal officials in any investigation related to any illegal activities conducted through the company network. Please note: Violation of any of these rules will result in disciplinary action. 212 Intertech Digital Entertainment Inc. Information Systems Phone Program Acceptable Use Policy By signing I acknowledge that I have read the policy, understand that it applies to me, and agree to abide by the guidelines set forth. Technician Name: _____________________________________________ ETA Direct External ID: ________________________________________ Tech Code: ______ Last 4 of SS#: ______ Phone Pickup Date: ______ Tech Start Location: Lockport Erie Remote Technician Signature: ___________________________________________ Date Signed: _______________________________ Manager Name: ______________________________________________ Manager Signature: ___________________________________________ Date Signed: _______________________________ Below to be filled in by the I.T. Department Tablet Received: _______________________________________________ ___ Stylus ___ AC Charger ___ Car Charger ___ Case 213 214 ***This is to be emailed to [email protected] by Monday 10AM*** Intertech Digital Time Worked Card Technicins Name:__________________________________ Trainer:___________________________________________ Team Leader:______________________________________ Week Ending:______________________________________ Date Day In Lunch Out Total Partner Sat Sun Mon Tue Wed Thur Fri I certify that the information provided is an accurate and truthful accounting of my time __________________________________________________________ Employee Signature Date________________ ___________________ 215 216 217