1
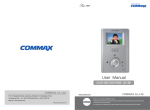
User Manual COMMAX LOBBY PHONE DRC-700S • • Thank Thank you you for for purchasing purchasing COMMAX COMMAX products. products. • • Please Please carefully carefully read read this this User’s User’sGuide Guide(in (inparticular, particular,precautions precautionsfor forsafety) safety)before beforeusing usingaaproduct productand andfollow follow instructions instructions to to use use aa product product exactly. exactly. • • The The company company isis not not responsible responsible for forany anysafety safetyaccidents accidentscaused causedby byabnormal abnormaloperation operationof ofthe theproduct. product. Part names ① TFT-LCD Screen ⑦ Security Button ② Mike ⑧ Call Button ③ RF CARD Receiver ⑨ Program Button ④ Camera ⑩ Speaker ⑤ Dial Button ⑪ LAN ⑥ Electric Key Button 2 1. Main Screen Setting 1.1. Main Screen Skin Theme Flip Clock Red Clock Green Clock Black Clock 1.2. Status Icon Description Icon Description Lan Connection Registered server status Display out post lobby Not Registered server status phone Display building lobby RF-Card Data save status phone 3 2. Security Call ① Push ② Push (Security Guard Post) Button (Call) button ③ Call sound is ringing and call Security Guard Post. ④ Call Security Guard Post when guard answer call. (Time: 1 min.) ⑤ Press “X” button when terminate call. ⑥ Security Guard push ‘Open door’ button, “Door is open” voice comment then door is open. ⑦ If line is busy, call it later. Picture1. Call security Guard ※ This is to call up the registered guard stations in advance by a manager 4 3. Call house 3.1. Communication call between residence I. When building number is set in advance: When building No. already registered to Call Prefix Picture2. Screen for registering house No. ① Input unit No. to key board. Ex) Unit 101 input ‘101’ ② Push (call) button. ③ Ringing call sound and call unit. ④ When tenants answer call, calling is on. (Max. time: 1 min) ⑤ Press “X” button when terminate call. ⑥ Tenant push ‘Open door’ button, “Door is open” voice comment then door is open 5 II. When building number is NOT set in advance: When building number hasn’t been registered Call Prefix yet. Picture3. Building house No. register screen ① Input Building No. to key board. Ex) Building 101 input ‘101’ ② Input unit No. to key board. Ex) Unit 101 input ‘101’ ③ Push (call) button. ④ Ringing call sound and call unit. ⑤ When tenants answer call, calling is on. (Max. time: 1 min) ⑥ Press “X” button when terminate call. ⑦ Tenant push ‘Open door’ button, “Door is open” voice comment then door is open 6 4. Access authorization 4.1 Opening the entrance with RF card. ① Tag RF card to ‘Card tagging window’. ② The common entrance get be opened with a vocal message, “door opens” when the access is successful. ③ The entrance does not be opened when the access fails with sound. Picture4. Tag RF-Card 4.2 Access by PIN No. I. Building Number designated case: Building Number designated in Call Prefix ① Input unit No. through key board. ② Push (Key) button. ③ Input designated house PIN No. ④ Push (call) button. ⑤ If access authorization is successful, Door is open with “Door is open” voice message. ⑥ If access is failed, warning sound is activated. 7 II. Building Number is not designated case: Building Number is not designated in Call Prefix ① Input Building No. through key board. EX) Building 101 Input 101 ② Push (call) button. ③ Input unit No. through key board. Ex) Unit 101 Input 101 ④ Push (call) button. ⑤ If access authorization is successful, Door is open with “Door is open” voice message. ⑥ If access is failed, warning sound is activated. . Picture5. Input password (PIN) 8 4.3. Use password for accessing when system is OFF-Line (No connection with Local server) ① Push (Key) button. ② Input PIN number. ③ Push ※ (call) button. This function is not activate when it is On-Line (possible to interface with local server status). ※ Please, should delete OFF-LINE PIN number when On-Line mode is activated. 9 5. Set up Set up ① Push button. ② Input PIN number. ③ Push (call) button. ※ We recommend user change initial password (0000) then use products for security. ※ Initialize password: + “0000” + button map ※ ” “is DOT (.) for IP address typing. 10 + + + + Set up menu 0: Set Network+ 0: IP address: (Input IP address) 1: G/W address (Input Gateway address) 2: DNS address (Input DNS address) 3: Net mask (Input network mask) 1: Set VoIP+ 0: SIP Server (Input SIP server address) 1: Guard ID (Input Security Guard Post) 2: Management+ 0: Server address (Input Local server address) 1: Update address (Input update server address) 2: System ID (Input DRC-700S serial No.) 3: Call Prefix (Set building) * If there is no building information in set up, automatically pop up for building information when call house. 4: Call Line+ 0: Min Call Line (Input call Min. line) 1: Max Call Line (Input call Max. line) * Attention: If Min Call Line is bigger than Max Call Line, you can’t call it. 5: Position (Set DRC-700S location) ※ button is for upper ground, button is for underground. Ex) when user set first floor after pushing pushing button, “1” is displayed and button, “B1” is displayed. ※ If do not set 1st floor, automatically 1st floor will be set. 11 3: Audio/Video+ 0: Audio+ 0: Guard Spe. Vol. (Control speaker volume when communicate with house) 1: Guard Mic Vol. (Control Mic. volume when communicate with house) 2: Guard Spe. Vol. (Control speaker volume when communicate with guard) 3: Guard Mic Vol. (Control Mic. volume when communicate with guard) 4: Key Sound (Select button sound) 5: Ring Sound (Select call sound) 6. Key Vol. (Select button volume) 7. Ring Vol. (Select call volume) 8: Effect Vol.(Select effect volume) 9: Initialization (Initialize audio) * Initialize all setting value from Audio menu. 1: Video:+ 0: Quality (Set visitor video quality) * Increase to 384K/800K/1M/1.2M order (increase video quality). However, video data is also increased. If video quality is not good such as broken video, please, set lower video quality. 1: Brightness (Control Video Brightness ) 2: Contrast (Control Video Contrast) 3: Saturation (Control Video Saturation) 4: Hue (Control Video Hue) 5: Initialization (Initialize Video) * Initialize all setting value from Video menu. 12 4: Extra Config+ 0: Language (Select language) 1: Skin Theme 0: Auto * Automatically change Skin Theme once a day or after booting. 1: Flip Clock * Set up Skin Theme to Flip Clock Type. 2: Red Clock * Set up Skin Theme to Red Clock Typ. 3: Green Clock * Set up Skin Theme to Green Clock Type. 4: Black Clock * Set up Skin Theme to Black Clock Type. 2: Set Time+ 0: Door Open Time (Gate Open time) * Select between 2sec., 5sec., 10sec., 15sec., 20sec., 25sec. 1: Sleep Mode Time (LCD Sleep Mode setting) * Select between 30sec, 1 min. 2 min. 3min, 4min, 5min 2: Key Time Out * Select between 10 sec, 20 sec, 30 sec 3: ADC Sensor (Change approach sensor and range.) * Range should be small when face to direct sun-ray. 0:[ ] 0.2V 1:[ ] 0.3V 2:[ ] 0.4V 3:[ ] Unused 4: Change Password * Push button for deleting previous password. 13 5: Off-Line Password (In put Off-Line password) * Push button for deleting previous password. * Initial Off-Line password is “123456”. 6: Reboot: (System rebooting) 7: System Reset (Initialize all setting and back to factory setting) * Do not initialize IP after changing IP address. 5: Database+ 0: Password Down. (Download house password) 1: RF-Card Down. (Download RF-Card Data) 2: Password Del. (Delete house password) 3: RF-Card Del. (Delete RF-Card Datas) 6: System Info+ 0: Version (Show software version) 1: Boot (Display boot loader information) 2: Kernel (Display OS information) 7: Test+ 0: Test Door Open 1: Test RF Card (Display RF card No.) * This function is for checking RF Card number. * Tag card to card reader when Reading status. 2: Test Elevator (Test elevator call) 3: Test Sensor (Display sensor value.) 4: System Initialize 14 6. Wiring Diagram ※ Pay attention to check polarity when install lobby panel. 15 Memo Memo 513-11, Sangdaewon-dong, Jungwon-gu, Seongnam-si, Gyeonggi-do, Korea Int’l Business Dept. Tel. : +82-31-7393-540~550 Fax. : +82-31-745-2133 Web site : www.commax.com PM10700S0010 Printed In Korea / 2013.08.104