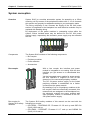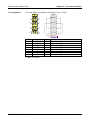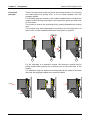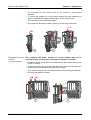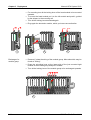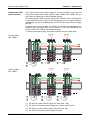
1
VIPA System SLIO
SM-S | Manual
HB300E_SM-S | Rev. 14/10
March 2014
Copyright © VIPA GmbH. All Rights Reserved.
This document contains proprietary information of VIPA and is not to be disclosed or used except in accordance with applicable
agreements.
This material is protected by the copyright laws. It may not be reproduced, distributed, or altered in any fashion by any entity (either
internal or external to VIPA), except in accordance with applicable agreements, contracts or licensing, without the express written
consent of VIPA and the business management owner of the material.
For permission to reproduce or distribute, please contact:
VIPA, Gesellschaft für Visualisierung und Prozessautomatisierung mbH
Ohmstraße 4, D-91074 Herzogenaurach, Germany
Tel.: +49 (91 32) 744 -0
Fax.: +49 9132 744 1864
EMail: [email protected]
http://www.vipa.com
Note
Every effort has been made to ensure that the information contained in this document was complete and accurate at the time of
publishing. Nevertheless, the authors retain the right to modify the information. This customer document describes all the hardware
units and functions known at the present time. Descriptions may be included for units which are not present at the customer site. The
exact scope of delivery is described in the respective purchase contract.
CE Conformity Declaration
Hereby, VIPA GmbH declares that the products and systems are in compliance with the essential requirements and other relevant
provisions.
Conformity is indicated by the CE marking affixed to the product.
Conformity Information
For more information regarding CE marking and Declaration of Conformity (DoC), please contact your local VIPA customer service
organization.
Machinery directive
The system SLIO safety modules of this manual meet all the requirements of the machinery directive 2006/42/EG.
Certification
The product SLIO safety signal module was developed and certified according to the standards specified at "Approvals, directives,
standards" in chapter "Safety".
It is suited for use in applications up to category 4 / PL e of EN ISO 13849-1 and SIL 3 of EN 62061 and IEC 61508.
Test report number: 968/M 387.01/14
Certificate number: 01/205/5301/13
Trademarks
VIPA, SLIO, System 100V, System 200V, System 300V, System 300S, System 400V, System 500S and Commander Compact are
registered trademarks of VIPA Gesellschaft für Visualisierung und Prozessautomatisierung mbH.
SPEED7 is a registered trademark of profichip GmbH.
SIMATIC, STEP, SINEC, S7-300 and S7-400 are registered trademarks of Siemens AG.
Microsoft und Windows are registered trademarks of Microsoft Inc., USA.
Portable Document Format (PDF) and Postscript are registered trademarks of Adobe Systems, Inc.
All other trademarks, logos and service or product marks specified herein are owned by their respective companies.
Information product support
Contact your local VIPA Customer Service Organization representative if you wish to report errors or questions regarding the contents
of this document. If you are unable to locate a customer service center, contact VIPA as follows:
VIPA GmbH, Ohmstraße 4, 91074 Herzogenaurach, Germany
Telefax:+49 9132 744 1204
EMail: [email protected]
Technical support
Contact your local VIPA Customer Service Organization representative if you encounter problems with the product or have questions
regarding the product. If you are unable to locate a customer service center, contact VIPA as follows:
VIPA GmbH, Ohmstraße 4, 91074 Herzogenaurach, Germany
Telephone: +49 9132 744 1150 (Hotline)
EMail: [email protected]
Manual VIPA System SLIO
Contents
Contents
About this manual .................................................................................... 1
Safety information .................................................................................... 2
Chapter 1
Safety ............................................................................... 1-1
Safety Information for Users................................................................. 1-2
Intended use ........................................................................................ 1-3
Responsibility of the user ..................................................................... 1-4
Protective devices ................................................................................ 1-4
Education of the personnel................................................................... 1-5
Personal protective equipment ............................................................. 1-6
Special hazards.................................................................................... 1-7
Fire fighting .......................................................................................... 1-8
Electrical safety .................................................................................... 1-9
Safety facilities ..................................................................................... 1-9
Behavior with dangers and accidents ................................................. 1-10
Sign-posting ....................................................................................... 1-10
Safety hints ........................................................................................ 1-11
Functional safety - safety relevant parameters ................................... 1-12
Approvals, directives, standards......................................................... 1-14
Chapter 2
Product description ........................................................ 2-1
System conception ............................................................................... 2-2
Dimensions .......................................................................................... 2-5
SDI 4xDC 24V - Operating and display elements ................................. 2-6
SDI 4xDC 24V - Process image ......................................................... 2-11
SDI 4xDC 24V - Parameter record set ............................................... 2-12
SDI 4xDC 24V - Technical data.......................................................... 2-21
SDO 4xDC 24V 0.5A - Operating and display elements ..................... 2-23
SDO 4xDC 24V 0.5A - Process image ............................................... 2-28
SDO 4xDC 24V 0.5A - Parameter record set ..................................... 2-29
SDO 4xDC 24V 0.5A - Technical data................................................ 2-36
Response time ................................................................................... 2-38
Compatibility list ................................................................................. 2-42
Chapter 3
Deployment ..................................................................... 3-1
Planning of a safety-related control system.......................................... 3-2
Installation guidelines ........................................................................... 3-5
Setting the F-address ........................................................................... 3-8
Installation .......................................................................................... 3-11
Demounting and module exchange .................................................... 3-17
Wiring................................................................................................. 3-22
Connection examples......................................................................... 3-29
Notes for Commissioning ................................................................... 3-43
Deployment with PROFIBUS.............................................................. 3-45
Deployment with PROFINET .............................................................. 3-50
Validation of the system ..................................................................... 3-55
Operation ........................................................................................... 3-57
Maintenance....................................................................................... 3-57
Repair ................................................................................................ 3-57
Diagnostics......................................................................................... 3-58
Packing and transport ........................................................................ 3-64
Storage and disposal.......................................................................... 3-65
HB300E - SM-S - Rev. 14/10
i
Contents
Manual VIPA System SLIO
A
ii
Appendix..........................................................................................A-1
Checklist Planning................................................................................A-2
Checklist Installation.............................................................................A-3
Checklist commissioning, parameterization and validation ...................A-4
Checklist modification and retrofitting...................................................A-5
Sample application ...............................................................................A-6
HB300E - SM-S - Rev. 14/10
Manual VIPA System SLIO
About this manual
About this manual
This Safety manual describes the Safety signal modules (SM-S) of the
system SLIO from VIPA. Here you may find besides of a product overview
a detailed description of the single modules. You’ll receive information
about the connection and the deployment of the System SLIO SM-S
modules.
Overview
Chapter 1:
Safety
This chapter gives an overview of all important safety aspects for optimum
protection of the personnel, as well as for the safe and fault-free operation.
Chapter 2:
Product description
Contents of this chapter are structure, characteristics and technical data of
the System SLIO safety signal modules.
Chapter 3:
Deployment
This chapter describes the usage of the System SLIO safety signal
modules with PROFIBUS and PROFINET. After a short introduction you
may find here every information about assembly, project engineering and
diagnostics.
Appendix
The use of the check lists serves for the documentation and as guide with
the realization of a control system.
Further the check lists are used to avoid errors. For each project they must
be handled conscientiously. For this it is necessary to make copies of the
printed check lists.
The check lists do not have any right of completeness. System dependent
additional requirements can result.
At the end you will find an application example. By means of a hardware
application, the operation of the System SLIO safety modules with both
PROFIBUS and PROFINET is described.
HB300E - SM-S - Rev. 14/10
1
About this manual
Manual VIPA System SLIO
Objective and
contents
This manual describes the System SLIO safety signal modules from VIPA.
It contains a description of the structure, project engineering and
deployment.
This manual is relevant for:
Product
Order no.
as of HW state
SDI 4xDC 24V
021-1SD00
2
SDO 4xDC 24V 0.5A
022-1SD00
2
Target audience
The manual is targeted at users who have a background in automation
technology.
Structure of the
manual
The manual consists of chapters. Every chapter provides a self-contained
description of a specific topic.
Guide to the
document
The following guides are available in the manual:
• an overall table of contents at the beginning of the manual
• an overview of the topics for every chapter
Availability
The manual is available in:
• printed form, on paper
• in electronic form as PDF-file (Adobe Acrobat Reader)
Icons
Headings
Important passages in the text are highlighted by following icons and
headings:
Danger!
Immediate danger to life and limb of personnel and others.
Non-compliance will cause death or serious injury.
Warning!
Hazardous situation to life and limb of personnel and others.
Non-compliance may cause death or serious injury.
Caution!
Hazardous situation to life and limb of personnel and others.
Non-compliance may cause death or serious injury.
This symbol is used also as warning of damages to property.
2
HB300E - SM-S - Rev. 14/10
Manual VIPA System SLIO
About this manual
Attention!
Designates a possibly harmful situation. Non-compliance can damage the
product or something in its environment.
Note!
Supplementary information and useful tips.
Liability Limitation
All data and notes in these instructions were prepared with consideration to
the statutory standards and regulations, the present state of technology, as
well as our many years of knowledge and experience.
The manufacturer accepts no liability for damage caused because:
• Non-compliance with the instructions
• Non-specified use
• Use of untrained personnel
The actual scope of delivery can, by special designs, deviate from the
explanations and presentations given here, because of the utilization of
additional order options, or because of the most recent technical changes.
The user is responsible for the execution of service and commissioning
according to the safety instructions of the prevailing standards and other
relevant national and local instructions concerning conductor dimensioning
and protection, earthing, disconnector, overcurrent protection and so on.
For damages, which result from the mounting or from the connection, the
one is liable, who has carried out the mounting or the installation.
We have checked the contents of this manual for agreement with the
hardware and software described. Since deviations cannot be precluded
entirely, we cannot guarantee full agreement. However, the data in this
manual are reviewed regularly. Necessary corrections are included in
subsequent editions.
Suggestions for improvement are welcomed.
For damage, which results from missing or insufficient knowledge of the
manual, any liability of the manufacturer is impossible.
Therefore, the operator is recommended to have the instruction of the
persons concerned confirmed in writing.
Modifications or functional alternations on the product are not allowed due
to safety reasons. Any modification on the product not explicitly authorized
by the manufacturer will result in loss of any liability claims to the vendor.
The same applies if non authorized parts or equipment are used.
Copyright
This manual is to be treated confidentially. It has been provided only for the
personnel, which use the product. The transfer of this document to third
parties without the authorization in writing of the vendor is prohibited.
HB300E - SM-S - Rev. 14/10
3
About this manual
Manual VIPA System SLIO
Note!
The contents, texts, drawings, pictures and any other illustrations are
copyrighted and subject to other protection rights. Any person unlawfully
using this publication is liable to criminal prosecution.
Use of this manual
This safety manual contains information for the intended use of the system
SLIO safety signal modules.
Knowledge of regulations and the proper technical implementation of the
safety instructions detailed in this manual performed by qualified personnel
(see chapter 1, "Education of the personnel") are prerequisites for safely
planning, engineering, programming, installing and starting up the system
SLIO safety modules as well as for ensuring safety during their operation
and maintenance.
VIPA GmbH will not be held liable for severe personal injuries, damage to
property or the surroundings caused by any of the following: unqualified
personnel working on or with the devices, de-activation or bypassing of
safety functions, or failure to comply with the instructions detailed in this
manual.
VIPA safety components and systems have been developed, manufactured
and tested in compliance with the pertinent safety standards and
regulations. They may only be used for the intended applications under the
specified environmental conditions.
They must be used only as specified in environmental descriptions and be
connected only to approved external devices
The manual contains safety instructions, description of the modules and
information about life cycle.
Applicable documentation
In the safety signal module components of other manufacturers are
possibly integrated. For these purchased parts of the respective
manufacturers risk evaluations were carried out. The conformity of the
constructions to the valid European and national regulations was declared
by the according manufacturer.
Warranty conditions
The warranty conditions by be found in the "General terms and conditions"
on the homepage and in the catalog of VIPA GmbH.
4
HB300E - SM-S - Rev. 14/10
Manual VIPA System SLIO
Safety information
Safety information
Intended use
The System SLIO is constructed and produced for:
• communication and process control
• general control and automation applications
• industrial applications
• operation within the environmental conditions specified in the technical
data
• installation into a cubicle with degree of protection IP54 or better
The modules have been engineered and designed exclusively for the
intended use described in this documentation.
The modules are intended used if you consider all references and
information of this manual.
Warning!
Danger by non intended use!
Every application in excess of the intended use and/or other use of the
product, can lead to hazardous situations.
Danger!
This device is not certified for applications in
• in explosive environments (EX-zone)
To prevent hazards and ensure optimum performance, no changes,
modifications or conversions may be made to the product that have not
been expressly approved by the manufacturer.
Documentation
Every person working with the product must have read and understood the
operating instructions before carrying out any work.
The manual must be available to all personnel in the:
• project design department
• installation department
• commissioning
• operation
The following conditions must be met before using or commissioning
the components described in this manual:
• Modification to the process control system should only be carried out
when the system has been disconnected from power!
• Installation and modifications only by properly trained personnel
• The national rules and regulations of the respective country must be
satisfied (installation, safety, EMC ...)
HB300E - SM-S - Rev. 14/10
5
Safety information
Manual VIPA System SLIO
Danger!
To prevent hazards and ensure optimum performance, no changes,
modifications or conversions may be made to the product that have not
been expressly approved by the manufacturer.
Maintenance
If you keep the prescribed environmental conditions (see technical data)
the corresponding safety module is maintenance-free.
Spare parts
Please use only original spare parts of the VIPA GmbH.
Warning!
Incorrect or faulty spare parts can cause damage, malfunction or failure as
well as affect security.
Shipping
For shipping always use the original packaging.
Disposal
National rules and regulations apply to the disposal of the unit!
6
HB300E - SM-S - Rev. 14/10
Manual VIPA System SLIO
Chapter 1 Safety
Chapter 1
Safety
Overview
This chapter gives an overview of all important safety aspects for optimum
protection of the personnel, as well as for the safe and fault-free operation.
Content
Topic
Page
Safety ............................................................................... 1-1
Chapter 1
Safety Information for Users................................................................. 1-2
Intended use ........................................................................................ 1-3
Responsibility of the user ..................................................................... 1-4
Protective devices ................................................................................ 1-4
Education of the personnel................................................................... 1-5
Personal protective equipment ............................................................. 1-6
Special hazards.................................................................................... 1-7
Fire fighting .......................................................................................... 1-8
Electrical safety .................................................................................... 1-9
Safety facilities ..................................................................................... 1-9
Behavior with dangers and accidents ................................................. 1-10
Sign-posting ....................................................................................... 1-10
Safety hints ........................................................................................ 1-11
Functional safety - safety relevant parameters ................................... 1-12
Approvals, directives, standards......................................................... 1-14
HB300E - SM-S - Rev. 14/10
1-1
Chapter 1 Safety
Manual VIPA System SLIO
Safety Information for Users
Handling of
electrostatic
sensitive modules
VIPA modules make use of highly integrated components in MOSTechnology. These components are extremely sensitive to over-voltages
that can occur during electrostatic discharges.
The following symbol is attached to modules that can be destroyed by
electrostatic discharges.
The Symbol is located on the module, the module rack or on packing
material and it indicates the presence of electrostatic sensitive equipment.
It is possible that electrostatic sensitive equipment is destroyed by energies
and voltages that are far less than the human threshold of perception.
These voltages can occur where persons do not discharge themselves
before handling electrostatic sensitive modules and they can damage
components thereby, causing the module to become inoperable or
unusable.
Modules that have been damaged by electrostatic discharges can fail after
a temperature change, mechanical shock or changes in the electrical load.
Only the consequent implementation of protection devices and meticulous
attention to the applicable rules and regulations for handling the respective
equipment can prevent failures of electrostatic sensitive modules.
Measurements and
alterations on
electrostatic
sensitive modules
When you are conducting measurements on electrostatic sensitive
modules you should take the following precautions:
• Floating instruments must be discharged before use.
• Instruments must be grounded.
Attention!
Personnel and instruments should be grounded when working on
electrostatic sensitive modules.
1-2
HB300E - SM-S - Rev. 14/10
Manual VIPA System SLIO
Chapter 1 Safety
Intended use
General
The product is exclusively designed and constructed for the intended use
described in this manual.
The product is intended used if all the notes and information of this manual
are considered.
Warning!
Danger by not intended use!
Each use of the product, which differs to the intended use can lead to
dangerous situations.
Therefore:
• Use the product only intended.
• Use the product only together with the recommended components.
• Consider all the data in this manual.
• Ensure that only qualified personnel (see chapter 1, "Education of the
personnel") work with/at the product.
• Ensure during configuration that the product is operated within its
specifications.
• Ensure that the power supply corresponds to the given specifications.
• Only use the product in a technically perfect condition.
• Only use the product in combination with approved components.
• Only use the product in an area of second type (industrial area). The
product was developed such as this fulfills the requirements of the
category C3. For operation an approved power supply (SELV/PELV) is
necessary. Here With the usage of the product in an area of first type,
category C2/C1 (living-, business and trade without an interstage
transformator directly at a public low-voltage-system) the cabinet builder
has to reduce the emission (conducted and radiated) by special
measure steps, which are to be demonstrated, since it can come without
any additional measures to EMC disturbances. Whether a products
described here reaches category C2/C1 with additional measures,
cannot be ensured.
Changes and
modifications at
the product
To avoid endangerments and to ensure the optimal power neither changes
nor modifications may be made at the product, which are not specially
approved by the manufacturer.
HB300E - SM-S - Rev. 14/10
1-3
Chapter 1 Safety
Manual VIPA System SLIO
Responsibility of the user
General
The product is used in the commercial range. The user of the product is
subject of the statutory duties to work safety.
In addition to the safety instructions in this manual, for the usage environment of the product valid safety, accident prevention and environmental
protection regulations must be adhered.
• The user must be informed about the valid industrial safety regulations
and determine in an endangerment evaluation additionally dangers,
which arise as a result of the special conditions for the product on the
place of operation. This is to be transcribed with working instructions for
the operation of the product.
• These working instructions must be kept in direct environment of the
product and accessible at any time for people, which work with the
product.
• The working instructions must fully be adhered.
• The product is only to be operated in a technically flawless condition.
Protective devices
Protection
1-4
The place of installation of the safe field bus modules must comply for
devices according to IP20.
HB300E - SM-S - Rev. 14/10
Manual VIPA System SLIO
Chapter 1 Safety
Education of the personnel
Warning!
Risk of injury resulting from insufficient qualification!
Improper use can cause considerable personal injury and material
damage.
Therefore:
The special activities may only be executed by personnel nominated by the
respective chapters.
Qualification
In the manual the following qualifications for different activities are defined:
Operating
personnel
The automation system may only be operated by persons, which are
trained, instructed and authorized. Troubleshooting, maintenance,
cleaning, maintenance and replacement must be performed only by skilled
or trained personnel. These persons have to know the instruction manual
and have to act accordingly. Commissioning and training should only be
performed by qualified personnel.
Qualified
personnel
These are electrical engineers and electricians of the customer or third
party, which are authorized by the manufacturer and which have learned
installation and commissioning by the manufacturer and are allowed to
ground, mark and install electrical circuits and devices in accordance to the
standard safety technology. Qualified personnel is trained and instructed
according to the corresponding valid standards in safety technology in the
care and use of appropriate safety equipment.
HB300E - SM-S - Rev. 14/10
1-5
Chapter 1 Safety
Manual VIPA System SLIO
Personal protective equipment
General
During work, the wearing of personal protective equipment is needed to
minimize health hazards.
• Always wear the necessary protective equipment for the corresponding
job.
• For your own safety regard the signs, which are in your work space.
Work clothing
is close-fitting clothing with low tensile strength, with tight sleeves and
without a protruding part. Depending on the application it should be
prevented, that the carrier gets serious injured or is exposed to health risk
during work. For reasons of injury no jewelry like rings and chains should
be worn.
Protective helmet
for protection against falling and flying objects.
Safety shoes
for protection against falling heavy objects.
Protective gloves
to protect hands from friction abrasions, punctures or injuries, as well as
from contact with hot objects.
Wear at special works:
Eye protector
to protect eyes from flying parts and liquid splashes.
1-6
HB300E - SM-S - Rev. 14/10
Manual VIPA System SLIO
Chapter 1 Safety
Special hazards
General
In the following section the residual risks are listed.
Regard the listed safety warnings here and the notes in the whole manual
to reduce health hazards and to avoid dangerous situations.
Electric current
Danger!
Risk of death by electric current!
Contact with live parts is immediate danger to life. Damage of the
insulation or of components can be danger to life.
Therefore:
Immediately turn off the power supply when the insulation is damaged.
Work on the electrical system only by qualified personnel.
Always power-off and secure the electrical system during the work on it.
Risk by residual
energy
Danger!
Risk of death by electric current!
After disconnecting the device from main voltage, parts such as power
connections should only be touched when the capacitors are discharged in
the device.
Therefore:
Regard discharge time of the capacitors, do not touch live parts before.
Regard corresponding instructions on the device.
If you have connected additional capacitors on the link, the discharge of
the link can last considerably longer. In this case you have to determine the
required waiting period or even to measure whether the device is free of
voltage.
HB300E - SM-S - Rev. 14/10
1-7
Chapter 1 Safety
Manual VIPA System SLIO
Moved objects
Warning!
Risk of injury from moving parts!
Rotary respectively linear moved parts can cause serious injuries.
Therefore:
Do not touch moving parts during operation.
Do not open the cover during operation.
The mechanical residual energy depends on the application.
Driven components rotate respectively move for a certain time even after
switching off the power supply. Here serve for suited safety devices.
Fire fighting
Danger!
Risk of death by electric current!
Risk of an electrical shock when using a conducting fire fighting medium.
Therefore use the following fire fighting medium:
ABC powder / CO2
1-8
HB300E - SM-S - Rev. 14/10
Manual VIPA System SLIO
Chapter 1 Safety
Electrical safety
General
The System SLIO Safety is designed according to IEC61131-2 for degree
of pollution 2. This means only non-conductive pollution may occur during
operation. Temporary conductivity by condensation is only allowed when
the module is out of operation.
Warning!
Risk of injury from conductive pollution!
During the operation there is no conductive pollution allowed.
Therefore:
Before the system is installed check and guarantee if necessary by
additional measures that the degree of pollution 2 is not exceeded (e.g.
installation in a cubicle with degree of protection IP54 or better).
Note to the
power supply
Warning!
Risk of injury by electric current!
There may only devices be connected to the module, which have a safe
separation of the 230V power.
The power supply to generate 24V power must correspond to the
requirements for PELV/SELV according to EN 50178.
Safety facilities
Warning!
Risk of death by non-functioning safety facilities!
Safety facilities serve for maximum safety during operation. Even if by
safety facilities working process become complicated, its never allowed to
circumvent them. The security is guaranteed only when the safety facilities
are intact.
Therefore:
Before beginning the work check whether the safety facilities are installed
properly and functional.
HB300E - SM-S - Rev. 14/10
1-9
Chapter 1 Safety
Manual VIPA System SLIO
Behavior with dangers and accidents
Preventive
measures
• Always be prepared for accidents or fire!
• First-aid equipment (first aid kit, blankets etc.) and
keep fire
extinguisher handy.
• Make Personal with accident message, first-aid and rescue mechanisms
familiar.
In case of
emergency:
act correctly
•
•
•
•
•
•
Set immediately the device with emergency stop out of operation.
Initiate first-aid measures.
Rescue persons from the danger zone.
Inform responsible on-site.
Alarm medical and / or fire department.
Make free the access routes for emergency vehicles.
Sign-posting
Warning!
Danger of injury by illegible symbols
In course of time stickers and symbols on the equipment can get dirty or
otherwise become unrecognizable.
Therefore:
Please hold all the safety warnings and operation instructions on the device
in always well readable condition.
Signs
The following symbols and signs are in the work space. They refer to the
direct environment in which they are attached.
Electrical voltage
In the such marked work space only qualified personnel may work.
Unauthorized may not touch the marked equipment.
1-10
HB300E - SM-S - Rev. 14/10
Manual VIPA System SLIO
Chapter 1 Safety
Danger!
Danger of life by electrical power!
Time for discharge > 1 Minute
Stored electrical charge
Therefore:
Consider discharge time of capacitor and do not touch live parts before.
Consider appropriate instructions on the device.
If you have connected additional capacitors at DC, the discharge of the DC
link can last longer. In this case you have to determine respectively to
measure the required waiting time whether the device is free of voltage.
Safety hints
The modules of the System SLIO represent the current state of the art and
fulfill the valid safety regulations and the appropriate harmonized,
European standards (EN)
For the user additionally is valid the:
• relevant rules for the prevention of accidents
• EG directives or other country-specific regulations
• generally accepted safety rules
• general ESD regulations
Disturbances of any kind or other damage must be reported to a
responsible person.
Protective and safety equipment must not be circumvented or bypassed.
Dismounted protective equipment must be mounted and functionally tested
before a restart.
The modules are to be secured against misuse or accidental use.
Original mounted signs, labels, stickers are to be always considered and
be held in a readable condition.
HB300E - SM-S - Rev. 14/10
1-11
Chapter 1 Safety
Manual VIPA System SLIO
Functional safety - safety relevant parameters
General
This chapter describes characteristics associated to functional safety. In
according to IEC 61508 safety means that the residual error probability of
the whole system below the standard limits. In accordance to the whole
system internal safety-relevant device errors must be detected and be led
to a safe condition.
Safety relevant
parameters
The values here refer to the modules of this manual. Safety relevant
characteristics may always be found in the according manuals of the
modules.
Characteristics
SDI 4xDC 24V
Characteristics according
to IEC 61508
PFH = 0.25 * 10-9/h
PFDavg = 2.14 * 10-5
SFF according SIL 3
Probability of failure per Hour:
Probability of danger failure per hour.
Probability of Failure on Demand average:
Average of probability of failure on demand.
Safe Failure Fraction:
Fraction of failure, which lead to a safe state.
Characteristics according
to DIN EN ISO 13849-1
Meaning
MTTFd: high
Mean Time To dangerous Failure
DCavg: high
Diagnostic Coverage average
During the expected life of the device of up to
20 years, no proof test is required.
After this interval, the system SLIO safety
module must be decommissioned and sent
back to the vendor.
Device life: 20 Years
1-12
Meaning
HB300E - SM-S - Rev. 14/10
Manual VIPA System SLIO
Characteristics
SDO 4xDC 24V,
0.5A
Characteristics according
to IEC 61508
PFH = 0.22 * 10-9/h
PFDavg = 1.85 * 10-5
SFF according SIL 3
Chapter 1 Safety
Meaning
Probability of failure per Hour:
Probability of danger failure per hour.
Probability of Failure on Demand average:
Average of probability of failure on demand.
Safe Failure Fraction:
Fraction of failure, which lead to a safe state.
Characteristics according
to DIN EN ISO 13849-1
Meaning
MTTFd: high
Mean Time To dangerous Failure
DCavg: high
Diagnostic Coverage average
During the expected life of the device of up to
20 years, no proof test is required.
After this interval, the system SLIO safety
module must be decommissioned and sent
back to the vendor.
Device life: 20 Years
Caution!
If the user calculates his safety application with the specified data for e.g.
10 years, the safety controller is to be decommissioned and sent back to
the vendor at the end of its lifetime. A proof test cannot be established by
the user.
HB300E - SM-S - Rev. 14/10
1-13
Chapter 1 Safety
Manual VIPA System SLIO
Approvals, directives, standards
Conformity and approval
Conformity
CE
Approval
UL
others
RoHS
2006/95/EC
2004/108/EC
2006/42/EC
Low-voltage directive
EMC directive
Machinery directive
UL 508
Approval for USA and Canada
-
Product is lead-free
Protection of persons and device protection
Type of protection
Electrical isolation
to the field bus
to the process level
Insulation resistance
EN 61131-2
Insulation voltage to reference earth
Inputs / outputs
Protective measures
-
IP20
electrically isolated
electrically isolated
AC / DC 50V, test voltage AC 500V
against short circuit
Environmental conditions to EN 61131-2
Climatic
Storage / transport
EN 60068-2-14
Operation
Horizontal installation hanging
EN 61131-2
Horizontal installation lying
EN 61131-2
Vertical installation
EN 61131-2
Air humidity
EN 60068-2-30
Pollution
EN 61131-2
Installation altitude
Mechanical
Oscillation
EN 60068-2-6
Shock
EN 60068-2-27
1g, 9Hz ... 150Hz
15g, 11ms
Mounting conditions
Mounting place
Mounting position
In the control cabinet (IP54 or better)
Horizontal hanging (see "Installation")
EMC
Emitted
interference
Noise immunity
zone B
-
Comment
Class A (Industrial area)
EN 61000-6-2
Industrial area
EN 61000-4-3
EN 61000-4-6
)
0…+60°C
0…+55°C
0…+50°C
RH1 (without condensation, rel. humidity 10…95%)
Degree of pollution 2
2000m
Standard
EN 61000-6-4
EN 61000-4-2
*
-25…+70°C
EN 61000-4-4
EN 61000-4-5
ESD
8kV at air discharge (degree of severity 3),
4kV at contact discharge (degree of severity 2)
HF irradiation (casing)
80MHz … 1000MHz, 10V/m, 80% AM (1kHz)
1.4GHz ... 2.0GHz, 3V/m, 80% AM (1kHz)
2GHz ... 2.7GHz, 1V/m, 80% AM (1kHz)
HF conducted
150kHz … 80MHz, 10V, 80% AM (1kHz)
Burst, degree of severity 3
Surge, installation class 3 *)
Due to the high-energetic single pulses with Surge an appropriate external protective circuit with
lightning protection elements like conductors for lightning and overvoltage is necessary.
1-14
HB300E - SM-S - Rev. 14/10
Manual VIPA System SLIO
Chapter 1 Safety
Example of lightning protection conductors
Application
Vendor
Feed
Dehn
Digital inputs, Test pulse outputs
Dehn
Digital outputs
Dehn
PROFIBUS interface
Dehn
PROFINET interface
Dehn
Norms and Standards
DIN EN 61508 part 1-7
DIN EN ISO 13849-1
DIN EN 61784-3:2010
DIN EN 60204-1
DIN EN 61131-2
DIN EN 61000-4-11
Row SN 29500
DIN EN 61496-1
Article
BLITZDUCTOR VT
BVT AVD 24
DEHNconnect RK
DCO RK ME 24
DEHNconnect RK
DCO RK D 5 24
BLITZDUCTOR XT
BXT ML2 BD HFS 5
DEHNpatch
DPA M CLE RJ45B 48
Description
External Lightning protection
(DC24V/10A)
External Lightning protection
(DC24V/0.5A)
External Lightning protection
(DC24V/10A)
External Lightning protection
(RS485/5V)
External Lightning protection
(RJ45/48V)
Functional safety of electrical/electronic/programmable electronic
safety-related systems
Safety of machinery: Safety-related parts of control systems
Functional safety field buses - General rules and profile definitions
Electrical equipment of machines
Programmable logic controllers,
part 2: Equipment requirements and tests
Mains voltage variation
Failure rate, component, expected value, reliability
Electro sensitive protective equipment
Requirements to clearance / creepage current distances and system power supply
EN 61131-2
The definition of clearance and creepage current distances takes
place in accordance to EN 61131-2. For the safe field bus coupler
overvoltage category 2 and degree of pollution 2 are basis.
EN 13849
The acceptance of error exclusions for short-circuits between
neighbouring conductor or for short-circuits between neighbouring
components must be avoided as far as possible by suitable circuit
and layout measures.
If an error exclusion is inevitable, measures are to be used in
accordance with EN 13849 part of 2.
EN 50178
The device is developed for operation on 24V power supplies, which
correspond to the PELV-/SELV regulations in accordance to EN
50178.
EN 61508
The normative requirements of the 61508 (increased EMC
requirements and requirements concerning isolation) are to be
fulfilled also for the common voltage circuit of the SLIO system.
EN 50178
So that the electrical values for extra-low voltage with safe
separation cannot be exceeded on the safe field bus coupler, for the
system 24V power supplies are exclusively used, which correspond
to the PELV /SELV regulations in accordance with EN 50178.
In order to protect the safe field bus couplers against overvoltage, a
suitable overvoltage protection is provided.
DIN EN 60204-1
The 24V power supply must keep the voltage interrupt according to
EN 60204-1.
Requirements for environmental and EMC testing
DIN EN 62061
Safety of machinery - Functional safety of safety-related electrical,
electronic and programmable electronic control systems
DIN EN 62061 Appendix E
For the EMC immunity tests, the increased requirements according
to appendix E of EN 62061 are applied.
HB300E - SM-S - Rev. 14/10
1-15
Chapter 1 Safety
1-16
Manual VIPA System SLIO
HB300E - SM-S - Rev. 14/10
Manual VIPA System SLIO
Chapter 2 Product description
Chapter 2
Product description
Overview
Contents of this chapter are structure, characteristics and technical data of
the System SLIO safety signal modules.
Content
Topic
Page
Chapter 2
Product description ........................................................ 2-1
System conception ............................................................................... 2-2
Dimensions .......................................................................................... 2-5
SDI 4xDC 24V - Operating and display elements ................................. 2-6
SDI 4xDC 24V - Process image ......................................................... 2-11
SDI 4xDC 24V - Parameter record set................................................ 2-12
SDI 4xDC 24V - Technical data.......................................................... 2-21
SDO 4xDC 24V 0.5A - Operating and display elements ..................... 2-23
SDO 4xDC 24V 0.5A - Process image ............................................... 2-28
SDO 4xDC 24V 0.5A - Parameter record set...................................... 2-29
SDO 4xDC 24V 0.5A - Technical data................................................ 2-36
Response time ................................................................................... 2-38
Compatibility list ................................................................................. 2-42
HB300E - SM-S - Rev. 14/10
2-1
Chapter 2 Product description
Manual VIPA System SLIO
System conception
Overview
System SLIO is a modular automation system for assembly on a 35mm
mounting rail. By means of the peripheral modules with 2, 4 or 8 channels
this system may properly be adapted matching to your automation tasks.
The wiring complexity is low, because the supply of the DC 24V power
section is integrated to the backplane bus and defective modules may be
replaced with standing wiring.
By deployment of the power modules in contrasting colors within the
system, further isolated areas may be defined for the DC 24V power
section supply, respectively the electronic power supply may be extended
with 2A.
Components
The System SLIO consists of the following components:
• Bus coupler
• Periphery modules
• Power modules
• Accessories
Bus coupler
Bus coupler for
System SLIO safety
modules
2-2
With a bus coupler bus interface and power
module is integrated to one casing. With the bus
interface you get access to a subordinated bus
system.
Via the integrated power module for power supply
the bus interface is supplied as well as the
electronic of the connected periphery modules.
The DC 24 power section supply for the linked
periphery modules is established via a further
connection at the power module.
By installing of up to 64 periphery modules at the
bus coupler, these are electrically connected, this
means these are assigned to the backplane bus,
the electronic modules are power supplied and
each periphery module is connected to the DC
24V power section supply.
The System SLIO safety modules of this manual can be used with the
following bus coupler:
• 053-1DP00 - PROFIBUS DP: Firmware V1.3.0 and up and GSD file
(SLIO) V223 and up
• 053-1PN00 - PROFINET: Firmware V1.1.7 and up and GSDML file
(SLIO) V116 and up
HB300E - SM-S - Rev. 14/10
Manual VIPA System SLIO
Periphery modules
Chapter 2 Product description
Each periphery module consists of a terminal and an electronic module.
[1]
[1]
Terminal module
[2]
Electronic module
[2]
Terminal module
The terminal module serves to carry the electronic
module, contains the backplane bus with power supply
for the electronic, the DC 24V power section supply and
the staircase-shaped terminal for wiring.
Additionally the terminal module has a locking system
for fixing at a mountig rail.
By means of this locking system your SLIO system may
be assembled outside of your switchgear cabinet to be
later mounted there as whole system.
Electronic module
The functionality of a SLIO periphery module is defined
by the electronic module, which is mounted to the
terminal module by a sliding mechanism.
With an error the defective module may be exchanged
for a functional module with standing installation.
At the front side there are LEDs for status indication.
For simple wiring each module shows a corresponding
connection diagram at the front and at the side.
Safety
periphery module
According to structure and dimensions the safety
periphery modules correspond to the standard periphery
modules.
For better recognition the color of the safety modules is
yellow.
Please consider that the safety electronic module may
only be used at an yellow terminal module!
The operation with mechanical compatible terminal
modules is not allowed.
HB300E - SM-S - Rev. 14/10
2-3
Chapter 2 Product description
Manual VIPA System SLIO
Power-Module
In the System SLIO the power supply is established by
power modules. These are either integrated to the bus
coupler or may be installed between the periphery
modules. Depending on the power module isolated
areas of the DC 24V power section supply may be
defined respectively the electronic power supply may be
extended with 2A.
For better recognition the color of the power modules
are contrasting to the periphery modules.
Clamp Module
A clamp module is a distributor module. According to the
module GND respectively DC 24V of the power section
supply may be accessed by the clamp connectors.
The backplane bus is looped through the module. So
this module has no module ID, but influences the
maximum number of modules to be connected.
Accessories
Shield bus carrier
The shield bus carrier serves to carry the shield bus
(10mm x 3mm) to connect cable shields.
Shield bus carriers, shield bus and shield fixings are not
in the scope of delivery. They are only available as
accessories.
The shield bus carrier is mounted underneath the
terminal of the terminal module.
With a flat mounting rail for adaptation to a flat mounting
rail you may remove the spacer of the shield bus carrier.
Bus cover
With each bus coupler, to protect the backplane bus
connectors, there is a mounted bus cover in the scope of
delivery. You have to remove the bus cover of the bus
coupler before mounting a SLIO module.
For the protection of the backplane bus connector you
always have to mount the bus cover at the last module
of your system again.
If this is a clamp module, for adaptation the upper part of
the bus cover can be cut off.
2-4
HB300E - SM-S - Rev. 14/10
Manual VIPA System SLIO
Chapter 2 Product description
Dimensions
109
104
Dimensions
bus coupler
76.5
48.5
49
76.5
12.9
15
55.5
Dimensions
electronic module
(here Safety)
133
109
104
Dimensions
periphery module
(here Safety)
62
12.9
Dimensions in mm
The dimensions of the System SLIO safety modules are identical to those
of the System SLIO standard modules.
HB300E - SM-S - Rev. 14/10
2-5
Manual VIPA System SLIO
Chapter 2 Product description
SDI 4xDC 24V - Operating and display elements
Description
The electronic module collects the binary control signals from the process
level and transmits them isolated to the central bus system.
It has 4 channels and their status is monitored via LEDs.
Properties
• 4 digital inputs isolated to the backplane bus
• Status indication of the channels via LEDs
• Safety module with automatic disconnection in case of error according to
IEC 61508 SIL3 and EN ISO 13849-1, Cat.4/PLe
Structure
1
2
3
4
5
6
7
8
9
10
Status indication
LED
RUN
MF
Color
green
red
RUN
MF
PS
ERR
ER2
DI 0
DI 1
DI 2
DI 3
PS
green
ERR
red
ER2
yellow
DI x
green
[1]
[2]
[3]
[4]
[5]
[6]
[7]
[8]
[9]
[10]
Locking lever terminal module
Labeling strip
Address switch for F-address
Backplane bus
LED status indication
DC 24V power section supply
Electronic module
Terminal module
Locking lever electronic module
Terminal
Description
RUN MF
●
○
●
●
○
●
○
BB
○
○
○
BB
●
BB
B
○
●
C
C
B
●
Bus communication is OK
Module status is OK
Bus communication is OK
Module status reports an error
Bus communication is not possible
Module status reports an error
Error at bus power supply
Error in configuration
(see following pages)
PROFIsafe communication in data exchange
Safety parameterization expected
Error - acknowledgement expected
Module initialization is running
Permanent fail-safe condition (s. following pages
Blink code (see following pages)
Blink code (see following pages)
Requesting fail-safe state
Digital input is triggered
on: ● off: ○ blinks with 0.5Hz: B blinks with 2Hz: BB Blink code: C
2-6
HB300E - SM-S - Rev. 14/10
Manual VIPA System SLIO
RUN- and MF-LED
Sum current of the
electronic power
supply exceeded
Chapter 2 Product description
Each module has the LEDs RUN and MF on its front side. Errors or
incorrect modules may be located by means of these LEDs.
In the following illustrations flashing LEDs are marked by ☼.
RUN
MF
RUN
MF
RUN
MF
RUN
MF
RUN
MF
RUN
MF
RUN
MF
RUN
MF
RUN
MF
RUN
MF
Behavior: After PowerON the RUN LED of each module is off and the MF
LED of each module is sporadically on.
Reason: The maximum current for the electronic power supply is exceeded.
Remedy: As soon as the sum current of the electronic power supply is
exceeded, always place the power module 007-1AB10.
More concerning this may be found below at "Wiring".
Error in
configuration
RUN
MF
RUN
MF
RUN
MF
RUN
MF
RUN
MF
RUN
MF
RUN
MF
RUN
MF
RUN
MF
RUN
MF
Behavior: After PowerON the MF LED of one module respectively more
modules flashes. The RUN LED remains off.
Reason: At this position a module is placed, which does not correspond to
the configured module.
Remedy: Match configuration and hardware structure.
Module failure
RUN
MF
RUN
MF
RUN
MF
RUN
MF
RUN
MF
RUN
MF
RUN
MF
RUN
MF
RUN
MF
RUN
MF
Behavior: After PowerON all of the RUN LEDs up to the defective module
are flashing. With all following modules the MF LED is on and the RUN
LED is off.
Reason: The module on the right of the flashing modules is defective.
Remedy: Replace the defective module.
HB300E - SM-S - Rev. 14/10
2-7
Chapter 2 Product description
ERR LED
Manual VIPA System SLIO
The LED is permanently on at a critical error, which led into a permanent
fail-safe state, which may not be acknowledged.
On error like short-circuit, cross-circuit and so on, the ERR LED shows an
error by the following blink behavior. The LED gets off for 2s. Then it shows
the following code 1 ... 6 by blinking with 1Hz:
Blinking
1x
2x
3x
4x
5x
6x
Error
Short-circuit within a channel
Cross-circuit error between 2 channels
Discrepancy error between 2 channels
--Other errors
F-address was changed
(see chapter 3 "Setting the F-address")
External error
yes
yes
yes
--no
no
After the blink code the LED gets off for 2s and then starts again with the
code output.
Normally an external error is caused by wiring respectively by a connected
sensor. Please check also your parameters for the sensor.
ER2 LED
2-8
If an external error was reported by the ERR LED, the LED ER2 indicates
the faulty channel by the following blink code:
The ER2 LED gets off for 2s. Then it indicates the number of the faulty
channel by blinking with 1Hz. Here it is valid blinking 1x...4x means channel
DI 0 ... 3. After the blink code the LED gets off for 2s and then starts again
with the code output.
If there are more errors pending, only the 1. recognized error is indicated!
If the LED blinks with 0.5Hz the safety control system requests a fail-safe
state of the System SLIO safety module. But there is no error on the
System SLIO safety module.
This request may occur, for example after a brief interrupt of the
communication and may be acknowledged.
HB300E - SM-S - Rev. 14/10
Manual VIPA System SLIO
Pin assignment
Chapter 2 Product description
For wires with a cross section of 0.08mm2 up to 1.5mm2.
DI
1
1
1
5
5
2
2
6
6
3
3
7
7
3
4
4
8
8
4
2
DI0 DI1
DI2 DI3
T0
T1
T2
T3
5
6
7
8
DC24V
0V
Pos.
1
2
3
4
5
6
7
8
Function
DI 0
DI 2
T0
T2
DI 1
DI 3
T1
T3
Type
I
I
O
O
I
I
O
O
Description
Digital input DI 0
Digital input DI 2
Clock output T0
Clock output T2
Digital input DI 1
Digital input DI 3
Clock output T1
Clock output T3
I: Input, O: Output
HB300E - SM-S - Rev. 14/10
2-9
Manual VIPA System SLIO
Chapter 2 Product description
Address switch for
F-address
The F-address is to be configured by the F-address switch at the VIPA
safety module and additionally in the master system e.g. hardware
configurator. The F-address is to be set by the F-address switch besides on
the safety module. Only if the F-address set in the hardware configurator
accords to the setting of the F-address switch, it is possible to operate!
Pos.
10
11
1
0
8
9
6
7
4
5
2
3
Value
0
1
1
0
0
1
2
3
4
5
6
7
8
9
10
11
1
2
4
8
16
32
64
128
256
512
1024
2048
Example
State
1
1
0
0
0
1
0
0
0
1
0
0
Address
1+2+32+512=547
Address: 547
Note!
When the module is installed, the F-address switch may not be
accessed!
To set the F-address on the safety module the (electronic) module is to be
demounted before as described under "Demounting and module
exchange".
2-10
HB300E - SM-S - Rev. 14/10
Manual VIPA System SLIO
Chapter 2 Product description
SDI 4xDC 24V - Process image
Input/Output
area
The safety DI module occupies 5 data bytes each in the input and output
image of the superordinate safety PLC system.
The data to be sent and received are stored in the input and output byte
0 ... 4.
PROFIsafe-V2
Mode
Input area
Output area
Addr.
+0
Name
PII
+1
+2
+3
+4
PII_STAT
PII_RN
PII_CRC_H
PII_CRC_L
Bytes Input data
0
PROFIsafe Inputs
Bit 0: DI 1
Bit 1: DI 2
Bit 2: DI 3
Bit 3: DI 4
Bit 7 ... 4: reserved
1
PROFIsafe Status
2
PROFIsafe CRC2 byte 2
3
PROFIsafe CRC2 byte 1
4
PROFIsafe CRC2 byte 0
Addr.
+0
+1
+2
+3
+4
Name
PIQ
PIQ_CTRL
PIQ_RN
PIQ_CRC_H
PIQ_CRC_L
Bytes
0
1
2
3
4
HB300E - SM-S - Rev. 14/10
Output data
reserved
PROFIsafe Control
PROFIsafe CRC2 byte 2
PROFIsafe CRC2 byte 1
PROFIsafe CRC2 byte 0
2-11
Manual VIPA System SLIO
Chapter 2 Product description
SDI 4xDC 24V - Parameter record set
Parameter data
Parameter
Record set 81h (iParameter)
This record set is once transferred during start-up by the standard
parameter telegram.
Name
Parameter change
mode
Behavior after
channel errors
Activation
diagnostic interrupt
Type
Bit
Bit
0: deactivated
1: activated
This bit is not safety-related.
Channel 0, 1:
Bit
0: deactivated
Activation
1: activated
Channel 0, 1:
UINT16 Condition: Channel 0, 1
Input smoothing time
Activation is "activated"
1-1000
in ms
Channel 0,1:
Bit
Condition: Channel 0, 1
Test pulse activation
Activation is "activated"
0: activated
1: deactivated
The test pulse activation also
switches on the short-circuit and
cross-circuit recognition.
Channel 0, 1:
Bit
Condition: Channel 0, 1
Evaluation of the
Activation is "activated"
inputs
0: 1 channel
1: 2 channel
Channel 0, 1:
Bit
Condition: Channel 0, 1
Signal polarity
Activation is "activated"
Condition: Channel 0, 1
Evaluation of the inputs is
"2 channel"
0: equivalent
1: antivalent
Channel 0, 1:
UINT16 Condition: Channel 0, 1
Discrepancy time
Activation is "activated"
in ms
Condition: Channel 0, 1
Evaluation of the inputs is
"2 channel"
1-30000
Channel 0, 1:
Bit
Condition: Channel 0, 1
Discrepancy error
Activation is "activated"
Condition: Channel 0, 1
(re-integration after
Evaluation of the inputs is
discrepancy error)
"2 channel"
0: Test 0-signal required
1: Test 0-Signal not required
Channel 2, 3:
Bit
0: deactivated
Activation
1: activated
2-12
Bit
Description / range of values
0: normal parameter record set
1: Parameter change F-address
0: Passivate the entire module
Default
0
0 (fix)
1
1
1
0
1
0
20
0
1
HB300E - SM-S - Rev. 14/10
Manual VIPA System SLIO
Chapter 2 Product description
Name
Type Description / range of values
Channel 2, 3:
UINT16 Condition: Channel 2, 3
Input smoothing time
Activation is "activated"
in ms
1-1000
Channel 2, 3:
Bit
Condition: Channel 2, 3
Test pulse activation
Activation is "activated"
0: activated
1: deactivated
The test pulse activation also
switches on the short-circuit and
cross-circuit recognition.
Channel 2, 3:
Bit
Condition: Channel 2, 3
Evaluation of the
Activation is "activated"
inputs
0: 1 channel
1: 2 channel
Channel 2, 3:
Bit
Condition: Channel 2, 3
Signal polarity
Activation is "activated"
Condition: Channel 2, 3
Evaluation of the inputs is
"2 channel"
0: equivalent
1: antivalent
Channel 2, 3:
UINT16 Condition: Channel 2, 3
Discrepancy time
Activation is "activated"
Condition: Channel 2, 3
in ms
Evaluation of the inputs is
"2 channel"
1-30000
Channel 2, 3:
Bit
Condition: Channel 2, 3
Discrepancy error
Activation is "activated"
(re-integration after
Condition: Channel 2, 3
discrepancy error)
Evaluation of the inputs is
"2 channel"
0: Test 0-signal required
1: Test 0-Signal not required
Default
1
0
1
0
20
0
Parameter change
mode
For a valid parameterization this parameter must be set to 0 (default value).
If the F-address of a System SLIO safety module is to be changed, the Faddress in the memory of the module can be erased by setting this
parameter.
More about this may be found in chapter 3 at "Setting the F-address".
Behavior after
channel errors
If the SDI module detects an error at one of the input channels (e.g. short
circuit), then the whole System SLIO safety module is passivated. Here, the
module provides the safety control system as long with the fail-safe value 0
for the inputs until the error is fixed and acknowledged.
Activation
diagnostic interrupt
Here you activate res. de-activate the diagnostic interrupt function. With a
set diagnostic interrupt bit in case of an error a diagnostic interrupt
message is sent to the upper master system. There the diagnostics
message can further be processed. More may be found in the manual of
the master system.
HB300E - SM-S - Rev. 14/10
2-13
Chapter 2 Product description
Channel activation
Manual VIPA System SLIO
With the channel activation channel groups may be activated or
deactivated. With channel activation = 1 the corresponding channel group
is in "standard operation".
Deactivated channel groups (channel activation = 0) permanently provide a
logical 1 during the cyclic data exchange as input information to the safety
control system as long as the module is not passivated. This serves to
bridge non-existing sensors e.g. during commissioning or variations of
machines, without adjustment of the safety program in the safety control
system.
Note!
Deactivation of channel groups represents a potentially dangerous
condition!
The usage of the channel activation must be taken into account during
planning and constructing the safety program!
Input smoothing
time
Errors on the input signals can be suppressed by specifying an input
smoothing time. This is used for debouncing sensors.
If there is an active safety sensor connected to an input, which tests the
wired lines by test pulses, then the input smoothing time must always be
greater than the max. test pulse length of the sensor.
Please also refer to the "Connection examples" in chapter 3.
Note!
The input smoothing time is included in the calculation of the max. system
response time (see "Response time")!
Test pulse
activation
2-14
When using sensors with mechanical or electromechanical contacts, to
detect a short circuit to DC 24V, for each channel group a test pulse can be
activated. For test pulse output each System SLIO safety module has a DC
24V power supply output for each channel group.
When activated (test pulse activation = 0) the DC 24V power supply output
is shortly set to 0V at defined intervals. Here the return of the test pulse is
observed by each input channel, provided the sensor is currently closed.
Here wiring errors or short and cross circuits can be detected.
This function is to be deactivated (test pulse activation = 1) if there is an
active sensor (e.g. light array) connected to the input with integrated
electronic and semiconductor output. Here the active sensor serves for the
observation of the connected lines by generating the test pulse to check the
switch-off ability. Here the input smoothing time of the corresponding safety
input must be greater than the test pulse length of the output of the safety
sensor (vendor information).
Please also refer to the "Connection examples" in chapter 3.
HB300E - SM-S - Rev. 14/10
Manual VIPA System SLIO
Chapter 2 Product description
Evaluation of the
inputs
Here for each channel group you can set the evaluation of the inputs as 1channel or 2-channel evaluation.
With "1-channel" evaluation one sensor with one output is connected to one
channel.
With "2-channel" evaluation one sensor with 2 outputs is connected to a
channel group. Here the sensor supplies by both connectors the same
signal state. With "2-channel" evaluation more short and cross circuits may
be detected as with "1-channel" evaluation.
This kind of 2-channel connection allows to achieve higher safety levels like
SIL 3 and PL e.
Signal polarity
With the parameter signal polarity with 2-channel evaluation the inputs of
your System SLIO safety module may be adapted to the signal polarity of
your sensor.
The 1. channel always supplies the current input signal of the sensor.
With "equivalent" signal polarity the 2. channel supplies the same value as
the 1. channel. With an "antivalent" signal polarity the signal is inverted by
the 2. channel of the sensor. Antivalent signals are found e.g. at connecting
safety doors. By this way simple manipulations can be prevented.
Independent of the signal polarity, in the safety control system the resulted
input value (corresponds to the polarity of the 1. channel) is passed to both
input bits of a channel group.
Discrepancy time
During the switching operation of 2-channel sensors, temporarily both
channels do not supply the same signal state. With the discrepancy time
you can set the time until both channels have valid values after switching.
If the discrepancy time is exceeded, the System SLIO safety module gets
to fail-safe state.
It is valid for electrical and electromechanical sensors:
Discrepancy to be set = real signal discrepancy (switch and bounce time of
the sensor) + set Input smoothing time + 7 ms
It is valid for active sensors with semiconductor output (and own test pulse
generation):
Discrepancy to be set = real signal discrepancy + set Input smoothing time
* 3 + 4 ms
Note!
Please consider with mechanical sensors and increasing abrasion by e.g.
contact bounce, the discrepancy time increases and this is reported as
error by the System SLIO safety module.
In this case, in order to avoid failure of a sensor, during operation a
defective sensor must immediately be changed!
HB300E - SM-S - Rev. 14/10
2-15
Chapter 2 Product description
Re-integration after
discrepancy error
2-16
Manual VIPA System SLIO
This parameter allows you to define how you can acknowledge a
discrepancy error.
With 0 of this parameter, a discrepancy error can only be acknowledged
when the sensor supplies 0 signal.
For example, an emergency stop switch must be pressed.
With 1 of this parameter, a discrepancy error can only be acknowledged
when both sensors supply a valid signal state (depending on the
parameterization equivalent or antivalent).
HB300E - SM-S - Rev. 14/10
Manual VIPA System SLIO
Overview
PROFIsafeF parameters
F Parameter
F_SIL
F_CRC_Length
F_Block_ID
F_Par_Version
F_Source_Add
F_Dest_Add
HB300E - SM-S - Rev. 14/10
Chapter 2 Product description
Description
The parameter F_SIL specifies the required
safety integrity class of the SLIO safety
module.
The SLIO safety module supports up to SIL3.
The parameter F_CRC_Length specifies the
length of the CRC2 key to be used in the
PROFIsafe telegram.
The required length depends on the length of
the user data to be transferred.
Valid combinations are:
F_Par_Version
F_CRC_Length
PROFIsafe-V2-Mode 3-Byte-CRC
F_Block_ID specifies the format of the F
parameter set.
Value 1 indicates that F_iPar_CRC is a part of
the F parameters.
F_Par_Version specifies the PROFIsafe
version to be used for communication.
The System SLIO safety module supports with
PROFIBUS and PROFINET PROFIsafe-V2mode and uses the version specified by this
parameter:
F_Par_Version
V2-mode
F_Source_Add specifies the PROFIsafe
source address. To prevent incorrect
parameterization, the address of the
configuration tool is automatically assigned
and cannot be changed.
The Parameter can accept values from 1 to
65534.
F_Dest_Add specifies the PROFIsafe
destination address of the SLIO safety module.
For F_Dest_ Add values from 1 to 4095 can be
selected. Each address value may appear in
the system once, which is accessed by the
safety PLC.
To establish the PROFIsafe communication
the parameter value must match the setting of
the F-address of the SLIO safety module,
which is set by the DIP switch (see "Setting Faddress").
Default
SIL 3
3-ByteCRC
1
V2mode
2000
200
2-17
Chapter 2 Product description
F Parameter
F_WD_Time
F_iPar_CRC
2-18
Manual VIPA System SLIO
Description
Default
150
The parameter F_WD_Time determines the
monitoring time for the PROFIsafe
communication between F controller and
System SLIO safety module.
At least on valid PROFIsafe telegram must be
exchanged between the safe PLC and the
SLIO safety module within the monitoring time.
If this condition is not met, the safe PLC or the
SLIO safety module initiates a safe state.
The monitoring time must be selected, so that
telegram execution times are tolerated, but an
interruption in the connection is detected
quickly enough.
Below you can find information about the
calculation.
The monitoring time can be specified in steps
of 1 ms. The possible range of value
(1 to 65535 ms) is specified by the device
description file (GSD/GDML).
0
The parameter F_iPar_CRC specifies a
comparison value for the CRC value via the
iParameter (iPar_CRC). The PROFIsafe data
exchange only starts when the value for
F_iPar_ CRC and the iPar_CRC match.
After confirmation of the set parameters the
CRC (iPar-CRC) is calculated and displayed
by the VIPA Safety CRC-Tool.
This value must be entered with the
configuration tool of the safe PLC to the F
parameter of the SLIO safety module.
HB300E - SM-S - Rev. 14/10
Manual VIPA System SLIO
Calculating the
F_WD_Time
Chapter 2 Product description
Thus the running PROFIsafe watchdog in the SLIO safety modules is reset
periodically, that this does not release, the following cyclically data flow
(circulation of a token) is to be considered:
System SLIO
safety module
Bus coupler
Field bus
F-SPS
The time required for this can be regarded as the full circulation time of a
token.
Thus the minimum PROFIsafe monitoring time to be configured results in:
TPSTO = TSlave + TBUS + TCI + TBUS + TSlave + TDAT
TPSTO = 2*TSlave + 2*TBUS + TCI + TDAT
Component Time
System SLIO TPSTO
safety
module
Bus coupler TSlave
Field bus
TBus
Either
TTR
Field bus
(PROFIBUS)
Or
TWD
Field bus
(PROFINET)
HB300E - SM-S - Rev. 14/10
Meaning
Configured PROFIsafe
monitoring time
(F_WD_Time)
Max. response time of
the decentralized
peripheral system =
max. delay by the bus
coupler and the backplane bus
Response time of the
field bus
max. target rotation
time for the DP master
system
From
refer to the formula above
Documentation of the
decentralized periphery
system
(for System SLIO
PROFIBUS and
PROFINET < 2ms)
TTR at PROFIBUS res.
TWD at PROFINET
Object properties of the
DP master system, bus
parameters in the HW
configuration.
threshold monitoring of Value from the object
the PROFINET IO
properties of the
device
PROFINET IO device Tab
"IO cycle", in HW config.
If there is no threshold
monitoring time configured
for the IO device, instead
of this you can take the
given refresh time
multiplied with 3.
The refresh time can be
found in the HW config. at
object properties of the
PROFINET IO system.
2-19
Manual VIPA System SLIO
Chapter 2 Product description
2-20
Component
F-PLC /
F-Logic
Time
TCI
Meaning
Configured cycle time
the F-runtime group is
called
SLIO safety
module
TDAT
max. acknowledge
time of the F periphery
(Device Acknowledgement Time)
From
Configured timing (cycle
time) for calling the Fruntime group.
By processing of higher
priority interrupts, by
communication load, or by
testing and commissioning
functions, the distance
between the start times
can increase.
The influence of these
factors can be determined
from the documentation
and configuration of the
standard system itself and
then added to the value
determined here.
8ms
HB300E - SM-S - Rev. 14/10
Manual VIPA System SLIO
Chapter 2 Product description
SDI 4xDC 24V - Technical data
Order no.
Type
Module ID
Current consumption/power loss
Current consumption from backplane bus
Power loss
Technical data digital inputs
Number of inputs
Cable length, shielded
Cable length, unshielded
Rated load voltage
Current consumption from load voltage L+ (without
load)
Rated value
Input voltage for signal "0"
Input voltage for signal "1"
Input voltage hysteresis
Frequency range
Input resistance
Input current for signal "1"
Connection of Two-Wire-BEROs possible
Max. permissible BERO quiescent current
Input delay of "0" to "1"
Input delay of "1" to "0"
Number of simultaneously utilizable inputs
horizontal configuration
Number of simultaneously utilizable inputs vertical
configuration
Input characteristic curve
Initial data size
Status information, alarms, diagnostics
Status display
Interrupts
Process alarm
Diagnostic interrupt
Diagnostic functions
Diagnostics information read-out
Module state
Module error display
Channel error display
Isolation
Between channels
Between channels of groups to
Between channels and backplane bus
Insulation tested with
Safety
Safety protocol
Safety requirements
Secure user address
Watchdog
Two channels
HB300E - SM-S - Rev. 14/10
021-1SD00
SM 021
0C41 2E00
95 mA
0.8 W
4
330 m
330 m
2 mA
DC 20.4...28.8 V
DC 0...5 V
DC 15...28.8 V
3 mA
9
0.5 mA
parameterizable 1ms - 1s
parameterizable 1ms - 1s
4
4
IEC 61131-2, type 3
4 Bit
green LED per channel
yes, parameterizable
no
yes, parameterizable
yes, parameterizable
possible
green LED
red LED
red ERR LED and yellow
ER2 LED
9
DC 500 V
PROFIsafe V2
SIL CL 3 and PL e
1 - 4095
parameterizable 10ms - 1s
Each 2 of 4 inputs
switchable
2-21
Chapter 2 Product description
Order no.
Test pulse outputs
Datasizes
Input bytes
Output bytes
Parameter bytes
Diagnostic bytes
Housing
Material
Mounting
Mechanical data
Dimensions (WxHxD)
Weight
Environmental conditions
Operating temperature
Storage temperature
Certifications
UL508 certification
Manual VIPA System SLIO
021-1SD00
4
5
5
44
20
PC / PPE GF10
Profile rail 35 mm
12.9 x 109 x 76.5 mm
60 g
0 °C to max. 60 °C
-25 °C to 70 °C
in preparation
Note!
Please consider that the signal increase of the sensor signals for signal on
and signal off must have a slope of at least 13V/s, otherwise an error could
be detected by the mutual monitoring of the microcontrollers!
2-22
HB300E - SM-S - Rev. 14/10
Manual VIPA System SLIO
Chapter 2 Product description
SDO 4xDC 24V 0.5A - Operating and display elements
Description
The electronic module accepts binary control signals from the central bus
system and transfers them to the process level via outputs.
It has 4 channels and their status is monitored via LEDs.
Properties
• 4 digital outputs, isolated to the backplane bus
• Status indication of the channels via LEDs
• Safety module with automatic disconnection in case of error according to
IEC 61508 SIL3 and EN ISO 13849-1, Cat.4/PLe
Structure
1
2
3
4
5
6
7
8
9
10
Status indication
LED
RUN
MF
Color
green
red
RUN
MF
PS
ERR
ER2
DO 0
DO 1
DO 2
DO 3
PS
green
ERR
red
ER2
yellow
DI x
green
[1]
[2]
[3]
[4]
[5]
[6]
[7]
[8]
[9]
[10]
Locking lever terminal module
Labeling strip
Address switch for F-address
Backplane bus
LED status indication
DC 24V power section supply
Electronic module
Terminal module
Locking lever electronic module
Terminal
Description
RUN MF
●
○
●
●
○
●
○
BB
○
○
○
BB
●
BB
B
○
●
C
C
B
●
Bus communication is OK
Module status is OK
Bus communication is OK
Module status reports an error
Bus communication is not possible
Module status reports an error
Error at bus power supply
Error in configuration
(see following pages)
PROFIsafe communication in data exchange
Safety parameterization expected
Error - acknowledgement expected
Module initialization is running
Permanent fail-safe condition (s. following pages
Blink code (see following pages)
Blink code (see following pages)
Requesting fail-safe state
Digital output is triggered
on: ● off: ○ blinks with 0.5Hz: B blinks with 2Hz: BB Blink code: C
HB300E - SM-S - Rev. 14/10
2-23
Manual VIPA System SLIO
Chapter 2 Product description
RUN- and MF-LED
Sum current of the
electronic power
supply exceeded
Each module has the LEDs RUN and MF on its front side. Errors or
incorrect modules may be located by means of these LEDs.
In the following illustrations flashing LEDs are marked by ☼.
RUN
MF
RUN
MF
RUN
MF
RUN
MF
RUN
MF
RUN
MF
RUN
MF
RUN
MF
RUN
MF
RUN
MF
Behavior: After PowerON the RUN LED of each module is off and the MF
LED of each module is sporadically on.
Reason: The maximum current for the electronic power supply is exceeded.
Remedy: As soon as the sum current of the electronic power supply is
exceeded, always place the power module 007-1AB10.
More concerning this may be found below at "Wiring".
Error in
configuration
RUN
MF
RUN
MF
RUN
MF
RUN
MF
RUN
MF
RUN
MF
RUN
MF
RUN
MF
RUN
MF
RUN
MF
Behavior: After PowerON the MF LED of one module respectively more
modules flashes. The RUN LED remains off.
Reason: At this position a module is placed, which does not correspond to
the configured module.
Remedy: Match configuration and hardware structure.
Module failure
RUN
MF
RUN
MF
RUN
MF
RUN
MF
RUN
MF
RUN
MF
RUN
MF
RUN
MF
RUN
MF
RUN
MF
Behavior: After PowerON all of the RUN LEDs up to the defective module
are flashing. With all following modules the MF LED is on and the RUN
LED is off.
Reason: The module on the right of the flashing modules is defective.
Remedy: Replace the defective module.
2-24
HB300E - SM-S - Rev. 14/10
Manual VIPA System SLIO
ERR LED
Chapter 2 Product description
The LED is permanently on at a critical error, which led into a permanent
fail-safe state, which may not be acknowledged.
On error like short-circuit, cross-circuit and so on, the ERR LED shows an
error by the following blink behavior. The LED gets off for 2s.
Then it shows the following code 1 ... 6 by blinking with 1Hz:
Blinking
1x
2x
3x
4x
5x
6x
Error
Short-circuit within a channel
Cross-circuit error between 2 channels
Wire break error on currents < 30mA
(see "Parameter record set" description)
Read back error output part
Other errors
F-address was changed
(see chapter 3 "Setting the F-address")
External error
yes
yes
yes
yes
no
no
After the blink code the LED gets off for 2s and then starts again with the
code output.
Normally an external error is caused by wiring respectively by a connected
actuator. Please check also your parameters for the actuator.
The system SLIO safety output module monitors the actual state of the
output voltage level monitoring with the setpoint state (control). If there is a
difference between the setpoint state and the actual state detected, a read
back error is reported.
This can either mean that the output is "1" state, although it should have "0"
state (points to a separate power supply) or the output has "0" state,
although it should have "1" state (points to an external short circuit or an
internal hardware malfunction.
In this case of error please check the external wiring and the configured
test pulse length. If they are OK and the error occurs several times in
succession, then the module is defective and you have to proceed as
described at "Repair".
ER2 LED
If an external error was reported by the ERR LED, the LED ER2 indicates
the faulty channel by the following blink code.
The ER2 LED gets off for 2s. Then it indicates the number of the faulty
channel by blinking with 1Hz. Here it is valid blinking 1x...4x means channel
DI 0 ... 3. After the blink code the LED gets off for 2s and then starts again
with the code output.
If there are more errors pending, only the 1. recognized error is indicated!
If the LED blinks with 0.5Hz the safety control system requests a fail-safe
state of the System SLIO safety module. But there is no error on the
System SLIO safety module.
This request may occur, for example after a brief interrupt of the
communication and may be acknowledged.
HB300E - SM-S - Rev. 14/10
2-25
Manual VIPA System SLIO
Chapter 2 Product description
Pin assignment
For wires with a cross section of 0.08mm2 up to 1.5mm2.
DO
1
1
1
5
5
2
2
6
6
3
3
7
7
3
4
4
8
8
4
DO0 DO1
2
5
6
DO2 DO3
7
8
DC24V
0V
Pos.
1
2
3
4
5
6
7
8
Function
DO 0
0V
DO 2
0V
DO 1
0V
DO 3
0V
Type
O
O
O
O
O
O
O
O
Description
Digital output DO 0
GND for actor
Digital output DO 2
GND for actor
Digital output DO 1
GND for actor
Digital output DO 3
GND for actor
O: Output
2-26
HB300E - SM-S - Rev. 14/10
Manual VIPA System SLIO
Address switch for
F-address
Chapter 2 Product description
The F-address is to be configured by the F-address switch at the VIPA
safety module and additionally in the master system e.g. hardware
configurator. The F-address is to be set by the F-address switch besides on
the safety module. Only if the F-address set in the hardware configurator
accords to the setting of the F-address switch, it is possible to operate!
Pos.
10
11
8
9
6
7
4
5
2
3
1
0
Value
0
1
1
0
0
1
2
3
4
5
6
7
8
9
10
11
1
2
4
8
16
32
64
128
256
512
1024
2048
Example
State
1
1
0
0
0
1
0
0
0
1
0
0
Address
1+2+32+512=547
Address: 547
Note!
When the module is installed, the F-address switch may not be
accessed!
To set the F-address on the safety module the (electronic) module is to be
demounted before as described under "Demounting and module
exchange".
HB300E - SM-S - Rev. 14/10
2-27
Manual VIPA System SLIO
Chapter 2 Product description
SDO 4xDC 24V 0.5A - Process image
Input/Output
area
The safety DO module occupies 5 data bytes each in the input and output
image of the superordinate safety PLC system.
The safety PROFIsafe data to be sent and received are stored in the input
and output byte 0 ... 4.
PROFIsafe-V2Mode
Input area
Addr.
+0
+1
+2
+3
+4
Name
PII
PII_STAT
PII_RN
PII_CRC_H
PII_CRC_L
Output area
Addr.
+0
Name
PIQ
+1
+2
+3
+4
PIQ_CTRL
PIQ_RN
PIQ_CRC_H
PIQ_CRC_L
2-28
Byte
0
1
2
3
4
Input data
reserved
PROFIsafe Status
PROFIsafe CRC2 byte 2
PROFIsafe CRC2 byte 1
PROFIsafe CRC2 byte 0
Byte Output data
0
PROFIsafe outputs
Bit 0: DO 0
Bit 1: DO 1
Bit 2: DO 2
Bit 3: DO 3
Bit 7 ... 4: reserved
1
PROFIsafe Control
2
PROFIsafe CRC2 byte 2
3
PROFIsafe CRC2 byte 1
4
PROFIsafe CRC2 byte 0
HB300E - SM-S - Rev. 14/10
Manual VIPA System SLIO
Chapter 2 Product description
SDO 4xDC 24V 0.5A - Parameter record set
Parameter data
Parameter
Record set 81h (iParameter)
This record set is once transferred during start-up by the standard
parameter telegram.
Name
Parameter
change mode
Diagnostic
interrupt
Channel 0, 1: *)
Activation
Channel 0, 1:
Activation mode
Channel 0:
Wire break
detection
Channel 1:
Wire break
detection
Channel 2, 3: *)
Activation
Channel 2, 3:
Activation mode
Channel 2:
Wire break
detection
Channel 3:
Wire break
detection
Channel 0:
Test pulse time
in µs
Channel 1:
Test pulse time
in µs
HB300E - SM-S - Rev. 14/10
Type
Bit
Description / Range of values
Default
0: normal parameter record set
0
1: Parameter change F-address
Bit
0: deactivated
1
1: activated
This bit is not safety-related.
Bit
0: deactivated
1
1: activated
Bit
Condition: Channel 0, 1 Activation
1
is "activated"
0: 1 channel
1: 2 channel
Bit
Condition: Channel 0, 1 Activation
0
is "activated"
0: deactivated
1: activated
This bit is not safety-related.
Bit
Condition: Channel 0, 1 Activation
0
is "activated"
0: deactivated
1: activated
This bit is not safety-related
Bit
0: deactivated
1
1: activated
Bit
Condition: Channel 2, 3 Activation
1
is "activated"
0: 1 channel
1: 2 channel
Bit
Condition: Channel 2, 3 Activation
0
is "activated"
0: deactivated
1: activated
This bit is not safety-related.
0
Bit
Condition: Channel 2, 3 Activation
is "activated"
0: deactivated
1: activated
This bit is not safety-related
UINT16 Condition: Channel 0, 1 Activation
500
is "activated"
Various values selectable
(e.g. 500µs, 750µs, 1ms, ... ,10ms)
UINT16 Condition: Channel 0, 1 Activation
500
is "activated"
Various values selectable
(e.g. 500µs, 750µs, 1ms, ... ,10ms)
2-29
Manual VIPA System SLIO
Chapter 2 Product description
Name
Channel 2:
Test pulse time
in µs
Channel 3:
Test pulse time
in µs
Type Description / Range of values
Default
500
UINT16 Condition: Channel 2, 3 Activation
is "activated"
Various values selectable
(e.g. 500µs, 750µs, 1ms, ... ,10ms)
UINT16 Condition: Channel 2, 3 Activation
500
is "activated"
Various values selectable
(e.g. 500µs, 750µs, 1ms, ... ,10ms)
*) The deactivation of channel groups deviates from the "standard mode" and represents a
potentially dangerous condition.
Parameter change
mode
For a valid parameterization this parameter must be set to 0 (default value).
If the F-address of a System SLIO safety module is to be changed, the Faddress in the memory of the module can be erased by setting this
parameter.
More about this may be found in chapter 3 at "Setting the F-address".
Activation
diagnostic interrupt
Here you activate res. de-activate the diagnostic interrupt function. With a
set diagnostic interrupt bit in case of an error a diagnostic interrupt
message is sent to the upper master system. There the diagnostics
message can further be processed. More may be found in the manual of
the master system.
Channel activation
With the channel activation channel groups may be activated or
deactivated. With channel activation = 1 the corresponding channel group
is in "standard operation".
Deactivated channel groups (channel activation = 0) permanently provide a
logical 0 as output signal, independent from the defined signal of the safety
control system. This can be useful during the first start-up.
Attention!
Deactivation of channel groups represents a potentially dangerous
condition!
Activation mode
2-30
Here for each channel group you can set the activation mode of the outputs
whether an actuator is controlled by 1-channel or 2-channel.
With "1-channel" one actuator with one input is connected to one channel.
With "2-channel" actuator with 2 inputs is connected to a channel group.
Here the actuator gets its output signal via both channels. sensor supplies
by both connectors the same signal state. Line breaks may be detected if
they affect only one of the two lines.
This kind of connection allows to achieve higher safety levels like SIL 3 and
PLe. Please also refer to the "Connection examples" in chapter 3.
HB300E - SM-S - Rev. 14/10
Manual VIPA System SLIO
Chapter 2 Product description
Attention!
In case of error with a switched-off output, a short-time turn-on pulse with a
max. length of the error detection time can occur. The error detection time
is 6ms + 2 x test pulse length.
Wire break
detection
If this parameter is set, the System SLIO safety module observes the
outputs with output state 1, whether there is a min. current of 10mA...30mA.
By this way a line break can be detected. Here the System SLIO safety
module gets to fail-safe state and the outputs are switched off.
Note!
This function must not be used as safety function. This means a safety
function must not depend on this function.
Test pulse length
Each output with 1 state is continuously observed whether this can still be
switched off. Here wiring errors e.g. short circuit to DC 24V and errors
within the System SLIO safety module can be detected.
The test pulse length must be set depending on cable capacitance and the
load current.
Note!
If the test pulse length is too long, a connected actuator may briefly switch
off during the test pulse, or if there is another security device connected,
this can recognize a 0-signal and turn off incorrectly!
If the test pulse length is too short, the System SLIO safety module reports
an error, because here it is not possible for the module to test the switch-off
ability of an output. Then the module reports "short circuit".
In the table below you will find orientation values for the test pulse length:
Load current Cable length (capacity, resistor)
2 mA
2 mA
2 mA
5 mA
5 mA
5 mA
> 25 mA
> 25 mA
> 25 mA
HB300E - SM-S - Rev. 14/10
100 m (30 nF, up to 6.7 Ohm)
333 m (100 nF, up to 22.4 Ohm)
1000 m (300 nF, up to 67 Ohm)
100 m (30 nF, up to 6.7 Ohm)
333 m (100 nF, up to 22.4 Ohm)
1000 m (300 nF, up to 67 Ohm)
100 m (30 nF, up to 6.7 Ohm)
333 m (100 nF, up to 22.4 Ohm)
1000 m (300 nF, up to 67 Ohm)
Test pulse length
to be configured
2500 µs
3500 µs
6000 µs
2000 µs
2500 µs
4000 µs
1000 µs
1000 µs
1500 µs
2-31
Chapter 2 Product description
Overview
PROFIsafeF parameters
F Parameter
F_SIL
F_CRC_Length
F_Block_ID
F_Par_Version
F_Source_Add
F_Dest_Add
2-32
Manual VIPA System SLIO
Description
The parameter F_SIL specifies the required
safety integrity class of the SLIO safety
module.
The SLIO safety module supports up to SIL3.
The parameter F_CRC_Length specifies the
length of the CRC2 key to be used in the
PROFIsafe telegram.
The required length depends on the length of
the user data to be transferred.
Valid combinations are:
F_Par_Version
F_CRC_Length
PROFIsafe-V2-Mode 3-Byte-CRC
F_Block_ID specifies the format of the F
parameter set.
Value 1 indicates that F_iPar_CRC is a part of
the F parameters.
F_Par_Version specifies the PROFIsafe
version to be used for communication.
The System SLIO safety module supports with
PROFIBUS and PROFINET PROFIsafe-V2mode and uses the version specified by this
parameter:
F_Par_Version
V2-mode
F_Source_Add specifies the PROFIsafe
source address. To prevent incorrect
parameterization, the address of the
configuration tool is automatically assigned
and cannot be changed.
The Parameter can accept values from 1 to
65534.
F_Dest_Add specifies the PROFIsafe
destination address of the SLIO safety module.
For F_Dest_ Add values from 1 to 4095 can be
selected. Each address value may appear in
the system once, which is accessed by the
safety PLC.
To establish the PROFIsafe communication
the parameter value must match the setting of
the F-address of the SLIO safety module,
which is set by the DIP switch (see "Setting Faddress").
Default
SIL 3
3-ByteCRC
1
V2mode
2000
200
HB300E - SM-S - Rev. 14/10
Manual VIPA System SLIO
F Parameter
F_WD_Time
F_iPar_CRC
HB300E - SM-S - Rev. 14/10
Chapter 2 Product description
Description
Default
150
The parameter F_WD_Time determines the
monitoring time for the PROFIsafe
communication between F controller and
System SLIO safety module.
At least on valid PROFIsafe telegram must be
exchanged between the safe PLC and the
SLIO safety module within the monitoring time.
If this condition is not met, the safe PLC or the
SLIO safety module initiates a safe state.
The monitoring time must be selected, so that
telegram execution times are tolerated, but an
interruption in the connection is detected
quickly enough.
Below you can find information about the
calculation.
The monitoring time can be specified in steps
of 1 ms. The possible range of value
(1 to 65535 ms) is specified by the device
description file (GSD/GDML).
0
The parameter F_iPar_CRC specifies a
comparison value for the CRC value via the
iParameter (iPar_CRC). The PROFIsafe data
exchange only starts when the value for
F_iPar_ CRC and the iPar_CRC match.
After confirmation of the set parameters the
CRC (iPar-CRC) is calculated and displayed
by the VIPA Safety CRC-Tool.
This value must be entered with the
configuration tool of the safe PLC to the F
parameter of the SLIO safety module.
2-33
Manual VIPA System SLIO
Chapter 2 Product description
Calculating the
F_WD_Time
Thus the running PROFIsafe watchdog in the SLIO safety modules is reset
periodically, that this does not release, the following cyclically data flow
(circulation of a token) is to be considered:
System SLIO
safety module
Bus coupler
Field bus
F-SPS
The time required for this can be regarded as the full circulation time of a
token.
Thus the minimum PROFIsafe monitoring time to be configured results in:
TPSTO = TSlave + TBUS + TCI + TBUS + TSlave + TDAT
TPSTO = 2*TSlave + 2*TBUS + TCI + TDAT
Component Time
System SLIO TPSTO
safety
module
Bus coupler TSlave
Field bus
TBus
Either
TTR
Field bus
(PROFIBUS)
Or
TWD
Field bus
(PROFINET)
2-34
Meaning
Configured PROFIsafe
monitoring time
(F_WD_Time)
Max. response time of
the decentralized
peripheral system =
max. delay by the bus
coupler and the backplane bus
Response time of the
field bus
max. target rotation
time for the DP master
system
From
refer to the formula above
Documentation of the
decentralized periphery
system
(for System SLIO
PROFIBUS and
PROFINET < 2ms)
TTR at PROFIBUS res.
TWD at PROFINET
Object properties of the
DP master system, bus
parameters in the HW
configuration.
threshold monitoring of Value from the object
the PROFINET IO
properties of the
device
PROFINET IO device Tab
"IO cycle", in HW config.
If there is no threshold
monitoring time configured
for the IO device, instead
of this you can take the
given refresh time
multiplied with 3.
The refresh time can be
found in the HW config. at
object properties of the
PROFINET IO system.
HB300E - SM-S - Rev. 14/10
Manual VIPA System SLIO
Chapter 2 Product description
Component
F-PLC /
F-Logic
Time
TCI
Meaning
Configured cycle time
the F-runtime group is
called
SLIO safety
module
TDAT
max. acknowledge
time of the F periphery
(Device Acknowledgement Time)
HB300E - SM-S - Rev. 14/10
From
Configured timing (cycle
time) for calling the Fruntime group.
By processing of higher
priority interrupts, by
communication load, or by
testing and commissioning
functions, the distance
between the start times
can increase.
The influence of these
factors can be determined
from the documentation
and configuration of the
standard system itself and
then added to the value
determined here.
8ms
2-35
Chapter 2 Product description
Manual VIPA System SLIO
SDO 4xDC 24V 0.5A - Technical data
Order no.
Type
Module ID
Current consumption/power loss
Current consumption from backplane bus
Power loss
Technical data digital outputs
Number of outputs
Cable length, shielded
Cable length, unshielded
Rated load voltage
Current consumption from load voltage L+ (without
load)
Total current per group, horizontal configuration,
40°C
Total current per group, horizontal configuration,
60°C
Total current per group, vertical configuration
Output current at signal "1", rated value
Output delay of "0" to "1"
Output delay of "1" to "0"
Minimum load current
Lamp load
Parallel switching of outputs for redundant control
of a load
Parallel switching of outputs for increased power
Actuation of digital input
Switching frequency with resistive load
Switching frequency with inductive load
Switching frequency on lamp load
Internal limitation of inductive
shut-off voltage
Short-circuit protection of output
Trigger level
Number of operating cycle of relay outputs
Switching capacity of contacts
Output data size
Status information, alarms, diagnostics
Status display
Interrupts
Process alarm
Diagnostic interrupt
Diagnostic functions
Diagnostics information read-out
Module state
Module error display
Channel error display
Isolation
Between channels
Between channels of groups to
Between channels and backplane bus
Insulation tested with
2-36
022-1SD00
SM 022
0C81 1E00
75 mA
1.0 W
4
1000 m
600 m
DC 20.4...28.8 V
15 mA
2A
0.5 A
100 µs
175 µs
5W
not possible
not possible
9
max. 50 Hz
max. 0.5 Hz
max. 10 Hz
L+ (-45 V)
yes, electronic
1.7 A
4 Bit
green LED per channel
yes, parameterizable
no
yes, parameterizable
yes, parameterizable
possible
green LED
red SF LED
red ERR LED and yellow
ER2 LED
9
DC 500 V
HB300E - SM-S - Rev. 14/10
Manual VIPA System SLIO
Order no.
Safety
Safety protocol
Safety requirements
Secure user address
Watchdog
Two channels
Test pulse length
Circuit monitoring
Datasizes
Input bytes
Output bytes
Parameter bytes
Diagnostic bytes
Housing
Material
Mounting
Mechanical data
Dimensions (WxHxD)
Weight
Environmental conditions
Operating temperature
Storage temperature
Certifications
UL508 certification
HB300E - SM-S - Rev. 14/10
Chapter 2 Product description
022-1SD00
PROFIsafe V2
SIL CL 3 and PL e
1 - 4095
parameterizable 10ms - 1s
Each 2 of 4 outputs
switchable
parameterizable 500µs 10ms
9
5
5
44
20
PC / PPE GF10
Profile rail 35 mm
12.9 x 109 x 76.5 mm
60 g
0 °C to max. 60 °C
-25 °C to 70 °C
in preparation
2-37
Manual VIPA System SLIO
Chapter 2 Product description
Response time
General
The response times of the System SLIO safety modules are listed below.
The response time of the safety modules is included in the calculation of
the fail-safe system response time.
Response time
safety digital
inputs
The response time specifies the time between a signal transition at the
digital input and the reliable availability of the safety message frame on the
backplane bus.
Response time
safety digital
outputs
The response time specifies the interval between the receipt of a safety
message from the backplane bus and the signal transition at the digital
output.
Maximum
response time of
the system
These response times are required for plant design. Hereby you can
determine whether the maximum error tolerance time of a process is not
exceeded.
Here, the following cases are to e distinguished, which are described
below:
• Error-free case
• Existing error
• Arbitrary run times at single errors
Error-free case
In error-free case it is assumed that none of the monitoring time is
exceeded and the transition of the signal of the input connector of a System
SLIO safety IN to the output connector of the safety SLIO OUT is
considered:
System SLIO
Safety SDI
Safety SDO
Max expected
response time in
error-free case
Bus coupler
Bus coupler
Field bus
Field bus
F-SPS
TmaxNF = TEGL + TEWCDT + TESlave + TEBUS + TCI + TFPROG + TABUS + TASlave +
TAWCDT
For plant design sensor and actuator run times are to be taken into
account:
TmaxNFSA = TSensorDly+ TmaxNF + TActuatorDly
2-38
HB300E - SM-S - Rev. 14/10
Manual VIPA System SLIO
Chapter 2 Product description
Existing error
If there is an error it is assumed that a monitoring time is exceeded and a
error reaction is released.
Possible reasons could be errors of the system, wrong listed run time in the
documentation of the standard system or a extension of the calculated
value of the run time, by changing the configuration of the standard system.
In case of no error the total response time increases by the maximum
duration of the possible single errors.
Possible single
errors
• Discrepancy error in the System SLIO safety SDI. Here, the discrepancy
time must be considered in addition: (TEDIS)
• A single error occurs in the System SLIO safety SDI.
Here the possibly larger max. response time during an error (TEOFDT) is
to be considered with the max response time in error-free case (TEWCDT):
(TEOFDT - TEWCDT)
• Once or permanent interrupted communication between System SLIO
safety SDI and the safety control.
Here the PROFIsafe monitoring time of the System SLIO safety SDI and
the configured cyclic time of the safety controller must be considered:
(TEPSTO + TCI)
• Once or permanent interrupted communication between System SLIO
safety SDO and the safety control respectively failure of the safety
control.
Here the PROFIsafe monitoring time of the System SLIO safety SDO
und Acknowledge time of the System SLIO safety SDO must be
considered: (TAPSTO + TADAT)
• A single error occurs in the System SLIO safety SDO.
Here the possibly larger max. response time during an error (TAOFDT) is
to be considered with the max response time in error-free case (TAWCDT):
(TAOFDT - TAWCDT)
Max. response time
on error
TmaxOF = TmaxNF + MAX((TEDIS), (TEOFDT - TEWCDT), (TEPSTO + TCI), (TAPSTO +
TADAT), (TAOFDT - TAWCDT))
For plant design sensor and actuator run times are to be taken into
account:
TmaxOFSA = TSensorDLY + TmaxOF + TActuatorDLY
HB300E - SM-S - Rev. 14/10
2-39
Manual VIPA System SLIO
Chapter 2 Product description
Arbitrary run times
at single errors
At arbitrary run times of the standard system in addition to an existing error,
it is assumed that the values of all the relevant run times lie nearby the limit
of the monitored times.
Times to be
considered
• The max processing time to and in the System SLIO safety SDI: (TEGL +
TEDIS + TEWCDT + TEPSTO)
• The smallest of the possible monitoring times, from this moment the
defined behavior of an error is:
(MIN(TEPSTO, TCI_MAX, TAPSTO))
• The max. processing time to and in the System SLIO safety SDO:
(TAWCDT + TAPSTO)
• The possibly increased processing times in case of an error within the
System SLIO safety modules, here but only the larger of them, because
it is assumed that there is a single error:
(MAX((TEOFDT - TEWCDT), (TAOFDT - TAWCDT)))
• For the entire process chain a good PROFIsafe telegram could be sent
before to the System SLIO safety SDI or -SDO. Here the largest of the
two timeouts must be considered:
(MAX(TEPSTO, TAPSTO))
Max. response time
at arbitrary run
times at one error:
Tmax = TEGL + TEDIS + TEWCDT + TEPSTO +
+ MIN(TEPSTO, TCI_MAX, TAPSTO) +
+ TAWCDT + TAPSTO +
+ MAX((TEOFDT - TEWCDT), (TAOFDT - TAWCDT)) +
+ MAX(TEPSTO, TAPSTO)
For plant design sensor and actuator run times are to be taken into
account:
TmaxSA = TSensorDLY + Tmax + TActuatorDLY
Designations
Components
Sensor
System SLIO
safety SDI
System SLIO
safety SDI
System SLIO
safety SDI
safety SDO
System SLIO
safety SDI
safety SDO
System SLIO
safety SDI
safety SDO
System SLIO
safety SDI
safety SDO
2-40
In the following table the used abbreviations, which are sorted by
components are listed and described.
)
Time *
Description
TSensorDLY Delay time of the sensor
Input smoothing time of the
TEGL
TEDIS
TEWCDT
TAWCDT
TEOFDT
TAOFDT
TEDAT
TADAT
TEPSTO
TAPSTO
inputs of the SLIO safety SDI
With two-channel evaluation
discrepancy time otherwise 0
Max. response time in error-free
case
(Worst Case Delay Time)
Max. response time at one error
(One Fault Delay Time)
max. acknowledge time of the F
periphery (Device Acknowledgement Time)
Configured PROFIsafe
monitoring time
(ProfiSafeTimeOut)
From
Documentation sensor
Configuration of the F periphery, matched
to the sensor used.
Configuration of the F periphery, matched
to the sensor used.
11ms
11ms
8ms
PROFIsafe monitoring time of the HWconfig.
HB300E - SM-S - Rev. 14/10
Manual VIPA System SLIO
)
Components
Bus coupler
Time *
Field bus
(PROFIBUS)
Field bus
(PROFINET)
TETR
TATR
TEWD
TAWD
F-SPS /
F-Logic
TCI
Configured cycle time the Fruntime group is called
F-SPS /
F-Logic
TCI_MAX
Cycle monitoring time the Fruntime group is called
F-SPS /
F-Logik
Aktor
Entire inputs,
outputs
Entire sensors,
actuator
Entire inputs,
outputs
Entire sensors,
actuators
Entire inputs,
outputs
Entire sensors,
actuators
TFPROG
Run time of the F-runtime group
(of the safety program)
Delay time of the actuator
Response time in error-free case
(maxNoFault)
Response time in error free case
(maxNoFaultSensorAktor)
Response time at one error
(maxOneFault)
Response time at one error
(maxOneFaultSensorAktor)
Response time at one error
(maxOneFault)
Response time at one error
(maxOneFaultSensorAktor)
TESlave
TASlave
TActuatorDLY
TmaxNF
TmaxNFSA
TmaxOF
TmaxOFSA
Tmax
TmaxSA
Description
Max. response time of the
decentralized periphery system
= max. delay by the coupler and
the backplane bus
max. target rotation time for the
DP master system
Threshold monitoring time of the
PROFINET IO device
*) "E" or "A" behind "T" corresponds input or output.
HB300E - SM-S - Rev. 14/10
Chapter 2 Product description
From
Documentation of the decentralized
periphery system (for System SLIO
PROFIBUS und PROFINET < 2ms)
Object properties of the DP master system,
bus parameters in HW config.
Values of the object properties of the
PROFINET IO device at tab "IO cycle", in
HW configuration.
If there is no threshold monitoring time
configured for the IO device, instead of this
you can take the given refresh time
multiplied with 3.
The refresh time can be found in the HW
config. at object properties of the
PROFINET IO system.
Configured timing (cycle time) for calling
the F-runtime group.
By processing of higher priority interrupts,
by communication load, or by testing and
commissioning functions, the distance
between the start times can increase. The
influence of these factors can be
determined from the documentation and
configuration of the standard system itself
and then added to the value determined
here.
Configured monitoring time of the F cycle
time (= Parameter "Max. cycle time of the
F-runtime in ms" in the dialog "F-Runtime
groups")
max. runtime of the F-runtime group
Documentation of the actuator
Refer to the formula "Error-free case"
Refer to the formula "Error-free case"
Refer to the formula " Existing error "
Refer to the formula "Existing error"
Refer to the formula "Arbitrary run times at
single errors "
Refer to the formula "Arbitrary run times at
single errors "
2-41
Chapter 2 Product description
Manual VIPA System SLIO
Compatibility list
Sensors
The System SLIO safety input module was successfully tested with the
following sensors:
•
•
•
•
•
Actuators
SICK L41S-11MA1A Single-beam photoelectric safety switch
SICK ES21-SA10E1 Emergency stop pushbutton
SICK i10-PA213 Safety position switch
SICK miniTwin4 Safety light curtain
SICK T4000-E0101K Safety switch
The System SLIO safety output module was successfully tested with the
following actuators:
• Pilz Safety switch device PNOZ X2.7P
Note!
You can also use sensors and actuators from other producers, which have
the properties suitable for the application and the corresponding type
examination.
Controllers
The System SLIO safety input and output modules were successfully tested
with the following controllers:
• Siemens IM151-8F PN/DP CPU
(6ES7151-8FB00-0AB0, Product version 3, FW 2.7.1)
• Siemens CPU315F-2 PN/DP
(6ES7315-2FH13-0AB0, Product version 4, FW 2.6.7)
• Siemens CPU317F-2 PN/DP
(6ES7317-2FK14-0AB0, Product version 2, FW 3.1.1)
2-42
HB300E - SM-S - Rev. 14/10
Manual VIPA System SLIO
Chapter 3 Deployment
Chapter 3
Deployment
Overview
This chapter describes the usage of the System SLIO safety signal
modules with PROFIBUS and PROFINET. After a short introduction you
may find here every information about assembly, project engineering and
diagnostics.
Content
Topic
Page
Chapter 3
Deployment ..................................................................... 3-1
Planning of a safety-related control system .......................................... 3-2
Installation guidelines ........................................................................... 3-5
Setting the F-address ........................................................................... 3-8
Installation .......................................................................................... 3-11
Demounting and module exchange .................................................... 3-17
Wiring................................................................................................. 3-22
Connection examples......................................................................... 3-29
Notes for Commissioning ................................................................... 3-43
Deployment with PROFIBUS.............................................................. 3-45
Deployment with PROFINET .............................................................. 3-50
Validation of the system ..................................................................... 3-55
Operation ........................................................................................... 3-57
Maintenance....................................................................................... 3-57
Repair ................................................................................................ 3-57
Diagnostics......................................................................................... 3-58
Packing and transport ........................................................................ 3-64
Storage and disposal.......................................................................... 3-65
HB300E - SM-S - Rev. 14/10
3-1
Chapter 3 Deployment
Manual VIPA System SLIO
Planning of a safety-related control system
General
In the planning phase the complete definition of the safety function(s) takes
place. Besides the risk evaluation the planning contains the detailed
definition of all system components, the definition of the system
parameters, the detailed installation and wiring of the components.
Danger!
A careful executed planning serves for avoidance of errors. Errors in safetyrelated machines can lead to irreversible injuries and to death.
Caution!
In the phase of planning the "Check list planning" in the appendix is to be
used.
Risk evaluation
The risk evaluation shows the risk, which can come from a machine and
which plant components must be equipped with safety equipment.
Due to the safety measures the residual risk is reduced to an acceptable
level.
Caution!
As a manufacturer of machine you are obliged under the machinery
directive to execute a risk evaluation to identify all hazards associated with
the machine and reduce the residual risk to an acceptable minimum.
Caution!
The risk evaluation must necessarily be conduced in the planning phase
and before realization and conversion works.
3-2
HB300E - SM-S - Rev. 14/10
Manual VIPA System SLIO
Chapter 3 Deployment
Sequence of a risk
evaluation in
accordance to DIN
EN ISO 12100-1
and
EN ISO 14121
Start of the risk
evaluation
Risk analysis
Risk evaluation
Delimination of
the system
Hazard
analysis
Definition
safety
function
Risk
estimation
Risk weighting
Machine
suffiently safe?
n
y
End
HB300E - SM-S - Rev. 14/10
3-3
Chapter 3 Deployment
Installation and
Wiring diagram
Manual VIPA System SLIO
In the phase of planning an installation and a wiring diagram for the total
safety system are to be created. It contains all system components and
their wiring.
Caution!
Please consider a separation of high- and low-voltage signals in the
installation and wiring diagram for the exclusion of cross- or short circuits to
potentials > 60V.
This can be achieved for the System SLIO by a separate installation and
appropriate isolation.
With the production of the wiring diagram valid standards and guidelines
are to be considered for the proper installation of lines.
Determining the
device parameters
The available safety parameters can be found in the chapter "Product
description". The parameters of further standard modules can be found in
the according user manual.
Caution!
In the phase of planning a list of parameters to be adjusted is to be created
with a determination of the individual parameters and their verification.
Sequence of the
phase of planning
3-4
The system is planned according to the respective need of the plant or
machine. The components available for the control technology are more
described at "Installation" further down.
Before the commissioning of a module the following must be checked and
ensured:
• Compatibility of the module (see chapter 2 "Compatibility list" and
technical data).
• Sufficient supply of the control system by attached power supplies,
respectively attached safety components.
HB300E - SM-S - Rev. 14/10
Manual VIPA System SLIO
Chapter 3 Deployment
Installation guidelines
General
The installation guidelines contain information about the interference free
deployment of System SLIO. There is the description of the ways,
interference may occur in your control, how you can make sure the
electromagnetic digestibility (EMC), and how you manage the isolation.
What means EMC?
Electromagnetic digestibility (EMC) means the ability of an electrical device,
to function error free in an electromagnetic environment without being
interferenced res. without interferencing the environment.
All System SLIO components are developed for the deployment in
industrial environments and fulfill high demands on the EMC. Nevertheless
you should project an EMC planning before installing the components and
take conceivable interference causes into account.
Possible
interference
causes
Electromagnetic interferences may interfere your control via different ways:
• Electromagnetic fields (RF coupling)
• Magnetic fields with power frequency
• I/O signal conductors
• Bus system
• Current supply
• Protected earth conductor
Depending on the spreading medium (lead bound or lead free) and the
distance to the interference cause, interferences to your control occur by
means of different coupling mechanisms.
One differs:
• galvanic coupling
• capacitive coupling
• inductive coupling
• radiant coupling
HB300E - SM-S - Rev. 14/10
3-5
Chapter 3 Deployment
Basic rules for
EMC
3-6
Manual VIPA System SLIO
In the most times it is enough to take care of some elementary rules to
guarantee the EMC. Please regard the following basic rules when installing
your PLC.
• Take care of a correct area-wide grounding of the inactive metal parts
when installing your components.
- Install a central connection between the ground and the protected
earth conductor system.
- Connect all inactive metal extensive and impedance-low.
- Please try not to use aluminum parts. Aluminum is easily oxidizing
and is therefore less suitable for grounding.
• When cabling, take care of the correct line routing.
- Organize your cabling in line groups (high voltage, current supply,
signal and data lines).
- Always lay your high voltage lines and signal res. data lines in
separate channels or bundles.
- Route the signal and data lines as near as possible beside ground
areas (e.g. suspension bars, metal rails, tin cabinet).
• Proof the correct fixing of the lead isolation.
- Data lines must be laid isolated (for details see below).
- Analog lines must be laid isolated. When transmitting signals with
small amplitudes the one sided laying of the isolation may be
favorable.
- Lay the line isolation extensively on an isolation/protected earth conductor rail directly after the cabinet entry and fix the isolation with
cable clamps.
- Make sure that the isolation/protected earth conductor rail is
connected impedance-low with the cabinet.
- Use metallic or metalized plug cases for isolated data lines.
• In special use cases you should appoint special EMC actions.
- Wire all inductivities with erase links, which are not addressed by the
System SLIO modules.
- For lightening cabinets you should avoid luminescent lamps.
• Create a homogeneous reference potential and ground all electrical
operating supplies when possible.
- Please take care for the targeted employment of the grounding
actions. The grounding of the PLC is a protection and functionality
activity.
- Connect installation parts and cabinets with the System SLIO in star
topology with the isolation/protected earth conductor system. So you
avoid ground loops.
- If potential differences between installation parts and cabinets occur,
lay sufficiently dimensioned potential compensation lines.
HB300E - SM-S - Rev. 14/10
Manual VIPA System SLIO
Isolation of
conductors
Chapter 3 Deployment
Electrical, magnetically and electromagnetic interference fields are
weakened by means of an isolation, one talks of absorption.
Via the isolation rail, that is connected conductive with the rack,
interference currents are shunt via cable isolation to the ground. Hereby
you have to make sure, that the connection to the protected earth conductor is impedance-low, because otherwise the interference currents may
appear as interference cause.
When isolating cables you have to regard the following:
• If possible, use only cables with isolation tangle.
• The hiding power of the isolation should be higher than 80%.
• Normally you should always lay the isolation of cables on both sides.
Only by means of the both-sided connection of the isolation you achieve
high quality interference suppression in the higher frequency area.
Only as exception you may also lay the isolation one-sided. Then you
only achieve the absorption of the lower frequencies. A one-sided
isolation connection may be convenient, if:
- the conduction of a potential compensating line is not possible
- analog signals (some mV res. µA) are transferred
- foil isolations (static isolations) are used.
• With data lines always use metallic or metalized plugs for serial
couplings. Fix the isolation of the data line at the plug rack.
• At stationary operation it is convenient to strip the insulated cable
interruption free and lay it on the isolation/protected earth conductor line.
• To fix the isolation tangles use cable clamps out of metal. The clamps
must clasp the isolation extensively and have well contact.
• Lay the isolation on an isolation rail directly after the entry of the cable in
the cabinet. Lead the isolation further on to the System SLIO module
and don't lay it on there again!
Please regard at installation!
At potential differences between the grounding points, there may be a
compensation current via the isolation connected at both sides.
Remedy: Potential compensation line
HB300E - SM-S - Rev. 14/10
3-7
Chapter 3 Deployment
Manual VIPA System SLIO
Setting the F-address
Address switch for
F-address
10
11
1
0
8
9
The F-address is to be configured by the F-address switch at the VIPA
safety module and additionally in the master system e.g. hardware
configurator. The F-address is to be set by the F-address switch besides on
the safety module. Only if the F-address set in the hardware configurator
accords to the setting of the F-address switch, it is possible to operate!
6
7
4
5
2
3
Pos.
Value
0
1
2
3
4
5
6
7
8
9
10
11
1
2
4
8
16
32
64
128
256
512
1024
2048
0
1
1
0
Example
State
1
1
0
0
0
1
0
0
0
1
0
0
Address
1+2+32+512=547
Address: 547
Note!
When the module is installed, the F-address switch may not be
accessed!
To set the F-address on the safety module the (electronic) module is to be
demounted before as described under "Demounting and module
exchange".
Before setting take the field bus coupler of circuit!
F-address must be unique!
F-addresses from 1 to 4095 may be set. Each F-address must be unique in
the communication network of the safety PLC!
Only use suitable tools for the setting!
The switching elements of the F-address switch must be set only with a
suitable tool like a screwdriver of a clockmaker. In no case should pressure
be exerted on the switching elements.
Setting the F-address via safety parameter dialog
In addition the F-address setting of the F-address switch must be
configured by the safety parameter dialog of the master system.
3-8
HB300E - SM-S - Rev. 14/10
Manual VIPA System SLIO
Changing the
F-address
Chapter 3 Deployment
The following 2 steps are required to change the F-address:
• Changing an existing F-address at the module
• Changing the F-address in the hardware configuration
Note!
For this please consider the hints below at "Demounting and module
exchange".
Changing an
existing F-address
at the module
If you want to change the F-address of a System SLIO module, which just
operates with a valid configuration, there are the following options to initiate
the change process:
• At the module by means of the F-address switch
• Online via the Siemens SIMATIC manager
At the module via
the F-address
switch
With the following approach the System SLIO safety module is to be
powered off and to demounted. Please refer to the notes below at
"Demounting and module exchange".
• Switch off the DC 24V power supply of your System SLIO safety
module.
• Demount the System SLIO safety module.
• Switch all the DIP switches of the F-address switch to 0 position.
• Mount the System SLIO safety module.
• Switch on the DC 24V power supply for the System SLIO safety module.
• Please wait for about 5s and switch the DC 24V power supply for the
System SLIO module off again. Hereby the internal F-address memory
of the System SLIO safety module is cleared.
• Demount the System SLIO safety module.
• Switch the F-address switch to the wished F-address.
• Mount the System SLIO safety module.
• Switch on again the DC 24V power supply for the System SLIO safety
module.
Online via the
Siemens SIMATIC
manager
In the following approach the System SLIO safety module is to be poweredoff and disassembled.
• Switch off the DC 24V power supply of your System SLIO safety
module.
• Demount the System SLIO safety module.
• Switch the F-address switch to the wished F-address.
• Mount the System SLIO safety module.
• Switch on again the DC 24V power supply for the System SLIO safety
module.
• Start the Siemens SIMATIC manager with your project.
• Open in the Siemens hardware configurator by a double-click the
properties dialog of your system SLIO safety module.
• Set the parameter parameter change mode.
• Close the properties dialog.
HB300E - SM-S - Rev. 14/10
3-9
Chapter 3 Deployment
Manual VIPA System SLIO
• For the validation of the parameters, click at the System SLIO safety
module and choose from the context menu "start device tool" to open
the "VIPA Safety CRC-Tool".
• Examine the validation. Here the re-generation of the safety program is
not necessary. More about the validation may be found at "Deployment
with PROFIBUS" respectively "Deployment with PROFINET".
• Translate and transfer your project to your CPU.
• Re-open the properties dialog of the system SLIO safety module and
reset the parameter parameter change mode.
• Examine the validation wit re-generation of the safety program. This
always includes the verification of the F-address of the module, which is
set by the DIP switches.
• Translate and transfer your project to your CPU.
Changing the Faddress in the
hardware
configuraton
3-10
For the following approach, it is assumed that the wished F-address is set
and the System SLIO safety module is mounted.
• Open the hardware configuration with your project.
• Open the properties dialog of the system SLIO safety module, whose
address you want to change.
• Switch to the Tab "PROFIsafe".
• Enter at "F_Dest_Add" your F-address.
• Close the properties dialog with [OK]. Save and translate your hardware
project and transfer it into your CPU. Then you can close the hardware
configurator.
• Open in the Siemens SIMATIC manager the dialog "Edit safety
program". "Generate" your safety program and "upload" it into your CPU.
The program is now executable with the new F-address.
HB300E - SM-S - Rev. 14/10
Manual VIPA System SLIO
Chapter 3 Deployment
Installation
Caution!
In the phase of installation the "Check list Installation" of the appendix is to
be used.
• Make sure that the installation is complete in accordance with the
installation and wiring plan.
• Make sure that you bring a supply voltage separation in the wiring in
accordance to SELV / PELV.
• After the installation make a visual inspection and check all components
for visible damages.
• Check the system for wiring errors.
• Check the tensile strength of the electrical terminal and screw
connections.
• Ensure the installation and wiring in accordance to valid standards and
guidelines.
• Make sure that the environmental characteristics of the system, which
are described in chapter 2, are not exceeded.
• Make sure that the type of safety system is sufficient.
• Make sure that the safety system will not be damaged by moving parts
or working in the environment of the installed safety components.
• Make sure that the system components do not get in contact to
aggressive media (e.g. acid, leaches, gear oil).
Requirements to
the operating
personnel
Qualified personnel are persons who, based on their education,
experiences, instructions about valid standards and regulations, accident
prevention regulations and operation conditions, are authorized by the plant
safety executive manager to execute the required actions and to recognize
and avoid potential hazards. The required qualifications for this duty are
e.g.:
• Training or instruction in accordance with the standards of the safety
engineering in care and use of appropriate safety equipment.
Danger!
Risk of life by electrical current!
Devices and the environment in the switch gear cabinet can remain at
dangerous potentials.
• For this before you start with work make sure that the device and the
environment are off circuit.
• Observe the relevant safety regulations when handling with high-voltage
devices.
• Make sure that only qualified personnel installs this module.
HB300E - SM-S - Rev. 14/10
3-11
Chapter 3 Deployment
Functional
principle
Manual VIPA System SLIO
There is a locking lever at the top side of the terminal module. For mounting
and demounting this locking lever is to be turned upwards until this
engages audible.
For mounting plug the module to the module installed before and push the
module to the mounting rail guided by the strips at the upper and lower side
of the module.
The module is fixed to the mounting rail by pushing downward the locking
lever.
The modules may either separately be mounted to the mounting rail or as
block. Here is to be considered that each locking lever is opened.
Clack
1
2
3
For the exchange of a electronic module, the electronic module may be
pulled forward after pressing the unlocking lever at the lower side of the
module.
For installation plug the electronic module guided by the strips at the lower
side until this engages audible to the terminal module.
2. Pull
1. Press
3-12
Clack
HB300E - SM-S - Rev. 14/10
Manual VIPA System SLIO
Chapter 3 Deployment
The modules were directly be mounted to the mounting rail and so
connected to the backplane bus and the power supply for the electronic
and power section.
Up to 64 modules may be mounted. Please consider here that the sum
current of the electronic power supply does not exceed the maximum value
of 3A. By means of the power module 007-1AB10 the current of the
electronic power supply may be expanded with 2A. More about this may be
found at "Wiring".
Mounting
possibility
Horizontal hanging
Mounting
mounting rail
• Mount the mounting rail! Please consider that a clearance from the
middle of the mounting rail of at least 80mm above and 60mm below,
respectively 80mm by deployment of shield bus carriers, exist.
HB300E - SM-S - Rev. 14/10
65mm
lying
60mm
80mm
80mm
Mounting
Proceeding
3-13
Chapter 3 Deployment
Mounting
Head module
(e.g. bus coupler)
Manual VIPA System SLIO
• Start at the left side with the head module (e.g. bus coupler). For this
turn both locking lever upwards, put the head module to the mounting
rail and turn both locking lever downward.
• Before mounting the periphery modules you have to remove the bus
cover at the right side of the Head module by pulling it forward. Keep the
cover for later mounting.
1
Mounting
periphery modules
•
Mount the periphery modules you want.
Clack
1
3-14
2
2
3
HB300E - SM-S - Rev. 14/10
Manual VIPA System SLIO
Chapter 3 Deployment
Characteristics
when installing
System SLIO safety
modules
Please consider when planning with System SLIO safety modules that you
may not install a System SLIO safety modules before and or behind clamp
modules!
Mounting the
bus cover at a
peripheral module
• After mounting the whole system, to protect the backplane bus
connectors at the last module you have to mount the bus cover, now.
HB300E - SM-S - Rev. 14/10
3-15
Chapter 3 Deployment
Manual VIPA System SLIO
Mounting the
bus cover at a
clamp module
If the last module is a clamp module, for adaptation the upper part of the
bus cover is to be removed.
Mounting
shield bus carrier
• The shield bus carrier (available as accessory) serves to carry the shield
bus to connect cable shields. The shield bus carrier is mounted
underneath the terminal of the terminal module. With a flat mounting rail
for adaptation to a flat mounting rail you may remove the spacer of the
shield bus carrier.
Clack
3-16
HB300E - SM-S - Rev. 14/10
Manual VIPA System SLIO
Chapter 3 Deployment
Demounting and module exchange
A defective module must be replaced immediately.
Caution!
• Demounting respectively module exchange may be performed only by
authorized and qualified personnel.
• A defective system SLIO safety module may only be replaced by a
System SLIO safety module with the same order number respectively by
a module of the compatibility list, which is under construction.
• After the module exchange a complete function test inclusive verification
and validation for the system must be accomplished. This should
accordingly be documented.
• Proceed with the function test accordingly carefully, since you may
reckon that after the module exchange there is an incorrect behavior of
the machine respectively plant.
• Defective modules must be labeled as defective and should be sent
back to VIPA. A re-use is absolutely prevented by measures within the
quality management with the user.
HB300E - SM-S - Rev. 14/10
3-17
Chapter 3 Deployment
Manual VIPA System SLIO
Proceeding
With demounting and exchange of a module, head module (e.g. bus
coupler) or a group of modules for mounting reasons you have always to
remove the electronic module of the just mounted right module. After the
mounting it may be plugged again.
Exchange of an
electronic module
For the exchange of an electronic module, the electronic module may be
pulled forward after pressing the unlocking lever at the lower side of the
module.
To exchange a System SLIO safety module read the F-address of the
address switch of the module to be changed and take these settings for the
replacement module.
For installation plug the electronic module guided by the strips at the lower
side until this engages audible to the terminal module.
2. Pull
Clack
1. Press
Exchange of a
module
• Remove if exists the wiring. More about this may be found at "Wiring".
• Press the unlocking lever at the lower side of the just mounted right
module and pull it forward.
• Turn the locking lever of the module to be exchanged upwards.
• Pull the module forward.
1
3-18
2
3
HB300E - SM-S - Rev. 14/10
Manual VIPA System SLIO
Chapter 3 Deployment
• For mounting turn the locking lever of the module to be mounted
upwards.
• To mount the module put it to the gap between the both modules and
push it, guided by the stripes at both sides, to the mounting rail.
• Turn the locking lever downward again.
• Plug again the electronic module, which you have removed before.
4
Exchange of a head
module
(e.g. bus coupler)
5
6
Bus interface and power module of a head module may not be
separated! Here you may only exchange the electronic module!
• Remove if exists the wiring of the head module. More about this may be
found at "Wiring".
• Press the unlocking lever at the lower side of the just mounted electronic
module right of the head module and pull it forward.
• Turn all the locking lever of the head module to be exchanged upwards.
• Pull the head module forward.
1
HB300E - SM-S - Rev. 14/10
2
3-19
Chapter 3 Deployment
Manual VIPA System SLIO
• For mounting turn all the locking lever of the head module to be mounted
upwards.
• To mount the head module put it to the left module and push it, guided
by the stripes, to the mounting rail.
• Turn all the locking lever downward again.
• Plug again the electronic module, which you have removed before.
3
Exchange of a
module group
4
5
• Remove if exists the wiring of the module group. More about this may be
found at "Wiring".
• Press the unlocking lever at the lower side of the just mounted right
module of the module group and pull it forward.
• Turn all the locking lever of the module group to be exchanged upwards.
1
3-20
HB300E - SM-S - Rev. 14/10
Manual VIPA System SLIO
Chapter 3 Deployment
• Pull the module group forward.
2
• For mounting turn all the locking lever of the module group to be
mounted upwards.
• To mount the module group put it to the gap between the both modules
and push it, guided by the stripes at both sides, to the mounting rail.
3
4
• Turn all the locking lever downward again.
• Plug again the electronic module, which you have removed before.
5
HB300E - SM-S - Rev. 14/10
3-21
Chapter 3 Deployment
Manual VIPA System SLIO
Wiring
Requirements on
the electrical
connection
To be able to fulfill the standard EN 60 204-1 (electrical equipment of
machines), you have to use the cables, which are suggested there. The
connectors may not drop away, otherwise the risk of short-cuts, external
voltages etc. exists.
Pay attention to a EMC-compatible installation of the cables.
Caution!
Danger by electrical current!
The module can be destroyed/damaged, if you do not ensure the
requirements for the electrical connection of the module.
• Make sure that the connected loads specified in the technical data are
kept and that the connections are made in accordance with the
specifications.
• Prevent a short-circuit between inputs and outputs. In the case of a
short-circuit between inputs and outputs the electronic module can be
destroyed.
Caution!
Please regard in particular that electromechanical sensors (safety
switchgears) are supplied with suitable clock pulses for short circuit
detection.
Electromechanical switches must correspond to the requirements in
accordance with IEC 60947-5-1.
Requirement to
the power supply
For the adherence to the NAMUR recommendation NE 21 IEC 61131-2
and EN 298 you have to use power supply units (AC 230V / DC 24V) with a
mains buffering of at least 20ms.
Warning!
Risk of injury by electric current!
There may only devices be connected to the controller, which have a safe
separation of the 230V power.
The power supply to generate 24V power must correspond to the
requirements for PELV according to EN 60204-1.
3-22
HB300E - SM-S - Rev. 14/10
Manual VIPA System SLIO
Connectors
Terminals with spring clamp technology are used for wiring. The spring
clamp technology allows quick and easy connection of your signal and
supply lines.
In contrast to screw terminal connections this type of connection is vibration
proof.
Requirements for
the connecting
cable
Wiring procedure
Chapter 3 Deployment
10mm
Umax: 240V AC / 30V DC
Imax: 10A
Cross section: 0.08 ... 1.5mm2 (AWG 28 ... 16)
Stripping length: 10mm
• Insert a suited screwdriver at an angel into the square opening as
shown.
Press and hold the screwdriver in the opposite direction to open the
contact spring.
• Insert the stripped end of wire into the round opening. You can use wires
with a cross section of 0.08mm2 to 1.5mm2.
• By removing the screwdriver, the wire is securely fixed via the spring
contact to the terminal.
1
HB300E - SM-S - Rev. 14/10
2
3
3-23
Chapter 3 Deployment
Manual VIPA System SLIO
Wiring power
supply
SysDC5V max. 3A
DC24V max. 10A
1
DC24V
0V
2
DC24V
0V
(1) DC 24V for power section supply I/O area (max 10A)
(2) DC 24V for electronic power supply bus coupler and I/O area
Attention!
Since the power section supply is not internally protected, it is to be
externally protected with a fuse, which corresponds to the maximum
current. This means max. 10A is to be protected by a 10A fuse (fast)
respectively by a line circuit breaker 10A characteristics Z!
Note!
The electronic power section supply is internally protected against higher
voltage by fuse. The fuse is within the power module.
If the fuse releases, its electronic module must be exchanged!
Fusing
• The power section supply is to be externally protected with a fuse, which
corresponds to the maximum current. This means max. 10A is to be
protected with a 10A fuse (fast) respectively by a line circuit breaker 10A
characteristics Z!
• It is recommended to externally protect the electronic power supply for
bus coupler and I/O area with a 2A fuse (fast) respectively by a line
circuit breaker 2A characteristics Z.
• The electronic power supply for the I/O area of the power module 0071AB10 should also be externally protected with a 1A fuse (fast)
respectively by a line circuit breaker 1A characteristics Z.
State of the
electronic power
supply via LEDs
After PowerON of the System SLIO the LEDs RUN respectively MF get on
so far as the sum current does not exceed 3A.
With a sum current greater than 3A the LEDs may not be activated. Here
the power module with the order number 007-1AB10 is to be placed
between the peripheral modules. More concerning this may be found at the
following page.
3-24
HB300E - SM-S - Rev. 14/10
Manual VIPA System SLIO
Deployment of the
power modules
Chapter 3 Deployment
If the 10A for the power section supply is no longer sufficient, you may use
the power module from VIPA with the order number 007-1AB00. So you
have also the possibility to define isolated groups.
The power module with the order number 007-1AB10 is to be used if the 3A
for the electronic power supply at the backplane bus is no longer sufficient.
Additionally you get an isolated group for the DC 24V power section supply
with 4A.
By placing the power module 007-1AB10 at the following backplane bus
modules may be placed with a sum current of max. 2A. Afterwards the
power module 007-1AB10 is to be placed again.
To secure the power supply, the power modules may be mixed used.
Power module
007-1AB00
007-1AB00
007-1AB00
Sys DC 5V: --DC 24V: 10A
Sys DC 5V: --DC 24V: 10A
SysDC5V max. 3A
DC24V max. 10A
1
DC24V
0V
2
DC24V
0V
1
DC24V max. 10A
1
DC24V
0V
DC24V
0V
007-1AB10
Power module
007-1AB10
007-1AB10
Sys DC 5V: 2A
DC 24V: 4A
Sys DC 5V: 2A
DC 24V: 4A
SysDC5V max. 3A
SysDC5V max. 2A
SysDC5V max. 2A
DC24V max. 10A
DC24V max. 4A
DC24V max. 4A
1
DC24V
0V
3
DC24V
0V
3
DC24V
0V
2
DC24V
0V
4
DC24V
0V
4
DC24V
0V
(1)
(2)
(3)
(4)
DC24V max. 10A
DC 24V for power section supply I/O area (max. 10A)
DC 24V for electronic power supply bus coupler and I/O area
DC 24V for power section supply I/O area (max. 4A)
DC 24V for electronic power supply I/O area
HB300E - SM-S - Rev. 14/10
3-25
Chapter 3 Deployment
Shield attachment
1
Manual VIPA System SLIO
To attach the shield the mounting of shield bus carriers are necessary.
The shield bus carrier (available as accessory) serves to carry the shield
bus to connect cable shields.
The shield bus carrier is mounted underneath the terminal of the terminal
module. With a flat mounting rail for adaptation to a flat mounting rail you
may remove the spacer of the shield bus carrier.
After mounting the shield bus carrier with the shield bus, the cables with the
accordingly stripped cable screen may be attached and fixed by the shield
clamp.
3
Clack
2
4
[1]
[2]
[3]
[4]
3-26
Shield bus carrier
Shield bus (10mm x 3mm)
Shield clamp
Cable shield
HB300E - SM-S - Rev. 14/10
Manual VIPA System SLIO
Requirements to
the sensor and
actuators
Chapter 3 Deployment
Note the following warning in terms of safety-oriented operation of sensors
and actuators:
Caution!
A safety system always consists of sensors, logic and actuators. The usage
of the sensors and actuators lies outside of our sphere of influence. We
equipped our electronics safety-relevant in such a way that we can offer
you for the sensors and actuators 85% of the maximally permissible
probability of dangerous errors (corresponds to the recommended dispatch
between sensors, actuators and the electronic circuits for input, processing
and output in expenditure in safety technology).
Instrumentation using sensors and actuators poses considerable safety
responsibility. Not safety-rated sensors may not be offhand used!
Note that sensors and actuators generally do not allow a proof-test interval
of 10 years to IEC 61508 standard.
A safety function must comply in terms of the probability and rate of
hazardous faults with limits determined by the safety integrity level (SIL).
The achieved values may be found in the technical data at "Safety relevant
parameters" in chapter 1. In order to achieve the desired security level,
suitably qualified sensors and actuators are necessary.
Requirements to
the sensors
The System SLIO safety DI modul can be used with cable length up to
330m (capacity up to 100nF, ohmic resistance up to 22.4Ω).
General rule: A single-channel sensor is sufficient to achieve SIL2/Cat.
3/PLd; to achieve SIL3/Cat.4/PLe, sensors must be connected via two
channels.
Duration of the
sensor signals
Note the following requirements on the sensor signals:
tmin
tmin
Signal:
State:
Caution!
In order to guarantee accurate detection of sensor signals by the safety DI
module, you must ensure that the sensor signals have a defined minimum
duration.
The minimum duration is a minimum switch-on and switch-off duration,
which is necessary to detect a signal in the worst case.
The time interval between two signal transitions must be greater than the
PROFIsafe monitoring time to allow reliable detection of the pulses (see
PROFIsafe F parameter).
HB300E - SM-S - Rev. 14/10
3-27
Chapter 3 Deployment
Reliable detection
by the safety DI
module
Manual VIPA System SLIO
In the following table exemplary the minimum duration of the sensor signals
of the safety DI module is shown. It depends on the configuration of the
short-circuit test and the input delay in STEP®7 from Siemens.
Parameter
short-circuit test
de-activated
activated
Requirements to
the actuators
1ms
7ms
8ms
Parameterized input delay
3ms
9ms
12ms
15ms
23ms
37ms
The safety-related output modules perform a cyclic test of the outputs. The
F module briefly disables the activate outputs.
This test pulse lengths can be parameterized to match the load current and
the cable capacitance / length.
In the table below you will find orientation values for the test pulse length:
Load current Cable length (capacity, resistor)
2 mA
2 mA
2 mA
5 mA
5 mA
5 mA
> 25 mA
> 25 mA
> 25 mA
100 m (30 nF, up to 6.7 Ohm)
333 m (100 nF, up to 22.4 Ohm)
1000 m (300 nF, up to 67 Ohm)
100 m (30 nF, up to 6.7 Ohm)
333 m (100 nF, up to 22.4 Ohm)
1000 m (300 nF, up to 67 Ohm)
100 m (30 nF, up to 6.7 Ohm)
333 m (100 nF, up to 22.4 Ohm)
1000 m (300 nF, up to 67 Ohm)
Test pulse length
to be configured
2500 µs
3500 µs
6000 µs
2000 µs
2500 µs
4000 µs
1000 µs
1000 µs
1500 µs
High-speed actuators may briefly drop out or be activated during this test. If
your process does not tolerate this action you must use actuators with a
sufficient lag (> 1 ms).
Caution!
The outputs of a fail-safe output module must be electrically isolated to EN
50178 from components which carry higher voltages if the actuators are
operated at voltages higher than 24 V DC, for example, at 230 V DC, or are
being used to switch higher voltages. More may be found at "Planning of a
safety-related control system".
Relays and contactors usually comply with this rule, is to be proved
separately. This aspect is of particular importance when using
semiconductor switchgear.
These components must be considered in the security calculation like the
SLIO safety modules.
3-28
HB300E - SM-S - Rev. 14/10
Manual VIPA System SLIO
Chapter 3 Deployment
Connection examples
Warning!
Warning against personal and property damage!
The use of the connection examples described in this section alone is not
enough to execute the safety function according to the SIL, Cat./PL
determined from the risk analysis. In connection with safe devices, sensors
and actuators, additional measures may be necessary to ensure the safety
function. This includes, for example, the appropriate wiring and
parameterization of digital inputs and outputs, as well as measures to
exclude unforeseeable errors.
More information is available in the user manuals of the safe devices used.
General
The section generally describes possible applications, in which the
functions of the System SLIO safety module for implementation of a safety
function are used.
You can only use the depicted connection examples in a tangible safety
application after a performed risk analysis.
Caution!
Please consider at single-channel operation
At single-channel operation the demand rate of the safety functions is max.
1/100 of the test rate!
System SLIO
Safety input
The test rate for the System SLIO safety input module at single-channel
operation is 1x per 150ms. This means the max. demand rate is 1x per 15s.
You have to evaluate the external components, which are used in singlechannel operation, regarding the demand rate (e.g.: manual check of a
single-channel protection door switch).
System SLIO
safety output
In single-channel operation each output-channel of the System SLIO safety
output module internally exists twice (serial redundant). Therefore, the
requirement with regard to the demand rate is not applicable.
But you have to evaluate the external components, regarding the demand
rate, which are used in single-channel operation.
HB300E - SM-S - Rev. 14/10
3-29
Chapter 3 Deployment
Connection
examples for
digital inputs
Manual VIPA System SLIO
You can operate e.g. the following sensors on the digital inputs:
• Potential-free, contact emergency off buttons
• Protective door switches
• Light array (general contactless protection system) with the following
characteristics:
- The outputs are source-mode outputs
- The outputs must be compatible to IEC 61131-2
Warning!
Achievable SIL, Cat./PL for single-channel use of the digital inputs!
The achievable SIL, Cat./PL depends on the quality of the safe sensors.
This must be certified according to EN 60947-5-1 /-5.
Emergency Off
connection,
single-channel
Connection 4 x emergency off, single-channel, short circuit Test pulse
activation active
DI
1
DI0 DI1
5
0
1
2
3
DI2 DI3
T0
T1
2
6
7
3
4
T2
T3
8
DC24V
0V
3-30
HB300E - SM-S - Rev. 14/10
Manual VIPA System SLIO
Chapter 3 Deployment
Connection 4 x emergency off, single-channel, short circuit Test pulse
activation not active
DI
1
DI0 DI1
5
0
1
2
3
DI2 DI3
T0
T1
6
7
2
2
4
DC24V
T2
T3
8
DC24V
DC24V
0V
You can connect the digital input via a switching element (e.g., an
emergency off switch) either to the associated clock output or to the field
supply voltage Uv directly. Alternatively, you can connect the semiconductor output of a sensor to the digital input directly. For the singlechannel use if a digital input, you must set the parameter Evaluation of the
inputs to "1 channel".
If you do not connect the digital input via a switching element to the
associated clock output (e.g., semiconductor output), set the Test pulse
activation to "deactivated". Otherwise, the safety module detects a short
circuit on the input and reports the "Short circuit" diagnostic message.
If you connect the digital input via the switching element to the associated
clock output and the safety module should monitor the signal line for short
circuits, you have to set the parameter Test pulse activation to "activated".
Note!
Please consider the instructions for single-channel operation with regard to
the demand rate.
HB300E - SM-S - Rev. 14/10
3-31
Chapter 3 Deployment
Emergency Off
connection,
dual-channel,
equivalent
evaluation
Manual VIPA System SLIO
Connection 2 x emergency-off switch, dual channel, equivalent evaluation
DI
1
0
2
3
DI0 DI1
DI2 DI3
T0
T1
5
6
7
1
4
T2
T3
8
DC24V
0V
Warning!
Pay attention to the protected installation of signal lines during Test pulse
activation is "deactivated"!
If you have set the parameter Test pulse activation to "deactivated", as
condition of fault exclusion, the signal lines must be installed protected
among each other and between the sensors and inputs according to EN
60204-1 or EN ISO 13849-2 (e.g., as separate sheathed lines or in
separate cable ducts).
For emergency off applications that require single fault security, you can
connect two digital inputs via two switching elements (two-channel
emergency off switches with two break contacts) to the safety module.
Use the hardware configuration together with the VIPA Safety CRC-Tool to
set the parameters. For more information about the configuration may be
found at the chapter "Deployment PROFIBUS" respectively "Deployment
PROFINET".
Set the parameter Evaluation of the inputs to "2-channel" and Signal
polarity to "equivalent". In addition, set the Discrepancy timeout parameter
to the discrepancy time required for the two switching elements.
You can set the Test pulse activation of both inputs used to "activated" or
"not active". Please note that the Test pulse activation parameter must be
set the same for both digital inputs.
If you connect the digital inputs via the switching elements directly to the
field voltage of DC +24 V or to two semiconductor outputs of a sensor, then
you have to set the Test pulse activation parameter to "deactivated"
because otherwise the safety module wrongly detects a short circuit and
reports the "Short circuit" diagnostic message.
The safe sensors used must be certified according to EN 60947-5-1 /-5.
Errors in the mechanics of the safe sensor must be excluded. In the case of
only one ram within a switching device, which serves both contacts, only
SIL2/Cat.3/PLd can be achieved.
When using electronic sensors with semiconductor outputs you can
achieve SIL3/Cat.4/PLe.
3-32
HB300E - SM-S - Rev. 14/10
Manual VIPA System SLIO
Connection
interlock
monitoring, dual
channel, antivalent
evaluation
Chapter 3 Deployment
Connection 1 x interlock monitoring, dual channel, antivalent evaluation
DI
1
2
3
4
DI0 DI1
DI2 DI3
T0
T1
T2
T3
5
6
7
8
DC24V
0V
Moving direction
To monitor protective devices, you can connect the normally open contact
of a protective door switch to four digital inputs of the safety module.
Use the hardware configuration together with the VIPA Safety CRC-Tool to
set the parameters. For more information about the configuration may be
found at the chapter "Deployment PROFIBUS" respectively "Deployment
PROFINET".
Set the parameter Evaluation of the inputs to "2-channel".
So that the signal lines of the digital inputs of the safety module are
monitored for short circuits, for every input set the Test pulse activation to
"activated".
You must set the parameter Signal polarity to "antivalent". In addition, set
the Discrepancy timeout parameter to the discrepancy time required for the
normally open contact of the protective door switch.
You can achieve SIL3/Cat.4/PLe with this circuit.
HB300E - SM-S - Rev. 14/10
3-33
Chapter 3 Deployment
Manual VIPA System SLIO
Connection
light array
DI
1
2
+
0V
3
4
DI0 DI1
DI2 DI3
T0
T1
T2
T3
5
6
7
8
DC24V
0V
For light array applications which require single fault security, you can
connect two digital safety inputs to the according light array outputs.
Here set the parameter Evaluation of the inputs of the digital safety inputs
to "2-channel".
For this the Input smoothing time of the according safety input must always
be greater than the test pulse length of the light array output (manufacturer
data).
Set the parameter Test pulse activation to "deactivated". Otherwise, the
safety module wrongly detects a short circuit on the input and reports the
"Short circuit" diagnostic message.
3-34
HB300E - SM-S - Rev. 14/10
Manual VIPA System SLIO
Connection
examples for
digital safety
outputs
Chapter 3 Deployment
The following loads can be operated on the digital safety outputs:
• resistive loads
• inductive load after DC13 according EN 60947-5-1
Note!
Wire break detection at the digital safety output
To detect a wire break between the safety outputs DO 0 ... 3 and 0V to the
connected load, for each safety output the parameter Wire break detection
may separately be set. The error "Wire break" is reported if the output
current is less than 10 ... 30mA. This error stops the module.
Switching
inductive loads
You can operate inductive loads on the digital safety outputs of the SLIO
safety module by using the internal recovery circuit.
Consider the maximum switching frequency of 0.1Hz.
Warning!
Defect by thermal overheating if the switching frequency is too high!
If the inductivity and load current you have selected is too high for the
selected switching frequency, it can lead to thermal destruction of the digital
safety output.
Destruction of the digital safety output can cause the safety function to fail.
Selecting an
external diode
recovery circuit
If you use a suitable external diode recovery circuit, then the magnetic
energy when shutting down the inductive load is not converted in the SLIO
safety module, but on the external diode recovery circuit.
Attention!
The external diode recovery circuit must be designed for the resulting heat
loss.
HB300E - SM-S - Rev. 14/10
3-35
Chapter 3 Deployment
Connection with
diode recovery
circuit
Manual VIPA System SLIO
When shutting down an inductive load, the magnetic energy stored in the
inductive load must be dissipated. This magnetic energy converted by a
diode recovery circuit into heat. You can convert the magnetic energy into
heat with the SLIO safety module or with a suitable external diode recovery
circuit.
These components must be considered in the security calculation like the
System SLIO safety modules.
DO
1
DO0 DO1
2
3
4
5
6
DO2 DO3
7
8
DC24V
0V
Note!
Please consider the instructions for single-channel operation with regard to
the demand rate.
3-36
HB300E - SM-S - Rev. 14/10
Manual VIPA System SLIO
Switching
electronic loads
Chapter 3 Deployment
You can switch electronic loads (e.g., electronically controlled door locking
device) using the System SLIO safety module.
Note!
Switching electronic loads
When switching electronic loads, increased inrush currents that significantly
exceed the rated current can be caused by internal capacities in the
electronic loads. This can lead to passivation of the System SLIO safety
module with the "Overload" diagnostic message. You can remedy this by
limiting the inrush current, e.g., by placing an additional series resistor
between the digital safety output and the electronic load.
Connection a load
to an safety output
In the following the connection of a load to an output with optional feedback
to a System SLIO safety input module is shown:
DI
DO
1
DI 0
DO0 DO1
1
5
DI 1
K0
DI0 DI1
5
K1
T0
2
3
DI 2
T1
6
DO2 DO3
2
3
7
DI 3
K2
DI2 DI3
T0
T1
T2
T3
6
7
K3
T2
DC24V
0V
HB300E - SM-S - Rev. 14/10
4
8
T3
4
8
DC24V
0V
3-37
Chapter 3 Deployment
Connection 2
parallel connected
loads to a safety
output
Manual VIPA System SLIO
With this connection, you can achieve SIL3/Cat.4/PLe by re-reading the
relay states on the condition that in the external wiring a cross-circuit to the
power supply can be excluded.
DO
1
DO0 DO1
5
DI 0
K0
2
3
T0
6
DO2 DO3
7
DI 1
K1
T1
K0
K1
4
8
M
DC24V
0V
Warning!
Pay attention to the protected installation of signal lines!
To prevent a short circuit between the connecting cables of the safe
sensors and the safety module, the signal lines must be installed protected
between the safe sensor and the safety module according to EN 60204-1
or EN ISO 13849-2 (e.g. as separated sheathed lines or in sep. cable
ducts).
3-38
HB300E - SM-S - Rev. 14/10
Manual VIPA System SLIO
Connection load to
safety output and
ground 0V
Chapter 3 Deployment
With this connection, you can achieve SIL3/Cat.4/PLe by re-reading the
relay states.
DO
1
DI 0
DO0 DO1
5
DI 1
K0
K1
T0
2
T1
6
0V
3
DO2 DO3
7
K0
K1
4
8
M
DC24V
0V
Warning!
Important note to single fault security!
If single fault security is required for the safety function, you must use at
least two digital safety outputs to connect two loads (e.g. two relays)
because each digital safety output uses only one semiconductor switch for
switching.
You can connect a load (e.g., a relay) between a digital safety output DO 0
... 3 and the ground connection 0V of the field power supply. It is not
necessary to lead back the ground connection to the according connection
of the System SLIO safety module.
Please observe the following conditions:
• Ensure for the fact that the relay and the system SLIO safety module
have the same reference potential.
• For single fault security, you need at least two digital safety outputs and
two relays.
• You must connect the normally open contacts (K0 and K1) of two relays
in series to the load to be switched.
HB300E - SM-S - Rev. 14/10
3-39
Chapter 3 Deployment
Connection digital
safety outputs to
digital safety inputs
Manual VIPA System SLIO
In the following it is shown how to connect the safety outputs DO 0 ... 3 to
the safety inputs of a System SLIO safety input module.
DO
1
DO0 DO1
2
3
4
DC24V
0V
DO2 DO3
DI
5
1
6
2
7
3
8
4
DI0 DI1
DI2 DI3
T0
T1
T2
T3
5
6
7
8
DC24V
0V
For the according safety input you have to set the parameter Test pulse
activation to "deactivated". Otherwise, the safety module detects a short
circuit on the input and reports the "Short circuit" diagnostic message.
For this the Input smoothing time of the according safety input must always
be greater than the set test pulse length of the safety output.
Note!
In this case wire break detection is not possible!
3-40
HB300E - SM-S - Rev. 14/10
Manual VIPA System SLIO
Connection 4 motors,
single-channel with
feedback (1 contactor
per motor)
Chapter 3 Deployment
You can connect a contactor to a digital safety output and connect a motor
single-channel using normally open contacts of the contactor. Connection is
possible to each of the four digital safety outputs. You must observe the
warning messages for single-channel use.
With this connection, you can achieve SIL2/Cat.2/PLd by re-reading the
relay states.
Note!
Please consider the instructions for single-channel operation with regard to
the demand rate.
DO
1
DI 0
DO0 DO1
5
DI 1
K0
K1
T0
2
3
DI 2
6
DO2 DO3
K0
M
DI 3
K3
4
M
7
K2
T2
K1
T1
8
K2
K3
T3
M
M
DC24V
0V
Warning!
Important note about single-channel use!
Never use a single digital safety output alone for the safety function if single
fault security is required!
If single fault security is required, you have to integrate a second
disconnection facility (e.g., a line contactor K4) in the safety application by
e.g. analyzing the relay states read back.
HB300E - SM-S - Rev. 14/10
3-41
Chapter 3 Deployment
Connection 4
motors, two-channel
with feedback (2
contactor per motor)
Manual VIPA System SLIO
With this connection, you can achieve SIL3/Cat.4/PLe by re-reading the
relay states.
DO
1
DI 0
DO0 DO1
5
DI 1
K0
K4
K4
K0
K1
K1
T0
2
T1
6
M
3
DI 2
DO2 DO3
M
7
DI 3
K2
K4
K4
K2
K3
K3
T2
4
T3
8
M
M
DC24V
0V
Connection 2
motors, two-channel
with feedback (2
contactor per motor)
With this connection, you can achieve SIL3/Cat.4/PLe by re-reading the
relay states.
DO
1
DI 0
DO0 DO1
5
DI 1
K0
K0
K2
K1
K3
K1
T0
2
T1
6
M
3
DI 2
DO2 DO3
M
7
DI 3
K2
K3
T2
4
8
T3
DC24V
0V
To achieve signal fault security, we recommend the use of two positively
driven normally open contacts of a contactor in series to the motor to be
connected. These can originate from one contactor or from two different
contactors. Connect the contactors between the digital safety outputs.
3-42
HB300E - SM-S - Rev. 14/10
Manual VIPA System SLIO
Chapter 3 Deployment
Notes for Commissioning
General
The Commissioning guarantees that the safety signal module functions
correctly.
Guarantee before commissioning that the following conditions are fulfilled:
• The digital module is correctly installed.
• The digital module is connected to safety components
(Emergency stop device, safety light array etc.)
• The safety devices are activated.
Note!
For the operation the ambient data, which are specified in the technical
data must be adhered to! Commissioning is only permitted after the
acclimation of the System SLIO safety modules!
Warning!
Risk of injury by electric current!
In the phase commissioning the checklist "Check list commissioning and
validation" in the appendix must be used.
• Make sure that the system is exclusively commissioned by qualified
personnel.
• Make sure during the commissioning that there is no person in the
danger zone. You always may reckon that the machine, plant or safety
device do not behave in such a way, as it is intended.
• If there are changes or extensions on the system during commissioning,
influences to the system behavior must be checked. Here the checklists
for planning and installation must be handled again.
Danger!
Risk of injury from moving parts!
During the commissioning machine parts / components or the entire
machine / plant can move.
• Keep a sufficient distance from any moving parts of machinery /
equipment or parts from the moving machine / plant.
• Note that via attached further modules the parts of machinery /
equipment or parts from the moving machine / plant can set to motion.
• Activate in each case their safety devices.
HB300E - SM-S - Rev. 14/10
3-43
Chapter 3 Deployment
Requirement to
the operating
personnel
Manual VIPA System SLIO
The work for commissioning must be performed by professionally trained
personnel, who in particular understands and acts on the safety regulations
and notes.
Danger!
Risk by mechanical influence!
During the commissioning of the module the machine / plant or parts of the
machine / plant may be moved by a completely available application
program.
• Keep a sufficient distance from moving machinery / equipment or parts
from the moving machine.
Change of the safe
parameterization
With each change of the safe parameterization you get the message from
the Siemens SIMATIC manager, that safety-relevant changes were
accomplished. So that these changes become effective, you have to
generate the safety program again as indicated.
For this you have to start the function "Generate" at "Calculate the safety
program" in the Siemens SIMATIC manager.
Note!
Behavior on changes of the safe parameterization
If the safety program was not again generated and transferred to the F PLC
after changing the safety parameterization, the SLIO safety module does
not report any error. Then the F PLC passivates the SLIO safety module
and the inputs and outputs remain at 0.
3-44
HB300E - SM-S - Rev. 14/10
Manual VIPA System SLIO
Chapter 3 Deployment
Deployment with PROFIBUS
General
During the project engineering the SLIO I/O modules are assigned to the
PROFIBUS DP master via the System SLIO DP salve.
The project engineering happens in the Siemens SIMATIC manager as
hardware configuration for a Siemens F CPU.
A direct assignment takes place via the PROFIBUS address that you set at
the DP slave and in the master project at slave properties.
By installing the corresponding GSD file the IM 053-1DP00 is listed at the
hardware catalog as "VIPA 053-1DP00".
Note!
Due to the restrictions of PROFIBUS in the parameter telegram you can
operate maximally 5 System SLIO safety modules at the backplane bus of
the PROFIBUS DP slave.
More information about the project engineering and the parameters of the
PROFIBUS DP slave IM 053-1DP00 may be found in the manual
HB300_IM_053-1DP00.
GSD- file
For every PROFIBUS slave from VIPA there is a GSD file available. This
file may either be found on the supplied storage media or at the download
area of www.vipa.com.
The assignment of the GSD-file to your slave is shown in the following
table:
Shown name in configuration tool
VIPA 053-1DP00(DP-V0)
VIPA 053-1DP00(DP-V1)
GSD-file
VI000C19.gsd
VI010C19.gsd
Please always use for the System SLIO safety modules the DP-V1 version.
Install the file VI010C19.gsd in the Siemens SIMATIC manager.
Details on the installation of the GSD and/or type files are available from
the manual respectively in the online help of Siemens.
After the installation of the GSD file you will find the DP-V1 slave in the
hardware catalog from Siemens at:
PROFIBUS DP >Additional field devices > I/O > VIPA_SLIO >
VIPA 053-1DP00 (DPV1)
HB300E - SM-S - Rev. 14/10
3-45
Chapter 3 Deployment
Project
engineering
•
•
•
•
•
•
•
•
•
•
Manual VIPA System SLIO
Mount your PROFIBUS system.
Set on your System SLIO safety module a F-address.
Start your project engineering tool with a new project.
Configure a master system with a F CPU from Siemens and create a
new PROFIBUS subnet.
For the project engineering of the IM 053-1DP00 take the "VIPA 0531DP00 (DPV1)" from the hardware catalog and drag it to the DP master
subnet.
Parameterize the DP slave. Here enter among others a PROFIBUS
address between 1 and 125 and set the same address at the address
switch.
Place the System SLIO modules on the DP slave in the plugged
sequence starting with slot 1, by dragging them from the hardware
catalog.
Place in this way your System SLIO Safety I/O modules.
For each System SLIO safety module a parameterization is necessary.
In addition you must validate the parameters my means of the VIPA
Safety CRC-Tool and take the resulting checksum to the
parameterization. Information about the parameterization may be found
below.
Save and transfer your project to the PLC.
Parameterization
System SLIO
safety module
The parameters of a System SLIO safety module can only bee assumed, if
the set parameters are validated by the VIPA Safety CRC-Tool and the
resulting checksum is taken to the parameter F_iParCRC.
In this way it is ensured that the transmitted parameters are always
consistent.
Installation of the
VIPA Safety CRCTool
From VIPA you get the software "VIPA Safety CRC-Tool" at a data carrier.
This software serves for the validation of the set module parameters.
• Close the Siemens SIMATIC manager before installing the VIPA Safety
CRC-Tool.
• For installation start setup.exe from the data carrier.
• Select the language for installation and click at [OK]. The InstallShieldWizard is started.
• Accept the terms of license and click on [Next].
• Enter your user information and click on [Next].
• Select a destination folder and click on [Next].
• Start the installation with [Install].
After the installation the VIPA Safety CRC-Tool is available in the hardware
configurator via the context menu.
3-46
HB300E - SM-S - Rev. 14/10
Manual VIPA System SLIO
Parameter setting
Chapter 3 Deployment
• Open in the Siemens hardware configurator the properties dialog of your
System SLIO safety module by double-click.
• Enter the according parameters. Information about the parameters may
be found in the chapter "Product description".
• Close the properties dialog.
Parameter
validation
Note!
With this step the safety-related test of the parameters is examined.
Danger!
By incorrect configuration there is a hazard for man and machine!
• Open the context menu of the System SLIO safety module and select
Start device tool for validation of the parameters with the "VIPA Safety
CRC-Tool"
HB300E - SM-S - Rev. 14/10
3-47
Chapter 3 Deployment
Parameter
validation
continued
Manual VIPA System SLIO
• In this tool among others every module parameter is listed. Here you
must validate each parameter, but you cannot change a parameter.
Please check and validate each parameter with [Accept]. Per default the
tool starts in English.
With settings an other language may be selected.
- For information about the currently being validated module, at
"Vendor/Device" you will find information about the module such as
vendor, bus coupler to which the System SLIO safety module is
connected and the order number of the module.
- In "Overview" all the module parameter are listed.
• Start the validation of each parameter by clicking in "Parameter" at the
entries, checking and accepting each entry with [Accept].
- In the 1. position in Parameter there is the vendor VIPA GmbH,
followed by the bus coupler with PROFIBUS address, to which the
System SLIO safety module is connected. Please check here again
the PROFIBUS address.
- The parameter Version ID is only be found in the VIPA Safety CRCTool. This is the version ID of the safety parameter in the GSD file.
The current version ID is 1.
- The Module type ID shows the type ID of the System SLIO safety
module. Also this parameter is exclusively be found in the VIPA
Safety CRC-Tool. There are the following type IDs:
Module
SM 021-1SD00
SM 022-1SD00
Module type ID
0x0C411E00
0x0C812E00
- Starting with Parameter change mode the parameters are listed,
which you have entered in the hardware configuration.
• After you have accepted each parameter the button [Calc-CRC] is
activated. Depending on the specifications of the hardware configuration
there is the possibility to calculate the CRC as hexadecimal or as
decimal value.
• Copy the calculated CRC value to clipboard and close the VIPA Safety
CRC-Tool with [Exit]. Since the VIPA Safety CRC-Tool does not store
any entry, there is a confirmation request before exiting the tool. Confirm
this.
3-48
HB300E - SM-S - Rev. 14/10
Manual VIPA System SLIO
Chapter 3 Deployment
Enter CRC in
HW configuration
• Return to the hardware configurator and open the properties dialog of
the system SLIO safety module.
• Open the register "PROFIsafe" and select the parameter F_iPar_CRC.
• Click on [Change value] and insert from the clipboard the CRC value.
With [OK] the value is accepted..
Generate safety
program
Safe and translate the hardware configuration and return to your project in
the SIMATIC manager.
To confirm the new safety hardware configuration you have to start the
function "Generate" at "Calculate the safety program".
Note!
As soon as you change a parameter of a System SLIO safety module in the
hardware configuration, you must validate this with the VIPA Safety CRCTool and you have to enter the calculated CRC value to F_iPar_CRC of the
module. Afterwards the safety program in the Siemens SIMATIC manager
must be generated again.
HB300E - SM-S - Rev. 14/10
3-49
Chapter 3 Deployment
Manual VIPA System SLIO
Deployment with PROFINET
General
During the project engineering the SLIO I/O modules are assigned to the
PROFINET IO controller via the System SLIO IO device.
The project engineering happens in the Siemens SIMATIC manager as
hardware configuration for a Siemens F CPU.
A direct assignment takes place via the PROFINET address that you set at
the IO device and in IO controller project at IO device properties.
By installing the corresponding GSDML file the IM 053-1PN00 is listed at
the hardware catalog as "VIPA 053-1PN00".
Note!
With PROFINET, you can operate, taking into account the maximum
current on the backplane bus, System SLIO safety modules up to the
maximum expansion.
More information about the maximum expansion, the project engineering
and the parameters of the PROFINET IO device IM 053-1PN00 may be
found in the manual HB300_IM_053-1PN00.
GSDML file
From VIPA there is a GSDML files for the IO device available. This file may
either be found on the supplied storage media or at the download area of
www.vipa.com.
Please install the GSDML file in your Siemens SIMATIC manager. Details
on the installation of the GSDML file may be found in the manual of
Siemens SIMATIC manager.
For configuration in your configuration tool every SLIO module may the
found in the GSDML file as XML data.
After the installation of the GSDML file you will find the System SLIO IO
device in the hardware catalog from Siemens at:
PROFINET IO >Additional field devices > I/O > VIPA SLIO System >
VIPA 053-PN00
3-50
HB300E - SM-S - Rev. 14/10
Manual VIPA System SLIO
Chapter 3 Deployment
Project
engineering
• Execute an initialization of the PROFINET IO device. More may be
found in the additional manual HB300_IM_053-1PN00.
• Mount your PROFINET system.
• Start your project engineering tool with a new project.
• Configure a master system and create a new PROFINET subnet.
• For the project engineering of the IM 053-1PN00 take the "VIPA 0531PN00" from the hardware catalog and drag it to the PROFINET subnet.
• Open via double click to the inserted symbol the properties dialog of the
PROFINET device and enter at "General" the device name, which was
preset by the address switch during the initialization. Confirm with [OK].
• For parameterization of the PROFINET device the VIPA specific
properties dialog may be opened in the slot overview .
• Insert the peripheral modules from the hardware catalog and
parameterize them if necessary.
• Transfer your project to the PLC.
Parameterization
System SLIO
safety module
The parameters of a System SLIO safety module can only bee assumed, if
the set parameters are validated by the VIPA Safety CRC-Tool and the
resulting checksum is taken to the parameter F_iParCRC.
In this way it is ensured that the transmitted parameters are always
consistent.
Installation of the
VIPA Safety CRCTool
From VIPA you get the software "VIPA Safety CRC-Tool" at a data carrier.
This software serves for the validation of the set module parameters.
• Close the Siemens SIMATIC manager before installing the VIPA Safety
CRC-Tool.
• For installation start setup.exe from the data carrier.
• Select the language for installation and click at [OK]. The InstallShieldWizard is started.
• Accept the terms of license and click on [Next].
• Enter your user information and click on [Next].
• Select a destination folder and click on [Next].
• Start the installation with [Install].
After the installation the VIPA Safety CRC-Tool is available in the hardware
configurator via the context menu.
HB300E - SM-S - Rev. 14/10
3-51
Chapter 3 Deployment
Parameter setting
Manual VIPA System SLIO
• Open in the Siemens hardware configurator the properties dialog of your
System SLIO safety module by double-click.
• Enter the according parameters. Information about the parameters may
be found in the chapter "Product description".
• Close the properties dialog.
Parameter
validation
Note!
With this step the safety-related test of the parameters is examined.
Danger!
By incorrect configuration there is a hazard for man and machine!
• Open the context menu of the System SLIO safety module and select
Start device tool for validation of the parameters with the "VIPA Safety
CRC-Tool".
3-52
HB300E - SM-S - Rev. 14/10
Manual VIPA System SLIO
Parameter
validation
continued
Chapter 3 Deployment
• In this tool among others every module parameter is listed. Here you
must validate each parameter, but you cannot change a parameter.
Please check and validate each parameter with [Accept]. Per default the
tool starts in English.
With settings an other language may be selected.
- For information about the currently being validated module, at
"Vendor/Device" you will find information about the module such as
vendor, bus coupler to which the System SLIO safety module is
connected and the order number of the module.
- In "Overview" all the module parameter are listed.
• Start the validation of each parameter by clicking in "Parameter" at the
entries, checking and accepting each entry with [Accept].
- In the 1. position in Parameter there is the vendor VIPA GmbH,
followed by the bus coupler with PROFINET address, to which the
System SLIO safety module is connected. Please check here again
the PROFINET address.
- The parameter Version ID is only be found in the VIPA Safety CRCTool. This is the version ID of the safety parameter in the GSD file.
The current version ID is 1.
- The Module type ID shows the type ID of the System SLIO safety
module. Also this parameter is exclusively be found in the VIPA
Safety CRC-Tool. There are the following type IDs:
Module
SM 021-1SD00
SM 022-1SD00
Module type ID
0x0C411E00
0x0C812E00
- Starting with Parameter change mode the parameters are listed,
which you have entered in the hardware configuration.
• After you have accepted each parameter the button [Calc-CRC] is
activated. Depending on the specifications of the hardware configuration
there is the possibility to calculate the CRC as hexadecimal or as
decimal value.
• Copy the calculated CRC value to clipboard and close the VIPA Safety
CRC-Tool with [Exit]. Since the VIPA Safety CRC-Tool does not store
any entry, there is a confirmation request before exiting the tool. Confirm
this.
HB300E - SM-S - Rev. 14/10
3-53
Chapter 3 Deployment
Manual VIPA System SLIO
Enter CRC in
HW configuration
• Return to the hardware configurator and open the properties dialog of
the system SLIO safety module.
• Open the register "PROFIsafe" and select the parameter F_iPar_CRC.
• Click on [Change value] and insert from the clipboard the CRC value.
With [OK] the value is accepted.
Generate safety
program
Safe and translate the hardware configuration and return to your project in
the SIMATIC manager.
To confirm the new safety hardware configuration you have to start the
function "Generate" at "Calculate the safety program".
Note!
As soon as you change a parameter of a System SLIO safety module in the
hardware configuration, you must validate this with the VIPA Safety CRCTool and you have to enter the calculated CRC value to F_iPar_CRC of the
module. Afterwards the safety program in the Siemens SIMATIC manager
must be generated again.
3-54
HB300E - SM-S - Rev. 14/10
Manual VIPA System SLIO
Chapter 3 Deployment
Validation of the system
General
With the first commissioning all the safety functions and the proper
functionality of the programmed and installed system must be checked.
And the check of the system must be documented.
Warning!
Danger with commissioning!
The control system may be operated only after successful testing by a
competent person.
• Perform a complete functional test and check the correct assignment of
the connected safety components.
• In the Appendix there is a checklist "Commissioning and validation" for
commissioning and validation of the system. Perform the system
validation in accordance to this checklist and document this accordingly.
• Make sure that the service personnel is trained in the handling of the
control system.
Function test
The function test is the main part of the validation of the entire system. The
perfect allocation of the safety components of the network and the
programmed logic of the system can be determined by the function test.
Depending on the complexity of the combinational logic of the according
project it is recommended to execute graded function tests.
The following proceeding for function tests is recommended:
• Connect the actuators and drives with the safe output terminals only if
while checking the wiring no errors were found.
HB300E - SM-S - Rev. 14/10
3-55
Chapter 3 Deployment
Manual VIPA System SLIO
• Examine a fully IO test. This means in order to bring all the sensors in
each switch positions, each (normally ON, OFF respectively actuated,
not actuated). With the entire sensors (initiators), switches, actuators
and drives. Please check whether the specified and expected signal
state is also the real state. Please also check whether the state of the
corresponding variables also accordingly changes in the safety control
(a detailed description of this test can be found in the manual of your
safety control). You have to check the actuators as well when you want
to control them with your safety output modules. You have to check each
process state, which is specified in the safety application, as well. If the
safety control does not provide a suited test mode, you have to release
the corresponding safety functions in your application and you have to
check the reaction of the respective outputs.
• Examine a fully function test with the entire sensors (initiators), switches,
actuators and drives.
• Document the result of the function test.
To examine the function test you have to release all safety functions
successively and you have to document the reaction of the system. Check
whether the reaction corresponds to the expected behavior.
3-56
HB300E - SM-S - Rev. 14/10
Manual VIPA System SLIO
Chapter 3 Deployment
Operation
Danger!
During operation of the safety control system, no changes to the system
configuration are allowed.
Therefore:
Before extending the system, removing individual system components and
changing the wiring, the PLC system is basically be set into a safe state
dependent on the application by professional personnel.
Note!
For the operation the ambient data, which are specified in the technical
data must be adhered to! Commissioning is only permitted after the
acclimation of the System SLIO safety modules!
Instructions for
operation
Instructions for the operation of system SLIO standard system components
like power supply, bus coupler, IO modules can be found in the according
manual.
Maintenance
Caution!
Make sure by organizational measures that the interval for the repeat
inspection of all system components is kept.
Information about this can be found at "Functional safety - safety relevant
parameters".
With the System SLIO safety module there is no repeat test possible for
the user.
If you keep the prescribed environmental conditions (see technical data)
the corresponding safety module is maintenance-free.
If you determine or assume a defect on a safety module, please contact
the VIPA GmbH.
Repair
Caution!
Defective safety modules may only be repaired by the manufacturer.
A defective safety module cannot be repaired. Please contact VIPA GmbH
for spare.
HB300E - SM-S - Rev. 14/10
3-57
Chapter 3 Deployment
Manual VIPA System SLIO
Diagnostics
Requirements to
the operating
personnel
The personnel, who works with the safety signal module, must be
instructed in the safety regulations and the operation of the module to
correctly operate it.
In particular the reaction to error messages and states requires special
knowledge which the operator must have. In the following you will find
information about disturbances and the resulting error messages. The
disturbances can have either mechanical or electrical causes.
Fail safe principle
The module bases on the fail-safe principle. This means that each error
automatically leads to a safety state (safety switched off outputs, every
input reports off-circuit state)
Caution!
Do not switch a safety-related incorrect system to operating state again, as
long as you do not know the cause of the error or an error has been
corrected.
Detecting errors in
the periphery
The electro-mechanical error detection is ensured by the input circuit.
Electronic sensors must have an own error detection relating to a shortcircuit on the output.
Error response
Safe state
The safety concept is based on the existence of a safe state at all process
variables. For digital safety modules, this safe state is the value "0". This
applies to sensors and actuators.
In safe condition the safety signal module safely switches off the outputs.
Thus a control of the attached actuators is safely interrupted.
Response to error
and startup of the
safety-related
system
The safety function requires the use of substitute values (safe state)
instead of process values for a safety-related signal module (passivation of
safety-related signal module) in the following cases:
• during the startup of the safety-related system
• when errors in safety-oriented communication between the F-CPU and
safety module are detected by means of the PROFIsafe safety protocol
(communication error)
• when peripheral or channel errors are detected (e.g. wire break,
discrepancy error)
If possible errors are logged to the diagnostic buffer of the safety-related
CPU and reported to the safety program of the safety-related CPU.
Safety modules cannot store errors non volatile. After PowerOFF PowerON during startup a further existing error is again detected. You can
make error storage however in your standard program.
HB300E - SM-S - Rev. 14/10
3-58
Manual VIPA System SLIO
Chapter 3 Deployment
Caution!
Channel errors do not trigger any diagnostic reactions or error handling for
channels that have been set to "deactivated", even when this channel is
affected indirectly by a channel group error ("Channel activated/
deactivated" parameter).
Remedying faults
in a safety-related
system
To remedy errors in your fail-safe system, proceed as described in EN
61508-1 Section 7.15.2.4 and EN 61508-2 Section 7.6.2.1 e.
For remedy the following steps must be performed in a safety-related
system:
1. Diagnosis and repair of the fault
2. Revalidation of the safety function
3. Recording in the service report
Substitute value
output for safety
modules
If channels are passivated with safety DI modules, the safety-related
system provides substitute values for the safety program instead of the
process values applied to the safety-related inputs.
• For safety DI modules, this is always the substitute value "0".
In the case of safety DO modules, if passivation occurs the safety-related
system transfers substitute values (0) to the safety-related outputs instead
of the output values provided by the safety program. The output channels
are de-energized. This also applies when the safety-related CPU goes into
STOP mode. You cannot program substitute values.
Reintegration of a
safety module
The system changes from substitute to process values (reintegration of a
safety module) either automatically or only after user acknowledgment in
the safety program.
After reintegration:
• for a safety DI module the process values pending at the safety-related
inputs are provided for the safety program
• for safety DO module the output values provided in the safety program
are again transferred to the safety-related outputs
Reaction of the
inputs to communication errors
The safety modules with inputs respond differently to communication errors
compared to other errors.
If a communication error is detected, the current process values remain set
at the inputs of the safety module and the channels are not passivated. The
current process values are sent to the safety-related CPU and are
passivated in the safety-related CPU.
HB300E - SM-S - Rev. 14/10
3-59
Chapter 3 Deployment
Manual VIPA System SLIO
Reaction of the
safety modules on
module failure
The following events occur following a serious internal fault in the safety
module:
• The connection to the backplane bus is interrupted and the safetyrelated I/Os are passivated.
• Diagnostics are not transmitted from the safety module and the default
diagnostic message "Module Fault" is reported.
• The SF LED of the corresponding safety module is on.
Fault diagnostics
Diagnostics are used to determine whether error-free signal acquisition is
taking place at the safety module. Diagnostics information is assigned
either to a single channel or to the entire safety module.
None of the diagnostic functions (displays and messages) are safety critical
and therefore not designed to be safety-related functions. Consequently,
they are not tested internally.
The following diagnostic options are available for fail-safe modules:
• LED display on the module front
• Diagnostic functions of the safety modules (slave diagnostics in
accordance with IEC 61784-1:2003).
Note!
Behavior on changes of the safe parameterization
If the safety program was not again generated and transferred to the F PLC
after changing the safety parameterization, the SLIO safety module does
not report any error. Then the F PLC passivates the SLIO safety module
and the inputs and outputs remain at 0.
Configurable
diagnostics
functions
Via the parameterization you may activate a diagnostic interrupt for the
module.
With a diagnostics interrupt the module serves for diagnostics data for
diagnostic interruptincoming. As soon as the reason for releasing a diagnostic
interrupt is no longer present, the diagnostic interruptgoing automatically
takes place.
Within this time window (1. diagnostic interruptincoming until last diagnostic
interruptgoing) the MF-LED of the module is on.
The following events may release a diagnostics interrupt:
• for safety DI module short- and cross-circuit monitoring
• for safety DO module wire-break detection
Caution!
Diagnostic functions should be activated or deactivated in accordance with
the application.
3-60
HB300E - SM-S - Rev. 14/10
Manual VIPA System SLIO
Diagnostic data
Name
ERR_A
MODTYP
ERR_B
ERR_C
CHTYP
NUMBIT
NUMCH
CHERR
CH0ERR
CH1ERR
CH2ERR
CH3ERR
ERR_D
ERR_E
ERR_F
DIAG_US
Bytes
1
1
1
1
1
1
1
1
1
1
1
1
1
1
2
4
Chapter 3 Deployment
With PROFIBUS and PROFINET the access happens by DS 01h.
Additionally the first 4 bytes may be accessed by DS 00h.
Function
Diagnostic
Module information
reserved
Module internal error
Channel type
Number diagnostic bits per channel
Number of channels of the module
Channel error
Channel-specific error channel 0
Channel-specific error channel 1
Channel-specific error channel 2
Channel-specific error channel 3
Module specific error
reserved
PROFISafe error code
µs ticker
ERR_A
Diagnostic
Byte
0
Bit 7 ... 0
Bit 0: set at module failure
Bit 1: set at internal error
Bit 2: set at external error
Bit 3: set at channel error
Bit 4: set at external auxiliary supply missing
Bit 5, 6: reserved
Bit 7: set at error in parameterization
MODTYP
Module information
Byte
0
Bit 7 ... 0
Bit 3 ... 0: module class
1000b: safety-related digital module
Bit 4: set at channel information present
Bit 7 ... 5: reserved
CHTYP
Channel type
Byte
0
Bit 7 ... 0
Bit 6 ... 0: channel type
30h: safety-related DI module
31h: safety-related DO module
Bit 7: reserved
NUMBIT
Diagnostic bits
Byte
0
Bit 7 ... 0
Number of diagnostic bits per channel (here 08h)
NUMCH
Channels
Byte
0
Bit 7 ... 0
Number of channels of a module (here 04h)
HB300E - SM-S - Rev. 14/10
Default
00h
18h
00h
00h
30h/31h
08h
04h
00h
00h
00h
00h
00h
00h
00h
00h
00h
3-61
Chapter 3 Deployment
Manual VIPA System SLIO
CHERR
Channel error
Byte
0
Bit 7 ... 0
Bit 0: set at error in channel 0
Bit 1: set at error in channel 1
Bit 2: set at error in channel 2
Bit 3: set at error in channel 3
Bit 7 ... 4: reserved
CH0ERR
CH3ERR
Channel-specific
Byte
0
Bit 7 ... 0
Channel-specific error: Channel x:
Bit 0: set at short circuit to DC 24V
Bit 1: set at short circuit to ground
Bit 2: set at wire-break
Bit 3: set at cross-circuit
Bit 4: set at discrepancy error
Bit 7 ... 5: reserved
ERR_C
Module internal
Byte
0
Bit 7 ... 0
Module internal error:
Bit 3 ... 0: reserved
Bit 4: set at a communication error on the System SLIO
safety module
Bit 7 ... 5: reserved
ERR_D
Module-specific
Byte
0
Bit 7 ... 0
Module specific error:
Bit 3 ... 0: reserved
Bit 4: set at error in I parameter
Bit 5: set at error in F parameter
Bit 6: set if the F-address set by the F-address switch, does not
fit to the F-address stored in the EEPROM.
Bit 7: set if the F-address in the EEPROM was reset.
Note!
If the change process of the F-address is initiated by the configured record
set, then bit 7 of ERR_D is set.
If the re-parameterization happens by means of the F-address switch
setting 0...0, the reset function of the bus device during start-up can
possibly prevent that this bit is reported.
ERR_F
Diag byte
3-62
Byte
0, 1
Bit 7 ... 0
PROFIsafe diagnostic code (see next page)
HB300E - SM-S - Rev. 14/10
Manual VIPA System SLIO
DIAG_US
µs ticker
Byte
0 ... 3
Chapter 3 Deployment
Bit 7 ... 0
Value of the µs ticker at the moment of the diagnostic
µs ticker
In the SLIO module there is a timer (µs ticker). With PowerON the timer
starts counting with 0. After 232-1µs the timer starts with 0 again.
ERR_B, C, E
reserved
PROFIsafeDiagnostic codes
Byte
0
Bit 7 ... 0
reserved
Code
Description
0x0000 no error
0x0040 Mismatch of safety destination address (F_Dest_Add)
The F-address set by the DIP switch and the F-address
configured by F parameter configuration (HW configuration) do
not agree.
0x0041 Safety destination address not valid (F_Dest_Add)
The F-address, which was set by the F parameter configuration is
not valid (e.g. = 0).
0x0042 Safety source address not valid (F_Source_Add)
The F source address, which was set by the F parameter
configuration is not valid (e.g. = 0).
0x0043 Safety watchdog time value is 0 ms (F_WD_Time)
The monitoring time, which was set by the F parameter
configuration is not valid (e.g. = 0).
0x0044 Parameter "F_SIL" exceeds SIL from specific device application
The safety integrity class, which was set by the F parameter
configuration is greater than the maximum possible F-SIL value
for the safety module.
0x0045 Parameter "F_CRC_Length" does not match the generated
values
The length of the CRC2 key, which was set by the F parameter
configuration does not agree with the generated values.
0x0046 F_Par_Version of F-Parameter set incorrect
The version of the F parameters, which was set by the F
parameter configuration is not understood by the safety module.
0x0047 CRC1-Fault
The calculated CRC1 checksum is incorrect.
0x004B Inconsistent iParameters (iPar-CRC error)
The checksum of the iParameters is incorrect.
HB300E - SM-S - Rev. 14/10
3-63
Chapter 3 Deployment
Manual VIPA System SLIO
Packing and transport
Packing
Each device was packaged before in a way, that makes becoming
damaged while on transport very unlikely.
Transport
The units are packed at the factory in accordance with the order.
• Avoid heavy shaking while on transport and severe bumping.
• Avoid electrostatic discharge on the electronic components of the
modules.
• Take the module until immediately before installation out of the
protective packaging.
If you have to transport the module later, please consider the following:
• use the original packaging or
• use a appropriate packaging for ESD sensitive components.
Make sure that the transportation conditions "Approvals, directives,
standards" in chapter 1 during the entire transport are met.
Unpacking
After delivery of the still packaged item check if there are visible
transportation damages. If yes report this to your deliverer. Request a
written confirmation of your reclamation and make immediate contact with
you local VIPA GmbH representation.
Caution!
Risk by electrostatic discharge
If you expose the module, particularly its electronic components to
electrostatic discharge by touching with the hand, the module can be
damaged or destroyed completely.
• Consider in handling the module the regulations and references to
handling electrostatic sensitive components.
• If you recognize a transport damage or the delivery is not complete, you
have to complain at the appropriate VIPA representative.
If there is no transport damage visible:
• Open the packaging of the device.
• Check the scope of delivery by means of the delivery note.
Scope of delivery
• System SLIO signal module
• Manual incl. conformity / manufacturer declaration
Disposal of
packaging
The packaging consists of cardboard and / or plastic.
Please observe the local disposal regulations, if you discard the packaging.
3-64
HB300E - SM-S - Rev. 14/10
Manual VIPA System SLIO
Chapter 3 Deployment
Storage and disposal
Storage
conditions
Store the safety module in an appropriate packaging and to the storage
conditions, mentioned in chapter 1 "Approvals, directives, standards" .
Shipping
For shipping always use the original packaging.
Disposal
In principle the disposal takes place via the VIPA GmbH. Send defective
and/or to be disposed System SLIO safety modules to VIPA GmbH.
Demands on the
personnel
The personnel which you instruct to demount devices must have the
knowledge and training to carry out these jobs properly.
Choose the personnel in a way that it is secured that safety information are
understood and observed.
HB300E - SM-S - Rev. 14/10
3-65
Chapter 3 Deployment
3-66
Manual VIPA System SLIO
HB300E - SM-S - Rev. 14/10
Manual VIPA System SLIO
A
Appendix
Appendix
Overview
The use of the check lists serves for the documentation and as guide with
the realization of a control system.
Further the check lists are used to avoid errors. For each project they must
be handled conscientiously. For this it is necessary to make copies of the
printed check lists.
The check lists do not have any right of completeness. System dependent
additional requirements can result.
At the end you will find an application example. By means of a hardware
application, the operation of the System SLIO safety modules with both
PROFIBUS and PROFINET is described.
Content
Topic
Page
A Appendix..........................................................................................A-1
Checklist Planning................................................................................A-2
Checklist Installation.............................................................................A-3
Checklist commissioning, parameterization and validation ...................A-4
Checklist modification and retrofitting...................................................A-5
Sample application ...............................................................................A-6
HB300E - SM-S - Rev. 14/10
A-1
Appendix
Manual VIPA System SLIO
Checklist Planning
Checklist
Run.
No.
Requirement
1
1.1
Planning
Was a risk evaluation established and were
the required SIL and performance level
according to DIN EN ISO 13849-1 or IEC
62061 determined?
Are exclusively power supplies used according
to PELV specification?
Does the wiring take place after valid
standards and guidelines?
Is the power supply for the local I/O modules
and field bus components correctly
dimensioned?
Do all the safety-related system components
fulfill the requirements of the determined SIL
(IEC 61508), performance level (DIN EN ISO
13849-1) and safety category
(DIN EN 954-1)?
Does the wiring of the safety components
correspond to the requirements of the safety
classification specified before?
Do the components fulfill the environmental
conditions of the application?
Does the system fulfill the necessary degree
of protection?
Is degree of pollution 2 kept?
Was the maximally permissible response time
of the safety functions determined by a hazard
analysis?
Is the maximally permissible response time
reached? Was the proof established by
means of a calculation?
Is the system protected against mechanical
overloading?
Is the system protected against aggressive
media?
Are the specified electrical values of the output
terminals kept?
Are all the electromechanical sensors supplied
with clock pulses for the recognition of shortcircuits?
Was a list created, which contains all the
parameters of the devices and its settings?
1.2
1.3
1.4
1.5
1.6
1.7
1.8
1.9
1.10
1.11
1.12
1.13
1.14
1.15
1.16
fulfilled
yes
no
Notes
Date:.........................Name: ...................................Sign: ......................................................
A-2
HB300E - SM-S - Rev. 14/10
Manual VIPA System SLIO
Appendix
Checklist Installation
Checklist
Run.
No.
Requirement
2
2.1
Installation
Is it guaranteed that there are no short circuits
by wiring of the input and output terminals?
Is it guaranteed that the safety switch devices
are not short-circuited due to a wiring fault?
Was the wiring checked by means of the
installation plan?
Are all the plugs labeled according to their
allocation?
Are the connecting terminals with screws
applied with the specified breakaway torque?
Is guaranteed that the isolation of the lines
does not lead to a faulty contact?
Was the reliability of all the clamp connections
controlled by a mechanical tensile load?
Was a visual inspection of the installed
components accomplished?
Were necessary installation distances kept to
other components?
Do the components fulfill the environmental
conditions of the application?
Does the system fulfill the necessary degree
of protection?
Is degree of pollution 2 kept?
Is the system protected against aggressive
media?
2.2
3.3
2.4
2.5
2.6
2.7
2.8
2.9
2.10
2.11
2.12
2.13
fulfilled
yes
no
Notes
Date:.........................Name: ...................................Sign: ......................................................
HB300E - SM-S - Rev. 14/10
A-3
Appendix
Manual VIPA System SLIO
Checklist commissioning, parameterization and validation
Checklist
Run.
No.
Requirement
3
3.1
Commissioning
Is guaranteed that all safe communication
participants of a system have a clear safe
device address (F-address)?
This is valid also for participants, which belong
to different safety controllers, if the controllers
are connected by gateways (e.g. Ethernet).
Is the station number of the safety controller
correctly adjusted?
Were the device parameters of the System
SLIO safety modules validated?
Was the safety cycle time determined and
adjusted in the safety controller?
Was the maximum response time with the
adjusted cycle time proofed by calculation?
Were the project data copied on a memory
card?
Was a complete functional test accomplished
and documented?
Was the service personnel instructed into the
handling of the control system?
3.2
3.3.
3.4
3.5
3.6
3.7
3.8
fulfilled
yes
no
Notes
Date:.........................Name: ...................................Sign: ......................................................
A-4
HB300E - SM-S - Rev. 14/10
Manual VIPA System SLIO
Appendix
Checklist modification and retrofitting
Checklist
Run.
No.
Requirement
4
4.1
Modification and retrofitting
Is the modification/retrofitting compatible? Are
the requirements of the checklists of planning,
installation, commissioning and validation
further fulfilled?
Are the calculated reaction times further kept
after modification/retrofitting? Proof
necessary!
Were the project data copied on a memory
card?
Was a complete functional test accomplished
and documented?
4.2
4.3
4.4
fulfilled
yes
no
Notes
Date:.........................Name: ...................................Sign: ......................................................
HB300E - SM-S - Rev. 14/10
A-5
Appendix
Manual VIPA System SLIO
Sample application
This instruction describes the usage of the System SLIO safety modules
with both PROFIBUS and PROFINET. Decide whether you want to build
the sample application with PROFIBUS or PROFINET.
The sample application requires the following hardware and software:
Precondition
Module
CC/Coupler
Central
controller
Coupler
Module
Designation / Order number
Siemens IM151-8F PN/DP CPU
Third-party safety
(6ES7151-8FB00-0AB0, product version 3, FW 2.7.1)
PLC
Siemens DP master for CPU (6ES7138-4HA00-0AB0)
Siemens power module PM-E DC24V
(6ES7138-4CA01-0AA0)
Power supply safety
Terminal module TM-P15S23-A0 (6ES7193-4CD20-0AA0)
Siemens 4F-DI73F-DO DC24V/2A
(6ES7138-4FC01-0AB0)
Safety I/O module
Terminal module TM-E30S44-01 (6ES7193-4CG20-0AA0)
Siemens power module PM-E DC24V
Power supply
(6ES7138-4CA01-.0AA0)
standard I/O
Terminal module TM-P15S23-A1 (6ES7193-4CC30-0AA0)
Siemens 8 DI DC24V (6ES7131-4BF00-0AA0)
Third-party I/O
module Input
Terminal module TM-E15S24-01 (6ES7193-4CB20-0AA0)
Siemens 8 DO DC24V/0.5A (6ES7132-4BF00-0AA0)
Third-party I/O
module Output
Terminal module TM-E15S24-01 (6ES7193-4CB20-0AA0)
Bus termination
Siemens 6ES7 193-4JA00-0AA0
VIPA IM 053PN PROFINET-IO (VIPA 053-1PN00)
VIPA SLIO bus
coupler
or VIPA IM 053DP DP slave (VIPA 053-1DP00)
VIPA SLIO AO
VIPA SM 032 AO 4x12BitI (VIPA 032-1BD40)
VIPA SLIO AI
VIPA SM 031 AI 4x12BitI (VIPA 031-1BD40)
VIPA SLIO Safety DI VIPA SM 021 (VIPA 021-1SD00)
VIPA SLIO Safety DO VIPA SM 022 (VIPA 022-1SD00)
VIPA SLIO DI
VIPA SM 021 (VIPA 021-1BD10)
VIPA SLIO DO
VIPA SM 022 (VIPA 022-1BD00)
Switch/Relay
• DC 24V Relay with two two-way switches
(e.g. Finder Type 40.52 with base 95.95.3)
• Switch (normally open contact)
Software
•
•
•
•
A-6
Siemens SIMATIC manager
SIMATIC Distributed Safety Programming
VIPA Safety CRC-Tool
VIPA SLIO gsd/gsdml file
HB300E - SM-S - Rev. 14/10
Manual VIPA System SLIO
Appendix
Setting the
F-address
Please preset the F-address of the following modules via the F-address
switch, before they are installed:
Module
F-address
Switch positions
decimal
Siemens 4 F-DI/3 F-DO DC24V/2A
200
0000 1100 1000
System SLIO 021-1SD00
199
0000 1100 0111
System SLIO 022-1SD00
198
0000 1100 0110
Hardware
structure
Build the sample application according to the following figure:
Config.
Tool
Workstation
PR O F IB US / P RO FI N ET
Ou t
third-party
safety
IO module
third-party
IO module
third-party
IO module
In
third-party
safety
PLC
VIPA
Safety
CRC-Tool
In
VIPA
SLIO
Bus coupler
Out
VIPA
SLIO AO
VIPA
SLIO AI
VIPA
SLIO
Safety DI
VIPA
SLIO
Safety DO
VIPA
SLIO DI
VIPA
SLIO DO
SLIO bus
In
Out
Wire the sample application as shown in the following figure:
Wiring
Power section supply
Power supply
0-30V
DI3
TP3
DO2
DO1
DO3
A1
GND
DO0
SLIO DO 4x24V
DI2
TP2
DI1
TP1
SLIO DI 4x2µs
DI0
TP0
SLIO Safety DO
SLIO Safety DI
GND
Field
DC24V GND
SLIO AI 4x12Bit
DC24V
Field
Finder2
SLIO AO 4x12Bit
SLIO Bus coupler
GND
11
COM
21
COM
12
NC 14
NO
22
NC 24
NO
Switch
DC 24V
HB300E - SM-S - Rev. 14/10
330R
330R
Electronic power supply
330R
Power supply
0-30V
GND
GND
GND
A-7
Appendix
Configuration in
the Siemens
SIMATIC manager
A-8
Manual VIPA System SLIO
• Configure in your Siemens SIMATIC-Manager a new project with a
SIMATIC 300 station.
• Open the hardware configuration for this station and configure the
hardware structure according to the hardware structure above.
• Decide whether you will realize your example with PROFIBUS or
PROFINET.
HB300E - SM-S - Rev. 14/10
Manual VIPA System SLIO
Parameterization
of the CPU
Appendix
• When you add a CPU, a dialog box opens to adjust the properties of the
new PROFINET subnet. Click "NEW" and create a new subnet.
Similarly, a dialog box opens when you add the DP master for setting
the PROFIBUS properties. Here act in the same way.
After the installation of the GSD/GSDML files, the VIPA components can
be found in the hardware catalog at:
PROFINET IO > Additional Field devices > I/O
respectively
PROFIBUS-DP > Additional Field devices > I/O
• To open the properties dialog double click at the CPU and select the tab
"Protection".
• Activate below the option "1: Access protect for F CPU" the option "Can
be bypassed with password".
• Enter the password for the F-CPU with at least 8 characters below the
option "3: Read/write protection". Repeat the password at "Reenter
password".
• Activate the option "CPU contains safety program".
• The settings in the tabs "F Parameters" and "Cyclic Interrupts" are let on
default values.
• Open the properties dialog of the Siemens module 4 F-DI/3 F-DO
DC24V/2A and enter in the tab "Parameter" for "F_target_address" the
value "200".
• Close the properties dialog with [OK].
HB300E - SM-S - Rev. 14/10
A-9
Appendix
Parameterization
of System SLIO
analog modules
A-10
Manual VIPA System SLIO
• Parameterize the system SLIO analog modules according to the
following figures. This point shows how configurable "non-safety"
System SLIO modules can be configured with System SLIO safety
modules.
HB300E - SM-S - Rev. 14/10
Manual VIPA System SLIO
Appendix
• For 021-1SD00 and 022-1SD00 open the properties dialog with a double
click, each and set the parameters according to the following figures:
HB300E - SM-S - Rev. 14/10
A-11
Appendix
Validation with the
VIPA Safety
CRC-Tool
Manual VIPA System SLIO
• Select the module 021-1SD00 and start the "VIPA Safety CRC-Tool" via
the context menu "Start Device Tool".
• Validate each parameter in the CRC-Tool according to the description
"Validation of the system" with the [Accepted] button and then calculate
the checksum with [Calc-CRC]. The [Calc-CRC] button is only enabled
when all the parameters were "accepted". More can be found in chapter
"Deployment" at "Validation of the system".
• Copy the CRC to the clipboard and then close the "VIPA Safety CRC
Tool".
• Re-open the properties dialog and select the tab "PROFIsafe". Here
open the dialog "Change value" of the parameter F_iPar_CRC an paste
the copied CRC. Set the value of "F_Dest_Add" to "199". Confirm with
[OK].
• Repeat these steps for the module 022-1SD00 and set the parameter
"F_Dest_Add" to the value "198".
• "Safe and translate" your project and close the hardware configuration.
The following automatically generated blocks should now be shown in
the Siemens SIMATIC manager:
A-12
HB300E - SM-S - Rev. 14/10
Manual VIPA System SLIO
Create F-FC
FC1
Appendix
• Configure in the Siemens SIMATIC manager a F-FC. First configure a
FC1. The properties window of the FC1 opens. Select as configure
language "F-FBD".
• Create symbolic names and comments for the used safety inputs and
outputs in the symbol editor.
• Double-click at the FC1 in the Siemens SIMATIC manager. The dialog
field to assign the password for the safety program opens. Enter (2x) for
the safety program a maximum 8-character password and confirm with
[OK]. The LAD/STL/FBD editor opens.
• Program the FC1. Save this and close the editor.
Network: 1
Controlling SDO 2
&
Q13.2
controlles
SDI 2
" SDO 2 "
I8.3
controlled via
switch
" SDI 3 "
Network: 2
=
Controlling SDO 3 (Relay)
&
Q13.3
controlles
relay
" SDO 3 "
I8.2
controlled by
SDO 2
" SDI 2 "
Network: 3
=
Controlling SDO 0
Since the channels SDO 0/1 are configured as 2-channel,
both channels are switched to "1" with controlling Q13.0.
I8.0
2-channel controlled
by relay
" SDI 0 "
I8.1
2-channel controlled
by relay
" SDI 1 "
HB300E - SM-S - Rev. 14/10
&
Q13.0
2-channel
only LED
" SDO 0 "
=
A-13
Appendix
Edit safety
program
Manual VIPA System SLIO
• Open in the Siemens SIMATIC manager the dialog "Edit safety
program" via Options > Edit safety program. The dialog "Safety
program" opens.
• Open the dialog "Edit F-Runtime groups" via the "F-Runtime groups"
button.
• Because a F-Runtime group does not exist, select with [New] the dialog
"Define New F-Runtime Group".
• Enter "FC2" at "F_CALL block". This FC is automatically generated, as
soon as you have left the dialog "Edit F-Runtime groups" with [OK]. Due
to the usage of a FC as F-program block, there is no instance DB (I-DB)
required for the F-program block. The max. cycle time of the F-runtime
group should be 200ms. A DB for the F-runtime group communication is
not required.
• Close the dialog with [OK].
• Close the dialog "Edit F-Runtime Groups" with [OK]. A message window
opens. Here you are asked whether the missing blocks (in the example
only FC2) should be automatically generated. Answer with [Yes].
• Now you are returned in the dialog "Safety program". Click at
[Generate]. During the generation a consistency check of the relevant F
blocks is established. Then a run able safety program is generated.
A-14
HB300E - SM-S - Rev. 14/10
Manual VIPA System SLIO
Create cyclic
interrupt
OB35
Appendix
• Create in the Siemens SIMATIC manager an OB35. Call the F-CALL
(FC2 in the example) in the cyclic interrupt OB35 and save the OB35.
OB35: "Cyclic Interrupt"
Network: 1
CALL FC
2
• Open the dialog window "Safety program" and click at [Load]. A
message window is shown about the possibility to load the default
blocks together with the safety program. Answer with [Yes].
• To activate the safety operation, perform a STOP/RUN transition. Now
you have created a run able safety program.
Changing the
F-address
• Switch off DC 24V power supply of your System SLIO station and
demount the System SLIO safety module 022-1SD00. Switch all the DIP
switches of the F-address switch to 0 position.
• Mount the System SLIO safety module and switch on the DC 24V power
supply. Please wait for about 5s and switch the DC 24V power supply
for the System SLIO module off again. Hereby the internal F-address
memory of the System SLIO safety module is cleared.
• Demount the System SLIO safety module again and switch the Faddress switch to the address "201" (switch setting 0000 1100 1001).
• Mount the System SLIO safety module and switch on the DC 24V power
supply.
• Open the hardware configuration for the application sample.
• Open the properties dialog of the System SLIO Safety module 0221SD00 und select the tab "PROFIsafe". change the parameter
"F_Dest_Add" to the value "201".
• Close the properties dialog with [OK]. "Save and translate" your
hardware project and transfer it into the CPU. Then you can close the
hardware configurator.
• Open in the Siemens SIMATIC manager the dialog "Edit safety
program". "Generate" your safety program and "upload" it into your
CPU. The program is now executable with the new F-address.
HB300E - SM-S - Rev. 14/10
A-15
Appendix
Modification
(changing
parameters)
A-16
Manual VIPA System SLIO
• Open the hardware configuration of the application sample and select
the VIPA053-1PN00-000 station.
• Open the properties dialog of the module 021-1SD00 via double click
and select the tab "Parameter".
• Change the parameter "Channel 2,3: Input signal-smoothing [ms]" from
"5" to "6" and confirm your changes with [OK]. The properties window is
closed.
• Select the module 021-1SD00 and start the "VIPA Safety CRC-Tool" via
the context menu "Start Device Tool". Accept in the "VIPA Safety CRCTool" every parameter, calculate the CRC and copy the CRC to the
clipboard. Then close the "VIPA Safety CRC-Tool".
• Re-open the properties dialog and select the "PROFIsafe" tab. You will
now be prompted to enter your password. Enter the password and
confirm with [OK].
• In the "PROFIsafe" tab open the dialog "Change value" of the parameter
F_iPar_CRC an paste the copied CRC.
• Close the properties dialog with [OK]. "Save and translate" your
hardware project and transfer it into the CPU. Then you can close the
hardware configurator.
• Open in the Siemens SIMATIC manager the dialog "Edit safety
program". "Generate" your safety program and "upload" it into your
CPU. The program is now executable with the new F-address.
HB300E - SM-S - Rev. 14/10