1
Public
Imagination Technologies
PVRGeoPOD
User Manual
Copyright © Imagination Technologies Limited. All Rights Reserved.
This publication contains proprietary information which is subject to change without notice and is
supplied 'as is' without warranty of any kind. Imagination Technologies and the Imagination
Technologies logo are trademarks or registered trademarks of Imagination Technologies Limited. All
other logos, products, trademarks and registered trademarks are the property of their respective
owners.
Filename
:
PVRGeoPOD.User Manual
Version
:
PowerVR SDK REL_3.5@3523383a External Issue
Issue Date
:
17 Apr 2015
Author
:
Imagination Technologies Limited
PVRGeoPOD
1
Revision PowerVR SDK REL_3.5@3523383a
Imagination Technologies
Public
Contents
1.
Introduction ................................................................................................................................. 4
1.1.
Supported Features ............................................................................................................ 4
1.2.
Limitations ........................................................................................................................... 4
2.
Installation ................................................................................................................................... 5
2.1.
Compatibility Information .................................................................................................... 5
2.1.1.
Autodesk 3ds Max .................................................................................................... 5
2.1.2.
Autodesk Maya ......................................................................................................... 6
2.1.3.
Blender ..................................................................................................................... 6
2.2.
Installation from Installer ..................................................................................................... 6
2.3.
Manual Installation .............................................................................................................. 6
2.3.1.
Qt Installation ........................................................................................................... 6
2.3.2.
Installation for Autodesk 3ds Max ............................................................................ 7
2.3.3.
Installation for Autodesk Maya ................................................................................. 7
2.3.4.
Installation for Blender .............................................................................................. 8
3.
File Export and Conversion ....................................................................................................... 9
3.1.
Available File Formats ........................................................................................................ 9
3.1.1.
POD File ................................................................................................................... 9
3.1.2.
Header/Source File .................................................................................................. 9
3.1.3.
POD vs. Header/Source File .................................................................................... 9
3.2.
Export a Scene from Autodesk 3ds Max ............................................................................ 9
3.3.
Export a Scene from Autodesk Maya ................................................................................. 9
3.4.
Export a Scene from Blender ...........................................................................................10
3.5.
Convert from a Collada File ..............................................................................................10
3.5.1.
Limitations ..............................................................................................................11
3.5.2.
Command-Line .......................................................................................................11
4.
PVRGeoPOD Options ...............................................................................................................12
4.1.
Geometry Options.............................................................................................................12
4.2.
Material Options................................................................................................................16
4.3.
Transformation Options ....................................................................................................17
4.4.
User Options .....................................................................................................................19
4.5.
Using Configurations ........................................................................................................20
4.5.1.
Save a Configuration ..............................................................................................20
4.5.2.
Make a Configuration Active ..................................................................................21
4.5.3.
Rename a Configuration ........................................................................................21
4.5.4.
Export a Configuration ............................................................................................21
4.5.5.
Import a Configuration ............................................................................................21
5.
Using MAXScript and MEL .......................................................................................................22
5.1.
Overview ...........................................................................................................................22
5.2.
MEL ..................................................................................................................................22
5.3.
MAXScript .........................................................................................................................23
6.
Using POD Data ........................................................................................................................24
7.
Contact Details ..........................................................................................................................25
Appendix A.
Block Names ............................................................................................................26
Appendix B.
PVRGeoPOD Command-Line Options ..................................................................29
Revision PowerVR SDK REL_3.5@3523383a
2
User Manual
Public
Imagination Technologies
List of Figures
Figure 1. PVRGeoPOD user interface .................................................................................................. 11
Figure 2. Geometry tab in PVRGeoPOD interface ............................................................................... 12
Figure 3. Vertex data options in the Geometry tab ............................................................................... 14
Figure 4. Materials tab in PVRGeoPOD interface ................................................................................ 16
Figure 5. Transformations tab in PVRGeoPOD interface ..................................................................... 17
Figure 6. User Options tab in PVRGeoPOD interface .......................................................................... 19
Figure 7. Using configurations .............................................................................................................. 20
List of Tables
Table 1. Compatible Autodesk 3ds Max plugins ..................................................................................... 5
Table 2. Autodesk Maya compatibility details ......................................................................................... 6
Table 3. General geometry export options ............................................................................................ 12
Table 4. Vertex data export options in the Geometry tab ..................................................................... 14
Table 5. Data types available under the Data Type column ................................................................. 16
Table 6. Material export options ............................................................................................................ 17
Table 7. Transformation export options ................................................................................................ 18
Table 8. User option settings ................................................................................................................ 19
Table 9. Block names............................................................................................................................ 26
Table 10. PVRGeoPOD command-line options .................................................................................... 29
PVRGeoPOD
3
Revision PowerVR SDK REL_3.5@3523383a
Imagination Technologies
Public
1. Introduction
PVRGeoPOD is an exporter plugin for Autodesk Maya, Autodesk 3ds Max and Blender. It exports 3D
geometry and scene data as the PowerVR Object Data (POD) format, which is PowerVR‟s optimized
deployment file format. PVRGeoPOD is also available as a standalone application designed to
convert from Collada‟s Digital Asset Exchange (DAE) format to the POD format. This standalone
application comes in both graphical and command-line versions and is provided for where a
developer‟s 3D modeller does not have a compatible plugin.
1.1.
Supported Features
Some of the notable features of PVRGeoPOD include:
Skinned meshes.
Bone batching based on matrix palette size.
Data format choice (store data as float, byte, unsigned int, etc.).
Interleaving of vertex data if desired.
Mesh instancing.
Multiple texture coordinate sets.
Parented nodes.
Polygon stripping.
Polygon and vertex sorting.
Tangent space generation.
Custom user data (plugins only).
1.2.
Limitations
The following features are not supported in PVRGeoPOD:
UV animation.
Vertex animation.
Splines.
Non-Uniform Rational Basis Spline (NURBS).
Per object culling information.
Physique modifier (Autodesk 3ds Max only).
Revision PowerVR SDK REL_3.5@3523383a
4
User Manual
Public
Imagination Technologies
2. Installation
2.1.
Compatibility Information
2.1.1.
Autodesk 3ds Max
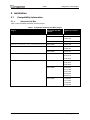
Table 1 lists compatible Autodesk 3ds Max plugins.
Table 1. Compatible Autodesk 3ds Max plugins
Plug-in
Autodesk 3ds Max
release
“igame.dll” version
3dsmax\12\Windows_x86_32\PVRGeoPOD.dle
2010
12.0.0.106
2011
13.0.0.94
13.0.0.104
2012
14.0.0.121
2010 (x64)
12.0.0.106
2011 (x64)
13.0.0.94
13.0.0.104
2012 (x64)
14.0.0.121
3dsmax\15\Windows_x86_32\PVRGeoPOD.dle
2013
15.0.0.347
15.5.121.0
15.6.164.0
3dsmax\15\Windows_x86_64\PVRGeoPOD.dle
2013 (x64)
15.0.0.347
15.5.121.0
15.6.164.0
2014 (x64)
16.0.420.0
16.1.178.0
16.2.475.0
16.3.253.0
16.5.277.0
2015 (x64)
17.0.630.0
17.1.149.0
17.2.259.0
17.3.374.0
3dsmax\12\Windows_x86_64\PVRGeoPOD.dle
PVRGeoPOD
5
Revision PowerVR SDK REL_3.5@3523383a
Imagination Technologies
2.1.2.
Public
Autodesk Maya
Table 2 lists compatibility details with versions of Autodesk Maya.
Table 2. Autodesk Maya compatibility details
Autodesk Maya
version
Windows
OS X
32-bit
64-bit
32-bit
2010
2011
2012
2013
2014
2015
2.1.3.
64-bit
Blender
Blender versions 2.59+ are currently compatible.
2.2.
Installation from Installer
PVRGeoPOD can be installed from the PowerVR SDK installer:
1.
2.
3.
Navigate to the PowerVR Insider webpage (powervrinsider.com) and download the SDK.
Launch the installer and follow the on-screen instructions.
Once the SDK has been successfully installed, PVRGeoPOD will be available in:
<InstallDir>\PVRGeoPOD
This folder contains the plugin files. Once these files have been located they must be installed into the
plugin system for the respective application. Installation instructions for each of the supported
platforms are highlighted next for cases where the user has decided not to auto-install the plugins
using the PowerVR Graphics SDK installer or for cases where the installer was unable to successfully
install the said plugins.
2.3.
Manual Installation
2.3.1.
Qt Installation
Some plugins are bundled with a series of Qt libraries, available in the same folder as the plugin. It is
important that these Qt libraries be placed in the correct location so that the GUI for the plugin can
function correctly. If no Qt libraries are present then they are not required and only the plugin should
be copied:
For Windows: The libraries must be placed local to the Autodesk 3ds Max, Autodesk Maya or
Blender executable.
For Linux: The location of the libraries must be set with LD_LIBRARY_PATH.
For OS X: The libraries must be placed in the same folder as the plugin.
Revision PowerVR SDK REL_3.5@3523383a
6
User Manual
Public
2.3.2.
Imagination Technologies
Installation for Autodesk 3ds Max
Copy:
PVRGeoPOD.dle
To:
<3DSMAX_DIR>\plugins\
Copy:
Qt Dlls
To:
<3DSMAX_DIR>\
2.3.3.
Installation for Autodesk Maya
Windows
Copy:
<VERSION>\Windows_x86_*\PVRGeoPOD_v<VERSION>.mll
And any Qt files to:
<MAYA_DIR>\bin\plug-ins\
Copy:
Qt Dlls
To:
<MAYA_DIR>\
OS X
Copy:
<VERSION>/OSX_x86*/PVRGeoPOD_v<VERSION>.bundle
And any Qt files to:
/Users/Shared/Autodesk/maya/<MAYA_VERSION>/plug-ins/
Once the plugin has been installed it must be activated in the Autodesk Maya Plug-in Manager.
PVRGeoPOD
7
Revision PowerVR SDK REL_3.5@3523383a
Imagination Technologies
2.3.4.
Public
Installation for Blender
Windows
Copy:
PVRGeoPOD.dll
PVRGeoPODScript.py
To the Blender Add-ons folder (run bpy.utils.script_paths("addons") for location).
Linux
Copy:
libPVRGeoPOD.so
PVRGeoPODScript.py
And any Qt files to the Blender Add-ons folder (run bpy.utils.script_paths("addons") for
location).
OS X
Copy:
libPVRGeoPOD.dylib
PVRGeoPODScript.py
And any Qt files to the Blender Add-ons folder (run bpy.utils.script_paths("addons") for
location).
Once these files have been copied, the plugin must be activated in user preferences, under the
section Add-Ons.
Revision PowerVR SDK REL_3.5@3523383a
8
User Manual
Public
Imagination Technologies
3. File Export and Conversion
3.1.
Available File Formats
3.1.1.
POD File
PVRGeoPOD exports data to POD files. The PowerVR SDK Tools library contains functions and
classes to use such files in applications. See Section 6 for examples of their use.
3.1.2.
Header/Source File
PVRGeoPOD can export the binary POD file directly to a C++ header file (H) or a C++ source file
(CPP) as if it had been wrapped using the PowerVR SDK Filewrap utility. The PowerVR SDK
contains tools to use POD file data from a header or source file. Further details can be found in
Section 6.
Note: For more information regarding the Filewrap utility, consult the “Filewrap User Manual”.
3.1.3.
POD vs. Header/Source File
A quick comparison of POD vs. header/source files is highlighted next:
Memory footprint: POD files have a smaller memory footprint. Once a POD file has been
copied into memory, the vertex data can be copied into hardware-friendly buffers, e.g., Vertex
Buffer Object and Vertex Buffer. As the graphics API has its own copy of the data, the original
data can be released as either the whole POD file or just the vertex data, if other information
from the file is still required.
Flexibility: A POD file can be changed post-compilation whereas a header/source file must be
recompiled into the final binary.
Storage: In situations where the POD file is compiled into the final executable, there will be little
size difference between methods. However, a POD file is smaller on disk than a header/source
file containing the same information.
3.2.
Export a Scene from Autodesk 3ds Max
Once PVRGeoPOD has been installed, it becomes possible to export scenes from Autodesk 3ds Max.
To do so, perform the following steps:
1.
2.
Open the MAX file that needs to be converted.
In the Autodesk 3ds Max application, click Main Menu -> Export.
3.
Follow the on-screen instructions, as appropriate, to complete the procedure.
3.3.
Export a Scene from Autodesk Maya
Once PVRGeoPOD has been installed and activated in the Autodesk Maya Plug-in Manager, it
becomes possible to export to the POD format through the following steps:
1.
2.
Open the desired Autodesk Maya scene file that needs to be converted.
Click File -> Export All to export an entire scene or File -> Export Selection to
export part of it. It is also possible to export using a MEL script. The MEL commands that can
be used are as follows:
PVRGeoPOD_Export(“filename.pod”)
The command exports the scene to filename.pod using the previously defined export options.
PVRGeoPOD
9
Revision PowerVR SDK REL_3.5@3523383a
Imagination Technologies
Public
PVRGeoPOD_Export(“filename.pod”, “optionsfilename.txt”)
The command exports the scene to filename.pod using the export options defined in
optionsfilename.txt.
PVRGeoPOD_Export(“filename.pod” “optionsfilename.txt”, “selected”)
The command exports the currently selected meshes to filename.pod using the export options
defined in optionsfilename.txt.
3.
3.4.
Follow any remaining on-screen instructions, as appropriate, to complete the procedure.
Export a Scene from Blender
Once PVRGeoPOD has been installed and activated in Blender‟s plugin manager, it becomes
possible to export scenes through the following steps:
1.
2.
Open the BLEND file that needs to be converted.
In the Blender application, click File -> Export -> PVRGeoPOD (.pod/.h/.cpp).
3.
Follow the on-screen instructions, as appropriate, to complete the procedure.
3.5.
Convert from a Collada File
In order to convert a Collada (i.e., DAE) file to a POD file, perform the following steps:
1.
2.
Launch the PVRGeoPOD interface (Figure 1).
Open the desired Collada file by browsing to it using the File -> Open option.
3.
4.
Set the required export options. A complete list of the available options is provided in Section 4.
Click the Export button to convert and save the file. A dialog box will then open to allow a
location to be specified for the converted file.
Specify the location of the POD file to be saved. After the file is saved, the export status of the
file will be summarized on PVRGeoPOD interface.
5.
Note: To verify that a given COLLADA file adheres to the COLLADA schema, use the xmllint
command-line application. More details about this application can be found here.
Revision PowerVR SDK REL_3.5@3523383a 10
User Manual
Public
Imagination Technologies
Figure 1. PVRGeoPOD user interface
3.5.1.
Limitations
The following limitations exist when converting from a Collada file:
Only meshes constructed from triangles, convex polygons, and polylists are supported.
Animations represented by curves are not supported.
Skinned animations may not always export correctly. This varies by exporter but has been
confirmed to work with OpenCOLLADA for Autodesk 3ds Max.
3.5.2.
Command-Line
The PVRGeoPOD standalone command-line utility can be called directly as follows:
PVRGeoPODCL –i=<input file> -o=<output file> -cs=<ogl, d3d>
All of the options available in the GUI utility are available in the command-line version via a series of
flags or from the command-line as follows:
PVRGeoPODCL /?
Note: A full list of the flags can be found in Appendix B.
PVRGeoPOD
11
Revision PowerVR SDK REL_3.5@3523383a
Imagination Technologies
Public
4. PVRGeoPOD Options
The PVRGeoPOD user interface (see Figure 1) contains a range of options that can be used during
the conversion and export to the POD file format. Explanations for the options are also available in the
interface itself by using the tooltip functionality. The available options to use are fully explained in this
section of the user manual.
4.1.
Geometry Options
Geometry option settings are adjusted using the Geometry tab in PVRGeoPOD interface (Figure 2).
Table 3 lists the general geometry options.
Figure 2. Geometry tab in PVRGeoPOD interface
Table 3. General geometry export options
Option
Description
Export Geometry
This checkbox must be ticked for geometry
information to be exported.
Primitive Type
When targeting PowerVR hardware, a
performance improvement can be gained by
ensuring that the primitives are in the form of a
Triangle List that is Indexed. The other
option (Triangle Strips) produces additional
draw calls and thus can introduce unwanted
overhead.
Use custom optimisation settings
PVRGeoPOD has a number of default export
settings that are recommended for most use
cases. If any of these settings require changing,
this option must be ticked.
Revision PowerVR SDK REL_3.5@3523383a 12
User Manual
Public
Imagination Technologies
Option
Description
Triangle data optimisations: Sorting
method
The correct Sorting Method can provide a
performance improvement. The specific sorting
algorithm to use varies with platform, however,
the following are suggested:
If PowerVR MBX hardware is being
targeted use PVRTTriStrip.
If PowerVR Series5 or Series6 hardware is
being targeted use PVRTGeometrySort.
If the DirectX API is being targeted use
either PVRTGeometrySort or D3DX.
Vertex data optimisations:
Interleave vertex data
Interleaving vertex data is an optimization that
takes the vectors generated for the position,
normals, UV coordinates, etc., and places them
into a single large array. Tick this option to use
this setting.
Vertex data optimisations: Align
vertex data (to 32-bits)
This option when ticked, pads the interleaved
array so that each attribute for each vertex falls
on a 32-bit boundary. On some hardware this will
provide a small performance improvement due to
the overhead involved in accessing memory that
does not align correctly with the said boundary.
Vertex data optimisations: Sort
vertices
This option when ticked optimizes the vertex list
to improve vertex-read memory cache. The
option is only available in Windows on machines
where DirectX9 is present.
Figure 3 illustrates the options that appear in the section below the general options. The section
displays the vectors to be exported, their format, how many dimensions a given vector uses, and any
other additional option related to a given set of vertex data. Some variables can be fine-tuned, such
as the individual dimensions that should be exported and the specific data types to be used. Table 4
provides a list of the participating vertex data export options.
Data that is greyed out will not be exported and any area that is not greyed out is only exported if
information exists to fill it. Controlling the data types can be done from the options under the Data
Type column. A list of data types can be found in Table 5.
PVRGeoPOD
13
Revision PowerVR SDK REL_3.5@3523383a
Imagination Technologies
Public
Figure 3. Vertex data options in the Geometry tab
Table 4. Vertex data export options in the Geometry tab
Option
Description
Position
Vertex position. The data type as well as the
dimensions that need to be exported can be set
as appropriate.
Normal
Vertex normal. The data type as well as the
dimensions that need to be exported can be set
as appropriate.
Colour
Vertex colour. The data type as well as the
dimensions that need to be exported can be set
as appropriate.
Export skinning data
Tick this option if skinning is required.
Export skinning data: Bone indices
Bone indices details to be exported. The data
type as well as the dimensions that need to be
exported can be set as appropriate.
Export skinning data: Bone weights
Bone weights details to be exported. The data
type as well as the dimensions that need to be
exported can be set as appropriate.
Revision PowerVR SDK REL_3.5@3523383a 14
User Manual
Public
Imagination Technologies
Option
Description
Export skinning data: Matrix palette
size
This option represents the number of matrices
that can affect a specific mesh. By default, this
value is equal to 9 in order to support APIs which
limit the matrix palette size, e.g., OpenGL ES 1.1.
If the number of matrices affecting a mesh is
greater than the Matrix Palette Size the
mesh is split into batches which use fewer
matrices per batch. The side effect is that more
meshes produce more draw calls and thus a
greater overhead.
Note: In some cases when performing skinning or
animation the default way of representing
transformations in the POD format is not
sufficient for skinning. This can cause
rendering issues. If this occurs with a
scene, ticking Export
transformations as matrices can
rectify the situation (see Section 4.3).
Export mapping channels
The mapping channel options consist of the
settings for UV coordinate channels, their
associated data types, and dimensions. Tick this
option if UV coordinates are to be exported.
Export mapping channels: UVW<number>
Specific mapping channel to be exported. The
data type as well as the dimensions that need to
be exported can be set as appropriate.
Export mapping channels: Flip V coordinate
This option flips the V coordinate in the UV
texture. It is used when textures are to behave in
the same way as a „render to texture‟ target in
OpenGL. If both Direct3D and OpenGL are being
targeted, this option is unlikely to be desirable.
Generate tangent space
The tangent space options consist of the settings
for both of the binormal and tangent channels,
their associated data types, and dimensions. This
option must be ticked if tangents and binormals
are to be exported.
Generate tangent space: Use mapping
channel
The value of this option determines which of the
possible eight UV channels are used to create
the tangent space data.
Generate tangent space: Tangent
Tangent details to be exported. The data type as
well as the dimensions that need to be exported
can be set as appropriate.
Generate tangent space: Binormal
Binormal details to be exported. The data type as
well as the dimensions that need to be exported
can be set as appropriate.
Generate tangent space: Vertex
splitting (-1 .. 1)
This option can have a value between -1 and 1,
representing a threshold value. If multiple faces
share a vertex and the difference between the
directions of those faces is greater than the
threshold, a new vertex is created for each face
with separate tangent space data.
PVRGeoPOD
15
Revision PowerVR SDK REL_3.5@3523383a
Imagination Technologies
Public
Table 5. Data types available under the Data Type column
Data type
ABGR
ARGB
RGBA
D3DCOLOR
DEC3N
fixed 16.16
float
int
short
short, normalised
UBYTE4
unsigned byte
unsigned byte, normalised
unsigned int
unsigned short
unsigned short, normalised
byte
byte, normalised
4.2.
Material Options
Material option settings are adjusted using the Materials tab in PVRGeoPOD interface (Figure 4).
Table 6 lists the material options available.
Figure 4. Materials tab in PVRGeoPOD interface
Revision PowerVR SDK REL_3.5@3523383a 16
User Manual
Public
Imagination Technologies
Table 6. Material export options
Option
Description
Export materials
This option must be ticked if materials are to be
exported.
Merge .PFX/.PVR
In cases where a POD file has been edited and
PVR or PFX files have been added, it is possible
to re-export the geometry from the original file
back into the edited POD file. To do this tick
Merge .PFX/.PVR, click the ellipsis (...)
button to browse to and open the POD file to be
updated. Once all export options are set and the
export has been completed the POD file will
contain the new geometry.
Source .pod file
Use this option to browse and open the desired
file.
Invert transparency
This option inverts the transparency value of the
materials being exported, e.g., if the transparency
is in the range of 0 < n < 1 all values will
become 1-n, post export).
4.3.
Transformation Options
Transformation option settings are adjusted using the Transformations tab in PVRGeoPOD
interface (Figure 5). Table 7 lists the transformation options available.
Figure 5. Transformations tab in PVRGeoPOD interface
PVRGeoPOD
17
Revision PowerVR SDK REL_3.5@3523383a
Imagination Technologies
Public
Table 7. Transformation export options
Option
Description
Export animations
This option must be ticked if animations are to be
exported.
Export animations: Index animation
data
Instead of storing transformation data per
keyframe, ticking this option forces PVRGeoPOD
to create a list of the transformations instead. The
transformations are then referred to by an index
into that list within each keyframe. In instances
where a small number of animations are being
performed repeatedly, this can produce a smaller
POD file.
Note: In some cases when performing skinning or
animation the default way of representing
transformations in the POD format is not
sufficient for skinning. This can cause
rendering issues. If this occurs with a
scene, ticking Export
transformations as matrices can
rectify the situation (see Section 4.3).
Co-ordinate system
There are two dropdown boxes in this section.
The first one contains two options, OpenGL and
DirectX, and must be set to match the API
being targeted. The second dropdown box
contains the options World Space and Model
Space. These represent the „spaces‟ that the file
will be exported into. This option only becomes
available when no animation is present. When
animation is present the export will always be in
model space.
Co-ordinate system: Static frame
If no animation is to be exported and World
Space has been selected, a single frame can be
selected for export. This allows for certain
transformations to be „baked in‟.
Export transformations as matrices
When this option is selected, all transformations
will be exported as matrices rather than as
positions, quaternions and scale.
Note: In some cases when performing skinning or
animation the default way of representing
transformations in the POD format is not
sufficient for skinning. This can cause
rendering issues. If this occurs with a
scene, ticking Export
transformations as matrices can
rectify the situation (see Section 4.3).
Improve position precision: Add
position unpack matrix
Revision PowerVR SDK REL_3.5@3523383a 18
If a non-float data type (e.g., ushort) is set for
position (see Section 4.1), this option can be
ticked to improve the precision of the position
data. This is done by using the entire range of the
data type to store the information. A matrix is
provided to unpack the data back to the correct
values.
User Manual
Public
4.4.
Imagination Technologies
User Options
User option settings are adjusted using the User Options tab in PVRGeoPOD interface (Figure 6).
Table 8 lists the user options available.
Figure 6. User Options tab in PVRGeoPOD interface
Table 8. User option settings
Option
Description
Open in PVRShaman
Tick this option to specify a path to PVRShaman.
This indicates that once the export is complete,
the resulting POD file will be opened in
PVRShaman.
PVRShaman path
Use this option to browse to the path of
PVRShaman.
Post-export command-line
Tick this option to be able to use the participating
settings. The settings allow the specification of a
separate program to be run upon successful
completion of an export.
Command
This option can be used to specify the path to the
executable or the command line call for the
command to run.
Command arguments
This option can be used to specify the arguments
that are to be passed to the program, specified in
Command and Command arguments. If the
phrase %POD is found in the argument list it will
be replaced with the absolute file path of the
exported POD file.
Working directory
This option can be used to specify the directory in
which the program specified by Command is to
be run.
PVRGeoPOD
19
Revision PowerVR SDK REL_3.5@3523383a
Imagination Technologies
Public
Option
Description
Export user data
[Plugins only] This option allows the addition of
user data to POD files by using MAXScript or
MEL. The user defined script should implement
the functions:
DefineNodeUserData
DefineMaterialUserData
DefineSceneUserData
These functions will be called by the exporter and
their return values will be stored in the POD file.
Examples can be seen in Section 5.
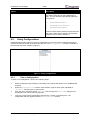
4.5.
Using Configurations
PVRGeoPOD includes support for custom configurations, which are groups of settings that can be
saved and reused to speed up the file export process. The Configurations section is available at
the left hand side of the interface (Figure 7).
Figure 7. Using configurations
4.5.1.
Save a Configuration
To save a new configuration, perform the following steps:
1.
2.
3.
4.
Select the desired export settings by switching to the various tab options in the PVRGeoPOD
interface.
Under the Configurations section of the interface, right-click the option identified as
[Current]. This will open an action menu.
From the menu, select the option Save As… This will open the Enter Name dialog box for
inputting the name of the new configuration.
Type in the name of the configuration and click the OK button in the dialog box. The
configuration will then appear under the Configurations section.
Revision PowerVR SDK REL_3.5@3523383a 20
User Manual
Public
4.5.2.
Imagination Technologies
Make a Configuration Active
If multiple configurations have been created and a specific one needs to be chosen from the list for a
particular export task, it is possible to switch to the required configuration and make it active. To do
so, follow the steps:
1.
Identify the desired configuration in the list under the Configurations section.
2.
3.
Right-click the configuration. This will open an action menu.
From the menu, select the option Set as [Current]. This will then set the chosen
configuration as active and will appear as the first item in the list, prefixed with the [Current]
tag.
4.5.3.
Rename a Configuration
Existing user-defined configurations can be renamed on demand by following these steps:
1.
Identify the desired configuration in the list under the Configurations section.
2.
Double-click the configuration. Alternatively, right-click the configuration and select the option
Rename.
3.
Enter the new name of the configuration.
4.5.4.
Export a Configuration
Configurations can be exported in order to have them saved as either TXT of CFG files for reuse and
portability. To export a configuration, perform the following steps:
1.
Identify and select the desired configuration in the list under the Configurations section.
2.
3.
Right-click the configuration. This will open an action menu.
Select the option Export to file. This will open a dialog box from which the save format
(TXT or CFG) and location of the file can be selected.
Click the Save button in the dialog box to complete the procedure.
4.
4.5.5.
Import a Configuration
Configurations can be imported on demand for use in PVRGeoPOD. To import a configuration,
perform the following steps:
1.
Right-click in an empty area of the Configurations section. This will open an action menu.
2.
Select the option Import from file. This will open a dialog box from which the saved file
can be selected.
Browse and select the required file.
Click the Open button in the dialog box to complete the procedure.
3.
4.
PVRGeoPOD
21
Revision PowerVR SDK REL_3.5@3523383a
Imagination Technologies
Public
5. Using MAXScript and MEL
5.1.
Overview
The Export user data option (see Table 8) allows the user to apply a script to export any desired
data. As previously explained, the location of this script must be entered or browsed to, in order for
this feature to function. The user-defined script should implement the following functions:
DefineNodeUserData
DefineMaterialUserData
DefineSceneUserData
These functions will be called during the export process: DefineNodeUserData when exporting an
object to a POD node; DefineMaterialUserData when exporting a Material;
DefineSceneUserData when exporting a full scene.
DefineNodeUserData will be passed a node ID; DefineMaterialUserData will be passed a
material ID; DefineSceneUserData will be passed nothing. The return value of each script will be
written into the pUserData field of the SPODNode, SPODMaterial, or SPODScene as appropriate.
Once the export process is complete it is the user‟s responsibility to read the pUserData field and
parse the exported data correctly. Examples of using MAXScript and MEL are provided next.
5.2.
MEL
// Note: The return type of the procedures can be changed if desired
global proc string DefineNodeUserData(string $nodeid)
{
// Return the node name and class type as a string to be included in the POD node for
nodeid
string $type = `nodeType $nodeid`;
return $nodeid + " is of type " + $type;
}
global proc string DefineMaterialUserData(string $matid)
{
/*
We're going to return the material colour but we're going to do it
as a comma seperated string. The first value will be a unique tag to
identify that we're exporting the colour value. The second value will
be the material's red colour value, the third green and the final value
blue.
*/
string $s = "";
$s += "3002,";
float $c[] = `getAttr ($matid + ".color")`;
$s += $c[0] + "," + $c[1] + "," + $c[2];
return $s;
};
global proc string DefineSceneUserData()
{
/*
Anything returned from this function will be included in the SPODScene's user data.
This is for information that doesn't belong with a node or a material.
*/
return "Extra global data";
}
Revision PowerVR SDK REL_3.5@3523383a 22
User Manual
Public
5.3.
Imagination Technologies
MAXScript
function DefineNodeUserData nodeid =
(
/* Return the node name and class type as a string to
be included in the POD node for nodeid */
node = maxOps.getNodeByHandle nodeid
str = stringstream ""
format "% is of type " node.name to:str
print (superClassOf node) to:str
str as string
)
function DefineMaterialUserData matid subid =
(
mat = sceneMaterials[matid]
superClassOf mat
/* Is our material a subobject material? */
if isKindOf mat multimaterial then
(
/* If it is a subobject material return its name and parent material name */
str = stringstream ""
submat = mat.materialList[subid]
format "%:%" mat.name submat.name to:str
return str as string
)
/*
Our material is just a material. We're going to return the diffuse colour
but we're going to do it in a structured way using a MAXScript array. The
first value will be a unique tag to identify that we're exporting the
diffuse value. The second value will be the data size and the third vale
is the material's diffuse value.
*/
matdata = #()
append matdata 3004
append matdata (4 * 3)
append matdata mat.diffuse
/* The POD tag for diffuse */
/* The size of the diffuse data (3 floats) */
/* The diffuse data */
/* return our data */
matdata
)
function DefineSceneUserData =
(
/*
Anything returned from this function will be included
in the SPODScene's user data.
This is for information that doesn't belong with a node or a material.
*/
"Extra global data"
)
PVRGeoPOD
23
Revision PowerVR SDK REL_3.5@3523383a
Imagination Technologies
Public
6. Using POD Data
POD files can be loaded into PVRShaman, which is the shader composer utility supplied as part of
the PowerVR Graphics SDK. For more information on PVRShaman please refer to the “PVRShaman
User Manual”. The following are two examples of how to load POD data.
Example of loading a POD file:
// Create the model object
CPVRTModelPOD m_model;
// Load the model & fill the object
if(m_model.ReadFromFile(“modelPOD”) != PVR_SUCCESS)
return false;
// Do stuff
// Free the memory
m_model.Destroy();
Example of loading a header/source file:
// Include the scene data
#include “modelH”
// Create the model object
CPVRTModelPOD m_model;
// Load the model * fill the object
if(m_model.ReadFromMemory(_model_pod, _model_pod_size) != PVR_SUCCESS)
return false;
// Do stuff
// Free the memory
m_model.Destroy();
Revision PowerVR SDK REL_3.5@3523383a 24
User Manual
Public
Imagination Technologies
7. Contact Details
For further support, visit our forum:
http://forum.imgtec.com
Or file a ticket in our support system:
https://pvrsupport.imgtec.com
To learn more about our PowerVR Graphics SDK and Insider programme, please visit:
http://www.powervrinsider.com
For general enquiries, please visit our website:
http://imgtec.com/corporate/contactus.asp
PVRGeoPOD
25
Revision PowerVR SDK REL_3.5@3523383a
Imagination Technologies
Public
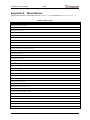
Appendix A. Block Names
Table 9 lists the block names taken from the EPODFileName enumerator in PVRTModelPOD.cpp.
Table 9. Block names
Name
ePODFileCamAnimFOV
ePODFileCamera
ePODFileCamFar
ePODFileCamFOV
ePODFileCamNear
ePODFileColourAmbient
ePODFileColourBackground
ePODFileData
ePODFileDataType
ePODFileEndiannessMisMatch
ePODFileExpOpt
ePODFileFlags
ePODFileFPS
ePODFileHistory
ePODFileLight
ePODFileLightColour
ePODFileLightConstantAttenuation
ePODFileLightFalloffAngle
ePODFileLightFalloffExponent
ePODFileLightIdxTgt
ePODFileLightLinearAttenuation
ePODFileLightQuadraticAttenuation
ePODFileLightType
ePODFileMatAmbient
ePODFileMatBlendColour
ePODFileMatBlendDstA
ePODFileMatBlendDstRGB
ePODFileMatBlendFactor
ePODFileMatBlendOpA
ePODFileMatBlendOpRGB
ePODFileMatBlendSrcA
ePODFileMatBlendSrcRGB
ePODFileMatDiffuse
Revision PowerVR SDK REL_3.5@3523383a 26
User Manual
Public
Imagination Technologies
Name
ePODFileMatEffectFile
ePODFileMatEffectName
ePODFileMaterial
ePODFileMatFlags
ePODFileMatIdxTexAmbient
ePODFileMatIdxTexBump
ePODFileMatIdxTexDiffuse
ePODFileMatIdxTexEmissive
ePODFileMatIdxTexGlossiness
ePODFileMatIdxTexOpacity
ePODFileMatIdxTexReflection
ePODFileMatIdxTexRefraction
ePODFileMatIdxTexSpecularColour
ePODFileMatIdxTexSpecularLevel
ePODFileMatName
ePODFileMatOpacity
ePODFileMatShininess
ePODFileMatSpecular
ePODFileMatUserData
ePODFileMesh
ePODFileMeshBin
ePODFileMeshBoneBatchBoneCnts
ePODFileMeshBoneBatchBoneMax
ePODFileMeshBoneBatchCnt
ePODFileMeshBoneBatches
ePODFileMeshBoneBatchOffsets
ePODFileMeshBoneIdx
ePODFileMeshBoneWeight
ePODFileMeshFaces
ePODFileMeshInterleaved
ePODFileMeshNor
ePODFileMeshNumFaces
ePODFileMeshNumStrips
ePODFileMeshNumUVW
ePODFileMeshNumVtx
ePODFileMeshStripLength
ePODFileMeshTan
ePODFileMeshUnpackMatrix
PVRGeoPOD
27
Revision PowerVR SDK REL_3.5@3523383a
Imagination Technologies
Public
Name
ePODFileMeshUVW
ePODFileMeshVtx
ePODFileMeshVtxCol
ePODFileN
ePODFileNode
ePODFileNodeAnimFlags
ePODFileNodeAnimMatrix
ePODFileNodeAnimMatrixIdx
ePODFileNodeAnimPos
ePODFileNodeAnimPosIdx
ePODFileNodeAnimRot
ePODFileNodeAnimRotIdx
ePODFileNodeAnimScale
ePODFileNodeAnimScaleIdx
ePODFileNodeIdx
ePODFileNodeIdxMat
ePODFileNodeIdxParent
ePODFileNodeMatrix
ePODFileNodeName
ePODFileNodePos
ePODFileNodeRot
ePODFileNodeScale
ePODFileNodeUserData
ePODFileNumCamera
ePODFileNumFrame
ePODFileNumLight
ePODFileNumMaterial
ePODFileNumMesh
ePODFileNumMeshNode
ePODFileNumNode
ePODFileNumTexture
ePODFileScene
ePODFileStride
ePODFileTexName
ePODFileTexture
ePODFileUserData
ePODFileVersion
Revision PowerVR SDK REL_3.5@3523383a 28
User Manual
Public
Imagination Technologies
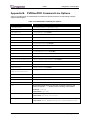
Appendix B. PVRGeoPOD Command-Line Options
Table 10 provides a list of PVRGeoPOD command-line options and their corresponding example
usage and description.
Table 10. PVRGeoPOD command-line options
Option
Example usage and description
-LoadOptions
-LoadOptions=c:\options.cfg
-SaveOption
-SaveOptions=c:\options.cfg
-FixedPoint
-FixedPoint=1 to enable
-FlipTextureV
-FlipTextureV=1 to enable
-Indexed
-Indexed=1 to enable
-Interleaved
-Interleaved=1 to enable
-SortVertices
-SortVertices=1 to enable
-TangentSpace
-TangentSpace=1 to enable
-ExportControllers
-ExportControllers=1 to enable
-IndexAnimation
-IndexAnimation=1 to enable
-ExportGeometry
-ExportGeometry=1 to enable
-ExportMatrices
-ExportMatrices=1 to enable
-ExportMappingChannels
-ExportMappingChannels=1 to enable
-ExportMaterials
-ExportMaterials=1 to enable
-ExportNormals
-ExportNormals=1 to enable
-ExportSkin
-ExportSkin=1 to enable
-ExportVertexColor
-ExportVertexColour
-ExportVertexColor=1 to enable
-InvertTransparency
-InvertTransparency=1 to enable
-ExportModelSpace
-ExportModelSpace=1 to enable
-TangentSpaceVtxSplit
-TangentSpaceVtxSplit=0.000
-BoneLimit
-BoneLimit=0
-cs
By default PVRGeoPOD converts the coordinate system of the
scene to OpenGL. -cs allows for the overriding of this default.
Example: -cs=ogl
Valid values: ogl, d3d
-PrimitiveType
-PrimitiveType=TriList
Valid values: TriList, TriStrips
-TriSort
-TriSort=None
Valid values: None, PVRTGeometrySort, D3DX, PVRTTriStrip
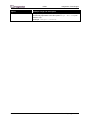
PVRGeoPOD
29
Revision PowerVR SDK REL_3.5@3523383a
Imagination Technologies
Public
Option
Example usage and description
-PosType
The data type for vertex positions.
Example: -PosType=float
Valid values: float, int, unsigned int, ushort, ushortN,
RGBA, ARGB, D3DCOLOR, UBYTE4, DEC3N, fixed, ubyte, ubyteN,
short, shortN, byte, byteN
-NorType
The data type for vertex normals.
Example: -NorType=float
Valid values: float, int, unsigned int, ushort, ushortN,
RGBA, ARGB, D3DCOLOR, UBYTE4, DEC3N, fixed, ubyte, ubyteN,
short, shortN, byte, byteN
-ColorType
-ColourType
The data type for vertex colours.
Example: -ColorType=float
Valid values: float, int, unsigned int, ushort, ushortN,
RGBA, ARGB, D3DCOLOR, UBYTE4, DEC3N, fixed, ubyte, ubyteN,
short, shortN, byte, byteN
-UVWnType
The data type for vertex UVW coordinates (set n).
Example: -UVW0Type=float -UVW5=ARGB
Valid values: float, int, unsigned int, ushort, ushortN,
RGBA, ARGB, D3DCOLOR, UBYTE4, DEC3N, fixed, ubyte, ubyteN,
short, shortN, byte, byteN
-BinormalType
The data type for binormals.
Example: -BinormalType=float
Valid values: float, int, unsigned int, ushort, ushortN,
RGBA, ARGB, D3DCOLOR, UBYTE4, DEC3N, fixed, ubyte, ubyteN,
short, shortN, byte, byteN
-TangentType
The data type for tangents.
Example: -TangentType=float
Valid values: float, int, unsigned int, ushort, ushortN,
RGBA, ARGB, D3DCOLOR, UBYTE4, DEC3N, fixed, ubyte, ubyteN,
short, shortN, byte, byteN
-BoneIdxType
The data type for bone indices.
Example: -BoneIdxType=float
Valid values: float, int, unsigned int, ushort, ushortN,
RGBA, ARGB, D3DCOLOR, UBYTE4, DEC3N, fixed, ubyte, ubyteN,
short, shortN, byte, byteN
-BoneWtType
The data type for bone weights.
Example: -BoneWtType=float
Valid values: float, int, unsigned int, ushort, ushortN,
RGBA, ARGB, D3DCOLOR, UBYTE4, DEC3N, fixed, ubyte, ubyteN,
short, shortN, byte, byteN
-PadDataTo
Pad the vertex data to PadDataTo no. of bytes. The GUI option
Align vertex data (see Section 4.1) is functionally equivalent to
-PadDataTo=4
Example: -PadDataTo=1
Valid values: 1, 2, 4
Revision PowerVR SDK REL_3.5@3523383a 30
User Manual
Public
Imagination Technologies
Option
Example usage and description
-Merge
Merge the output POD file with an existing POD file. This is
functionally equivalent to the GUI option Merge .PFX/.PVR (see
Section 4.2).
Example: -Merge=c:/otherPOD
PVRGeoPOD
31
Revision PowerVR SDK REL_3.5@3523383a
Imagination Technologies
Public
Imagination Technologies, the Imagination Technologies logo, AMA, Codescape, Ensigma, IMGworks, I2P,
PowerVR, PURE, PURE Digital, MeOS, Meta, MBX, MTX, PDP, SGX, UCC, USSE, VXD and VXE are
trademarks or registered trademarks of Imagination Technologies Limited. All other logos, products,
trademarks and registered trademarks are the property of their respective owners.
Revision PowerVR SDK REL_3.5@3523383a 32
User Manual