1
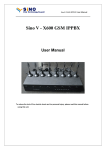
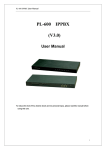
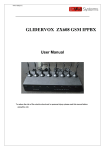
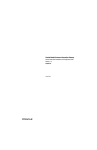
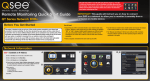
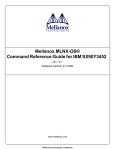
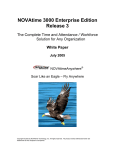
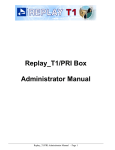
Conference Server User Manual
www.allo.com
AGI
Version 2.0
1
Conference Server User Manual
Copy Right
Copyright © 2014 Allo. All rights reserved.
No part of this publication may be copied, distributed, transmitted, transcribed, stored in a
retrieval system, or translated into any human or computer language without the prior written
permission of Allo.com. This document has been prepared for use by professional and properly
trained personnel, and the customer assumes full responsibility when using it.
Proprietary Rights
The information in this document is Confidential to Allo and is legally privileged. The information
and this document are intended solely for the addressee. Use of this document by anyone else
for any other purpose is unauthorized. If you are not the intended recipient, any disclosure,
copying or distribution of this information is prohibited and unlawful.
Disclaimer
Information in this document is subject to change without notice and should not be construed as
a commitment on the part of allo.com. And does not assume any responsibility or make any
warranty against errors. It may appear in this document and disclaims any implied warranty of
merchantability or fitness for a particular purpose.
www.allo.com
Version 2.0
2
Conference Server User Manual
About this manual
This manual describes the Allo product application and explains how to work and use it major
features. It serves as a means to describe the user interface and how to use it to accomplish
common tasks. This manual also describes the underlying assumptions and users make the
underlying data model.
Document Conventions
In this manual, certain words are represented in different fonts, typefaces, sizes, and weights.
This highlighting is systematic; different words are represented in the same style to indicate
their inclusion in a specific category. Additionally, this document has different strategies to draw
User attention to certain pieces of information. In order of how critical the information is to your
system, these items are marked as a note, tip, important, caution, or warning.
Icon
Purpose
Note
Tip/Best Practice
Important
Caution
Warning
o Bold indicates the name of the menu items, options, dialog boxes, windows and
functions.
o The color blue with underline is used to indicate cross-references and hyperlinks.
o Numbered Paragraphs - Numbered paragraphs are used to indicate tasks that
need to be carried out. Text in paragraphs without numbering represents
ordinary information.
o The Courier font indicates a command sequence, file type, URL, Folder/File name
e.g. www.allo.com
Support Information
Every effort has been made to ensure the accuracy of the document. If you have comments,
questions, or ideas regarding the document contact online support: http://support.allo.com
www.allo.com
Version 2.0
3
Conference Server User Manual
Table of Contents
About this manual .................................................................................................................. 3
Document Conventions .......................................................................................................... 3
Support Information............................................................................................................... 3
1. Introduction ................................................................................................................. 6
2. Features ....................................................................................................................... 6
3. Overview ...................................................................................................................... 7
3.1 Calculation of maximum number of channels available for conference ......................... 8
3.1.1 For 4 span PRI card (with 3, 4 spans loop backed) .................................................... 8
3.2 Calculation of max number of conference rooms ......................................................... 10
3.2.1 For 4 span PRI card (with 3, 4 spans loop backed) .................................................. 10
3.2.2 Dummy channels: .................................................................................................... 11
4. Installation Steps ........................................................................................................ 11
4.1 Installation of Pre-requisite packages ............................................................................ 11
4.2 Conference Server Installation Steps ............................................................................. 12
5. Manual Configuration for Webserver .......................................................................... 14
6. Conference Server ...................................................................................................... 15
6.1 Accessing the WEB GUI .................................................................................................. 15
7. System Admin ............................................................................................................ 18
7.1 AMI Configuration (Asterisk Manager Interface) ........................................................... 18
7.2 DID List............................................................................................................................ 18
7.3 Email Settings ................................................................................................................. 20
7.3.1 Server Settings ......................................................................................................... 20
7.3.2 Message Settings (Conf.Admin) .............................................................................. 21
www.allo.com
Version 2.0
4
Conference Server User Manual
7.3.3 Message Settings (Conf.Users) ................................................................................ 22
8. Conference Creator ..................................................................................................... 23
8.1 Create Conference ......................................................................................................... 23
8.2 Outbound Dial ................................................................................................................ 26
9. Conference Admin User .............................................................................................. 28
9.1 Conference Settings ....................................................................................................... 28
9.2 Live Conferences ............................................................................................................ 30
9.3 Recordings ...................................................................................................................... 32
www.allo.com
Version 2.0
5
Conference Server User Manual
1. Introduction
The ALLO Conference Server allows you to schedule and manage conference calls using a Webbased interface.
Tele conferencing is an important part of modern business communications, connecting offices,
remote workers and customers. Conferencing can save thousands of dollars and hours
otherwise spent on travel, lodging and logistics for face-to- face meetings. Unfortunately,
traditional conferencing systems tend to be proprietary, difficult to integrate and prohibitively
expensive. Asterisk changes that.
Allo has integrated conferencing features any company can operate its own conference server
for a fraction of the price of traditional commercial systems. Allo conference servers can operate
as stand-alone devices connected directly to the PSTN, or as private resources connected behind
existing PBX systems. VoIP- only systems require no additional hardware and no per server or
per seat license fee. Systems that connect with analog or digital telephony technologies require
only an ALL0 interface card.
2. Features
1. Different user modes like admin, marked and normal.
2. Run AGI script while user enters into conference.
3. Announcements like user count, user join/leave, and marked user entered, kicked from
conference, custom intro file play back.
4. Music on hold when the conference has a single caller.
5. Allow user to exit the conference by pressing a single digit.
6. Record conference.
7. Conference menu for user and admin users on pressing *.
8. Allow user to exit the conference by entering a valid single digit extension.
9. Time out for user/conference rooms.
10. Invite user by outbound call.
11. Play the last recorded file.
12. Monitor (list active conference rooms and users) and control the Conference (kick
user, invite user etc) from the UI.
www.allo.com
Version 2.0
6
Conference Server User Manual
3. Overview
In conference, all the voice samples of the users are added and the resulting signal will be sent
to each user after removing its own samples. The mixer is the main part of a conference bridge
which will make the process of adding all channel samples and consume CPU.
Figure 1 shows the normal conference server where the mixing is done the host CPU.
Figure 1: Normal Conference Setup
On the PRI conference server the mixing is done by the DSP on the PRI card (figure 2) hence it
consumes very less host CPU cycles when compared to the normal conference.
www.allo.com
Version 2.0
7
Conference Server User Manual
Figure 2: PRI Conference Setup
3.1 Calculation of maximum number of channels available for conference
Maximum number of channels available for conference = (total number of B channels on PRI
card - no. conf rooms * 2)
Maximum number of channels available for the conference again divided into PRI and SIP
channels.PRI channels will be the number of real PRI channels available and SIP channels will be
the number of available dummy channels.
SIP channels = maximum number of channels available for conference - real PRI channels
3.1.1 For 4 span PRI card (with 3, 4 spans loop backed)
Maximum number of channels available for conference = (120 - no.conf rooms * 2)
SIP channels = maximum number of channels available for conference - 60
www.allo.com
Version 2.0
8
Conference Server User Manual
No of Conference
Available channels
PRI
SIP
1
118
60
58
2
116
60
56
3
114
60
54
4
112
60
52
5
110
60
50
6
108
60
48
7
106
60
46
8
104
60
44
9
102
60
42
10
100
60
40
11
98
60
38
12
96
60
36
13
94
60
34
14
92
60
32
15
90
60
30
16
88
60
28
17
86
60
26
18
84
60
24
19
82
60
22
20
80
60
20
21
78
60
18
22
76
60
16
23
74
60
14
24
72
60
12
Rooms
www.allo.com
Version 2.0
9
Conference Server User Manual
3.2 Calculation of max number of conference rooms
Max no. rooms = total number of B channels on PRI card / (channels per conf room + 2)
3.2.1 For 4 span PRI card (with 3, 4 spans loop backed)
Max no. rooms = 120 / (channels per conf room + 2)
Channels per conference
No of Rooms
Room
www.allo.com
3
24
4
20
5
17
6
15
7
13
8
12
9
10
10
10
11
9
12
8
13
8
14
7
15
7
16
6
17
6
18
6
19-22
5
23-28
4
29-38
3
39-58
2
59-118
1
Version 2.0
10
Conference Server User Manual
3.2.2 Dummy channels:
As the PRI conference server used DSP Conference Bridge the SIP channel data need to be
brought to DSP which is on the PRI card. So user has to reserve at least one span for this
purpose. Channels on this span/s are called dummy channels.
The number of SIP channels can be added to the conference is proportional to the number of
dummy channels. For card with one span user have to use the same span for dummy
channels(Eg:-group id -11), in this case the number of SIP channels can be added is proportional
to number of free channels in the span and user cannot use the same channel at the same time
as dummy channel and normal channel for calls.
For cards with more than two spans, dummy channels can be created by physically looping back
two spans, in this case user have to combine the two spans in a group and configure the
common group id.
4. Installation Steps
4.1 Installation of Pre-requisite packages
Dahdi version (2.9.1.1) from allo.com and
Asterisk (12.1.1) from source
Install all of Asterisk’s dependencies that are required to compile asterisk.
The conference server source code can be obtained through ALLO.com. The conference server
application is tested with an Asterisk 12.1.1 standard open source code.
The software also needs webserver, php (version >=5.3) and sqlite (version 3) software packages.
The user can use the existing packages in their PC or use installation script to install it.
The installation script present in the source code can be used for installing the software. The
script will patch dahdi and Asterisk source code; the paths for both sources need to be entered by
the user while running the installation script.
www.allo.com
Version 2.0
11
Conference Server User Manual
4.2 Conference Server Installation Steps
1. The file downloaded will need to be extracted before compiling. Use the GNU tar
application to extract the source code from compressed archive. This is a simple process
that can be achieved through the following commands:
$tar xvfz conferenceserver_<version>.tar.gz
2. Go to PCS folder then execute.
$cd PCS
3. Run Install Script
$./install_script.sh
I.
Enter the dahdi 2.9.1.1 source path
II.
III.
Enter the asterisk 12.1.1 source path.
If user have own web server they can configure it by using the steps given below.
Other wise choose installation script to install the packages and configure it.
While installing webserver, using the installation script choose the type of OS in use.
IV.
Select installation script to install sqlite3, if it’s not presented.
V.
Select installation script to install php, if it’s not presented.
If everything goes fine “success” will be printed.
4. For card with 4 spans, make sure that span 3 and span 4 are UP in asterisk by connecting a
loop back cable for the dummy channels.
5. Configure AMI (Asterisk Manager Interface) in manager.conf .You can use the previous
settings if any.
Eg:[general]
enabled = yes
webenabled = yes
port = 5038
bindaddr = 0.0.0.0
www.allo.com
Version 2.0
12
Conference Server User Manual
[admin]
secret = admin
all
read = system,call,log,verbose,agent,user,config,dtmf,reporting,cdr,dialplan
write = system,call,agent,user,config,command,reporting,originate,message
6. Include CEM_Meetmeallo.conf file at the end of all incoming contexts as required using
#include CEM_Meetmeallo.conf
7. Create an outbound call context for making out-bound calls from the conference.
8. Mail Transfer Agent configuration. You can use the existing MTA if any or follow the below
steps to install and configure the MTA.
I.Install ssmtp
For Ubuntu
$sudo apt-get install ssmtp
For centos
$wget -c http://dl.fedoraproject.org/pub/epel/5/x86_64/epel-release-5-4.noarch.rpm
$rpm -ivh epel-release-5-4.noarch.rpm
$yum -y install ssmtp
$alternatives --config mta # select sendmail.ssmtp
II.
sudo vim /etc/ssmtp/ssmtp.conf
# Config file for sSMTP sendmail
#
[email protected]
mailhub=smtp.gmail.com:587
[email protected]
AuthPass=MyPassword
UseTLS=YES
UseSTARTTLS=YES
www.allo.com
Version 2.0
13
Conference Server User Manual
rewriteDomain=gmail.com
[email protected]
FromLineOverride=YES
III.
sudo vim /etc/ssmtp/revaliases
root:[email protected]:smtp.gmail.com:587
IV.
8.4.Test the mta with
$echo "hello" | ssmtp [email protected]
In
centos
if
you
get
'sendmail:
Cannot
open
smtp.gmail.com:587'
error
add
TLS_CA_File=/etc/pki/tls/certs/ca-bundle.crt
at the end of /etc/ssmtp/ssmtp.conf
For step II and III replace with your own credentials.
5. Manual Configuration for Webserver
1. Copy the Conference GUI folder to the http server document root path and provide
proper permissions.
Excp -rf GUI /var/www/
chmod 777 -R /var/www/GUI/DB
chown www-data: www-data -R /var/www/GUI/DB
The document root may vary for different web server.
2. Add root permission for the web server user.
On the command prompt run visudo.
Add the following line to the file and save it.
<http-server-username> ALL= NOPASSWD: ALL
Exwww-data ALL= NOPASSWD: ALL
The web server user may vary for different web server.
www.allo.com
Version 2.0
14
Conference Server User Manual
3. Configure php cgi.
Configuration for php may vary for different web server. Not providing an example.
Your Installation of conference server is now complete.
6. Conference Server
6.1 Accessing the WEB GUI
Conference Server Web GUI can be accessed through browser at http://<conferenceserver
IP>/GUI
Eg: http://192.168.1.100/GUI .
There are three types of users for the conference server.
1. System Admin
2. Creator
3. Conference admin
1. System Admin
Login using the default username & password (Default: Username: admin; Password: admin).
Successful login takes you to the ALLO.COM’S Conference Server.
Figure 3: Login Page
www.allo.com
Version 2.0
15
Conference Server User Manual
The Recommended web browser to access GUI is Mozilla Firefox.
Please change the default administrator password to alphanumeric, to prevent hacking.
Figure 4: Log out
Web Settings: Here you can change the administrator password settings.
Figure 5: Web Settings
Web Session Timeout: Duration after which current web login session expires. Default:
3600 sec
www.allo.com
Version 2.0
16
Conference Server User Manual
Default Filtering: Number of entries in a table per page to be displayed.
Change Password: Modify Administrator password here.
Click on “SAVE “button, followed by “APPLY CHANGES” button to update the configuration
changes.
Logout: It will take you out of the web interface.
www.allo.com
Version 2.0
17
Conference Server User Manual
7. System Admin
7.1 AMI Configuration (Asterisk Manager Interface)
The conference GUI will communicate with the asterisk using the AMI.
Enter the AMI
configuration details of the Asterisk. (Please refer installation steps)
Figure 6: AMI Configuration
Configuration Parameters
IP Address
Do not change the IP address.
Port
Enter the Port number used for AMI. E.g.: 5038 (required entry).
Username
It specifies the name of AMI user. (Required entry).
Password
Enter the password to authenticate AMI registrations for the users.
7.2 DID List
For each PRI line, the service provider would provide more around 100-500 numbers which can
be used by outsiders to call the extension directly.
www.allo.com
Version 2.0
18
Conference Server User Manual
Figure 7: Add DID Number
Here you can configure the range of the DID numbers provided by the service provider, e.g.:
5000 to 5010.
Figure 8: Create DID Range
Figure 9: DID Routing
www.allo.com
Version 2.0
19
Conference Server User Manual
Channel Group ID
Enter the span group ID to be used for dummy channels.
Figure 10: Channel Group ID
The dummy channels are used in the PRI card for announcement, recording and
connecting SIP channels into conference. For 1 port card, the id will be same as the real span id.
7.3 Email Settings
Email settings for the sender name, contents of the emails send to conference admin and end
user.
7.3.1 Server Settings
Navigate through Email Settings > Server Settings
Please enter your email address (e.g., [email protected]) and the same is configured in
the MTA.
Figure 11: Email Settings
www.allo.com
Version 2.0
20
Conference Server User Manual
Email ID
Enter the email id for the server settings. E.g.: [email protected]
Select Time zone
Select the correct time zone for the location where the conference is
happened using the Time Zone dropdown box. Default: Asia/Kolkata.
1. The same Email–id as configured in your Send mail configuration.
2. The same time zone as set in your system
7.3.2 Message Settings (Conf.Admin)
Navigate through Email Settings > Message Settings
Here, the content of the email send to the corresponding conference administrator when a
conference is created/modified.
When the customized conference messages are being updated with “Add Headers” button,
that specific header will be added at the end of the message. It’s similar to the following
appearing on the screen. A message appears confirming that the customized message have
been added to the defaults.
E.g.: Conference ID
#CONFID will be added in the body of message.
Figure 12: Message Settings (Conf.Admin)
www.allo.com
Version 2.0
21
Conference Server User Manual
7.3.3 Message Settings (Conf.Users)
Navigate through Email Settings > Message Settings
This is the content of the email send to the corresponding conference end users when conference
administrator creates/modifies a conference.
Figure 13: Message Settings (Conf.Users)
www.allo.com
Version 2.0
22
Conference Server User Manual
8. Conference Creator
Login as Conference Creator (username: creator / password: creator)
8.1 Create Conference
Create conference for the conference admin.
Figure 14: Create Conference
Conference Number
Enter the unique conference number for create conference
(positive integer).
Created For (User ID)
Enter the name of the conference admin to whom creator
wants to create a conference.
Created For (Email ID)
Enter the email id for the conference admin.
Max Participants
It specifies maximum number of participants allowed.
Conf. Extension No
Enter the extension no for the internal SIP users to enter
www.allo.com
Version 2.0
23
Conference Server User Manual
into conference.
DID Extension No
Enter the DID number to dial for the external users.
Date (mm/dd/yyyy)
Enter the date or date range when the conference allowed
happening.
Click date, to display the calendar and select the
desired date.
Conference duration
Enter the maximum duration of the conference once it
started. This should not exceed time.
Start time
Enter the starting time of the conference slot and it should
be in 24 hour format.
Dial-in Duration
Enter the duration up to what time users are allowed to
enter into the conference.
Repeat on days
Select if conference to be repeated in selected day of a
week. By default it is all days.
Figure 15: Conference List
www.allo.com
Version 2.0
24
Conference Server User Manual
The Conference lists that have been created are displayed.
You have the options to select the conference name that you wish to Edit/Delete on screen.
Click
icon to delete the selected items.
Figure 16: Delete
Figure 17: Edit Conference
www.allo.com
Version 2.0
25
Conference Server User Manual
Option
Description
b
Run AGI Script
c
Announce user(s) count on joining a conference.
C
Continue in dialplan when kicked out of conference
G
Play an intro announcement in conference.
i
Announce user join/leave with review
I
Announce user join/leave without review
k
Close the conference if there is only one active participant left at exist.
M
Enable music on hold when the conference has a single caller.
P
Allow user to exit the conference by pressing # (default) or any of the defined
keys.
r
Recorded Conference
s
Present menu (user or admin) when* is received
X
Allow user to exist the conference by entering a value single digit extension.
1
Do not play message when first person enters
L
Limit the conference to x seconds. Play a warning when y seconds are left.
Repeat the warning every z seconds.
na
Invite user by outbound call
na
Play the last recorded file
8.2 Outbound Dial
Navigate through Outbound Dial. This is where you can configure the Outbound Dialing context
for inviting users via out-bound calls. The details to be filled are given as
www.allo.com
Version 2.0
26
Conference Server User Manual
Figure 18: Outbound Dialing Configuration
Context
Enter the Outbound Dialing context name.
Conference Name
Enter the name of the conference which will be displayed in the
caller name for SIP users for incoming call.
www.allo.com
Version 2.0
27
Conference Server User Manual
9. Conference Admin User
Login as the default username/password provided in the email invitation.
9.1 Conference Settings
This chapter provides detailed information to configure conference users, user type, pin
numbers etc. Here some options are read only.
Figure 19: Conference Settings
Click Edit button, you will be navigated to Edit Manage Conference screen page. In
this page you can edit the date, time and participants etc.
www.allo.com
Version 2.0
28
Conference Server User Manual
Figure 20: Manage Conference
Date
Specifies the date when the conference is Scheduled. e.g.:
05/2/2015. (Read only)
Days
Repeat status on week days (Read only)
Time
Start time of the conference (Read only)
Dial-in Duration
Duration from the starting time up to what time users are
allowed to join.(Read only)
Maximum Members
Maximum number of users allowed joining in the
conference. (Read only)
Conf. Extension No
Number of dial for joining in the conference for
internal/external users. (Read only)
Admin Pin
Specifies the PIN for the admin user to join the conference,
e.g.: 555. Admin is the one who can speak, listen, invite,
www.allo.com
Version 2.0
29
Conference Server User Manual
kick users in the conference.
Speaker Pin
Listener Pin
It indicates PIN number for the user, who can only speak
and listen.
PIN number for the user, who can only listen but can’t
speak.
Participants
Type
Administrator/speaker/listener.
When adding users in the conference, you can select what
permission you have.
Email
Enter the email id of the end-user.
Schedule conference is the term we used to fix the conference at an exact time for
particular people with corresponding access like admin, speaker and listener.
9.2 Live Conferences
Monitor conferences happening now and add users dynamically into the conference.
Figure 21: Live Conferences
Conference ID
It specifies the unique conference ID. E.g. 1234
Total Members
It indicates the number of participants.
Duration
It specifies the length of the conference.
Options
Options for volume control/mute/unmute/kick
Click Edit button, you will be navigated to Edit Manage Conference screen page. In
this page you can invite the user with various options.
www.allo.com
Version 2.0
30
Conference Server User Manual
Figure 22: Manage Conference
You can invite other users to the same conference room by using user id. User can change
the volume settings for Mick and speaker.
Options
Description
Kick- eject user out of the conference.
Mute/Unmute
www.allo.com
Version 2.0
31
Conference Server User Manual
9.3 Recordings
Recorded Conferences —You can view / play the recorded conferences here.
Figure 23: Conference Recordings
Conference ID
Unique conference id.
Time
Time the files are created.
File Size
It specifies the size of the recording.
Options
Click play, the file on the browser.
www.allo.com
Version 2.0
32
Conference Server User Manual
www.allo.com
Version 2.0
33