1
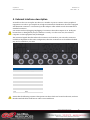
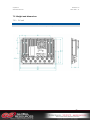
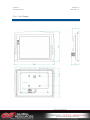
CCpilot XL
Technical Manual
Revision: 3.0
Date: Feb 7, 11
enclosure of 6.5 mm. The maximum torque is 2.5 Nm. Apply a thread locker in all bolt holes, e.g.
Loctite 222.
3.3.2. Panel Mount
With a front-mounted installation, use the rubber mask as a seal against the panel plate. The unit is
locked down by applying clamps which are either fixed to the panel (recommended) or fixed to the
unit through holes for VESA installation.
3.4. Integrated installation, PC unit mounted on display unit
An integrated installation can only be carried out on the PC unit together with the 12.1” display
unit.
The same placing demands apply here, as when the units are mounted separately. Mounting,
however, is carried out somewhat differently.
To fasten the PC and display units together, screws of type MC6S (Insex) or MRT (Torx), M4 x 25,
should be used. The maximum tightening torque allowed is 1.0 Nm. Use thread lockers in all screw
holes, e.g., Loctite 222.
The mounting holes on the PC unit’s cooling flanges are used to screw the integrated unit onto a flat
mounting plate. The mounting holes have M6 dimensions and are blind holes with a depth of 10
mm. Use screws of the correct length so that they do not hit the bottom of the mounting holes, and
always use thread lockers in all screw holes, e.g., Loctite 222. Maximum tightening torque allowed
is 9.8 Nm.
Note that the mounting plate, which is screwed onto the cooling flanges, should not cover a large
area. This may cause poor cooling of the computer and damage it permanently.
If the screws used in the mounting holes hit the bottom, it may cause damage to the unit’s
enclosure.
3.5. Mounting Cables
Cables shall be installed so that they don’t run the risk of being damaged, pinched or worn. Strain
relief cable assemblies and avoid bending and twisting cables. The connectors shall always be
screwed-in securely to give good contact and avoid unnecessary strain.
Through adapter cables, as supplied by CrossControl, standard connectors for Ethernet, USB and
COM can be connected to the unit. The hook up of these adapter cables can and should be placed in
a moisture-free, hidden space and should be secured and strain-relived.
3.6. Connecting the Power supply
This instruction addresses vehicle installations but the principle is the same also for other types of
installations. See also the description for the Power Supply Connector pin outs under the section
External interface description.
Carefully follow the connection instructions below. Make sure that the contacts are the right way up
and that they do not have to be forced, but lock gently and pliant.
www.crosscontrol.com
9