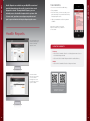
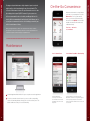
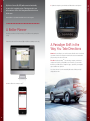
1
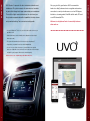
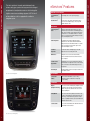
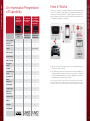
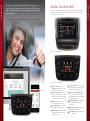
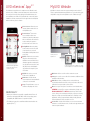
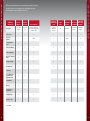
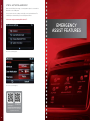
COVER GOES HERE
INTRODUCTION
Plus, you get all the great features UVO is renowned for:
infotainment. The system connects the convenience of a website
hands-free calling4, advanced voice recognition and seamless
to your vehicle through a free app2,3 powered by your smartphone2.
connection to a variety of media sources such as MP3 players,
The result is a tighter connection between the vehicle and your
flash drives, streaming audio, SiriusXM satellite radio8, CDs and
lifestyle and an expansive breadth of capabilities that help enhance
even MP3-formatted CDs.
safety and make driving more convenient and enjoyable.
Welcome to a heightened level of connectivity between
driver and car.
4
INTRODUCTION
UVO eServices1 represents the latest evolution in telematics and
• You can run diagnostic5 checks on your vehicle and send the results to your
MyUVO account
• Roadside Assistance6 and Scheduling Service Appointments are a simple
button press away
• The system will automatically call 911 whenever any air bag deploys7
• Forget where you parked? Not an issue with Parking Minder
• You can even save Points of Interest on your MyUVO account, upload them to the UVO audio control unit in the vehicle and route to them using the
navigation system (requires UVO eServices with Navigation)
All this and more are complimentary, with NO monthly fees.
2
3
INTRODUCTION
Table of Contents
UVO eServices 1 Overview
5
USER INTERFACE
11
CORE UVO SYSTEM CAPABILITIES
19
UVO eServices vs. the Competition
25
Registration AND Setup
29
Emergency Assist FEATURES
33
Roadside Assist6
37
Vehicle Diagnostics5
41
Health Reports
45
Maintenance49
Schedule Service Appointments
53
Notifications57
Parking Minder
59
My POIs63
UVO eServices Guide
4
67
UVO eSERVICES OVERVIEW
eServices1 Features
Emergency assist features
Crash Notification7
Assist
Automatically calls 911 when any air bag deploys.
Roadside Assist6
Pressing an icon on the audio control unit in the vehicle
or an icon on the smartphone app2, 3 connects you with
roadside assistance, 24/7.
Maintenance
UVO eServices with Navigation.
Critical Diagnostics5
Alerts
Diagnostics will automatically start whenever a critical
powertrain issue is detected. The results will display on the
audio control unit, and the system will provide the option to
schedule service or call roadside assistance. If “schedule
service” is selected, the system will send diagnostic results
to the owner’s MyUVO account.
Vehicle Diagnostics
Run diagnostics at any time by simply pressing the
Diagnostics icon on the audio control unit. Results will
display and users can call roadside assistance or schedule
service as needed. Users also have the option to send
results to their MyUVO account.
Scheduled
Diagnostics
Use the UVO eServices smartphone app to schedule
diagnostics to run on a set day each month.
Maintenance
On MyUVO.com, users can select service intervals, view recommended service and record when service has
been completed.
Schedule Service
Appointments
Using MyUVO.com, users can schedule service with their
preferred dealer or a nearby dealer. Users can also schedule
service on the audio control unit when diagnostic checks
turn up issues.
Health Reports
Results from diagnostic checks are easily accessible on the
user’s MyUVO account.
UVO eSERVICES OVERVIEW
This latest evolution in telematics and infotainment helps
enhance safety, gives you tools to keep your vehicle running at
an optimum level, and provides smart uses of technology that
heighten convenience and driving enjoyment. UVO eServices1
will be available on vehicles equipped with or without a
navigation system.
Entertainment
Coming Later:
Twitter®9
Drivers can follow their Twitter® account on the go, allowing the system to read back tweets from people they are following.
Convenience
My POIs
(Navigation units only)
Users can save Points of Interest (POIs) on MyUVO.com and
upload them to the UVO audio control unit for navigation
guidance. They can also send them to the user’s account
using Google MapsTM10.
Parking Minder
Users can save the vehicle’s parking location and use map
functions on their smartphone to find their way back to the
vehicle. They can also take and save pictures for location
reference, set parking meter times, set meter reminders and
email their location to others.
eServices Guide
Places a call to an automated service that allows the user to
get information on UVO eServices.
UVO eServices (non-Navigation).
6
7
UVO eSERVICES OVERVIEW
Kia UVO
Powered by
Microsoft®1
UVO eServices
Infotainment
System
UVO eServices
Infotainment
System with
Voice-command
Navigation
Simply known as:
UVO
Simply known as:
UVO eServices
(non-Navigation)
Simply known as:
UVO eServices
with Navigation
Voice recognition
X
X
X
Bluetooth®11
hands-free calling
X
X
X
Jukebox
X
X
X (called My Music)
Audio streaming
X
X
X
Software updates
X
X
X
USB connectivity
X
X
X
Rear Camera
Display12
X
X
X
HD Radio13
X
X
X
Crash Notification7
Assist
X
X
Roadside Assist6
X
X
Vehicle
Diagnostics5
X
X
Parking Minder
X
X
eServices Guide
X
X
MyUVO.com
(web/mobile)
X
X
Schedule service
X
X
MyPOIs
X
Navigation
X
SiriusXM Traffic8
X
How it Works
UVO eServices1 employs a very unique infrastructure. Unlike subscription-based
systems such as OnStar®14, UVO eServices is a smartphone-dependent system
that leverages the owner’s Bluetooth®11-enabled smartphone to communicate
with the outside world. This allows Kia to offer UVO eServices without the need
of an additional cellular plan or subscription.
1
2
UVO eSERVICES OVERVIEW
8
An Impressive Progression
of Capability
Registered Bluetooth®enabled iPhone®15 with UVO
eServices app running.
1. U
VO eServices gathers information from the vehicle and sends that data to the
UVO eServices audio control unit.
2. The UVO eServices audio control unit leverages the owner’s paired Bluetooth®enabled smartphone to transmit information to remote locations, including the
911 center, Kia Roadside Assistance, the owner’s MyUVO account, and their
preferred Kia dealer or another nearby Kia dealer.
Note: Communication services of this system such as Crash Notification Assist, Roadside
Assist and Scheduling Service are dependent on having a properly paired phone and may
not function in the event of a poor wireless signal or if the phone is damaged in an accident.
9
USER
INTERFACE
USER INTERFACE
Audio Control Unit
The audio control unit is the primary means to utilize UVO eServices1 while in the
vehicle. The driver can select features using the touch screen, steering-wheel
controls and voice commands4.
C
D
E
H
F
I
USER INTERFACE
Kia owners can interface with the UVO eServices1 system in their
vehicle through the audio control unit, through the UVO eServices
app2, 3 on their smartphone2 and through their personalized MyUVO
website account.
J
B
UVO eServices with Navigation.
A
D
C
F
E
G
UVO eServices (non-Navigation).
A eServices button (non-
F eServices Guide—Places a call to
B Info/Setup (NAVI only)—Press
G Settings (non-Navigation only)—
C Roadside Assist 6—Press to
H My POIs (NAVI only)—Shows points
Navigation only)—Press to bring
up the eServices menu screen.
this to go to the Info/Setup screen.
On this screen, press Info/UVO to
get to the eServices menu screen.
contact roadside assistance.
D Vehicle Diagnostics 5—Click the
icon to run a diagnostic check.
E Parking Minder—Saves the GPS
location of the parked car to the
smartphone app.
12
an automated service that provides
information on UVO eServices.
Access to set custom settings like
Crash Notification7 Assist or changing
the registered phone.
of interest loaded into the audio
control unit.
I GPS Info (NAVI only)—Provides
detailed GPS information.
J Help? (NAVI only)—Provides lists of
voice commands.
13
USER INTERFACE
The advanced voice-recognition system makes it very easy to control UVO
eServices1 using your voice4. Use the TALK button on the steering wheel to
initiate voice commands.
To issue a voice command
• Press the TALK button C
USER INTERFACE
Voice Commands
• Wait for the prompt tone (radio volume is dampened)
• Speak your command
• The system will assist you with questions and prompts as you proceed
To PLACE a call
• Press TALK A , wait for the prompt, and say: “Call (name)” or “Dial (number)” E
G
To answer a call
• Press the RECEIVE button A To end a call
D
C
F
• Press the END button B Summary of AUDIO Voice Commands
• To ask for help, say: “Help”
• To play specific media, say:
-- “Radio” or
-- “FM” or
-- “AM” or
A
B
-- “SIRIUS8” or
-- “CD” or
-- “My Music” (Navigation) / “Jukebox” (non-Navigation)
-- “USB” or
-- “Bluetooth®11 audio” or
-- “iPod® 15”
EXAMPLES of UVO eServices
Voice Commands
• To display the UVO eServices screen, say: “eServices”
• To run diagnostics, say: “Diagnostics”
STEERING-WHEEL-MOUNTED CONTROLS
• To call roadside assistance, say: “Roadside Assistance”
The driver can control UVO eServices using several buttons mounted on the
steering wheel2.
• To access the eServices Guide, say: “eServices Guide”
A Call—Receive calls, switch calls (call waiting)
B End—End or reject calls
Refer to the UVO User’s Manual for the full list of voice commands.
C Talk—Give voice commands
D Mute—Mute volume
E Volume—Adjust volume up or down
F Mode—Rotate through audio modes
G Track Selections—Change track or radio station
14
15
USER INTERFACE
MyUVO Website
The UVO eServices app links a user’s smartphone to the UVO audio control
unit in the vehicle, enabling communication between the control unit and the
911 center (in the event any air bag deploys), Kia Roadside Assistance, the
user’s MyUVO account and the user’s preferred dealer or other nearby dealer.
In addition to this vital communications link, the app includes functionality that
interfaces with many eServices features.
MyUVO.com is where the owner sets up a personalized account for eServices1. The site is optimized for both desktop and mobile use. To get to the mobile version
of MyUVO.com, simply click on the MyUVO icon on the UVO eServices app2,3.
A Vehicle Selector—Allows the user to
maneuver between saved vehicles on
their MyUVO account.
G
A
B
C
D
E
F
C
D
user to roadside assistance and
simultaneously transmits a data stream
with issue information, VIN and vehicle
location, enabling the operator to
provide accurate service for the user.
C Parking Minder—Once the parking
location has been saved on the audio
control unit, the user can use the
Parking Minder for GPS guidance back
to the vehicle.
D
Desktop version of
MyUVO.com.
new points of interest from his/her
MyUVO account to the UVO eServices
smartphone app. Once transferred, the
user can load them to the audio control
unit (UVO eServices with Navigation
only) and have the navigation system
route to them.
E MyUVO—One-touch access to the
mobile version of MyUVO.com.
F Maintenance—Provides the next
recommended service interval and details
on the services recommended.
G Setup—Through this button, users can
schedule monthly diagnostic checks.
Compatibility
• At launch, the UVO eServices app will be compatible with the iPhone® 4S
and earlier models equipped with iOS5- or iOS6-level operating systems.
Compatibility with additional devices is expected in late 2013
• The UVO eServices app is free and will be available for download from the App Store (iPhone®)
16
E
B
B Roadside Assist 6—Connects the
D My POIs—Enables the user to transfer
The UVO eServices app must be
running on the phone for UVO
eServices to operate.
A
USER INTERFACE
UVO eServices1 App2, 3
To get to the mobile version of MyUVO.com, simply
click on the MyUVO icon on the UVO eServices app.
A My Vehicles—Click to see all the vehicles saved to the account.
B Settings—Access this screen to edit vehicle information, add/delete vehicles
and edit personal information.
C Notifications—Alerts you if diagnostic issues exist and if the next
recommended maintenance interval is coming soon. On the mobile version,
notifications show up as red dots on the menu lines.
D Menu—Users get an “at-a-glance” look at their account information when
OVERVIEW is selected. They can get more information by clicking on the
VEHICLE DIAGNOSTICS 5 and MY POIs tabs at the top. On the mobile
version, clicking on the menu drop down will give you options for checking
diagnostics, looking up recommended maintenance, scheduling a service
appointment, viewing your preferred dealer, finding a nearby dealer and
maneuvering between vehicles saved to the account.
E Selection Bar—Using the links in this bar, users can view recommended
maintenance, record maintenance visits, schedule service appointments and
view/select a preferred dealer.
17
core UVO SYSTEM
capabilities
CORE UVO SYSTEM CAPABILITIES
CORE UVO SYSTEM CAPABILITIES
The UVO eServices1 system uses cutting-edge technology
to put hands-free calling4, music controls and more all at the
beck and call of one incredibly powerful tool: your voice! With
voice-recognition architecture that can recognize a wide array
of voice commands, it’s easy to let UVO do the work while you
concentrate on driving.
The UVO eServices system makes it easy to take your music with you. You can
play CDs and MP3 CDs, connect flash drives loaded with audio files, play MP3
players and stream audio from compatible devices. You can even save your
favorite music to the Jukebox (called “My Music” on the NAVI system)—the
system’s hard drive—for anytime access.
The Rear-Camera Display12 offers an extra set of eyes when backing up. It
becomes active whenever you shift the vehicle into Reverse.
Press the TALK button, wait for the prompt and then say a command.
Commands are intuitive: “Call (name),” “FM,” “CD,” “iPod®15” and many others.
And, if you ever need help, just ask. Say “Help,” and the system will respond
with prompts that will guide you to the information you’re looking for.
20
21
CORE UVO SYSTEM CAPABILITIES
Phone Pairing
Set Priority
1. Make sure the Bluetooth®11 wireless technology setting on your phone is ON
and searching for an active signal.
The system will always attempt to connect first to the phone that is set as the
priority phone. To manually set a phone as the priority phone:
2. From any mode, press the PHONE button.
1. From any mode, press the PHONE button.
3. Press Connections.
2. Press Connections.
4. Press Add New (NAVI) -/- Add Device (non-NAVI).
3. Press Set Priority.
5. Complete the process on the smartphone.
4. Select the phone you wish to make priority.
CORE UVO SYSTEM CAPABILITIES
How-to Summary
Note: Manually setting priority is not possible on UVO eServices with Navigation.
Connect to a Different Phone
Up to 5 phones can be paired to the system, but only one phone can be
connected and usable with the UVO system at a time. To connect to one of the
paired phones:
1. From any mode, press the PHONE button.
2. Press Connections.
3. Select the handset you want to use.
4. Press Connect.
22
23
CORE UVO SYSTEM CAPABILITIES
Copy Music
UVO eServices with Navigation.
1. While playing a song from a USB flash drive or MP3 CD, press Menu.
2. Press Copy to copy the song to My Music.
UVO eServices (non-Navigation).
1. While playing a song from a USB flash drive or MP3/WMA CD, press Copy to
copy a song to the Jukebox.
2. When finished, press OK on the confirmation screen.
To Copy Multiple Songs:
1. Press Menu.
2. Press Now Playing.
3. Press Edit, then select songs you wish to copy.
4. Press Copy.
Note: The system can only copy files with MP3 or WMA extensions; it cannot copy files from
an Apple iPod®15, iPhone® or other MP3 device.
UVO eServices
with Navigation
24
UVO eServices
(non-Navigation)
UVO eSERVICES VS. THE COMPETITION
ELEMENTS/
CAPABILITIES
Kia UVO
eServices
Hyundai
Blue Link®
Toyota Entune™
Ford Sync®
with MyFord
Touch®
3 years free.
Afterwards: $60/year
NA
3 months free
No subscription
required
No subscription
required
HondaLink™
Chevrolet
MyLink
Mazda Audio/
Infotainment
Chrysler,
Jeep®, Dodge
Uconnect®
Subscription
No subscription
required
$79 - $279 per
year
3 years free. Afterwards: $5-$16.94/month depending
on features chosen
Voice Control
X
X
X
X
X
X
X
X
Phone Call
by Name
X
X
Option
X
X
Option
X
X
Crash Notification
Assist7
X
X
iPod®15 Compatibility
X
X
X
X
X
X
X
X
Tablet Compatibility
X
X
X
X
X
Bluetooth®11 Streaming
Audio
X
X
X
X
X
X
X
Navigation Available
X
X
X
X
X
X
X
Roadside Assist6
X
X
X
X
Diagnostics5
X
X
Access Maintenance
Intervals Record
Maintenance Visits
X
X
Parking Minder
X
MY POIs
X
X
Schedule Service
Appointments
X
X
Smartphone App
X2, 3
X
X
X
X
X
Website Account
X
X
X
X
X
X
UVO eSERVICES VS. THE COMPETITION
While many manufacturers are now offering telematics systems
on their vehicles, few can match the undeniable value and
functionality offered by Kia UVO eServices1.
X
X
X = Included
26
27
registration
and setup
REGISTRATION AND SETUP
Step 2: Download
the UVO eServices1
App2, 3
The UVO eServices app is compatible
with the iPhone®2, 3, 14.
Four-Step Registration
Download the app from your phone’s
app store. Launch the app, and then
log in using the same credentials you
set up on MyUVO.com. The app is now
linked to your MyUVO account.
Step 1: Register on MyUVO.com
And keep your credit card in your
wallet—the app is free!
The user can access and register on the site using a mobile phone, tablet
or desktop computer (desktop registration shown below). Fill in the required
fields and follow the prompts, including entering the Vehicle Identification
Number (VIN).
Note: At launch, the UVO eServices app will
be compatible with iPhone® 4S and earlier
models equipped with iOS5- or iOS6-level
operating systems. Compatibility with
additional devices is expected in late 2013.
REGISTRATION AND SETUP
Before you can use UVO eServices1, you will need to complete a
four-step registration process. The process is straightforward and
intuitive—in no time, you’ll be enjoying all the great features UVO
eServices offers.
After receiving an email confirmation, you must click on the link in the email
or the system will not activate. (Make sure to check your SPAM folder if you
don’t receive this confirmation.)
Step 3: Pair your
phone
Enable Bluetooth®11 on your phone,
initiate pairing on the audio control
unit, then follow the instructions on
the screen.
30
31
REGISTRATION AND SETUP
Step 4: Activate eServices1
Make sure the UVO eServices app2, 3 is running and the phone is connected via
Bluetooth®11 to the UVO system.
Just go into the eServices settings on the audio control unit and activate. The
activated phone automatically becomes the Registered Phone.
You’re now ready to start using UVO eServices1.
EMERGENCY
ASSIST FEATURES
UVO eServices with Navigation.
UVO eServices (non-Navigation).
UVO eServices
with Navigation
UVO eServices
(non-Navigation)
Snap a QR code for more information
on registration and setup.
32
EMERGENCY ASSIST FEATURES
Set it and Forget It
For Crash Notification7 Assist to operate, just make sure it is set to ON in
the settings menu and that your cell phone is connected to the system via
Bluetooth®11 wireless technology.
UVO will take it from there.
In an Emergency,
Every Second Counts
EMERGENCY ASSIST FEATURES
Crash Notification7 Assist delivers the peace of mind—and
confidence—that help will soon be on the way whenever any air
bag deploys. As long as a phone is connected to the system and
the feature is enabled, the system will automatically call 911 after
10 seconds of an air bag deployment.
Along with the call to 911, the system sends an air bag deployment signal to
alert the operator that the vehicle has been in an accident. If requested by the
operator, the system will also send the vehicle’s location.
With automatic calling and vehicle-location information at the ready, 911
operators can accurately dispatch emergency assistance to those in need within
a matter of seconds.
UVO eServices1 with Navigation.
Within 10 seconds of air bag deployment, the system
will automatically call 911.
UVO eServices (non-Navigation).
A red icon
34
will display to indicate that Crash Notification Assist is active.
35
EMERGENCY ASSIST FEATURES
Active Even When eServices1 Isn’t
Crash Notification7 Assist simply requires a connected phone to work—
activation with eServices is not required.
Note: The connected phone must be within the service coverage area for Crash Notification
Assist to operate.
The Payoffs:
• Automatic call to 911 mere seconds after an accident
• Air bag deployment signal is sent so 911 operator knows that the vehicle has
been in an accident
• 911 operator can get location information—without having to speak to an
occupant—to accurately dispatch emergency services
• Fast and accurate emergency response
how-to summary
• Connect your phone via Bluetooth®11
• In the settings menu, make sure Crash Notification Assist is set
to ON
• If an air bag deploys, the system will automatically call 911 after
10 seconds
UVO eServices
with Navigation
UVO eServices
(non-Navigation)
Snap the QR code for more
information on this feature.
36
ROADSIDE ASSIST
Just Say the Word
Use voice commands for the same lightning-fast access to a
Roadside Assistance operator.
Press TALK, wait for the prompt and say, “Roadside Assistance.”
Roadside Assist
Simply press the Roadside Assist6 icon and your call is placed. A Roadside
Assistance Operator will answer and get you the help you need—wherever and
whenever you need it.
Note: The connected phone must be within the service coverage area for Roadside Assist
to operate.
ROADSIDE ASSIST
No phone numbers to look up. No scrolling through contacts.
Just push a button for instant access to a friendly person who is
there to help.
More Options, More Convenience
The UVO eServices smartphone app2, 3 also gives you one-button access to
Roadside Assistance—with a bonus: You can prep the operator about your
situation before you even make the call.
Before placing the call, select an issue and write a note. When you hit send, this
information is forwarded to the Roadside Assistance Call Center, along with your
location and Vehicle Identification Number (VIN). Equipped with this information,
the operator needs less time to evaluate the situation and identify your location,
getting help to your location in less time.
38
39
ROADSIDE ASSIST
The Payoffs:
• Help is a simple button press or voice command away
• When using the UVO eServices app2, 3
-- Call-center operators are prepped on your situation prior to the call. That
means less time getting up to speed
-- Location information is sent so misunderstandings about directions are no
longer an issue
how-to summary
• There are two ways to contact Roadside Assist6. (Note that the UVO
eServices app must be used to transmit vehicle information)
1. Select the Roadside Assist icon on the audio control unit or use a
voice command—“Roadside Assist”—to place a phone call to the
operator (vehicle information is not sent)
2. S
elect the Roadside Assist icon on the UVO eServices app. Select
an issue and/or write a note. And then hit SEND to submit the VIN,
location data and the nature of the problem to the operator
• Using either method, you will be connected by phone to a Roadside
Assistance operator
UVO eServices1
with Navigation
UVO eServices
(non-Navigation)
Snap the QR code for more
information on this feature.
40
VEHICLE DIAGNOSTICS
Critical Diagnostic5 Alerts
To keep your Kia finely tuned and running at an optimum level, UVO eServices1 includes
three types of checkups—called diagnostics5—that evaluate the vehicle’s health:
UVO eServices automatically runs diagnostic checks when critical powertrain issues
are detected.
1. Critical Diagnostic Alerts
• Results will display on the audio control unit after the ignition is cycled (when the
vehicle is turned off, then on again). Results will not display when the vehicle is moving
2. Vehicle Diagnostics
3. Scheduled Diagnostics
Note: To run a diagnostic check, the vehicle must be in PARK with the ignition turned on.
• The system will provide the option to schedule service or call roadside assistance.
When schedule service is selected, the system will send the diagnostic
results to the owner’s MyUVO account. (Note: If you cancel or exit the system,
MyUVO.com will not be updated to reflect the current diagnostic results)
VEHICLE DIAGNOSTICS
On-Board Diagnostics
Vehicle Diagnostics
The driver can manually run a diagnostic check at any time by simply pressing
the Vehicle Diagnostics icon.
On-board diagnostics completes a check of major vehicle systems. If issues are found,
the audio control unit alerts you and gives you options to schedule service or call
roadside assistance. Plus, you can save the results of the diagnostic checks to your
MyUVO account, creating a health history report for your vehicle that you can access
anytime.
Just Say the Word
Press TALK, wait for the prompt and say, “Diagnostics” to run a
manual diagnostic check.
Click on any line in the health history report for diagnostic details.
42
43
VEHICLE DIAGNOSTICS
Scheduled Diagnostics5
You’re busy. And you have enough to keep track of. Put your vehicle on a
monthly check-up schedule and let UVO eServices1 take care of the rest.
The Payoffs:
• Catch small problems before they become
bigger problems
• If issues are found, corrective actions are
instantly available: call Roadside Assistance6
or Schedule Service
• Decreased likelihood of driving in an unsafe situation
• Health record on MyUVO.com gives you
something you can show a technician to
make it easier to identify and then diagnose
the issue
• Makes it easier to identify recurring issues
and apply the right corrective action
• Easier to maintain your vehicle in optimum
condition
Each month on the date you save, the
audio control unit will prompt you to run
a diagnostic check.
how-to summary
• Critical Diagnostic Alerts: Will occur automatically when critical
powertrain issues are detected
• Vehicle Diagnostics: Press the Vehicle Diagnostics icon or use a
voice command: “Diagnostics”
• Schedule Diagnostics: Access the Settings screen on the UVO
eServices app and set the date
UVO eServices1
with Navigation
UVO eServices
(non-Navigation)
Snap the QR code for more
information on these features.
44
HEALTH REPORTS
The Payoffs:
• Access to recent vehicle health history
• Easy navigation
• If an issue exists, you have a record you can
print out and give to your technician for help
in diagnosing the cause
• Helps you maintain the vehicle in optimum
condition
HEALTH REPORTS
Health Reports are available on your MyUVO account and
provide information on the results of your last two saved
diagnostic5 checks. Through Health Reports, you can
instantly assess the health of major vehicle systems. And
if issues exist, you have a record you can print out and
give to your technician for help in diagnosing the cause.
Menu-driven navigation on the mobile
MyUVO site makes it easy to drill down
for more details.
Health Reports
The Car Summary screen
shows the status of your
vehicle as of the last
diagnostic check.
how-to summary
Desktop:
• Click on the Powertrain-, Chassis- or Safety-System status icons or
the Vehicle Diagnostics tab
• Click on the Vehicle Health Reports tab for the archived history
Mobile:
• Click on the Powertrain, Chassis or Safety menu items
The Vehicle Health
Reports screen provides
a record of the last
two diagnostic checks
performed. Just click on
any line for details.
UVO eServices1
with Navigation
UVO eServices
(non-Navigation)
Snap the QR code for more
information on this feature.
46
47
maintenance
MAINTENANCE
On-the-Go Convenience
Maintenance information is a simple button
push away on your smartphone. Press the
Maintenance icon if you just want the
facts on your next recommended service
interval. Press the MyUVO icon for a wider
breadth of maintenance information and
added functionality. MAINTENANCE
Keeping on top of maintenance helps to protect your investment
and keeps the vehicle performing the way it was intended. The
eServices1 Maintenance feature lets you know when service is due
by sending alerts to your MyUVO account. It gives you access
to the recommended service schedule, providing details on the
service that’s recommended at each interval. And, it allows you to
record your recommended service visits, building a record of your
vehicle’s maintenance history.
Two icons — two levels
of convenience.
Note: Ignoring maintenance alerts can compromise the safety, condition
and operation of the vehicle. Always follow the recommended maintenance
schedule to keep the vehicle running at an optimum level.
Maintenance
Level 1: Just the Facts
Level 2: More Facts, More Functionality
Press the Maintenance
icon and you’ll see the next
recommended service interval
and details on its services and
inspections.
Press the MyUVO icon and then select the
Maintenance menu line. You’ll get an at-a-glance
look at upcoming and past service intervals.
Press any interval for details and to record or edit
a service visit.
A
B
A Schedule Appointment button makes it easy to set up the next service appointment.
B For each recommended service interval, you can record the corresponding
service visit, indicating the date, mileage, place of service and any notes. This
builds a maintenance history for convenient tracking.
50
51
MAINTENANCE
The Payoffs:
• Service alerts keep you on track
• Access to what’s recommended for each service interval
• Builds a maintenance history
• Easy to access and monitor maintenance on the fly
how-to summary
Desktop:
• Click on the Maintenance tab
• Click on an interval to see recommended service, to schedule service
and to record service visits
Mobile:
• Click on the Maintenance icon for details on your next recommended
service interval
• Click on the MyUVO icon and then select the Maintenance menu line for
an at-a-glance look at upcoming and past service intervals. Press any
interval for details and to record or edit a service visit
UVO eServices1
with Navigation
UVO eServices
(non-Navigation)
Snap the QR code for more
information on these features.
52
schedule service
appointments
SCHEDULE SERVICE APPOINTMENTS
Whenever a diagnostic5 check turns up an
issue, the UVO system offers the driver the
opportunity to schedule service.
Appointment Tracking
Once the appointment is
set and scheduled by the
dealer, it will show up on
your MyUVO account. And
notifications will show up
on your account to keep the
appointment top of mind.
SCHEDULE SERVICE APPOINTMENTS
UVO eServices1 makes
scheduling service a snap.
Or, better yet, a click.
When selected, the driver can then choose
their preferred dealer for service or search
for another nearby dealer.
Pick a Dealer, Any Dealer
When scheduling service,
MyUVO.com makes it
easy to find exactly the
right dealer. You’ll have
the option to choose your
Preferred Dealer or search
for a nearby dealer. You can
search by zip code or by
city and state.
You can also schedule service from the desktop and mobile versions of MyUVO.com — just
click the Schedule Appointment button.
Once “Schedule Service” has been initiated:
• A service request is generated for the dealer selected
• The selected dealer will call you within 24 hours to set up a convenient time
for the service visit and then enter your appointment into the system. You’ll
then get an SMS text message to confirm appointment details
54
55
SCHEDULE SERVICE APPOINTMENTS
The Payoffs:
• One step—from multiple places—is all it takes to initiate the scheduling process
• Notifications keep users informed of upcoming appointments
how-to summary
Audio Control Unit:
• Press Schedule Service when diagnostics turn up issues
• Dealer will call to set up a time. Once confirmed, the appointment
will show up as an upcoming appointment on the user’s MyUVO account
Desktop/Mobile:
• Click on the Schedule Appointment button and follow the prompts
• Dealer will call to set up a time. Once confirmed, the appointment
will show up as an upcoming appointment on the user’s MyUVO account
UVO eServices1
with Navigation
UVO eServices
(non-Navigation)
Snap the QR code for more
information on these features.
56
NOTIFICATIONS
Through handy notifications, UVO eServices1 helps you stay
on top of service appointments, upcoming service intervals,
diagnostic results and software changes. And the notifications
display prominently to help communicate the idea that, “Hey, this
is pretty important!”
Notifications
Notifications show up in the
drop-down menu.
On the Vehicle Overview screen, red
markers indicate important notifications.
The Payoffs:
• Important issues are immediately brought to the owner’s attention
• Intuitive navigation makes it easy to find details for each notification
how-to summary
• On MyUVO, simply click on the Notification drop down (desktop) or
menu item where the red marker appears (mobile)
UVO eServices
with Navigation
UVO eServices
(non-Navigation)
Snap the QR code for more
information on this feature.
58
PARKING MINDER
Using Parking Minder, you can save the location of your vehicle
and then use the UVO eServices1 smartphone app2, 3 to guide you
back. Never lose your car again.
When a Map is Not
Enough
Some locations require more than the location-finding abilities of a twodimensional map. A multi-level parking structure, for example.
PARKING MINDER
Ever have trouble finding your vehicle in a large parking lot or
multi-level parking structure? Not anymore.
Not to worry. Parking Minder has some smart functionality to help you find your
car, regardless of the situation.
Park. Mark. Find. Drive.
To mark—or save—your parking location, just press the Parking Minder icon. The
UVO system will then confirm the vehicle’s location through the smartphone app.
The Parking Minder app allows you to save up to three pictures to help you better reference
the vehicle’s location. You can write notes. You can track the parking meter’s time. You can
even set reminders to feed the meter before time runs out.
And, if someone else is picking up the car, just send them an email. They’ll get a map with
the vehicle’s exact location.
The Payoffs:
• Never lose your car in a parking lot again
• Track parking meter times and set reminders to feed the meter
• Send parking location to others if they need to pick up the vehicle
With the parking location saved, you can use GPS mapping to guide your way back.*
60
*The Parking Minder feature on the smartphone app is relying on the GPS within the user’s phone to retrieve a
parked vehicle from the current location.
61
PARKING MINDER
how-to summary
• Select the Parking Minder icon on the audio control unit to save the location
• On the smartphone UVO eServices1 app2, 3, select the Parking
Minder icon. Save the vehicle’s location and take pictures and/or
write notes for better reference to the location
• Use the app for guidance back to the car
my pois
UVO eServices
with Navigation
UVO eServices
(non-Navigation)
Snap the QR code for more
information on this feature.
62
MY POIs
3. Update the navigation system with the new POI and then route right to it!
MY POIs
My Points of Interest (My POIs) adds convenient functionality
to your vehicle’s navigation system. Planning your day is now
easier and more efficient. And, taking down directions will never
be the same.
Note: My POIs is only available with UVO eServices with navigation.
A Better Planner
Need to be somewhere new later in the day? Use My POIs to make getting there
a snap.
1. Save the location as a Point of Interest (POI) on MyUVO.com (desktop version only).
A Paradigm Shift in the
Way You Take Directions
Situation: You are driving in your new Kia to meet a friend for lunch. He calls and
says that the location has changed—lunch will now be at a new restaurant that
just opened up on the other side of town.
The shift: Using Google MapsTM10 from a desktop computer, your friend can
send the new location to your MyUVO account. From there, you can retrieve
this POI to your UVO eServices smartphone app2, 3, upload it to your navigation
system and then route right to it.
Less chance for error. Less time wasted. My POIs makes “shifting on the fly”
simple and stress-free.
2. L
oad the POIs to the smartphone app2, 3.
64
65
MY POIs
The Payoffs:
• Easier and more efficient way to plan future trips
• Simple way to send and receive directions with less chance for error and less
time wasted
how-to summary
• Planning a trip: Save the POI to MyUVO; load it to the UVO
smartphone app2, 3 by pressing “Get Destinations”; on the audio
control unit, go to the MyPOI screen and press “Update.” You can
now route to the new POI
• Sending directions:
-- Find the location on Google MapsTM10
-- Select the location; in the menu, select “More”; select “Send”;
select “Car”; under make, select “Kia”; then enter the email of the
person holding the MyUVO account
UVO eServices1
with Navigation
UVO eServices
(non-Navigation)
Snap the QR code for more
information on this feature.
66
UVO eSERVICES GUIDE
The Payoffs:
• Instant access to audio help
• eServices guide is continuously updated so you’re guaranteed the latest and greatest information
how-to summary
eServices Guide
• Press the eServices Guide icon then follow the prompts
UVO eSERVICES GUIDE
An audio guide is accessible for help on all things eServices1.
Just select the eServices Guide icon—the system will make
an outgoing call to an automated service that will get you the
answers you’re looking for 4.
• If using voice commands, say “eServices Guide” then follow the prompts
UVO eServices1
with Navigation
UVO eServices
(non-Navigation)
Snap the QR code for more
information on this feature.
Just Say the Word
To access the eServices Guide using voice commands, press TALK,
wait for the prompt and say, “eServices Guide.”
68
69
DISCLAIMERS
Microsoft is a registered trademark of Microsoft Corporation in the United States and/or other countries.
Warning: Driving while distracted can result in a loss of vehicle control that may lead to an accident, severe
personal injury and death. The driver’s primary responsibility is in the safe and legal operation of a vehicle,
and use of any handheld devices, other equipment or vehicle systems, which take the driver’s eyes,
attention and focus away from the safe operation of a vehicle or which are not permissible by law should
never be used during operation of the vehicle.
1. At launch, the Apple iPhone® will be the only UVO eServices compatible device. iPhone® is a registered
trademark of Apple, Inc. Apple iOS6 compatibility expected early 2013. Additional compatible devices
expected late 2013.
2. 3.
pp Store is a service mark of Apple Inc. No charge for the UVO eServices app. App runs on your
A
smartphone cellular data service. Normal data rates will apply.
Warning: Driving while distracted can result in a loss of vehicle control that may lead to an accident, severe
personal injury and death. The driver’s primary responsibility is in the safe and legal operation of a vehicle,
and use of any handheld devices, other equipment or vehicle systems, which take the driver’s eyes,
attention and focus away from the safe operation of a vehicle or which are not permissible by law should
never be used during operation of the vehicle.
4. 5.
iagnostics checks apply to powertrain, chassis and air bag systems only. Requires initial activation. See
D
UVO eServices’ Maintenance Feature or Owner’s Manual for factory recommended maintenance schedule.
24-hour Roadside Assistance is a service plan provided by Kia Motors America, Inc. Certain limitations
apply. Coverage details are available in the Kia Warranty and Consumer Information Manual. For access to
Roadside Assistance, a connected mobile phone via Bluetooth within the cellular service coverage area is
required.
6. Feature activates after an airbag deployment. Feature requires a connected mobile phone via Bluetooth®.
Dependent on cellular service coverage area.
7. SiriusXM/SiriusXM Traffic service requires a subscription, sold separately, after 3-month trial included with
vehicle purchase. If you decide to continue your SiriusXM service at the end of the trial subscription,
the plan you choose will automatically renew and bill at the current rates until you call SiriusXM
at 1-866-635-2349 to cancel. See our Customer Agreement for complete terms at www.siriusxm.com.
Programming subject to change. Sirius satellite service is available only to those at least 18 and older in
the 48 contiguous USA, D.C., and P.R. (with coverage limitations). Traffic information not available in all
markets. See siriusxm.com/traffic for details. Sirius, XM and all related marks and logos are trademarks of
Sirius XM Radio Inc.
8. Please read this section carefully since it limits the liability of Twitter and its parents, subsidiaries, affiliates,
related companies, officers, directors, employees, agents, representatives, partners, and licensors
(collectively, the “Twitter Entities”). Each of the subsections below only applies up to the maximum extent
permitted under applicable law. Some jurisdictions do not allow the disclaimer of implied warranties or the
limitation of liability in contracts, and as a result the contents of this section may not apply to you. Nothing in
this section is intended to limit any rights you may have which may not be lawfully limited.
9. ( a) GOOGLE AND ITS LICENSORS (INCLUDING BUT NOT LIMITED TO TOMTOM AND ITS
SUPPLIERS) MAKE NO REPRESENTATIONS OR WARRANTIES REGARDING THE ACCURACY
OR COMPLETENESS OF ANY CONTENT OR THE PRODUCTS. (b) SUBJECT TO THE “OUR
WARRANTIES AND DISCLAIMERS” SECTION OF THE GOOGLE UNIVERSAL TERMS, GOOGLE AND
ITS LICENSORS (INCLUDING BUT NOT LIMITED TO TOMTOM AND ITS SUPPLIERS) DISCLAIM ALL
WARRANTIES IN CONNECTION WITH THE CONTENT AND THE PRODUCTS, AND WILL NOT BE
LIABLE FOR ANY DAMAGE OR LOSS RESULTING FROM YOUR USE OF THE CONTENT OR THE
PRODUCTS.
10.
©2013 KIA MOTORS AMERICA, INC.
The Bluetooth® word mark and logos are registered trademarks owned by Bluetooth® SIG, Inc., and any
use of such marks by Kia is under license. Other trademarks and trade names are those of their respective
owners. A Bluetooth®-enabled cell phone is required to use Bluetooth® wireless technology.
11. The Rear-Camera Display is not a substitute for proper and safe backing-up procedures. The Rear-Camera
Display may not display every object behind the vehicle. Always drive safely and use caution when backing
up.
12. 13.
HD Radio and the HD Radio logo are proprietary trademarks of iBiquity Digital Corporation.
14.
Copyright [2012] OnStar, LLC. All Rights Reserved.
15.
iPhone®, iPod® and iPad® are registered trademarks of Apple, Inc.
UP-050-UVOESDG-013-1A
70


![Geneva Motor Show Highlights [p23] BMW starts using](http://vs1.manualzilla.com/store/data/005908572_1-3c7305169b56611097f3edc8348ebe76-150x150.png)