1
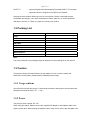
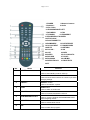
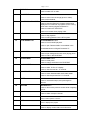
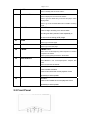
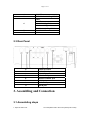
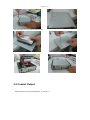
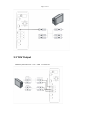
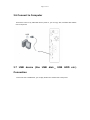
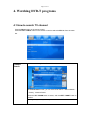
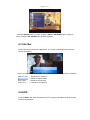
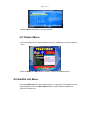
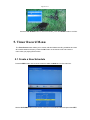
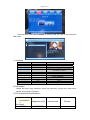
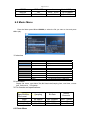
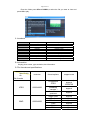
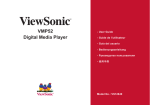
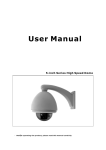
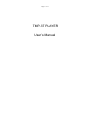
Page 1 of 31
TMP-3T PLAYER
User’s Manual
Page 2 of 31
Table of Contents
1.Introduction ................................................................................................................... 3
1.1Preface................................................................................................................. 3
1.2 Packing List ....................................................................................................... 4
1.3 Caution ............................................................................................................... 4
1.3.1 Usage cautions..........................................................................................................4
1.3.2 Power........................................................................................................................4
1.3.3 Repair .......................................................................................................................5
1.3.4 Others .......................................................................................................................5
2. About the Player........................................................................................................... 5
2.1 Remote Control .................................................................................................. 5
2.2 Front Panel ......................................................................................................... 8
2.3 Rear Panel .......................................................................................................... 9
3. Assembling and Connection ......................................................................................... 9
3.1 Assembling steps .............................................................................................. 9
3.2 Coaxial Output ................................................................................................. 10
3.3 YUV Output....................................................................................................... 11
3.4 AV Output ......................................................................................................... 12
3.5 HDMI Output..................................................................................................... 12
3.6 Connect to Computer ...................................................................................... 13
3.7 USB device (like USB disk、USB HDD etc.) Connection ............................. 13
3.8 DVB-T Connection ........................................................................................... 14
4. Watching DVB-T programs ........................................................................................ 15
4.1 How to search TV channel .............................................................................. 15
4.2 Program List Menu........................................................................................... 17
4.3 Info Bar ............................................................................................................. 18
4.4 EPG ................................................................................................................... 18
4.5 Teletext Menu ................................................................................................... 19
4.6 Subtitle List Menu ............................................................................................ 19
5. Timer Record Menu .................................................................................................... 20
5.1 Create a New Schedule.................................................................................... 20
5.2 Editing Schedule.............................................................................................. 21
5.3 Deleting Schedules .......................................................................................... 21
6. Multimedia Menu ........................................................................................................ 21
6.1 Movies Menu .................................................................................................... 21
6.2 Music Menu ...................................................................................................... 23
7.Setup Menu .................................................................................................................. 25
7.1 Changing DVB-T TV settings .......................................................................... 25
7.2 Changing Movies settings............................................................................... 25
7.3 Changing Photo settings................................................................................. 25
7.4 Changing Setup settings................................................................................. 26
8. Appendixes ................................................................................................................. 27
8.1 Specifications................................................................................................... 27
8.2 Frequently Asked Questions........................................................................... 29
Page 3 of 31
8.3 Copyrights and Trademarks............................................................................ 30
8.4 Warranty ........................................................................................................... 31
1.Introduction
1.1Preface
Dear Customer,
Thank you very much for purchasing our product. In the digital era, this product is a great
home entertainment partner. With the outstanding design, you can enjoy movies and music,
view photos of precious moments, and record your favorite TV or movie programs and view
them in your own time. The editing function provides you with an easy way to save these.
It’s easy to use this product as a portable external storage device with its built-in HDD and
high-speed USB 2.0.
This player has the following functionality:
Video Recording
-
supports one button recording and scheduled recording, can easily
record programs from DVB-T , and save as MPEG-2 (.mpg, or .ts)
format; also can edit the recorded titles;
Time Shift
Movie Playback
pause and enjoy chasing playback of live TV programs;
-
supports VOB (DVD), IFO (DVD), MPG (MPEG-2/1), AVI (MPEG-4
ASP: XviD), DAT (VCD),MKV(H.264) and MPEG-2 TS files;
resolution up to 1080P;
Music Playback
-
supports MP3, OGG, and WMA files;
Photo Playback
-
supports digital camera JPEG, and BMP files;
Data Storage
-
works as a portable hard disk using USB 2.0 port;
USB HOST
-
supports USB 2.0 host ports.
HDMI
-
High-Definition Multimedia Interface transmits the highest
quality digital video and audio via a single cable, simplifies
cabling and provides high quality home theater experience.
Page 4 of 31
DVB-T TV
-
supports Digital Video Broadcasting Terrestrial (DVB-T) TV reception;
- supports Electronic Program Guide (EPG) and Teletext.
We hope that this product will bring you a lot of enjoyment. We are committed to apply
multimedia technology in your work, entertainment, family, daily life, car and everywhere!
Welcome to be with us. Thank you again for choosing our product.
1.2 Packing List
Part
Player
Quantity
1
AV cable
1
HDMI cable
1(optional)
USB cable
1
Remote control
1
AC/DC adaptor
1
AC/DC adaptor power cord
1
DVB-T Antenna
1
Manual (Driver CD)
1
Note:
The actual contents in the package might be different from the packing list in this manual.
1.3 Caution
This player’s design and manufacture has your safety in mind. In order to safely and
effectively use this player, please read the following before usage.
1.3.1 Usage cautions
User should not modify this player. If commercial hard disk is being used, the environmental
temperature should be within +5℃ ~ +35℃.
1.3.2 Power
The player’s power voltage: DC 12V.
When using this player, please connect the supplied AC adapter or AC adapter cable to the
player’s power jack. When placing the adapter cable, make sure it can not get damaged or be
Page 5 of 31
subject to pressure. To reduce the risk of electric shock, unplug the adapter first before
cleaning it. Never connect the adapter to the player in a humid or dusty area. Do not replace
the adapter or cable’s wire or connector
1.3.3 Repair
If the player has a problem, you should take it to an appointed repair center and let the
specialists do the repair, never repair the player yourself, you might damage the player or
endanger yourself or your data.
1.3.4 Others
When using this player, please do not let the player come into contact with water or other
liquid,
if water is accidentally spilled on the player, please use a dry cloth to absorb the spillage.
Electronic products are vulnerable, when using please avoid shaking or hitting the player,
and do not press the buttons too hard.
Do not let the player come into contact with water or other liquid.
Do not disassemble the player, repair the player or change the design of the player, any
damage done will not be included in the repair policy.
Do not press the buttons of the player too hard.
Avoid hitting the player with hard object, avoid shaking the player, and stay away from
magnetic fields.
During electrostatic discharge and the strong electromagnetic field, the product will
malfunction, then unplug the power cable and the product will return to normal
2. About the Player
2.1 Remote Control
All procedures in this manual can be carried out using the remote control buttons. See the
following for details on each button and its function:
Page 6 of 31
1.POWER
2.Numeric buttons
3.Subtitle/-4.Audio
5.VOL+/VOL-6.UP/DOWN/RIGHT/LEFT
7.DVB MENU
8.FAV
9.TV/RADIO
10.ZOOM/EDIT
11.EPG/REVEAL/F.SCREEN
12.STOP/LOCK
13.PLAY/PAUSE/TTX
14.BGM/INDEX
15.ROTATE/SIZE
16.16:9/4:3/NEXT
17.PMODE/PREV
18.MUTE
19.RETURN
20.CH+/CH-21.OK
22.LIST
23.INFO
24.SLEEP
25.CLOCK/GOTO
26.RECORD
27.PG.UP
28.PG.DOWN
29.A-B/MIX
30.REPEAT/HOLD
31.DELETE/FR
32.FF
NO.
1
Name
POWER
Function
POWER button:
Press to enter standby mode or wake up.
2
Numeric buttons
Numeric buttons:
Press to enter channel numbers or numeric input when
changing settings.
3
Subtitle/--
Subtitle/-- button:
Press to set subtitle/-- options.
4
Audio
AUDIO button:
Press to select an audio track.
5
VOL+/VOL--
6
UP/DOWN/RIGHT/LEFT
7
DVB MENU
VOL+/VOL - button:
Press to increase/ decrease the volume.
UP/DOWN/RIGHT/LEFT button:
Press to move the highlight UP/DOWN/RIGHT/LEFT
while navigating menus.
MENU button:
Press to activate tools menus.
8
FAV
FAV button:
Press to select favor program。
Page 7 of 31
9
TV/RADIO
TV/RADIO button:
Press to select DTV or radio.
10
ZOOM/EDIT
ZOOM/EDIT button:
Press to zoom in/out the image (photo or video).
Press to edit schedule.
11
EPG/REVEAL/F.SCREEN
EPG/REVEAL/F.SCREEN
Press to enter the Electronic Program Guide which
displays an on-screen list of programs for the coming
week when watching Digital Terrestrial TV.
Press to reveal in the TELETEXT.
Press to full screen when playing video.
12
STOP/LOCK
STOP/LOCK
Press to stop playback.
Press to setting password in the DTV system.
13
PLAY/PAUSE/TTX
PLAY/PAUSE/TTX button:
Press to PLAY/PAUSE playback.
Press to open Teletext OSD if it is available in the
broadcasted stream of Digital Terrestrial TV.
14
BGM/INDEX
BGM/INDEX button:
Press to open background music when playing photo.
Press to index in the TELETEXT.
15
ROTATE/SIZE
ROTATE/SIZE button:
Press to rotate photo.
Press to change word size in the TELETEXT.
16
16:9/4:3/NEXT
16:9/4:3/NEXT button:
Press to select 16:9 or 4:3 display.
Press to view the next file / TV channel.
17
PMODE/PREV
PMODE/PREV button:
Press to switch between480P,720P,1080I,1080P.
Press to view the previous file / TV channel.
18
MUTE
MUTE button:
Press to mute audio output, and press again to
resume.
19
RETURN
RETURN button:
Press to return to the previous screen while navigating
menus.
20
CH+/CH--
CH+/CH-- button:
Press to select next/perv channel.
21
OK
OK button:
Press to select options in menus.
22
LIST
LIST button:
Press to display DTV playlist.
23
INFO
INFO button:
Press to display current status and information.
Page 8 of 31
24
SLEEP
SLEEP button:
Press to standby after 30 60 90 120min。
25
CLOCK/GOTO
CLOCK/GOTO button:
Press to display the clock in the TELETEXT.
Press to go to the select time you choose and play in video
playing mode.
Press to go to the recorded files menu in DVB-T receiving
mode.
26
RECORD
RECORD button:
Press to begin recording or to resume when
recording has been paused. Press repeatedly to
set one touch recording (OTR) length.
27
PG.UP
PG.UP button:
Press to go to the last page.
28
PG.DOWN
PG.DOWN button:
Press to go to the next page.
29
A-B/MIX
A-B/MIX button:
Press A-B to set the beginning and end points of a section
to repeat in the media.
Press to playing background in the TELETEXT.
30
REPEAT/HOLD
REPEAT/HOLD button:
Press REPEAT 1 / ALL to set repeat option - Chapter, Title
or Off.
Press to hold in the TELETEXT.
31
DELETE/FR
DELETE/FR button:
Press to delete schedule.
Press to fast rewind the current playback. Press
repeatedly to select speeds.
32
FF
FF button:
Press to fast forward the current playback. Press
repeatedly to select speeds.
2.2 Front Panel
Page 9 of 31
A
POWER
B
RETURN/CHANNEL_RETURN
LEFT
RIGHT
C
SELECT/DVB_MENU
UP/CHANNEL_PLUS
DOWN/CHANNEL_MINUS
D
PLAY/PAUSE
E
STOP
2.3 Rear Panel
A
TV/RF IN socket
B
USB DEVICE port
C
A/V OUT jack
D
Y/Pb/Pr OUT jack
E
S/PDIF COAXIAL jack
F
HDMI jack
G
USB HOST port
H
DC IN jack
3. Assembling and Connection
3.1 Assembling steps
1. Open the side cover
2 Put the plastic hole to the correct place (hole to hole)
Page 10 of 31
3.Lay the HDD to the correct place (hole to hole)
4. Whorl back the side cover
3.2 Coaxial Output
Follow the picture and Use Coaxial cable
to connect TV
Page 11 of 31
3.3 YUV Output
Follow the picture and Use
YUV cable
to connect TV
Page 12 of 31
3.4 AV Output
Follow the picture and Use
AV cable to connect TV
3.5 HDMI Output
Follow the picture and Use
HDMI cable
to connect TV
Page 13 of 31
3.6 Connect to Computer
Connect the unit to PC by USB cable when it power on, you can copy, stick, and delete files. Please
refer to the picture.
3.7 USB device (like USB disk 、 USB HDD etc.)
Connection
Connect the unit to USB device; you can play the files in it. Please refer to the picture.
Page 14 of 31
3.8 DVB-T Connection
Follow the picture and use DVB-T antenna to connect player
Page 15 of 31
4. Watching DVB-T programs
4.1 How to search TV channel
Press the Menu button on the remote control.
Press the LEFT / RIGHT button on the remote control to select the DTV tab from the menu
bar.
Channel
Search
Select to set the region for Channel Search。
In Channel Search mode, you can select Auto Search,Manual Search,
Country,Antenna Power。
Press the UP / DOWN button to select, and the LEFT / RIGHT button to
confirm.
Country: Firstly choose your country
Page 16 of 31
Auto Search
In Auto Search mode, the system will automatically scan for available
DVB-T TV channels.
Manual Search
In Manual Search mode, you can select the CH name, Bandwidth,
Input Frequency and Quality. Use the Right and Left buttons on the
remote control to select or input. Press the ENTER button to confirm.
Program
Select to set the region for Program.
Press the UP / DOWN button to select, and the LEFT / RIGHT button to
confirm.
Page 17 of 31
Select to set the region for Time
Time
In this menu, Press the UP / DOWN button to select, and the LEFT /
RIGHT button to confirm.
PVR Configure
Select to set the region for PVR Configure.
In this menu, Press the UP / DOWN button to select, and the LEFT /
RIGHT button to confirm.
4.2 Program List Menu
Press the List button when watching DVB-T TV programs, and the program list menu
where you can see the program number and name will be displayed.
Page 18 of 31
Press the ENTER button to confirm. Press the PG.UP / PG.DOWN button to page up
/down. Press the UP / DOWN button to select channels.
4.3 Info Bar
While switching channels by the Info button, an info bar will be displayed to show the
channel information.
There’re 4 strings displayed on the bar. Taking the info bar in the above photo for example
C800 YLE TV1 ----- Stands for TV channels.
------ Stands for signal quality
09:15-10:03 ------- Stands for now playing
10:05-10:13 -------- Stands for next playing
4.4 EPG
Press the EPG button when watching DVB-T TV programs, the Electronic Programming
Guide will be displayed.
Page 19 of 31
Press the Right / Left button to change channels.
4.5 Teletext Menu
If the broadcasted stream supports Teletext, press the TTX button to enter the Teletext
menu.
Press the INDEX and MIX buttons to view the content in the Teletext menu
4.6 Subtitle List Menu
Press the SUBTITLE button when watching DVB-T TV programs, the Subtitle List menu
will be displayed. Press the LEFT / RIGHT button to switch between Subtitle and
TELETEXT Subtitle List
Page 20 of 31
Press the UP / DOWN button to select the subtitle, press the ENTER button to confirm.
5. Timer Record Menu
The Timer Record menu allows you to create, edit and delete recording schedules and view
all schedule status and history. Press the OK button on the remote control to enter the
menu when you playing EPG function。
5.1 Create a New Schedule
Press the RED button on the remote control to select the Add tab from the menu bar.
Use the UP /DOWN button on the remote control to move between fields and press the LEFT /
Page 21 of 31
RIGHT button to adjust each setting.
Channel Type
Channel No.
Channel Name
Start Date
Start Time
End Time
Repeat
Select the video source
Display the channel number
Display the channel name
Enter the date of the recording.
Enter the time of the begin recording.
Enter the time of the end recording.
Select how often you want the schedule to record. Choose fromOnce,
Everyday, Mon-Fri, Mon-Sat or for an individual day of the week.
Mode
Select the recording mode.
5.2 Editing Schedule
Press the GREEN button on the remote control to select the EDIT tab from the menu bar.
Select the schedule you want to edit from the list and press the ENTER button. The
schedule setting screen appears. Modify the schedule as described in ‘5.1 Creating a New
Schedule’.
5.3 Deleting Schedules
Press the UP / DOWN button on the remote control to select the Delete tab from the
menubar.Select the schedule you want to delete and press the ENTER button. A
confirmation message appears.
6. Multimedia Menu
6.1 Movies Menu
Page 22 of 31
Enter the folder press UPand DOWN ,to select the file you want to view and press
OK to play.
1. Introduce
Video
Music
Movies
►||
■
16:9/4:3
Info
A-B
Subtitle
Repeat
◄◄
►►
VOL+
VOLGoto
Playback
Stop
16:9/4:3
To show some information on the video
Press to set the beginning and end points
of a section to repeat.
Switch between different captions
Press to set repeat option.
FAST REWIND
FAST ORWARD
VOL+1
VOL-1
Go to the time you choose and play
2. Information
Display file name, type, resolution, frame rate, total time, current time, audio track,
subtitle and program information.
3. File formats and specifications:
specification
s
file format
MPEG1
Supported suffix
Internal code
Bit rate
.DAT\.MPG
\
\
Page 23 of 31
MPEG2
MPEG4
H264
.MPG\.VOB
.AVI
.MKV\.MOV
\
DIVX,XVID
H.264
Up to 9.8Mbps
Up to 9Mbps
Up to 9Mbps
6.2 Music Menu
Enter the folder press UPand DOWN ,to select the file you want to view and press
OK to play.
1. Introduce
Photo
Music
►||
■
PG. up
Playback
Stop
Page up
Movies
PG. down
Page down
►►
◄◄
VOL+
VOL GOTO
Repeat
B.G.M
Fast Forward
Fast Rewind
VOl +1
VOL -1
Go to the time you choose and play
Press to set repeat option.
To select files and go to BM Menu
T
T
T
T
2. Information
Display file name, type,Album,Title,Bit Rate,Artist,Samping,Year, total time, current
time, audio track, information.
3. File formats and specifications:
Specifications
File format
WMA
MP3
M4A(AAC)
6.3 Photo Menu
Sampling
Bit Rate
Sound
Channels
8K-48KHz
8K-48KHz
16K-48KHz
32K-320Kbps
32K-320Kbps
32K-192Kbps
Mono,Stereo
Mono,Stereo
Mono,Stereo
Page 24 of 31
Enter the folder press UPand DOWN ,to select the file you want to view and
press OK to play.
1. Introduce
►||
■
16:9/4:3
Information
Rotation
◄◄
►►
PG. up
PG. down
Repeat
B.G.M
Photo
Music
Movies
Playback
Stop
16:9/4:3
To show some information on the photo
Rotation photo
FAST REWIND
FAST FORWARD
Page up
Page down
Press to set repeat option.
To select files and go to BM Menu
2. Information
Display photo name, type,resolution,size information.
3. File formats and specifications
specificatio
ns
file formats
resolution
T
T
format options
Progressive
JPEG
JPEG
6000X6000
baseline
T
TT
(“ standard ”)
T
baseline
optimized
6000X6000
resolution only
T
T
support
1024X768
support
TT
T
BMP.
support area
TT
support
TT
Single color
16 colors
256 colors
16bit
24bit
32bit
support
support
support
support
support
support
Page 25 of 31
7.Setup Menu
7.1 Changing DVB-T TV settings
Please refer to watching DVB-T programs on page 17.
7.2 Changing Movies settings
Press the LEFT / RIGHT button on the remote control to select the Movies tab from the menu
bar,Press the UP/DOWN button to select the Movie Configure tab,Press the OK button to
confirm
Select to set the region for Movie Configure.
Movie Configure
In this menu, Press the UP / DOWN button to select, and the LEFT / RIGHT
button to confirm.
7.3 Changing Photo settings
Page 26 of 31
Select to set the region for Photo Configure
Photo Configure
In this menu,you can select Slide Time,Slide Mode,Aspect Ratio。 Press
the UP / DOWN button to select, and the LEFT / RIGHT button to confirm.
7.4 Changing Setup settings
Select to scan for Picture。
Picture
In this menu,you can select Aspect Ratio,Resolution ,TV Format,Video
Output。 Press the UP / DOWN button to select, and the LEFT / RIGHT
button to confirm.
Select to set the region for Option。
Option
Page 27 of 31
In this menu,you can select OSD Language,Subtitle Language,Audio
Language Digital Audio。 Press the UP / DOWN button to select, and the
LEFT / RIGHT button to confirm.
Select to set the region for System。
System
In this menu,you can select Parental Guidance,Set Password,Restore
Factory Default,Information。 Press the UP / DOWN button to select, and
the LEFT / RIGHT button to confirm.
8. Appendixes
8.1 Specifications
————————————————————————
USB SUPPORTED:
USB HDD
Other USB Mass Storage Devices
USB 2.0 Interface
————————————————————————
CONTENT FORMATS SUPPORTED:
Page 28 of 31
DAT/VOB/MPG/AVI/TS/MP4/MKV MP3/OGG/WMA
Compression rate: between 32 kbps and 320 kbps
JPEG/BMP
————————————————————————
VIDEO CODECS SURPORTED:
MPEG-1/MPEG-2
MPEG-4 ASP: XviD
H.264
—————————————————————————
AUDIO CODECS SURPORTED:
MP2/MP3 /OGG Vorbis/WMA Standard (DRM, Pro & Advanced
Profile not supported)/PCM
—————————————————————————
SUBTITLE FORMATS SURPORTED:
SRT,SSA
——————————————————————————
RECORDABLE DEVICES SUPPORTED:
Built in HDD
USB HDD
——————————————————————————
VIDEO RECORDING FORMAT
HQ/SP/LP/EP/SLP mode: MPEG-2 MP@ML
——————————————————————————
AUDIO RECORDING FORMAT
HQ/SP/LP/EP/SLP mode: MP2 2-chanel
——————————————————————————
VIDEO OUTPUT SPECIFICATION
Composite Output
1 Vpp 75 Ohm
Components Output Y:1 Vpp 75 Ohm
Cb:0.7 Vpp 75 Ohm
Cr:0.7 Vpp 75 Ohm
HDMI Output
HDMI
——————————————————————————
AUDIO PERFORMANCE
DA Converter
AD Converter
Signal-Noise
24-bit/192kHZ
24-bit/96kHZ
≥ 95dB
Dynamic Range ≥90dB(1kHZ)
Channel
≥95dB Separation
——————————————————————————
Page 29 of 31
DIGITAL TERRESTRIAL TV SYSTEM
Frequency Range
44.25MHz~863.25MHz (VHF I/III / UHF)
COFDM
2K FFT or 8K FFT COFDM demodulator
(Fully DVB-T compliant : ETS 300-744) Code Rate
1/2, 2/3,3/4, 5/6, and 7/8
Guard Interval
1/4, 1/8, 1/16, 1/32
Constellation QPSK
16QAM, 64 QAM
Bandwidth
6, 7 or 8MHz
Digital TV Tuner
75 Ohm (VHF / UHF) TV Digital Antenna
————————————————————————————
GENERAL
Power Supply
AC 100~240V 50~60Hz
Power Consumption
Approx. 35 W
Operating
Hard Disk
+5°C to +35°C (+36°F to +95°F)
3.5’’ SATA HDD
Dimensions
(W/H/D)
Weight
200x170x60mm
Approx 1.5 kg
————————————————————————————
Note: The specifications and design of this product are subject to change without notice.
8.2 Frequently Asked Questions
Question 1. My computer does not recognize my player.
Answer:
(1) Make sure the player is powered on. If it is off, the computer will not be able to
find the player;
(2) Make sure the player is connected to computer. (Refer to 1.4.1 for connecting
player to computer);
(3) When using Windows 98SE, install the USB driver first. After installation, restart
the computer. Then reconnect the player to the computer. (Refer to 1.4.1 for
connecting player to computer);
(4) If you installed the Windows 98SE driver over your Windows® XP, 2000, or ME
edition, problems might occur;
(5) It is not recommend using the USB ports in the front of your computer, try to use
the USB
ports in the rear, because the USB ports in the front are often from non-powered
Page 30 of 31
hubs.
Question 2. I used my player to transfer files back and forth between different
computers. Will defragmenting the player hard disk do any harm to it?
Answer:
Defragmenting the player hard disk may be useful after having transferred many files
to and from the player. It is never harmful to use the defragment on the player. Make
sure no other programs are running while using the Windows® defragment utility.
Make sure you have connected the player with the external power adapter during this
procedure.
Question 3. My files have disappeared from the player.
Answer:
Make sure that you browse your files via the correct Browser mode which means
correct filtered views such as Photos, Music, or Movies.
Question 4. Why is there no sound on movie or music playback when using
Y/Pb/Pr component output?
Answer:
Y/Pb/Pr output is a video output only, and does not include sound signals, when using
Y/Pb/Pr output, please plug the A/V OUT or the S/PDIF jack to output sound.
Question 5. Why couldn’t the player find the hard disc?
Answer:
Make sure the firmware is installed correctly, and no system partitions on the HDD
were deleted. If hard disc failure occurs, please backup your data and reinstall the
firmware.
Question 6. Some functions like recording, time shift etc. do not work. What
should I do?
Answer:
If you find some functions do not work properly on the player, please change system
settings to the default (Refer to 6.6 for changing system settings).
8.3 Copyrights and Trademarks
Copyrights
All rights reserved. No part of this manual may be reproduced, stored in a retrieval
system, or transmitted in any form or by any means, electronic, mechanical,
photocopying, recording or otherwise, without the prior written permission from the
copyright holder. According to
copyright law, no recorded data may be used for purposes other than personal
enjoyment without permission from the copyright holder.
Trademarks
Page 31 of 31
Microsoft and Windows are registered trademarks of Microsoft Corporation. All
other trademarks are property of their respective holder
8.4 Warranty
What your warranty does not cover:
-Acts of nature, such as fire, static discharge.
-Damage from unauthorized repair, alteration or accident.
-Damage from misuse or neglect.
-A unit that has been modified or incorporated into other products or is used for
institutional or
other commercial purposes.
-Loss of customer’s software, firmware, information, or memory data.
-Improper handling or installation.