1
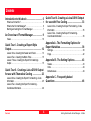
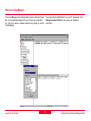
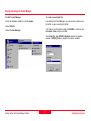
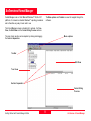
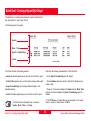
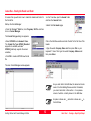
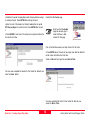
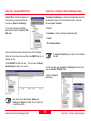
20 30 40 50 GPS System 500 Getting Started with the Format Manager Version 4.00 English Symbols used in this manual Technical Support Important paragraphs which must be adhered to in practice as they enable the product to be used in a technically correct and efficient manner. Technical Support is provided by Leica Geosystems worldwide network of representatives. We are represented in almost every country in the world. A representative directory is available at: www.leica-geosystems.com Preface 2 Getting Started with Format Manager - 4.0.0en Chapter Overview Introduction 5 An Overview of Format Manager 9 Quick Tour I - Creating a Report Style Output 12 Quick Tour II - Creating a Leica GSI16 Output for use with Thematical Coding 23 Quick Tour II - Creating a Leica GSI16 Output for use with Free Coding 33 Appendix A - The Formatting Options for Export Variables 38 Appendix B - The Setting Options 43 Appendix C - Frequently asked questions 46 Getting Started with Format Manager - 4.0.0en 3 Chapter Overview Contents Introduction to this book .............................. 5 What is a format file? ................................................... 5 What is the Format Manager? ...................................... 6 Starting and exiting the Format Manager ....................... 7 An Overview of Format Manager .................. 9 Views .........................................................................10 Quick Tour I - Creating a Report Style Output ........................................................... 12 Lesson One - Creating the Header and Footer ..............13 Lesson Two - Creating the Block Titles ........................15 Lesson Three - Creating the Export Formatstrings Output ........................................................................15 Quick Tour II - Creating a Leica GSI16 Output for use with Thematical Coding ................. 23 Lesson One - Creating the Export Formatstring - Code Information ..................................................................25 Lesson Two - Creating the Export Formatstring Coordinate Information .................................................29 Contents 4 Quick Tour III- Creating a Leica GSI16 Output for use with Free Coding ............................ 33 Lesson One - Creating the Export Formatstring - Code Information .................................................................. 35 Lesson Two - Creating the Export Formatstring Coordinate Information ................................................. 36 Appendix A - The Formatting Options for Export Variables .......................................... 38 Settings ..................................................................... 39 Flags ..........................................................................42 Appendix B - The Setting Options .............. 43 Scales ........................................................................ 43 Units ..........................................................................44 Default values ............................................................. 44 Appendix C - Frequently Asked Questions ..................................................... 46 Getting Started with Format Manager - 4.0.0en Introduction to this book What is a format file? The aim of this book is to help users in getting started with using the Format Manager software to create format files (.frt files) that can be used with Leica GPS System 500. A format file is quite simply a "mask" or "filter" which allows surveyed GPS data to be exported in any format as an ASCII text file. The format file can be used both in SKI-Pro and on the System 500 sensor. The best way to learn how to use the Format Manager is to actually generate format files. There are 3 "Quick Tours" in this book which are step by step tutorials explaining how to create the following 3 different format files: Ø Quick Tour I - Report Style format file Ø Quick Tour II - Leica GSI16 output format file using thematical coding Ø Quick Tour III - Leica GSI16 output format file using free coding For example one user may wish to export post processed data from SKI-Pro in a standard Leica GSI16 format. A second user wishes to export RTK data from the sensor in a "Report Style" format. Using the appropriate format file, the export of any data from the sensor and SKI-Pro into both these formats is possible. It is thus easily possible to build up a library of many different output formats. Each format file needs only to be created once and the same format file can be used on both the sensor and with SKI-Pro. It is recommended that you complete all of these Quick Tours. What you learn in Quick Tour I you will need to use in Quick Tours II and III. After completing these Quick Tours you should be able to appreciate the flexibility of format files and be able to create a format file for almost any output type you need. For example, it is possible to create both common output formats such as a Geodimeter type format or a Sokkia SDR33 format and an unlimited number of unique "report" style formats. Any surveyed data can be used with these format files. However, sample data is provided on the SKI-Pro CD which can be used with each of the Quick Tour format files. Getting Started with Format Manager-4.0.0en 5 Introduction to this book What is the Format Manager? The Format Manager is the software that is used to create the format files. It is automatically installed onto your PC when you install SKIPro. You do not require a software protection key (dongle) to use the Format Manager. Introduction to this book If you have not yet installed SKI-Pro on your PC, please refer to the Getting Started with SKI-Pro user manual for installation instructions. 6 Getting Started with Format Manager-4.0.0en Starting and exiting the Format Manager To start Format Manager: To create a new format file: ØFrom the Windows Upon starting the Format Manager, you can choose to create a new format file or open an existing format file. TM Start bar, click Programs ØSelect SKI-Pro ØTo create a new format file, ensure that GPS500 is chosen as the Instrument Class and then click OK. ØSelect Format Manager The Format File Type GPS500_Standard supports all variables, whereas GPS500_Field only supports the sensor variables. Getting Started with Format Manager-4.0.0en 7 Introduction to this book To exit Format Manager: Firstly ensure any changes you have made to a format file are saved. ØFrom the File menu click Exit or click on the manager main window. Introduction to this book icon of the Format 8 Getting Started with Format Manager-4.0.0en An Overview of Format Manager Format Manager runs on 32-bit Microsoft WindowsTM 95,98 or NT platforms. It is based on standard WindowsTM operating procedures and is therefore very easy to learn and to use The Menu options and Toolbar are used to navigate through the software. The Format Manager screen is divided into 3 sections - the TreeView, the Edit-View and the Format String Preview sections. The size of each section can be adjusted by clicking and dragging the Section Separators. Menu options Toolbar Edit-View Tree-View Section Separators Format String Preview Getting Started with Format Manager-4.0.0en 9 An Overview of Format Manager Views Tree-View: Edit-View: The tree view provides an overview of all the Header data blocks and all Export Formatstrings in an expandable hierachy of books and pages . After selecting a Header data block or an Export Formatstring from the tree view, the data that should be exported for that Header data block or an Export Formatstring is entered in the Edit-View. Double click on an item or click The Edit-View is basically similar to any text editor. Any text that is required to be included in the output file needs to be entered here. to expand it. If an item is open, double click on it or click to close it. If a Header data block or an Export Formatstring contains data then the page is shown thus: In addition, if an Export Formatstring page is selected from the Tree-View then the Insert export variable dialog box appears. This allows any variables that are to be exported to be chosen. Insert export variable dialog box Tree-View An Overview of Format Manager 10 Getting Started with Format Manager-4.0.0en Format String Preview: The Format String Preview section is simply a preview screen. It allows you to see how the text and export variables will look when the format file is used. No data can be entered in this screen. Example of how the Views may look whilst working in the Format Manager: In the Edit-View a mix of some text and export variables has been entered The Insert export variable dialog box is active because an Export Format String is selected in the Tree-View In the Tree-View the Fixpoint Export Format String has been selected In the Format String Preview you can see how the output data would appear when this format string is used Getting Started with Format Manager-4.0.0en 11 An Overview of Format Manager Quick Tour I - Creating a Report Style Output This Quick Tour is a step-by-step tutorial to create a format file that will output data in a "report style" format. The following output is required: Header Block Titles Export Formatstrings Footer This format file has the following sections: Note also the following characteristics of this format file: Header information appearing only once at the head of the report. All the Export Formatstrings are left aligned. A Block Title appears once over the actual surveyed data output. The Coordinate values are output to 3dp but the CQ values are output to 2dp. Export Formatstrings (the surveyed data) arranged in tab delimited columns. Footer information appearing only once at the end of the report. A format file does not always have to include a Header, Block Titles or a Footer. Quick Tour I - Creating a Report Style Output There are 2 blank lines between the Header and the Block Titles and two blank lines between the Export Formatstrings and the Footer. Point TP306 was not coded when it was surveyed. In the output above, it is given a "default value" of NULL. 12 Getting Started with Format Manager-4.0.0en Lesson One - Creating the Header and Footer In Lesson One you will learn how to create the header and footer for the format file. ØIn the Tree-View open the Header folder and then the General folder. Start-up the Format Manager: ØSelect the File Header page. ØFrom the WindowsTM Start bar, click Programs, SKI-Pro and then click on Format Manager. The Format file type dialog box appears. ØSelect GPS500 as Instrument Class. The Format File Type GPS500_Standard supports all variables, whereas GPS500_Field only supports the sensor variables. ØClick OK to create a GPS500 new format file. Click in the Edit-View section and enter the text for the first line of the header. ØType the words Company Name and then press Tab on your keyboard 7 times. Then type the words Company Address and then press Enter. The main Format Manager window appears. As you enter text in the Edit-View, the same text can be seen in the Formatstring-Preview section. Remember, you cannot enter text in this section - it is a preview screen of what is currently shown in the Edit-View. A space is shown as a the Edit-View. Getting Started with Format Manager-4.0.0en 13 and a tab is shown as a in Quick Tour I - Creating a Report Style Output ØUnderline the words Company Name and Company Address using = to underline the text. Press ENTER after entering the last =. ØSelect the File Footer page. ØEnter the rest of the header text. Enter 4 tabs before the words RTK Survey Report to centre this text. Press ENTER after the last =. Note how the File Header page has become grey to show that there is data entered for this page. ØPress ENTER 2 more times. This will put two empty lines before the text which will follow. Click in the Edit-View section and enter the text for the footer. ØPress ENTER twice. This will put two empty lines after the data that will be output and before the footer text. ØEnter 4 tabs and then type the words End of Data. You have now completed the header for this format file. We will now enter the footer details. You have completed the footer for this format file. We will now create the Block Titles. Quick Tour I - Creating a Report Style Output 14 Getting Started with Format Manager-4.0.0en Lesson Two - Creating the Block Titles Lesson Three - Creating the Export Formatstrings output A Block Title is text that will appear as a "title" above any surveyed data that will be output as Export Formatstrings. The Export Formatstrings are the actual surveyed data values that are required to output. For this format file we need to output the following export variables: ØIn the Tree-View open the Blocks folder and then select the Fixpoint (TPS/ GPS) page. Point ID Coordinates - easting, northing and ellipsoidal height Code ID 3D Coordinate Quality Click in the Edit-View section and enter the text for the block title. An Export Formatstring can consist of both variables and text. ØEnter the text as shown below and then press ENTER. Use the - to underline the text. ØPress ENTER at the end of the last - . This will ensure the Export Formatstrings are output on a new line. ØIn the Tree-View open the Export Formatstrings folder and then open the Fixpoint (TPS/GPS) folder. ØSelect the Fixpoint Exportstring. Note there are two tabs between Easting and Northing and Height and Code. This is to space the output data correctly. Getting Started with Format Manager-4.0.0en 15 Quick Tour I - Creating a Report Style Output Export Variables that have been selected are shown in the Edit-View with << >> brackets. When you select an Export Formatstring, the Insert export variable dialog box becomes active. This allows the different variables you need for a format file to be chosen. The first variable needed in this format file is the Point ID (Target) variable. ØScroll the list box to find the Point ID (Target) variable. Select this variable either by double clicking on it, or by highlighting it and then pressing Insert. For this format file, we only require 6 characters of the point ID to be output. (No point ID in our surveyed data has more than 6 characters). We also require the point ID data to be left aligned. ØDouble click on the Point ID (Target) export variable in the EditView. The Formatting options for export variable dialog box will appear. The Point Id (Target) variable will appear in the Edit-View. In the Format String Preview screen you can see how this variable will look when the format file is used (Format Manager uses a dummy point ID value). Note that because Point ID (Target) is a String (text) variable, the Representation, Sign, and Alternate Format options are grey. These settings only apply to Floating Point (numerical) variables such as grid or geodetic coordinates. Quick Tour I - Creating a Report Style Output 16 Getting Started with Format Manager-4.0.0en ØSelect the Alignment to be Left. ØChoose the Length to be 6 and the Precision to be 6. ØClick OK. We now need to enter the coordinate variables. ØClick in the Edit-View screen to put the cursor behind <<Point ID (Target)>> variable. ØEnter a tab which will separate the <<Point ID (Target)>> export variable from the easting export variable. The example point ID in the Format String Preview screen will now apppear as left aligned with only 6 characters. Before entering the coordinate variables, we should consider something. A full description of using the Default settings for variables dialog box is given in Appendix A of this manual. Previously, after we had entered the variable <<Point ID (Target)>> we then had to set the alignment and the length and precision by using the Formatting options for export variable dialog box. This was because the default settings for alignment, length and precision were not as we required. It is possible to set the default settings for a newly selected variable. This would then mean we do not have to set the format settings individually for each of the coordinate export variables. Getting Started with Format Manager-4.0.0en 17 Quick Tour I - Creating a Report Style Output If you require these settings also to be applied to subsequently created format files, select the Apply to every new format option. ØFrom the Options menu or from the Toolbar select Defaults The following dialog appears - these are the current output settings that will be applied to any variable which is selected: ØEnsure the Apply to every new format option is selected. ØClick OK. We can now enter the easting, northing and height export variables. ØFrom the Insert export variable dialog box insert Target (East). However, the next 3 variables we will enter will be easting, northing and height. For these 3 variables we require the same format settings: Alignment to be left, the length to be 12 and the precision to be 3. ØEnter a tab. ØEdit the settings to those shown below. ØEnter a tab. ØFrom the Insert export variable dialog box insert Target (North). ØFrom the Insert export variable dialog box insert Local Ellipsoidal Height. ØEnter a tab. Ensure you choose the Local Ellipsoidal Height export variable not the Target (Elev) export variable. Quick Tour I - Creating a Report Style Output 18 Getting Started with Format Manager-4.0.0en If you select a wrong export variable, put the cursor to the right of that export variable by clicking just behind it and press Backspace. This will delete that export variable. We now need to choose the Code ID export variable. This is stored in the Code data block type. You should now see the following: To make export variables easier to find in the Insert export variables dialog box, they are sorted into different data block types. For example all code information is stored in the Code (TPS/GPS) data block type whereas all quality information is stored in the Quality information (GPS) data block type. Put the cursor behind the Local Ellipsoidal Height export variable and the tab by clicking in the Edit-View. ØDouble click on Local Ellipsoidal Height. The Formatting options for export variable dialog box will show the default settings you have previously set to be the default. ØFrom the Insert export variable dialog box select the DatablockType to be Code (TPS/GPS). ØClick Cancel. To output a Local Ellipsoidal Height in a format file, use the Local Ellipsoidal Height export variable. For this format file we need the local ellipsoidal height. This is because the sample data we will use with this format file has local ellipsoidal heights, not orthometric heights. To output a local orthometric height in a format file, use the Target (Elev) export variable. Getting Started with Format Manager-4.0.0en ØScroll the Available variable list box to find Code ID. Double click on the Code ID or highlight the variable and click Insert. ØEnter a tab. 19 Quick Tour I - Creating a Report Style Output The format settings for the Code ID export variable are however again different to those we have previously set to be default. Thus we need to edit the format settings for the Code ID export variable. Because this is the final export variable we need to enter a carriage return at the end of the line. This will ensure the information for each point will start on a new line. ØDouble click on the Code ID to activate the Formatting options for export variable dialog box. ØPress Enter. ØSelect the Alignment to be Left. ØChoose the Length to be 4 and the Precision to be 4. ØClick OK. You should now see the following: The format settings are again different to those we have previously set to be default and need to be changed for the code ID. ØDouble click on the 3D Coordinate Quality to activate the Formatting options for export variable dialog box. ØEnsure the Alignment is set to be Left. ØChange the Length to be 5 and the Precision to be 2. ØClick OK. You should now see the following: The final export variable to enter is the 3D Coordinate Quality. ØFrom the Insert export variable dialog box choose data block type Quality information (GPS) and the export variable. ØDouble click on the 3D Coordinate Quality or highlight the variable and click Insert. Quick Tour I - Creating a Report Style Output 20 Getting Started with Format Manager-4.0.0en It is also possible to change the default values for Floating-Point variables (such as coordinate values) and Integer variables (such as angular values). Refer to Appendix B for a complete description of the use of the Settings dialog box. It is of course possible to use this format file with surveyed points that were not coded. For these points, a default value would be assigned to these points. It is possible to edit the default values that are assigned to points that do not contain data for the export variables that are being used. ØFrom the Options menu or from the Toolbar select Formats . The following dialog box will appear. Select the Default values tab. This shows the current default settings. The export formatstring and the format file is now complete and needs to be saved. ØFrom the File menu choose Save as... ØChoose the directory where you wish to save this format file. Give the format file a file name and click OK. The .frt extension is automatically added. ØChange the String default value to be NULL. It is recommended that all format files are stored in the same directory. This means that when this format file is used, any point surveyed without a code will be given the value NULL. ØClick OK. Getting Started with Format Manager-4.0.0en 21 Quick Tour I - Creating a Report Style Output Congratulations! You have created a Report Style format file that can be used with either SKI-Pro or on board the System 500 sensor. When you export the sample data using this format file, you should see the following output. If you do not, check the format file to identify the problem. It is recommended that you use the Real Time sample data to test this format file. Import this sample data into SKI-Pro and then export the data using this format file. If you are not sure how to use the format file in SKI-Pro, please refer to the Quick Tour I in the Getting Started with SKI-Pro user manual. When you installed SKI-Pro, the sample data should have been installed on your PC in the directory: The best way to test a format file is to use any sample data and inspect the output. The format file can then be edited until you are satisfied with the output. \SkiPro\Data\SampleData\Sys500\Realtime\. Quick Tour I - Creating a Report Style Output 22 Getting Started with Format Manager-4.0.0en Quick Tour II - Creating a Leica GSI16 Output for use with Thematical Coding Quick Tour II is a step-by-step tutorial to create a format file that will output data in the standard Leica GSI16 format for use with thematically coded data. A brief overview of the differences between Thematical and Free Coding Thematical coding means that when a point is coded in the field, the code information is directly connected to that surveyed point - it is a "property" of the point. For this reason, the code export variables have to be entered into the Fixpoint (TPS/GPS) Export Formatstring. Quick Tour II follows on from what you have learnt in Quick Tour I. If you have not yet completed Quick Tour I, it is recommended that you do so. When thematically coded points are exported with this format file, any code information connected with the surveyed points is also output. Note, this format file can only be used with data that has been coded using Thematical coding. This format file could not be used with data that was surveyed using Free coding. No code information would be output. Thematically coded data can be sorted by time or point ID when exported from SKI-Pro or the sensor. A GSI16 format file that can be used with data that has been coded with Free Coding will be created in Quick Tour III. Free coding means that when a code is selected in the field, that code is given only a time stamp. It is not connected directly to any surveyed point. For this reason, the code export variables have to be entered into the Code (TPS/GPS) Export Formatstring. When free coded survey data is exported it must be sorted by time. A brief overview of the differences between Thematical and Free coding is given here. For a full description, please refer to Chapter 8 of the System 500 Technical Reference Manual which can be found on the SKI-Pro CD. When the data is exported, both the codes and the surveyed points will be exported in exactly the same chronological order in which they were collected in the field. Free coded data must be sorted by time when exported from SKI-Pro or the sensor. Getting Started with Format Manager-4.0.0en 23 Quick Tour II - Creating a Leica GSI16 Output - Thematical Codes The output shown below is required. In this format, the Export Formatstrings consist of both text and export variables. For each point, the code data is output on one line and then the point ID and coordinate data is output immediately on the following line. Incrementing block number Code ID Attributes 1,2 and 3 Code data Point ID and coordinates Point ID Note also the following characteristics of this format file: This format file does not include a Header, Block Titles or a Footer. It contains only one Export Formatstring. The Coordinate values are output in mm values and contain no decimal point. All variables are right aligned. Easting Northing Height The length of the output variables must always be exactly 16. If the surveyed data contains less than 16 characters for any variable then the "fill" character must be 0. If the surveyed data that is output using this format file contains more than 16 characters, then the data must be truncated. Attributes 2 and 3 for points p00003 to p00005 were not given a value when surveyed. In the output above, they are given a "default value" of 0. Each line contains an incrementing number - the GSI block number Quick Tour II - Creating a Leica GSI16 Output - Thematical Codes 24 Getting Started with Format Manager-4.0.0en Lesson One - Creating the Export Formatstring - Code Information Choose to create a new format file. ØFrom the File menu or from the Toolbar select New The first part of the code line is the text *41. This is not an export variable, but simply text. ØEnter the text *41. ØClick OK to create a standard GPS 500 format file. ØExpand the tree view and select the Fixpoint (TPS/GPS) Exportstring. The next part of the code line is an incrementing block number. This is effectively a line counter which increases by 1 for each line that is output. ØFrom the Insert export variable list box, choose Blocknumber (GSI). We will enter the code export variables into the Fixpoint (TPS/GPS) Export Formartstring because this format file is for use with data surveyed using Thematical coding. Getting Started with Format Manager-4.0.0en 25 Quick Tour II - Creating a Leica GSI16 Output - Thematical Codes ØDouble click on the variable to access the Formatting options for export variable dialog box. The remainder of the export variables in this line are the Code ID and Attribute values 1, 2 and 3 all have the same format. ØSet the format options as shown below. They are all Right aligned, with a Length of 16, a Precision of 0 and use the Fill Character of 0. Remember that it is possible to set the default format values for export variables. ØFrom the Options menu or from the Toolbar select Defaults ØSet the format options as shown below. Ensure to click the Use for every new format option. Note that when you choose to right align a variable you can choose between a space or zero as the fill character. For GSI formats, the fill character will always be zero. ØClick OK. The next character is a + sign immediately after the Blocknumber (GSI) export variable. Instead of setting the length of the variable to be 16, you could also set the length of the variable to be 8 and then enter 00000000 as text. The output would be exactly the same. ØEnter a +. Quick Tour II - Creating a Leica GSI16 Output - Thematical Codes 26 Getting Started with Format Manager-4.0.0en We must also ensure that the number of characters output for any export variable is never more than 16. GSI16 format does not allow any export variable to be greater than 16 characters in length. We must therefore set the truncate flag. As mentioned at the beginning of the Quick Tour, any "gaps" in GSI16 format must be filled with a 0. This means that we must ensure 0 is output for the points where codes or attribute values are not available. ØSelect the Flags tab view and tick the Truncate value option as shown below. ØFrom the Options menu or from the Toolbar select Formats ØSet the format options as shown below. Ensure to click the Use for every new format option. . ØSelect the Default values tab. Change the settings to those shown below. This means that when this format file is used, any point without a code or attribute value, the code and attribute output will be 0. ØClick OK. ØClick OK A full description of using the Default settings for variables dialog box is given in Appendix A of this manual. Getting Started with Format Manager-4.0.0en A full description of using the Settings dialog box is given in Appendix B of this manual. 27 Quick Tour II - Creating a Leica GSI16 Output - Thematical Codes ØFrom the Insert export variable list box, choose Code ID. Remember to select the Code (TPS/GPS) Datablock-Type first. ØEnter a space and then the text 42....+ Complete the rest of the code line as shown below. Ensure you select the Attribute value export variables, not the Attribute Name export variable. All GSI16 output requires a space at the end of the line. ØAt the end of the line enter a space and then press Enter. Quick Tour II - Creating a Leica GSI16 Output - Thematical Codes 28 Getting Started with Format Manager-4.0.0en Lesson Two - Creating the Export Formatstring - Coordinate Information The first part of the coordinate line is the same as the code line. It again consists of text and the Blocknumber (GSI). ØEnter the text *11 and the Blocknumber (GSI) as described for the code line in Lesson One. Remember to set the format settings for the blocknumber as in Lesson One. The next part of the line is the coordinate variables. For metric formats, the GSI format allows no decimal point in the output string which means the coordinates have to be output in mm. However, the coordinate data that will be output from SKI-Pro or the sensor will be in metres. It is therefore necessary to scale the coordinate values by 1000. ØFrom the Options menu or from the Toolbar select Formats . The Setting dialog box will appear. Ensure the Scales tab view is selected. ØEnter a + as text. It is possible here to enter 4 differerent scale values for Angular, Linear, Temperature and Pressure type export variable. (Normally, GPS users would only be interested in scaling linear export variables such as coordinate values or baseline lengths). The next part of the line is the Point ID (Target). Enter the Point ID (Target) export variable as shown below. ØChange the Linear scale to be 1000. ØClick OK. Getting Started with Format Manager-4.0.0en 29 Quick Tour II - Creating a Leica GSI16 Output - Thematical Codes We now need to define the Formatting options for the coordinate export variables. Since the easting, northing and height will all have exactly the same settings, it is more efficient to set the default format settings that will be applied to every subsequently selected export variable than to enter each export variable and then individually set the format settings for each variable. A length of 17 is required because the sign of the export variable is included in the export variable. Thus we will have 16 actual numeric characters for the coordinate value and one character for the sign. A precision of 0 is required because we do not want a decimal point or any decimal values in the output. ØSet the Length to 17 and the Precision to 0. ØFrom the Options menu or from the Toolbar select Defaults Set the format options as shown below. Notice that we have set the length of the output to be 17. However, if the actual length of the coordinate value that is output contains only 12 characters then the "missing" characters need to be filled. The choice is to fill with either 0 or spaces. For a GSI format the spaces need to be filled with 0. ØSet the Fill character to be 0. ØEnsure to select the Use for every new format option. It is quite possible that a coordinate system could be used that may produce negative values for any of the coordinate values. For this reason the correct sign must always be included in the output. ØChoose Always for the Sign. Quick Tour II - Creating a Leica GSI16 Output - Thematical Codes 30 Getting Started with Format Manager-4.0.0en ØSelect the Flags tab view. ØEnsure the Allow scaling option is selected. This option means that any real or integer type export variable (coordinates, baselines, angular values...) will be scaled by the appropriate factor that was entered in the Scales dialog box. In this example, the coordinate values will be scaled by 1000. ØEnter the remainder of the coordinate line as shown below. Do not enter the + charcter as text. Remember this will be output as part of the coordinate export variable itself. ØAt the end of the line enter a space and press ENTER The export formatstring and the format file is now complete and needs to be saved. ØFrom the File menu choose Save as... ØGive this format file a file name and click OK. The .frt extension is automatically added. Ensure that the Truncate value flag that we set for the code export variables is still selected. ØClick OK. Getting Started with Format Manager-4.0.0en 31 Quick Tour II - Creating a Leica GSI16 Output - Thematical Codes Congratulations! You have created a GSI16 format file that can be used with either SKI-Pro or on board the System 500 sensor. It is recommended that you use the Thematically Coded sample data to test this format file. Import this sample data into SKI-Pro and then export the data using this format file. When you installed SKI-Pro, the Thematical sample data should have been installed on your PC in: \SkiPro\Data\SampleData\Sys500\Thematic Coded\. When this sample data is exported using this format file, you should see the following output. If you do not, carefully check the format file to identify the problem. The best way to test a format file is to use any sample data and inspect the output. The format file can then be edited until you are satisfied with the output. Quick Tour II - Creating a Leica GSI16 Output - Thematical Codes 32 Getting Started with Format Manager-4.0.0en Quick Tour III- Creating a Leica GSI16 Output for use with Free Coding Quick Tour III is a brief tutorial to create a format file that will output data in the standard Leica GSI16 format for use with free coded data. The actual creation and the export variables used for this format file is virtually identical to the format file we have just created in Quick Tour II. Quick Tour III follows on from what you have learnt in Quick Tours I and II. If you have not yet completed Quick Tours I and II, it is recommended that you do so. There is only one difference between this format file for use with free coding and the format file created in Quick Tour II for use with thematical coding. With this format file, the code export variables are entered into the Code (TPS/GPS) Exportstring. With the format file created in Quick Tour II, the code export variables were entered into the Fixpoint (TPS/GPS) Exportstring. Note, this format file can only be used with data that has been coded using Free coding. This format file could not be used with data that was surveyed using Thematical coding. No code information would be output. We have already created a GSI16 format file that can be used with data that has been thematically coded in Quick Tour II. For a brief description of the differences between Thematical and Free coding, refer to Quick Tour II. For a full description, please refer to Chapter 8 of the System 500 Technical Reference Manual which can be found on the SKI-Pro CD. Getting Started with Format Manager-4.0.0en 33 Quick Tour III - Creating a Leica GSI16 Output - Free Codes The output shown below is required. Note here that the code road was only entered once, immediately before point p00003 was surveyed. Most CAD pakages will interperate that subsequent points (p00004 to p00005) will also use this code until a new code is entered. This is the correct way to survey with free codes. Incrementing block number Code ID Attributes 1,2 and 3 Code data Point ID and coordinates Point ID The characteristics of this format file are identical to the format file created in Quick Tour II: Easting Northing Height This format file does not include a Header, Block Titles or a Footer. It contains only two Export Formatstrings. The length of the output variables must always be exactly 16. If the surveyed data contains less than 16 characters for any variable then the "fill" character must be 0. If the surveyed data that is output using this format file contains more than 16 characters, then the data must be truncated. The Coordinate values are output in mm values and contain no decimal point. Attributes 2 and 3 for the code road were not given a value when surveyed. In the output above, they are given a "default value" of 0. All variables are right aligned. Each line contains an incrementing number - the GSI block number Quick Tour III - Creating a Leica GSI16 Output - Free Codes 34 Getting Started with Format Manager-4.0.0en Lesson One - Creating the Export Formatstring - Code Information Choose to create a new format file. ØFrom the File menu or from the Toolbar select New To enter the code and attribute export variables, repeat exactly what we did for Lesson One of Quick Tour II. Refer back to this lesson if necessary. ØClick OK to create a standard GPS 500 format file. Note, that when you activate the Formatting options for export variable dialog box, many of the settings will be correct. This is because we ticked the Use for every new format option in Quick Tour II. To create the export formatstring for the code information, repeat exactly what you did in Lesson One of Quick Tour II. The only difference is to enter the code information into the Code (TPS/GPS) Exportstring. We will enter the code export variables into the Code (TPS/GPS) Export Formartstring because this format file is for use with data surveyed using Free coding. After creating the code information export formartstring, you should see the following. ØExpand the tree view and select the Code (TPS/GPS) Exportstring. Getting Started with Format Manager-4.0.0en 35 Quick Tour III - Creating a Leica GSI16 Output - Free Codes Lesson Two - Creating the Export Formatstring - Coordinate Information We now need to enter the coordinate information. Again, this is identical to what we did in Lesson Two of Quick Tour II. After creating the coordinate information export formartstring, you should see the following. ØExpand the tree view and select the Fixpoint (TPS/GPS) Exportstring. Once you have completed entering the coordinate information, save the format file. To create the export formatstring for the coordinate information, repeat exactly what you did in Lesson One of Quick Tour II. Refer back to this lesson if necessary. Quick Tour III - Creating a Leica GSI16 Output - Free Codes 36 Getting Started with Format Manager-4.0.0en It is recommended that you use the Free Coded sample data to test this format file. Import this sample data into SKI-Pro and then export the data using this format file. When you installed SKI-Pro, the Free Coded sample data should have been installed on your PC in: \SkiPro\Data\SampleData\Sys500\Free Coded\ When this sample data is exported using this format file, you should see the following output. If you do not, carefully check the format file to identify the problem. If you do not see any code information, it is possible that you have selected in the export setting options in SKI-Pro to sort the data by Point Id. Export the data again, this time sorting by Time. Getting Started with Format Manager-4.0.0en 37 Quick Tour III - Creating a Leica GSI16 Output - Free Codes Appendix A - The Formatting Options for Export Variables This Appendix describes the different format options that are possible using the Formatting Options for Export Variables dialog box. Double click on any export variable to access this dialog box. It is possible to set the default Formatting Options for Export Variables. From the Options menu or from the Toolbar select Defaults . The use of the options within this dialog box allows a large number of different output formats to be created. You can then define the formatting options that will be applied to every subsequently selected export variable for that particular format file. As mentioned in Quick Tour I only all format options are available if the selected export variable is a Floating point export variable. This type of variable normally contains a decimal point and a decimal value. An example of such an export variable is Coordinate (Easting). Additionally, if you wish those formatting options to also be applied and used in every subsequent format file you create, you should select the Use for every new format option. If the export variable is a String (text) variable or an Integer variable then not all format options are available. An example of a String variable is a Point ID. An example of an Integer variable is the degree part of the Latitude of a point. In the following descriptions of each format option it is stated if that option is applicable to String and/or Integer export variables. Appendix A - The Formatting Options for Export Variables 38 Getting Started with Format Manager-4.0.0en Settings This section describes the options that are available on the Settings tab view of the Formatting options for export variables dialog box. Representation The representation allows a decimal or an exponential representation to be chosen. Does not apply to String and Integer export variables. Example (using Easting of 609.173): Normal - 609.173 Exp. basis e - 6.092e+02 Exp. basis E - 6.092E+02 Sign The sign controls if a sign (+ or -) will be output with the export variable. Does not apply to String export variables. Alignment The alignment defines the orientation of the string within the defined string length. Applies also to String and Integer export variables. Example (using Point ID of 12345678): Left alignment Right alignment - Example 1 (using Easting of 123456.123): Only negative - 123456.123 Always - +123456.123 12345678 12345678 Getting Started with Format Manager-4.0.0en Example 2 (using Easting of -123456.123): Only negative - -123456.123 Always - -123456.123 39 Appendix A - The Formatting Options for Export Variables Alternate Format Examples (using Point ID of 12345678): This is a functionality which may be introduced in the future. It has no function at the present time. Length 5 5 5 5 5 5 5 5 Length Defines the minimum length of the output. This length includes the sign (if selected to use) and the decimal point. Applies also to String and Integer export variables. Length 0 is not allowed. Maximum length is 20. See below in the description of Precision for examples of using the length. Precision 0 0 3 3 5 5 7 7 Truncation No Yes No Yes No Yes No Yes Output 12345678 45678 00123 00123 12345 12345 1234567 34567 It can be seen that using the correct length, precision and the truncation flag, any output can be achieved. Note how a precision of 0 does not set the maximum length - the whole string is output (truncated if the truncation flag is set). Precision If the length is greater than the precision, the remaining spaces are filled with the fill character. This has different meaning for String and Integer variables and Floating point variables. String and Integer variables: Precision defines the maximum length of the output. Floating point variables: Precision defines the number of decimal places of the output. The examples below use a fill character of 0 In the examples below, the output is shown for both using truncation and not using truncation is shown and uses 0 as the fill character (both truncation and the fill character are explained later). Examples (using Easting of 123456.12345): Length 15 15 Precision 3 6 Output 00000123456.123 00123456.123450 Note that the length of 15 includes the decimal point. Appendix A - The Formatting Options for Export Variables 40 Getting Started with Format Manager-4.0.0en Fill Character Units Fill characters are used to "fill" variables that have fewer characters than the defined length for that variable. Applies also to String and Integer export variables. The unit type as to how the data will be output for each variable can be defined. This setting will overide any unit setting in SKI-Pro or on the sensor. Does not apply to String export variables. Either spaces or 0 can be used as the fill character. Linear variables (such as coordinates, baseline lengths) can be set to metres, US feet, or Intl feet. In the example below, the output is right aligned and has a length of 7. Examples (using Point ID of 12345): 0 as fill character space as fill character - 0012345 12345 Angular variables (such as convergence angle) can be set to radians, gons, degrees (sexagesimal), degrees (decimal) or mils. The Use system unit will read the instrument settings regardless of the Format Manager settings for that variable. The space fill character is automatically selected if a variable is left aligned. Getting Started with Format Manager-4.0.0en 41 Appendix A - The Formatting Options for Export Variables Flags Flags are special "attributes" that can be set to export variables to increase the flexibility of the output format. Suppress rounding If this option is selected, the true value will be truncated (instead of rounded) at the specified precision. Does not apply to String and Integer variables. In the examples below, the Precision is set to 2. Example (using Easting of 123456.789): Some flags are not applicable to String and Integer export variable types. For each flag it is stated in the following descriptions if that flag is applicable to these export variable types. Flag Enabled (rounding suppressed) - 123456.78 Flag Disabled (rounding not suppressed) - 123456.79 Truncate value Allow scaling If this option is selected, variables will be multiplied by the entered scaling factor. Does not apply to String and Integer variables. If this option is selected, variable values will be truncated to reach the desired string length. Applies also to String and Integer variables. In the examples below, the linear scale is set to 1000. In the examples below, the Length is set to 7. Example (using Easting of 123456.789): Example (using Easting of 123456.789): Flag Enabled (use scaling) - Flag Enabled (truncate) - 123456789.000 Flag Disabled (do not scale) - 123456.789 Flag Disabled (do not truncate) - 123456.789 For Floating Point variables the truncation is always from the left. For String and Integer only variables, the text can be truncated from the left or right depending on the Length and Precision settings. Please refer to the previous description on Precision. The scaling factors themselves are entered in the Settings dialog box. (From the Options menu or from the Toolbar select Formats ). Appendix A - The Formatting Options for Export Variables 456.789 42 Getting Started with Format Manager-4.0.0en Appendix B - The Setting Options This Appendix describes the different format options that are possible using the Settings dialog box. This is accessed from the Options menu or from the Toolbar select Formats . Scales Scales can be defined for all export variable types. All export variables will then be mutiplied by the specific scale factor. Example (using Easting of 123456.12345): In the example below, the linear scale is set to 1000. Output - The use of the options within this dialog box allows the Units, Scaling factors and the export variable Default values to be set. 123456123.45 If you wish to use scaling for an export variable, remember to set the Allow scaling flag for that export variable. Refer to Appendix A. If you wish the scaling values also to be used in every subsequent format file you create, you should select the Use for every new format option. Getting Started with Format Manager-4.0.0en 43 Units Default values The units for angular, linear, temperature and pressure units can be selected. The output will then be converted into the selected units. This allows the default values to be defined that will be output for Floating Point, Integer and String export variables. ØExamples of Floating Point variables are coordinate or baseline length variables. They are variables which could contain a decimal point in their output. If you wish the unit settings also to be used in every subsequent format file you create, you should tick the Use for every new format option. If you wish the units which are currently chosen on the instrument or in SKI-Pro to be output, you should select the Use instrument units option. ØAn example of an Integer variable is the degree part of the WGS84 coordinates. They are variables which do not contain a decimal point in their output. ØExamples of String variables are Point ID or Code ID. They are purely text variables. Appendix B - The Setting Options 44 Getting Started with Format Manager-4.0.0en The default value you enter will be output when that variable type (floating point, integer or string) is output but no actual data for that particular variable is available. For example, a simple format file is created which will output point ID, coordinates and code. However, during the survey, not every point is coded. When the format file is used with this survey data, the code ID that will be seen in the output for the points that have not been coded will be the default value. If you wish the default values you enter also to be used in every subsequent format file you create, you should tick the Use for every new format option. Getting Started with Format Manager-4.0.0en 45 Appendix B - The Setting Options Appendix C - Frequently Asked Questions Q. Why has my data not come out on separate lines? It has scrolled around the screen. Example: This is because you have not pressed ENTER at the end of the output string. You must enter the complete output for a format file and the carriage return / line feed to create a new line is part of that format. This also applies to any footers, headers or block titles. You require GPS data to be output in a format that is similar as shown below Job Details... Name of job, Creator etc Point Details... Point ID, coordinates, CQ etc Baseline Information... Baseline lengths etc Q. Why do I see 1.00 for my local heights? I can see the proper heights in SKI-Pro. You see 1.00 because this is the default export value for floating point export variables when you install Format Manager. This means that the export variable you have selected does not contain data. Check you have selected the correct export variable for your local height. Each "type" of data (Job, Point details, Baseline information) is grouped together in blocks which allows complex format outputs to be created. However, the vast majority of format outputs can be created by just using the Fixpoint folder. Remember the Target (Elev) export variable will output local orthometric heights. The Local Ellipsoidal Height export variable will output local ellipsoidal heights. Not every export variable can be used in every folder. For example the Baseline Cofactor Qzz export variable could not be used in the Job folder. The baseline cofactor information would simply not be output. Q. Why are there so many export formatstrings in the tree view? Do I always have to use the Fixpoint exportstring folder? Using the different formatstring "folders" allows data of certain specific types to be grouped together. Appendix C - Frequently Asked Questions 46 Getting Started with Format Manager-4.0.0en Q. Why has the code information not been output? Q. What is the String Pool? Are you using thematical coding or free coding? The string pool is a library for storing "strings" (combinations of export variables). This may be useful if you wish to use the same combination of export variables again and again in different format files. If you have coded with thematical coding then the code export variables must be entered into the Fixpoint (TPS/GPS) Exportstring. If you have entered the code export variables into the Code (TPS/ GPS) Exportstring, no thematical code information will be output. The format files created in Quick Tours I and II in this book can only be used with thematical codes. Please refer to Quick Tour II in this book for further information on thematical and free coding. Example: How to save strings into the string pool You wish to use the combination of export variables shown below in other format files you will create. If you have coded with free coding then the code export variables must be entered into the Code (TPS/GPS) Exportstring. If you have entered the code export variables into the Fixpoint (TPS/GPS) Exportstring, no free code information will be output. Additionally, when you export the surveyed data from the sensor or SKI-Pro, the data must be sorted by Time. If the surveyed data is sorted by Point Id, no free code information will be output. The format file created in Quick Tour III in this book can only be used with free codes. Please refer to Quick Tour II in this book or Chapter 8 of the System 500 Technical Reference Manual for further information on thematical and free coding. ØRight click in the edit view or tree view sections of the screen to activate the String pool menu. Choose Save. Alternatively select the icon from the toolbar. ØEnter a name to identify this combination of export variables and save the combination to the string pool. ØClick Save. Getting Started with Format Manager-4.0.0en 47 Appendix C - Frequently Asked Questions Example: How to load strings from the string pool Any export variables or entered text that is present in the formatstring where you will load the string from the string pool will be deleted when you load the string. You now wish to create a different format file that will use this combination of export variables. ØOpen the tree view to access the Fixpoint Export Formatstring. ØRight click in the edit view or tree view sections of the screen to activate the String pool menu. Choose Load. Alternatively select the icon from the toolbar. The pool content shows what strings are currently stored in the pool. ØSelect the correct string and click Load. The combination of export variables will appear in the edit-view. Appendix C - Frequently Asked Questions 48 Getting Started with Format Manager-4.0.0en Leica Geosystems AG, Heerbrugg, Switzerland, has been certified as being equipped with a quality system which meets the International Standards of Quality Management and Quality Systems (ISO standard 9001) and Environmental Management Systems (ISO standard 14001). 722431-4.0.0en Printed in Switzerland - Copyright Leica Geosystems AG, Heerbrugg, Switzerland 2002 Original text Total Quality ManagementOur commitment to total customer satisfaction Ask your local Leica agent for more information about our TQM program Leica Geosystems AG CH-9435 Heerbrugg (Switzerland) Phone +41 71 727 31 31 Fax +41 71 727 46 73 www.leica-geosystems.com