1
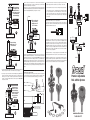
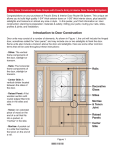
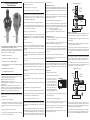
Using Your Premier Adjustable
Rail & Stile System
• Various common woodworking hand tools including hammer, chisels, rule,
straight edge, square, coping saw.
• Clamps with the capacity to secure all door joints.
• A sturdy, level work table or saw horses for door assembly
Safety Tips
Creating your own doors is a fun and rewarding woodworking project. As with any
woodworking project, however, your first concern must always be safety. To get
the best performance and results from your Freud cutting tools, observe these
safety recommendations for EACH operation:
knots, splits and checks.
Fence (aligned with bearing)
Calculating Sizes of Door Parts
Stock thickness: Your Premier Adjustable Stile and Rail bit set is suitable for stock
from 5/8” to 1-1/4” thick. To mill double sided or glass panel doors in thicker stock,
please contact your Freud Distributor to purchase the optional cutter set to match
your profile.
Stile Bit
(Stick Cutter)
Stile and Rails for common cabinet doors are normally 2-1/4” to 2-1/2” wide,
depending on your preference and application. Your Freud bits can easily be used
to mill stiles and rails of any width.
Stub
Tenon
Stile
(good side down)
Stile lengths: Should be equal to the finished height of the door.
Table
• Make sure that you are well rested before working with power equipment.
• Do not use power equipment if you have consumed any drugs or alcohol. If
you are taking prescription medication, check with your physician to ensure it
is safe for you to operate power equipment.
• Never use a router bit that is damaged or dull.
Stile Bit
Rail Bit
• Always turn off and unplug the router before removing, installing or adjusting
bits, adjusting the router or fence, or assembling or disassembling bits.
WARNING: Failure to obey these warnings could lead to serious bodily injury
or death
• Use router bits with a router only.
This new unique, patented solution allows woodworkers to build any style
of cabinet door in a range of door thicknesses and size!
Congratulations on your purchase of Freud’s Premier Adjustable Stile and Rail
Router Bit System. These unique bits allow you to build a remarkable variety of
different styles and sizes of cabinet doors, including:
• Rail and Stile doors with “stub” tenons
• Rail and Stile doors with extended tenons for added strength
• Rail and Stile doors with panels of undersized plywood
• Double Sided Rail and Stile doors with decorative profiles on both sides
(requires optional cutters)
• Glass Panel doors (requires optional cutters)
• Doors with thicknesses from 5/8” to 1-1/4”
Introduction to Cabinet Door Construction
Cabinet doors may consist of a number of elements. Here are some common
terms that will be used throughout these instructions:
Stiles: The vertical frame components of the door.
Rails: The horizontal frame components of the door.
Tenon: An extended piece of wood on the end of a rail that fits into a pocket, or
“mortise” in the stile.
Mortise: A pocket cut in a stile that matches the tenon on the end of a rail.
Panel: The center portion of a door, which is contained within the frame of rails &
stiles. Panels may be solid wood (normally a “raised” panel), plywood or glass.
Glass trim: The wooden molding which holds glass in the door frame.
Materials Required
In addition to your Freud router bits, you will need the following tools and supplies
to build your door unit:
• Variable speed router, 2-1/ 4 HP minimum.
• Router table with fence and miter gauge. For best results, use featherboards
and push blocks to control work pieces when possible. We also strongly
recommend that a shop vacuum or dust collector be used with the router
table.
• Table saw for ripping stiles, rails and other door parts.
• For long tenon door construction: Mortising machine, Drill Press with mortising
attachment, or Drill Press with brad point bits.
• Carbide is a very hard and brittle material. Slight shocks can damage the
carbide. Before each use, check that the bit is sharp and free from damage.
DO NOT use the bit if it is dull, broken, cracked or if any damage is noticed or
suspected.
• Before each use, make sure that at least 80% of the router bit shank is inserted
into the collet. The end of the bit shank should be at least 1/8” from the bottom
of the collet.
• Before each use, ensure that the collet has been tightened and that the work
piece is secure.
• Read and obey all warnings and instructions contained in the router’s user’s
manual, and for any accessory that is used. If you do not have the correct
user’s manual, obtain one from the manufacturer before using the router bit.
• Always wear eye protection or a full face shield complying with current ANSI
Standard Z87.1.
• Keep body, clothing and hair clear of spinning bit. Do not wear loose hanging
clothing or jewelry.
• Use a router table and fence wherever possible. Be sure all guards are in
place.
Rail lengths: are determined based on the width of the stiles and the length of the
tenon you plan to use. The rail length should be equal to: the width of the door,
minus the width of two stiles, plus the length of the two stub tenons. The stub
tenons are 10mm (13/32”) long, so the formula is:
Door Width – (Stile Width x 2) + 13/16”= Rail length
Note: For doors with extended tenons, add twice the length of the desired
tenon.
Mill and Cut Your Door Parts
a) Read and follow all safety instructions that came with these router bits, as well
as your planer, saw and all other tools.
b) Mill all stock to final thickness. If you do not have a thickness planer, many
lumber dealers and millwork shops will plane stock for a fee.
c) Rip all stock to finished width. See recommended widths in the previous
section. Be sure all edges are perfectly square, and that all surfaces are
straight and flat. Freud’s LM75R series ripping blades are excellent choices
for this stock.
d) Cut all parts to length, using the formulas in the previous section.
• Plug the router in and carefully make a test cut in scrap material to check your
set up. Use push blocks to control narrow stiles.
• Test the fit of your stile sample to the rail ends you routed in the previous step.
If you need to adjust the height of the bit, unplug the router, adjust the bit, and
make another test cut. Once the height matches perfectly, rout one edge of all
stiles and rails.
Doors with (Standard) Stub Tenons.
Your Freud Premier Adjustable Rail and Stile bits come factory-assembled to
produce perfectly fit stub tenon joints right out of the box. This is the most common
type of cabinet door. It is fast and easy to produce, and gives a beautiful finished
appearance.
• First, calculate the length of your tenons. As a general rule, plan on your long
tenons being as long as half the width of your stiles. For example, if your stile
width is 2-1/2”, then a 1-1/4” long tenon will be a good choice.
Routing rail ends:
a) Install the rail bit into the router collet.
Fence (aligned with bearing)
Rail Bit
b) Set the bit height and make a test cut as follows:
Inset Bead
• If you have any questions regarding your router bits, please call Freud Customer
Service at 800-472-7307. In Canada call 800-263-7016.
• Use a straight edge to align the router table infeed and outfeed fences
with the bearing on the bit.
• Keep these instructions in a safe place for future reference.
• Be sure that the fence is parallel to the miter gauge track.
Getting Started:Planning and Preparation
Plan the project carefully before purchasing materials. Refer to the reference
below for formulas to calculate the widths and lengths of your stiles, rails, and
glass inserts.
• Make a test cut across the end of a test piece of stock by using a miter
gauge to feed the stock perpendicularly across the cutter (B).
Be sure to obtain enough stock to build all doors, plus extra stock for making test
cuts. This will make it easier to match the grain and color of the material for a
more attractive finish, and milling all stock to thickness at the same time avoids
inconsistencies that can affect the quality of your joints. Choose stock with care.
Lumber for door construction should be straight, and free from defects such as
• Use a straight edge to align the router table infeed and outfeed fences with the
bearing on the bit.
Tip 1: Determine the best or “face” side of all components and use a pencil to
label each component on the back.
• Never use bit on router that will exceed maximum recommended RPM of bit.
• Use multiple passes when removing large quantities of material.
Routing edges of stiles and rails:
• With the router unplugged, install the stile bit in the router (A). The stile bit is the
tallest of the two bits in your set, with one profile cutter and two slot cutters.
Routing rail ends with extended tenons:
For stronger joints in your cabinet doors, your Freud set offers a unique capability
to mill tenons of unlimited length. This capability is especially important for large
or heavy doors, and doors that will be subjected to excessive use and stress:
• Set the bit height to produce the
desired profile. A common rule is
to have the inset “bead” on the face
of the stile the same thickness as
the “shoulder” on the back of the stile,
but this can vary depending on stock
thickness and the appearance you
desire. In 3/4” thick material, the inset
bead should be approximately 1/8” deep.
• Bits over 1-1/2” in diameter must only be used with the router mounted in the
table.
A
Router
(Cope Cutter)
Stub
Tenon
Rail
(good side down)
Shoulder
Tip 1: Make the opening between the infeed and outfeed fence as narrow as
possible (without touching the cutter) to provide maximum support.
Tip 2: Use a backer board on the sled or miter gauge to reduce the chance for
blow-out at the back end of the cope cut.
Table
B
Router
• Be sure that the fence is parallel to the miter gauge track, then rout across
each rail end using the same procedure described for routing the stub tenons
(B). For this first cut, leave the rail bit fully assembled with the bearing and
upper cutter in place. This will produce a stub tenon.
• Now, unplug the router. Use the supplied spanner wrench to remove the upper
portion of the cutter as shown (C). Use the router spindle lock or your router
wrench to prevent the bit from turning. DO NOT change the height of the bit!
Without adjusting
the height, use the
included wrench to
remove upper portion
of cutter and insert
the threaded plug
Rail
(good side down)
Table
C
Router
• Move the fence back in increments of not more than 1/2” and repeat the
procedure described for the second pass. Continue this process until the tenon
reaches the desired length on the face side.
• Unplug the router, remove the threaded plug and carefully thread the spindle
containing the bearing and upper cutter back into the rail bit. Tighten with the
spanner wrench (E). DO NOT change the position of the fence!
Fence
With out moving the
fence, rout using
multiple passes of
1/2” increments
b) Lay out and cut mortises in the door stiles to accept the tenons. The tenon
should fit snugly into the mortise. There are several ways to cut mortises:
• The easiest method is to use a mortiser or drill press mortising attachment.
• If you don’t have a mortiser or mortising machine, an alternative technique
is to use a brad point bit or forstner bit in a drill press to remove most of the
stock for the mortise, and then use a chisel to remove the remaining stock
and to “square up” the mortise. Drill only about 1/16” deeper than required
for the tenon.
Plywood Panels
Adjusting the bits for thinner grooves for plywood panels:
If you want to make doors with plywood panels, your bits can be adjusted to
produce grooves as thin as 5.5mm. This is important, because most 1/4” plywood
is actually much thinner than a true 1/4”.
Stile Bit
Rail
(flipped over)
Table
Fence (move in 1/2” increments)
Rout ends using
multiple passes of
1/2” increments
F
Router
Rail
(good side down)
Table
D
Router
• Lower the router and bit (F). Turn your rail face up, and use the stub tenon you
routed to adjust the bit height. The top of the cutter should be lower than the
underside of the stub tenon for the first pass. Important Note because you will
remove the back of the tenon in a width greater than 1/2”, you will make this cut
in multiple passes by starting with the top of the bit no more than 1/8” above the
table. Make multiple cuts by moving the bit up no more than 1/8” per cut. On the
final pass, the top of the rail bit should precisely match the underside of the stub
tenon. This will create a long tenon and profile that will perfectly match the stile
profile.
• To adjust the groove width produced by the stile bit, unplug the router and
install the bit in the collet. Use a 1/2” open end wrench or adjustable wrench
(not included) to remove the nut on top of the spindle. Carefully unstack the
components of the bits until you remove the upper of the two slot cutters. You
will find thin shims between these cutters. Removing some of these shims will
produce a narrower groove. Adding shims from the extras stored under the nut
will make the groove thicker. Reassemble the bit, secure the nut, and make
tests cuts to check your adjustment.
• To adjust the thickness of the tongue, unplug the router and install the rail bit.
Use the supplied Allen wrench to loosen the screw and remove the top cutter.
• To make the tongue thinner, remove some of the shims you will find on top of the
bearing. To make the tongue thicker, add shims in this area from the collection
of extra shims you will find in the package containing the wrenches. Reassemble
the bit, secure the screw, and make test cuts to check your adjustment.
Rail Bit
• Insert the threaded plug supplied with your set into the threaded hole in the rail
bit. Tighten securely with a 3/16” or 5mm Allen wrench (not supplied.).
• Second pass: Long tenons should be routed in multiple passes (D). Move the
fence back 1/2” from the position used for the first pass. Use a miter gauge, and
with the good or “face” side of the rails facing down; make the rail end cut on
one side of each end of all rail parts that are to have long tenons. ROUT ONLY
the face side of the rail!
Fence
(do not
change
position)
Finish the mortise and tenon joints:
a) First, carefully “haunch” the tenons as shown in the photo. This step produces
a stronger and more attractive joint and conceals the tenon within the end of
the stile. Cut the haunched tenon with a band saw, jig saw or handsaw.
Premier Adjustable
Rail & Stile System
With out moving
the fence, remove
the threaded plug
and with the included
wrench, re-attach
the upper portion
of rail cutter
Rail
(flipped over)
Table
E
Router
Note: length of haunch must
match the stile profile. Make
test cuts to ensure proper fit.
www.freudtools.com
1-800-334-4107