1
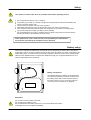
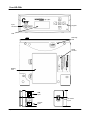
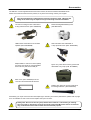
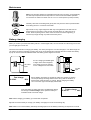
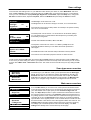
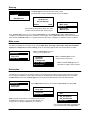
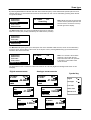
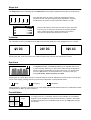
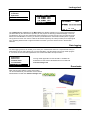
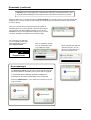
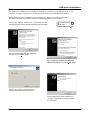
Cm+
INPUT
Horizon Global Electronics Ltd.
First Floor Office
Allen House
Edinburgh Way
Harlow
Essex
CM20 2HJ
Phone: +44(0) 1279 417 005
Fax:
+44(0) 1279 417 025
Email: [email protected]
Web:
www.horizonhge.com
HD – CM +
OFF
OK
ON
Issue No. 1
Horizon Part Number: KM165
© Copyright 2012, Horizon Global Electronics Ltd. No part of this document may be copied or reproduced without the written consent of
Horizon Global Electronics Ltd. First Floor Office, Allen House, Edinburgh way, Harlow, Essex, CM20 2HJ
Contents
Please read through these instructions carefully before using your new HD-CM+ meter to familiarise yourself with
all of the features available.
Contents
1
Overview
Meter MOT
Safety
Battery safety
Your HD-CM+
Accessories
Maintenance
Battery charging
User settings
Scan type menu overview
Main menu overview
Start up
Main menu
Select plan
Scan type
Slope test
Voltmeter
Spectrum
Constellation
Leakage test
Data logging
Downloads
USB Driver Installation
Specifications
Manufacturer Notes
2
3
4
5
6
7
8
9
10
12
14
Rear cover
Overview
Thank you for choosing to purchase the Horizon Global Electronics HD-CM+ cable meter. The HD-CM+ cable
meter features all the functions you will need to perform digital and analogue cable installations.
The HD-CM+ has an easy to read 128 x 64 pixel LCD with adjustable brightness and contrast, real-time
measurement of analogue and digital carriers, spectrum analyser, constellation diagram (including 256 QAM),
slope test, data logging (free software download), replaceable input connector, USB connectivity (for channel
plan updates), 12 Volt in-car charger, AC charger (built in), a high capacity Ni-Mh battery, adjustable shoulder
strap (detachable) and nylon carry case with an accessory pocket.
Meter MOT
Horizon Global Electronics is now offering a meter MOT service, so that you can be sure that your HD-CM+
is always performing to a reliable standard and giving you the most accurate results for your installation
needs. For more details on meter MOT please contact us directly at Horizon Global Electronics by calling us
on +44 (0)1279 417 005 or via our website www.horizonhge.com
Page 1
Safety
This symbol is used to alert users of a possible hazard while operating the unit.
●
●
●
●
●
●
Do not expose this meter to rain or moisture.
Avoid storing your meter in a vehicle overnight as low temperatures will impact the battery life.
Clean only with a soft dry cloth.
Always use the protective case and cover provided.
Read these instructions through carefully before using your meter for the first time.
Care should be observed when using the carry strap as this can present a choking hazard;
only use the strap when slipping or falling is not a posibility.
● Do not disassemble your meter or interfere with the internal components; as this will void the
warranty and there is the possibility of electric shock.
If this equipment is used in a manner that is not specified by the manufacturer,
the protection provided by the equipment may be impaired.
Battery safety
This meter is equipped a Ni-Mh battery that should only be charged by the meter either using the AC
mains lead or DC car charger provided. The use of other types of charger may result in damage to your
Ni-Mh battery back, your meter and be potentially dangerous (cause an electric shock). Always obtain
official Horizon Global Electronics replacement batteries through our recognised distributors or from
Horizon Global Electronics Ltd directly.
Battery compartment
The HD-CM+ features a battery compartment that
can hold a spare battery if required. To disconnect
the battery press down on the white tab and pull
the black connector. On re-connection push the
connectors home so that they clip together.
Remember:
Do not short circuit the battery terminals.
Do not dispose of batteries in fire.
Do not disassemble the battery (there are no user serviceable parts inside).
If damaged remove and replace immediately.
Page 2
Your HD-CM+
Input
connector
Keypad
LCD
Warranty
seal
Serial
number
HD-CM+
Battery
door
USB
input
AC mains
input
1.5A
12V DC
input
Page 3
Accessories
The HD-CM+ comes supplied with this instruction manual, and the accessories illustrated below.
Please check that all of the items are present, if any items are missing contact your supplier.
Only the manufacturers replacement accessories should be used, otherwise the
safety of the meter may be impaired and your warranty would be invalidated.
12V DC Car Charger Lead. Fitted with a
2 Amp protection fuse. (P/N: AW992CIG)
Ni-Mh Rechargeable Battery Pack.
(P/N: BP7233/2)
USB lead for transmitter list or firmware
updates (P/N: AW998USB)
240V AC Mains lead. Fitted with a
3 Amp protection fuse. (P/N: AW993UKP)
Replaceable F-F barrel connector (fitted)
and spare F-F barrel for use with Rubber
duck antenna. (P/N: JFFC494N) x2
Nylon carry case with accessory pocket and
detachable carry strap. (P/N: AL006BK-2)
Rain cover. (P/N: ARHDCM) The rain
cover should remain fitted at all times.
Rubber duck antenna (F-Type) wide band
for leakage detection. (P/N: AJDUCKF)
Periodically your input connectors will need replacing to maintain your meter’s performance; please refer to page
5 for more details on how to remove and replace the input connector.
Safety note: Do not use the carry strap where there could be a risk of falling or choking.
The carry strap is designed to support the weight of the HD-CM+ meter and its accessories
only; and should not be used for other than its intended purpose.
Page 4
Maintenance
Note: Your HD-CM+ features a replaceable F barrel input connector, and periodically
this will require replacement and inspection to ensure continued reliable operation.
To remove the F barrel connector use an 11 mm or 7/16th spanner (or deep socket).
Carefully clean the surrounding area gently with a dry lint free cloth to prevent debris
from falling into the F connector socket well.
Tip: Check for any copper fragments that may have gathered in the well of the F
barrel socket on the meter. These can be removed with a dry cotton bud or air
duster. When replacing with a new F barrel connector avoid over tightening, it
should only be tight enough to prevent removal by hand.
Battery charging
When you receive your meter the battery will be in a discharged state, we recommend an initial charge of 8 hours
(or overnight) prior to first use.
There are two methods of charging the battery, AC mains (through the on board charger) or 12V DC through the
car charger accessory supplied. Charging with AC is recommended and charging with DC is useful as a battery
top up on route to the next installation when the battery power happens to be low.
AC mains
input
For AC charging a suitable figure
of eight mains lead is supplied.
The charge circuit can operate
on AC voltages from 90 to 250V
1.5A
12V DC
input
Fast charge
00:25:43
80%
During battery charging the LCD will be active but not back lit, and the
current percentage of charge will be shown along with the duration of
time that the meter has been on charge. During charging the battery
icon in the lower right of the display will animate.
Once the battery charging has been completed the display
will change to Trickle charge; at this point the battery is
maintained with a low level charge.
Trickle charge
07:45:16
99%
Note: While charging your battery your meter will not operate.
Tip: We recommend that you charge your battery overnight prior to the next working day.
Note: When not in use the battery will slowly discharge (this is for the battery monitoring circuit) which is normal.
Page 5
User settings
To access the user settings menu on your HD-CM+ meter switch your meter on, select Main Menu and scroll
down to User settings; press the right arrow button or the OK button to access these options. In user settings
menu you can customise the display Backlight, Brightness and Contrast, adjust the Sleep timer, change the
RF units of measurements, adjust the Squelch, restore the Default setup and verify the Version number.
Shutdown
Main menu
Backlight
Brightness
▲▼For more
The Backlight can be set as On or Off
The Brightness can be set from Off (0) to 15 levels; 14 is recommended.
on
10
Contrast
20
Sleep
6M
RF Units dBmV
Squelch -21.2 dBmV
▲▼For more ▲
▼
RF Units dBmV
Squelch -21.2 dBmV
Defaults
3. 0Aa-0024
▲▼For more
The Contrast can be set from Off (0 which is invisible) to 40 (which is black);
16 to 22 is recommended.
The Sleep timer can be set from 1 to 30 minutes or set to Never (always
on). The sleep timer is a useful feature that will prevent your battery from
accidentally running down.
The RF units available are dBuV, dBmV and dBm
The Squelch can be set from -26.2 to -6.2 dBmV (or Off); this is the
threshold adjustment where you can define what level represents a
valid signal.
The Defaults function will reset the setup mode back to factory default.
The Version is for information purposes and has no other function.
To edit a value press the OK button and use the Up and Down buttons to adjust and then press the OK button
to set. Once you have setup your meter to your preferences return to the top of the menu where you can choose
to return to the Main menu or Shut down the meter. The meter can be turned off at any time by holding the Off
button.
Scan type menu overview
Shut down
Main menu
► Full scan
Short scan
Manual scan
On switching on your HD-CM+ meter you are presented with the Scan type
menu; (from here you can select the options as illustrated on the left). The
Full Scan will start a scan of the current selected channel plan, the Short
scan will scan selected channels within the channel plan, the Manual scan
allows you to navigate using a marker to investigate services of interest.
Main menu overview
Shut down
► Scan type
Select plan
Slope test
▲▼For more
Voltmeter
Spectrum
Leakage test
► User settings
▲▼For more
From the Main menu you can select one of the options as illustrated shown
on the left. Select plan allows you to choose which channel plan to used from
your downloaded channel plan pack (via the www.horizonhge.com web
site). The Slope test provides a 5 point simultaneous measurement mode for
the purpose of slope correction. The Voltmeter enables the measurement of
any voltage present on the coaxial cable; the measurement range is from 0 to
120 Volts AC or DC. The Spectrum function gives you a real-time graphical
representation of the signals present on the co-axial cable, this mode can also
be used to detect noise with the use of the supplied rubber duck antenna. The
Leakage test has provider specific frequencies for the purpose of checking
for leakage (via a modified spectrum and noise level display). The User
settings have already been covered at the top of this page.
Page 6
Start up
The Scan type menu is the first menu that you are
presented with once the start-up animation has completed.
HD-CM PLUS
HD-CM PLUS
(c) 2012 V3.0
UK_VC General
Battery
100%
During start up information about your meter
and the current selected plan will be shown.
Shut down
Main menu
►Full scan
Short scan
Manual scan
From the Scan type menu you can choose to Shut down, go to the Main menu, select a Full scan for a
complete scan including frequencies outside the channel plan, select a Short scan that only scans the channel
plan selected or Manual scan for a complete band view with cursor navigation to select the carrier of interest.
Main menu
The options available from the Main menu include Shut down, Scan type, Select plan, Slope test, Voltmeter,
Spectrum, Leakage test and User settings. Over the next few pages we will cover these options in detail.
Shut down
►Scan type
Select plan
Slope test
▲▼For more
Note: The Scan type menu will
return you to the first menu.
Voltmeter
Spectrum
Leakage test
► User settings
▲▼For more
Note: The Select plan menu is
covered in the next section.
Note: The User settings menu is
described on page 6 of this manual.
Select plan
The HD-CM+ can store up to 20 channel plans in its internal memory making it easy to select the correct plan
for the required installation. Custom plans can also be requested from Horizon Global Electronics Ltd. Select
the Main menu option from the Scan type menu and follow the steps below to select an alternate plan.
Shut down
►Scan type
Select plan
Slope test
▲▼For more
Select Main menu and then scroll down to Select Plan, then press OK.
Shut down
Scan type
►Select plan
Slope test
▲▼For more
Note: Use the arrow buttons to navigate the menus and
the OK button to select. You can turn the HD-CM+ off
at any time by holding the Off button for 5 seconds.
Exit
►UK_VC General
UK_VC Norwich
UK_VC Rainham
▲▼For more
Once you have selected the required plan
you will be returned to the Scan menu.
Page 7
Scan type
By selecting Full scan the HD-CM+ will start at the lowest frequency of the selected transponder plan and scan
upwards stopping on each active service found. The direction of scan can be selected by pressing either the left
or right arrow button.
Shut down
Main menu
►Full scan
Short scan
Manual scan
434.75MHz
133
Searching
Note: While scanning for services the
current channel plan frequencies and
service names are shown in the top
left and right of the display.
The Short scan option only scans a predetermined group of channels
within the current plan (usually specified by the cable service provider).
Shut down
Main menu
Full scan
►Short scan
Manual scan
The Manual scan option gives you a wide span view of the available cable services, which can be selected by
moving a cursor at the bottom of the screen to the require carrier, pressing OK will bring up the measurement
screen for the channel selected.
Shut down
Main menu
Full scan
Short scan
►Manual scan
458.75MHz
129
Note: If no service is found when
selecting a carrier with the OK
button the meter will scan upwards
in frequency until another valid
carrier is found.
The Illustrations below is where the meter has locked on to a service (digital and analogue are shown in this
example).
Digital measurements
210.75MHz
RF Power
Analogue measurements
Sky Sp
D F
512.00MHz
RF-Video
-44.4dBm
▼MER
Symbol key
BBC2
A
F
-41.3dBm
▼SNR
210.75MHz
MER
Sky Sp
D
F
-31.3dB
▼BER
210.75MHz
BER
QAM 256
512.00MHz
SNR
BBC2
A
F
>54.0dB
Digital
D
Analogue
A
Full scan
F
Short scan
S
Manual scan
M
▼RF-Audio
Sky Sp
D F
2.83E-4
512.00MHz
RF-Audio
BBC2
A
F
-52.8dBm
▼RF-Video
Page 8
Slope test
The Slope test function is available from the Main menu and provides 5 predetermined points of measurement.
UK_VC General
The slope test gives you a quick method of assessing the level of
slope and can be used where applying slope equalisation. Pressing
the On button will show the service levels with reference to 0dB.
Doc
140
132
115
Doc -25.6dBmV
140
132
115
126
126
ref 0dB
- 1.5dB
- 1.6dB
- 1.7dB
- 1.8dB
Press the On button to select the next channel in the slope test,
from here you can exit to the Scan menu by pressing the OK
button, pressing the right or left arrow button will re-start a
channel scan until the next valid service is found.
Voltmeter
The Voltmeter function is available from the Main menu and will display AC or DC voltages from 0 to 110 Volts.
0V DC
24V DC
90V AC
Pressing the right or left arrow button will re-start a channel scan until the next valid service is found.
Spectrum
RF Level -71.6dBm
The Spectrum display (and Channel view) can be adjusted with the left
or right arrow key and the up or down key to select the type of adjustment,
which is visually indicated at the top right of the screen. To exit this mode
press the “OK” button to access the sub menu. The top line will cycle
through RF Power, Centre frequency and Span.
Pressing the up or down key in spectrum mode will select the mode for adjustment and the symbol in the top right
corner of the display, pressing the left or right arrows will adjust the currently selected mode.
Span
Frequency
Amplitude
While operating in spectrum mode the top line of the display will alternate between Frequency in MHz Span in MHz
and RF Power (in dBmV at centre frequency).
Constellation
Press OK
to exit
Page 9
For digital services a constellation display is also available, the constellation
diagram can be navigated by using the arrow buttons, a marker in the smaller
box will show where in the constellation field you are. The OK button will exit
this function.
Leakage test
Slope test
Voltmeter
Spectrum
► Leakage test
▲▼For more
►136. 00MHz
136. 00MHz
136. 00MHz
144. 00MHz
▲▼For more
10Hz
10Hz
20Hz
10Hz
136. 00MHz
10Hz
The Leakage test is available from the Main menu; this feature enables you to inspect spot frequencies
(as determined by the cable service provider) for the purpose of detecting unwanted leakage or sources
of interference. Once you have selected the required frequency from the list by using up and down arrow
buttons and the OK button to select, you are then presented with a noise level indicator (when a greyed
out signal bar is shown the noise is under the threshold required by the cable provider) and a rapid signal
scan. Pressing either the left or right arrow button will return you to the channel scan in the direction
selected.
Data logging
The data logging function will enable you to store your measurement values in a sequential file ready for
download to your PC and insertion into your documentation. The file output from the log reader program
is .csv which can be used with applications such as Microsoft Office and Open Office.
Shut down
Main menu
Channel view
Constellation
► Log as 00000
The log reader application for the HD-CM+ is available for
download from the Horizon Global Electronics Ltd web site.
www.horizonhge.com
Downloads
New channel plans listed by region and provider
can be downloaded to your HD-CM+ via the Horizon
Global Electronics web site www.horizonhge.com
Page 10
Downloads (continued)
Important: If you have logged any measurements make sure you download these to your
computer before updating your transmitter list as this operation will reset the log entries.
Select the plans that you require and click on Download Now; you can also choose to have the settings file
emailed to you. You can choose to save this file (we recommend to your desktop so that it’s easily found),
or open it directly.
Open your received file and a small program will appear as
illustrated above. If you have already connected your meter to
your computer and downloaded the drivers you can click on
Transfer to load your new transmitter settings into your meter.
The driver installation is detailed on the next few pages.
On connecting your HD-CM+
to your computer via the USB
lead supplied the meter will
enter Program mode.
HD-CM PLUS
Click on Transfer to upload
the new channel plan data
to your HD-CM+ meter.
Program mode
Error messages
If a “No devices found” error should occur this indicates that the
automatic USB driver installation has not been able to complete.
A manual USB driver installation package is available for
download from the Horizon Global Electronics Ltd web site.
Should a “USB Port Error” occur check the connection from your
meter to the PC.
Page 11
When complete click OK and
close the program, you can
disconnect your meter and it
will now be ready for use.
USB driver installation
The USB driver installation for the most part is automatic on connection of your HD-CM+ meter to your
computer via USB for the first time. The steps illustrated show a typical Windows XP installation.
Before starting the driver installation process please ensure that your computer is connected to
the internet, and that your HD-CM+ meter has at least 25% battery charge remaining.
Connect your HD-CM+ meter to your computer with the USB
lead supplied and the Found New Hardware wizard will begin.
Found New Hardware
X
HD-CM+ Meter
When prompted select Yes, this time only
and then click the Next> button.
Select Install the software automatically
(Recommended) then click the Next> button
While your computer is searching for the
drivers a window like this will be visible.
The first stage of the driver installation is
complete. Click Finish to continue loading
the next driver.
Page 12
USB driver installation
The second stage of the USB driver installation will now begin.
Found New Hardware
X
USB Serial Port
To complete the installation of the required drivers ensure
that Install the software automatically (Recommended)
is selected, then click the Next> button.
While your computer is searching for the
driver a window like this will be visible.
The HD-CM+ driver installation process is now
complete. Click the Finish button to close the
window.
Found New Hardware
X
Your new hardware is installed and ready to use.
You are now ready to download cable plan updates or firmware updates from the www.horizonhge.com web site.
Page 13
Specification
128x64 pixel backlit monochrome screen
Field-replaceable F barrel for RF In
Variable bandwidth to 8MHz
Frequency range 51MHz to 858MHz, analogue and digital channels
Rapid scan over full band
Selectable limited plan for speed of installation
Signal squelch adjustable from -75dBm to -55dBm
Input levels from -75dBm to +17dBm
Clear indication of digital and analogue channels
Digital RF level indication by bargraph and in dBm or dBuV or dBmV
MER value by bargraph and in dB
BER value by bargraph and in scientific notation
Display of QAM value and symbol rate for digital carriers
Support for QAM rates up to 256
Symbol rates from 0.87 to 6.9 Mbaud
Analogue Video level by bargraph and in dBm or dBuV or dBmV
Analogue Video signal C/N ratio by bargraph and in dB
Analogue Audio level by bargraph and in dBm or dBuV or dBmV
Selectable Slope channels for equalization (up to 5 frequencies)
High capacity Ni-MH 3300mAh battery for 7 hours of operation from a single charge
Agile channel plan format, downloadable plans
Voltmeter facility, measures AC voltage and frequency or DC voltage on the cable (to 110V)
Results logging for quality verification (500 entries, uploadable to PC)
USB-2 B-type socket for PC connection
Page 14
LIMITED WARRANTY
Horizon Global Electronics Ltd will, at our option, repair or replace any Horizon Global Electronics Ltd HD-CM+
meter found to be defective in manufacture within the warranty period of 1 year.
The warranty period is determined by the date of purchase. Keep your receipt as proof of your purchase,
otherwise the warranty would be determined by the date of manufacture.
This warranty does not apply to damage caused by accident, misuse or deliberate tampering with the unit.
Tampering with the seals will immediately invalidate your warranty. This does not affect your statutory rights.
DECLARATION OF CONFORMITY
Manufacturer: Horizon Global Electronics Ltd.
Address: First Floor Office, Allen House, Edinburgh Way, Harlow, Essex, CM20 2HJ
Declares that the HD-CM+ cable installation meter complies with the following directives and standards.
Safety EN610 10-1:2001
EMC 61326:1997
All Horizon Global Electronics Ltd products are ROHS compliant.
Technical Department
Horizon Global Electronics Ltd.
July 2012
CONTACT DETAILS
Horizon Global Electronics Ltd.
First Floor Office
Allen House
Edinburgh Way
Harlow
Essex
CM20 2HJ
United Kingdom
Tel:
Fax:
Email:
Web:
+44(0)1279 417 005
+44(0)1279 417 025
[email protected]
www.horizonhge.com
Producer ID for the purpose of WEEE regulations: WEE/BB019UV