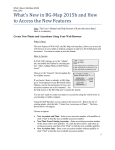
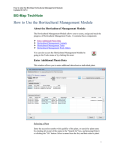
1
BG-Map Garden Notepad Plus User’s Manual BG-Map Mapping the world… one plant at a time Garden Notepad Plus Users Manual Garden Notepad Plus version 4.2.5 © 2012 - 2015 Glicksman Associates, Inc. All rights reserved. No part of this publication may be reproduced, transcribed, or stored in any form without the prior written consent of Glicksman Associates, Inc. Page 1 of 18 BG-Map Garden Notepad Plus User’s Manual Contents WHAT IS GARDEN NOTEPAD PLUS? ..................................................................................................... 4 WHAT DATA CAN YOU RECORD WITH GARDEN NOTEPAD PLUS? ........................................... 4 STARTING GARDEN NOTEPAD PLUS ................................................................................................... 4 ABOUT GARDEN NOTEPAD PLUS INVENTORIES ............................................................................. 4 EXPORTING OTHER DATA TO GARDEN NOTEPAD PLUS .............................................................. 5 THE GARDEN NOTEPAD PLUS HOME SCREEN ................................................................................. 5 DOWNLOADING THE LATEST INVENTORY LISTS AND OTHER DATA .............................................................. 5 SELECTING AN INVENTORY ........................................................................................................................... 6 SELECTING A CAMERA IMAGE RESOLUTION ................................................................................................. 6 BEGINNING TO INVENTORY – ENTERING DATA ............................................................................................. 6 CLEARING ALL RECORDED DATA .................................................................................................................. 6 UPLOADING THE RECORDED DATA ............................................................................................................... 6 EDITING THE UPLOADED DATA AND TRANSFERRING IT TO BG-BASE.................................... 6 TO INSERT THE DATA INTO BG-BASE WITHOUT EDITING ............................................................................. 6 TO REVIEW AND EDIT THE DATA BEFORE INSERTING IT INTO BG-BASE ...................................................... 6 RECORDING IMAGES ................................................................................................................................ 7 TAKING PICTURES AND ADDING CAPTIONS................................................................................................... 7 TAKING IMAGES WITH PORTRAIT ORIENTATION .......................................................................................... 8 UPLOADING AND USING THE IMAGES ............................................................................................................ 8 THE INVENTORY LIST SCREEN ............................................................................................................. 9 PREVIOUS OBSERVATIONS SHOWN ON THE LIST ........................................................................................... 9 PREVIOUS OBSERVATIONS ARE SHOWN IN LIGHT GREEN ON THE LIST. THESE ARE REPLACED BY NEW DATA WHEN YOU ENTER IT. ..................................................................................................................................... 9 SELECTING A PLANT TO INVENTORY ............................................................................................................. 9 DELETING DATA FOR A PLANT .................................................................................................................... 10 DATA ENTRY SCREEN – PAGE 1 ........................................................................................................... 10 CONDITION .................................................................................................................................................. 10 REPRODUCTIVE STATUS .............................................................................................................................. 10 CHECK NOTE ............................................................................................................................................... 10 OPENING THE RECORD FOR THIS PLANT IN WEB-VQF ............................................................................... 11 NAVIGATING TO OTHER PAGES ................................................................................................................... 11 DATA ENTRY SCREEN – PAGE 2 ........................................................................................................... 11 SEX, VEGETATIVE STATUS, CONTAINER, NUMBER OF TRUNKS .................................................................. 12 CAUSE OF DEATH ........................................................................................................................................ 12 NEW LOCATION........................................................................................................................................... 13 SPREAD, DBH AND HEIGHT ........................................................................................................................ 13 USING MULTIPLE TRUNK SIZE DATA .......................................................................................................... 13 USING THE TREE HEIGHT CALCULATOR...................................................................................................... 13 NAVIGATING TO OTHER PAGES ................................................................................................................... 14 DATA ENTRY SCREEN – PAGE 3 ........................................................................................................... 15 RECORDING THE LABELS THAT THE PLANT HAS ......................................................................................... 15 Page 2 of 18 BG-Map Garden Notepad Plus User’s Manual RECORDING THE LABELS THAT THE PLANT NEEDS ..................................................................................... 15 RECORDING SPECIAL CHARACTERISTICS .................................................................................................... 16 TREE HAZARD RATING .......................................................................................................................... 16 NUMERICAL RATINGS ................................................................................................................................. 16 OVERALL RATING ....................................................................................................................................... 16 ACTION TO BE TAKEN ................................................................................................................................. 16 NOTES ......................................................................................................................................................... 16 ITREE DATA ............................................................................................................................................... 17 ABOUT ITREE .............................................................................................................................................. 17 ENTERING ITREE DATA ............................................................................................................................... 17 USING ITREE DATA ..................................................................................................................................... 18 Page 3 of 18 BG-Map Garden Notepad Plus User’s Manual What is Garden Notepad Plus? GN+ is a time and labor saving software application that allows garden staff to capture information about the size and condition of plants in the field on an iPad and automatically upload and transfer that information to BG-BASE. To use GN+, you must first install, Web-VQF, the BG-Map web interface. What Data Can You Record With Garden Notepad Plus? GN+ allows you to record: Condition Images DBH Number of Trunks Sex Reproductive Status Vegetative Status Container Die Why Location Number of Plants Special Characteristics Spread Height Check Note Performance Note Labels Existing Labels Needed Tree Hazard Score, Comments and Recommended Action Up to 6 Images per Plant iTree Data Starting Garden Notepad Plus Tap the GN+ icon on the iPad home screen. About Garden Notepad Plus Inventories To use GN+, you need to create at least one inventory list. This can be a list of living plants in a BG-BASE Location or a Location Group, a BG-BASE saved list and/or a BG-Map Defined View. To create an inventory list, in BG-Map go to Field Data/Create Garden Notepad Plus Inventories, and follow the directions in the help screen. The list of plants in each inventory is automatically updated daily, so the inventory lists available for download by GN+ are always current. Once you select an inventory list in the GN+ home screen, you cannot select another inventory list until the recorded data has either been uploaded or cleared. When using GN+, you can record data for other plants not on the selected inventory list by entering their accession numbers or other unique codes of your own choosing. And, you do not have to record data for all the plants on the inventory list before uploading the recorded data. Page 4 of 18 BG-Map Garden Notepad Plus User’s Manual Exporting Other Data to Garden Notepad Plus Before using GN+, you must also export data from several files, including codes for Containers, Die Why, Labels, Locations, Special Characteristics, and Staff. To do this, in BG-Map go to Field Data/Export BG-BASE Label Types, Container and Die Why Codes. You will also need to export Check Note phrases – for details, in BG-Map go to Field Data/Edit Garden Notepad Checknote Phrases, and follow the instructions in the help screen. The Garden Notepad Plus Home Screen Page 5 of 18 BG-Map Garden Notepad Plus User’s Manual Downloading the Latest Inventory Lists and Other Data Before selecting a new inventory, tap Download to obtain the most recent inventory lists and other data. (Internet Connection Required) Restart GN+ when prompted. Selecting an Inventory Tap the down arrow, and select an inventory from the choices listed. Selecting a Camera Image Resolution Select either normal or high image resolution. This will change the size of the images recorded from the normal 960 x 720 to 1920 x 1440. Once you select a resolution, you cannot change it until you start a new inventory. Beginning to Inventory – Entering Data Enter your initials and then tap Enter Data to begin. This loads the inventory and takes you to the Inventory List Screen. Note: Your initials must first be entered into the BGBASE Staff file. Note: If the inventory list is quite long, it may take some time to load. Clearing all Recorded Data To clear all recorded data without uploading it, tap “Download”, and download new data (Internet Connection Required.) Uploading the Recorded Data After you have recorded data for as many plants as you wish, you may upload it to the server by tapping Upload (Internet Connection Required.) Editing the Uploaded Data and Transferring it to BG-BASE The uploaded data is stored on the server in the folder \bgmapwin\ECM\Web\GNP\GNP202\Field Data. A new file in this folder is created each time data is uploaded. The file names consist of the initials entered plus numbers representing that date and time the data was uploaded. To Insert the Data into BG-BASE without Editing In BG-Map, tap Field Data/Upload, and select the data file in the folder listed above. To Review and Edit the Data Before Inserting it into BG-BASE In BG-Map, tap Field Data/Edit/Print Garden Notepad Data, and select the data file in the folder listed above. Edit the data as required, following the instructions in the help screen. Then, tap Field Data/Upload. Page 6 of 18 BG-Map Garden Notepad Plus User’s Manual Recording Images Using Garden Notepad Plus, you can record up to 6 images of each plant. Images can be recorded only after you have saved the record for the plant. Then, tap “Add Images” in the Inventory List Screen. Taking Pictures and Adding Captions Tap the camera icon, and choose “Take Photo.” Take the picture in the normal way and choose “Use.” The picture will be inserted into the first available empty space. You can then add an image description or leave it blank. You may take additional pictures up to a maximum of 6. To delete an image, tap the corresponding “Delete” button. Page 7 of 18 BG-Map Garden Notepad Plus User’s Manual Taking Images With Portrait Orientation When you upload the image into BG-Map you will be able to correct any rotation so that all images appear right side up. Uploading and Using the Images When you upload the Garden Notepad Plus data, the images will be uploaded and stored in the \bgmapwin\ECM\Web\GNP\GNP202\Field Data\Images folder as JPEG images. The next time you choose “Upload” from the BG-Map field data menu, the images will be moved to the folder “GNP” in the web folder designated as “Plantpix.” You will then be able to edit the images before they are automatically assigned in BG-Map to the corresponding Plants (not Names), where they will be available for viewing when a plant record is pulled up in BG-Map (but not in BGBASE.) The images will also be viewable in Web-VQF at the Staff and Visitor Levels. To make these images only viewable at the Staff Level, uncheck the option “Display GNP Images at Staff Level Only” in the Web-VQF/ECM Settings Window/Admin Tab. Page 8 of 18 BG-Map Garden Notepad Plus User’s Manual The Inventory List Screen Previous Observations Shown on the List Previous observations are shown in light green on the list. These are replaced by new data when you enter it. Selecting a Plant to Inventory Touch any plant on the list to select it. Then touch Edit Record to open the plant in the Data Entry Screen – Page 1. Navigating the List To scroll up or down the list, swipe the screen or use the scroll bar at the side of the list. Page 9 of 18 BG-Map Garden Notepad Plus User’s Manual To move up or down the list several plants at a time, touch the single arrow buttons. To move to the top or bottom of the list, touch the double arrow buttons. To see other columns in the list, swipe from right to left. To find a plant accession number or name in the list, touch a Find button, and all or enter part of the accession number or plant name. Deleting Data for a Plant As data for each plant is saved, check marks are added to the list. To delete all the data for any plant that has a check mark, select the plant, and touch Clear Record. Data Entry Screen – Page 1 This screen allows you to enter data on plant condition and phenology plus a check note. Condition Select the BG-BASE condition code. The last previously recorded condition is displayed in the box below. Reproductive Status Select one or more BG-BASE phenology codes. Note, codes J (Juvenile) or V (Vegetative) cannot be combined with other codes. Double-tap the items to select them. Check Note You can type in your notes and/or select phrases to insert by picking them from the “Phrase Picker.” To insert a phrase, tap the “Phrase Picker” and select phrase from the dropdown list. Page 10 of 18 BG-Map Garden Notepad Plus User’s Manual Opening the Record for This Plant in Web-VQF Touch Open in Web-VQF to display the full record for this plant (Internet Connection Required) Navigating to Other Pages iTree – Goes to the iTree Data Entry Screen Page 2 – Goes to Data Entry Screen Page 2. Page 3 – Goes to Data Entry Screen Page 3. Cancel – Returns to the Inventory List Screen without saving. Save – Saves and returns to the Inventory List Screen Page 11 of 18 BG-Map Garden Notepad Plus User’s Manual Data Entry Screen – Page 2 This screen allows you enter information for a number of different data fields. Sex, Vegetative Status, Container, Number of Trunks Select the appropriate codes from the dropdown lists. Note: Page 12 of 18 Before you enter the number of trunks for the first time, you must first set up BG-Map to assign a data field for this purpose. See “Quad Up Options” in the BG-Map Tools/Options menu. BG-Map Garden Notepad Plus User’s Manual Cause of Death If the plant has died, select a cause of death. A popup message will appear that allows you to change the recorded condition to Dead or Removed. You can also enter additional notes in the space labeled Reason for Death. New Location If the plant is in a new location that differs from the previous location shown in the box below, select the new location from the list. Then select a Location Change Type and a Number of Plants (or enter the word “MASS”.) Spread, DBH and Height Select a unit type (English or Metric), and enter only numeric values in these spaces. If you change the unit type after entering values, the values will be converted to the selected units. If you selected a number of trunks greater than 1, for DBH, enter multiple values in the spaces provided. The number of values must match the number of trunks as entered, except, for number of trunks = ">6", enter 6 values. You can record the height at which you measured the DBH. If you leave this blank, a standard height of 4.0 feet or 1.2 meters will be recorded. Using Multiple Trunk Size Data In BG-Map, you can view the multiple trunk sizes recorded for any tree by going to Tools/Horticultural Management/Enter Additional Plants Data. Or, click this icon: You can export multi-trunk sized in a report by adding the multi-trunk data fields to a Plant List Format in BG-Map Using the Tree Height Calculator The height of a tree can be determined with the tree height calculator. To calculate the height, you must enter the angle to the base of the tree, angle to the top of the tree, and distance from the tree. These measurements are explained in the illustration. Page 13 of 18 BG-Map Garden Notepad Plus User’s Manual In order to determine these three pieces of information, you will need to use a clinometer in conjunction with an electronic range finder or tape measure. The clinometer can determine the angles, the electronic range finder or tape measure can determine the distance. Enter the angle to the base of the tree in the box labeled "angle to base". (If it is a downward angle, make sure it is negative.) Enter the angle to the top of the in the box labeled "angle to top." Enter the distance to the tree. Touch Calculate Height. The tree's height will be calculated and automatically entered into the "Height" box. Navigating to Other Pages Page 14 of 18 iTree – Goes to the iTree Data Entry Screen Page 1 – Goes to Data Entry Screen Page 1. Page 3 – Goes to Data Entry Screen Page 3. Cancel – Returns to the Inventory List Screen without saving. Save – Saves and returns to the Inventory List Screen BG-Map Garden Notepad Plus User’s Manual Data Entry Screen – Page 3 This screen allows you to enter data on labels, special characteristics and tree hazard rating. Recording the Labels that the Plant Has In the column labeled “Have”, touch the boxes corresponding to each type of label currently on the plant. Recording the Labels that the Plant Needs In the column labeled “Need”, touch the boxes corresponding to each type of label that the plant needs. When prompted, enter the quantity of labels needed and touch Page 15 of 18 BG-Map Garden Notepad Plus User’s Manual OK. If you wish to enter a note regarding the needed labels, touch the box labeled “Note”, enter the note and touch OK. Recording Special Characteristics In the column labeled “Yes”, touch the boxes corresponding to the Special Characteristics that pertain to this plant. If you wish to enter a note regarding a Special Characteristic, touch the box labeled “Note”, enter the note and touch OK. Tree Hazard Rating Numerical Ratings All three of these ratings must be entered in order to produce an Overall Rating. Probability of Failure (1 to 4) – indicates the likelihood of failure of all or a portion of the tree. Probability of Hitting Target (1 to 4) – indicates the likelihood of the tree or a failed part striking a target, such as a person, vehicle or structure. Consequences of Hitting Target (1 to 4) – indicates the expected consequences of the tree or a failed part hitting the target. Overall Rating This determined by 3 items described above. It is based on the tables in ISA Publication Tree Risk Assessment, Best Management Practices, companion publication to ANSI A300 Part 9. Note: This rating should serve as a guide only. Accurate determination of hazard should be based on the full evaluation of the tree and its surroundings by a certified arborist qualified in tree risk assessment. Action to be Taken Enter text and/or choose a phrase from the Phrase Picker. Notes Enter text describing defects and other factors related to the recommended action and/or choose a phrase from the Phrase Picker. Page 16 of 18 BG-Map Garden Notepad Plus User’s Manual iTree Data About iTree iTree is a peer-reviewed software suite from the USDA Forest Service that provides urban forestry analysis and benefits assessment tools. Entering iTree Data In any of the data entry screens, click “iTree” to access the iTree data entry screen. Fill in all the required data, and save. For details on the iTree data entry fields, refer to the iTree website: https://www.itreetools.org/ Page 17 of 18 BG-Map Garden Notepad Plus User’s Manual Using iTree Data In BG-Map, you can view the iTree data recorded for any tree by going to Tools/Horticultural Management/Enter Additional Plants Data. Or, click this icon: You can export iTree data in a report by adding the iTree data fields to a Plant List Format in BG-Map BG-Map Mapping the world… one plant at a time C/o Morris Arboretum of the University of Pennsylvania 100 E. Northwestern Ave. Philadelphia, PA 19118 • USA 1.215.247.5777 ext. 283 [email protected] Users Support Website: www.bg-map.com/userdata Page 18 of 18