1
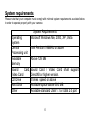
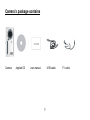
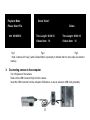
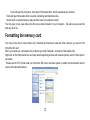
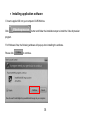
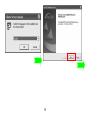
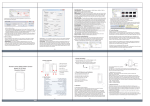
Jazz
DV151
Instruction Manual
General Notes/ Precautions:
Please read this Instruction Manual fully in order to become familiar with your camera; enjoy
maximum performance and preserve its service life.
u
Camera must first have 2 AA batteries and SD card (or MMC card) installed in order to
operate. These are NOT supplied included. Video clips can be recorded only when card
is inserted. SD Memory cards and AA alkaline batteries are readily available at most
stores.
u
SD cards must NOT be exposed to heat, moisture or strong magnetic field as the
memory could be lost or damage. Do not bend or force SD card when inserting into the
camera slot as card is a delicate electronic device that needs careful handling
u
Remove batteries if you do not plan to use camera for a few weeks
u
Avoid exposing camera to direct sunshine or excessively high temperatures (such as
inside parked car).
u
Avoid exposing camera to dirty, sandy or wet environments or harmful chemicals.
u
Carefully clean sand or dust from the surface of the camera if contaminated, Use soft
rag or tissue for cleaning lens if required. Avoid use of any solvent to clean camera and
lens.
u
TV programs, movies, music, pictures and other records may be subject to copyright
protection.
u
It is your responsibility to comply with copyright regulations.
2
FCC statement
FCCpart15.21
Warning: Changes or modifications to this unit not expressly approved by the party responsible
for compliance could void the user’s authority to operate the equipment.
FCC part 15.105
Note: This equipment has been tested and found to comply with the limits for a Class B digital
device, pursuant to Part 15 of the FCC Rules. These limits are designed to provide
reasonable protection against harmful interference in a residential installation. This
equipment generates, uses, and can radiate radio frequency energy and, if not installed
and used in accordance with the instructions, may cause harmful interference to radio
communications. However, there is no guarantee that interference will not occur in a
particular installation. If this equipment does cause harmful interference to radio or
television reception, which can be determined by turning the equipment off and on, the
user is encouraged to try to correct the interference by one or more of the following
measures:
Reorient or relocate the receiving antenna.
Increase the separation between the equipment and receiver.
Connect the equipment into an outlet on a circuit different from that to which the receiver is
connected.
3
System requirements
Please note that your computer must comply with minimal system requirements as stated below
in order to operate properly with your camera:
System Requirements
Operating
Microsoft Windows Me, 2000, XP, Vista
System
Central
Intel Pentium 166MHz or above
Processing unit
Available
Above 128 MB
Memory
Sound
Card, Sound Card / Video Card shall support
Video Card
DirectX8 or higher version.
CD Drive
4 times speed or above
Hard Disk
Available space above 500 MB
Other
Available standard USB 1.1 or USB 2.0 port
4
Camera’s package contains
Camera
Applied CD
user manual
USB cable
5
TV cable
Getting know your camera
Key definition:
1 LCD screen
2 Direction buttons
3 Playback/Stop button
4 Power on/off switch
5
Shutter button 6 Delete button 7 Battery cover
8 Battery cover release 9 USB Slider
Switch 10 Lens 11 Front cover trim patch 12 Busy light 13 Speaker 14 LCD (Fold
out LCD panel) 15 SD/MMC Card slot 16 USB port 17 TV Output Socket
18 Tripod
socket
6
Using your camera
m
Installing batteries
To open depress the Battery Cover release (8) and simultaneously slide down the Battery Cover (7).
Insert two, fresh AA Alkaline batteries carefully matching battery polarity with the plus and minus terminal
markings.
m
Installing SD/MMC card (not supplied)
Camera works with SD / MMC memory card up to 2GB capacity
Insert card carefully into the SD / MCC Card Slot according to the Direction Mark. Do NOT force. Press
down until it locks; push it down again to remove / replace the card.
Note:
l SD Card has a tiny “LOCK” slider on the side.
You can not record any video clip when the card is in “locked” position - slide the switch to “unlock” the
card.
Stop recording / playback before you attempt to remove / replace the SD Card.
m
Turning camera ON
Press and momentarily hold down the Power on / off switch.
Camera becomes active and LCD screen displays images in Preview mode. In this Mode you can adjust /
select desired zoom setting for your intended picture – press UP or DOWN Direction Buttons to set desired
effect. Please notice 1.0X digit indicating the initial zoom setting. 1.0X is the Default setting – no digital
zoom is activated.
7
Ready to Rec…1.0x
Time Left 00:33:17
Videos Saved 0000
m
Battery lev el indicator
When Battery level indicates low
the camera will not record video; replace batteries as soon as
possible.
When Battery level is very low
the camera will turn OFF after several seconds. You must replace
the batteries.
m
Turning camera OFF
Press the Power ON/OFF switch to turn off the camera.
Note:
Camera power will turn off automatically within 3 minutes after last function or operation has been
performed in order to save energy
8
m
Recording Video
Press the Shutter Button to start recording a video clip. Digits on the screen display the elapsed time (in
seconds, minutes) of recorded video clip.
Press the Shutter Button again to stop recording.
Rec
00:00:01
Note: When “Memory Full” message appears on the screen, camera will not record any further video
clips.
Transfer video to your computer (or delete if not required), or insert another SD card to continue
recording.
9
Playing back recorded v ideo clips
Press the Playback / Stop button to switch to the Playback mode and observe messages on the LCD screen.
Use Direction Buttons (Left / Right) to select desired video clip.
Press Playback / Stop Button to play back or review the video clip, press the same button when you wish to
stop video play back.
Play
Playback Mode
00:00:05
Please Select File
◄► 0016/0016
m
Deleting v ideo clips
Press the Playback / Stop Button to select Playback Mode. (e.g. Fig.1)
Press the Direction Button (Right or Left) and select the video clip you wish view or delete.
Press the Delete Button; LCD display will display message “Delete Video?” (e.g. Fig.2)
Press Delete Button to delete selected video clip. (e.g. Fig.3)
Note: To cancel deleting press any other button or set camera in idle mode.
10
Playback Mode
Delete Video?
Please Select File
◄► 0016/0016
Delete
Time Length: 00:00:16
Time Length: 00:00:16
Videos Num: 16
Videos Num: 16
Fig.1
Fig.2
Fig.3
Note: Camera will “beep” (when Delete Button is pressed) to indicate that no video clips are stored in
memory.
m
Connecting camera to the computer
Turn ON power of the camera.
Slide out the USB Connector fully from the camera.
Insert the USB connector into the computer USB socket, or use an extension USB Cord (provided).
11
Click and open My Computer, then select “Removable Disc” which represents your camera.
Click and open Removable Disc to see file containing recorded video clips.
Double click on selected video to play back the video on computer monitor.
You may copy, move, save video clips file to any desired location in your computer – the same as you would do
with any other file.
Formatting the memory card
You may not be able to record video clip if inserted card has been used with other devices; you need to first
format the SD card.
When your camera is connected to the computer, go to My Computer, and point to Removable Disc.
Right click on the Removable Disc and open small supporting window with several options; select Format option,
see below.
Please use the FAT format when you format the SD card in windows system to obtain synchronization rate for
read or write data with camera.
12
Please note that formatting card will erase all previous data; download any valuable data, file or video
BEFORE formatting the SD card.
m
TV output
You may connect camera to your TV and watch / playback recorded video clips.
Turn ON power of the camera.
Use supplied AV cable and connect TV Output (on your camera) to Video Input (yellow connector) and Audio
Input (red / white connector) on your TV. Set your TV to Video/ External mode.
Use the camera Playback / Stop Button to play the video on your TV.
13
• Installing application software
◎ Insert supplied CD into your computer CD-ROM drive.
Click
button and follow the installation steps to install the Video Impression
program.
For Windows Vista, the following windows will pop up when installing the software.
Please click
to continue.
14
15
Please restart your computer after installation.
16
•
Using VideoImpression 2 program
Double-click the
icon on the desktop, or open VideoImpression 2 from Start → Programs.
17
Import the photos in camera to Videoimpression:
1
Connect the camera to computer to operate in removable disk mode
2
Run the VideoImpression 2 software
3
Refer to following chart to import the photos in camera using Videoimpression
Detailed operation method of VideoImpression2 can be found in “Help” section of the program (as shown in the
following figure).
18
19
FAQ
Batteries are depleted. Please reinstall new batteries.
Camera can NOT be turned
ON.
Batteries are installed incorrectly. Make sure that
batteries are inserted carefully matching battery polarity
with plus / minus terminal markings.
Camera
does
can
not
The memory of the SD/MMC storage card is already
record any further video
full. Save and then delete some files or replace the
clips.
card. Make sure the SD card is not “locked”
Video clips seem dark.
Scene is too dark to record video. Use additional light
source to brighten the scene.
Please install the plug-in package DirectX9 and the
Videos can not be played
player Windows Media Player9 (or higher edition).
on the computer
DirectX9 is available in the provided CD or can be
downloaded from internet.
20
• Specification
Image sensor
Sensor 300K pixels
Function mode
Video recording, playback, removable disc
LCD screen
Video resolution
1.5” TFT LCD
320x240 pixels, up to 30fps
White balance
Auto
Exposure
Auto
File format
AVI
Storage media
External SD/MMC card, not supplied
USB interface
USB1.1 interface
Power source
2×AA alkaline batteries, not supplied
Dimensions
105mm×64mm×31mm
Weight
72g (without batteries)
21