1
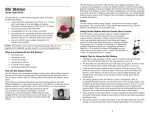
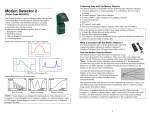
Data-Collection Software Vernier Drop Counter (Order Code VDC-BTD) The Vernier Drop Counter is used to perform accurate, automatic titrations. This digital sensor can be used in conjunction with a pH Sensor (or other sensor) to accurately record the volume of titrant added during a titration. What is included with the Vernier Drop Counter? Vernier Drop Counter Plastic reagent reservoir Plastic valve with a double stopcock fitting Vernier Microstirrer (a stirrer that fits onto the tip of your pH Sensor, and is used along with a magnetic stirrer) NOTE: Vernier products are designed for educational use. Our products are not designed nor recommended for any industrial, medical, or commercial processes such as life support, patient diagnosis, control of a manufacturing process, or industrial testing of any kind. Features of the Vernier Drop Counter The Vernier Drop Counter has many features that help simplify its use: Adjustable clamp, fits most laboratory ring stands and lattices Wide drop-detecting area Large sensor slot, fits most conventional stick-style sensors Smaller, adjustable slot for temperature sensors Accurate drop counting at rates up to 6 drops/second Red LED, near the detecting area, flashes to indicate a drop has been recorded This sensor can be used with an interface and the following data-collection software. Logger Pro This computer program is used with LabQuest 2, LabQuest, LabQuest Mini, and LabPro. Note: Use Logger Pro version 3.8.6 or newer. The most recent version of Logger Pro is available at www.vernier.com/downloads LabQuest App This program is used when LabQuest 2 or LabQuest is used as a standalone device. EasyData App This calculator application for the TI-83 Plus and TI-84 Plus can be used with CBL 2™ and LabPro. We recommend version 2.1 or newer, which can be downloaded from the Vernier web site, www.vernier.com/easy/easydata.html, and then transferred to the calculator. See the Vernier web site, www.vernier.com/calc/software/index.html for more information on the App and Program Transfer Guidebook. DataQuest™ Software for TI-Nspire™ This calculator application for the TI-Nspire can be used with the TI-Nspire Lab Cradle. LabVIEW National Instruments LabVIEW™ software is a graphical programming language sold by National Instruments. It is used with SensorDAQ and can be used with a number of other Vernier interfaces. See www.vernier.com/labview for more information. How the Vernier Drop Counter Works The Vernier Drop Counter has an optical-path slot that is 3.7 cm (1.45 in.) in length and 1.3 cm (0.5 in.) in width. When the infrared beam (centered at 890 nm) between the source and detector is blocked by a drop of titrant, a digital signal is sent to the data-collection interface. The drops are then converted to volume units (e.g., milliliters), in the data-collection program. A red LED indicator light flashes each time a drop of liquid passes through the Drop Counter. This sensor is equipped with circuitry that supports auto-ID. When used with LabQuest 2, LabQuest, LabQuest Mini, LabPro, SensorDAQ, TI-Nspire™ Lab Cradle, or CBL 2™, the data-collection software identifies the sensor and uses pre-defined parameters to configure an experiment appropriate to the recognized sensor. Collecting Data with the Drop Counter The Drop Counter can be used with the following interfaces to collect data. Vernier LabQuest 2 or original LabQuest as a standalone device or with a computer Vernier LabQuest Mini with a computer Vernier LabPro with a computer or TI graphing calculator Vernier SensorDAQ CBL 2™ TI-Nspire™ Lab Cradle 2 Using the Drop Counter 1. Assemble the equipment. (Note: The Vernier Stir Station, 100 mL beaker, and utility clamp are not included with the Vernier Drop Counter.) a. Place a 100 mL beaker on the center of the Stir Station, or a ring stand and magnetic stirrer. b. Remove the pH storage bottle from the pH Sensor. Insert the pH Sensor body through the larger round hole on the Vernier Drop Counter. c. Slip the Microstirrer (shown at right) onto the bottom of the pH Sensor. Slide the Vernier Drop Counter down the ring stand to a level such that the Microstirrer is very close to the bottom of the beaker. Tighten the turn screw of the Drop Counter to hold it firmly in place. d. Connect the pH Sensor to CH 1 of the interface, and connect the cable of the Vernier Drop Counter to the digital channel 1. e. Connect the spout and two 2-way valves to the plastic reagent reservoir. Note: There are two 2-way valves below the reagent reservoir. In these directions, we will use the bottom valve as an on-off valve (either completely open or completely shut). We will use the top valve as an adjustment valve, to adjust to a slow, consistent rate. 2. Make sure that both 2-way valves are in the closed position (horizontal). Add about 20 mL of titrant to the plastic reagent reservoir. For this example, we will use 0.1 M NaOH solution. 3. Before collecting data or calibrating the drops, adjust the flow rate of the two valves of the reagent reservoir. Temporarily, place another beaker below the spout of the reagent reservoir. First, completely open the bottom 2-way valve; then slowly open the top valve until a very slow drop rate is achieved—a rate of one drop every two seconds, or slower. Close the bottom valve. 4. Add the solution to be titrated to the 100 mL beaker. For this example, we will use about 5 mL of 0.1 M HCl solution. Add enough distilled water so the solution level covers the bulb of the pH Sensor (about 35–40 mL). If you are going to use a small magnetic stirring bar, less distilled water will be required (about 1–20 mL). Turn on the magnetic stirrer. Important: Minimizing volumes of solution titrated, and maximizing stirring efficiency will significantly improve your titration results. 5. Start the data-collection program. If you have older sensors that do not auto-ID, manually set up your sensors. See “Using Other Sensors with Drop Counter” below for additional information about manually setting up sensors. 3 6. There are three different ways to handle the reporting of volume. Use the stored calibration In this case, skip to Step 7, and begin collecting data. Manually enter a drops/mL ratio value If you have done a previous calibration with a particular apparatus, you can enter the drops/mL ratio. Perform an Automatic drops/mL calibration You can calibrate the reagent reservoir or a buret (see “Calibrate Drop Volume” below for specific directions). 7. Start data collection. Important: No data will be collected until the first drop falls through the Drop Counter’s slot. Carefully center the spout of the reagent reservoir over the slot in the Drop Counter. Completely open the lower 2-way valve (the upper valve should still be set to a slow drop rate). You will now see pH vs. volume data being plotted on a graph. When you are satisfied that the titration has proceeded past the equivalence point, shut off the lower 2-way valve of the reagent reservoir and stop the data collection. Optional Calibration Information To perform your own drops-per-mL calibration, follow these steps: a. Place a 10 mL graduated cylinder below the slot of the Drop Counter. b. Fill the reagent reservoir about ¾ full with the titrant solution. c. Choose to calibrate the Drop Counter in your data-collection program. d. Open the bottom 2-way (on-off) valve to begin releasing drops through the Drop Counter. e. Release drops until there are 9–10 mL of liquid in the graduated cylinder. f. Close the bottom valve to stop the drops. g. Type the exact volume, to the nearest 0.1 mL, of liquid in the graduated cylinder in the Volume (mL) box of the Calibrate drops dialog box. h. Choose to stop the calibration routine of your program. i. The number of drops/mL will be displayed. j. You can now continue with the titration (return to Step 7). 4 Helpful Tips for Using the Vernier Drop Counter Typical Titration Data Set a slow drop rate. For the best, most accurate data, we recommend setting the rate at 2 seconds per drop or slower. A slow rate provides enough time for each drop of titrant to be thoroughly mixed in the solution and the pH sensor (or other sensor) to respond. Minimize the volume of solution to be titrated. We recommend 5–10 mL of test solution. Larger volumes will take longer to mix and may require a very slow drop rate for best results. Use the Vernier Microstirrer. It helps deliver solution directly to the pH bulb, minimizing the response time. Also, you can run a magnetic stirrer at a very high speed and the Microstirrer will not form a visible vortex, preventing splashing. Add only as much distilled water to the solution being titrated as is necessary to cover the bulb of the pH Sensor (or other sensor). Use the plastic reagent reservoir that is supplied with the Drop Counter. The reagent reservoir provides a wider diameter and less change in the hydrostatic pressure per unit volume of titrant above the 2-way valve. Another advantage of using the plastic reagent reservoir is the pair of 2-way valves, using one for drop rate adjustment, and the other as an on-off valve. This eliminates the need to do a fine adjust during the initial readings, and also allows the user to set a consistent rate. If you want to allow for more thorough mixing when you are near the equivalence point, you can also manually release drops at a slower rate for that region of data. Using Other Sensors with Drop Counter The Vernier Drop Counter can be used with other Vernier sensors such as our Ion-Selective Electrodes, Conductivity Probe, or older Vernier pH Sensors that do not auto-ID. The Vernier Drop Counter can accommodate many third-party electrodes when used in conjunction with our Electrode Amplifier. You can also take simultaneous pH and temperature readings while using the Drop Counter. To use any of these other sensors, follow the instructions below. Computers (Logger Pro 3) 1. Set up the equipment and start Logger Pro 3. 2. Open the Drop Counter folder located in the Probes & Sensors folder. Choose the appropriate folder and proceed normally. If none of these file names fits your sensor, open the file named “Drop Counter-pH”. 3. Choose Set Up Sensors from the Experiment menu. 4. Click the picture of the pH Sensor in Channel 1 and select Choose Sensor from the drop-down menu. Choose the sensor you will be using. 5. Close the window and proceed with data collection. 5 6 LabQuest 2 or LabQuest as a Standalone Device (LabQuest App) Limited Warranty 1. Set up the equipment and launch the LabQuest App. 2. If your sensors do not auto-ID, choose Sensor Setup from the Sensors menu. 3. Open the drop down menu next to the Channel in which the sensor is connected. Select the sensor you are using from the list. 4. Select OK to continue and proceed with data collection. Vernier warrants this product to be free from defects in materials and workmanship for a period of five years from the date of shipment to the customer. This warranty does not cover damage to the product caused by abuse or improper use. TI Graphing Calculators EasyData 1. Set up the pH Sensor and Drop Counter. a. Turn on the calculator and connect it to the data-collection interface. b. Lower the Drop Counter onto a ring stand and connect it to the DIG/SONIC 1 port of the interface. c. Connect the other sensor to the appropriate channel or port of the interface. 2. Set up EasyData for data collection with a Drop Counter. a. Start the EasyData application, if it is not already running. b. Select from the Main screen, and then select New to reset the application. If the Drop Counter does not automatically identify, continue with the following steps. Otherwise, proceed to Step 3. c. Select , then select Other Sensors. d. Select DIG/SONIC1, then select . e. Select Drop Counter, then select . Repeat for the other sensor, if necessary. 3. Proceed with data collection. DataQuest 1. Set up the equipment and run DataQuest. 2. If your sensors do not auto-ID, choose Advanced Setup ► Configure Sensor from the Experiment menu. 3. Select the channel your sensor is connected to from the drop down list. 4. Select OK and proceed with data collection. Vernier Software & Technology 13979 S.W. Millikan Way Beaverton, OR 97005-2886 Toll Free (888) 837-6437 (503) 277-2299 FAX (503) 277-2440 [email protected] www.vernier.com Rev. 10/7/13 Logger Pro, Logger Lite, Vernier LabPro, Vernier LabQuest 2, Vernier LabQuest, Vernier LabQuest Mini, Go! Link, Vernier EasyLink and other marks shown are our trademarks or registered trademarks in the United States. TI-Npsire, CBL 2 and CBL, TI-GRAPH LINK, and TI Connect are trademarks of Texas Instruments. All other marks not owned by us that appear herein are the property of their respective owners, who may or may not be affiliated with, connected to, or sponsored by us. Printed on recycled paper. 7 8