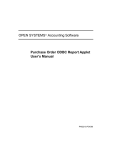
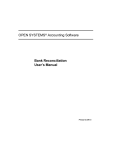
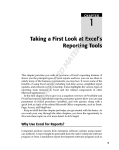
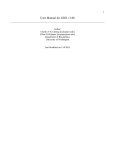
1
General Ledger User’s Manual
PN/2210.GLO60
OPEN SYSTEMS Accounting Software
General Ledger ODBC Report Applet
User’s Manual
PN/2210.GLO60
© 1998 Open Systems Holdings Corp. All rights reserved.
Document Number 2210.GLO600
No part of this manual may be reproduced by any means without the written permission of Open Systems Holdings Corp.
OPEN SYSTEMS is a registered trademark and OSAS, Resource Manager, Resource Manager for Windows, and Report
Writer are trademarks of Open Systems Holdings Corp. BBx is a trademark and PRO/5 and Visual PRO/5 are registered
trademarks of BASIS International Ltd. Novell, NetWare, and UNIXWare are registered trademarks of Novell, Inc.
Microsoft, Microsoft Access, Microsoft Windows, Microsoft Windows 95, Windows, MS-DOS and PivotTable are either
trademarks or registered trademarks of Microsoft Corporation. Crystal Reports for Windows is a trademark of Seagate
Software, Inc. TrueType is a registered trademark of Apple Computer, Inc.
Printed in U.S.A.
August 1998, Release 6.0
This document has been prepared to conform to the current release version of OPEN SYSTEMS Accounting Software.
Because of our extensive development efforts and our desire to further improve and enhance the software, inconsistencies
may exist between the software and the documentation in some instances. Call your customer support representative if you
encounter an inconsistency.
GL Report Applet
User’s Manual
Contents
Contents
Introduction
General Information
General Ledger Data Files
Introduction to PivotTables
Creating Microsoft Excel PivotTables
1-3
1-5
1-7
1-9
Installation
GL PivotTables
GL Budget Detail
GL Comparative Analysis
GL Forecast Detail
GL Journal
3-3
3-5
3-7
3-9
Index
GL Report Applet User’s Manual
iii
Introduction
1
GL Report Applet User’s Manual
General Information
General Ledger Data Files
Introduction to PivotTables
Creating Microsoft Excel PivotTables
GL Report Applet User’s Manual
1-3
1-5
1-7
1-9
1-1
General Information
The OPEN SYSTEMS Accounting Software (OSAS ) product line consists of
several accounting applications. Each application addresses a different phase of
your financial operations; together, they form a powerful accounting solution to
your daily and periodic accounting needs.
The ODBC Kit
The OSAS ODBC Kit provides users with a way to access their OSAS data through
any ODBC-compliant productivity package. The ODBC Kit includes an ODBC
driver for Windows, the data dictionaries for the OSAS data files, utilities for
maintaining the data dictionaries and some sample reports in Microsoft Excel,
Microsoft Access and Crystal Reports for Windows.
The Report Applets
Since the release of the ODBC Kit, OSAS users have been discovering the power
of these popular productivity packages to analyze their accounting data. The
Report Applets provide a series of pre-built Microsoft Excel PivotTables to help
you get the most from your accounting data.
These tables are provided for each of the major data files in each application. This
manual includes instructions for loading and using these spreadsheets to sort and
analyze your data. With a little practice, you can easily create similar PivotTables
or modify the ones provided to customize them to your exact needs.
GL Report Applet User’s Manual
1-3
General Ledger Data Files
You use the General Ledger (GL) system to consolidate information about your
business. You can use it alone, but it works best when interfaced with other
applications. You can set up accounts and produce statements that include debit and
credit information from the interfaced applications.
GL Data Files
The General Ledger Report Applet contains several spreadsheets that report
information from the OSAS General Ledger data files. The PivotTables in the GL
Report Applet are based on these data files:
GLMAxxx
The General Ledger Master file holds the general ledger accounts and their
balances. The balances are updated when you use the Post to Master function. Each
record stores the account number, description, beginning balances and balances for
each period for five types of balances: actual, budgeted, last-year, next-year, and
forecast. Data from the GL Master file is used in the GL Budget Detail
(GLBUDGET.XLS), GL Comparative Analysis (GLCOMP.XLS) and GL Forecast
Detail (GLFORCST.XLS) PivotTables.
GLJRxxx
The General Ledger Journal file stores general ledger transactions. You can enter
the transactions through General Ledger or through the other OSAS applications.
When you post, the information in this file is used to update the General Ledger
Master file. The data in this file is displayed on the GL Journal (GLJRNL.XLS)
PivotTable.
GL Report Applet User’s Manual
1-5
Introduction to PivotTables
A Microsoft Excel PivotTable is an interactive table that quickly summarizes, or
cross-tabulates, large amounts of data. You can rotate its rows and columns to see
different summaries of the source data, filter the data by displaying different pages,
or display the details for areas of interest.
A PivotTable contains fields, each of which summarizes multiple rows of
information from the source data. By dragging a field button to another part of the
PivotTable, you can view your data in different ways. For example, you can view
any field either down the rows or across the columns.
The PivotTable summarizes data by using a summary function, such as Sum,
Count, or Average. You can include subtotals and grand totals automatically, or use
your own formulas by adding calculated fields and items.
In the General Ledger Report Applet, several PivotTables are provided based on
the data in the OSAS data files. The PivotTable is updated through the ODBC
driver.
The next section includes a tutorial for setting up and modifying PivotTables in
Excel.
GL Report Applet User’s Manual
1-7
Creating Microsoft Excel PivotTables
Read this section for an exercise in creating a PivotTable using the ODBC Kit and
Microsoft Excel 97. If you require more information about Microsoft Excel,
consult the Microsoft Excel User’s Guide or Online Help.
Before you can create this report, complete these tasks:
•
Install and set up the ODBC Kit.
•
Install and set up the BASIS ODBC drivers.
•
Install Microsoft Excel 97 and Microsoft Query 97.
Note
This section includes instructions for using Microsoft Query with Microsoft
Excel. If necessary, you can install Microsoft Query from the Microsoft Office 97
media. You may also need to create a shortcut to Query manually.
GL Report Applet User’s Manual
1-9
Creating Microsoft Excel PivotTables
Introduction
Building a Query For a PivotTable
1. Start Microsoft Query.
2. Under the File menu, select New.
The Choose Data Source screen appears.
1-10
GL Report Applet User’s Manual
Introduction
Creating Microsoft Excel PivotTables
3. Select <New Data Source>, and click OK.
The Create New Data Source screen appears.
4. Enter a name you want to give the data source in field 1. You can use the same
source again.
5. Select the BASIS ODBC Driver in field 2.
6. Click Connect.
The BASIS ODBC Driver Data Source Setup box appears.
7. Enter the file path and name of the CONFIG.TPM file you set up from within
the OSAS ODBC software in the Database Configuration field, or select
Browse and locate the file.
GL Report Applet User’s Manual
1-11
Creating Microsoft Excel PivotTables
Introduction
If you have already built the shadow dictionary, click on the Advanced
button, and check the options for No Shadow Dictionary Consistency Check
and Fast Connect to improve performance. See online help for additional
information about the options that come with the Advanced button.
8. Click OK to connect to the data source.
You are returned to the Create New Data Source screen.
9. Select a table in field 4 if you want to select a default table source; otherwise,
leave field 4 blank and select any table when you develop the query. (If you
select a table, the list of tables always starts at that table; otherwise the list of
tables starts at the beginning of the list.)
The Choose Data Source box appears.
10. Select the data source you set up in the previous steps.
1-12
GL Report Applet User’s Manual
Introduction
Creating Microsoft Excel PivotTables
The Choose Columns screen appears.
11. Select a table you want to use in your Excel spreadsheet. For this example,
start with one table and add a second table later. Select the SOTH table, select
the columns for the spreadsheet, and click Next >.
The Filter Data box appears.
Use the Filter Data dialog box to select specific records from the table. In
most cases, you do not need to choose anything in the Filter Data dialog box.
For example, to filter out credit memos, select the field named
TRANSACTION_TYPE, select does not equal, and then enter 4 for a value.
(TRANSACTION_TYPE 4 is a credit memo.)
GL Report Applet User’s Manual
1-13
Creating Microsoft Excel PivotTables
Introduction
12. Click Next >.
The Sort Order box appears.
Use the Sort Order dialog box to select how the data is sorted. For example,
select a field in Sort by and check Ascending or Descending. Select more
fields and orders for hierarchical sorts. For now, don’t enter any sort fields.
13. Click Finish. You are returned to the Microsoft Query screen.
1-14
GL Report Applet User’s Manual
Introduction
Creating Microsoft Excel PivotTables
The data in your query is displayed. You can delete columns by selecting a
column and pressing the Delete key. You can also add a column by doubleclicking on the field name (in the SOTH file).
Note
NOTE: You can also select which fields you want in your query in step 6 above.
Instead of selecting the entire table, you can click the + box next to the table you
want and select the given fields from the list.
14. Select the following fields:
•
•
•
•
•
•
•
•
•
BATCH_ID
ORDER_NUMBER
TRANSACTION_TYPE
INVOICE_NUMBER
INVOICE_DATE
CUSTOMER_ID
SUBTOTAL
SALES_TAX
TOTAL_COST
15. Select Table from the main menu, and choose Add tables.
The Add Table dialog box appears.
GL Report Applet User’s Manual
1-15
Creating Microsoft Excel PivotTables
Introduction
16. A list of all the tables is displayed. Select the SOTD table, and click Close.
Joining Tables
17. Locate BATCH_ID in the SOTD and SOTH tables; then click and hold the
left mouse button down on BATCH_ID in the SOTH table
18. Drag the field over to the BATCH_ID field in the SOTD table and release the
mouse button.
A line appears between the two BATCH_ID fields, joining the two fields.
19. Follow steps 17 through 18 with the ORDER_NUMBER field.
NOTE: You may get the following message. For now, click Yes to ignore the
message and join the fields together.
20. Select the following fields from the SOTD table:
•
•
•
•
•
•
ENTRY_NUMBER
UNIT_COST_COMPNT
UNIT_PRICE
ORDERED_QTY
SHIPPED_QTY_SELL
BACKORDERED_QTY.
21. Select Save from the File menu to save the query.
1-16
GL Report Applet User’s Manual
Introduction
Creating Microsoft Excel PivotTables
Using the Query in Microsoft Excel
1. Start Excel and open a new worksheet.
2. Select the Data menu; then select PivotTable Report.
GL Report Applet User’s Manual
1-17
Creating Microsoft Excel PivotTables
Introduction
The PivotTable Wizard appears.
3. In step 1 of the Wizard, a list of options is displayed where you can choose
your data source to be used in your PivotTable. Select External Data Source,
and click Next >.
The PivotTable Wizard Step 2 dialog box appears.
4. In step 2 of the Wizard, click Get Data.
1-18
GL Report Applet User’s Manual
Introduction
Creating Microsoft Excel PivotTables
The Choose Data Source box from Microsoft Query appears.
5. Click the Queries tab, and select the query you saved under Microsoft Query.
The Choose Columns box under Query appears.
GL Report Applet User’s Manual
1-19
Creating Microsoft Excel PivotTables
Introduction
6. Click Next >. The query columns are displayed.
7. Click Next > to pass by Filter Data and Sort Order options.
The Query Wizard - Finish dialog box appears.
8. Select Return Data to Microsoft Excel, and click Finish.
You are returned to the PivotTable Wizard Step 2 dialog box.
9. Click Next >.
1-20
GL Report Applet User’s Manual
Introduction
Creating Microsoft Excel PivotTables
The PivotTable Wizard Step 3 dialog box appears.
The selected fields and four areas—Page, Row, Column, and Data—to put
fields are displayed. Drag and drop the fields to use in this report into the
respective areas. (To display the full field name, hold the cursor on the button,
and a tool tip displays the full field name.)
10. Drag and drop the following fields:
•
TRANSACTION_TYPE into Page
•
INVOICE_NUMBER, INVOICE_DATE, and ENTRY_NUM into Row
•
BATCH_ID into Column
•
ORDERED_QTY, SHIPPED_QTY_SELL, UNIT_COST_COMPNT
and UNIT_PRICE into Data.
GL Report Applet User’s Manual
1-21
Creating Microsoft Excel PivotTables
Introduction
The fields are displayed on the screen. Numeric fields dropped into the Data
section become summary fields.
11. Click Next >.
The PivotTable Wizard Step 4 dialog box appears.
12. The last step lets you create the PivotTable either in the existing worksheet or
in a different worksheet. Accept the given options and click Finish.
1-22
GL Report Applet User’s Manual
Introduction
Creating Microsoft Excel PivotTables
The PivotTable is displayed.
Highlight rows and columns to shift them around. To display only invoices,
change Transaction Type from All to 3 . Change it to 4 and credit memos are
displayed. Totals per type are also displayed.
Adding a Calculated Field
You can also add new fields, like profit, to the data area. To add profit to the data
area, follow these steps:
1. Highlight the last row in your data area, Sum of UNIT_PRICE, right-click,
and select Insert.
GL Report Applet User’s Manual
1-23
Creating Microsoft Excel PivotTables
Introduction
The Insert Calculated Field dialog box appears.
2. Enter the following information about the inserted field:
•
Enter Profit Dollars in the Name field.
•
Enter =(SHIPPED_QTY_SELL* UNIT_PRICE) ( SHIPPED_QTY_SELL* UNIT_COST_COMPNT) in the Formula
field.
3. Click Add.
1-24
GL Report Applet User’s Manual
Introduction
Creating Microsoft Excel PivotTables
4. Click OK.
The PivotTable is displayed with the Sum of Profit Dollars field.
GL Report Applet User’s Manual
1-25
Creating Microsoft Excel PivotTables
Introduction
Changing Field Properties
You can also change the properties of the fields in the table. For example, to
remove the subtotals from the INVOICE_DATE field:
1. Place your mouse cursor on the INVOICE_DATE column heading, right-click
and select Field... from the menu.
The PivotTable Field dialog box appears:
You can use the PivotTable Field dialog box to change the field name, its
orientation on the PivotTable, its display mask, subtotalling options and so on.
2. To shut of the subtotals, select None under Subtotals and click OK.
1-26
GL Report Applet User’s Manual
Introduction
Creating Microsoft Excel PivotTables
The PivotTable is redisplayed reflecting your changes:
GL Report Applet User’s Manual
1-27
Creating Microsoft Excel PivotTables
Introduction
Moving Fields and Sorting Data
You can dramatically change the appearance of the table by moving the fields
around. Fields appear on the PivotTable as gray blocks with the field name on
them. To move any field, simply drag it to a new destination.
You can change your PivotTable by moving fields in these ways:
Changing the Selection Fields
If you want to be able to limit the data in the table, you can make any field in the
table part of the selection criteria by moving it to the Page area.
For example, to select a specific batch for this table rather than displaying all the
batches across the table columns as they are in our sample table, follow these steps:
1. Position the mouse cursor over the BATCH_ID field, press and hold the left
mouse button.
As you drag the BATCH_ID field around the table, the cursor changes to
show where you can drop it. If the cursor looks like a block with an X over it,
you will remove the field from the table by dropping it there.
2. Drag the BATCH_ID field to the left of the TRANSACTION_TYPE field and
drop it there.
1-28
GL Report Applet User’s Manual
Introduction
Creating Microsoft Excel PivotTables
The change appears immediately:
GL Report Applet User’s Manual
1-29
Creating Microsoft Excel PivotTables
Introduction
Changing the Column Data
You can change the data that appears in the columns in the table by dragging the
fields or data block to the column heading area.
For example, to show the quantity, price, cost and profit information in our table
across the columns instead of in the data block as they now appear, drag the Data
field above the Total column heading and drop it there.
The change appears immediately:
1-30
GL Report Applet User’s Manual
Introduction
Creating Microsoft Excel PivotTables
Changing the Data Sort
To change the order in which the data is displayed, you can simply change the Row
fields around.
For example, our PivotTable is sorted by Invoice Number. To sort it by Invoice
Date instead, click and drag the INVOICE_DATE field to the left of the
INVOICE_NUMBER field.
The data is sorted by Invoice Date and is redisplayed:
You can also drag the selection fields from the Page area to the Row area to sort the
data by those fields.
GL Report Applet User’s Manual
1-31
Creating Microsoft Excel PivotTables
Introduction
More About Using PivotTables
Feel free to experiment with the orientation of the fields on this sample report. As
you become more familiar with the tables and how to use them, you can enjoy the
benefits of viewing your data in new and different ways.
For more information about PivotTables, see the Microsoft Excel documentation or
online help.
1-32
GL Report Applet User’s Manual
Installation
2
GL Report Applet User’s Manual
You can put the General Ledger ODBC Report Applet on your system by installing
it through Resource Manager. The installation process is described in this section.
The General Ledger Report Applet needs a minimum of 487 kilobytes (487KB) for
installation. You must also have installed General Ledger and the ODBC Kit on
your system, and the ODBC drivers on the Windows workstation.
Installing the Report Applet
Use the Install Application function on the Resource Manager Installation menu to
install the report applet. You must install the General Ledger application before you
install this report applet.
The installation will treat the report applet as though you are reinstalling General
Ledger. This is normal behavior.
When you install the report applet, Resource Manager copies the PivotTables to the
directory where your General Ledger programs are stored. You must have access to
this directory from your Windows machine to access the tables in Microsoft Excel.
The CONFIG.TPM File
When you install the ODBC Kit, you specify the location of the data files and data
dictionaries in a file called CONFIG.TPM. You can build this file using the ODBC
Kit functions. You can store this file in any directory, but the report applets expect
the file to be located in the C:\WINDOWS directory.
If your CONFIG.TPM file is stored in a different directory, you have three choices
for using the PivotTables supplied with the report applet:
GL Report Applet User’s Manual
2-1
Installation
1. Move the CONFIG.TPM file to the C:\WINDOWS directory and change any
Data Sources you have set up and any ODBC reports or spreadsheets you
have already set up to use the CONFIG.TPM in its new location.
2. Copy the CONFIG.TPM file to the C:\WINDOWS directory and leave a copy
in its current location. You do not need to change any Data Sources or reports
you have set up, but you need to make any changes in both files.
3. Change the PivotTables provided with this report applet to use the
CONFIG.TPM file in its current location. You can find instructions for doing
this below.
If you choose methods 1 or 2 above, you can load the PivotTables in Microsoft
Excel and begin using them with your data by using the Refresh Data command in
Excel.
If you choose option 3, follow the instructions below to point the PivotTable to the
correct CONFIG.TPM file.
Using a Different CONFIG.TPM
If you store your CONFIG.TPM file in a location other than the C:\WINDOWS
directory, you will see this message when you attempt to refresh the data in any
PivotTable included with this report applet:
2-2
GL Report Applet User’s Manual
Installation
When you click on OK, the BASIS ODBC Driver Data Source Setup dialog box
appears:
To specify the location of your CONFIG.TPM file, click Browse and select the file
from the location screen:
When you select the file, the final dialog appears:
When you click on OK, the PivotTable is updated with your accounting data.
GL Report Applet User’s Manual
2-3
Installation
Report Applet PivotTables
Use the descriptions of the PivotTables in chapter 3 to work with your accounting
data.
2-4
GL Report Applet User’s Manual
GL PivotTables
3
GL Report Applet User’s Manual
GL Budget Detail
GL Comparative Analysis
GL Forecast Detail
GL Journal
GL Report Applet User’s Manual
3-3
3-5
3-7
3-9
3-1
GL Budget Detail
File Name
GLBUDGET.XLS
Description
The GL Budget Detail PivotTable uses the data in the General Ledger Master
(GLMAx) file to display the budget amounts on file for each GL account.
The data is sorted by GL Account Number and Description, but you can easily
change the sort order.
You can use this PivotTable to review and analyze your budget figures, or use these
budget figures to perform what-if analyses or calculate financial ratios.
Active Fields
Default Field Type
Field
Page
(None)
Row
GL Account Number
Description
Column
Beginning Balance
Period 1-13 Amounts
GL Report Applet User’s Manual
3-3
GL Budget Detail
GL PivotTables
GL Budget Detail PivotTable Sample
3-4
GL Report Applet User’s Manual
GL Comparative Analysis
File Name
GLCOMP.XLS
Description
The GL Comparative Analysis PivotTable uses the data in the General Ledger
Master (GLMAx) file to display all of the balances stored for each period for each
GL account.
The data is displayed on 5 separate spreadsheets: actual, budget, last-year, forecast
and next-year. You can view the data on the sheets by selecting the appropriate tab
at the bottom of the current spreadsheet. The data is sorted by GL Account Number
and Description, but you can easily change the sort order.
You can use this PivotTable to review and analyze your account balances, compare
the balances of different types, perform what-if analyses and calculate financial
ratios.
Active Fields
Default Field Type
Field
Page
(None)
Row
GL Account Number
Description
Column
Actual, Budget, Last-Year, Forecast and Next-Year
Beginning and Period 1-13 Balances
GL Report Applet User’s Manual
3-5
GL Comparative Analysis
GL PivotTables
GL Comparative Analysis PivotTable Sample
3-6
GL Report Applet User’s Manual
GL Forecast Detail
File Name
GLFORCST.XLS
Description
The GL Forecast Detail PivotTable uses the data in the General Ledger Master
(GLMAx) file to display the forecast amounts on file for each GL account.
The data is sorted by GL Account Number and Description, but you can easily
change the sort order.
You can use this PivotTable to review and analyze your forecast figures, or use
these forecasted figures to perform what-if analyses or calculate financial ratios.
Active Fields
Default Field Type
Field
Page
(None)
Row
GL Account Number
Description
Column
Beginning Balance
Period 1-13 Amounts
GL Report Applet User’s Manual
3-7
GL Forecast Detail
GL PivotTables
GL Forecast Detail PivotTable Sample
3-8
GL Report Applet User’s Manual
GL Journal
File Name
GLJRNL.XLS
Description
The GL Journal PivotTable uses the data in the General Ledger Journal (GLJRx)
file to display the posted and unposted general ledger entries on file.
The report is sorted by Entry Number, but you can easily change the order of the
sort.
Active Fields
Default Field Type
Field
Page
GL Period
Row
Entry Number
Entry Date
GL Account Number
Description
Column
Credit Amount
Debit Amount
GL Report Applet User’s Manual
3-9
GL Journal
GL PivotTables
GL Journal PivotTable Sample
3-10
GL Report Applet User’s Manual
GL Report Applet
User’s Manual
IX
Index
Index
A
accessing data
Microsoft Excel
D
data files
in General Ledger Data Source
creating a new source Fast Connect No Shadow Dictionary Consistency Check
selecting a data source F
Fast Connect
Microsoft Query
G
General Ledger
data files description installing system requirements GL Budget Detail PivotTable
description files used in sample report screen GL Comparative Analysis PivotTable
description files used in screen GL Forecast Detail PivotTable
description GL Report Applet User’s Manual
files used in sample report screen GL Journal PivotTable
description files used in sample report screen GLBUDGET.XLS
data files description GLCOMP.XLS
data files description GLFORCST.XLS
data files description GLJRNL.XLS
data files description GLJRxxx
file description GLMAxxx
file description I
installing the applet
M
Microsoft Excel PivotTable layout PivotTable sample PivotTable wizard selecting a data source IX-1
Index
Microsoft Query adding tables building a query Filtering data joining tables Selecting a table Sorting data N
No Shadow Dictionary Consistency Check
Microsoft Query report applets
definition
S
spreadsheets
GL Budget Detail GL Comparative Analysis
GL Forecast Detail GL Journal system requirements O
ODBC Kit
definition OSAS
general information
P
PivotTable
adding a calculated field changing column data changing data sort changing field properties changing selection fields definition moving fields PivotTable Wizard
Choosing a data source getting the data laying out the table returning the data PivotTables
GL Budget Detail GL Comparative Analysis GL Forecast Detail GL Journal R
Report Applet
requirements for report applet
installation IX-2
GL Report Applet User’s Manual