1
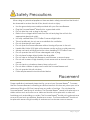
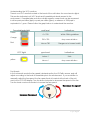
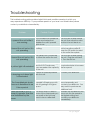
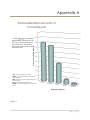
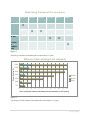
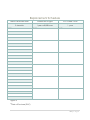
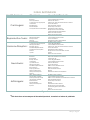
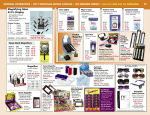
Innovative Labs, LLC Sonoma Breeze® SB-100 Instruction Manual TABLE OF CONTENTS 3. About the Sonoma Breeze ® 4. Safety Precautions 5. Specifications 6. Operating Instructions 9. Care and Maintenance 13. Troubleshooting 14. Warranty Information 17. Contact us 18. Appendix A 2|Page About the Sonoma Breeze® Thank you for purchasing the Sonoma Breeze®. Our uniquely designed air cleansing process will vastly improve the quality of the air you breathe and will transform the way you think about air purification. We are aware there are many ‘air filtration’ products on the market today, and we look forward to proving how valuable the Sonoma Breeze® can be in any indoor environment. Our technology has been tested by Lawrence Berkeley National Laboratory, National Aeronautics and Space Administration, Center for Disease Control, Federal Emergency Management Administration and The California Resource Board. The technology within the Sonoma Breeze® has been designed to target formaldehyde, a volatile organic compound used in many industries. However, it will also safely remove other air contaminants such as dust, fungi, pet dander, viruses, bacteria, and other harmful volatile organic compounds (VOCs). Furthermore, unlike other air filtration systems our technology removes air pollutants without emitting hazardous material such as ozone. Every space is different, and the speed that your Sonoma Breeze® cleanses the air is related to the size of the room and the rate that VOCs are emitted into the environment. Our distributors are able to calculate the Sonoma Breeze® best suited for your environment based on our research data tables. We have included these tables as well as health and safety information in Appendix A, located at the back of this manual. 3|Page Safety Precautions When using any electrical appliance there are basic safety precautions that should be observed to reduce the risk of fire, electric shock or injury. Use the grounded power cable provided with your Sonoma Breeze®. Plug the Sonoma Breeze® directly into a grounded outlet. Do not alter the cord or plug in any way. Refer to the voltage label located on the unit and plug the unit into the appropriate electrical outlet. Use only certified filters, PCO-Purifier Cores and light bulbs. This unit purifies air, do not use as a substitute for ventilation. Do not operate with wet hands. Do not open the Sonoma Breeze® without turning off power to the unit. Handle Ultra Violet (UV) lights with extreme caution as they contain mercury. Always use hand and eye protection when handling PCO-Purifier Cores. Do not operate the unit if it has a damaged cord or plug. Do not place foreign objects inside the air purifier. Do not wipe or cleanse with Benzene, paint thinners, or aerosol spray. Do not use in areas of high humidity or wet areas such as shower rooms or saunas. Do not stand on or balance heavy items on the unit. Do not allow children to play near or with the Sonoma Breeze® unit. Do not operate this unit outdoors. Follow all placement instructions listed below. Placement Proper ventilation is extremely important for you and your Sonoma Breeze®. To ensure that the Sonoma Breeze® is cleansing a sufficient amount of indoor air, place your unit a minimum of 8 inches (20.3 cm) away from any walls, or furniture. Do not place the Sonoma Breeze® near doors or windows. The Sonoma Breeze® needs to be placed on a stable surface such as the floor or a table and should not be placed in or near soft furnishings such as bedding or curtains. The Sonoma Breeze® should not be placed near sources of heat such as radiators, fireplaces or ovens. The Sonoma Breeze® should not be placed in areas of high humidity or wetness such as shower rooms or saunas. 4|Page Specifications Power Source 104-230 VAC 50/60 HZ Air Flow Rate 100 CFM Power Consumption 240 watts Standby Power 120 watts Dimensions 14 in x 24 in x 22 in Cord Length 72 inches (182 cm) Weight of unit 38 lb. (17.3 kg) Design and Function The Sonoma Breeze® SB-100 is comprised of one front loading Macro-Particulate Filter, two germicidal UV lamps, three PCO-Purifier Cores including one rear loading PCO micro-particulate filter, three Flow-Netic fans and an innovative formaldehyde sensor system. Our Macro-Particulate Filter coated with activated carbon absorbs dust, pollen, smoke and particles 3 µm or larger. The PCO-Purifier Cores are responsible for removing harmful VOCs such as formaldehyde. The dual- functioning germicidal UV-lamps destroy viruses and bacteria and simultaneously activate our PCO-Purifier Cores. The rear-loading PCO is the final ‘catch system’ destroying VOCs, removing large particles and killing biological contaminants. The ultra-quiet, long-lifespan FlowFront-loading filter UV blind Netic fans pull the polluted air Rear-loading PCO through our cleansing system delivering uncontaminated air on the other side. Additionally we have equipped our unit with blinds to prevent UV exposure while the unit is operating. Our system is equipped with four VOCallic sensors that detect humidity, temperature, a broad spectrum of volatile organic compounds as well as formaldehyde. 5|Page Operating Instructions Turning on the unit: To turn on your Sonoma Breeze® locate your power cable and insert the AC power plug into the wall socket and the power socket component into the plug located at the back of the unit. Press the power switch located next to the power socket. The Sonoma Breeze® will perform an initial self-test as indicated by a light sequence and an acoustic signal at the back of the unit and then the ready light will turn to green. Understanding the Light Display: Our engineers have designed a multi-functional display coded to tell you how effectively and efficiently your unit is operating. Two identical light displays can be located at the back and front of the unit. Follow the table below to understand the meaning of each light. Light Indications What you should do Green Ready Light Indicates the unit is functioning optimally Relax Yellow Warning Light Indicates the fan is not set in automatic mode Turn the fan knob counterclockwise until it clicks into automatic Blinking Blue Service Light Indicates the MacroParticulate Filter needs to be replaced Replace the MacroParticulate Filter Solid Blue Service Light Indicates the PCO-Purifier Cores and UV lights need to be replaced Replace both the PCOPurifier Cores and UVlamps Beeping red Alarm Light Indicates that there is an internal problem Contact your distributor immediately 6|Page Understanding the VOC monitors: There is one VOC monitor located at the back of the unit below the round service lights. This monitor indicates both VOC levels and formaldehyde levels present in the environment. Formaldehyde and other volatile organic compounds can be measured in either parts per billion (ppb) or parts per million (ppm), a measure of 1000 ppb is equivalent to 1 ppm. Please follow the graph below to understand the monitors. Formaldehyde Light Green Orange Red VOC Light yellow ppb level Indications 0 < 750 Within OSHA guidelines 700 < 750 May cause irritation Above 750 Dangerous to human health ppm level Indications below 1 Safe Above 1 May cause irritation Fan Speed: In the automatic mode the fan speed is determined by the VOCallic sensors, and will adjust according to the level of formaldehyde in the environment. If you would like to manually adjust the fan speed, the fan speed knob is located at the back of the unit next to the VOC LED display. Turn the knob clockwise to decrease the speed of the fan. Turn the knob counter-clockwise to increase the fan speed. Decrease fan speed Increase fan speed 7|Page Filter installation: If you have recently purchased your Sonoma Breeze® through an authorized distributor, it should come already equipped with all the necessary filters and lights. If you are the distributor you must install the filters and lights prior to shipment of the unit. Follow the steps below and refer to the photographs in this section. The unit should be switched off and unplugged prior to installing the Macro-Particulate Filters, PCO-Purifier Cores and light bulbs. Inserting the Macro-Particulate Filter 1. Pull the magnetically retained cover plate away from the unit. 2. Remove the Macro-Particulate Filter from the packaging and place between the clips with the activated carbon side facing you. 3. Gently press the filter into the space located on the inside of the face plate, between the clips. You should hear a clicking sound indicating that they have snapped into place. 4. Place the cover plate on the magnetic hinges. Inserting the PCO-Purifier Cores and UV Lamps 1. Loosen the screws on the side-access panel and open the side-access panel door by pulling the door towards you. 2. Remove the UV lamps from the packaging and carefully line up the metal pins with the sockets inside the unit. 3. Push the light bulb into the socket, when they have snapped into place you should hear a clicking sound. 4. Locate and remove the three PCO-Purifier Cores from the packaging and carefully slide into the marked metal guidelines. Make sure that the filter is securely in place and pushed all the way in. 5. Close the side-access panel door and turn screws clockwise to fasten. 8|Page Care and Maintenance In order to keep your Sonoma Breeze® functioning perfectly it is essential to change the filters and UV lights when they begin to deteriorate. We have created a schedule table located in Appendix A at the back of this user manual to help you keep track of your replacement schedule. How quickly each part deteriorates is dependent on the air pollution as well as the usage. We suggest that you replace the Macro-Particulate filter every 3-4 months, the Germicidal UV lights every 8,000 hours and the PCO-Purifier Cores once every year. Replacing the Filters To replace the Macro-Particulate Filter: 1. Turn off and unplug the Sonoma Breeze® unit. 2. Pull the magnetically retained front cover plate away from the unit in order to expose the Macro-Particulate Filter. 3. Rest the cover plate on a flat surface so that the filter is facing you. 4. The filter is held into place by two snaps. To remove the filter you must first locate the metal clips. 5. With your fingers on the inside edge of the clip press away from the filter and the filter should detach from the cover plate. 6. Remove the Macro-Particulate Filter and discard immediately. 7. Snap a new Macro-Particulate Filter onto the cover plate, ensuring that the activated carbon side is facing you. Press towards the cover plate until you hear a clicking noise. 8. Replace the magnetically retained cover plate on the magnetic hinges. Replacing the Germicidal UV lights To ensure that your unit is functioning properly and your warranty remains active we suggest that only authorized technicians replace the PCO-Purifier Cores and UV light bulbs. If you are a distributor please follow the steps below for replacing these parts. The PCO-Purifier Cores and the Germicidal UV lights should be replaced at the same time as they both have approximately the same lifespan, 1 year or 8,000 hours. 1. Locate the three PCO-Purifier Cores which have a distinct honeycomb structure. 2. Pull the PCO- Purifier Cores towards you and discard immediately. 3. Locate the two UV light bulbs located between the PCO-Purifier Cores. 9|Page 4. Locate the red button located at the bottom of the light bulb and push in. The light bulb should pop out of the light socket. 5. Gently unsnap the light from the metal prongs located at the top of the bulb and carefully remove light bulb from the interior of the unit. Note that these light bulbs contain mercury, so check with your local refuse agency and discard according to local regulations. 6. Remove a new UV light bulb from packaging and replace in light socket by gently snapping the bulb into place, ensuring that the metal pins align with the contact clamps in the socket. Replacing the PCO-Purifier Cores To simplify procedures we suggest you replace the PCO-Purifying Cores when you replace the Germicidal UV lamps. 1. After replacing the UV light bulbs you are ready to replace the PCO-Purifier Cores. 2. Remove the Purifier Cores from the fresh sealed bag. Note that each core is marked by PCO-A or PCO-B. 3. Slide the PCO-A cores in the spaces marked ‘A.’ Slide the PCO-B core in the space marked ‘B.’ 4. Close the side-access panel and screw the door into place. Calibrating the VOCallic Sensors Unlike most of the air filtration units available on the market today, the Sonoma Breeze® will automatically adjust the speed of the fan to suit the needs of the environment. In order to do this, our engineering team has developed a highly advanced ‘smelling’ system. When the VOCallic sensors detect changes in the environment, the speed of the fans will adjust automatically. With time and use the VOCallic sensors will drift, similar to the alignment of the tires on your car, hence the sensors will require calibrating. We have chosen to indicate this with a blinking blue service light. Calibrating the sensor is a quick process that should require very little down time for the unit and should only be performed by an authorized technician. If you believe that your system is not detecting changes in the air quality contact your distributor. If you are an authorized technician, please turn to appendix A and follow the instructions on calibrating your unit. 10 | P a g e Troubleshooting This troubleshooting guide provides helpful hints and possible scenarios in which you may experience difficulty. If your problem persists or your issue is not listed below please contact your distributor immediately. Problem I opened the unit while it was running I turned the unit on but it is not operating I turned the unit on but it is not operating Possible Cause For your safety we installed a safety mechanism that disables the unit if opened while in use. The power outlet is not working. The cable is not connected to either the wall or the unit. Solution Turn the unit off and unplug the unit, then plug the unit in and turn the unit back on. Turn off the unit and plug the unit into another outlet or press the GFI switch located on the outlet face plate. Turn the unit off and unplug the unit. Plug the unit back in. Turn the unit on. You adjusted the fan settings and the VOC levels may have exceeded the capacity of the unit. There is an internal problem with the unit. Turn the fan knob counterclockwise to increase the fan speed. The formaldehyde levels have not diminished in an 8 hour period The unit you purchased is not capable of keeping up with the off-gassing in the given space. I think the level of VOCs present is greater than the level indicated by the sensor The sensor may not detect some of the compounds you can smell or the unit may need to be re-calibrated. Increase the ventilation in the room temporarily and contact your distributor. You may need to purchase an additional unit. Increase the ventilation in the room, turn the fan speed to the highest setting and contact your distributor immediately. A yellow light is illuminated A beeping red alarm light is illuminated Contact your distributor. 11 | P a g e Warranty Innovative Labs, LLC SB-40, SB-100, SB-200 Limited Warranty Innovative Labs, LLC warrants that all models of the Sonoma Breeze® including the SB40, SB-100 and SB-200 will be free of defects in material and workmanship during normal operational use for one year from the date of purchase provided that the lights and filters are replaced at the appropriate time and the distributor calibrates the unit at least once a year. Innovative Labs, LLC offers a limited one year warranty on all parts, excluding those that require normal maintenance such as the Macro-Particulate Filters, PCO Purifier Cores, and Germicidal UV Lamps, which are covered under separate and different warranties. Damage caused by accident, misuse or abuse is not covered by this warranty including but not limited to incorrect voltage, obstruction of ventilation, fire, flood, damage caused by power surges resulting from power outages, or “acts of nature.” Improper care and unauthorized repair such as: not replacing Macro-Particulate Filter, PCO purifier cores and germicidal UV lamps at appropriate intervals or replacing any of the above improperly will void the warranty. Under no circumstances shall the liability of Innovative Labs, LLC exceed the purchase price of the respective unit. If a defect is found during normal operational use, Innovative Labs, LLC will, at its election, repair, replace, or make appropriate adjustment to the respective unit. Innovative Labs, LLC will not send a replacement unit while the unit is being repaired. Proof of purchase of the unit (original sales receipt) must be submitted at the time of repair, unless the unit was previously registered online or with a warranty card. Innovative Labs, LLC is not responsible for incidental or consequential costs other than those listed above. Slight changes in color, scratches and stains to the exterior of the unit over time, due to use, cleaning practices, water or atmospheric conditions, are not manufacturing defects but are indicative of normal wear and tear. If you believe that your unit requires repair, contact your distributor for service. If the distributor is unable to repair the unit, contact our repair facility by writing Attn: Customer Care Center, One Willowbrook Court Suite 150 Petaluma, CA 94954 or call 1888-706-0080 from within the USA or Canada. If you have any questions regarding this warranty or our product, we provide a troubleshooting page on our website at www.ino-labs.com. 12 | P a g e Some states and provinces do not allow limitations of how long an implied warranty lasts or the exclusion or limitation of such damages. If the unit was purchased in one of these locations these limitations and exclusions may not apply. This warranty gives the consumer specific legal rights. This warranty applies to the original consumer purchaser only, and excludes product damage due to product accident, abuse or misuse, whether performed by a contractor, service-company or the consumer. Innovative Labs, LLC PCO Purifier Core Limited Warranty Innovative labs, LLC warrants that all models of the PCO purifier cores will be free of defects in material and workmanship during normal commercial or residential use for one- year from the date of purchase. Damage caused by accident, misuse or abuse is not covered by this warranty including, but not limited to, incorrect placement, obstruction of ventilation, fire, flood, or “acts of nature.” Improper care and unauthorized repair will void this warranty If a defect is found in the PCO-Purifier Core during normal operational use, Innovative labs will replace or repair the PCO Purifier Core. Innovative Labs, LLC will not send a replacement while the PCO-Core is being repaired. Proof of purchase (original sales receipt) maybe requested at the time of repair. Innovative Labs, LLC is not responsible for incidental or consequential costs other than those listed above. Slight changes in color to the exterior of the PCO Purifier Core overtime due to use, water or atmospheric conditions, are not manufacturing defects but are indicative of normal wear and tear. Under no circumstances shall the liability of Innovative Labs, LLC exceed the purchase price of the respective unit. If you believe that you have a repair issue, contact your local distributor for service. If the distributor is unable to repair the PCO-Purifier Core contact our repair facility by writing Attn: Customer Care Center, One Willowbrook Court Suite 150 Petaluma, CA 94954 or call 1-888-706-0080 from within the USA or Canada. If you have any questions regarding this warranty or our PCO Purifier Core, we provide a troubleshooting page on our website at www.ino-labs.com. Some states and provinces do not allow limitations of how long an implied warranty lasts or the exclusion or limitation of such damages. If the unit was purchased in one of these locations, these limitations and exclusions may not apply. This warranty gives the consumer specific legal rights. This warranty applies to the original consumer purchaser only, and excludes product damage due to product accident, abuse or misuse, whether performed by a contractor, service-company or the consumer. Innovative Labs, LLC Germicidal UV Lamps 13 | P a g e Limited Warranty Innovative labs, LLC warrants that all models of the Germicidal UV lamps will be free of defects in material and workmanship during normal commercial use for one- year from the date of installation. Damage caused by accident, misuse or abuse is not covered by this warranty including, but not limited to, incorrect placement, incorrect voltage, fire, flood, damage caused by power surges from power outages or “acts of nature.” Improper care and unauthorized repair will void this warranty If a defect is found during normal operational use, Innovative labs, LLC will, at its election, repair, replace, or make appropriate adjustment to the respective unit. Innovative Labs, LLC will not send a replacement unit while the unit is being repaired or replaced. Proof of purchase (original sales receipt must be submitted at the time of repair. Innovative Labs, LLC is not responsible for incidental or consequential costs other than those listed above. Under no circumstances shall the liability of Innovative Labs, LLC exceed the purchase price of the respective unit. If you believe that you have a repair issue, contact your local distributor for service. If your distributor is unable to repair the lamp, contact our repair facility by writing Attn: Customer Care Center, One Willowbrook Court Suite 150 Petaluma, CA 94954 or call 1888-706-0080 from within the USA or Canada. If located outside of the USA or Canada call 001-888-706-0080. If you have any questions regarding this warranty or our product, we provide a troubleshooting page on our website at ino-labs.com. Some states and provinces do not allow limitations of how long an implied warranty lasts or the exclusion or limitation of such damages. If the unit was purchased in one of these locations, these limitations and exclusions may not apply. This warranty gives the consumer specific legal rights. This warranty applies to the original consumer purchaser only, and excludes product damage due to product accident, abuse or misuse, whether performed by a contractor, service-company or the consumer. 14 | P a g e Contact Us If you have any questions or concerns after reading this manual or contacting your distributor, please do not hesitate to contact our customer service department by calling toll free 1 (888) 706-0080. If you lose or damage your copy of this user manual, you can locate an electronic copy online at our website www.ino-labs.com. If you would prefer to contact us via the web please send your inquiries or comments to one of the following team members who would be happy to assist you during our normal business hours. Monday-Friday 8 am- 5 pm Standard Pacific Time Customer Service [email protected] Technical Support [email protected] 15 | P a g e Appendix A Permissable Exposure Limits of Formaldehyde 1 max concentration (ppm) * OSHA enforces a maximum 0.9 permissable exposure limit of 0.75 ppm during a normal 8 0.8 hour work day. All values in this graph are based on an 8 0.7 hour work day. 0.6 0.5 0.4 0.3 0.2 CDC- Center for Disease Control 0.1 OSHA- Occupational safety and Health Administration HUD- Department of Housing and Urban 0 Development WHO- World Health Organization NIOSH- National Institute of Occupational Safety CDC OSHA* HUD WHO NIOSH Regulatory Agency Figure 1 16 | P a g e Determining the best unit for your space 100 sq. ft. SB-40 200 sq. ft. 400 sq. ft. x x 600 sq. ft. 800 sq. ft. x x 1000 + x SB-100 SB-200 Custom or multiple units x Figure 2 *Assuming a ambient formaldehyde concentration of 1 ppm Efficiency Table: Meeting OSHA standards 1200 Room Size (sq ft) 1000 800 600 SB-200 400 SB-100 200 SB-40 100 0 1 2 3 4 5 6 7 8 9 10 11 12 Time required to reduce formaldehyde concentration by 50% (Hours) Figure 3 *Assuming an initial ambient formaldehyde concentration of 1 ppm 17 | P a g e Replacement Schedule Macro-Particulate Filter Germicidal UV lights PCO-Purifier Cores 3-4 months 1 year or 8,000 hours 1 year DOP* DOP* DOP* Figure 4 *Date of Purchase (DOP) 18 | P a g e Indoor Air Pollutants Health Concern Carcinogens: Reproductive Toxins: Hormone Disruptors: Neurotoxins: Asthmagens: Chemical Household Products Acetaldehyde Benzene 2-butoxyethanol 1-chloro-2,3-epoxypropane Chloroform Ethylbenzene Formaldehyde N-ethyl-N-nitroso-ethanamine Citrus-scrub Comet disinfectant powder Febreze air effects Glance HC Glass and Multi-surface cleaner Goof Off cleaner Pine-Sol brand cleaner Pioneer Super cleaner Shineline Seal Floor Sealer Simple Green Concentrated Cleaner/Degreaser/Deadorizer Waxie 21 Glass Cleaner Waxie Green Floor Finish Alpha HP Multi-Surface Cleaner Comet Disinfectant Powder Goof off Cleaner Shineline Seal Floor Sealer/Finish 3M Brand Glass Cleaner Clorox Regular Bleach Comet Disinfectant Powder Glance HC Glass and Multi-Surface Cleaner Goof Off Cleaner Shineline Seal Floor Sealer Simple Green Concentrated Cleaner Twister Waxie 21 Glass Cleaner 3M Brand Bathroom Cleaner Alpha HP Multi-Surface Cleaner Citrus-Scrub 90 Clorox Regular Bleach Comet Disinfectant Powder Febreze Air Effects Goof Off Cleaner NABC Non-acid Disinfectant Bathroom Cleaner Pine-Sol Brand Cleaner Ripsaw ShineLine Seal Floor Sealer/Finish Benzene Dibutyl phthalate Ethoxyethanol Toluene Benzophenone 1-chloro-2,3-epoxypropane Dibutyl phthalate Ethylene glycol N,N-dimethylformamide Nonlyphenol ethoxylate Phenol styrene Acetone Benzene Benzonitrile Benzyl alcohol Chloroform Cyclohexanone Dibutyl phthalate N,N-Dimethylformamide Ethyl acetate Isopropyl alcohol Methyl ethyl ketone Methyl methacrylate phenol Alkyl dimethyl Benzyl Ammonium Chloride Didecyl dimethyl benzyl ammonium chloride Ethanolamine Formaldehyde Methyl methacrylate Styrene 3M Brand Glass Cleaner Comet Disinfectant Powder NABC Non-acid Disinfectant Bathroom Cleaner Pine-Sol Brand Cleaner Pioneer Super cleaner Ripsaw Shineline Seal Floor Sealer Simple Green Concentrated cleaner/degreaser/deodorizer Virex II Waxie Green Floor Finish Figure 5 *This chart does not encompass all household products, chemicals or indoor air pollutants. 19 | P a g e Calibration instructions 1. 2. 3. 4. Close all windows and doors. Turn on the Sonoma Breeze. Turn on the FP-30. Open a paper tape cap, and place the paper tape cap face down in the chamber. 5. Scroll down using the up and down buttons to find the 30 minute sample entitled test b. 6. Select test b and select start, place the monitor on top of the unit. 7. When the timer goes off, indicated by a beeping sound, record the number on the right hand corner of the screen. Note that if the number is greater or equal to 1 ppm you will need to move the Sonoma Breeze ® to a different space and run the formaldehyde test once more. 8. If the formaldehyde monitor located on the Sonoma Breeze ® indicates a range that does not coincide with the number furnished by the FP-30, and, all other parts have been well maintained you can reasonably assume the problem is due to a sensor drift. 9. Locate the pin supplied with the distributors’ packet. 10. Insert the pin into the hole located on the side of the unit. 11. Adjust the small knob on the side of the unit until the range indicated on the formaldehyde light display agrees with the reading recorded on the FP-30. 12. Insert the pin once more into the small hole located on the side of the unit. Note that this will reset the fan knob. 13. Restart the Sonoma Breeze® 14. The LED light display will illuminate and run a self-test sequence. 15. When the self-test sequence is complete the green ready button will illuminate. 16. The LED display should indicate that the VOC and formaldehyde levels match the levels indicated by your testing device. 17. If you experience problems in this process contact the manufacturer immediately. 20 | P a g e