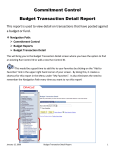
1
District Wide Applications eProcurement 8.9 SDUSD PeopleSoft Training – Financials January 2010 1 Table of Contents CHAPTER 1 – EPROCUREMENT OVERVIEW ............................................. 5 eProcurement Overview........................................................................................................... 5 Direct Connect ..................................................................................................................................... 5 Your Security!....................................................................................................................................... 6 Not Using the “Back” Button .............................................................................................................. 6 Step by Step Exercise: Login to PeopleSoft Financials ....................................................................... 6 How Does eProcurement Work? ............................................................................................. 9 Request Lifespan– Overview ................................................................................................. 10 CHAPTER 2 –ORDER PRESET ITEMS & DIRECT CONNECT ................ 12 Requisitions Overview ............................................................................................................ 12 Tips To Help You Get Your Orders Faster: ....................................................................................... 12 Status Notification .............................................................................................................................. 12 Chartfields ............................................................................................................................... 13 Budget Inquiry ........................................................................................................................ 15 Step by Step Exercise: Budget Inquiry ............................................................................................... 15 Creating Requisitions – Your Options.................................................................................. 17 Catalog: Goods or Services .................................................................................................... 20 Option 1 – Basic Search ..................................................................................................................... 21 Option 2 – Advanced Search .............................................................................................................. 22 Option 3 – Browse Catalogs .............................................................................................................. 23 Adding Items....................................................................................................................................... 25 Compare Selected Items Side-by-Side ................................................................................................ 26 Favorites ............................................................................................................................................ 27 Step by Step Exercise: Order a Preset Catalog Item ......................................................................... 27 Shipping ............................................................................................................................................. 32 Important Notes about Requisition Chartfields/Budgets ................................................... 33 Splitting Costs between Budgets ........................................................................................................ 34 SpeedChart .............................................................................................................................. 37 Step by Step: How to Use SpeedChart ............................................................................................... 37 Download Chartfield String to Excel .................................................................................... 38 Step by Step: Download Chartfield String to Excel ........................................................................... 39 Split Payment between Two or More Budgets ..................................................................... 40 Step by Step: Split Payment Single Line Item .................................................................................... 41 Step by Step: Split Payment Whole Requisition (all line items) ......................................................... 43 Step by Step: Cost Distribution – Amount or Quantity ...................................................................... 47 Templates – A Great Shortcut ............................................................................................... 50 Use Preset District Templates ............................................................................................................ 50 Create Your Own Template ................................................................................................................ 51 Naming Your Requisition ................................................................................................................... 52 Requester’s Worklist – Requisition Status Notification ..................................................... 52 Step by Step Exercise: View Your Worklist & Requisitions ............................................................... 53 Direct Connect – How to Use It ............................................................................................. 54 Step by Step Exercise: Order Items with Direct Connect .................................................................. 55 CHAPTER 3 –SPECIAL REQUESTS & ASSET ITEMS ............................... 60 2 “Special Request” Goods or Services ................................................................................... 60 Asset Management – What is an Asset? ............................................................................... 61 Categories for Special Request Items ................................................................................... 62 How to Find the Right Special Request Item Categories ................................................................... 63 - Look Up Categories by Their Names............................................................................................... 63 - Look Up Categories by Their Account Numbers ............................................................................. 66 Get Forms through the District Web Site........................................................................................... 68 Order a Special Request Item ............................................................................................... 69 Step by Step Exercise: Order Special Request Goods Item ............................................................... 69 How to Attach a Document to a Requisition ...................................................................................... 74 Step by Step Exercise: Order Special Request Asset Item ................................................................. 76 Suggest Vendor .................................................................................................................................. 84 Service Orders – Hiring a Contractor .................................................................................. 85 Step by Step Exercise: Special Request Service – Fixed Cost ........................................................... 85 Step by Step Exercise: Special Request Service – Variable Cost....................................................... 90 Step by Step Exercise: Special Request Service – Time and Materials ............................................. 92 Step by Step: View Line Item Buyer Details ...................................................................................... 96 Additional Features ................................................................................................................ 98 Step by Step: Add a Comment for a Line Item ................................................................................... 98 Step by Step: Display Catalog Search Fields – Yes or No................................................................. 99 Step by Step: Change # of Rows in Catalog Results Display........................................................... 101 CHAPTER 4 – ABOUT BUDGETS & MANAGING REQUISITIONS...... 103 Lot Orders ............................................................................................................................. 103 Step by Step Exercise: Create a Lot Order for Books...................................................................... 103 Step by Step Exercise: Create a Lot Order for Things Other than Books ....................................... 105 Budget Checking................................................................................................................... 108 Budget Checking Status says ERROR - What to do? ....................................................... 110 Step by Step Exercise: Fix a Budget Error ...................................................................................... 111 Enter Budget Codes Once for All Items on a Requisition ................................................ 113 Step by Step Exercise: Enter Budget Codes Once for Entire Requisition........................................ 113 How to Change the Account Code Number on a Requisition .......................................... 116 Track a Requisition with the Request Lifespan ................................................................ 119 Manage Your Requisitions .................................................................................................. 120 Editing Requisitions, Add or Delete Items ......................................................................... 123 Cancel a Requisition ........................................................................................................................ 124 Step by Step Exercise: Cancel a Requisition ................................................................................... 124 Re-Open a Canceled Requisition ..................................................................................................... 126 Step by Step Exercise: Re-open a Canceled Requisition ................................................................. 126 Approval Status ................................................................................................................................ 126 Step by Step Exercise: Check Approval Status ................................................................................ 127 eProcurement Report – Keeping Track of Your Funds ................................................... 127 Step by Step: All ePro Requisitions for Your School/Dept. ............................................................. 128 CHAPTER 5 – VENDORS & ITEMS ............................................................. 132 Look for a Vendor ................................................................................................................ 132 Step by Step Exercise: Find a Vendor.............................................................................................. 132 Look for Items ...................................................................................................................... 134 CHAPTER 6 – APPROVE REQUISITIONS ................................................. 136 3 What an Approver Needs to Know ..................................................................................... 136 Step by Step Exercise: Approve a Requisition.................................................................................. 137 Step by Step Exercise: Deny Single Items and Approve the Rest of a Requisition ........................... 140 Can’t Find a Requisition on Your Approver Worklist?.................................................................... 146 Step by Step Exercise: View Your Manage Approvals Page ............................................................ 146 CHAPTER 7 – MAINTENANCE & SUPPORT ............................................. 148 Clear (Delete) Cache Files .................................................................................................... 148 Step by Step Exercise: Clear/Delete Cache Files ............................................................................ 148 How to Get Help ................................................................................................................... 150 INDEX .................................................................................................................. 152 4 Chapter 1 – eProcurement Overview eProcurement Overview Oracle’s PeopleSoft eProcurement (“ePro”) is an online software application (also called “software program”) used by the San Diego Unified School District to purchase goods and services, and to manage the procurement of those goods and services. Online software is accessed on a computer via the Internet. You must have a San Diego Unified School District Employee Identification number and a personal DWA (District Wide Applications) password set up before you can login ePro to use it. The fact that ePro is an online software application means that you can login and use it from any computer, anywhere, as long as that computer meets the minimum requirements: It must have Microsoft Internet Explorer version 6.0 or higher, and it must have fast, reliable Internet access (not dial-up). ePro helps us manage organizational spending through the efficient, cost-effective procurement of goods and services. ePro helps us to control spending and lower acquisition costs thanks to agreements for prearranged prices that have been set by the SDUSD district Buyers and the chosen Vendors. By the same token, ePro lets us improve supplier relationships by reducing returns and customer support costs. ePro utilizes an automated process that lets us create requisitions and budget-check them (pre-encumber the funds) before being sent to an approver for processing. We have the ability to manage our own requisitions, and easily track order progress via the ePro software. Direct Connect We can order things from common district vendors (such as Office Depot, Waxie, Lakeshore Learning Materials, and Grainger) right from within the ePro application itself. This ePro feature is called Direct Connect. Using Direct Connect lets you order from your favorite vendors easily, while still keeping the same discounts, and still receiving shipments very quickly (usually within a couple of days). This manual has a section that explains in detail how to use Direct Connect. ePro Requesters and Approvers A Requester is any district employee who has access in the computer to place orders by creating and submitting ePro requisitions. Most employees fall under this category. A Requester can create, edit, cancel, reopen, track, and generally manage only his/her own requisitions; Requesters cannot see anyone else’s requisitions. Requesters do not have access in the computer to approve requisitions. An Approver is any district employee who is a site administrator (usually a principal, supervisor, program manager, or other kind of Department Head). Approvers can view, track, approve, or deny requisitions. Approvers do not have access in the computer to create and submit requisitions. All they can really do to a requisition is approve or deny it. 5 Chapter 1 Your Security! When you login to eProcurement, the computer system recognizes who you are by your Employee ID number, and it recognizes which access/permissions you have. These are very powerful tools that protect your personal information. Don’t ever share your password with anyone. Unfortunately, a common practice among district employees is for site administrators to provide their ID numbers and personal passwords to other staff members, so that the staff member can login “as the site administrator” and perform tasks (such as approving requisitions) on behalf of the administrator. This is against district policy and can compromise your own security. NOTE: If someone else has your Employee ID number AND your personal DWA password, that person could do a lot of damage. That person could use the information to find out how much money you earn, change your personal information such as benefits and deductions, and even have your paycheck be automatically deposited into their own bank account. NEVER give anyone your password! Not Using the “Back” Button When we use the Internet, many of us have the habit of clicking the Back button at the top of the browser window to return to the previous screen or page. When you work in any PeopleSoft application it is highly recommended that you never use the Back button. When you click the Back button in PeopleSoft it takes you back to the previous screen, but only an old version of that screen, if it is even still available. It does not “refresh” your screen so that the previous screen would be updated. In fact, clicking the Back button can easily make you lose your work by kicking you completely out of the application, without saving any work you did. Any time you wish to return to a previous screen or page, instead of clicking the Back button, you need to click a button or hyperlink that will take you back correctly. Such buttons and links in PeopleSoft are usually located near the bottom of the screen, and are self-explanatory. Step by Step Exercise: Login to PeopleSoft Financials The following Steps show how to login and access PeopleSoft eProcurement. Step 1 Launch Microsoft Internet Explorer from your PC computer’s desktop screen or Start menu. If you use a Macintosh, you must also use Internet Explorer as your browser. Step 2 Go to the main PeopleSoft login page at this website address: https\\:dwa.sandi.net and sign in with your Employee ID number and your personal DWA password. (If you don’t have a DWA password yet, contact the school district’s I.T. Help Desk at (619) 725-7500). 6 Chapter 1 Step 3 Click the PeopleSoft link. Then click the link entitled: Financials Supply Chain: A separate window will open up, containing the PeopleSoft menu choices on the left side: 7 Chapter 1 Step 4 Take a moment to return to the first window (the one where you clicked Financials Supply Chain) and close that window completely. Doing this will extend the amount of time the system lets you work until it automatically logs you out of the system. Step 5 In the vertical menu on the left side, click the link entitled: eProcurement. This opens a submenu list to choose from. There, you can navigate where you like within the ePro environment: To begin, let’s take a look at the eProcurement Home Page. Through this page you can navigate to any needed area within ePro: You can do several tasks from the eProcurement Home Page: 1. Select the Create Requisition link to create a new requisition. 2. Select the Manage Requisitions link to review existing requisitions, edit, view their status, cancel, and generally track your orders. 3. Select the My Profile link to modify important information about yourself and your personal preferences. The illustration below shows a typical ePro requisition, with a single item (absence excuses) ordered: 8 Chapter 1 Seen across the top of the page are three major tabs, or areas, of a requisition. The area displayed in the illustration above is #3, the Review and Submit tab (circled): 1. Define Requisition 2. Add Items and Services 3. Review and Submit We will explore these areas in great detail later on in this manual. How Does eProcurement Work? ePro follows several steps to complete a successful requisition. The illustration below (see next page) shows the steps a requisition takes from start to finish. It begins with a Requester creating and submitting an ePro requisition, and it ends with the Requester receiving the order: 9 Chapter 1 BEGIN Requester Creates requisition, checks budgets, submits requisition. Approver Reviews requisition, and approves it. Inventory YES ePro Catalog Item? Requisition goes to Inventory, request sent to Supply Center. NO Vendor Purchasing Receives Purchase Order, fills order, ships to district Supply Center warehouse. Special Request orders: Requisition generates Purchase Order, then sent to Vendor. Direct Connect? NO YES END Supply Center Warehouse Requester Receives Receives request or shipment, records on computer, ships order to Requester. Items are received at Requester’s site. There are five basic steps you must take to create and submit any requisition successfully: 1. Budget Inquiry (verify available funds). 2. Create Requisition. 3. Edit as Needed (shipping & budget info.). 4. Budget-Check (pre-encumber the funds). 5. Save and Submit. Request Lifespan– Overview Every requisition has its own Request Lifespan. The Request Lifespan is a graphic representation that allows you to track your orders: 10 Chapter 1 In this example, the Requisition icon (the first one in the Lifespan line, on the left-hand side) is underlined because this particular requisition was submitted. The Approvals icon is also underlined because the requisition has also been approved. The rest of the icons in the Lifespan line are not underlined, because the requisition hasn’t reached those steps yet...it was just approved a few moments ago. (On your computer screen, the icons for steps that have been completed are lit up and brightly colored. The steps that haven’t been done yet remain grayedout). By viewing the Lifespan page of the requisition, you can quickly tell what has happened to your order, and what will happen next. As long as you have Internet access from any computer, you can login to PeopleSoft eProcurement and navigate to the Request Lifespan for any of your Requisitions to find out what is happening to them. 11 Chapter 1 Chapter 2 –Order Preset Items & Direct Connect Requisitions Overview Many goods and services requiring a purchase order (P.O.) can be obtained through eProcurement. A budget-check (pre-encumbering money for the requisition) must be successfully completed before submitting the requisition to the Approver. This ensures that funds are currently available to pay for the order. Upon successful budget-check, the needed funds are electronically attached to (saved for) that one requisition, so nothing else can use that money. When the time comes to pay the bill, the money is in place. When ordering “Catalog” items (goods or services already preset and listed in our online district ePro Catalogs) the ePro system will attempt to find the item from district Inventory. If the item or service is not available from Inventory, a purchase order (generated by our Purchasing Department) is placed with a vendor. If a purchase order is created it, too, is budget-checked before being sent to the vendor. Therefore, “Catalog” items include things that may or may not be currently in stock. Tips To Help You Get Your Orders Faster: TIP – In Special Request orders, use vendors already designated by the district and listed in eProcurement (especially use the vendors in Direct Connect...they are the fastest!). It can mean the difference between getting your order in days (sometimes in just hours!)...or, if you suggest a vendor not listed with us, getting your order in weeks or months. TIP – Order like items/vendors on the same requisition. (Not necessary, but it will move the requisition along faster). While it’s true that you can order up to 100 separate items with differing vendors on the same requisition, doing so will slow down the processing of that requisition. TIP – Place Catalog items and Special Request items on separate ePro Requisitions. Special Request items (things you want to order that are not found in the Catalogs) take longer to process than Catalog items. TIP – Whenever possible, limit the line items on a requisition to 50 or less. This makes it easier for Accounts Payable to match the purchase order to an invoice. Status Notification Email notifications and Worklists Whenever an ePro requisition is either approved or denied, the requester (the person who submitted it) should receive an automatic email notification about it. The email will tell the requester whether the requisition was approved or denied, as well as when the Approver made the decision. 12 Chapter 2 In addition to the email notification, Requesters have their own Worklists, too. They are similar to the Worklist an Approver uses to view and approve or deny requisitions. The Requester Worklist is mainly used to display the reasons why a requisition was denied, which the Approver entered at the time of denial. Details on how to view the Requester Worklist are included further on in this manual. Chartfields Before you can understand how to use your budgets when placing eProcurement orders, you need to understand a little about the role Chartfields play. Chartfield Definition: A chartfield is a textbox on a computer screen within the PeopleSoft Financials software, designed to be populated with numerals (budget numbers). A chartfield is a component of a chartfield string. Here is an example illustration of a typical chartfield: Chartfield String Definition: A chartfield string is a numeric sentence comprised of several chartfields “strung together” in a row. One chartfield string names a single budget. Here is an example illustration of what might be a typical chartfield string: In the San Diego Unified School District, we follow the Standardized Account Code Structure (SACS). SACS is “a comprehensive system of accounting for and reporting school district revenues and expenditures”.1 The chartfields we use are determined by SACS, which all California public schools follow. Here is a list of the chartfields we use: Structure of the Account Codes 1 Examples: Department 4 digits 0354 Location Resource 5 digits 00010 Unrestricted Budget Reference 2 digits 00 End of funding Account 4 digits 1107 Teacher Program 4 digits 1000 Instruction Class 4 digits 1110 Reg Ed K12 Fund 5 digits 01000 General Fund Extended 4 digits 0000 General Example of chartfield budget numbers in a common chartfield string. Quoted definition of SACS taken from www.edsource.org 13 Chapter 2 Following are definitions of the individual chartfields, referred to as Chart of Accounts: Department: Defines where the financial activity is occurring o Example: 0003 = Adams Elementary School Resource: Defines source of funding o Example: 00000 = Unrestricted Budget Reference: Defines the year in which the funding will end (if other than June 30) and if funding must be tracked for several years o Example: 10 = 2010 Account: Defines the type of expense o Example: 4301 = Supplies Program: Defines the activities or services performed to accomplish a set of objectives or goal o Example: 2700 = School Administration, such as office staff Class: Defines the instructional setting or the group of students who are receiving instructional services o Example: 1110 = Regular Education K-12 Fund: Defines the highest level of financial monitoring for the district o Example: 01000 = General Fund Extended: Defines the detailed activity at the district level only o Example: 0311 = ROP Business Computer Here is an example illustration of a typical chartfield string used to purchase instructional supplies for a school: Every eProcurement requisition is made up of individual line items (goods or services we wish to purchase). Each individual line item must have a budget (chartfield string) associated with it, so that the funds to pay for that item will be available at the appropriate time. When an SDUSD employee creates an ePro requisition, the employee must enter the chartfield strings and verify the budget status before submitting the requisition. How to do these things are explained and illustrated in detail in this training manual. 14 Chapter 2 Budget Inquiry PeopleSoft software allows us to review real-time budget information online. One very useful method is called Budget Inquiry. This allows you to view current budget activity for one or more budget accounts. You can see how much money was allocated into a given budget, how much has already been spent, and how much is currently available to use at that moment. It is highly advisable for a Requester to complete this simple, quick procedure to make sure there is enough money to spend, before creating and submitting a requisition. If there isn’t enough money in the budget the Requester chooses to use on a requisition, then the requisition will not pass the Budget-Check process, and the Requester will not be able to submit that order. Running a Budget Inquiry works just like using a search engine on the Internet to look up information. You enter the criteria you wish to search by, and the computer will show you the available information based on that criteria. Step by Step Exercise: Budget Inquiry Step 1 Navigation: Commitment Control Review Budget Activities Budget Details a) Make sure that the Business Unit field says SDUSD. If it doesn’t, type it in. b) In the Ledger Group field, you must either type “control” or “expense”. Use “control” if you want to see a general overview/summary of the large, overview budgets (such as 4000, for example). Use “expense” if you want to see one or more specific budget accounts (such as 4301, for example). c) In the Department field, you must enter the four-digit code number for the department that will be paying for the requisition you plan to submit. This used to be referred to as the “cost center”. d) If you want to see a list of all that department’s budgets, after completing Steps a – c above, click the Search button in the lower-left corner. If you want to see specific 15 Chapter 2 budgets, then you need to fill in as many of the other fields as you wish before clicking the Search button. Typically, the only fields we use in a Budget Inquiry are: Ledger Group Account Department Fund Code Class Field Program Code Budget Reference Resource Extended Budget Period e) NOTE: Best results are usually found when you enter the Account code number into the Account field and the Resource code number into the Resource field. f) After you click the Search button, the results are shown at the bottom of the page. You may need to scroll down to see them. You’ll see a list of hyperlink budgets, with a separate budget on each horizontal line. Click on the budget line you wish to see, and its details will appear. Step 2 Details of a single budget: 16 Chapter 2 Budget: Total budget (money) for the current fiscal year allocated for this account. Expense: Total amount already paid out from the allocated money for this account. Encumbrance: Total amount of purchase orders against this account that hasn’t been paid yet. Pre-Encumbrance: Total amount of ePro requisitions submitted against this account that have not yet become purchase orders. Available Budget: Total amount of available money remaining in this account. Creating Requisitions – Your Options By and large, there are three different kinds of items you can order on an ePro requisition: a “Catalog” item, a “Special Request” item, or a “Direct Connect” item. Using the Catalogs lets you find and choose pre-arranged items from different categorical lists. Special Request lets you order goods or services not found on those categorical lists. Through Special Request you can order anything from anywhere, theoretically. Direct Connect lets you place orders with commonly used vendors such as Office Depot and Waxie. Direct Connect ensures you get your orders very quickly and with discounts. The rest of this chapter shows you how to create a requisition, and how to order a preset Catalog type of item. Other chapters describe how to order Special Request and Direct Connect items. After you’ve finished doing a Budget Inquiry and have established that there is enough money in the budget account you wish to use, you can go ahead and create a requisition. The next picture shows what the screen looks like immediately after clicking Create Requisition: Navigation: eProcurement Create Requisition 17 Chapter 2 Displayed on the left side of the screen are two things: the Menu (on top) and the Requisition Summary (below the Menu). The Requisition Summary sits to the left of the Create Requisition area, so it’s always available to you as you work. It shows you the detailed line items you enter onto the requisition, including the total dollar amount, which is refreshed each time you add a new line item. This summary stays on your screen while you create your order. Notice the three major areas across the very top of the Create Requisition area: 1. Define Requisition, 2. Add Items and Services, and 3. Review and Submit. The screen displayed above is the second one, Add Items and Services. It was decided to show this screen first when you click Create Requisition, because most people like to begin adding items to the requisition right away. But you can click any of the three areas and use any of them at any time. 1. Define Requisition – Enter information that will apply to the entire requisition. However, most people ignore this screen. Everything you can do here can also be done on the other screens. Here, you can: a. Enter a Requisition Name (in addition to letting the system give the requisition its own, unique ID number). b. Create Line Defaults (you can click on Line Defaults, and then enter a budget Chartfield string there that will pay for the entire requisition). NOTE: As of the printing of this manual, this feature might not work! c. Choose a Priority (you can choose low, medium, or high priority). 18 Chapter 2 2. Add Items and Services – Add lines to the requisition, specifying information necessary to procure each item or service. Here, you can: a. Enter a basic keyword search to look up items or services in the Catalogs. b. Use the Catalog area to do an advanced search for Catalog items or services. c. Browse the Catalogs available on the Catalog Tab. d. Build a list of your Favorite items on the Favorites Tab, as you place those items onto a requisition. e. Build a list of Requisition Templates on the Templates Tab. f. Locate district forms on the Forms Tab. g. Use the new Direct Connect feature on the Web Tab to order things from popular vendors, such as Lakeshore or Office Depot. h. Order Special Request goods or services on the Special Request Tab. 3. Review and Submit – Review the details of your requisition, make any necessary changes, budget-check the requisition, and submit it for approval. Here, you can: a. Enter the budget Chartfield string for individual line items. b. Change the Location code so that the item is delivered to a different physical address than your own office. c. Enter Justification Comments that your Approver will see (any kind of note concerning purchase of this item). d. Run the Budget-Check process. 19 Chapter 2 e. Enter a name for the requisition, or change the existing one. (The requisition will still possess a unique ID number that is automatically given, whether or not you give it a name). Catalog: Goods or Services There are three ways to find items through the Catalog method: Basic Search: Allows you to search through all the catalogs based on a specific keyword you enter (much like a typical Internet search engine, such as Google or Yahoo). Advanced Catalog Search: Allows you to input more details as search criteria, such as a particular manufacturer, vendor, or district item ID number. Browse Catalogs: Allows you to scroll through a list of items within a specific category (catalog), such as “Computer Hardware”. The items in the ePro catalogs are classified into categories. When you browse the catalogs to find an item to order, you can select from a list of multiple categories. Each category has its own list of items from which to choose. To create a Catalog order, follow this navigation: Navigation: eProcurement Create Requisition Add Items and Services 20 Chapter 2 Following are descriptions of the three Catalog ordering options: Option 1 – Basic Search Let’s say you want to order some district forms, such as “Permit to Leave School Grounds”. You could enter %permit% into the Search textbox field, and then click the Search button. The results of the search would be displayed at the bottom of the page. The results would show a list of items whose names/descriptions have the word permit in them. NOTE: It is very helpful to type a % before and after the keyword you enter. The % works as a wildcard in the search process and it helps to locate and present items you want much faster than if you do not use the %. Then, click the Search button on the right-hand side. In this example, ePro displays all items with the word “permit” within their titles. The one we were looking for, Permit to Leave School Grounds, is the fourth item from the top. TIP – If you type in a keyword that is a singular version of the word, (such as “transparency”) and you get no results, try changing the keyword to its plural form (such as “transparencies”); or vice versa. TIP – When doing any form of searching for an item there are several different ways you can conduct the search. For example, let’s say you need to find the book, Harry Potter and the Sorcerer’s Stone. You type Harry Potter and the Sorcerer’s Stone into the search field and click the Search button, but your result at the bottom says “No matching items found”. You can then try another search by entering, for example, Rowling (the name of the author). You might find different results. Be aware that a basic search may need several different keyword entries before finding the exact item you want. It is recommended that if you are looking for a specific book, you should do an Advanced Search and type the book’s ISBN into the Manufacturer’s Item ID field. 21 Chapter 2 Option 2 – Advanced Search You can create a more specific search by using the Advanced Search method, if you already know some details about the item you want. Refine your search by making an entry into the Manufacturer’s Item ID, Vendor Name, or Item ID field. The Manufacturer’s Item ID is specifically designed to handle a book’s ISBN. Navigation: eProcurement Create Requisition Fill in as many fields as you can. The more search criteria you enter here, the more precise your search results will be. Then click the Search button. The search results will show a list of items that meet the search criteria: From this page you can select the quantity of items you want to add to your requisition. 22 Chapter 2 TIP – You can sort your items by Item Description, Manufacturer, Price, or Vendor. Option 3 – Browse Catalogs Navigation: eProcurement Create Requisition You can just browse through the Catalogs to find items to order. There are five basic Catalogs to pick from, and each of them contains many sub-Catalogs. Each Catalog starts with a link that says Z_DO_NOT_USE which is a temporary place-holder and should not be clicked on directly. Instead, you would choose one of the five main Catalogs (listed below) from the dropdown menu, and then click on the little yellow folder icon with the plus sign, that sits right next to the Z_DO_NOT_USE link: 1. Assets – Items over $500 (each) 2. Items – Goods 3. Items – Services 4. Textbooks – Elementary 5. Textbooks – Secondary Once you select one of the basic Catalogs, you can click the folder icon (with the plus sign on it) to open up the many sub-Catalogs. On the right you’ll see a bulleted list of instructions: 23 Chapter 2 To view the list of items within a sub-Catalog, click on the sub-Catalog’s linked name: The list of items within that Catalog will appear at the bottom of the page. You may have to scroll your computer screen up to see the list: You can also select individual Catalogs to display their respective item lists. You can choose one or more, and see multiple Catalog lists at the same time. To do this, click a checkmark into the checkbox to the left of each Catalog you’re interested in. Then click the Search button at the bottom of the page in the Catalog section: 24 Chapter 2 When you click on an Item Description for a single item from the item list at the bottom of your screen, ePro displays all the details it has for that item. If you find an item you want to order, type the quantity into the Qty box and add the item to your requisition by clicking the Add button next to the Qty box: If you don’t want to order the item, click the Return to Previous Page link (located at the bottom-left of the page) to return to the requisition. Adding Items When creating a requisition, you can choose multiple items from the same list at the same time. Or, you can choose different items from different catalogs or categories. These items will be added to your requisition as individual “line items”. You can place up to 100 line items on a single requisition. However, it’s highly recommended that you limit a requisition to no more than 50 line items. Otherwise, it could take a long time for the district to process. When you see an item you want to order, you must do two things: 1. In the Qty box you must type the number of how many of that item you want, and 2. You must click the Add button to add that item to your requisition. WARNING! : Do not click the Add button more than once, or you will double the quantity you’re ordering! 25 Chapter 2 Compare Selected Items Side-by-Side This feature allows you to display more than one item side-by-side, so that you can easily compare detailed information about the items, such as vendor or price. This tool is especially useful if you need to order similar items but you don’t know which brand or which manufacturer you really want. You can add items to your requisition directly from the Comparison screen. First you click a checkmark into the checkboxes of the items you wish to compare: Then you go to the bottom of the screen and click the Compare button: You will then see the comparison on your screen: 26 Chapter 2 Favorites ePro gives you the ability to group together frequently ordered items by adding them to your personal Favorites list. These items are then stored in a list in the Favorites tab on the Create Requisition page. To add an item to your Favorites list, click a checkmark into the checkbox to the left of the item: Next, scroll the page up so you can see the bottom of the screen. Click the Add to Favorites button: The next time you want to order any items in your Favorites list, simply click the Favorites tab on the main Create Requisition page. Below is an illustration of what you would see after clicking the Favorites tab: Step by Step Exercise: Order a Preset Catalog Item TIP – Be sure to complete a Budget Inquiry before creating your requisition, to verify you have the needed funds in place. Please refer to the Budget Inquiry section of this manual to see how to do a Budget Inquiry. Step 1 Navigation: eProcurement Create Requisition After you click Create Requisition, click the Catalog tab if necessary to bring it forward: 27 Chapter 2 Step 2 You can do a basic search, advanced search, or a browse catalogs search for items, all on this same page. In this example, we’ll find an item we want to order by browsing the catalogs. From the Select a catalog drop-down menu, we clicked on Items – Goods. Then we clicked directly on the folder with the plus sign on it for the Z_DO_NOT_USE link, to open up the list of items under Goods: Step 3 To view the items within the Gasoline & Oil/Pupil Transprtn Catalog, we clicked on the Catalog name: 28 Chapter 2 Step 4 Let’s say we want to order some diesel fuel. At the bottom of our screen, after we clicked on the Gasoline & Oil/Pupil Transprtn Catalog, we saw the item(s) available. We wanted to buy 100 gallons, so we entered 100 into the Quantity box on the right-hand side: Step 5 We then clicked the Add button next to the Quantity box to add this item to our requisition. The Requisition Summary block on the left side of the page reflects the addition of the diesel as a line item: Step 6 This was the only item we wanted to order. Before we could submit the requisition for processing, we had to complete a few other details. The next step was to enter some general information about the requisition, so we clicked on the Define Requisition area link in the topleft part of the page: 29 Chapter 2 Step 7 We can give a requisition a customized name. You can do this at any point in the creation process. An ID number is attached automatically which identifies the requisition in the system so that district employees, such as Purchasing Dept. people, can track the requisition later on. The name you may choose to give the requisition yourself is more for your own benefit, to help you recognize the order when it arrives. To give a name to the requisition, we clicked inside the Requisition Name box and typed the name we wanted to give it: Step 8 The next step was to enter the correct budget information that the ePro system would know where to find the money to pay for the order. So, we clicked the Review and Submit area link at the top-right of the page: Step 9 On the Review and Submit page, we can see pretty much everything of importance about the requisition. The Review and Submit page displays things like: The name of the requisition (if you gave it one...if you didn’t, then the ID number will be considered the name). The descriptions, quantities, prices, vendors, and total dollar amounts of all items on the requisition. The Chartfield string (budget code number) being used to pay for the items. A place to type any Justification Comments you want to include (a note to your Approver explaining why you’re ordering the item(s), for example). The ability to run the Budget Check on the requisition. The ability to save & submit the requisition. 30 Chapter 2 To enter the budget code numbers (Chartfield string) that will pay for the order, we clicked the Expand Section icon; that’s the little triangle just to the left of the Item Description that looks like this: : Step 10 You then see the Accounting Lines appear, as shown below. These are also known as the budget code numbers, or the Chartfield String. Note that the Account code number is in permanent form; you can’t click on it or edit it. In the next step we’ll show you how to enter the correct budget code numbers for the account you plan to use to pay for your ePro order (we are using “fake” sample code numbers here just for illustration; these are not necessarily the same budget code numbers you should use for diploma covers or anything else!): 31 Chapter 2 Shipping Most of the time ePro orders are shipped from the vendors to the district’s Supply Warehouse, and then delivered to you at your site. This is true for all preset catalog orders, and most special request orders. Any orders placed via the Direct Connect part of eProcurement software will be shipped directly to you at your site from the Direct Connect vendor. Also be aware that if you’re ordering any asset items, then you absolutely must have them shipped from the vendor to the warehouse first. This is to maintain our asset management program. And, it lets the warehouse folks tag the asset items with special district tags before they come to you, which is part of asset management. You can erase your name from the Attention field on the Shipping page, and enter the name of the actual person who will receive the order, if it is not you. The Due Date field does not have to be filled in, but if you want, you can enter the date when you’d like to receive the order by. This is a “wish date” and doesn’t guarantee you will get the order on that day: Step 11 Here you must enter the budget numbers into the individual Chartfields (small textboxes). This is how we tell the ePro system which budget to use to pay for whatever we are ordering in eProcurement. It’s very important to enter the correct numbers, so the correct money is used. (School district budgets are designated for certain goods and services by law, and cannot be interchanged willy-nilly). For detailed definitions of chartfields, please refer to an earlier section of this chapter entitled Chartfields. Generally, the Chartfields you need to deal with are: DeptID: (Cost Center) Resource: (State or Federal Grant number) Bud Ref (Budget Reference): (Project Year for certain multiple year choices) Account: (Individual object accounts – automatically populated, can’t edit them) Program: (State of CA mandated field that classifies transactions according to purpose or reason for transaction) Class: (Further categorization of Program field mandated by state of CA required only in particular circumstances) Fund: (Identifies source of funds for a transaction) 32 Chapter 2 Extended: (Extension of Program field that stores District-specific information) Pictured here is an example of a typical Chartfield string: To the right of every individual Chartfield (with the exception of the Account Chartfield) is a Search icon: . You can click the Search icon to view a list of choices for budget code numbers to pick from for that particular Chartfield. The list includes the numeric value as well as a brief description of that value. It can’t tell you which one you’re supposed to choose...you have to already know that before you begin to fill in the Chartfield string. Here is an example of a Chartfield list: TIP – If you don’t know what budget code numbers to enter into the Chartfields, you must obtain that information before creating the requisition; otherwise, you will not be able to save or submit the requisition. TIP – You can ask your Site Administrator which budget (Chartfield string) you must use for any given item on a requisition. If your Site Administrator isn’t sure, ask your school’s or department’s Budget Analyst. Important Notes about Requisition Chartfields/Budgets It is crucial for you to use the correct budgets to pay for your orders. Budgets/accounts are not interchangeable. Paying for orders with the wrong budgets is a serious mistake! If you aren’t sure which Chartfield string to use on a requisition, ask your office staff or your Budget Analyst. 33 Chapter 2 Splitting Costs between Budgets You can choose to pay for an item on the requisition by using one single budget, or you can split the cost between two or more budgets. If you want to split a cost, you must do several things after you add the item to the requisition: 1. On the Review and Submit page, change the Distribute by from Qty to Amount: 2. On the far right side of the page, click the plus sign line of Chartfields below the original one: which will add a second budget 3. Enter the budget code numbers into the Chartfields for each budget line. You can adjust the amounts each budget will pay for in the Amount or Percent boxes: Step 12 When you’re done entering the Chartfield information (please remember that you must enter a Chartfield string for each and every item on a requisition!), you need to run the Budget-Check process for the requisition. To do this in our example, we clicked the Check Budget button at the bottom-left corner of the Review and Submit page: 34 Chapter 2 Step 13 The budget-check process usually takes just a few moments. Then you should see a Budget Checking Status that says Valid (as long as there are enough funds in the account...otherwise you would see a Budget Error...more about that later on in this manual): NOTE: When you budget-check a requisition, you are actually pre-encumbering the funds from the budget you designated when you filled in the Chartfields; the money to pay for the requisition order is actually taken from the budget at this moment, and “attached” or “pre-encumbered” to the requisition. Step 14 Once your Budget Checking Status shows Valid it means that ePro has pre-encumbered the funds from the budget account. When the money was successfully pre-encumbered, we could submit the requisition by clicking the Save & submit button. (If the requisition does not pass the budget check process, then the Save & submit button will not be clickable): Step 15 After you click the Save & submit button, you will see the Confirmation page, which shows (among other things) who will be approving the requisition: 35 Chapter 2 Our ePro requisition is now completed and on its way to be approved and processed. At this point, there are several things you can choose to do from this Confirmation page. You can: Click the View printable version link to see and print out a hardcopy of the requisition. Click the Manage Requisitions link to view that page, so you can track other requisitions, etc. Click the Create New Requisition link to start a fresh, new requisition. Click the Edit Requisition button to return to the requisition you just submitted, so that you can make changes to it if you want, and then re-budget-check it and re-submit it. NOTE: When you click the Save & submit button, three things happen simultaneously: 1. It sends the requisition to your department approver (your school principal or site administrator). 2. It generates an automatic email message that’s sent to the approver, notifying him/her that there is a new requisition to view and approve. 3. It saves the requisition for you in your own, private history page, called the “Manage Requisitions” page. (More about that later in this manual). 36 Chapter 2 SpeedChart SpeedChart is a way to quickly and automatically insert commonly used budget numbers (Chartfield strings) into a requisition, without having to type them in yourself. SpeedChart is a list of preset Chartfield strings often used throughout the district. You can choose from that list to populate the Chartfields for certain kinds (not all) of ePro requisition items. For some ePro orders, SpeedChart can save you time. Step by Step: How to Use SpeedChart Step 1 In the example illustrated here, we created a line item to order a set of tires for a school bus. To access the Chartfield area on the Review & Submit screen, click the Expand Section icon: Step 2 Locate the SpeedChart tool just to the right of the Distribute by tool, and click the SpeedChart Search icon : Step 3 Click the SpeedChart Key or Description appropriate for the item. For this example, we clicked Bus Parts: 37 Chapter 2 Step 4 The name of the chosen SpeedChart string appears in the SpeedChart box. Additionally, all of the correct budget numbers automatically populate the Chartfields: Now you could complete the rest of the requisition normally. Download Chartfield String to Excel After you enter the budget numbers into the Chartfields for a requisition, you can download that Chartfield string into an Excel spreadsheet for your own use, if you wish. Once the data is displayed in an Excel spreadsheet, it can be manipulated and saved to your computer as you desire. eProcurement does not require that you use Excel at all; but many people would like to know how to do this. 38 Chapter 2 Step by Step: Download Chartfield String to Excel Step 1 In the process of creating a requisition, when you arrive at the point where you’ve just finished entering the budget numbers into the Chartfields, you can download a copy of the Chartfield string into an Excel spreadsheet. The numbers will download along with their respective Chartfield titles. The advantage of doing this is that you can use Excel to manipulate and work with the numbers, which you can’t do in PeopleSoft eProcurement. First, you must scroll the page over to the far right. The Excel icon is located there: Step 2 Click the Download icon : 39 Chapter 2 Step 3 You may see a File Download window appear (shown below). If you do, you need to click either Open or Save, depending on which you want to do at that moment: Step 4 Excel will launch and display the spreadsheet automatically if you clicked Open. You can then save the spreadsheet for your own personal use. NOTE: Excel is a Microsoft Office Suite software application that our district uses for a variety of purposes. Excel is a spreadsheet program designed for simple to advanced, complex spreadsheet/accounting tasks. When you’re finished using the Excel spreadsheet, close it and return to the eProcurement window behind the spreadsheet. Split Payment between Two or More Budgets You can set up the Chartfields on a requisition so that more than one budget is used to pay for one or more items. You can: Designate multiple budgets to pay for a single line item at a time. Designate multiple budgets to pay for the cost of an entire requisition (all line items). Split Payment on Single Line Item You can set up the ePro requisition so that more than one budget can be used to pay for a single item. You can direct ePro to use two or more budgets from your own department or school; or 40 Chapter 2 you can direct ePro to use one of your own budgets along with a budget from an entirely different department or school. NOTE: If you use budgets from more than one department or school, please remember that means the ePro requisition will take longer to process. This is because more than one Department Approver will have to approve the requisition. Each Department Approver can only approve requisitions containing items using their own budgets. For example, let’s say that you order a widget and you split the budgets so that your school will pay 40% of it, while another school will pay 60% of it. You budget-check and submit the requisition normally. Once your own Department Approver (principal or department head) approves the requisition, it will automatically be routed to the approver for the other school, so that he/she can approve it too. Then the requisition automatically goes on to be processed. Step by Step: Split Payment Single Line Item Step 1 In this example, we’re ordering some health profile envelopes. We already entered the budget numbers for our own budget to be used. In the left-hand area of the Chartfield string, we see that ePro automatically indicates that our budget will pay 100% of this item. But we want 60% of it to be paid for out of a different budget: Step 2 Scroll the screen over to the far right side of the Chartfield string, and click the Add a New Row button (it looks like a plus sign): 41 Chapter 2 Step 3 A second, blank Chartfield row appears below the first one: Step 4 In the first Chartfield row’s Percent box, change the 100% to 60%. In the second Chartfield row’s Percent box, enter 40%.When you click away (click into any other box on the screen), the dollar amounts are automatically adjusted to show exactly how much money each budget will pay out for that one item: Don’t forget to enter the rest of the budget numbers for that second Chartfield row: You can then finish the requisition normally. Split Payments for Whole Requisition You can set up an ePro requisition so that one budget can be used to pay for some of the line items, and another budget can be used to pay for the rest of the line items. You can direct ePro to use two or more budgets from your own department or school; or you can direct ePro to use one of your own budgets along with a budget from an entirely different department or school. 42 Chapter 2 NOTE: If you use budgets from more than one department or school, remember that means the ePro requisition will take longer to process. This is because more than one Department Approver will have to approve the requisition. Each Department Approver can only approve requisitions containing items using their own budgets. For example, let’s say that you order 5 different items and you want to use Budget A to pay for them, and you also want to order 7 completely different items on the same requisition and pay for those with Budget B. Step by Step: Split Payment Whole Requisition (all line items) Step 1 In this example, we’re ordering several food items, and several non-food items: Step 2 First we’ll designate a budget to pay for the food items alone. Select each of the food items by clicking a checkmark into their selection checkboxes on the left side: Step 3 Click the Modify Line/Shipping/Accounting button located below the last line item: 43 Chapter 2 Step 4 Enter the budget numbers into the Chartfields for the budget you want to use to pay for just the food items. Then click the Apply button: Step 5 On the Distribution Change Options page, click to select the Matching Distribution Lines option, and then click OK: Step 6 Now uncheck the food line items, and click checkmarks into the selection boxes for the rest of the items on the requisition. You will designate a different budget to pay for those: 44 Chapter 2 Step 7 Once again, click the Modify Line/Shipping/Accounting button: Step 8 Enter the budget numbers for the second budget; the one that will pay for all the non-food items. Then click the Apply button: 45 Chapter 2 Step 9 On the Distribution Change Options page, click to select the Matching Distribution Lines option, and then click OK: Step 10 The requisition is now ready to be budget-checked and submitted. When you run the budgetcheck, it will automatically check any/all budgets designated on the entire requisition: You can then finish the requisition normally. 46 Chapter 2 Cost Distribution by Amount or by Quantity Step by Step: Cost Distribution – Amount or Quantity You can designate whether a budget will distribute funds to pay for an item by Quantity (percentage) or by Amount (actual dollars). For example, if you want to use two different budgets to pay for an item, you can either: Set it up by Quantity so that, for instance, Budget A will pay 40% and Budget B will pay 60% Set it up by Amount so that, for instance, Budget A will pay $200 and Budget B will pay $300 In the example that follows, we will show you how to choose either one. Step 1 We added a line item for wooden blocks and want to pay some of it from one budget, and the rest from another budget. First we must create a new, blank Chartfield string line where the second budget will go. We’ll click the Expand Section icon to open up the Chartfield area for the wooden blocks item: Step 2 Once open, we must scroll our screen over to the far right side: 47 Chapter 2 Step 3 We click the plus sign button to add a new, blank Chartfield line to this item: Step 4 The default setting is for Quantity (percentages), displayed here: Step 5 Here is what it looks like when we designate the Quantities by percentage, between the two budgets. After adding the second Chartfield line, we entered 40% for the first budget, and 60% for the second: 48 Chapter 2 Step 6 To change to Amounts by dollars, we clicked to change Qty to Amt: Step 7 Upon clicking Amt the screen changed to display the different type of distribution: Step 8 We then entered different dollar amounts in the Amount boxes. Then the screen automatically altered to show the correct percentages corresponding to the new dollar amounts: We can now finish processing our requisition normally. When we run a single budget-check, all the correct budgets we designated will pay the amounts we asked them to pay. 49 Chapter 2 IT District Wide Applications SDUSD PeopleSoft Advanced eProcurement Templates – A Great Shortcut Use Preset District Templates ePro has a variety of templates you can use at any time. These templates are basically alreadycreated requisitions that list groups of specific things commonly purchased in our school district. You can use any of these templates as a shortcut. Once you choose a preset template, you can edit your copy of it in any way you please. You must also remember to enter your budget codes to pay for whatever you order from a template requisition. To view the template list, open a new, blank requisition form and then click on the blue Template tab, as shown here: After you click the Template tab you should scroll the page to view the entire list of Templates. Here is an example of one part of the list: When you see a Template you want to use, you would click inside the white Quantity box (next to the yellow Add button) and type the number of how many you want of that particular item, and then click Add. After you click Add, you must click the Review and Submit link (either at the very bottom or very top of the page). You would then get to see all the items related to that Template, placed automatically on your requisition. In the next example shown here, we ordered two PC laptop computers. The Template placed the items on our requisition for us: Next you would just complete the requisition normally...enter the Chartfield string (budget codes) to pay for each item, run the Budget Check process, verify it is Valid, and then submit the requisition. Chapter 2 50 IT District Wide Applications SDUSD PeopleSoft Advanced eProcurement Create Your Own Template You can also store a copy of a completed requisition you created yourself in your Templates list (so that you can easily use the copy at a future time). Before you click the Save and submit button you must click a checkmark into the Save as Template checkbox. This checkbox is located just above the Save & submit button: After you clicked a checkmark there, you would submit the requisition normally. At any time in the future, if you ever want to use a copy of that requisition again, you can find it by doing this: 1. Start a fresh new requisition by clicking Create Requisition from the ePro home page. 2. Click the Templates tab: 3. Scroll down your list of requisition templates until you find the one you want to use. (The one you saved as a template should be there, at the bottom). 4. Once you find the requisition template you want, you can open up its description to verify what’s on that requisition (the items and quantities you entered when you first created the requisition). You can view the description details by clicking the small triangle button on the left side of the template description: 5. Next, enter the quantity into the Quantity box, and then click the Add button (you should probably enter a 1 here, and then you can change the quantity later): Chapter 2 51 IT District Wide Applications SDUSD PeopleSoft Advanced eProcurement 6. Finally, click the Review and Submit link located in the bottom-left corner of the page: Then you can finish the requisition normally. You can submit it as is (with the quantities and budget codes already in place from the last time you used it); or, you can edit the requisition (change the items, quantities, and/or budget code numbers, etc.) and then submit it. The original template remains the same as before, for future use. Naming Your Requisition If you want the requisition to have a customized name, you can type it into the Requisition Name textbox on the Define Requisition page or on the Review and Submit page, at any time during the creation of your requisition. Please review the Steps earlier in this manual for Step by Step Exercise: Create a Catalog Item Requisition. Requester’s Worklist – Requisition Status Notification Earlier in this book we told you about a new 8.9 feature in eProcurement: Status Notification, which lets you know by email when a requisition is approved or denied. (This feature may or may not be activated for our school district’s use). In addition to that notification, you can navigate to your own Worklist to see any given requisition and whether it was approved or denied by the Approver. When an Approver views a submitted requisition he/she can type a note inside a specially designated textbox, explaining why he/she is denying the requisition. After you’re notified by email of the denial you can look at your Worklist to see why. The following exercise walks you through the steps for how to view your Worklist. Chapter 2 52 IT District Wide Applications SDUSD PeopleSoft Advanced eProcurement Step by Step Exercise: View Your Worklist & Requisitions Step 1 Navigation: eProcurement Worklist The illustration below shows where to find and click on the Worklist link: Step 2 When you click your Worklist link you’re brought to the Worklist screen; an example is shown here: Step 3 To view an individual requisition, click on its blue link, on the right side of the screen: Step 4 The Requisition Review screen is displayed. In the example shown here (on the next page), the approvals are shown for both of the two items that were on the requisition: Chapter 2 53 IT District Wide Applications SDUSD PeopleSoft Advanced eProcurement When you are finished viewing the Requisition Review, you can click the link in the far bottomleft corner of the screen that says Return to Worklist. Direct Connect – How to Use It Our district frequently orders items from certain contracted vendors. Direct Connect was set up in eProcurement to make those orders easier to create and submit. We need to use Direct Connect as often as possible, because: We get better discounts with it, on items and shipping (sometimes even free shipping). We get our orders much faster (usually within a day, or even a few hours!). Chapter 2 54 IT District Wide Applications SDUSD PeopleSoft Advanced eProcurement If the items we order are not assets, then the vendors in Direct Connect will ship directly to our own sites, and not to our district warehouse. Requesters get email notifications directly from the vendors in Direct Connect, telling us they received our order and will be shipping it shortly. Probably the most common vendors we’ll use in Direct Connect are Office Depot and Waxie. Additional vendors will be added as time goes on. To learn how to use Direct Connect, please read through the following illustrated exercise: Step by Step Exercise: Order Items with Direct Connect TIP – You should always complete a Budget Inquiry before creating any requisition, to ensure you have enough funds in the budget you want to use to pay for your order. Otherwise, there is a chance you may not be able to complete the requisition correctly, and you may not get your order. Step 1 Navigation: eProcurement Create Requisition On a fresh, blank requisition form, click the Web tab. Once you arrive at the Web page, click the link for the vendor you wish to buy from. In this example, we chose Office Depot: Step 2 Once you arrive at the vendor’s web site, you can go ahead and select the items you want. Each vendor’s web site is different, but the procedures are basically the same; you look through the lists of their products, and click to choose the ones you want. Following is an illustration of the Office Depot web site home page for our school district: Chapter 2 55 IT District Wide Applications SDUSD PeopleSoft Advanced eProcurement You can used any of several methods to locate items to order: Step 3 In the example shown here, we chose to order five packages of Office Depot brand pencils: Chapter 2 56 IT District Wide Applications SDUSD PeopleSoft Advanced eProcurement Step 4 After clicking the red Checkout icon for Office Depot, the computer system brings us to one last page where we must click a Continue button (shown here in the lower left corner). That brings us back into the eProcurement pages. We can now continue working on the requisition to completion, either by adding more of any items from anywhere, or by finishing up the requisition (entering the Chartfields and running the Budget Check) and submitting it. Click the Review and Submit link to navigate to that screen: Chapter 2 57 IT District Wide Applications SDUSD PeopleSoft Advanced eProcurement Step 5 Give the requisition a name, as in this example: Step 6 Next, click the Expand Section button (small triangle on the left side of each line item) so that you can enter the budget code numbers for the item: Step 7 Now we can enter the Due Date (if we want to...it is not required), and we must enter the budget code numbers that represent the budget we plan to use to pay for the item: Chapter 2 58 IT District Wide Applications SDUSD PeopleSoft Advanced eProcurement Step 8 Next, in the lower left corner of the screen, we need to budget-check the requisition to preencumber the funds for it. Click the Check Budget button: Step 9 If the requisition passes the budget-check, it will show a Valid budget status. Then we can submit the requisition for approval and processing. Click the Save & submit button. (If the budget status shows Error, we must correct that before we can submit the requisition...please refer to that section of this manual, dealing with how to resolve a budget error): Step 10 Now we see the Confirmation screen. We can print this page out, if we want, but it will automatically be saved online, anyway. From here we can start another new requisition, or log out of eProcurement: Chapter 2 59 IT District Wide Applications SDUSD PeopleSoft Advanced eProcurement Chapter 3 –Special Requests & Asset Items “Special Request” Goods or Services NOTE: Special Request goods or services are only to be ordered when the needed items are not available through the regular ePro Catalog method, or through Direct Connect. It is very important to search Direct Connect and the Catalogs first to verify that the good or service you want to order is not available there. Creating a Special Request item on a requisition should be your last resort. TIP – Most district forms can ONLY be ordered through the ePro Catalogs method. If the form you want is not in the ePro catalogs, then it has been removed and placed on the district’s website as an online form you must print out yourself. You may not, at any time, order a district form as a Special Request item. To begin a Special Request requisition, you start by clicking the Special Request tab from a fresh, blank Create Requisition page. Navigation: eProcurement Create Requisition You can create three different types of Special Request items: Assets, Goods or Services. Assets are Goods, but they also possess special characteristics that place them apart from other Goods. Assets are defined in detail in the paragraphs ahead. Goods are physical items, and Services are tasks performed by outside agents (people who are not SDUSD district employees). Examples of services are lecturers, repairmen, performers, etc.). Most likely, the majority of the Special Request items you’ll order will be Goods. Once you click the Special Request tab, you will see the Special Request page where you can begin your order: Chapter 3 60 IT District Wide Applications SDUSD PeopleSoft Advanced eProcurement You’ll see how to order Special Request items in detail a bit further on in this chapter. Asset Management – What is an Asset? Although you probably don’t need to order assets very often, Asset Management is an important part of ordering with eProcurement. In our school district the term “Asset Management” means managing and tracking the purchase and retention of assets. An Asset is: Physical property other than land, buildings, or improvements to either of these, that costs $500 and above per unit, and has the following three characteristics: Non-consumable, with a normal service life of more than two years. Retains its original shape and appearance. Not easily broken, damaged, or lost in normal use, and more economical to repair than to replace. Examples of some assets are computers, furniture, or appliances such as refrigerators. (Other things like notebooks, pencils, or food are consumable, and therefore are not assets). And while a computer mouse, for example, is non-consumable, it’s not considered an asset because one single mouse costs less than $500. However, if we buy the mouse as part of a “package” including a computer, monitor, keyboard, and mouse, then the mouse would be considered an asset. Asset Management is very important because it helps the school district keep its costs down, and keep better track of what it owns and uses. NOTE: Some assets are ordered by using a district-created template in eProcurement. For assets that are not listed in a template, all district personnel who order any assets Chapter 3 61 IT District Wide Applications SDUSD PeopleSoft Advanced eProcurement through the Special Request screen in eProcurement are required to use Asset Management procedures. Using Asset Management in ePro is really pretty straightforward. Basically, you are provided with a clear list of Categories to choose from, when creating a Special Request item order. You must choose the correct Category that matches up with the item you’re ordering. When you choose a category for your Special Request item, the ePro system automatically populates the Account Chartfield for that item with the correct Account code number. This ensures that you can’t accidentally enter the wrong Account code number, and it makes sure that the right money is being used to pay for the right items. Special Request Categories and their corresponding Account code numbers are already paired up and locked in together. You cannot “un-pair” them. If you want to use a different Account to pay for a Special Request item, then you have to choose a different Category that has the Account you want already paired up with it. However, only the Account code is filled in for you. You still have to manually fill in the rest of the requisition Chartfield string for your item. Step-by-Step instructions on how to do an Asset Management type of Special Request order are included in the Special Request exercises. Categories for Special Request Items Choosing the correct category in Special Request orders is crucial. All categories are permanently paired up with appropriate Account codes. This means that when you enter a given category for a Special Request item, the Account code piece of the budget number is automatically filled in for you. You cannot edit the Account code, generally speaking (although there is an exception to that, which we show you in later paragraphs...Look for the section entitled “Changing an Account Code Number”). You cannot pair up an Account number with a different category. If there is a specific Account you want to use to pay for a Special Request item, then you will have to accept the category that is already associated with that Account. Categories are divided up into several general areas: Assets, Goods, and Services. You can view the entire list of over 300 categories in all areas; or you can filter the list to view only those category areas you want to see. The following explains the different kinds of categories and how to find them. Assets: Remember that an Asset is: Physical property other than land, buildings, or improvements to either of these, that costs $500 and above, and has the following three characteristics: Non-consumable, with a normal service life of more than two years. Retains its original shape and appearance. Not easily broken, damaged, or lost in normal use, and more economical to repair than to replace. There are generally two kinds of assets: those that are priced at less than $4,640 and those that are priced at greater than $4,640. The reason why we have this 4640 cutoff amount is due to local sales tax. If we order an item whose price is below $4,640, and our local sales tax is added to that amount, the total will end up being under $5,000. If we order an item whose price is at or above $4,640, and our local sales tax is added to that amount, the total will end up being Chapter 3 62 IT District Wide Applications SDUSD PeopleSoft Advanced eProcurement $5,000 or more. Tracking which assets cost less than or more than $5,000 is something our Accounting folks need to know; hence, we must choose the appropriate asset category that is either G4640 or L4640 (for Greater than or for Less than). Goods: Goods are physical items. All assets are goods, but not all goods are assets. For example, computers and refrigerators are Goods, and they are also Assets. Pencils and books are Goods too, but they aren’t Assets. Services: Services are tasks performed by people who are not district employees. For example, if we had to hire a speaker to deliver a lecture to a group of teachers for professional development, that would be considered a Special Request Service item. Another example is if we had to pay for a contractor to come to our site to trim trees, or to repair a machine of some kind. How to Find the Right Special Request Item Categories - Look Up Categories by Their Names Here is what the screen looks like when you need to choose a category for a Special Request item you want to order (the category area is circled): Now we’ll show you the same screen filled in with data about an item we want to order. Let’s say we want to order an asset, such as a computer printer: Chapter 3 63 IT District Wide Applications SDUSD PeopleSoft Advanced eProcurement In the illustration above the Category area is highlighted. That is where we need to choose a correct category that matches up with the item we’re ordering. To do this, we click on the Search icon for the Category list. Upon doing that, we see this screen next: From here we can explore the various Categories and find the one we need. To do this, we would click the Select a catalog drop-down list and click the appropriate category area. If we are ordering an asset item, for example, we would leave it on SD_ASSETS. Then we would click the plus sign symbol to the left of the Z_DO_NOT_USE link to expand the Category choices thusly: Chapter 3 64 IT District Wide Applications SDUSD PeopleSoft Advanced eProcurement Next we would look through the list to find the right Category. In the example we have here (ordering a computer printer), we would look for Computer Equipment. Since the printer we’re ordering costs less than $4,640 we should choose Computer Equipment L4640. We would click on that Category, and then we would see this screen (note the circled Category): Chapter 3 65 IT District Wide Applications SDUSD PeopleSoft Advanced eProcurement That’s how to locate an Asset Category. To locate other Categories, we would choose a different Catalog from the Select a catalog drop-down list: - Look Up Categories by Their Account Numbers You can also find the correct Categories if all you know is which Account number you plan to use. Let’s say that you want to order a Special Request item and pay for it with Account # 4301. You’re not sure which Category is the correct one to use. So you look it up by the Account number. First, you navigate to the Special Request screen, and then click the Category Lookup icon: Next, you expand the Search Categories section by clicking its Expand icon: Chapter 3 66 IT District Wide Applications SDUSD PeopleSoft Advanced eProcurement Next, you choose to Search By Category instead of by Description: Next, you enter a percent sign and the Account code number into the Search By textbox, and click the Find button: Chapter 3 67 IT District Wide Applications SDUSD PeopleSoft Advanced eProcurement You should then see the correct Category appear in the blue-shaded area below: To select that Category for your Special Request item, simply click on the link itself (either click on the Category link, such as GDS_4301, or on the Description link, such as Instructional Supplies). You would then be returned to your requisition and be able to continue your order. Get Forms through the District Web Site You can find some district forms by using ePro’s basic keyword search on the Catalog page. However, many district forms that used to be in eProcurement have been removed and placed on the district’s web site. Instead of ordering those forms through ePro, all you have to do is navigate to the form on the web site and print it out from there. If you can’t locate a form you want in ePro, then you’ll probably find it on the web site, and vice-versa. To locate a form on the district web site home page, you must first click the Staff link: Next, click the Forms link: Chapter 3 68 IT District Wide Applications SDUSD PeopleSoft Advanced eProcurement Then you’ll see a list of various types of forms to choose from: Just click the type of form you want, and you can open it on your computer screen to print it out. Order a Special Request Item There are two kinds of Special Request items you can order; Goods or Services. A “Good” is any physical item you can touch (as opposed to a Service Item, which means paying someone outside the district for some kind of service). If the item you want isn’t in the ePro Catalogs, then you can order it through Special Request. Some Goods are also Assets. (Please see the earlier part of this chapter for detailed information about Assets). The following exercise shows you Step by Step how to order a Special Request Asset item on an ePro requisition. Step by Step Exercise: Order Special Request Goods Item You should always complete a Budget Inquiry before creating any requisition, to ensure you have enough funds in the budget you want to use to pay for it. Otherwise, there is a chance you may not be able to complete the requisition correctly, and you may not get your order. Step 1 Navigation: eProcurement Create Requisition Click the Special Request tab: Chapter 3 69 IT District Wide Applications SDUSD PeopleSoft Advanced eProcurement Step 2a You will see the blank fields of the Special Request screen, shown here. (There is only one Special Request screen that’s used to order all Special Request goods and services): Step 2b Fill in the fields as completely as possible. The fields that have asterisks (*) are required. If you don’t know what to enter into a required field, you need to find out before you begin a Special Request order. NOTE: Always be sure to leave the following fields blank: Vendor Item ID, Mfg ID, and Mfg Item ID. In the example shown below, we’re ordering a couple of globes for a geography classroom: Chapter 3 70 IT District Wide Applications SDUSD PeopleSoft Advanced eProcurement Always keep these 3 fields blank. A. Item Description: When ordering goods (physical items) be sure to include all of the following details in the Item Description textbox: 1. Type the noun for the item (book, table, telephone, etc.). 2. Type the vendor’s item ID number, or part number or catalog number. 3. Type the actual name of the item. 4. Type descriptive details about the item, such as size, color, and anything else that helps to identify exactly what you want. B. Price: Enter the dollar amount per unit. Do not include commas, but you can include a decimal when necessary. Examples: 1200; or 1599.99 C. Quantity: Enter the total quantity you want of this item. (Whole numbers only; no decimals). D. Category: Always choose the correct category for your item. (There is no miscellaneous category). All categories are permanently connected to appropriate budget account codes. When you enter a category, the account number part of the Chartfield string is automatically entered for you. (You still have to enter the rest of the Chartfield string for each item...more on this later). E. Vendor ID: You don’t need to memorize the vendor’s ID number...just know the name of the vendor you’re buying from. When you use the Search feature, you can find the vendor you want and click on it to choose it. The ID number for that vendor will then populate this field automatically. Chapter 3 71 IT District Wide Applications SDUSD PeopleSoft Advanced eProcurement F. Unit of Measure: You must choose the correct Unit of Measure because that directly relates to how many items you’re actually ordering, and hence, the cost. Examples of Units of Measure are: EA (each), HRS (hour), DZ (dozen), and SK (sack). There are many more. To view the list, click the Search icon next to this field. G. Due Date: Here you must enter a future date. This date determines how much time will be set up for the Purchasing Department to process the Purchase Order before it expires. Therefore, you need to enter a date 3 – 5 weeks into the future. This does not mean your order won’t be processed until then. All orders are processed based on a firstcome-first served policy. Your order will be processed as soon as possible. H. Additional Information: Always start by entering your name, phone number, and the site where you work. You must also enter any additional details concerning this item. Include any explanations you want the district Buyer to see, and anything else that can help place the order. After completing all necessary fields in this screen, click the Add Item button to add this item to your requisition. Step 3 Notice that the Special Request area becomes “blanked out” and the item you just added appears in the Requisition Summary area on the left side of the screen: Step 4 Click Define Requisition in the upper-left area: Chapter 3 72 IT District Wide Applications SDUSD PeopleSoft Advanced eProcurement Step 5 Type a name for the requisition in the Requisition Name field, and then click Continue: Step 6 Click the Review and Submit link in the upper-right of the screen: Step 7 Click the Expand Section button to access the Chartfield string (where you need to enter the budget numbers to pay for this item): Step 8 Enter the correct budget numbers into the Chartfields. These numbers tell the system which budget to use to pay for this item (the numbers shown here are only for demonstration and are not to be used): Chapter 3 73 IT District Wide Applications SDUSD PeopleSoft Advanced eProcurement How to Attach a Document to a Requisition NOTE: If you want to learn how to attach a document to an ePro requisition (such as a list, or any other document the Buyer needs in order to process the requisition), then follow Steps 8a – 8d. If not, then skip ahead to Step 9. Step 8a To the right of the Line Description, right next to the Total dollar amount, you’ll see a small icon that looks like a text bubble: . It’s called the Comments icon. Click it to open it: Step 8b Click the Add Attachment button: Step 8c Use the Browse button to locate the file you want to attach to the requisition. Typically this might be a list of titles, names, brands, a vendor quote, a filled-in vendor form, or some other item the Buyer needs to place your order. Then click the Upload button: Step 8d Click the OK button: Chapter 3 74 IT District Wide Applications SDUSD PeopleSoft Advanced eProcurement You are returned to the requisition and can now finish the usual steps to complete and submit the order. Please continue on to Step 9. Step 9 Click the Check Budget button to initiate the budget-check process (which pre-encumbers the funds to pay for the order): Step 10 Click OK: Step 11 Verify that you received a Valid Budget Status. If it is valid, click the Save & submit button: Chapter 3 75 IT District Wide Applications SDUSD PeopleSoft Advanced eProcurement You should then see the Confirmation page appear: Step by Step Exercise: Order Special Request Asset Item You should always complete a Budget Inquiry before creating any requisition, to ensure you have enough funds in the budget you want to use to pay for it. Otherwise, there is a chance you may not be able to complete the requisition correctly, and you may not get your order. Step 1 Navigation: eProcurement Create Requisition Click the Special Request tab: Chapter 3 76 IT District Wide Applications SDUSD PeopleSoft Advanced eProcurement Step 2a You will see the blank fields of the Special Request screen, shown here. (There is only one Special Request screen that’s used to order all Special Request goods and services): Step 2b Fill in the fields as completely as possible. The fields that have asterisks (*) are required. If you don’t know what to enter into a required field, you need to find out before you begin a Special Request order. NOTE: Always be sure to leave the following fields blank: Vendor Item ID, Mfg ID, and Mfg Item ID. In the example shown below, we’re ordering a new laptop computer. Computers meet the district definition of an Asset. Therefore, we must be sure to choose the correct Asset Management category at the right time: Chapter 3 77 IT District Wide Applications SDUSD PeopleSoft Advanced eProcurement A. Item Description: When ordering assets, use the following format, but also include any additional details such as color, size, part or catalog number: 5. Type with all capitals 6. The very first word must be a noun that tells what it is. Examples: CAR or REFRIGERATOR or FURNITURE 7. The second word should be the make or manufacturer. Examples: HONDA or KENMORE or VIRCO 8. The third word should be the name of the model or other description of the exact item. Examples: CIVIC or ULTRA 5000 or 3-DRAWER SHELF B. Price: Enter the dollar amount per unit. Do not include commas, but you can include a decimal when necessary. Examples: 1200; or 1599.99 C. Quantity: Enter the total quantity you want of this item. (Whole numbers only; no decimals). D. Category: Always choose the correct category. There is no longer a Miscellaneous or All Items category. All categories are permanently connected to appropriate budget Account codes. When you enter a category, the Account code piece of the Chartfield string is automatically populated for you. (You still have to enter the rest of the Chartfield string for each item...more on this later in the manual). E. Vendor ID: You don’t need to know the ID number...just the name of the vendor. When you use the Search feature, you can find the vendor you want and click on it. The ID number for that vendor will then populate this field. F. Unit of Measure: You must choose the correct Unit of Measure because that directly relates to how many items you’re actually ordering, and hence, the cost. Examples of Units of Measure are: EA (each), HRS (hour), DZ (dozen), and SK (sack). G. Due Date: Here you must enter a future date. This is the date you would like to receive your order by. This does not guarantee that you will actually get it by that date. Generally, depending on who the vendor is, you can expect to receive your order in about 3 – 5 weeks. H. Additional Information: Here you must enter any pertinent details concerning this item. Always start by entering your name, phone number, and the site where you work. Include any explanations you want the district Buyer to see, and anything else that can help place the order. Step 3 Click Add Item to add the item to your requisition: Chapter 3 78 IT District Wide Applications SDUSD PeopleSoft Advanced eProcurement Step 4 Notice that the Special Request area becomes “blanked out” and the item you just added appears in the Requisition Summary area on the left side of the screen: Step 5 Now you can click Define Requisition in the upper-left area: Step 6 On the Define Requisition screen you can type in a name for the requisition to help you and others identify it later on. (You don’t have to use the Define Requisition screen for this...You Chapter 3 79 IT District Wide Applications SDUSD PeopleSoft Advanced eProcurement can do the same thing on the Review and Submit screen, too). Then click the yellow Continue button in the bottom-left area: Step 7 Now you need to click the Review and Submit link in the upper-right of the screen: Step 8 On this screen you need to enter the budget code numbers (Chartfield string) that represent the account that will pay for the order. To do that, you need to open up the Chartfield string area. Click the Expand Section arrow on the left side: Chapter 3 80 IT District Wide Applications SDUSD PeopleSoft Advanced eProcurement Step 9 You will need to scroll the page over somewhat to view the part of the Chartfield string you need (DeptID through Extended). Then you would type in the budget code numbers to complete the string (please note that the budget numbers used in this example are NOT to be used for real. You must use your own Department’s or school’s budget codes): Step 10 Next you must run the Budget Check process to pre-encumber the funds for this order. To do this, click the Check Budget button in the lower left corner: Step 11 When you see this next screen, click OK to begin the actual Budget Check: Chapter 3 81 IT District Wide Applications SDUSD PeopleSoft Advanced eProcurement Step 12 Next you must verify that the budget checking status is Valid. The status should be displayed just to the right of the now-grayed-out Check Budget button: Step 13 This step will save your requisition and let you view who the Approvers are (where the requisition will go after you submit it). Below the Check Budget button you would click the Save & preview approvals button: Step 14 The next page you see is the confirmation that you’ve saved your requisition, and it displays the workflow of the requisition. From this screen, you would click the Submit button to submit the requisition for approval: Chapter 3 82 IT District Wide Applications SDUSD PeopleSoft Advanced eProcurement After you click the Submit button, you could choose to click any of the hyperlinks at the very bottom of the screen to print a copy of the requisition, or view your Manage Requisitions page, or start a new requisition. TIP – If you don’t know the Vendor ID you can do a Vendor Lookup – Suggest Vendor to choose a Vendor. Just be aware that any vendors you use that are not part of our Direct Connect can easily take weeks to ship your order to you. To find and choose a Vendor for your item, select the Vendor Lookup link. On the Vendor Search page, enter the name of the Vendor you want to use (or the city or state where the Vendor is located). Then click Find to see if the Vendor exists in the district’s vendor list: Chapter 3 83 IT District Wide Applications SDUSD PeopleSoft Advanced eProcurement If you see the Vendor you want in the results of your search, you can choose that Vendor by clicking on the black checkmark on the right-hand side. Suggest Vendor Use the Suggest Vendor page to enter a Vendor you want to use who is not listed with the district. After you submit the requisition, your Buyer will review your suggested Vendor. The Buyer will contact that Vendor and attempt to set him up with the district. The Buyer will then add the Vendor to the district list before creating a purchase order. If the Buyer is unable to purchase what you want from the Vendor you chose, the Buyer has the discretion to choose a different Vendor, or he/she might call you to discuss this with you. Enter the suggested Vendor’s name and all other details (address, phone, etc.). Include an explanation as to why you want to use this Vendor in the Comment textbox. When you’re finished, click the Suggest Vendor button: Chapter 3 84 IT District Wide Applications SDUSD PeopleSoft Advanced eProcurement After you have your Vendor selection arranged, and you’re finished adding items to the requisition, you must complete the requisition by budget-checking it and then clicking Save and Submit. IMPORTANT NOTE: You only need to designate the vendor once, for the first Line Item on a requisition, as long as all the rest of the items are coming from the same vendor. Service Orders – Hiring a Contractor There are three methods of ordering a Service: Fixed Cost Service – Hire an outside contractor to do a specific job for a flat rate or fee. Variable Cost Service – Hire an outside contractor to do a specific job for a variable fee. Time and Materials – Hire an outside contractor to do a specific job for a variable fee and a charge for materials. Step by Step Exercise: Special Request Service – Fixed Cost TIP – You should always complete a Budget Inquiry before creating any requisition, to ensure you have enough funds in the budget you want to use to pay for it. Otherwise, there is a chance you may not be able to complete the requisition correctly, and you may not get your order. Step 1 Navigation: eProcurement Create Requisition Chapter 3 85 IT District Wide Applications SDUSD PeopleSoft Advanced eProcurement Click the Special Request tab: Step 2 On the Special Request screen fill in the necessary fields. In this example, we want to hire a tree trimmer to come trim the trees at our school. Some preliminary fields are shown filled in, below: A. Item Description – Enter a brief description of the service you want. B. Price – Enter the cost for the service. C. Quantity – Enter how many of these services you want. Basically, just enter a 1. D. Category – This is very important. You must choose the correct service category here from the list of possible Service categories. E. Unit of Measure – For a service, always enter EA. F. Due Date – Enter the date by which the service is supposed to be completed. G. Suggest New Vendor – Click this link only if you first tried to locate an appropriate vendor in the preset list of district vendors and couldn’t find one. Chapter 3 86 IT District Wide Applications SDUSD PeopleSoft Advanced eProcurement Step 3 In this example we suggested a vendor. We clicked on the Suggest New Vendor link, and were brought to this screen. Shown here is the screen filled in with pertinent details about the vendor we wanted to hire: Step 4 We click the OK button and are brought back to the Special Request screen. Notice how the name of our vendor now appears there (H). We also entered important details into the Additional Information textbox (I): Chapter 3 87 IT District Wide Applications SDUSD PeopleSoft Advanced eProcurement Step 5 Now we can add this service as a line item onto our requisition. Click the yellow Add Item button in the lower right area. Next, we need to enter the Chartfield string (budget codes) that determine which account will be used to pay for this service. Click the Review and Submit link in the upper-right area of the screen: Step 6 In order to view the place to enter the Chartfields, we need to click the little Expand Section icon: Step 7 We may need to scroll our page up or down to view the Chartfields. Once we see them, we can fill them in as shown here (note that the Account Chartfield is already populated for us and cannot be edited). Also please note that the budget codes shown here are an example only, and should NOT be used on a real requisition: Chapter 3 88 IT District Wide Applications SDUSD PeopleSoft Advanced eProcurement Step 8 Now we must run the Budget Check process on the requisition. This procedure will preencumber the funds that will pay for this order. All ePro requisitions must pass the Budget Check process successfully before they can be approved and processed. Notice that the Budget Checking Status reads: Not Checked. Towards the bottom of the screen, click the Check Budget button: Step 9 The Budget Check ran successfully. Notice that the Check Budget button is no longer clickable, so we can’t accidentally pre-encumber funds twice. Also note that the Budget Checking Status now reads: Valid: Step 10 The next thing we need to do is save and preview the requisition before we submit it. Click the yellow Save & preview approvals button at the bottom of the page. Shown here is the screen we see next. We see at a glance who the Department Approver is and who the district’s Buyer Approver is. These are the people who will receive the requisition and approve it so it can be processed. From this screen, we can click the Submit button: Chapter 3 89 IT District Wide Applications SDUSD PeopleSoft Advanced eProcurement Step by Step Exercise: Special Request Service – Variable Cost TIP – You should always complete a Budget Inquiry before creating any requisition, to ensure you have enough funds in the budget you want to use to pay for it. Otherwise, there is a chance you may not be able to complete the requisition correctly, and you may not get your order. Step 1 Navigation: eProcurement Create Requisition Click the Special Request tab: Chapter 3 90 IT District Wide Applications SDUSD PeopleSoft Advanced eProcurement Step 2 Enter required details about your order into the fields on this screen, as shown by the example below; then click the Add Item button to add this as a line item to your requisition: A. Item Description: Always try to begin with the word Service. Then describe it. B. Price: Enter the total dollar amount that will be charged per unit of time (usually by the hour). C. Quantity: Enter the total estimated quantity of units of time for the job to be completed. In the example shown above, we entered 8 since the vendor estimates the job will take up to eight hours. D. Category: Enter the correct Service Category. This ensures the order will be processed correctly, and will use the correct budget to pay for it. E. Vendor ID: Enter the vendor you are hiring to perform the service. This might be a district vendor we’ve used before, or it might be a new one you want to suggest. F. Unit of Measure: Enter the correct unit of time. This might be hours, days, or weeks. G. Due Date: Enter the date for the last day of service; the day when it will be completed. H. Additional Information: Enter your name, phone number, and the site where you work. Then enter a justification for ordering this service, and any other details the district Buyer will need in order to process your request. If you have a written quote or estimate, scan the document into your computer and attach it electronically to your requisition. I. Add Item: Click to add this order for service as a line item to your requisition. Chapter 3 91 IT District Wide Applications SDUSD PeopleSoft Advanced eProcurement Step 3 After clicking the Add Item button, you will see a blank Special Request screen. On the left side you will also see the Requisition Summary that displays the service line item on your requisition: Step 4 Click the Review and Submit link in the upper right corner of the screen: Step 5 Now that you’ve added this service item to your requisition form, you would do the usual things to process it: enter the budget numbers into the Chartfields, run the Budget-Check process, and upon receiving a Valid Budget Status, submit the requisition. Step by Step Exercise: Special Request Service – Time and Materials TIP – You should always complete a Budget Inquiry before creating any requisition, to ensure you have enough funds in the budget you want to use to pay for it. Otherwise, there is a chance you may not be able to complete the requisition correctly, and you may not get your order. NOTE: Always create a separate line item for Time and a separate line item for Materials, both on the same ePro requisition. Chapter 3 92 IT District Wide Applications SDUSD PeopleSoft Advanced eProcurement Step 1 Navigation: eProcurement Create Requisition Click the Special Request tab: Step 2 Enter required details about your order into the fields on this screen, as shown by the example below. This is the first of three line items (Note that this is an Asset item, hence the use of all capitals in the Item Description, as well as using an Asset Category): Chapter 3 93 IT District Wide Applications SDUSD PeopleSoft Advanced eProcurement Remember to click the Add Item button after you finish filling in the fields. Step 4 Observe that the Requisition Summary displays the item added to the requisition: Step 5 Enter the details for the second line item that goes with the first one. Note that you don’t have to enter the same information in the Additional Information field for each item, if the information in the first line item is true for all the others. Just make note of it as shown here, then click the Add Item button: Chapter 3 94 IT District Wide Applications SDUSD PeopleSoft Advanced eProcurement Step 6 Enter the details for the third line item that goes with the first two. Click the Add Item button: NOTE: If you see this message, just click OK and ignore it. It is not an error message, nor will it affect your order. Step 7 Notice on the left side of your screen that the Requisition Summary now displays all the items: Chapter 3 95 IT District Wide Applications SDUSD PeopleSoft Advanced eProcurement Step 8 Click the Review and Submit link: Now that you’ve added this to your requisition form, you could do the usual things to process it (see previous exercises for detailed steps): Give it a name in the Requisition Name field. Enter the budget numbers into the Chartfields. Run the Budget-Check process, and upon receiving a Valid Budget Status you could… Submit the requisition. Line Details – Who is the SDUSD Buyer? When you submit a requisition with more than one Special Request item, it might be routed to more than one San Diego Unified School District Buyer for processing. School district Buyers are assigned to process specific categories of orders. For example, the Buyer that processes orders for books may not be the same Buyer that processes orders for cafeteria food. When you want to see which district Buyer is designated to process a given individual line item in your Special Request requisition, as well as how to contact him/her, you can do so from the Review & Submit screen. Step by Step: View Line Item Buyer Details We begin this example exercise from the point at which we have already created a Special Request item, and have just added it as a line item to a requisition. The line item is for wooden blocks for a kindergarten classroom. Step 1 begins immediately after we clicked the Review & Submit link: Step 1 Click the Line Details icon, located on the far right side of the line item: Chapter 3 96 IT District Wide Applications SDUSD PeopleSoft Advanced eProcurement Step 2 On the Line Details page click the Buyer Information link: Step 3 The Buyer’s name and telephone number are displayed. Click the Return button to go back to the previous page: Alex Doe 858 555 5555 858 555 0000 Step 4 From here you can click OK or Cancel. They both return you to the Review & Submit page of the requisition: Chapter 3 97 IT District Wide Applications SDUSD PeopleSoft Advanced eProcurement Additional Features Comments for Individual Line Items In addition to inserting text into the Justification/Comments textbox at the bottom of a requisition (which applies to the entire requisition and is read by the Approver), you can also type a comment for an individual line item. You could insert a separate comment for each item on a requisition, if you wanted to. Step by Step: Add a Comment for a Line Item Step 1 After adding items to your requisition and clicking the Review & Submit link to view it, you can add individual comments to a single line item. Next to the Line Details icon on the far right side of the line item, click the Comments icon (it looks like an empty cartoon text bubble): Step 2 Enter the comments you wish to make for that one item, and then click OK: Chapter 3 98 IT District Wide Applications SDUSD PeopleSoft Advanced eProcurement Step 3 You are returned to the Review & Submit page, where you’ll notice that the Comments icon now appears to have lines of text inside it. This is your visual indicator that a line item has comments: Change Search Settings on the Catalog Search Page When running searches on the Catalog page of eProcurement, you can make a couple of alterations as to how the search results are displayed for you. Step by Step: Display Catalog Search Fields – Yes or No Step 1 On the Add Items and Services screen, we clicked the blue Catalog tab to bring that page forward. Under the Search Catalog section (where all the fields are), on the right side beneath the Search button, click the Search Settings link: Chapter 3 99 IT District Wide Applications SDUSD PeopleSoft Advanced eProcurement Step 2 The Display Catalog Search Fields feature has a default setting of being on. If you don’t want to have these fields displayed, click into the checkbox to remove the checkmark, and then click the OK button: Step 3 On the Add Items & Services page, the search fields are no longer displayed: Chapter 3 100 IT District Wide Applications SDUSD PeopleSoft Advanced eProcurement Step by Step: Change # of Rows in Catalog Results Display Step 1 On the Add Items and Services screen, we clicked the blue Catalog tab to bring that page forward. Under the Search Catalog section (where all the fields are), on the right side beneath the Search button, click the Search Settings link: Chapter 3 101 IT District Wide Applications SDUSD PeopleSoft Advanced eProcurement Step 2 The Catalog Results Display feature offers a drop-down menu with choices on how many rows of items to display when you click on a Catalog. Change the choice by clicking the menu open, and selecting A.15 Rows Per Page. Then click the OK button: Step 3 To test the setting, click on a Catalog that typically has a lot of items in it, such as the Supplies Catalog: Step 4 Notice that the number of rows of items displayed is now 15: Chapter 3 102 Chapter 4 – About Budgets & Managing Requisitions Lot Orders Traditionally, a “Lot Order” is when you want to order a large number of the same item. In our school district, any time you need to order more than 40 individual items of one type, you can create a Lot Order in the Special Request screen. Examples: 1. When you want to order more than 40 individual books with different titles (such as library books for a school library or classroom). (If you’re ordering 40 or fewer, you can’t do a Lot order...you’d have to enter each book title as an individual line item). 2. When you want to order more than 40 of any item (Goods, that is...any physical items). Lot Orders are described in the following exercise: Step by Step Exercise: Create a Lot Order for Books In this example we ordered more than 40 library books. NOTE: If you place an order for 40 or fewer items, you must enter each individual item as a separate line item on a requisition. Step 1 Navigation: eProcurement Create Requisition Click Special Request: Chapter 4 103 Step 2 Enter the required information into the appropriate fields. In this example, we are ordering 75 different library books, not to exceed the cost of $5,000. Notice that we chose the correct Category for library books, which is GDS_4201: NTE $5,000 incl. all costs Step 3 After all the fields have been filled in, we click the Add Item button to add the item to our ePro requisition: NTE $5,000 incl. all costs Chapter 4 104 NOTE: Anytime you see this message appear about changing the category, please know that it is not an error message, and you should just click OK to dismiss it. Then continue on, normally. It will not have any effect on your requisition order: Step 4 Complete and submit the requisition as you normally would (run the Budget-Check process, receive a Valid budget status, and then submit the requisition, as usual). IMPORTANT NOTE: Whenever you submit a lot order (or any order involving a long list of items) you must also submit a detailed list of those items to the Purchasing Dept. The list should contain information such as names or titles of the items, descriptions, ID or Part numbers, publishers, year of publication or other such information depending on what kind of items they are. There are two ways you can submit such a list to go with the ePro requisition: You can attach the list electronically to the requisition before you submit the requisition. You can fax the list to the Strategic Sourcing and Contract Services Dept. (formerly called the Purchasing Dept.) with the ePro requisition’s ID number on the fax (the fax number is (619) 542-5705). By far, the best and most preferable method is to attach the list electronically. The next exercise illustrates how to do this. Step by Step Exercise: Create a Lot Order for Things Other than Books If you order more than 40 different items under a single kind of item, you may place a Lot Order. An example might be if you were ordering more than 40 different tools and hardware supplies for a district location (different kinds of wrenches, screwdrivers, drills, nuts & bolts, etc.). Perhaps you want to order them all from one vendor. The following steps show how to place a Lot Order for things other than books. Step 1 Navigation: eProcurement Create Requisition Click Special Request: Chapter 4 105 Step 2 Enter the required information into the appropriate fields. In this example, we are ordering 50 different tools and hardware items, not to exceed the cost of $7,500. Notice that we chose the correct Category for building maintenance and supplies, which is GDS_4515: Step 3 After all the fields have been filled in, we click the Add Item button to add the item to our ePro requisition: Chapter 4 106 Step 4 Complete and submit the requisition as you normally would (run the Budget-Check process, receive a Valid budget status, and then submit the requisition, as usual), but there is one additional thing you must do: attach the detailed list of items to the requisition before you submit it. The following steps show how to do this. After you click Add Item, navigate to the Review and Submit screen: Step 5 On the far right side of the line item you just created, click the Comments icon. It looks like a small cartoon text bubble: Step 6 On the Line Comments page, click the Add Attachment button: Chapter 4 107 Step 7 Browse to locate the list document. (You needed to have scanned the list into your computer and saved it as a file, before beginning this ePro order. Some computer printers have scanner abilities. If you don’t have access to a computer scanner, then you won’t be able to attach anything to your ePro requisition, in which case you would just fax the list over to Purchasing). After you find your list wherever you saved it on your computer, click to select its file name. Then, click the Upload button: Step 8 Verify that the list file is now attached, by viewing its name under the Attached File column. Then click the OK button: Step 9 Now you can complete, save, and submit the ePro requisition normally. Your list will travel electronically with the requisition through its processing. Budget Checking It is CRUCIAL for you to use the correct budgets to pay for your orders. Budgets/accounts are not interchangeable. NOTE: You absolutely must budget-check every single requisition and verify that the budget status is Valid, before submitting the requisition for approval. The system will not let you submit a requisition unless it passes budget-check first. You need to click the Check Budget button to budget-check any requisition. The Check Budget button is located at the bottom of the Review and Submit screen of a requisition. It’s important to do this on all new requisitions you create, as well as on all old requisitions you may edit for re-submission. Chapter 4 108 After you click the Check Budget button, the following screen appears: Then you would click OK. Next, you would need to verify that you have a Valid budget checking status before continuing. NOTE: If the budget checking status says “Error” instead of “Valid”, the system will not let you submit the requisition (although you can save it). You must fix the budget error and make it Valid before you’ll be able to submit the requisition. Chapter 4 109 Budget Checking Status says ERROR - What to do? If you run the budget-check on a requisition and it returns an error instead of a valid budget status (shown here): then it must be resolved and made Valid before you submit the requisition. All requisitions must pass the budget-check process. There could be any one of several possible reasons why the budget-check failed. The most common reasons are: 1) There isn’t enough money in the budget you chose to use, or 2) You entered incorrect budget codes, or 3) The budget you chose to use has not been set up or activated properly. To solve the budget checking error you may need to change the Chartfield string information. Common Scenarios: 1. The Chartfields have the wrong account string or budget information entered. 2. The budget doesn’t have enough money in it at that moment to cover the expense of your requisition order. 3. The Budget Analyst for your department/site has not allocated money into that budget or has not activated it yet. Solutions to the Above Common Scenarios: 1. Follow this navigation path to double-check that all the Chartfield code numbers are correct: Click the Review and Submit tab at the top of the requisition: Next, click the Expand Section icon just to the left of the description of the line item on the Review and Submit screen. This will expand the item’s details to display the Chapter 4 110 Chartfield string for that item: 2. Edit the Chartfields as needed so that they contain the correct budget code numbers. There are look-up screens next to each Chartfield box (see the magnifying glass icons to the right of each Chartfield). You can use these icons to search for other codes: 3. Contact your Budget Analyst and ask him/her to double-check the budget information you are using, particularly the Account and Fund codes. Ask him/her to check both the Expense Account and the Control Account. If necessary, your Budget Analyst has the power to transfer funds from one account into another, as long as this procedure remains in compliance with district policies. Step by Step Exercise: Fix a Budget Error Let’s pretend that you have an Open requisition that you haven’t submitted yet, because it has a budget error. The following Steps show you what you should do. Step 1 Navigation: eProcurement Manage Requisitions Chapter 4 111 In the Select Action drop-down menu next to the requisition that has the budget error, choose Edit Requisition and then click the Go button: Step 2 The requisition opens up, ready for editing. Expand the details of the line item with the budget error by clicking its Expand Section icon: Step 3 Examine the budget code numbers in the Chartfields. Make sure they are correct. If they aren’t, delete the wrong ones and type in the correct ones. If they are already correct, then click the Save & preview approvals button in the lower left corner. That will save the requisition for you indefinitely, so you can log out and contact your Budget Analyst for help with resolving the budget problem: Chapter 4 112 Step 4 Once the budget problem is resolved by the Budget Analyst you can log back in, reopen the requisition, and run the budget-check again. If it returns a Valid status, you can then submit the requisition. Enter Budget Codes Once for All Items on a Requisition It can be tedious to have to enter the same exact budget codes over and over again on a single requisition, when all the items you’re ordering will be paid for out of the same budget. Modify Line/Shipping/Accounting is a shortcut feature that comes in handy in such a situation. If you create a requisition with multiple line items that use all the exact same Chartfields (budget codes numbers), and all the items will be delivered to the same location (yours), you can enter the budget codes one single time (after you’ve entered all your items onto the requisition), and make it cover the entire requisition. This means that instead of entering Chartfield strings repeatedly for individual items on a requisition, you can enter one Chartfield string once for the entire requisition. All you need to do is navigate to the Review and Submit screen and follow these steps: NOTE: You can use this feature at any point during the process of creating your requisition. Step by Step Exercise: Enter Budget Codes Once for Entire Requisition Let’s say you want to place an order for several different items (you can have as many as 50 on a single requisition). You intend to pay for the items with money from a single budget account, and all the items will be delivered to your own office/department/school. The following steps show you what you should do. Chapter 4 113 Step 1 Navigation: eProcurement Create Requisition We begin at a point where we have just entered several items into a requisition. Click the Review and Submit area link: Step 2 On the Review and Submit page click to select all the items in your requisition. Click the Select All/Deselect All link below the list of your items. This places a checkmark into all the checkboxes of all the items at the same time: Chapter 4 114 Step 3 Next, click the Modify Line/Shipping/Accounting button: Step 4 Now type the budget code numbers for the account you plan to use into the Chartfields (Please remember that the code numbers shown here are samples only, and should not be copied for use on a real requisition). Please note that the Account Chartfield will appear blank if the items on the requisition use different Accounts. Don’t worry about that; rest assured that the correct Accounts are being used. Then, click the Apply button: Step 5 The next screen you see asks you to make a choice regarding Distribution Change Options. It will probably default to All Distribution Lines, which is what you usually want anyway. So on this page, just click the OK button: Chapter 4 115 Step 6 Upon clicking OK you are brought back to the requisition. You can now run the Budget Check, and if it returns a Valid status, you can submit the requisition. How to Change the Account Code Number on a Requisition When we enter budget codes on a requisition to pay for items, ePro always fills in the Account code number piece automatically. And, it appears “unclickable” so we can’t edit that Account code. For items we order from the preset lists of Catalog items (such as textbooks, gasoline, or food, for example) it’s true that we have to accept the Account codes that ePro enters for us. But... When we order things in ePro by either Special Request or Direct Connect, we can edit the Account code. The following paragraphs illustrate how to do it. For the following example, let’s pretend that there are two separate Account codes we have to deal with: 4519 for Office Supplies and 4301 for Instructional Supplies. Let’s say we want to order pencils from Office Depot, strictly for use by students only. Ordering pencils from Office Depot means that ePro will automatically enter the Account code for Office Supplies. In order to “force” ePro to change the code to the one we need to use, we must do a few special steps. In the illustration below we begin from the point where we have added the pencils from Office Depot to our ePro requisition. We are now on the Review and Submit screen. The first thing we must do is select the item whose Account code we want to change. To select the item, we click a checkmark into the checkbox immediately to the left of the item description: Chapter 4 116 Next, we click the button labeled Modify Line/Shipping/Accounting: On the next page we see, we notice that most of the boxes are blank, which is fine for now. We need to leave them blank, and just click the Search button (the magnifying glass) to the right of the Category box: On the next page we see, we need to enter a percent sign (%) and the Account code we want to use, into the Category begins with box, and then click the Look Up button: When the Account code’s Category appears, we must click on it to choose it: Chapter 4 117 Next we are brought back to the Modify Line/Shipping/Accounting page. We must now manually enter the rest of the budget code numbers for the budget/account we want to use: Now we click the Apply button in the lower left corner: The next page we see is the Distribution Change Options page. Here, we need to make sure that the All Distribution Lines choice is selected, and then we click the OK button: Chapter 4 118 After that we are brought back to the requisition itself, to the Review and Submit page where we first began. At this point we can complete the requisition as we normally would, by budgetchecking it and submitting it. Track a Requisition with the Request Lifespan Each requisition has its own Request Lifespan, which is a graphical representation of the entire “life” of a requisition. Viewing the Request Lifespan lets you track your requisitions. Just by a glance, you can immediately see what is happening with your orders, and how far they have come along. You can access the Request Lifespan for any requisition you have submitted. You do this by navigating to your Manage Requisitions page (see the next section of this manual for details about the Manage Requisitions page), and clicking on the Expand Section icon next to the ID number or name of the Requisition you wish to track. Below is a picture of what that page looks like: There are 9 stages in the Request Lifespan. The stages and their definitions are: Request: details about a submitted requisition (its items, budgets, etc.). Approve: shows the individual(s) and/or department(s) that need to approve the requisition. Inventory: decides if the requisition is currently a stock item or if the requisition needs to be ordered by a district Buyer. The ePro system automatically determines this. Purchase Order: purchase order status. Change Request: if you want your order changed in any way, you can contact the Purchasing department and ask them to do a Change Request, as long as the order has not yet been sent to the Vendor. Receiving: shows all receipts of items that have been received at the Supply Center. Returns: RTV processes are followed. If you want to return an item, you must ask the Purchasing department to do it for you. Invoice: shows the PO lines; both the voucher and the receiver lines. Payment: shows payment inquiry and results. Chapter 4 119 The illustration below shows a Request Lifespan for a typical requisition that has completed the first two stages; it’s been submitted and approved by the Department Head or Principal. Icons that are brightly colored indicate that the requisition has passed that stage (those are circled in the illustration below). Icons that are gray indicate that the requisition hasn’t reached that stage yet, or that the requisition skipped that stage because it was unnecessary: Manage Your Requisitions The Manage Requisitions page is where you can view information about all the requisitions you ever created. You can track each requisition through its Request Lifespan; you can edit and resubmit requisitions; you can cancel and reopen requisitions; you can even see which approver a requisition was sent to, whether they approved it, and when. There are a few time restrictions that affect several of these functions. You can edit and resubmit a requisition even after it has been approved, as long as it hasn’t yet become a purchase order. This is also true if you want to cancel a requisition. Probably the most important parts of the Manage Requisitions page are those that display the Status and the Budget of the requisitions. You want to pay particular attention to the Status and the Budget columns on this page. Those two areas display the most important information for you about your orders. The following navigation shows how to access the Manage Requisitions page. The next illustration shows a typical Manage Requisitions page with four requisitions on it: Navigation: eProcurement Manage Requisitions Chapter 4 120 Requisitions Displayed: When you first arrive at the Manage Requisitions page, you will see that it shows the most recent requisitions you’ve done. You can change the display to show you any of your own requisitions from any time frame you wish. For example, you might like to see a list of all the requisitions you submitted during the month of April. In order to do this, you need to click into the Date From box and change the date to April 1 of whatever year you want. Then click into the Date To box and change that date to April 30. Then click the yellow Search button. The screen will change its display to show only your requisitions from April. Request Status: You can also filter the display further by having it show you only certain types of requisitions. You can click into the Request Status drop-down menu and choose a filter. Examples of filters are: Approved, Canceled, Denied, Open, etc. For example, if you only want to see requisitions that are currently Open, you can choose that filter from the menu and click the Search button. Budget Status: Another way you can filter what you see is to use the Budget Status drop-down menu. Here, you can choose to view only those requisitions that have one particular kind of budget status. There are three: Not Checked, Valid, or Error. Requisition ID: This is a hyperlink you can click to view the details of a particular requisition. Clicking a requisition’s ID number does NOT open the requisition up for editing or anything else. It only lets you see a picture of the requisition. Chapter 4 121 Requisition Name: This shows the name you manually typed in when you were creating the requisition (if you chose to do so...It isn’t necessary to give a name to a requisition, but it can be helpful to you later on). BU: This is the Business Unit of the requisition. The only Business Unit we use is SDUSD (San Diego Unified School District). Date: This shows the date that the requisition was first created and saved or submitted. Status: This shows the current status of the requisition; where it is along the Request Lifespan. This is one way you can track your requisition and tell how far along it has come. Please see the Status Definitions, below: Status Definitions: Open: means the requisition is active, but that only you see it. It has not yet been submitted, and so your Approver will not see it yet. Pending: means the requisition has been sent to your Approver, and it is waiting for him/her to approve it. Approved: means the requisition has been approved and it’s now on its way to be processed and fulfilled. PO Created: means the requisition has been turned into a purchase order. PO Dispatched: means the purchase order was sent to the Vendor. Denied: means your Approver denied the requisition. The requisition will not be processed or fulfilled. Canceled: means you canceled the requisition at some time in the past. The requisition is “frozen” indefinitely with no money pre-encumbered. Completed: means the requisition itself has completed its entire cycle. This does NOT necessarily mean that you have received your order at your site. Budget: This shows what the status is of the budget being used to pay for a given requisition. Please see the Budget Definitions, below: Budget Definitions: Not Chk’d: means the budget check process has not been run yet. (All requisitions must pass budget check before they can be submitted). Valid: means the requisition has passed the budget check process successfully, and money has been pre-encumbered for it. Error: means the budget check process has been run, but the requisition has not passed. This usually means there isn’t enough money in the budget to cover the cost of the Chapter 4 122 requisition. (No requisition can be approved or processed until it passes the budget check process). Total: This shows the total dollar amount of a requisition, but without the sales tax. Sales tax is added when the Purchase Order is created later on. Select Action: This is a drop-down list where you can choose to perform an action on your requisition. The choices in this list may change; they depend upon the status of the requisition. The further along the requisition is in its life, the fewer choices you’ll have to do things to it. Editing Requisitions, Add or Delete Items A requisition can be reopened and edited as long as a Purchase Order has not yet been generated from it. You can easily find out whether a P.O. exists by checking the status of the requisition on the Manage Requisitions page. Keep in mind that each time you edit a requisition you must also re-budget-check it and re-submit it for approval. To edit a requisition, you must first navigate to the Manage Requisitions page. From there, find the requisition you want to edit in the list of requisitions. In the Select Action drop-down menu to the right of the requisition, choose the Edit Requisition option, and then click the Go button next to that menu. When you click Go, the requisition will open on your screen, and you’ll be able to edit it. You can add or delete items, change quantities, change Chartfield strings, or just about anything else. If you want to add more items, you simply pick them out from the Catalogs (or create Special Request items) and add them normally to the requisition. If you want to delete items from the requisition, you just select the item you want to get rid of (by clicking a checkmark into its checkbox), and click the Delete button at the bottom of the requisition: Chapter 4 123 NOTE: If you’re working on a Special Request type of requisition you may only be able to edit the Quantity, Comments, Prices, or Due Date of a line item. You might not be able to delete Special Request items if a budget-check has been run on it. Remember: After you finish editing a requisition you must budget-check it again to verify a Valid budget status. Finally, you must submit the requisition for approval. TIP – Requesters and Approvers need to remember that the current tax rate, along with freight and/or any shipping costs are NOT reflected in the total cost of an ePro requisition. These costs are not applied to an order at the requisition level. They are applied later on, when the requisition is turned into a purchase order. It’s important to be aware that any requisition you create will really end up costing a bit more, after tax and possible shipping costs are added. Cancel a Requisition You can only cancel a requisition if it has not yet been turned into a purchase order. You can verify whether a purchase order has been created or not by visiting the Request Lifespan for the requisition. The following shows step-by-step how to cancel a requisition: Step by Step Exercise: Cancel a Requisition Step 1 Navigation: eProcurement Manage Requisitions Go to the Select Action drop-down menu to the right of the requisition you want to cancel. If the choice “Cancel Requisition” is there, then you can still cancel the requisition. After you click “Cancel Requisition,” click the Go button next to it: Chapter 4 124 Step 2 Click the Cancel Requisition button. You will then be brought back to the Manage Requisitions page. Step 3 Verify the requisition was canceled by viewing the following: The Status column shows the requisition is Canceled and the Budget column shows the requisition is Not Checked. Any requisition that is canceled will stay as it is (nothing on it will be deleted or altered) forever. The money that was originally pre-encumbered for it when you performed the budget check will be returned to the budget automatically upon cancellation. NOTE: The returned funds may NOT be immediately available for use! You will have to wait until the district runs its reconciliation process, which is usually once a week. For more details about this, please contact the Budget Department directly. Chapter 4 125 Re-Open a Canceled Requisition You always have the choice of reopening a canceled requisition at any time (even a moment after you canceled it, or months later), if you decide you want to process it after all. The following walks you through how to reopen a canceled requisition and process it. Step by Step Exercise: Re-open a Canceled Requisition Step 1 Navigation: eProcurement Manage Requisitions In the Select Action menu, choose Re-Open Requisition and click Go: Step 2 Click the Reopen Requisition button: Step 3 The requisition will open up and be available for any editing you want to do. You must now edit, then budget-check, get a Valid budget status, and submit the requisition. Approval Status You can see the approval status of your requisition by clicking on the Workflow icon from the Manage Requisitions page. This will show you a graphical representation of the approval flow of any requisition. You can see who (which Approver) the requisition was submitted to; Chapter 4 126 whether or not that person approved the requisition; and if they did approve it, you can see when that happened. Please remember, too, that you can see more details about the status of your requisitions (particularly the denied ones) if you navigate to your Worklist. For information about that, please review the Status Notification section of this book in Chapter 1. The following walks you through how to check the approval status of a requisition. Step by Step Exercise: Check Approval Status Step 1 Navigation: eProcurement Manage Requisitions In the Select Action menu, choose View Approvals and then click Go: Step 2 You can then see all the pertinent information about the approval status: eProcurement Report – Keeping Track of Your Funds All ePro Requisitions for Your School/Dept. Run this report whenever you want to view an up-to-date list that contains: All ePro requisitions submitted by anyone within your school or department. Report will display the following details: o Short description of items ordered o Quantities ordered Chapter 4 127 o Dollar amounts spent o Current status of requisitions o Budget-checking status o Requester ID (who placed the order) o Chartfield strings used in orders Step by Step: All ePro Requisitions for Your School/Dept. Step 1 After you login PeopleSoft Financials and see the main starting page, click Reporting Tools located towards the bottom of the main menu list: Step 2 Click Query Viewer: Chapter 4 128 Step 3 On the Query Viewer page, type the name of the query/report in the begins with text box, and then click the Search button. The name of this particular query/report is SD_SITES_EPRO_REQS: Step 4 The results of the search are displayed, and you’ll have to make a choice on how to run the query: Step 5 You must choose whether to run the query to HTML or to Excel. If you choose HTML, the report will be displayed as a regular PeopleSoft software-type of page on your screen. If you choose Excel, the report will be displayed within an Excel spreadsheet, which makes the data available for editing as you wish. (To print a hardcopy, you must run to Excel). In these example illustrations, we’ll run the query to HTML, and then show you how to download the results to an Excel spreadsheet from the HTML page. Click the blue HTML link underneath the column title Run to HTML: Step 6 A separate window appears on your screen, containing fields to fill in: Chapter 4 129 In the Department field, enter your school’s or department’s 4-digit code number (also called the cost center number). In the Req Date Greater Than field, enter a past date. This should be the beginning of the time frame you want the report to cover. For example, if you want the report to show all ePro requisitions submitted between March 1, 2009 and June 1, 2009, then the Req Date Greater Than field should have the March 1, 2009 date entered into it. In the Req Date Less Than field, enter the ending date of the time period you want to see (it cannot be a future date; it can be the current date, or a past date). Observe the following example. We wanted a report that would show all requisitions submitted between January 1, 2009 and June 23, 2009: After you fill in the fields, click the View Results button to run the query. Step 7 The results are displayed in an HTML page, since that’s the option we chose: NOTE: The results are lengthy and can’t be viewed all in one screen. To view the rest of the results, including dollar amounts spent, you will have to scroll your screen over to the right. If you want to print the report, it’s best to do it after you download the report into an Excel spreadsheet. Otherwise, it won’t print out everything displayed…only what you actually see on your screen, even though there is additional data over to one side that you have to scroll to view. Step 8 At the top, above the results of the query, there is a link called Excel Spreadsheet. Click it: Chapter 4 130 The results from the query/report are displayed in a new window within an Excel spreadsheet. You can then print, save, manipulate the data, format the spreadsheet, etc.: NOTE: Instead of choosing Excel Spreadsheet, you can also choose CSV Text File. Clicking CSV Text File will also download the results into an Excel spreadsheet, but it formats all the data as text. Choosing the Excel Spreadsheet download means that the data will be displayed in more of a bookkeeping sort of way, with the data formatted as numbers, more easily adaptable to financial manipulation and calculations. Here is an illustration of the same query results downloaded into a CSV Text File format: When you are finished viewing, simply close the query window by its black X Close button in its upper right corner. Chapter 4 131 Chapter 5 – Vendors & Items Look for a Vendor You can determine whether a particular Vendor already has an established agreement with the district. Vendor information, forms, invoices, or contracts will be sent from the parties requesting such additions to employees who are designated with the authority to enter Vendors into the PeopleSoft system. (Usually that does not include Requesters who create and submit ePro requisitions). The following walks you through how to find a Vendor. Step by Step Exercise: Find a Vendor Step 1 Navigation: Vendors Vendor Information Under the Add/Update section, click Vendor: Step 2 Use some or all the search fields to look for Vendors. Probably the easiest, fastest way to do this is to type the first three letters of the name of the vendor into the Short Vendor Name textbox, and then click Search. (NOTE: If you just want to view all the vendors in the district list, leave all fields blank and click Search, although that will only return the first 300 vendors we have. There are likely more than that, so it’s better if you can enter a name to be more specific). In the example shown here, we want to look up Scholastic to see whether they are in the district’s list of vendors: Chapter 5 132 Step 3 A list of vendors will appear below, that contain the name you searched on. When you find the one you want click on its name to open it and view details about it: Chapter 5 133 Step 4 You’re then shown a screen containing several tabbed pages (the tabs are located across the top). You can click into the different tabs to view different information about the vendor: To determine for certain if a particular Vendor exists in the eProcurement system, you might need to conduct a search in several different ways, using different criteria. For example, you may need to search with only the first letter of the Vendor name in order to broaden the search. Look for Items Searching for a particular item can be done through a catalog search when creating a requisition. Within that search method you have three options available for finding an item. You can choose to do a Basic search, Advanced search, or Browse Catalogs search. Chapter 2 explains those three search options and how to use them in detail. Chapter 5 134 NOTE: If you want to find out the quantity on hand for any district item within the district’s Catalog lists, please do the following: 1. Click Create Requisition. 2. Click Catalog. 3. Find the item(s) you want by doing a Basic search, Advanced search, or a Browse Catalogs search. 4. When you see the item you want, click on the blue hyperlink text of the Item Description. That brings you to a page displaying the long description of the item. 5. Scroll down to the very bottom of the description page. The current quantity in stock should be displayed there. 6. If the number showing is zero, then it is probably NOT a good idea to try to order it now. Zero quantity means there are none in the warehouse and it’s on back-order. Chapter 5 135 Chapter 6 – Approve Requisitions What an Approver Needs to Know All requisitions require approval before they can be processed. The eProcurement system automatically routes requisitions to the appropriate approvers. Which approver receives a requisition is determined by the Department ID code number used in the Chartfields within the requisition. For example, if Brad Pitt is the approver for Department 0123, then all requisitions whose originators (requesters) use DeptID 0123 in the Chartfields will be routed to Brad Pitt for approval. NOTE: Approvers can only view details, approve or deny requisitions, and track progress. Requisition approvals follow three distinct rules: Departmental approval: Approvers have been established for all Departments (including schools) in the district. As mentioned above, requisitions are routed for approval based upon the Department Chartfield values. Requisitions with multiple Department codes require multiple Departmental approvals. For example, if a single requisition uses two or more Department codes so that two or more Departments pay for the items on that requisition, then all Department approvers for all those Departments will have to approve that requisition. This means that an approver could possibly receive more than one email notification about the same requisition. (Email notifications are automatically sent to approvers upon requisition submission). Resource approvals: Approvers have been established for many Resources. Some requisitions (based on the items being ordered) are routed for approval based on the Resource Chartfield values on each requisition (part of the Chartfield string). Resource approvals are separate and in addition to any Department approvals. This means that after the Department approver approves a requisition, it might be automatically routed to an additional approver based on its Resource Chartfields. Amount approval: If the total dollar amount of any one requisition exceeds $64,000 then that requisition requires an additional approval by the Purchasing Department. Complex requisitions that contain many line items, multiple cost distributions, food service items, or high dollar amounts may require approval from several different approvers. If any one approver denies the requisition at any point in the approval process, the requisition status changes to Denied, regardless of any other approvals. Ultimately, it is the approver’s responsibility to view and verify the requisition’s budget information (Chartfields). Approvers must make sure that the correct department, resource, account, and fund code numbers are being used for the items or services being requested. TIP – It is a good idea for requesters to send a personal email to their Department approvers, letting them know there is a requisition waiting for their approval in their Worklist, in addition to the automatic email message approvers receive from the ePro system, each time a requisition is submitted. Chapter 6 136 Every time someone submits a requisition to you, the Approver, you receive an automated email message from the ePro system. This email is intended to be a notification just to let you know that the req is not sitting in your Worklist awaiting approval. It’s possible for you to click an embedded hyperlink within the email, to open and view the requisition. You can approve it in this manner. However, please be aware that doing this only lets you take care of a single requisition. You still need to login your Worklist periodically (at least once a week) to view all the items awaiting your approval. NOTE: It is important for approvers to approve requisitions by logging in properly to PeopleSoft Financials, and navigating to the correct Worklist. The following walks you through an example of how to approve a typical requisition: Step by Step Exercise: Approve a Requisition Step 1 First, you must login properly: 1. Launch Microsoft Internet Explorer (do NOT use Netscape or any other Internet browser). 2. Go to this URL (address): https://dwa.sandi.net 3. Click the link: Financials Supply Chain 4. Navigation: Worklist You can get to your Worklist two different ways: you can click on the hyperlink Worklist from the header in the upper right corner, or you can navigate through the menu on the left side of the screen: Step 2 To see the details of a requisition that’s been submitted to your Worklist, click the blue hyperlink Requisition ID number to access the Requisition Approval page: Chapter 6 137 Step 3 The last step opened up the submitted requisition. Please take a moment to look at all the parts of the illustration below. When you’re ready to see more details of the requisition (which budget is being used to pay for this item, etc.), you would click the yellow button labeled: View Line Details: General information Details about what’s being ordered. Approver Information If Approver denies requisition, he/she must type explanation to Requester here. Step 4 It is extremely important that every Department Approver verifies that the correct Department, Resource, Account, and Fund code numbers are being used for each item on every requisition. An Approver should also consider Item Description, Quantity, and Price, before approving a requisition. This illustration shows the separate window you’d see after you clicked the View Line Details button. After viewing this, you would click it closed: Chapter 6 138 NOTE: If a requisition is approved and the Chartfield account information is incorrect, then the Approver will have to explain why the incorrect information was not adjusted before approving the requisition. (To have the information adjusted before approval, the Approver must Deny the requisition so that the Requester can make the adjustments and re-submit the requisition. Step 5 After verifying that all the information is correct, it’s now okay to approve the requisition. (If you wanted to deny the requisition, and have the Requester edit it and re-submit it, you would click the Deny button instead). To process the order as it is, you’d click the Approve button: The Worklist maintains all requisitions that require approval from the Worklist owner (the Approver). Once a requisition is approved it no longer appears on the Worklist. You can view all requisitions you’ve approved or denied in the Manage Approvals page; you can also track orders from there by clicking on a requisition’s Request Lifespan icon. If a requisition is denied it might remain on the Worklist until it is edited, re-submitted, or canceled by the requester who created it. If a requisition is going to be denied, the Comment textbox is a good place for the approver to communicate to the requester the reasons for the denial. Any additional approvers can also view these comments, if the requisition is routed to them. TIP –You can approve a single requisition by clicking on the hyperlink within the email notification you receive when the req is submitted to you. HOWEVER, this only lets you view and approve a single requisition. It does not let you see other requisitions that may be sitting in your Worklist, awaiting approval. Chapter 6 139 TIP – Be sure to check your Worklist on a regular basis (about once or twice a week). Verify all requisitions before approving them. Step by Step Exercise: Deny Single Items and Approve the Rest of a Requisition Step 1 First, you must login properly: 1. Launch Microsoft Internet Explorer (do NOT use Netscape or any other Internet browser). 2. Go to this URL (address): https://dwa.sandi.net 3. Click the link: Financials Supply Chain 4. Navigation: Worklist You can get to your Worklist two different ways: you can click on the hyperlink Worklist from the header in the upper right corner, or you can navigate through the menu on the left side of the screen: Step 2 To see the details of a requisition that’s been submitted to your Worklist, click the blue hyperlink Requisition ID number to access the Requisition Approval page: Chapter 6 140 Step 3 The last step opened up the submitted requisition. Please take a moment to look at all the parts of the illustration below. When you’re ready to see more details of the requisition (which budget is being used to pay for this item, etc.), you would click the yellow button labeled: View Line Details: General information Details about what’s being ordered. Approver Information If Approver denies requisition, he/she must type explanation to Requester here. Step 4 It is extremely important that every Department Approver verifies that the correct Department, Resource, Account, and Fund code numbers are being used for each item on every requisition. An Approver should also consider Item Description, Quantity, and Price, before approving a requisition. This illustration shows the separate window you’d see after you clicked the View Line Details button. After viewing this, you would click it closed: Chapter 6 141 NOTE: If a requisition is approved and the Chartfield account information is incorrect, then the Approver will have to explain why the incorrect information was not adjusted before approving the requisition. (To have the information adjusted before approval, the Approver must Deny the requisition so that the Requester can make the adjustments and re-submit the requisition. Step 5 When you receive a requisition with multiple items, you have the option of denying one or more individual items while approving the rest. After approving such a requisition, its status displays for the Requester (the one who submitted it) as See Lines, which indicates that it was partially denied. The Requester can view the requisition to see what part of it was denied and why. You are required to enter a reason why you are denying part(s) of the requisition, before the system allows you to deny anything. To deny individual line items on a submitted requisition, click a checkmark into the left-hand checkboxes of only those items you want to deny: Chapter 6 142 Step 6 Scroll your page up to view the very bottom of the screen. In the Enter Approver Comments textbox enter your reason(s) for denying those items. Your comments will be read by the Requester. You can include brief instructions for the Requester, if desired: Step 7 Scroll back up to the top of the screen. Click the Deny button: Notice how your page changes to reflect your choices (please see large illustration on next page): Chapter 6 143 Chapter 6 144 Step 8 Now click the Approve button to approve the rest of the requisition: Notice how your screen changes once again, to reflect which items were denied (in red) and which ones were approved (in green): Chapter 6 145 Step 9 Click the Return to Worklist link at the bottom left corner of the screen, to view any additional requisitions: Can’t Find a Requisition on Your Approver Worklist? When you navigate online to your PeopleSoft Financials Worklist and you see an ePro requisition there that was recently submitted to you, sometimes you might decide to hold it there until you are ready to approve or deny it. Perhaps you want to get some more information before you make your decision. You might find that the next time you look at your Worklist that requisition is no longer there. That might alarm you or make you wonder where it went, when you had not approved or denied it. The requisition can still be found if you navigate to your Manage Approvals page. Step by Step Exercise: View Your Manage Approvals Page Step 1 From the main menus on the left side of the screen, click the eProcurement menu, and then click Approve Requisitions: Step 2 That takes you to the Approve Requisitions screen, where you can see the status of requisitions you have dealt with, at a glance. You can view details of any requisition on this list by clicking its respective Expand Section icon: Chapter 6 146 Step 3 When you expand the section of a single requisition you can see more details: When you’re finished viewing things on the Approve Requisitions page, you can navigate away from that page or log out of PeopleSoft. Chapter 6 147 Chapter 7 – Maintenance & Support Clear (Delete) Cache Files If you want both PeopleSoft eProcurement and your computer to work well for you, you must perform this routine maintenance task on a regular basis. Most people find that this works best when they do this task every single day that they use any PeopleSoft applications. NOTE: If you use any PeopleSoft (or other Internet-based) applications, and you don’t do this task on a regular basis, you will have technical problems with your computer. This task is called either Deleting Cache Files or Clearing Cache Files. Both names mean the same thing. Cache files are also called “cookies” or “temporary Internet files”. These files are automatically placed onto your computer’s hard drive every time you click into any web page on the Internet (which of course includes all the pages within the PeopleSoft applications). These files are innocuous…that is, they cause no harm to your computer. They actually exist to help your computer navigate quickly back to web pages you’ve visited before. After a while, though, if you ignore these cookies while you keep on using the Internet (and PeopleSoft especially), the cookies pile up more and more, until they start to cause problems. For example, you might notice that your computer starts to respond sluggishly, or you might begin to see mysterious error messages pop up. It’s important to clear the cache files regularly, in order to make room for all the new cookies that are continually pouring in every time you use the Internet. This helps keep your computer and your PeopleSoft applications “fit” and running smoothly for you. The following walks you through the process of clearing cache files. Step by Step Exercise: Clear/Delete Cache Files Step 1 It doesn’t matter which web page you have on your screen, as long as you are in Microsoft Internet Explorer, on the Internet. Go to the Menu Bar at the top of your screen. The Menu Bar sits just beneath the Title Bar. Click Tools on the Menu Bar. The Tools drop-down menu should appear. Chapter 7 148 Step 2 Scroll to the bottom of the Tools drop-down menu and click Internet Options. Step 3 The Internet Options utility window should appear. It’s gray with several tabs along the top. Be sure that the General tab is facing front. About half-way down the middle of this utility window, find two buttons: Delete Cookies and Delete Files. Chapter 7 149 Step 4 Click Delete Cookies. A small confirmation window appears. Click OK on this window. Step 5 Click Delete Files. Another small window appears. Click the checkbox to place a mark inside it, to Delete all offline content. Then click the OK button on this small window. Step 6 Click the big OK button at the very bottom of the Internet Options utility window. Step 7 To completely refresh the browser, close any and all Internet windows that are currently open on your screen. Then you may re-launch Microsoft Internet Explorer and log back into PeopleSoft, if you wish. How to Get Help There are different ways to find help if you ever have a question or experience a problem concerning PeopleSoft eProcurement. NOTE: Currently, the IT Help Desk does not support PeopleSoft applications. Please do not contact them for help with eProcurement. Chapter 7 150 1. The FIRST thing you need to do is review the information found in this user manual, and in related ePro job aids (cheat-sheet handouts received during the ePro training class). Answers to the majority of questions and problems most people experience can be found this way. You can always print out training and support materials at this website: http://www.sandi.net/peoplesoft/readandlearn 2. Another thing you can do (if the printed training materials don’t provide all the answers you need) is to ask the Knowledgebase for help. The Knowledgebase is an online database you can access from any computer through the Internet. You type in a keyword (like, “ePro” or “eProcurement”) and search for information articles that answer many specific questions. To use the Knowledgebase, go to this website (the Knowledgebase is located in the upper-right corner when you arrive there): http://www.sandi.net/peoplesoft 3. You can also view a PeopleSoft Online Tutorial. These tutorials are animated and narrated video clips our district’s training team created just for you. The tutorials step you through how to do things in ePro, using a simulated website that looks and acts like the real ePro. You can just watch the tutorial, or you can click along with it in a handson exercise to learn (or just to refresh your memory) how to do different ePro tasks. You can use these tutorials from any PC computer with a good Internet connection (no dial-up). The tutorials don’t run on Macintosh computers. To access one of these tutorials, you must be logged into PeopleSoft Financials, be on the screen where you need help, and click the Help hyperlink in the upper-right corner. To learn more about how to find and use these tutorials, go to this website: http://www.sandi.net/peoplesoft/readandlearn/elearning 4. For face-to-face assistance, you can attend the next available Open Lab session. Open Labs are free, “help clinics”. No appointments are ever needed; Open Lab is a walk-in, first-come-first-served place. Just be sure to bring with you all pertinent information concerning the issue you want help with. A district eProcurement expert will be there at the Open Lab, waiting for you. You can sit down with the expert at a computer, and receive customized, one-on-one assistance. For details on when and where Open Lab will be taking place (each month a new schedule is posted), please go to this website: http://www.sandi.net/peoplesoft/training/open_lab/practice.asp 5. Finally, the last thing you can do, in an urgent situation, is contact the currently designated Subject Matter Expert (SME) in our district’s use of eProcurement. As of the printing of this manual, that person is: Robin Hoffpauir [email protected] Chapter 7 (858) 522-5805 151 Index All ePro Requisitions for Your School/Dept......................................... 127 Asset .......................................................... 61 Attach a document to an ePro requisition ............................................................... 74 Budget ....................................................... 32 Budget Checking ..................................... 108 Budget Errors .......................................... 110 Cache Files .............................................. 148 Categories ................................................. 62 Chart of Accounts ................................... 14 Chartfields ................................................. 32 Comments ................................................ 98 Comments for Individual Line Items .... 98 Cost Distribution by Amount or Quantity ............................................................... 47 Direct Connect .......................................... 54 Flow Chart - the Basics ............................ 10 Forms ........................................................ 68 How to Get Help ..................................... 150 Look for Items ........................................ 134 Office Depot ............................................ 55 Shipping .................................................... 32 Split Payment............................................ 40 Splitting Costs .......................................... 34 Standardized Account Code Structure (SACS) .................................................. 13 Track a Requisition................................. 119 Vendor .................................................... 132 Waxie .......................................................... 5 152