1
EFI Shell User’s Guide
Draft for Review
Version 1.0_to7thRvw
July 7, 2005
i
EFI Shell User's Guide
Information in this document is provided in connection with Intel products. No license, express or implied, by estoppel or
otherwise, to any intellectual property rights is granted by this document. Except as provided in Intel's Terms and Conditions
of Sale for such products, Intel assumes no liability whatsoever, and INTEL DISCLAIMS ANY EXPRESS OR IMPLIED
WARRANTY, RELATING TO SALE AND/OR USE OF INTEL PRODUCTS INCLUDING LIABILITY OR WARRANTIES
RELATING TO FITNESS FOR A PARTICULAR PURPOSE, MERCHANTABILITY, OR INFRINGEMENT OF ANY PATENT,
COPYRIGHT OR OTHER INTELLECTUAL PROPERTY RIGHT. Intel products are not intended for use in medical, life
saving, or life sustaining applications. Intel may make changes to specifications and product descriptions at any time,
without notice.
This document contains information on products in the design phase. The information here is subject to change without
notice. Do not finalize a design with this information.
Designers must not rely on the absence or characteristics of any features or instructions marked "reserved" or "undefined."
Intel reserves these for future definition and shall have no responsibility whatsoever for conflicts or incompatibilities arising
from future changes to them.
This document as well as the software described in it is furnished under license and may only be used or copied in
accordance with the terms of the license. The information in this manual is furnished for informational use only, is subject to
change without notice, and should not be construed as a commitment by Intel Corporation to update or revise the
information or document. Intel Corporation assumes no responsibility or liability for any errors or inaccuracies that may
appear in this document or any software that may be provided in association with this document.
This document provides website addresses for certain third party websites. The referenced sites are not under the control of
Intel and Intel is not responsible for the content of any referenced site or any link contained in a referenced site. Intel does
not endorse companies or products for sites which it references. If you decide to access any of the third party sites
referenced in this document, you do this entirely at your own risk.
*Other names and brands may be claimed as the property of others.
Intel, the Intel logo, Itanium, and Pentium are trademarks or registered trademarks of Intel Corporation or its subsidiaries in
the United States and other countries.
Copyright © 2000–2005, Intel Corporation. All Rights Reserved.
ii
Revision History
Revision
Revision History
Date
1.0_toRvw
Finished editing pass and first help version. Sent to engr owner for
review. This version is missing the Shell How To's chapter (will be
added soon).
7/15/04
Added Shell How To's chapter and sent for review.
8/2/04
1.0_to2ndRvw
Incorporated the review comments that I received from Winters. Did
not receive replies for all of my review questions, so some are still
included in this version.
8/25/04
1.0_to7thRvw
Incorporated review comments received from Fang & Liu.
(External). Synchronized database.
7/6/2005
1.0to7thRvw
July, 2005
iii
EFI Shell User's Guide
iv
Contents
1 Introduction ...................................................................................................... 9
1.1
1.2
1.3
1.4
Overview ........................................................................................................................ 9
Help System of This Document...................................................................................... 9
Terms ............................................................................................................................. 9
Conventions Used in This Document........................................................................... 10
1.4.1
Command Descriptions ................................................................................. 10
1.4.2
Pseudo-Code Conventions............................................................................ 11
1.4.3
Typographic Conventions.............................................................................. 11
2 Features .......................................................................................................... 13
2.1
2.2
2.3
2.4
Shell Features Introduction .......................................................................................... 13
Shell Appearance......................................................................................................... 13
Supported Features ..................................................................................................... 14
2.3.1
Supported Features....................................................................................... 14
2.3.2
EFI Shell Commands..................................................................................... 15
2.3.3
Batch Scripts ................................................................................................. 15
2.3.4
Nesting the Shell ........................................................................................... 16
2.3.5
PATH Variable Support ................................................................................. 16
2.3.6
KEY History Support...................................................................................... 17
2.3.7
Execution Interrupts....................................................................................... 17
2.3.8
Consistent Mapping of File Systems ............................................................. 18
2.3.9
Output Redirection......................................................................................... 18
2.3.10 Output Streaming Control.............................................................................. 18
2.3.11 Scroll Back Buffer Support ............................................................................ 19
2.3.12 Verbose Help Support ................................................................................... 19
2.3.13 EFI Compatibility of the EFI Shell.................................................................. 19
2.3.14 Running Modes and Backward-Compatibility Support .................................. 20
Invoking the EFI Shell .................................................................................................. 20
2.4.1
Invoking the EFI Shell.................................................................................... 20
2.4.2
Start-up Batch File Startup.nsh ..................................................................... 20
2.4.3
EFI Shell Prompt ........................................................................................... 21
3 Syntax.............................................................................................................. 22
3.1
3.2
3.3
3.4
Introduction .................................................................................................................. 22
Special Characters....................................................................................................... 22
Variable and Alias Substitution .................................................................................... 23
3.3.1
Environment Variables and Variable Substitution ......................................... 23
3.3.2
Alias Substitution ........................................................................................... 23
3.3.3
Valid Characters for Variable Names ............................................................ 23
3.3.4
Variables Available Only in Batch Scripts...................................................... 23
3.3.5
Special Shell Variables.................................................................................. 24
3.3.6
Variable Substitution Flowchart ..................................................................... 25
Wildcard Expansion ..................................................................................................... 27
1.0to7thRvw
July, 2005
v
EFI Shell User's Guide
3.5
3.6
3.7
3.8
Switches and Arguments in Commands ...................................................................... 27
Quotation Marks........................................................................................................... 28
Output Redirection ....................................................................................................... 29
File Naming Conventions ............................................................................................. 30
4 Batch Scripts .................................................................................................. 31
4.1
4.2
Introduction .................................................................................................................. 31
Batch Script Command Descriptions ........................................................................... 31
4.2.1
Summary of Batch Script Commands ........................................................... 31
4.2.2
for...endfor ..................................................................................................... 32
4.2.3
goto................................................................................................................ 34
4.2.4
if...else...endif ................................................................................................ 35
4.2.5
pause............................................................................................................. 36
4.2.6
shift ................................................................................................................ 39
4.3 Variable, Argument, and Alias Substitution.................................................................. 40
4.3.1
Variable, Argument, and Alias Substitution in Batch Scripts ......................... 40
4.3.2
Alias Substitution Rule in Batch Scripts......................................................... 41
4.3.3
General Variable Substitution Rule in Batch Scripts ..................................... 41
4.3.4
General Command Line Variable Substitution Rule in Batch Scripts ............ 41
4.3.5
Supported Number of Arguments in Batch Scripts........................................ 42
4.3.6
Syntax for Variables in Batch Scripts ............................................................ 42
4.3.7
Example of Variable, Argument, and Alias Substitution in Batch Scripts ...... 42
4.4 Comments.................................................................................................................... 43
4.5 Error Handling .............................................................................................................. 43
4.6 Running Modes in Batch Scripts .................................................................................. 44
4.7 Nesting Batch Scripts................................................................................................... 44
4.8 Output Redirection in Batch Scripts ............................................................................. 44
4.9 Echoing in Batch Scripts .............................................................................................. 45
4.10 Known Limitations with the Shell Scripting Language.................................................. 45
5 Commands...................................................................................................... 46
5.1
5.2
5.3
5.4
5.5
vi
Introduction .................................................................................................................. 46
External Commands..................................................................................................... 46
Supported EFI Protocols in the Shell ........................................................................... 46
MS-DOS* 6.22 and Unix* Equivalents ......................................................................... 48
Internal Command Descriptions................................................................................... 49
5.5.1
Summary of EFI Shell Internal Commands ................................................... 49
5.5.2
Command Usage Notes ................................................................................ 50
5.5.3
alias ............................................................................................................... 51
5.5.4
attrib............................................................................................................... 53
5.5.5
cd................................................................................................................... 56
5.5.6
cls .................................................................................................................. 58
5.5.7
connect .......................................................................................................... 59
5.5.8
copy ............................................................................................................... 62
5.5.9
cp................................................................................................................... 66
5.5.10 date................................................................................................................ 69
5.5.11 del.................................................................................................................. 70
5.5.12 dh................................................................................................................... 73
5.5.13
5.5.14
5.5.15
5.5.16
5.5.17
5.5.18
5.5.19
5.5.20
5.5.21
5.5.22
5.5.23
5.5.24
5.5.25
5.5.26
5.5.27
5.5.28
5.5.29
5.5.30
5.5.31
5.5.32
5.5.33
5.5.34
5.5.35
dir................................................................................................................... 77
disconnect ..................................................................................................... 79
drivers............................................................................................................ 82
drvcfg............................................................................................................. 84
drvdiag........................................................................................................... 88
echo............................................................................................................... 91
exit ................................................................................................................. 94
help................................................................................................................ 94
load................................................................................................................ 97
ls .................................................................................................................... 98
map.............................................................................................................. 101
mkdir............................................................................................................ 108
mv................................................................................................................ 110
reconnect..................................................................................................... 112
reset............................................................................................................. 115
rm ................................................................................................................ 116
set................................................................................................................ 118
time.............................................................................................................. 121
touch............................................................................................................ 122
type.............................................................................................................. 124
unload.......................................................................................................... 127
ver................................................................................................................ 129
vol ................................................................................................................ 131
6 Shell How To's .............................................................................................. 133
6.1
6.2
6.3
6.4
6.5
6.6
6.7
6.8
6.9
6.10
6.11
6.12
6.13
6.14
6.15
6.16
6.17
6.18
6.19
6.20
6.21
6.22
6.23
Introduction ................................................................................................................ 133
How to Switch an External Command to an Internal Command ................................ 133
How to Switch an Internal Command to an External Command ................................ 134
How to Understand Consistent Mapping.................................................................... 135
How to Switch the Running Modes of the EFI Shell................................................... 135
How to Correctly Write Scripts in the New EFI Shell.................................................. 136
How to Start a Specific startup.nsh File When Launching EFI Shell.......................... 136
How to Understand the Use of Quotation Marks........................................................ 137
How to Understand the Use of the Escaping Character '^' ........................................ 138
How to Alias ............................................................................................................... 139
How to Map a File System to a User-Specific Mapping Name .................................. 139
How to Set/Modify/Delete Environment Variables ..................................................... 139
How to Launch and Exit the EFI Shell........................................................................ 140
How to Determine the Version of the EFI Shell.......................................................... 140
How to Get Help Information...................................................................................... 141
How to Terminate the Execution of Commands......................................................... 141
How to Pause the Screen Output............................................................................... 141
How to View the Screen History................................................................................. 142
How to Redirect the Output of Commands to Files.................................................... 142
How to View the Contents of a Text File .................................................................... 142
How to Edit a Text File ............................................................................................... 142
How to Edit a Binary File............................................................................................ 142
How to Edit Disk Blocks ............................................................................................. 143
1.0to7thRvw
July, 2005
vii
EFI Shell User's Guide
6.24 How to Edit Memory................................................................................................... 143
6.25 How to Connect a Driver to a Device ......................................................................... 143
Figures
Figure 2-1 EFI Shell Look and Feel ......................................................................................14
Figure 3-1 Variable and Argument Substitution Flowchart....................................................26
Table
Table 1-1 Organization of This Document .............................................................................9
Table 2-1 Types of Commands Available in the EFI Shell...................................................15
Table 2-2 EFI Shell Command Help Information Level........................................................19
Table 3-1 Special Characters in the EFI Shell .....................................................................22
Table 3-2 Index and Positional Variables ............................................................................24
Table 3-3 Special Shell Variables ........................................................................................24
Table 3-4 Wildcard Character Expansion ............................................................................27
Table 3-5 Output Redirection Syntax...................................................................................29
Table 4-1 EFI Shell Batch Script Commands ......................................................................31
Table 4-2 Additional Information on Running Modes...........................................................44
Table 5-1 EFI Shell Protocol Information Table ...................................................................46
Table 5-2 MS-DOS 6.22 and Unix Equivalents for Shell Internal Commands .....................48
Table 5-3 EFI Shell Internal Commands ..............................................................................49
Table 5-4 Conventions for Directory Names ........................................................................56
Table 5-5 Default Values for the Type Parameter ...............................................................85
Table 6-1 Examples of Custom Aliases .............................................................................139
viii
1
Introduction
1.1
Overview
This document, the EFI Shell User's Guide, is the end-user's manual for the EFI Shell. The EFI
Shell is a special EFI application that allows batch scripting, EFI Shell commands, and other EFI
Shell applications to be launched.
This document is organized as listed in the table below.
Table 1-1 Organization of This Document
1.2
Book
Description
Introduction
Provides definitions of terms that are used in this document and
information on references that are mentioned. It also describes the
typographic conventions that are used in this specification.
Features
Describes the features of the EFI Shell. It introduces Shell
commands, batch scripts, PATH variable support, KEY history
support, verbose help support, and other Shell features.
Syntax
Introduces the required syntax for commands and batch scripts in
the EFI Shell.
Batch Scripts
Lists all batch script commands that are available in the EFI Shell.
Commands
Lists all the internal core commands that are available in the EFI
Shell.
Shell How To's
Gives instructions on how to perform various tasks in the EFI Shell.
Help System of This Document
This document is also available in an online help format from the EFI web site. To view the help
system, go to the following URL and go to Tool Documentation > EFI Shell > Standalone
Product in the table of contents (TOC):
http://developer.intel.com/technology/efi/help/efidocs.htm
1.3
Terms
The terms listed below are used throughout this document. See the master Glossary topic in the EFI
Documentation help system and the glossary in the EFI 1.10 Specification for additional definitions
of terms and abbreviations that are used in this document or that might be useful in understanding
the descriptions presented in this document.
9
EFI Shell User's Guide
Introduction
DXE
Driver Execution Environment. Phase of operation in the Intel® Platform Innovation
Framework for EFI that supports running modular code in the form of EFI drivers. Common
to all platforms. Typically in C language. See the Intel® Platform Innovation Framework for
EFI Architecture Specification for more information on this phase.
EFI
The specification containing interface definitions for firmware. These interfaces include those
that are used by the operating system for booting as well as those for the internal construction
of firmware.
Framework
Intel® Platform Innovation Framework for EFI. An implementation of EFI that has been
designed to perform the full range of operations that are required to initialize the platform
from power-on through transfer of control to the operating system. See Related Information
from Intel Corporation in the EFI Documentation help system for more information.
Shell
The EFI Shell is a simple, interactive environment that allows EFI device drivers to be
loaded, EFI applications to be launched, and operating systems to be booted.
1.4
Conventions Used in This Document
1.4.1
Command Descriptions
The commands that are described in this document generally have the following format:
Command Name:
The formal name of the command.
Summary:
A brief description of the command.
EFI Versions:
Indicates the versions of EFI with which the command can
be used.
Usage:
A brief usage of the command.
Description:
A detailed description about how to use that command.
Examples:
Examples to show how to use that command.
10
Features
1.4.2
Pseudo-Code Conventions
Pseudo code is presented to describe algorithms in a more concise form. None of the algorithms in
this document are intended to be compiled directly. The code is presented at a level corresponding
to the surrounding text.
In describing variables, a list is an unordered collection of homogeneous objects. A queue is an
ordered list of homogeneous objects. Unless otherwise noted, the ordering is assumed to be First In
First Out (FIFO).
Pseudo code is presented in a C-like format, using C conventions where appropriate. The coding
style, particularly the indentation style, is used for readability and does not necessarily comply with
an implementation of the Extensible Firmware Interface Specification.
1.4.3
Typographic Conventions
This document uses the typographic and illustrative conventions described below:
Plain text
The normal text typeface is used for the vast majority of the descriptive
text in a specification.
Plain text (blue)
In the online help version of this specification, any plain text that is
underlined and in blue indicates an active link to the cross-reference.
Click on the word to follow the hyperlink. Note that these links are not
active in the PDF of the specification.
Bold
In text, a Bold typeface identifies a processor register name. In other
instances, a Bold typeface can be used as a running head within a
paragraph.
Italic
In text, an Italic typeface can be used as emphasis to introduce a new
term or to indicate a manual or specification name.
BOLD Monospace
Computer code, example code segments, and all prototype code
segments use a BOLD Monospace typeface with a dark red color.
These code listings normally appear in one or more separate paragraphs,
though words or segments can also be embedded in a normal text
paragraph.
Bold Monospace
In the online help version of this specification, words in a
Bold Monospace typeface that is underlined and in blue indicate an
active hyperlink to the code definition for that function or type definition.
Click on the word to follow the hyperlink. Note that these links are not
active in the PDF of the specification. Also, these inactive links in the
PDF may instead have a Bold Monospace appearance that is
underlined but in dark red. Again, these links are not active in the PDF of
the specification.
Italic Monospace
In code or in text, words in Italic Monospace indicate placeholder
names for variable information that must be supplied (i.e., arguments).
Plain Monospace
In code, words in a Plain Monospace typeface that is a dark red
color but is not bold or italicized indicate pseudo code or example code.
These code segments typically occur in one or more separate paragraphs.
1.0to7thRvw
July, 2005
11
EFI Shell User's Guide
text text text
Introduction
In the PDF of this specification, text that is highlighted in yellow
indicates that a change was made to that text since the previous revision
of the PDF. The highlighting indicates only that a change was made
since the previous version; it does not specify what changed. If text was
deleted and thus cannot be highlighted, a note in red and highlighted in
yellow (that looks like (Note: text text text.)) appears where the deletion
occurred.
See the glossary sections in the EFI 1.10 Specification and in the EFI Documentation help system
for definitions of terms and abbreviations that are used in this document or that might be useful in
understanding the descriptions presented in this document.
See the references sections in the EFI 1.10 Specification and in the in the EFI Documentation help
system for a complete list of the additional documents and specifications that are required or
suggested for interpreting the information presented in this document:
The EFI 1.10 Specification is available from the EFI web site
http://developer.intel.com/technology/efi/. The EFI Documentation help
system is available from the EFI web site
http://developer.intel.com/technology/efi/help/efidocs.htm
12
2
Features
2.1
Shell Features Introduction
This section provides information on the various features of the EFI Shell. The EFI Shell is a
simple, interactive environment that allows users to do the following:
• Load EFI device drivers.
• Launch EFI applications.
• Boot operating systems.
• Use a set of basic commands to manage files, system environment variables, and other elements
of EFI.
The EFI Shell provides an environment that can be modified to easily adapt to many different
hardware configurations.
The EFI Shell supports the following:
• A command line interface
• A set of Shell internal commands and external commands
• Batch scripting
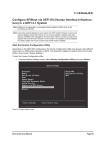
2.2
Shell Appearance
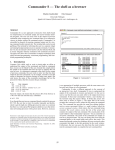
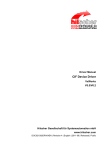
The figure below shows what the device mapping table looks like in the EFI Shell GUI.
13
EFI Shell User's Guide
Features
Figure 2-1 EFI Shell Look and Feel
2.3
Supported Features
2.3.1
Supported Features
The EFI Shell supports the following features, which are discussed in more detail in subsequent
topics:
• EFI Shell Commands
• Batch Scripts
• Nesting the Shell
• PATH Variable
• KEY History
• Execution Interrupts
14
Features
• Consistent Mapping of File Systems
• Output Redirection
• Output Streaming Control
• Scroll Back Buffer
• Verbose Help
• Aliases
• EFI Compatibility of the EFI Shell
• Running Modes and Backward Compatibility
2.3.2
EFI Shell Commands
Three types of commands are available in the EFI Shell:
• Internal commands
• External commands
• Script-only commands
The following table describes these commands.
Table 2-1 Types of Commands Available in the EFI Shell
Type of
Command
For more information,
see...
Description
Internal
Commands that are integrated into the EFI Shell core image.
These commands provide general-purpose management such
as file/directory management and date/time management under
the EFI Shell. The Shell also provides some EFI-specific
management commands, such as for connecting and
disconnecting devices and loading and unloading EFI drivers.
Commands chapter
External
A set of Shell applications.
External Commands in
the Commands chapter
Script-only
Commands that can be executed only when using batch script
files.
Batch Scripts chapter
All commands are invoked by typing the name of the command at the Shell command prompt (also
called just the Shell prompt).
2.3.3
Batch Scripts
The EFI Shell can execute commands from a file, which is called a batch script file (or batch script
program). These files allow users to simplify routine or repetitive tasks. A batch script program is a
Unicode or ASCII text file that contains one or more commands and has an .nsh file name
extension. EFI Shell batch script files are invoked by typing the file name at the command prompt,
with or without the file name extension. Commands in the file are then executed sequentially.
1.0to7thRvw
July, 2005
15
EFI Shell User's Guide
Features
All Shell commands can be executed in batch scripts. In addition, this version of the Shell provides
a set of script-only commands to do the following:
• Perform basic flow control.
• Allow branching and looping in a script
• Allow users to control input and output and call other batch programs (known as script nesting).
Script only means that those commands can be executed only in Shell batch script files and cannot
be executed at the Shell prompt.
See the Batch Script chapter for detailed descriptions of batch scripts and the script-only
commands.
2.3.4
Nesting the Shell
The EFI Shell supports nesting the Shell itself. The EFI Shell can run the Shell from within itself.
The nesting level is determined by how much memory the system has.
The exit command exits the EFI Shell environment. In a nested Shell, this command will quit
only the current Shell. In scripts, the exit command terminates the current Shell, not the current
script. If the current Shell is a child Shell, it will return to the parent Shell. The newly launched
Shell will have a brand new execution environment except for variables and aliases.
Internal Commands in a Nested Shell
Different instances of the EFI Shell can have different sets of internal commands. For example, you
can boot the system to an EFI Shell with the minimum set of internal commands, and then you can
load an EFI Shell with the expected built-in internal commands at the Shell command prompt.
Users can dynamically change their internal command sets in this way and do not need to recompile
their EFI Shell.
2.3.5
PATH Variable Support
The EFI Shell has a default volatile environment variable path, which contains the default path
that the EFI Shell will search if necessary. When a user tries to launch an EFI application, the Shell
first searches for the application in the current directory and does the following:
• If it finds the application in the current directory, it stops searching and executes that application.
• If it does not find the application in the current directory, it will search the path list that is stored
in the path variable sequentially. If it finds the application in one of the paths, it stops searching
and executes that application.
• If the path variable is empty or it does not exist, it treats the current directory as the working
directory.
• If it does not find the application in any of the paths, it reports that the application was not found.
In general, paths that are stored in the path variable look like the following:
16
Features
path:
.;fs0:\efi\tools;fs0:\efi\boot;fs0:\;fs1:\efi\tools;fs1:\efi\boot
;fs1:\
The EFI Shell supports both absolute paths and relative paths when executing commands. Users
can set path to any specified value, but this variable will be refreshed immediately after the
map -r command is executed. This variable is volatile, so the contents will be lost after a reset or
power off.
Typically, users can append the paths to this variable in the following way:
set -v path %path%;fs0:\test
2.3.6
KEY History Support
The EFI Shell saves the history of commands that executed from a Shell prompt. Press the up or
down arrow key to recall the previous commands. Note that the Shell will not save commands that
are executed in batch scripts in the KEY history.
2.3.7
2.3.7.1
Execution Interrupts
Execution Interrupt Support
The EFI Shell supports interrupting the execution of the Shell commands and scripts. There are two
kinds of execution interrupts, which are described in more detail in the next topics:
•
Script execution interrupts
•
Internal command execution interrupts
2.3.7.2
Script Execution Interrupt
Press the ESC key to interrupt the execution of a batch script. The interrupt can happen only
between commands that are included in the batch script. The batch script supports the nesting of the
script. Once a script is interrupted, all its predecessor scripts are also interrupted.
2.3.7.3
Internal Command Execution Interrupt
Press the ESC key to interrupt the execution of time-consuming EFI Shell internal commands (for
example, ls -r). These EFI Shell commands implement the interrupt mechanism by themselves.
1.0to7thRvw
July, 2005
17
EFI Shell User's Guide
Features
Currently, the EFI Shell core does not support interrupting the execution of commands or
applications all by itself. It requires that the commands or applications be able to detect
interruptions.
2.3.8
Consistent Mapping of File Systems
This version of the EFI Shell adopts a new rule called consistent mapping for file system mappings.
Under this rule, names of file system mappings will not change in either of the following scenarios:
• After a reboot
• After the map -r command if the hardware configuration does not change
If two or more computers have the same hardware configuration, the results of the consistent
mapping on these computers should be exactly the same. Hardware configuration changes are
defined as a change to the controllers or physical interfaces to which the devices are
connected.
If you used an older version of the Shell that used the fsX notation style for mapping file systems,
then the new consistent mapping convention might look a little different. For example, a GUIDed
file system may have a consistent mapping name as
f0agonennapphibbndlnmeaakamjeafdnb.They are provided to deliver the capability of
consistent mapping.
The old fsX-style mapping names will be kept in this version of EFI Shell to facilitate the use of
mapping names on the command line, but they do not have the consistent mapping characteristics.
If you need to use mapping names that are consistently mapped, please do not use the old fsX-style
mapping names.
The consistent mapping rule applies only to file system mappings. It does not apply to block I/O
mappings.
2.3.9
Output Redirection
The output of EFI Shell commands can be redirected to Unicode or ASCII text files. See the
following for more information:
• Output Redirection in the Syntax chapter
• Output Redirection in Batch Scripts in the Batch Scripts chapter
2.3.10 Output Streaming Control
The EFI Shell supports pausing and resuming the streaming of characters to the output device.
Press the Tab key to pause and resume the output results that are produced by the current running
commands or applications. This feature is especially useful for commands and applications that
may produce a large number of output results.
18
Features
2.3.11 Scroll Back Buffer Support
The EFI Shell supports scrolling the output buffer back and forward so that consoles can have a
screen history. Press the Page Up and Page Down keys to scroll back and forward in the screen
history, and press any other key to quit scrolling. However, you cannot scroll through the screen
history while a command, application, or script is being executed.
The text output history is limited to a maximum of three screens.
2.3.12 Verbose Help Support
The EFI Shell supports verbose help for each command. Type either help cmd or cmd -? to get
detailed help information for that command. See the help command description in the Commands
chapter for more details.
There are two levels of help information, which are listed in the following table.
Table 2-2 EFI Shell Command Help Information Level
Level
Description
Line help
Describes the Shell command usage in one sentence.
Verbose help
Describes the Shell command usage in detail, including explanations of each switch
and examples.
The help information is built into the EFI Shell image. If you need help support for a customized
internal command, the command has to process the -? flag. The command should print its verbose
help information when it sees this flag. See the EFI Shell Developer’s Guide for details.
2.3.13 EFI Compatibility of the EFI Shell
The EFI Shell is designed to run on all EFI implementations that conform to version 1.02 or higher
of the EFI Specification. As a result, it should be able to run on the following implementations
without any modifications:
• EFI 1.02
• EFI 1.10
• Intel® Platform Innovation Framework for EFI (hereafter referred to as "the Framework")
However, some Shell commands and applications are not supported in all implementations and may
not work on all implementations. The Summary of Shell Internal Commands topic and the
description of each individual command (see the Commands chapter) indicate the versions of EFI
with which the command can be used.
1.0to7thRvw
July, 2005
19
EFI Shell User's Guide
Features
2.3.14 Running Modes and Backward-Compatibility Support
This version of the EFI Shell has two running modes:
• Backward-compatible mode
• Enhanced Shell mode
In backward-compatible mode, users can run old Shell scripts, old Shell commands with old syntax,
and part of the old Shell application without modification or recompiling. In enhanced Shell mode,
the Shell runs with more new features and is not completely compatible with old versions of the
EFI Shell.
This latest version of the EFI Shell uses a reserved volatile environment variable efishellmode
to control and indicate the mode in which the Shell is running. See Special Shell Variables in the
Syntax chapter for more information on this variable.
By default, the EFI Shell will run in enhanced Shell mode. See Running Modes in Batch Scripts in
the Batch Scripts chapter for more information on setting running modes in batch scripts.
2.4
Invoking the EFI Shell
2.4.1
Invoking the EFI Shell
The EFI Shell is provided in two forms:
• As the built-in EFI Shell
• As an .efi image file of the EFI Shell
In the first form, the EFI Shell is built with the firmware and it can be a boot option. In the second
form, the EFI Shell is provided as a file, which users can load and run using either of the following
methods:
• Through the menus in the EFI boot manager (in EFI 1.10) or the Boot Maintenance Manager (in
the Framework)
• By executing the file at the EFI Shell command prompt
2.4.2
Start-up Batch File Startup.nsh
When the EFI Shell is invoked, it searches for a start-up file named startup.nsh and displays
the following message:
Press ESC in 5 seconds to skip startup.nsh, any other key to continue.
20
Features
Startup.nsh is a batch script file that contains Shell commands that will be executed when the
Shell starts. Press the ESC key within five seconds to prevent startup.nsh from executing.
Press any other key to immediately execute startup.nsh. See Shell Appearance for a screen
shot of this prompt.
Startup.nsh is not a required file and does not have to exist.
If the Shell was launched from a file system, it first looks for the startup.nsh file in the same
directory from which the Shell image was just launched. If it cannot find the startup.nsh file in
that directory or if it was not launched from a file system, it will search the execution path that is
defined by the environment variable path. Once the start-up file commands in startup.nsh
have been executed, the Shell looks for commands from a console input device.
When the shell starts it waits for 5 seconds, then executes startup.nsh. Use the shell
environment variable “StartupDelay” to set the waiting time.
2.4.3
EFI Shell Prompt
The Shell prompt—which can also be called the Shell command prompt—is the basic entry for
users to do the following:
• Execute Shell commands.
• Load drivers.
• Execute EFI applications.
It displays one of the following prompt symbols on the screen and waits for user input:
fs0:\> or Shell>
All commands and applications are invoked by typing the name of the command at the Shell
prompt. In addition, the active drive may be changed at the command prompt by typing the mapped
name followed by a colon (:).
1.0to7thRvw
July, 2005
21
3
Syntax
3.1
Introduction
This section provides information on the syntax to use with the EFI Shell. In this context, syntax
means the general rules for what you can and cannot type at the command prompt and include in
batch scripts. It covers the following information:
• Special Characters
• Variable and Alias Substitution
• Wildcard Expansion
• Switches and Arguments in Commands
• Quotation Marks
• Output Redirection
• File Naming Conventions
3.2
Special Characters
The EFI Shell implements a programming language that provides control over the execution of
individual commands. Command names and keywords in certain commands are all case insensitive.
When the Shell scans its input, it always treats certain characters (#, >, %, *, ?, ^, ", space, ,, [,
], and newline)specially. Care should be exercised when using these characters. The following
table describes the uses of these characters.
Table 3-1 Special Characters in the EFI Shell
Character
Description
Newline
Ends a command line.
space
Ends an argument, if it is not in quotation marks. This character is sometimes
referred to as the splitting character.
#
Starts a comment.
>
Used for output redirection.
%
Used to delimit a variable or an argument.
"
Used to delimit a quotation.
^
Prevents the next character from being interpreted as having special meaning.
This character is referred to as the escaping character.
* ? [ ]
Wildcards to specify multiple similar file names.
22
Syntax
3.3
Variable and Alias Substitution
3.3.1
Environment Variables and Variable Substitution
Environment variables are variables that can hold user-specified contents and can be read on a
command line or in scripts. There are two kinds of environment variables:
• Volatile environment variables
• Nonvolatile environment variables
Volatile environment variables will be lost when the system is reset or turned off. Nonvolatile
environment variables will not change until they are modified or deleted.
Environment variables can be set and viewed using the set command. To access the value of an
environment variable, delimit the name of the variable with a % character before and after the
variable name—for example, %myvariable%. The variable names are case insensitive.
Variable substitution is not a recursive process. If %a% is set to %b% and %b% is set to 123, the
substitution result of %a% is %b%, not 123.
In addition to the other topics in this subsection, see Variable, Argument, and Alias Substitution in
the Batch Scripts chapter for more information.
3.3.2
Alias Substitution
If the first argument of a command is a defined alias, the Shell replaces the alias with its defined
value. The alias substitution occurs after the variable substitution. For example, if
%myvariable% is set to dir and dir is aliased to ls, entering %myvariable% in the
command line will cause the ls command to be executed.
Like variable substitution, alias substitution is not recursive.
See Aliases in the Features chapter for more information on aliases.
3.3.3
Valid Characters for Variable Names
Any appearance of invalid characters in a variable name will cause the Shell to stop substituting,
and it will discard the current % on the command line. Only the following characters can be used in
variable names:
• _ (underscore)
• The digits 0 through 9
• Lowercase letters a through z
• Uppercase letters A through Z
3.3.4
Variables Available Only in Batch Scripts
This topic describes the following variables, which are available only in batch scripts:
1.0to7thRvw
July, 2005
23
EFI Shell User's Guide
•
•
Syntax
Index and positional variables
Lasterror variable
See the Batch Scripts chapter for more information on batch scripts.
Index and Positional Variables
In scripts, you can access two other kinds of variables, which are described in the table below:
• Index variables
• Positional variables
Table 3-2 Index and Positional Variables
Variable
Denoted
By
Index
Positional
Required Syntax
Description
%x
Any alphabet
character from
a to z or A to Z
Used in for loops. This variable is valid only within the
for statement in which it is defined.
%n
Digit between 0
and 9
Refers to the arguments that are specified on the
command line with the script. Up to ten positional
arguments are supported for batch scripts. Positional
arguments are substituted before each line in the script
file is executed.
By convention, %0 is the name of the script file that is
currently being executed.
See Variable Substitution Flowchart for the substitution rule in scripts.
To delimit an index variable or positional variable, use a % before the variable name. For example,
%a will delimit the content of index variable a as well as the positional variable.
Lasterror Variable
The Shell also defines a special variable named lasterror that is valid only in scripts. See
Special Shell Variables for more information.
3.3.5
Special Shell Variables
The Shell maintains the following three special variables, which are described in the table below:
• path
• lasterror
• efishellmode
• StartupDelay
Table 3-3 Special Shell Variables
Variable
Description
path
Contains the default directories that may exist on all the discovered file systems. These
24
Syntax
default directories are the root directory, \efi\tools , and \efi\boot. If the
Shell cannot find the script or application under the current directory, it will search the
directories that are referred by this variable when users execute a script or an
application. For more information on this variable, see PATH Variable Support in the
Features chapter.
lasterror
Contains the return code of the most recently executed Shell command. This variable
is valid only in scripts and cannot be set by users. Its name space is separate from that
of an environment variable. Script-only commands, such as if, for, else, and
goto, which are used to control the logic of the script, do not change the value of
lasterror.
efishellmode
A reserved volatile environment variable that is used to determine or specify the current
running mode (backward-compatible mode/enhanced Shell mode, or a newer mode in
a future version of the EFI Shell).
Users can specify a value for this variable using the following command, where
is the valid value for efishellmode:
xxx
set -v efishellmode xxx
Users can read the value of efishellmode the same as when they are reading a
normal environment variable, %efishellmode%. For more information on this
variable, see Running Modes and Backward Compatibility in the Features chapter.
StartupDelay
3.3.6
Set the Startup.nsh delay time.
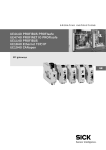
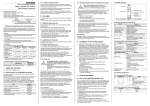
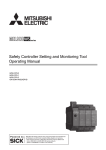
Variable Substitution Flowchart
The following figure shows the sequence for variable and argument substitution. %x means an
index variable and %n means a positional variable.
1.0to7thRvw
July, 2005
25
EFI Shell User's Guide
Figure 3-1 Variable and Argument Substitution Flowchart
26
Syntax
Syntax
3.4
Wildcard Expansion
The *, ?, [, and ] characters can be used as wildcard characters in file name arguments to certain
Shell commands. Besides the file or directory operation commands, the script-only for and if
commands also expand arguments containing wildcard characters to existing file names that match
the pattern. A ^ before the wildcard cannot prevent the wildcard from being expanded.
[ and ] can be either wildcard characters or literal file name characters. The EFI Shell will first try
to interpret them as wildcard characters to match files. If any files are matched, the Shell makes no
further interpretation. Otherwise, the [ and ] characters will be considered as literal characters in
file names.
The table below describes the wildcard expansion for the *, ?, [, and ] characters.
Table 3-4 Wildcard Character Expansion
Character Sequence
Description
*
Matches zero or more characters in a file name.
?
Matches exactly one character in a file name.
[ and ]
Matches one character in a file name with one of the characters in [ and
].
3.5
Switches and Arguments in Commands
Most Shell commands take arguments after the command name that allow you to additionally
specify what the command is supposed to do. Some arguments are optional or required,
depending on the command. The syntax for the command, as listed in the command description
in this document (or in the verbose help for the command), indicates the required
format for any arguments.
The Shell and this document also use some specialized terms switch, flag, and option
to indicate a subset of arguments. These terms are used interchangeably and indicate
an argument that begins with a + or – character. The Shell will interpret this argument
specially.
The following are some examples of arguments and switches that can be used in specific
Shell commands. The text after the command name are arguments or switches.
1.0to7thRvw
July, 2005
27
EFI Shell User's Guide
Shell>
Shell>
Shell>
Shell>
Syntax
load –nc IsaBus.efi
map -r
connect –c
set -d diagnosticpath
All of the internal and external Shell commands support the flag -b. This flag tells the command to
display one screen at a time. This flag is very useful when listing the help information of a
command. Because it is a default flag that is available in all commands, it is not listed in the
commands’ syntax or help information.
3.6
Quotation Marks
The EFI Shell uses quotation marks for argument grouping. A quoted string is treated as a single
argument to a command or as a part of a single argument to a command. Any white space
(including spaces, tabs, and commas) that is included in the quoted string is simply part of that
single argument.
Double quotation marks ("") are used to denote strings and should appear in pairs. However, if
unpaired quotation marks appear in a command line, they will be discarded before passing to the
command entry point. Empty strings are treated as valid command line arguments. It is up to each
command whether to ignore these empty strings.
Quotation marks can define the smallest unit upon which variable substitution will be performed.
This smallest unit is called a part. A part is a subset of a single argument. For example, there are
three parts in the following argument, which are abc, %1, and def, respectively:
abc"%1"def
The introduction of a part helps to avoid ambiguity in the variable substitution process. Variable
substitution will be performed within a single part and cannot be performed across the boundary of
any two adjacent parts. As a result, a"%1"b is completely different from a%"1"b for variable
substitution.
In a command line, the EFI Shell will treat an argument that begins with a + or – character as a flag
option, and it will be specially interpreted. As a result, to prevent an argument from being
interpreted as a flag, a string starting with a + or - character must be enclosed by a pair of quotation
marks. For example, in the following command line, the argument -b will not be interpreted as a
flag:
alias more "-b"
As an alternate approach, you can use the escaping character ^ to prevent an argument that starts
with a + or – character from being interpreted as a flag option. For example, if you type echo ^d" at the command prompt, -d is interpreted as a string and not as a flag, and the string -d will be
displayed instead of an error message that the flag -d is unknown.
28
Syntax
3.7
Output Redirection
The output of EFI Shell commands can be redirected to files. The following is the syntax for this
redirection:
Command > unicode_output_file_pathname
Command >a ascii_output_file_pathname
Command 1> unicode_output_file_pathname
Command 1>a ascii_output_file_pathname
Command 2> unicode_output_file_pathname
Command 2>a ascii_output_file_pathname
Command >> unicode_output_file_pathname
Command >>a ascii_output_file_pathname
Command 1>> unicode_output_file_pathname
Command 1>>a ascii_output_file_pathname
The table below describes the special character combinations that are used in the syntax above.
Table 3-5 Output Redirection Syntax
Character
Sequence Description
>
Redirects standard output to a Unicode file.
>a
Redirects standard output to an ASCII file.
1>
Redirects standard output to a Unicode file.
1>a
Redirects standard output to an ASCII file.
2>
Redirects standard error to a Unicode file.
2>a
Redirects standard error to an ASCII file.
>>
Redirects standard output that is appended to a Unicode file.
>>a
Redirects standard output that is appended to an ASCII file.
1>>
Redirects standard output that is appended to a Unicode file.
1>>a
Redirects standard output that is appended to an ASCII file.
The EFI Shell will redirect standard output to a single file and standard errors to a single file.
Redirecting both standard output and standard errors to different files is allowed. The following
actions are not currently supported:
• Redirecting standard output and standard errors to the same file
• Redirecting standard output to more than one file on the same command
• Redirecting standard errors to multiple files
NUL is used as a special output file name. When NUL is used, the output will not be written into a
file. Instead, it is discarded silently.
1.0to7thRvw
July, 2005
29
EFI Shell User's Guide
3.8
Syntax
File Naming Conventions
This version of the EFI Shell supports only the FAT file system. All file and directory naming
conventions are compatible with the FAT file system specification. The following FAT versions are
supported:
• For system partitions: FAT32
• For removable media: FAT12 and FAT16
Both short and long names are supported. The maximum valid length for a file or directory name is
255 characters. According to conventions, the following characters cannot be used in a file or
directory name:
•*
•?
•<
•>
•/
•\
•"
•:
•|
30
4
Batch Scripts
4.1
Introduction
This chapter describes batch scripts and the batch-script-only commands in more detail.
Specifically, it provides detailed descriptions of all batch script commands (also known as scriptonly commands) and discusses the following:
• Performing variable, argument, and alias substitution in batch script files
• Using comments in batch script files
• Handling errors in batch scripts
• Handling running modes in batch scripts
• Nesting the execution of batch script files
• Redirecting the output of batch script files
• Echoing commands in batch scripts to the console
• Known limitations with the scripting language in batch scripts
See the Batch Scripts topic in the Features chapter for introductory information on batch scripts.
All EFI Shell command syntax that was described in the Syntax chapter applies to EFI Shell batch
scripts. Note that the Shell does not save commands that are executed from a batch script for the
KEY history (up-arrow command recall).
4.2
Batch Script Command Descriptions
4.2.1
Summary of Batch Script Commands
The table below lists the script-only commands. The following topics describe the EFI Shell batch
script commands in detail.
Table 4-1 EFI Shell Batch Script Commands
Command
Description
for...endfor
Executes commands for each item in a set of items.
goto
Makes the execution of the batch file jump to another location.
if...else...endif
Executes commands in specified conditions.
pause
Prints a message and suspends for keyboard input.
shift
Shifts the arguments from %0 to %9 one by one.
31
EFI Shell User's Guide
Batch Scripts
NOTE
The indentation, spacing, or line breaks that are used in the script command descriptions in this
section are optimized for viewing the documentation. They might not always match what is in the
EFI Shell product itself.
4.2.2
for...endfor
NOTE
This command is available only in batch script files.
Summary
Executes one or more commands for each item in a set of items.
Usage
for %indexvar in set
command [arguments]
[command [arguments]]
...
endfor
for %indexvar run (start end [step])
command [arguments]
[command [arguments]]
...
endfor
Description
The for command executes one or more commands for each item in a set of items. The set may
be text strings, file names, or a mixture of both, separated by spaces (if not in quotation marks). If
the length of an element in the set is between 0 and 256 and if the string contains wildcards, the
string will be treated as a file name containing wildcards and be expanded before command is
executed. If no such files are found after expansion, the literal string itself is kept.
Indexvar is any alphabet character from a to z or A to Z, and they are case sensitive. It should
not be a digit (0–9) because %digit will be interpreted as a positional argument in the command
line that launches the script. The name space for index variables is separate from that for
environment variables, so if indexvar has the same name as an existing environment variable,
the environment variable will remain unchanged by the for loop. Each command is executed once
for each item in the set, with any occurrence of %indexvar in the command being replaced with
the current item.
In the second format of the for...endfor statement, indexvar will be assigned a value from
start to end with an interval of step. The start and end values can be any integer whose
32
Batch Scripts
length is less than 7 digits excluding the sign, and it can also apply to step with one exception of
zero.
Step is optional. If step is not specified, it will automatically be determined by the following
rule: if start <= end, then step = 1; otherwise step = -1.
Start, end, and step are divided by a space.
Examples
Example 1
#
# Sample for loop - listing all .txt files
#
echo -off
for %a in *.txt
echo %a exists
endfor
If there are two files named file1.txt and file2.txt in the current directory, the following
will be the output of the sample script:
Sample1> echo -off
file1.txt exists
file2.txt exists
Theoretically it is legal for two nested for commands to use the same alphabet letter as their index
variable, for instance, a.
#
# Sample for loop from 1 to 3 with step 1
#
echo -off
for %a run (1 3)
echo %a
endfor
#
# Sample for loop from 3 down to 1 with step -1
#
echo -off
for %a run (3 1 -1)
echo %a
endfor
Example 2
1.0to7thRvw
July, 2005
33
EFI Shell User's Guide
Batch Scripts
#
# Sample for loop - 2 nested for using same index variable
#
echo -off
for %a in value1 value2
for %a in value3 value4
echo %a
endfor
endfor
When processing the first for loop and before seeing the endfor, the index variable %a has the
value value1. As a result, in the second for loop, the %a has already been defined and will be
replaced with the current value of %a. After substitution, the string becomes for value1 in
value3 value4, which is not a legal for command. Thus, the script will execute without error
only when the value of %a is also a single alphabet letter. If two independent for commands use
the same index variable, the first for has already freed the variable when the second for is
encountered, so there will be no problem in this case.
4.2.3
goto
NOTE
This command is available only in batch script files.
Summary
Makes the execution of the batch file jump to another location.
Usage
goto label
Description
The goto command directs the batch file to execute the line in the batch file after the given label.
This command is not supported from the interactive Shell.
A label is a line beginning with a colon (:). It can appear either before or after the goto command.
The Shell searches forward in the batch file for label, from the current file position. If it reaches
the end of the file, the search resumes at the top of the file and continues until it finds label or it
reaches the starting point. If label is not found, the batch process terminates and the Shell
displays an error message. If a label is encountered but the goto command was not executed, the
label lines are ignored.
You cannot use the goto command to jump into another for loop, but it is legal to jump into an
if statement.
34
Batch Scripts
Examples
# This is a batch script
goto Done
...
:Done
cleanup.nsh
4.2.4
if...else...endif
NOTE
This command is available only in batch script files.
Summary
Executes one or more commands depending on whether a specified condition is true or false.
Usage
The if command has two forms:
(1)if [not] exist filename then
command [arguments]
[command [arguments]]
...
[else
command [arguments]
[command [arguments]]
...
]
endif
(2)if [/i] [not] string1 == string2 then
command [arguments]
[command [arguments]]
...
[else
command [arguments]
[command [arguments]]
...
]
endif
Description
The if command executes one or more commands before the else or endif commands, if the
specified condition is true; otherwise, commands between else (if there is an else) and endif
are executed.
1.0to7thRvw
July, 2005
35
EFI Shell User's Guide
Batch Scripts
In the first usage above of if, the exist condition is true when the file that is specified by
filename exists. The filename argument may include device and path information. This first
form of if also supports wildcard expansion. If more than one file matches the wildcard pattern,
the condition evaluates to TRUE.
In the second usage, the string1 == string2 condition is true if the two strings are identical.
Here the comparison can be case sensitive or insensitive, depending on the optional switch /i. If
/i is specified, it will compare strings in the case-insensitive manner; if /i is not specified, it
compares strings in the case-sensitive manner.
The else command is optional in an if/else statement.
Examples
#
# Example script for "if" command
#
if exist fs0:\myscript.nsh then
myscript myarg1 myarg2
endif
if %myvar% == runboth then
myscript1
myscript2
else
echo ^%myvar^% != runboth
endif
In this example, if the script file myscript.nsh exists in fs0:\, then this script will be
launched with the following two arguments:
• myarg1
• myarg2
The environment variable %myvar% is then checked to see if its value is runboth. If it is, the
scripts myscript1 and myscript2 will be executed one after the other; otherwise, the
following message is printed:
%myvar% != runboth
4.2.5
pause
NOTE
This command is available only in batch script files.
Summary
Prints a message to the display and then suspends batch file execution and waits for keyboard input.
36
Batch Scripts
Usage
pause [-q]
Description
The pause command prints a message to the display and then suspends the execution of the batch
file and waits for keyboard input. Pressing any key except for q or Q resumes execution of the
script. If q or Q is pressed, batch processing terminates; otherwise, execution continues with the
next line after the pause command.
The -q switch is optional and hides the message.
1.0to7thRvw
July, 2005
37
EFI Shell User's Guide
Batch Scripts
Examples
* The following script is a sample of 'pause' command:
fs0:\> type pause.nsh
File: fs0:\pause.nsh, Size 204
#
# Example script for 'pause' command
#
echo pause.nsh begin..
date
time
pause
echo pause.nsh done.
* To execute the script with echo on:
fs0:\> pause.nsh
+pause.nsh> echo pause.nsh begin..
pause.nsh begin..
+pause.nsh> date
06/19/2001
+pause.nsh> time
00:51:45
+pause.nsh> pause
Enter 'q' to quit, any other key to continue:
+pause.nsh> echo pause.nsh done.
pause.nsh done.
* To execute the script with echo off:
fs0:\> echo -off
fs0:\> pause.nsh
pause.nsh begin..
06/19/2001
00:52:50
Enter 'q' to quit, any other key to continue: q
fs0:\>
Shell>
38
Batch Scripts
* The following script is a sample of 'pause -q' command:
fs0:\> type pause.nsh
File: fs0:\pause.nsh, Size 207
#
# Example script for 'pause' command
#
echo pause.nsh begin..
date
time
pause -q
echo pause.nsh done.
* To execute the script with echo on:
fs0:\> pause.nsh
+pause.nsh> echo pause.nsh begin..
pause.nsh begin..
+pause.nsh> date
06/19/2001
+pause.nsh> time
00:51:45
+pause.nsh> pause -q
+pause.nsh> echo pause.nsh done.
pause.nsh done.
* To execute the script with echo off:
fs0:\> echo -off
fs0:\> pause.nsh
pause.nsh begin..
06/19/2001
00:52:50
pause.nsh done.
fs0:\>
Shell>
4.2.6
shift
NOTE
This command is available only in batch script files.
Summary
Shifts the arguments from %0 to %9 one by one.
1.0to7thRvw
July, 2005
39
EFI Shell User's Guide
Batch Scripts
Usage
shift
Description
The shift command increases the number of positional parameters to more than the standard ten
for use.
Examples
* Following script is a sample of 'shift' command:
fs0:\> type shift.nsh
File: fs0:\shift.nsh, Size 79
#
# Example script for 'shift' command
#
echo %1 %2 %3
shift
echo %1 %2
* To execute the script with echo on:
fs0:\> shift.nsh welcome EFI world
+shift.nsh> echo welcome EFI world
Welcome EFI world
+shift.nsh> shift
+shift.nsh> echo EFI world
EFI world
* To execute the script with echo off:
fs0:\> echo -off
fs0:\> shift.nsh welcome EFI world
welcome EFI world
EFI world
4.3
Variable, Argument, and Alias Substitution
4.3.1
Variable, Argument, and Alias Substitution in Batch Scripts
This section describes variable, argument, and alias substitution in batch scripts and covers the
following:
• Alias Substitution Rule
• General Variable Substitution Rule
• General Command Line Variable Substitution Rule
• Supported Number of Arguments
• Syntax for Variables
40
Batch Scripts
• Examples
The rules that are described in this section are true only in enhanced Shell mode.
4.3.2
Alias Substitution Rule in Batch Scripts
NOTE
This rule is true only in enhanced Shell mode.
In batch scripts, only the first argument on the command line can be an alias. No other arguments
will be interpreted as an alias. Substitution of aliases is not recursive.
4.3.3
General Variable Substitution Rule in Batch Scripts
NOTE
This rule is true only in enhanced Shell mode.
Besides environment variables, there are positional variables and index variables that can be used
only in batch scripts. As a result, variable substitution in scripts is more complicated. See the
Variable Substitution Flowchart in the Syntax chapter for the searching sequence for variable
substitution.
4.3.4
General Command Line Variable Substitution Rule in Batch Scripts
NOTE
This rule is true only in enhanced Shell mode.
Command line variable substitution in batch scripts is simple, because it does not have to consider
index variables and positional variables. Command line variable substitution deals only with
environment variables. For environment variables, the syntax is %var%, where var is a valid
variable name and should be included between two % characters.
If the command line interpreter finds an environment variable whose name is var, it will substitute
the %var% string with the content that is defined by the variable. If the command line interpreter
cannot find any environment variable whose name is var, then it will substitute the %var% string
with an empty string.
Variable substitution is not recursive, which means that the content that is extracted from a variable
will not be further interpreted as a variable.
1.0to7thRvw
July, 2005
41
EFI Shell User's Guide
4.3.5
Batch Scripts
Supported Number of Arguments in Batch Scripts
NOTE
This rule is true only in enhanced Shell mode.
This release of the EFI Shell supports a maximum of 256 arguments for batch scripts. However,
only a maximum of nine positional variables from %0 to %9 are provided in scripts. This version of
the Shell adds a new script-only command shift, which provides access to all the arguments by
rotating the positional variables from %0 to %9.
4.3.6
Syntax for Variables in Batch Scripts
NOTE
This rule is true only in enhanced Shell mode.
The syntax listed in Valid Characters for Variable Names (in the Syntax chapter) also applies for
variables in batch scripts.
For index variables, their names are case sensitive and can only be one of the letters.
For positional variables, their names can only be one of the digits from 0 to 9.
4.3.7
Example of Variable, Argument, and Alias Substitution in Batch
Scripts
The following uses the script file ArgVar.nsh as an example:
# Variable & Argument substitution
echo -off
for %a in IndexVarA
echo Output: %1%a%b
endfor
echo -on
Suppose there is an environment variable %1% defined as EnvVar1 and another variable %a%
defined as EnvVarA:
fs0:>ArgVar PosArg1
Argvar> echo -off
Output: EnvVar1ab
When the script is executed with an argument, %1 is defined as EnvArg1. When the first % is met,
environment variable %1 is attempted, which causes the %1 be replaced with EnvArg1. Then a is
42
Batch Scripts
met and it is kept as it is. Lastly, the %b is attempted. Because %b does not exist, the % will be
discarded and b will be left.
Now launch the script without the command line argument:
fs0:>set –d 1
Argvar> echo -off
Output: EnvVarAb
This time %1% does not exist and %1 becomes undefined. The next check will then be %a%, and
%a% will be substituted with EnvVarA. The resulting string then looks like EnvVarAb.
Now delete another environment variable %a% and try the script:
fs0:>set -d a
fs0:>ArgVar
Argvar> echo -off
Output: IndexVarAb
In the previous example, %1 is replaced with an empty string. Then the second % is met. Because
%a% also is not defined, the index variable %a is attempted, which will find a match. Thus %a is
replaced with IndexVarA. Then, the remaining %b takes the form %x but matches nothing, so the
% is discarded.
The argument and variable substitution is a single circular process, so if the value of a positional
argument contains an environment variable %var% and regardless of whether %var% is defined
when the script is launched, the argument will be replaced with the literal string %var%.
After the arguments and variables are substituted, the Shell examines the first argument to see if it
is an alias name. If so, the alias name is replaced with its value.
4.4
Comments
Comments can be embedded in batch scripts. The # character on a line is used to denote that the
Shell is to ignore all characters on the same line and to the right of the #. Comments are not echoed
to the console regardless of whether the echo state is on or off.
4.5
Error Handling
By default, if an error is encountered during the execution of a command in a batch script, the script
will continue to execute. However, if an error is encountered that affects the logic of the script
when executing the script-only commands (such as for...endfor, if...else...endif,
and goto), the script will exit. If the error-causing script is called by another script, the caller script
will continue to execute.
1.0to7thRvw
July, 2005
43
EFI Shell User's Guide
Batch Scripts
The lasterror Shell variable is provided to allow batch scripts to test the results of the most
recently executed command using the if command. This variable is not an environment variable; it
is a special variable that the Shell maintains for the lifetime of the current instance of the Shell. It is
a read-only variable and cannot be modified by the command set. Script-only commands, which
are used to control the logic of the script, do not affect the value of the lasterror variable.
4.6
Running Modes in Batch Scripts
The running mode will always be set to backward-compatible mode at the beginning of execution
of a batch script file, no matter what mode the Shell was in before the script is executed. As a
result, it is the user's responsibility to have the script set the running mode to the proper mode for
its purpose.
See the topics that are listed in the table below for more information on running modes.
Table 4-2 Additional Information on Running Modes
Topic
Chapter
Description
Running Modes and
Backward Compatibility
Features
Provides general information on running modes in the Shell.
Nesting Batch Scripts
Batch Scripts
Discusses running modes in nested batch scripts.
4.7
Nesting Batch Scripts
Execution of batch script files can be nested; that is, script files may be executed from within other
script files. Recursion is allowed.
A batch script can contain one or more batch scripts. The maximum nesting level is 9. The
embedded batch script will be executed as a command. After the whole embedded batch script is
executed completely, the next command will be executed.
The EFI Shell will automatically save and restore the running mode before and after the execution
of nested scripts so that the changes of running modes in nested scripts will not affect the running
mode of a parent script.
4.8
Output Redirection in Batch Scripts
Output redirection is fully supported in scripts. Output redirection on a command in a script file
causes the output for that command to be redirected. Output redirection on the invocation of a batch
44
Batch Scripts
script causes the output for all commands that are executed from that batch script to be redirected to
the file, with the output of each command appended to the end of the file.
If a command in a script redirects its output to file1 but the output is redirected to file2 on
invocation of a whole script, the output of that command will be redirected to file1. However,
the echo of the command itself (if the echo state is on) will appear in file2, as well as the output
of all other commands.
4.9
Echoing in Batch Scripts
By default, both the input and output for all commands that are executed from a batch script are
echoed to the console. Use the echo -off command to suppress displaying commands that are
read from a batch file. In addition, you can insert an additional @ character before a command in a
batch file to prevent the current command from being echoed.
When a script is launched from the interactive Shell, by default its echo state inherits the echo state
of the interactive Shell. Changing the echo state in the script does not affect the echo state of the
interactive Shell. When a script calls another script, the called script inherits the caller script's
current echo state. However, if the called script changes the echo state, after returning, the caller's
echo script also changes.
4.10 Known Limitations with the Shell Scripting Language
The following are some known limitations with the EFI Shell scripting language capabilities:
• Do not try to read from and write to the same file within a single command. For example, do not
use the following:
fs0:>type test.nsh > test.nsh;
• Do not use the goto command to jump into another loop.
• Do not use the same index variable in nested for statements, which can easily lead to errors.
• Do not reference the index value outside of the for statement that defines it.
• Do not use continue and break (which are unsupported) to begin the next iteration or quit a
loop. Use the goto command to control the execution flow if necessary. Note that there is a
Shell command called break, but it is for debug purposes only and is not documented in this
user's guide.
• Do not use the exit command to quit the current script. This command will quit the entire EFI
Shell.
1.0to7thRvw
July, 2005
45
5
Commands
5.1
Introduction
The EFI Shell environment provides a rich set of commands that extend and enhance the EFI Shell
capability. These commands can be used directly from a command prompt.
In addition, users can combine and organize these commands into a batch file. Batch files (also
called batch programs) allow users to simplify routine or repetitive tasks (see the Batch Scripts
chapter for more information).
This chapter does the following:
• Briefly discusses external Shell commands
• Lists the abbreviations that are used in the EFI Shell to indicate EFI protocol names
• Lists the MS-DOS* 6.22 and Unix* equivalent names for EFI Shell internal commands
• Provides descriptions of all the Shell internal commands
5.2
External Commands
External commands are a set of Shell applications. There is no difference between internal and
external Shell commands, and they can be switched to each other very easily. See the Shell How
To's chapter for instructions on switching internal commands to external commands, and vice versa.
However, some internal commands are internal only and cannot be switched to external commands,
because they are too close to the EFI Shell core and it is not reasonable to make them external.
These commands are noted with a double asterisk (**) in Shell Internal Command Descriptions
Overview and in the detailed description of each command.
External commands have to reside in a file system. As a result, to run them, users need to have at
least one mapped file system and put those external commands under this file system.
5.3
Supported EFI Protocols in the Shell
The table below shows all the supported protocol information in the EFI Shell. Some Shell
commands need this information to operate. For example, the dh command needs the protocol
symbol for its -p flag to list all the handles on which the specific protocol was installed.
Table 5-1 EFI Shell Protocol Information Table
Protocol Symbol
EFI Protocol
BlkIo
Block I/O Protocol
46
Commands
BusSpecificDriverOverride
Bus Specific Driver Override Protocol
ComponentName
Component Name Protocol
Configuration
Driver Configuration Protocol
ConIn
Console-in Device
ConOut
Console-out Device
DebugPort
Debugport Protocol
DebugSupport
Debug Support Protocol
Decompress
Decompress Protocol
DevIo
Device I/O Protocol
Diagnostics
Driver Diagnostics Protocol
DiskIo
Disk I/O Protocol
Dpath
Device Path Protocol
DriverBinding
Driver Binding Protocol
ErrOutSplit
Error-out Splitter Protocol
Fs
Simple File System Protocol
Image
Loaded Image Protocol
IsaAcpi
ISA ACPI Protocol
IsaIo
ISA I/O Protocol
LegacyBoot
Legacy Boot Protocol
Load
Load File Protocol
Net
Simple Network Protocol
Nii
Network Interface Identifier Protocol
PciIo
PCI I/O Protocol
PciRootBridgeIo
PCI Root Bridge I/O Protocol
Pxebc
PXE Base Code Protocol
ScsiIo
SCSI I/O Protocol
ScsiPassThru
SCSI Pass Thru Protocol
SerialIo
Serial I/O Protocol
SimplePointer
Simple Pointer Protocol
StdErr
Standard Error Device
Tcp
TCP Protocol
Txtin
Simple Text-in Protocol
TxtInSplit
Text-in Splitter Protocol
Txtout
Simple Text Output Protocol
TxtOutSplit
Text-out Splitter Protocol
UgaDraw
UGA Draw Protocol
UgaIo
UGA I/O Protocol
UnicodeCollation
Unicode Collation Protocol
1.0to7thRvw
July, 2005
47
EFI Shell User's Guide
Commands
UsbIo
USB I/O Protocol
VgaClass
VGA Class Driver Protocol
5.4
MS-DOS* 6.22 and Unix* Equivalents
The following table lists the equivalent command names for internal EFI Shell commands and MSDOS* 6.22 and Unix* commands.
Table 5-2 MS-DOS 6.22 and Unix Equivalents for Shell Internal Commands
EFI Shell Command
MS-DOS 6.22 Equivalent
alias
Unix Equivalent
alias
attrib
attrib
chmod
cd
cd
cd
cls
cls
clear
copy
copy
cp
cp
copy
cp
date
date
date
del
del
rm
dir
dir
echo
echo
echo
exit
exit
exit
connect
dh
dir
disconnect
drivers
drvcfg
drvdiag
help
help
load
ls
dir
ls
mkdir
mkdir
mkdir
mv
move
mv
reset
reset
reboot
rm
del
rm
map
reconnect
48
Commands
set
set
set
time
time
time
touch
touch
type
type
type
unload
ver
ver
vol
vol
5.5
Internal Command Descriptions
5.5.1
Summary of EFI Shell Internal Commands
The EFI Shell core integrates some internal commands. The table below lists all the internal EFI
Shell commands that are supported. The following topics describe each command in more detail.
Because there are some fundamental differences between different EFI implementations, some of
the commands cannot run across all implementations. The table indicates the versions of EFI that
are supported for each respective command. If you run a command that is not supported on a
system, the command should quit gracefully with a message.
In the table below, a double asterisk (**) indicates that the command is an internal-only command;
it cannot be switched to an external command or application. See the External Commands topic in
this chapter for more information.
All of the Shell commands listed below support the -b flag. This flag tells the command to display
one screen at a time. Because it is a default flag that is available in all commands, it is not listed in
the commands’ syntax or help information.
Table 5-3 EFI Shell Internal Commands
Command
Supported EFI
Version
Description
alias**
EFI 1.02 and above
Displays, creates, or deletes aliases in the EFI Shell.
attrib
EFI 1.02 and above
Displays or changes the attributes of files/directories.
cd**
EFI 1.02 and above
Displays or changes the current directory.
cls
EFI 1.02 and above
Clears the standard output with a background color.
connect**
EFI 1.10 and above
Binds an EFI driver to a device and starts the driver.
copy
EFI 1.02 and above
Copies one or more files/directories to another location.
cp
EFI 1.02 and above
Copies one or more files/directories to another location.
date
EFI 1.02 and above
Displays the current date or sets the date in the system.
del
EFI 1.02 and above
Deletes one or more files or directories.
dh**
EFI 1.10 and above
Displays the handles in the EFI environment.
1.0to7thRvw
July, 2005
49
EFI Shell User's Guide
Commands
dir
EFI 1.02 and above
Displays a list of files and subdirectories.
disconnect**
EFI 1.10 and above
Disconnects one or more drivers from a device.
drivers
EFI 1.10 and above
Displays a list of drivers that follow the EFI Driver Model.
drvcfg
EFI 1.10 and above
Invokes the Driver Configuration Protocol.
drvdiag
EFI 1.10 and above
Invokes the Driver Diagnostics Protocol.
echo**
EFI 1.02 and above
Displays messages or turns command echoing on or off.
exit**
EFI 1.02 and above
Exits the EFI Shell.
help, ?**
EFI 1.02 and above
Displays the list of commands or verbose help of a command.
load
EFI 1.10 and above
Loads EFI drivers.
ls
EFI 1.02 and above
Displays a list of files and subdirectories.
map**
EFI 1.02 and above
Displays or defines mappings.
mkdir
EFI 1.02 and above
Creates one or more directories.
mv
EFI 1.02 and above
Moves one or more files/directories to a destination.
reconnect**
EFI 1.10 and above
Disconnects a driver from a device and then connects it again.
reset
EFI 1.02 and above
Resets the system.
rm
EFI 1.02 and above
Deletes one or more files or directories.
set**
EFI 1.02 and above
Displays/creates/changes/deletes environment variables.
time
EFI 1.02 and above
Displays the current time or sets the time of the system.
touch
EFI 1.02 and above
Updates the time with the current time.
type
EFI 1.02 and above
Displays the contents of a file.
unload
EFI 1.10 and above
Unloads a protocol image.
ver
EFI 1.02 and above
Displays the version information.
vol
EFI 1.02 and above
Displays volume information of the file system.
**
This command is an internal-only command; it cannot be switched to an external command or application.
NOTE
The indentation, spacing, or line breaks that are used in the command descriptions in this section
are optimized for viewing the documentation. They might not always match what is in the EFI Shell
product itself.
All of the syntax in these command descriptions is only for enhanced Shell mode.
5.5.2
Command Usage Notes
Note the following when using the Shell internal commands:
1. If the Handle parameter is required in the internal Shell command argument—for example, in
the dh or disconnect command—it actually indicates the handle index, not the real handle.
For convenience, the EFI Shell views the handle index as the equivalent of the real handle to
operate an image handle, device handle, and so on. As a result, users should also use the handle
50
Commands
index instead of the real handle value in Shell commands. The handle index can change after
some hardware changes or the execution of some commands, such as disconnect, connect,
reconnect. To get the current handle index for the specified device, driver, or image, use the
dh command.
In some file-operation-related Shell commands, such as load and attrib, an argument is listed
as File... or Directory... in the syntax. The suffix "..." here indicates that the
arguments can be one or more files/directories. The command will process these arguments in the
order in which they appear on the command line. Any previous execution failures will not prevent
the following commands from executing. For example, attrib +h file1 file2 file3
is a legal command and has the same execution results as the following command sequence:
attrib +h file1
attrib +h file2
attrib +h file3
If any execution among them fails, the next command will continue executing until all the
arguments in the list have been executed.
2.
3.
4.
5.
5.5.3
alias
NOTE
This command is an internal-only command. It cannot be switched to an external command.
Summary
Displays, creates, or deletes aliases in the EFI Shell environment.
EFI Versions
EFI 1.02 and above.
Usage
ALIAS [-d|-v] [sname] [value]
-d
-v
sname
value
-
Deletes an alias
Volatile variable
Alias name
Original name
Description
This command displays, creates, or deletes aliases in the EFI Shell environment. An alias provides
a new name for an existing EFI Shell command or an EFI application. Once the alias is created, it
can be used to run the command or launch the EFI application. There are some aliases that are
predefined in the EFI Shell environment. These aliases provide the MS-DOS* and Unix*
1.0to7thRvw
July, 2005
51
EFI Shell User's Guide
Commands
equivalent names for the file manipulation commands. The examples below show the default
aliases that are available in the EFI Shell.
See the following for more information on alias substitution:
• Alias Substitution in the Syntax chapter
• Alias Substitution Rule in the Batch Scripts chapter
Examples
Shell> help alias
Displays, creates, modifies, or deletes aliases in the EFI Shell
environment.
ALIAS [-d|-v] [sname] [value]
-d
-v
sname
value
-
Deletes an alias
Volatile variable
Alias name
Original name
Note:
1. 'sname' should not be an internal Shell command.
2. 'value' can be an internal Shell command, a script, or an EFI
application. However, any other values are also acceptable.
3. Alias values are stored in EFI NVRAM and will be retained
between
boots unless the flag '-v' is specified.
4. Alias should not succeed to add a non-volatile alias when a
same
volatile alias exists, or vice versa.
52
Commands
Examples:
* To display all aliases in the current EFI environment:
Shell> alias
md
: mkdir
rd
: rm
* To create an
Shell> alias
Shell> alias
md
:
rd
:
myguid :
alias to the EFI environment:
myguid guid
* To delete an
Shell> alias
Shell> alias
md
:
rd
:
alias in the EFI environment:
-d myguid
mkdir
rm
guid
mkdir
rm
* To add a volatile alias in the current EFI environment, which
has a
star * at the line head. This volatile alias will disappear
at
next boot.
Shell> alias -v fs0 floppy
Shell> alias
md
: mkdir
rd
: rm
* fs0 : floppy
Shell>
5.5.4
attrib
Summary
Displays and sets the attributes of files or directories.
EFI Versions
EFI 1.02 and above.
1.0to7thRvw
July, 2005
53
EFI Shell User's Guide
Commands
Usage
ATTRIB [+a|-a] [+s|-s] [+h|-h] [+r|-r] [file...] [directory...]
+a|-a
+s|-s
+h|-h
+r|-r
file
directory
-
Sets or clears 'archive' attribute
Sets or clears 'system' attribute
Sets or clears 'hidden' attribute
Sets or clears 'read only' attribute
File name (wildcards are permitted)
Directory name (wildcards are permitted)
Description
This command displays and sets the attributes of files or directories. The following four attribute
types are supported in the EFI file system:
• Archive [A]
• System [S]
• Hidden [H]
• Read only [R]
If a file (in general meaning) is a directory, then it is also shown to have the attribute [D].
If any file in the file list that is specified in the command line does not exist, attrib will continue
processing the remaining files while reporting the error.
54
Commands
Examples
Shell> help attrib
Displays or changes the attributes of files or directories.
ATTRIB [+a|-a]
+a|-a
+s|-s
+h|-h
+r|-r
file
directory
[+s|-s] [+h|-h] [+r|-r] [file...] [directory...]
- Sets or clears 'archive' attribute
- Sets or clears 'system' attribute
- Sets or clears 'hidden' attribute
- Sets or clears 'read only' attribute
- File name (wildcards are permitted)
- Directory name (wildcards are permitted)
Notes:
1. If no attribute option is specified in the parameters, the
command
simply displays the attributes of specified files or
directories.
2. If no file or directory is specified in the command line
arguments,
then the command applies to all the files and directories
within the
current directory.
Examples:
* To display the attributes of a directory:
fs0:\> attrib fs0:\
attrib:D
fs0:\
* To add the system attribute to all files of extension '.efi':
fs0:\> attrib +s *.efi
* To display attributes of all files/directories in the current
directory:
fs0:\> attrib *
attrib: AS
fs0:\serial.efi
attrib:DA
fs0:\test1
attrib: A HR fs0:\bios.inf
attrib: A
fs0:\VerboseHelp.txt
attrib: AS
fs0:\IsaBus.efi
* To remove attributes of files, using the -a, -s, -h, -r
option:
fs0:\> attrib -r *.inf
attrib: A H fs0:\bios.inf
1.0to7thRvw
July, 2005
55
EFI Shell User's Guide
Commands
Shell>
5.5.5
cd
NOTE
This command is an internal-only command. It cannot be switched to an external command.
Summary
Changes the current working directory that is used by the EFI Shell environment.
EFI Versions
EFI 1.02 and above.
Usage
CD [path]
path - The relative or absolute file path
Description
This command changes the current working directory that is used by the EFI Shell environment.
The table below describes the conventions that are used to refer to the directory, its parent, and its
driver mapping in the EFI Shell environment.
Table 5-4 Conventions for Directory Names
Convention
Description
.
Refers to the current directory.
..
Refers to the directory's parent.
\
Refers to the root of the current driver mapping.
The following example shows how to move between the directories on a floppy drive containing an
EFI directory and a TOOLS subdirectory below the EFI directory.
56
Commands
Examples
Shell> help cd
Displays or changes the current directory.
CD [path]
path - The relative or absolute file path
Note:
1. Type CD without parameters to display the current fs and
directory.
2. The 'path' parameter can contain some special usage. When '.'
or
'..' is used as a directory, '.' means the current directory,
and
'..' means its parent directory. '\' can also be used at the
beginning of the path to represent the root of the current
driver
mapping.
3. CD shall be used in the same volume.
4. CD can change the current directory in the file system other
than
current file system.
5. There must be at least one blank space between CD and path.
Examples:
* To change the current fs to the mapped fs0:
Shell> fs0:
* To change the current directory to subdirectory 'efi':
fs0:\> cd efi
* To change the current directory to the parent directory
(fs0:\):
fs0:\efi\> cd ..
* To change the current directory to 'fs0:\efi\tools':
fs0:\> cd efi\tools
* To change the current directory to the root of the current fs
(fs0):
fs0:\efi\tools\> cd \
fs0:\>
* To move between volumes and maintain the current path .
fs0:\> cd \efi\tools
fs0:\efi\tools\> fs1:
fs1:\> cd tmp
fs1:\tmp> cp fs0:*.* .
1.0to7thRvw
July, 2005
57
EFI Shell User's Guide
Commands
Shell>
5.5.6
cls
Summary
Clears the standard output device with an optional background color attribute.
EFI Versions
EFI 1.02 and above.
Usage
CLS [color]
color
- New
0
1
2
3
4
5
6
7
background color
- Black
- Blue
- Green
- Cyan
- Red
- Magenta
- Yellow
- Light gray
Description
This command clears the standard output device with an optional background color attribute. If
color is not defined, then the background color does not change.
58
Commands
Examples
Shell> help cls
Clears the standard output with an optional background color.
CLS [color]
color
- New
0
1
2
3
4
5
6
7
background color
- Black
- Blue
- Green
- Cyan
- Red
- Magenta
- Yellow
- Light gray
Note:
1. If no parameters are specified, this command clears the
standard output device. The background color is not changed.
Examples:
* To clear the output but not change the background color:
fs0:\> cls
* To clear the output and change the background color to Cyan:
fs0:\> cls 3
* To clear the output and change the background with default
color (black):
fs0:\> cls 0
Shell>
5.5.7
connect
NOTE
This command is an internal-only command. It cannot be switched to an external command.
Summary
Binds a driver to a specific device and starts the driver.
EFI Versions
EFI 1.10 and above.
1.0to7thRvw
July, 2005
59
EFI Shell User's Guide
Commands
Usage
CONNECT [[DeviceHandle] [DriverHandle] | [-c] | [-r]]
-r
-c
- Connect recursively
- Connect console devices described in the
EFI
DeviceHandle
number
DriverHandle
number
Environment Variables
- Device handle, always taken as hexadecimal
- Driver handle, always taken as hexadecimal
Description
This command binds a driver to a specific device and starts the driver. If the -r flag is used, then
the connection is done recursively until no further connections between devices and drivers are
made. If the -c flag is used, then the connect command will bind the proper drivers to the
console devices that are described in the EFI environment variables. The example below shows the
typical output from the verbose help for this command.
60
Commands
Examples
Shell> help connect
Binds an EFI driver to a device and starts the driver.
CONNECT [[DeviceHandle] [DriverHandle] | [-c] | [-r]]
-r
-c
- Connect recursively
- Connect console devices described in the
EFI
DeviceHandle
number
DriverHandle
number
Environment Variables
- Device handle, always taken as hexadecimal
- Driver handle, always taken as hexadecimal
Note:
1. When option '-c' is specified, only console devices described
in the
EFI Environment Variables and related devices will be
connected.
2. If recursive option '-r' is specified, it causes EFI to scan
all
handles and checks to see if any loaded or embedded driver can
match
the specified device. If so, the driver will be bound to the
device.
Additionally, if more device handles are created during the
binding, these
handles will also be checked to see if a matching driver can
bind to
these devices as well. The process is repeated until no more
drivers
are able to connect to any devices. However, if without the
option,
the newly created device handles will not be further bound to
any
drivers.
3. If no 'DriverHandle' parameter is specified, all matched
drivers will
be bound to the specified device.
4. If no 'DeviceHandle' parameter is specified, all device
handles in the
current system will be the default.
5. If only a single handle is specified and the handle has an
EFI_DRIVER_BINDING_PROTOCOL on it, then the handle is assumed
to
be a driver handle. Otherwise, it is assumed to be a device
handle.
1.0to7thRvw
July, 2005
61
EFI Shell User's Guide
Commands
6. If nothing is specified, then all proper drivers will be tried
to bind
to all the devices without recursion. Each connection status
will
be dumped.
7. Output redirection is not supported for ‘connect –r’ usage.
Examples:
* To connect all drivers to all devices recursively:
Shell> connect –r
* To display all connections:
Shell> connect
ConnectController(1) : Status = Success
ConnectController(2) : Status = Success
ConnectController(3) : Status = Success
...
ConnectController(3D) : Status = Success
* To connect driver 0x17 to all the devices it can manage:
Shell> connect 17
* To connect all possible drivers to device 0x19:
Shell> connect 19
* To connect driver 0x17 to device 0x19:
Shell> connect 19 17
* To connect console devices described in the EFI Environment
Variables:
Shell> connect -c
Shell>
5.5.8
copy
Summary
Copies one or more source files or directories to a destination.
EFI Versions
EFI 1.02 and above
62
Commands
Usage
COPY [-r] [-q] src [src...] [dst]
-r
-q
prompt)
src
permitted)
dst
- Recursive copy
- Quiet copying (replace existing files without
- Source file/directory name (wildcards are
- Destination file/directory name (wildcards are not
permitted)
Description
This command copies one or more source files or directories to a destination. If the source is a
directory, the -r flag must be specified. If -r is specified, then the source directory will be
recursively copied to the destination (which means that all subdirectories will be copied). If a
destination is not specified, then the current working directory is assumed to be the destination.
If any target file (not directory) already exists, there will be a prompt asking the user to confirm
replacing the file. The following four choices are available:
• Yes: Replace the file.
• No: Do not replace the file.
• All: Replace the existing files in all subsequent cases.
• Cancel: Do not replace any existing files in all subsequent cases.
If there are multiple source files/directories, the destination must be a directory.
1.0to7thRvw
July, 2005
63
EFI Shell User's Guide
Commands
Examples
Shell> help copy
Copies one or more files/directories to another location.
COPY [-r] [-q] src [src...] [dst]
-r
-q
prompt)
src
permitted)
dst
- Recursive copy
- Quiet copying (replace existing files without
- Source file/directory name (wildcards are
- Destination file/directory name (wildcards are not
permitted)
Note:
1. '-r' must be specified if src is a directory. If '-r' is
specified,
then the source directory will be recursively copied to the
destination. Src itself will be copied.
2. If 'dst' parameter is not specified, then the current
directory is assumed to
be the destination.
3. 'COPY -r src1 src2 dst' is to copy all files and
subdirectories in
'src1' and 'src2' to the destination 'dst'. 'Src1' and 'src2'
themselves are also
copied. 'dst' parameter will be interpreted as a directory.
4. Copying a directory/file to itself is not allowed.
5. If an error occurs, COPY will exit immediately and the
remaining files or
directories will not be copied.
6. When 'copy' is executed with a script file, it always performs
quiet
copying regardless of whether the '-q' option is specified.
7. If you are copying multiple files, the destination must be an
existing
directory.
Examples:
* To display the contents of current directory first of all:
fs0:\> ls
Directory of: fs0:\
06/18/01
06/18/01
06/18/01
06/13/01
06/13/01
64
01:02p <DIR>
01:02p <DIR>
01:02p <DIR>
10:00a
10:00a
512
512
512
28,739
32,838
efi
test1
test2
IsaBus.efi
IsaSerial.efi
Commands
06/18/01
06/18/01
08:04p
29
08:05p <DIR>
512
3 File(s)
61,606 bytes
4 Dir(s)
temp.txt
test
* To copy a file in the same directory but change the file
name:
fs0:\> copy temp.txt readme.txt
copying fs0:\temp.txt -> fs0:\readme.txt
- [ok]
* To copy multiple files to another directory:
fs0:\> copy temp.txt isaBus.efi \test
copying fs0:\temp.txt -> fs0:\test\temp.txt
- [ok]
copying fs0:\isaBus.efi -> fs0:\test\IsaBus.efi
- [ok]
* To copy multiple directories recursively to another
directory:
fs0:\> copy -r test1 test2 boot \test
copying fs0:\test1 -> fs0:\test\test1
copying fs0:\test1\test1.txt -> fs0:\test\test1\test1.txt
- [ok]
copying fs0:\test2 -> fs0:\test\test2
copying fs0:\test2\test2.txt -> fs0:\test\test2\test2.txt
- [ok]
copying fs0:\boot -> fs0:\test\boot
copying fs0:\boot\shell.efi -> fs0:\test\boot\shell.efi
- [ok]
* To see the results of the above operations:
fs0:\> ls \test
Directory of: fs0:\test
06/18/01
06/18/01
01/28/01
01/28/01
01/28/01
01/28/01
01/28/01
01:01p <DIR>
512
01:01p <DIR>
0
08:21p <DIR>
512
08:21p <DIR>
512
08:21p <DIR>
512
08:23p
29
08:23p
28,739
2 File(s)
28,828 bytes
5 Dir(s)
.
..
test1
test2
boot
temp.txt
IsaBus.efi
Shell>
1.0to7thRvw
July, 2005
65
EFI Shell User's Guide
5.5.9
Commands
cp
Summary
Copies one or more source files or directories to a destination.
EFI Versions
EFI 1.02 and above.
Usage
CP [-r] [-q] src [src...] [dst]
-r
-q
prompt)
src
permitted)
dst
- Recursive copy
- Quiet copying (replace existing files without
- Source file/directory name (wildcards are
- Destination file/directory name (wildcards are not
permitted)
Description
This command copies one or more source files or directories to a destination. If the source is a
directory, the -r flag must be specified. If -r is specified, then the source directory will be
recursively copied to the destination (which means that all subdirectories will be copied). If a
destination is not specified, then the current working directory is assumed to be the destination.
If any target file (not directory) already exists, there will be a prompt asking the user to confirm
replacing the file. The following four choices are available:
• Yes: Replace the file.
• No: Do not replace the file.
• All: Replace the existing files in all subsequent cases.
• Cancel: Do not replace any existing files in all subsequent cases.
If there are multiple source files/directories, the destination must be a directory.
66
Commands
Examples
Shell> help cp
Copies one or more files/directories to another location.
CP [-r] [-q] src [src...] [dst]
-r
-q
prompt)
src
permitted)
dst
- Recursive copy
- Quiet copying (replace existing files without
- Source file/directory name (wildcards are
- Destination file/directory name (wildcards are not
permitted)
Note:
1. ‘-r’ must be specified if src is a directory. If '-r' is
specified,
then the source directory will be recursively copied to the
destination.
Src itself will be copied.
2. If 'dst' parameter is not specified, then the current
directory is assumed to
be the destination.
3. 'Cp -r src1 src2 dst' is to copy all files and subdirectories
in
'src1' and 'src2' to the 'dst.' 'Src1' and 'src2' themselves
are also
copied. 'dst' parameter will be interpreted as a directory.
4. Copying a directory/file to itself is not allowed.
5. If an error occurs, cp will exit immediately and the remaining
files or
directories will not be copied.
6. When 'cp' is executed with a script file, it always performs
quiet
copy regardless of whether the '-q' option is specified.
7. If are copying multiple files, the destination must be an
existing directory.
Examples:
* To display the contents of current directory first of all:
fs0:\> ls
Directory of: fs0:\
06/18/01
06/18/01
06/18/01
06/13/01
06/13/01
1.0to7thRvw
01:02p <DIR>
01:02p <DIR>
01:02p <DIR>
10:00a
10:00a
July, 2005
512
512
512
28,739
32,838
efi
test1
test2
IsaBus.efi
IsaSerial.efi
67
EFI Shell User's Guide
06/18/01
06/18/01
08:04p
29
08:05p <DIR>
512
3 File(s)
61,606 bytes
4 Dir(s)
Commands
temp.txt
test
* To copy a file in the same directory but change the file
name:
fs0:\> cp temp.txt readme.txt
copying fs0:\temp.txt -> fs0:\readme.txt
- [ok]
* To copy multiple files to another directory:
fs0:\> cp temp.txt isaBus.efi \test
copying fs0:\temp.txt -> fs0:\test\temp.txt
- [ok]
copying fs0:\isaBus.efi -> fs0:\test\IsaBus.efi
- [ok]
* To copy multiple directories recursively to another
directory:
fs0:\> cp -r test1 test2 boot \test
copying fs0:\test1 -> fs0:\test\test1
copying fs0:\test1\test1.txt -> fs0:\test\test1\test1.txt
- [ok]
copying fs0:\test2 -> fs0:\test\test2
copying fs0:\test2\test2.txt -> fs0:\test\test2\test2.txt
- [ok]
copying fs0:\boot -> fs0:\test\boot
copying fs0:\boot\shell.efi -> fs0:\test\boot\shell.efi
- [ok]
* To see the results of the above operations:
fs0:\> ls \test
Directory of: fs0:\test
06/18/01
06/18/01
01/28/01
01/28/01
01/28/01
01/28/01
01/28/01
Shell>
68
01:01p <DIR>
512
01:01p <DIR>
0
08:21p <DIR>
512
08:21p <DIR>
512
08:21p <DIR>
512
08:23p
29
08:23p
28,739
2 File(s)
28,828 bytes
5 Dir(s)
.
..
test1
test2
boot
temp.txt
IsaBus.efi
Commands
5.5.10 date
Summary
Displays and sets the current date for the system.
EFI Versions
EFI 1.02 and above.
Usage
DATE [mm/dd/[yy]yy]
mm
dd
yyyy
- Month of date to be set, Month range: 1 – 12
- Day of date to be set, Day range: 1 – 31
- Year of date to be set, Year range: 1998 – 2099
Description
This command displays and/or sets the current date for the system. If no parameters are used, it
shows the current date. If a valid month, day, and year are provided, then the system's date will be
updated. Detailed rules are listed below:
1. Except for numeric characters and /, all other characters in the argument are invalid. The Shell
will report an error if the number is in the wrong month/date/year range.
2. Space before or after the numeric character is not allowed. Inserting a space into the number is
invalid.
3. Repeated zeros are allowed before the number. For example:
Shell > date 0000008/000004/000097
Shell > date
08/04/2097
Shell >
4. The year range is greater than or equal to 1998. Two numeric characters indicate the year.
Numbers below 98 are regarded as 20xx, and numbers equal to or above 98 are regarded as 19xx.
00 means 2000. For example:
Shell > date 8/4/97
Shell > date
08/04/2097
Shell >
Shell > date 8/4/98
Shell > date
08/04/1998
Shell >
5. The range of valid years is from 1998–2099.
1.0to7thRvw
July, 2005
69
EFI Shell User's Guide
Commands
Examples
Shell> help date
Displays the current date or sets the date in the system.
DATE [mm/dd/[yy]yy]
mm
dd
yyyy
- Month of date to be set, Month range: 1 - 12
- Day of date to be set, Day range: 1 - 31
- Year of date to be set, Year range: 1998 - 2099
Note:
1. yy: 98=1998, 99=1999, 00=2000, 01=2001, ..., 97=2097.
2. yyyy: 1998 - 2099, other values are invalid.
3. EFI may behave unpredictably if illegal date values are used.
Examples:
* To display the current date in the system:
fs0:\> date
06/18/2001
* To set the date with long year format:
fs0:\> date 01/01/2050
fs0:\> date
01/01/2050
* To set the date with short year format:
fs0:\> date 06/18/01
fs0:\> date
06/18/2001
Shell>
5.5.11 del
Summary
Deletes one or more files or directories.
EFI Versions
EFI 1.02 and above.
70
Commands
Usage
DEL [-q] file/directory [file/directory ...]
-q
confirmation
file
directory
- Quiet mode; does not prompt user for a
- File name (wildcards are permitted)
- Directory name (wildcards are permitted)
Description
This command deletes one or more files or directories. If the target is a directory, it will delete the
directory, including all its subdirectories. It is not allowed to redirect a file whose parent directory
(or the file itself) is being deleted.
1.0to7thRvw
July, 2005
71
EFI Shell User's Guide
Commands
Examples
Shell> help del
Deletes one or more files or directories.
DEL [-q] file/directory [file/directory ...]
-q
confirmation
file
directory
- Quite mode: does not prompt user for a
- File name (wildcards are permitted)
- Directory name (wildcards are permitted)
Note:
1. Removing a read-only file/directory will result in a failure.
Removing a
directory containing read-only file(s) will result failure.
2. If an error occurs, DEL will exit immediately and later
files/directories
will not be removed.
3. You cannot remove a directory when the current directory is
itself or its
subdirectory.
4. If file contains wildcards, it will not ask the user for
confirmation.
5. You cannot remove the root directory.
6. You cannot remove thecurrent directory or its ancestor.
7. Redirecting output to a file that exists under the directory
that will
be removed is not allowed.
Examples:
* To remove multiple directories at a time:
fs0:\> ls test
Directory of: fs0:\test
06/18/01
06/18/01
06/19/01
06/19/01
01:01p <DIR>
01:01p <DIR>
12:59a <DIR>
12:59a <DIR>
0 File(s)
4 Dir(s)
512
0
512
512
0 bytes
.
..
temp1
temp2
* Error occurs and DEL will exit:
fs0:\> del test\temp11 temp2
rm/del: Cannot find 'fs0:\test\temp11' - Not Found
* To remove multiple directories with wildcards:
fs0:\> del test\temp*
rm/del: Remove subtree 'fs0:\test\temp1' [y/n]? y
72
Commands
removing fs0:\test\temp1\temp1.txt
- [ok]
removing fs0:\test\temp1\boot\nshell.efi
- [ok]
removing fs0:\test\temp1\boot
- [ok]
removing fs0:\test\temp1
- [ok]
rm/del: Remove subtree 'fs0:\test\temp2' [y/n]? y
removing fs0:\test\temp2\temp2.txt
- [ok]
removing fs0:\test\temp2
- [ok]
* Removing a directory that contains a read-only file will
fail:
fs0:\> attrib +r test\temp1\readme.txt
A R fs0:\test\temp1\readme.txt
fs0:\> del test\temp1
rm/del: Cannot open 'readme.txt' under 'fs0:\test\temp1' in
writable
mode
- [error] - Access Denied
Exit status code: Access Denied
Shell>
5.5.12 dh
NOTE
This command is an internal-only command. It cannot be switched to an external command.
Summary
Displays the device handles in the EFI environment.
EFI Versions
EFI 1.10 and above.
1.0to7thRvw
July, 2005
73
EFI Shell User's Guide
Commands
Usage
DH [-l <lang>] [handle | -p <prot_id>] [-d] [-v]
handle
taken as
-p
prot_id
-d
-l
-v
- Dumps information of a specified handle, always
hexadecimal number
- Dumps all handles of a protocol specified by
- Dumps EFI Driver Model related information
- Dumps information using the ISO 639-2 language
specified by lang.
- Dumps verbose information on specified handle
Description
This command displays the device handles in the EFI environment. If this command is used with a
specific handle number, the details of all the protocols that are associated with that device handle
are displayed. Otherwise, the -p option can be used to list the device handles that contain a specific
protocol. See Supported EFI Protocols in the Shell for the abbreviations that are used with this
command for EFI protocols. The following examples show how the command can be used.
74
Commands
Examples
Shell> help dh
Displays the handles in the EFI environment.
DH [-l <lang>] [handle | -p <prot_id>] [-d] [-v]
handle
always taken
-p
prot_id
-d
-l
-v
- Dumps information of a specified handle,
as hexadecimal number
- Dumps all handles of a protocol specified by
- Dumps EFI Driver Model related information
- Dumps information using the ISO 639-2 language
specified by lang.
- Dumps verbose information on specified handle
Note:
1. When neither 'handle' nor 'prot_id' is specified, a list of
all the
handles in the EFI environment is displayed.
2. Option '-d' can be used to display EFI Driver Model related
information, including its parent handles, child handles, all
drivers
on it, etc.
3. Option '-v' can be used to display verbose information on the
specified handle, including all the protocols on it and their
details.
4. If option '-p' is specified, all handles containing the
specified
protocol will be displayed. Otherwise, the 'handle' parameter
has to
be specified for display. In this case, option '-d' will be
enabled
automatically if option '-v' is not specified.
Examples:
* To display all handles and display one screen at a time:
Shell> dh -b
Handle dump
1: Image(DXE Foundation)
2: FwVol FwFileSys FwVolBlk DevPath(MemMap(11:1B500001D4FFC8))
3: Image(Ebc)
4: DevPath(MemMap(11:1CA0000-1CB0000))
5: Image(WinNtThunk)
6: WinNtThunk DevPath(..76F3-11D4-BCEA-0080C73C8881))
7: Image(WinNtBusDriver) DriverBinding
...
1.0to7thRvw
July, 2005
75
EFI Shell User's Guide
Commands
* To display the detailed information on handle 0x30:
Shell> dh 30
Handle 30 (01AF5308)
IsaIo
ROM Size......: 00000000
ROM Location..: 00000000
ISA Resource List :
IO : 000003F8-000003FF Attr : 00000000
INT : 00000004-00000000 Attr : 00000000
dpath
PNP Device Path for PnP
HID A0341D0, UID 0x0
Hardware Device Path for PCI
PNP Device Path for PnP
HID 50141D0, UID 0
AsStr: 'Acpi(PNP0A03,0)/Pci(1F|0)/Acpi(PNP0501,0)'
* To display all handles with 'diskio' protocol:
Shell> dh -p diskio
Handle dump by protocol 'Diskio'
15: DiskIo BlkIo DevPath(..i(3|1)/Ata(Secondary,Master))
16: DiskIo BlkIo DevPath(..,1)/PCI(0|0)/Scsi(Pun0,Lun0))
44: DiskIo BlkIo Fs DevPath(..ABD0-01C0-507B-9E5F8078F531))
ESP
45: DiskIo BlkIo Fs DevPath(..i(Pun0,Lun0)/HD(Part4,SigG0))
ESP
17: DiskIo BlkIo DevPath(..PCI(3|1)/Ata(Primary,Master))
* To display all handles with 'Image' protocol and break when
the screen is
full:
Shell> dh -p Image -b
Handle dump by protocol 'image'
1: Image(DXE Foundation)
5: Image(WinNtThunk)
7: Image(WinNtBusDriver) DriverBinding
8: Image(Metronome)
A: Image(IsaBus) DriverBinding
B: Image(WinNtConsole) DriverBinding
...
Shell>
76
Commands
5.5.13 dir
Summary
Lists directory contents or file information.
EFI Versions
EFI 1.02 and above.
Usage
DIR [-r] [-a[attrib]] [file]
-r
attrib
file
- Displays recursively (including subdirectories)
- 'a', 's', 'h', 'r', 'd' or combination of them
a
- Archive
s
- System
h
- Hidden
r
- Read-only
d
- Directory
- Name of file/directory (wildcards are permitted)
Description
This command lists directory contents or file information. If no file name or directory name is
specified, then the current directory is assumed. The contents of a directory are listed if all of the
following are true:
• If option -r is not specified
• If no wildcard characters are specified in the file parameter
• If file represents an existing directory
In all other cases, the command functions as follows:
• All files/directories that match the specified name are displayed.
• The -r flag determines whether a recursive search is performed.
• The option flag -a[attrib] tells the command to display only those files with the attributes
that are specified by [attrib]. If more than one attribute is specified, only the files that have
all those attributes will be listed. If -a is followed by nothing, then all files/directories are
displayed, regardless of their attributes. If -a itself is not specified, then all files except system
and hidden files are displayed.
1.0to7thRvw
July, 2005
77
EFI Shell User's Guide
Commands
Examples
Shell> help dir
Displays a list of files and subdirectories in a directory.
DIR [-r] [-a[attrib]] [file]
-r
attrib
file
- Displays recursively (including subdirectories)
- 'a', 's', 'h', 'r', 'd' or combination of them
a
- Archive
s
- System
h
- Hidden
r
- Read-only
d
- Directory
- Name of file/directory (wildcards are permitted)
Examples:
* To hide files by adding the hidden or system attribute to
them:
fs0:\> attrib +s +h *.efi
ASH fs0:\IsaBus.efi
ASH fs0:\IsaSerial.efi
* To display all, except the files/directories with 'h' or 's'
attribute:
fs0:\> dir
Directory of: fs0:\
06/18/01
06/18/01
06/18/01
06/18/01
06/18/01
06/18/01
01/28/01
09:32p
01:02p <DIR>
01:02p <DIR>
01:02p <DIR>
08:04p
08:05p <DIR>
08:24p
r
3 File(s)
4 Dir(s)
153
512
512
512
29
512
29
211 bytes
for.nsh
efi
test1
test2
temp.txt
test
readme.txt
* To display files with all attributes in the current
directory:
fs0:\> dir -a
Directory of: fs0:\
06/18/01
06/18/01
06/18/01
06/18/01
06/18/01
06/18/01
78
09:32p
01:02p <DIR>
01:02p <DIR>
01:02p <DIR>
10:59p
10:59p
153
512
512
512
28,739
32,838
for.nsh
efi
test1
test2
IsaBus.efi
IsaSerial.efi
Commands
06/18/01
06/18/01
01/28/01
08:04p
29
08:05p <DIR>
512
08:24p
r
29
5 File(s)
61,788 bytes
4 Dir(s)
temp.txt
test
readme.txt
* To display files with read-only attributes in the current
directory:
fs0:\> dir -ar
Directory of: fs0:\
06/18/01
11:14p
1 File(s)
0 Dir(s)
r
29
readme.txt
29 bytes
* To display the files with attribute of 's':
fs0:\> dir -as isabus.efi
Directory of: fs0:\
06/18/01
10:59p
1 File(s)
0 Dir(s)
28,739
28,739 bytes
IsaBus.efi
* To display all in fs0:\efi directory recursively:
fs0:\> dir -r -a efi
* To search for files with the specified type in the current
directory recursively:
fs0:\> dir -r -a *.efi -b
Shell>
5.5.14 disconnect
NOTE
This command is an internal-only command. It cannot be switched to an external command.
Summary
Disconnects one or more drivers from the specified devices.
EFI Versions
EFI 1.10 and above.
1.0to7thRvw
July, 2005
79
EFI Shell User's Guide
Commands
Usage
DISCONNECT DeviceHandle [DriverHandle [ChildHandle]]
DISCONNECT -r
DeviceHandle
number
DriverHandle
number
ChildHandle
-r
- Device handle, always taken as hexadecimal
- Driver handle, always taken as hexadecimal
- Child handle of a device, always taken as
hexadecimal number
- Disconnect drivers from all devices
Description
This command disconnects one or more drivers from the specified devices. If the -r option is used,
all drivers are disconnected from all devices in the system. The following example is the typical
output from the help for this command.
80
Commands
Examples
Shell> help disconnect
Disconnects one or more drivers from a device.
DISCONNECT DeviceHandle [DriverHandle [ChildHandle]]
DISCONNECT -r
DeviceHandle
number
DriverHandle
number
ChildHandle
-r
- Device handle, always taken as hexadecimal
- Driver handle, always taken as hexadecimal
- Child handle of a device, always taken as
hexadecimal number
- Disconnect drivers from all devices
Notes:
1. If option '-r' is used, all drivers will be disconnected from
all
devices in the system. In this case, no other parameters are
allowed
to be used together.
2. If no 'ChildHandle' parameter is specified, the default is to
disconnect all child handles of the 'DeviceHandle.
3. If no 'DriverHandle' parameter is specified, the default is to
disconnect all driver handles on the 'DeviceHandle.'
4. This command does not support output redirection.
Examples:
* To disconnect all drivers from all devices:
Shell> disconnect -r
* To disconnect all drivers from device 0x28:
fs0:\> disconnect 28
* To disconnect driver 0x17 from device 0x28:
fs0:\> disconnect 28 17
* To disconnect driver 0x17 from controlling the child 0x32 of
device 0x28
fs0:\> disconnect 28 17 32
Shell>
1.0to7thRvw
July, 2005
81
EFI Shell User's Guide
Commands
5.5.15 drivers
Summary
Displays a list of information for drivers that follow the EFI Driver Model in the EFI environment.
EFI Versions
EFI 1.10 and above.
Usage
DRIVERS [-l XXX]
-l
language
- Displays drivers using the ISO 639-2
specified by XXX
Description
This command displays a list of information for drivers that follow the EFI Driver Model in EFI
environment. The list has the following columns:
• DRV: The handle number of the EFI driver.
• VERSION: The version number of the EFI driver.
• TYPE: The driver type. A B in this column indicates a bus driver, and D indicates a device driver.
• CFG: Indicates that the driver supports the Driver Configuration Protocol.
• DIAG: Indicates that the driver supports the Driver Diagnostics Protocol.
• #D: The number of devices that this driver is managing.
• #C: The number of child devices that this driver has produced.
• DRIVER NAME: The name of the driver from the Component Name Protocol.
• IMAGE NAME: The file path from which the driver was loaded.
82
Commands
Examples
Shell> help drivers
Displays the list of drivers that follow the EFI Driver Model
DRIVERS [-l XXX]
-l
language
- Displays drivers using the ISO 639-2
specified by XXX
Display Format:
DRV - The handle number of the EFI driver
TYPE - The driver type
[B] Bus driver
[D] Device driver
CFG - The driver supports the Driver Configuration Protocol
DIAG - The driver supports the Driver Diagnostics Protocol
#D - The number of devices that this driver is managing
#C - The number of child devices that this driver has produced
DRIVER NAME - The name of the driver from the Component Name
Protocol
IMAGE NAME - The file path from which the driver was loaded
Examples:
* To display the list:
Shell> drivers
T
D
D
Y C I
R
P F A
V VERSION E G G #D #C DRIVER NAME
IMAGE
NAME
=== ======== = = = == == ===================================
===================
39 00000010 D - - 1 - Platform Console Management Driver
ConPlatform
3A 00000010 D - - 1 - Platform Console Management Driver
ConPlatform
3B 00000010 B - - 1 1 Console Splitter Driver
ConSplitter
3C 00000010 ? - - - - Console Splitter Driver
ConSplitter
3D 00000010 B - - 1 1 Console Splitter Driver
ConSplitter
3E 00000010 ? - - - - Console Splitter Driver
ConSplitter
42 00000010 D - - 1 - UGA Console Driver
GraphicsConsole
1.0to7thRvw
July, 2005
83
EFI Shell User's Guide
43 00000010 ? - - Terminal
44 00000010 D - - 1
DiskIo
45 00000010 D - - 1
48 00000010 ? - - -
Commands
- Serial Terminal Driver
- Generic Disk I/O Driver
- FAT File System Driver
- ISA Bus Driver
IsaBus
49 00000010 ? - - - - ISA Serial Driver
IsaSerial
4C 00000010 B - - 1 1 PCI Bus Driver
PciBus
55 00000010 D X X 1 - Windows Block I/O Driver
WinNtBlockIo
56 00000010 ? - - - - Windows Text Console Driver
WinNtConsole
57 00000010 ? - - - - Windows Serial I/O Driver
WinNtSerialIo
58 00000010 D - - 1 - Windows Simple File System Driver
WinNtSimpleFileSystem
59 00000010 B - - 1 3 Windows Bus Driver
WinNtBusDriver
5F 00000010 D - - 1 - Windows Universal Graphics Adapter
WinNtUga
Shell>
5.5.16 drvcfg
Summary
Invokes the Driver Configuration Protocol.
EFI Versions
EFI 1.10 and above.
84
Fat
Commands
Usage
DRVCFG [-l XXX] [-c] [-f <Type>|-v|-s] [DriverHandle
[DeviceHandle [ChildHandle]]]
-c
- Configure all child devices
-l
- Configure using the ISO 639-2 language
specified by XXX
-f
- Force defaults
-v
- Validate options
-s
- Set options
Type
- The type of default configuration options to
force on
the controller.
0 - Safe Defaults.
1 - Manufacturing Defaults.
2 - Custom Defaults.
3 - Performance Defaults.
DriverHandle - The handle of the driver to configure
DeviceHandle - The handle of a device that DriverHandle is
managing
ChildHandle - The handle of a device that is a child of
DeviceHandle
Description
This command invokes the Driver Configuration Protocol. The table below describes the values for
the Type parameter. Other values depend on the driver’s implementation.
Table 5-5 Default Values for the Type Parameter
Value
Type of Default
Description
0x0000
Safe Defaults
Places a controller in a safe configuration that has the greatest
probability of functioning correctly in a platform.
0x0001
Manufacturing Defaults
Optional type that places the controller in a configuration that is
suitable for a manufacturing and test environment.
0x0002
Custom Defaults
Optional type that places the controller in a custom
configuration.
0x0003
Performance Defaults
Optional type that places the controller in a configuration that
maximizes the controller’s performance in a platform.
1.0to7thRvw
July, 2005
85
EFI Shell User's Guide
Commands
Examples
Shell> help drvcfg
Invokes the Driver Configuration Protocol
DRVCFG [-l XXX] [-c] [-f <Type>|-v|-s] [DriverHandle
[DeviceHandle [ChildHandle]]]
-c
- Configure all child devices
-l
- Configure using the ISO 639-2 language
specified by XXX
-f
- Force defaults
-v
- Validate options
-s
- Set options
Type
- The type of default configuration options to
force on
the controller.
0 - Safe Defaults.
1 - Manufacturing Defaults.
2 - Custom Defaults.
3 - Performance Defaults.
DriverHandle - The handle of the driver to configure
DeviceHandle - The handle of a device that DriverHandle is
managing
ChildHandle - The handle of a device that is a child of
DeviceHandle
Notes:
1. Default Type.
0 - Safe Defaults. It places a controller in a safe
configuration
that has the greatest probability of functioning
correctly in a
platform.
1 - Manufacturing Defaults. Optional type that places the
controller
in a configuration suitable for a manufacturing and test
environment.
2 - Custom Defaults. Optional type that places the
controller in a
custom configuration.
3 - Performance Defaults. Optional type that places the
controller in
a configuration that maximizes the controller's
performance in a
platform.
Other values depend on the driver's implementation.
Examples:
86
Commands
* To display the list of devices that are available for
configuration:
Shell> drvcfg
* To display the list of devices and child devices that are
available
for configuration:
Shell> drvcfg –c
* To force defaults on all devices:
Shell> drvcfg –f 0
* To force defaults on all devices that are managed by driver
0x17:
Shell> drvcfg –f 0 17
* To force defaults on device 0x28 that is managed by driver
0x17:
Shell> drvcfg –f 0 17 28
* To force defaults on all child devices of device 0x28 that is
managed
by driver 0x17:
Shell> drvcfg –f 0 17 28 –c
* To force defaults on child device 0x30 of device 0x28 that is
managed
by driver 0x17:
Shell> drvcfg –f 0 17 28 30
* To validate options on all devices:
Shell> drvcfg –v
* To validate options on all devices that are managed by driver
0x17:
Shell> drvcfg –v 17
* To validate options on device 0x28 that is managed by driver
0x17:
Shell> drvcfg –v 17 28
* To validate options on all child devices of device 0x28 that
is
managed by driver 0x17:
Shell> drvcfg –v 17 28 –c
* To validate options on child device 0x30 of device 0x28 that
is
managed by driver 0x17:
1.0to7thRvw
July, 2005
87
EFI Shell User's Guide
Commands
Shell> drvcfg –v 17 28 30
* To set options on device 0x28 that is managed by driver 0x17:
Shell> drvcfg –s 17 28
* To set options on child device 0x30 of device 0x28 that is
managed by
driver 0x17:
Shell> drvcfg –s 17 28 30
* To set options on device 0x28 that is managed by driver 0x17
in
English:
Shell> drvcfg –s 17 28 –l eng
* To set options on device 0x28 that is managed by driver 0x17
in
Spanish:
Shell> drvcfg –s 17 28 –l spa
Shell>
5.5.17 drvdiag
Summary
Invokes the Driver Diagnostics Protocol.
EFI Versions
EFI 1.10 and above.
88
Commands
Usage
DRVDIAG [-c] [-l XXX] [-s|-e|-m] [DriverHandle [DeviceHandle
[ChildHandle]]]
-c
-l
specified by XXX
-s
-e
-m
DriverHandle
DeviceHandle
managing
ChildHandle
DeviceHandle
- Diagnose all child devices
- Diagnose using the ISO 639-2 language
-
Run
Run
Run
The
The
diagnostics in standard mode
diagnostics in extended mode
diagnostics in manufacturing mode
handle of the driver to diagnose
handle of a device that DriverHandle is
- The handle of a device that is a child of
Description
This command invokes the Driver Diagnostics Protocol.
1.0to7thRvw
July, 2005
89
EFI Shell User's Guide
Commands
Examples
Shell> help drvdiag
Invokes the Driver Diagnostics Protocol
DRVDIAG [-c] [-l XXX] [-s|-e|-m] [DriverHandle [DeviceHandle
[ChildHandle]]]
-c
-l
specified by XXX
-s
-e
-m
DriverHandle
DeviceHandle
managing
ChildHandle
DeviceHandle
- Diagnose all child devices
- Diagnose using the ISO 639-2 language
-
Run
Run
Run
The
The
diagnostics in standard mode
diagnostics in extended mode
diagnostics in manufacturing mode
handle of the driver to diagnose
handle of a device that DriverHandle is
- The handle of a device that is a child of
Examples:
* To display the list of devices that are available for
diagnostics:
Shell> drvdiag
* To display the list of devices and child devices that are
available
for diagnostics:
Shell> drvdiag –c
* To run diagnostics in standard mode on all devices:
Shell> drvdiag –s
* To run diagnostics in standard mode on all devices in
English:
Shell> drvdiag –s –l eng
* To run diagnostics in standard mode on all devices in
Spanish:
Shell> drvdiag –s –l spa
* To run diagnostics in standard mode on all devices and child
devices:
Shell> drvdiag –s –c
* To run diagnostics in extended mode on all devices:
Shell> drvdiag –e
* To run diagnostics in manufacturing mode on all devices:
90
Commands
Shell> drvdiag –m
* To run diagnostics in standard mode on all devices managed by
driver 0x17:
Shell> drvdiag –s 17
* To run diagnostics in standard mode on device 0x28 managed by
driver 0x17:
Shell> drvdiag –s 17 28
* To run diagnostics in standard mode on all child devices of
device 0x28
managed by driver 0x17:
Shell> drvdiag –s 17 28 –c
* To run diagnostics in standard mode on child device 0x30 of
device 0x28
managed by driver 0x17:
Shell> drvdiag –s 17 28 30
Shell>
5.5.18 echo
NOTE
This command is an internal-only command. It cannot be switched to an external command.
Summary
Controls whether or not batch commands are displayed as they are read from the batch file and
prints the given message to the display.
EFI Versions
EFI 1.02 and above.
1.0to7thRvw
July, 2005
91
EFI Shell User's Guide
Commands
Usage
ECHO [-on|-off]
ECHO [message]
-on
files
-off
lines
message
- Displays when reading command lines from batch
- Does not display when reading batch command
- Displays a message string
Description
The first form of this command controls whether or not batch commands are displayed as they are
read from the batch file. If no argument is given, the current "on" or "off" status is displayed. The
second form prints the given message to the display.
92
Commands
Examples
Shell> help echo
Displays a message, or turns command echoing on or off in batch
files.
ECHO [-on|-off]
ECHO [message]
-on
files
-off
lines
message
- Displays when reading command lines from batch
- Does not display when reading batch command
- Displays a message string
Note:
1. Echo -off means to not display the command line when reading
from batch
files. This command is not like the MS-DOS echo.
2. Echo without a parameter shows current echo setting.
Examples:
* To display a message string of 'Hello World':
fs0:\> echo Hello World
Hello World
* To turn command echoing on:
fs0:\> echo -on
* To execute HelloWorld.nsh, and display when reading lines
from the batch file:
fs0:\> HelloWorld.nsh
+HelloWorld.nsh> echo Hello World
Hello World
* To turn command echoing off:
fs0:\> echo -off
* To display the current echo setting:
fs0:\> echo
Echo is off
Shell>
1.0to7thRvw
July, 2005
93
EFI Shell User's Guide
Commands
5.5.19 exit
NOTE
This command is an internal-only command. It cannot be switched to an external command.
Summary
Exits the EFI Shell environment and returns control to the parent that launched the EFI Shell.
EFI Versions
EFI 1.02 and above.
Usage
EXIT
Description
This command exits the EFI Shell environment and returns control to the parent that launched the
EFI Shell.
Examples
Shell> help exit
Exits the EFI Shell environment and returns control to its
parent.
EXIT
Examples:
Shell> exit
5.5.20 help
NOTE
This command is an internal-only command. It cannot be switched to an external command.
Summary
Displays the list of commands that are built into the EFI Shell.
EFI Versions
EFI 1.02 and above.
94
Commands
Usage
HELP [cmd | pattern]
cmd
- Shell command
pattern – Wildmatch pattern
Description
The help command displays the list of commands that are built into the EFI Shell. It also supports
displaying the verbose help information for a specified command.
You can also use cmd -? to display the verbose help of a command, where cmd is the name of the
EFI Shell command or application. This syntax does the same thing as help cmd and can be used
for both internal and external Shell commands. The form of help cmd, however, can be used
only for internal Shell commands.
The following example shows the output from this command.
1.0to7thRvw
July, 2005
95
EFI Shell User's Guide
Commands
Examples
Shell> help help
Displays the list of commands or verbose help of a command in the
EFI Shell.
HELP [cmd | pattern]
cmd
- Shell command
pattern – Wildmatch pattern
Note:
1. 'cmd -?' also displays the verbose help of cmd, the same as
'help cmd'.
2. If cmd has no verbose help, its line help will be displayed
instead.
3. HELP will only show commands that were documented in the
Shell.
Examples:
* To display the list of commands in the EFI Shell and break
after one screen:
Shell> help –b
?
- Displays commands list or verbose help of a
command
alias
- Displays, creates, or deletes aliases in the
EFI shell
attrib
- Displays or changes the attributes of files
or
directories
cd
- Displays or changes the current directory
cls
- Clears the standard output with an optional
background
color
connect
- Binds an EFI driver to a device and starts
the driver
copy
- Copies one or more files/directories to
another
location
...
* To display help information of a Shell command - ls:
Shell> help ls
Shell> ? ls
Shell> ls -?
96
Commands
* To display the list of commands that start with character
‘p’:
Shell> help p*
pause – Prints a message and suspends for keyboard input
5.5.21 load
Summary
Loads an EFI driver into memory.
EFI Versions
EFI 1.10 and above.
Usage
LOAD [-nc] file [file...]
-nc
file
(wildcards
- Load the driver, but do not connect the driver.
- File that contains the image of the EFI driver
are permitted)
Description
This command loads an EFI driver into memory. It can load multiple files at one time, and the file
name supports the asterisk wildcard. If the -nc flag is not specified, this command will try to
connect the driver to a proper device; meanwhile it may cause loaded drivers be connected to their
corresponding devices. This action is not a bug but the implementation policy.
1.0to7thRvw
July, 2005
97
EFI Shell User's Guide
Commands
Examples
Shell> help load
Loads EFI drivers and then they can provide available services.
LOAD [-nc] file [file...]
-nc
file
(wildcards
- Load the driver, but do not connect the driver.
- File that contains the image of the EFI driver
are permitted)
Note:
1. LOAD can deal with multiple files and supports wildcards.
2. Use 'UNLOAD' command to unload a driver if it supports
unloading.
3. If option –nc is not specified, then the loaded drivers will
be
automatically connected. If –nc is specified, then none of the
loaded
drivers will be connected. Loading without –nc could cause the
previously loaded drivers to be connected. This is not a bug,
and it
complies with EFI specification.
Examples:
fs0:\> load Isabus.efi
load: Image 'fs0:\Isabus.efi' loaded at 18FE000 - Success
fs0:\> load Isabus.efi IsaSerial.efi
load: Image 'fs0:\Isabus.efi' loaded at 18E5000 - Success
load: Image 'fs0:\IsaSerial.efi' loaded at 18DC000 - Success
fs0:\> load Isa*.efi
load: Image 'fs0:\IsaBus.efi' loaded at 18D4000 - Success
load: Image 'fs0:\IsaSerial.efi' loaded at 18CB000 – Success
fs0:\> load –nc IsaBus.efi
load: Image ‘fs0:\Isabus.efi’ loaded at 18FE000 - Success
Shell>
5.5.22 ls
Summary
Lists a directory's contents or file information.
98
Commands
EFI Versions
EFI 1.02 and above.
Usage
LS [-r] [-a[attrib]] [file]
-r
attrib
file
- Displays recursively (including subdirectories)
- 'a', 's', 'h', 'r', 'd' or combination of them
a
- Archive
s
- System
h
- Hidden
r
- Read-only
d
- Directory
- Name of file/directory (wildcards are permitted)
Description
This command lists directory contents or file information. If no file name or directory name is
specified, then the current directory is assumed. The contents of a directory are listed if all of the
following are true:
• If option -r is not specified
• If no wildcard characters are specified in the file parameter
• If file represents an existing directory
In all other cases, the command functions as follows:
• All files/directories that match the specified name are displayed.
• The -r flag determines whether a recursive search is performed.
• The option flag -a[attrib] tells the command to display only those files with the attributes
that are specified by [attrib]. If more than one attribute is specified, only the files that have
all those attributes will be listed. If -a is followed by nothing, then all files/directories are
displayed, regardless of their attributes. If -a itself is not specified, then all files except system
and hidden files are displayed.
1.0to7thRvw
July, 2005
99
EFI Shell User's Guide
Commands
Examples
Shell> help ls
Displays a list of files and subdirectories in a directory.
LS [-r] [-a[attrib]] [file]
-r
attrib
file
- Displays recursively (including subdirectories)
- 'a', 's', 'h', 'r', 'd' or combination of them
a
- Archive
s
- System
h
- Hidden
r
- Read-only
d
- Directory
- Name of file/directory (wildcards are permitted)
Examples:
* To hide files by adding the hidden or system attribute to
them:
fs0:\> attrib +s +h *.efi
ASH fs0:\IsaBus.efi
ASH fs0:\IsaSerial.efi
* To display all, except the files/directories with 'h' or 's'
attribute:
fs0:\> ls
Directory of: fs0:\
06/18/01
06/18/01
06/18/01
06/18/01
06/18/01
06/18/01
01/28/01
09:32p
01:02p <DIR>
01:02p <DIR>
01:02p <DIR>
08:04p
08:05p <DIR>
08:24p
r
3 File(s)
4 Dir(s)
153
512
512
512
29
512
29
211 bytes
for.nsh
efi
test1
test2
temp.txt
test
readme.txt
* To display files with all attributes in the current
directory:
fs0:\> ls -a
Directory of: fs0:\
06/18/01
06/18/01
06/18/01
06/18/01
06/18/01
06/18/01
100
09:32p
01:02p <DIR>
01:02p <DIR>
01:02p <DIR>
10:59p
10:59p
153
512
512
512
28,739
32,838
for.nsh
efi
test1
test2
IsaBus.efi
IsaSerial.efi
Commands
06/18/01
06/18/01
01/28/01
08:04p
29
08:05p <DIR>
512
08:24p
r
29
5 File(s)
61,788 bytes
4 Dir(s)
temp.txt
test
readme.txt
* To display files with read-only attributes in the current
directory:
fs0:\> ls -ar
Directory of: fs0:\
06/18/01
11:14p
1 File(s)
0 Dir(s)
r
29
readme.txt
29 bytes
* To display the files with attribute of 's':
fs0:\> ls -as isabus.efi
Directory of: fs0:\
06/18/01
10:59p
1 File(s)
0 Dir(s)
28,739
28,739 bytes
IsaBus.efi
* To display all in fs0:\efi directory recursively:
fs0:\> ls -r -a efi
* To search for files with the specified type in the current
directory recursively:
fs0:\> ls -r -a *.efi -b
Shell>
5.5.23 map
NOTE
This command is an internal-only command. It cannot be switched to an external command.
Summary
Defines a mapping between a user-defined name and a device handle.
EFI Versions
EFI 1.02 and above.
1.0to7thRvw
July, 2005
101
EFI Shell User's Guide
Commands
Usage
MAP [-d <sname>]
MAP [[-r][-v][-c][-f][-t <type[,type…]>][sname]]
MAP [sname handle | mapname]
-d
-r
-v
sname
handle
-
Deletes a mapping
Resets to default mappings
Lists verbose information of mappings
Defines a name for the mapping by users
The number of handle, which is same as dumped from
'dh'
-c
-f
mapping).
-t
type.
command
- Shows the consistent mapping name.
- Shows the normal mapping name (not consistent
- Shows the device mapping name according the device
type
- The device type. The current supported
types are:
fp (Floppy)
hd (Hard Disk)
cd (CD Rom)
Types can be combined by putting a comma between
two
types. Spaces are not allowed between types.
mapname – The device’s mapped name. Use this parameter to
assign a new
mapping name to a device. There is a postfix ':'
after the
mapname.
Description
This command is used to define a mapping between a user-defined name and a device handle. The
most common use of this command is to assign drive letters to device handles that support a file
system protocol. Once these mappings are created, the drive letters can be used with all the file
manipulation commands.
The EFI Shell environment creates default mappings for all the device handles that support a
recognized file system.
This command can be used to create additional mappings, or it can be used to delete an existing
mapping with the -d option. If the map command is used without any parameters, all the current
mappings will be listed. If the -v option is used, the mappings will be shown with additional
information about each mapped handle. The -r option is used to regenerate all the default
mappings in a system; this option is useful if the system configuration has changed since the last
boot.
102
Commands
Each device in the system has a consistent mapping name. If the hardware configuration has not
changed, the device’s consistent mapping names do not change. If two or more machines have the
same hardware configurations, the device’s consistent mapping will be the same. Use the -c option
to list all the consistent mapping names in the system.
The mapping name consists of digits and characters. Other characters are illegal.
This command support wildcards. You can use the wildcards to delete or show the mapping name.
However, when you assign the mapping name, wildcards are forbidden.
1.0to7thRvw
July, 2005
103
EFI Shell User's Guide
Commands
Examples
Shell> help map
Displays or defines mappings between user-defined names and
device handles.
MAP [-d <sname>]
MAP [[-r][-v][-c][-f][-t <type[,type…]>][sname]]
MAP [sname handle | mapname]
-d
-r
-v
sname
handle
-
Deletes a mapping
Resets to default mappings
Lists verbose information of mappings
Defines a name for the mapping by users
The number of handle, which is same as dumped from
'dh'
-c
-f
mapping).
-t
type.
command
- Shows the consistent mapping name.
- Shows the normal mapping name (not consistent
- Shows the device mapping name according the device
type
- The device type. The current supported
types are:
fp (Floppy)
hd (Hard Disk)
cd (CD Rom)
Types can be combined by putting a comma between
two
types. Spaces are not allowed between types.
mapname – The device’s mapped name. Use this parameter to
assign a new
mapping name to a device. There is a postfix ':'
after the
mapname.
Note:
1. Consistent mapping is persistent across
and a
system reboot.
2. Only characters and numbers are allowed
3. Redirection is not allowed when running
know the file
system before mapping is done.
4. Output redirection is not supported for
104
the 'map -r' command
inside of sname.
map because we do not
'map –r' usage.
Commands
Examples:
* To reset the mapping table to the default mappings:
shell> map -r
Device mapping table
f4
:UnknownDevice - Alias fs0 blk0
Device Path VenHw(58C518B1-76F3-11D4-BCEA0080C73C8881)
/VenHw(0C95A92F-A006-11D4-BCFA-0080C73C8881)
fs0
:UnknownDevice - Alias f4 blk0
Device Path VenHw(58C518B1-76F3-11D4-BCEA0080C73C8881)
/VenHw(0C95A92F-A006-11D4-BCFA-0080C73C8881)
blk0 :UnknownDevice - Alias f4 fs0
Device Path VenHw(58C518B1-76F3-11D4-BCEA0080C73C8881)
/VenHw(0C95A92F-A006-11D4-BCFA-0080C73C8881)
1.0to7thRvw
July, 2005
105
EFI Shell User's Guide
Commands
* To display all mappings in the device mapping table:
Shell> map
Device mapping table
f4
:UnknownDevice - Alias fs0 blk0
Device Path VenHw(58C518B1-76F3-11D4-BCEA0080C73C8881)
/VenHw(0C95A92F-A006-11D4-BCFA-0080C73C8881)
fs0
:UnknownDevice - Alias f4 blk0
Device Path VenHw(58C518B1-76F3-11D4-BCEA0080C73C8881)
/VenHw(0C95A92F-A006-11D4-BCFA-0080C73C8881)
blk0 :UnknownDevice - Alias f4 fs0
Device Path VenHw(58C518B1-76F3-11D4-BCEA0080C73C8881)
/VenHw(0C95A92F-A006-11D4-BCFA-0080C73C8881)
* To display mapping table verbosely:
Shell> map -v
Device mapping table
f4
Consist Name f4
Other Name
fs0 blk0
Handle
5F: Fs DiskIo BlkIo WinNtDriverIo
Media Type
UnknownDevice
Removeable
NO
Current Dir \
Device Path VenHw(58C518B1-76F3-11D4-BCEA0080C73C8881)
/VenHw(0C95A92F-A006-11D4-BCFA0080C73C8881)
fs0
Consist Name f4
Other Name
blk0
Handle
5F: Fs DiskIo BlkIo WinNtDriverIo
Media Type
UnknownDevice
Removeable
NO
Current Dir \
Device Path VenHw(58C518B1-76F3-11D4-BCEA0080C73C8881)
/VenHw(0C95A92F-A006-11D4-BCFA0080C73C8881)
blk0
Consist Name f4
Other Name
fs0
Handle
5F: Fs DiskIo BlkIo WinNtDriverIo
Media Type
UnknownDevice
Removeable
NO
Current Dir \
Device Path VenHw(58C518B1-76F3-11D4-BCEA0080C73C8881)
106
Commands
/VenHw(0C95A92F-A006-11D4-BCFA0080C73C8881)
* To assign fs0 another name:
Shell> map floppy fs0:
floppy:UnknownDevice - Alias f4 fs0 blk0
Device Path VenHw(58C518B1-76F3-11D4-BCEA-0080C73C8881)
/VenHw(0C95A92F-A006-11D4-BCFA0080C73C8881)
* To display the information of the mapped name:
Shell> map floppy
floppy:UnknownDevice - Alias f4 fs0 blk0
Device Path VenHw(58C518B1-76F3-11D4-BCEA-0080C73C8881)
/VenHw(0C95A92F-A006-11D4-BCFA0080C73C8881)
* To operate with the mapped name:
Shell> floppy:
floppy:\> ls
* To delete a mapped name:
Shell> map -d floppy
Shell> map
Device mapping table
f4
:UnknownDevice - Alias fs0 blk0
Device Path VenHw(58C518B1-76F3-11D4-BCEA0080C73C8881)
/VenHw(0C95A92F-A006-11D4-BCFA-0080C73C8881)
fs0
:UnknownDevice - Alias f4 blk0
Device Path VenHw(58C518B1-76F3-11D4-BCEA0080C73C8881)
/VenHw(0C95A92F-A006-11D4-BCFA-0080C73C8881)
blk0 :UnknownDevice - Alias f4 fs0
Device Path VenHw(58C518B1-76F3-11D4-BCEA0080C73C8881)
/VenHw(0C95A92F-A006-11D4-BCFA-0080C73C8881)
* To display all the mapped names that start with 'f':
Shell> map f*
Device mapping table:
f4
:UnknownDevice - Alias fs0 blk0
Device Path VenHw(58C518B1-76F3-11D4-BCEA0080C73C8881)
/VenHw(0C95A92F-A006-11D4-BCFA-0080C73C8881)
fs0
:UnknownDevice - Alias f4 blk0
Device Path VenHw(58C518B1-76F3-11D4-BCEA0080C73C8881)
/VenHw(0C95A92F-A006-11D4-BCFA-0080C73C8881)
1.0to7thRvw
July, 2005
107
EFI Shell User's Guide
Commands
5.5.24 mkdir
Summary
Creates one or more new directories.
EFI Versions
EFI 1.02 and above.
Usage
MKDIR dir [dir...]
dir
- Name of a directory to be created (wildcards are
not
allowed).
Description
This command creates one or more new directories.
Examples
108
Commands
Shell> help mkdir
Creates one or more directories.
MKDIR dir [dir...]
dir
allowed)
- Name of a directory to be created(wildcards are not
Note:
1. The parent directory must already exist.
2. If the directory already exists, it will fail to make such a
directory.
3. The directories in the command line should not rely on the
creation of
other directories in the command line. For example, 'mkdir new
new\test'
is not allowed.
4. Redirecting output to a file that exists under the directory
specified
on the command line is not allowed.
Examples:
* To create a new directory:
fs0:\> mkdir rafter
fs0:\> ls
Directory of: fs0:\
06/18/01
06/18/01
06/18/01
08:05p <DIR>
11:14p
r
11:50p <DIR>
1 File(s)
2 Dir(s)
512
29
512
211 bytes
test
readme.txt
rafter
* To create multiple directories:
fs0:\> mkdir temp1 temp2
fs0:\> ls
Directory of: fs0:\
06/18/01
06/18/01
06/18/01
06/18/01
06/18/01
08:05p <DIR>
11:14p
r
11:50p <DIR>
11:52p <DIR>
11:52p <DIR>
1 File(s)
4 Dir(s)
512
29
512
512
512
211 bytes
test
readme.txt
rafter
temp1
temp2
Shell>
1.0to7thRvw
July, 2005
109
EFI Shell User's Guide
Commands
5.5.25 mv
Summary
Moves one or more files to a destination within a file system.
EFI Versions
EFI 1.02 and above.
Usage
MV src [src...] [dst]
src
permitted)
dst
- Source file/directory name (wildcards are
- Destination file/directory name (wildcards are not
permitted)
Description
This command moves one or more files to a destination within a file system. Moving between file
system volumes is not supported. If the destination is an existing directory, then the sources are
moved into that directory. Otherwise, the sources are moved to the destination, as if the directory
has been renamed. If a destination is not specified, the current directory is assumed to be the
destination.
110
Commands
Examples
Shell> help mv
Moves one or more files/directories to destination within fs.
MV src [src...] [dst]
src
permitted)
dst
- Source file/directory name (wildcards are
- Destination file/directory name (wildcards are not
permitted)
Note:
1. If 'dst' is not specified, then the current directory is
assumed to be the
'dst'.
2. If there is more than one argument in the command line, the
last one
will be taken as 'dst' unconditionally. If there is more than
one
source file/directory to move, the 'dst' should be an existing
directory.
3. Attempting to move a read-only file/directory will result a
failure.
4. Moving a directory containing read-only file(s) is allowed.
5. You cannot move a directory into itself or its subdirectories.
6. You cannot move a directory if current directory is itself or
its
subdirectory.
7. Redirecting output to a file that exists under the directory
that will
be moved is not allowed.
8. If an error occurs, the remaining files or directories will
still be
moved.
Examples:
* To rename a file:
fs0:\> mv IsaBus.efi Bus.efi
moving fs0:\IsaBus.efi -> \Bus.efi
- [ok]
* To move a directory to the current directory:
fs0:\> mkdir test1\temp
fs0:\> mv test1\temp
moving fs0:\test1\temp -> \.\temp
- [ok]
* To rename a directory:
1.0to7thRvw
July, 2005
111
EFI Shell User's Guide
Commands
fs0:\> mv efi efi1.1
moving fs0:\efi -> \efi1.1
- [ok]
* To move multiple directories at a time:
fs0:\> mv test1 test2 test
moving fs0:\test1 -> \test\test1
- [ok]
moving fs0:\test2 -> \test\test2
- [ok]
* Moving a read-only directory will result a failure:
fs0:\test> attrib +r temp1
DA R fs0:\test\temp1
fs0:\test> mv temp1 temp2
moving fs0:\test\temp1 -> \test\temp2
- error - Invalid Parameter
Shell>
5.5.26 reconnect
NOTE
This command is an internal-only command. It cannot be switched to an external command.
Summary
Reconnects drivers to the specific device.
EFI Versions
EFI 1.10 and above.
112
Commands
Usage
RECONNECT DeviceHandle [DriverHandle [ChildHandle]]
RECONNECT -r
DeviceHandle
number
DriverHandle
number
ChildHandle
hexadecimal
-r
- Device handle, always taken as hexadecimal
- Driver handle, always taken as hexadecimal
- Child handle of device, always taken as
number
- Reconnect drivers to all devices
Description
This command reconnects drivers to the specific device. It will first disconnect the specified driver
from the specified device and then connect the driver to the device recursively.
If the -r option is used, then all drivers will be reconnected to all devices. See the connect and
disconnect commands for more details. The example below is the typical output from the help
for this command.
1.0to7thRvw
July, 2005
113
EFI Shell User's Guide
Commands
Examples
Shell> Help Reconnect
Reconnects one or more drivers from a device.
RECONNECT DeviceHandle [DriverHandle [ChildHandle]]
RECONNECT -r
DeviceHandle
number
DriverHandle
number
ChildHandle
hexadecimal
-r
- Device handle, always taken as hexadecimal
- Driver handle, always taken as hexadecimal
- Child handle of device, always taken as
number
- Reconnect drivers to all devices
Note:
1. This command disconnects the drivers from the controller, just
like
'DISCONNECT', but it then immediately reconnects them
recursively.
2. If option '-r' is specified, any drivers that are binding to
any devices will be
disconnected first and then connected recursively.
3. If no 'ChildHandle' parameter is specified, all child handles
of the
specified device will be the default.
4. If no 'DriverHandle' parameter is specified, all drivers on
the
specified device will be the default.
5. This command is a great way to test if drivers are following
the
EFI 1.10 Driver Model.
6. This command does not support output redirection.
Examples:
* To reconnect all drivers to all devices:
Shell> reconnect -r
* To reconnect all drivers to device 0x28:
fs0:\> reconnect 28
* To reconnect driver 0x17 to device 0x28:
fs0:\> reconnect 28 17
* To reconnect driver 0x17 to child 0x32 of device 0x28:
fs0:\> reconnect 28 17 32
114
Commands
Shell>
5.5.27 reset
Summary
Resets the system.
EFI Versions
EFI 1.02 and above.
Usage
RESET [-w [string]]
RESET [-s [string]]
-w
-s
string
- Performs a warm reset
- Performs a shutdown
- String to be passed to reset service
Description
This command resets the system. The default is to perform a cold reset unless the -w parameter is
specified. If the reset string is specified, then it is passed into the Reset() function, so the
system can know the reason for the system reset.
1.0to7thRvw
July, 2005
115
EFI Shell User's Guide
Commands
Examples
Shell> help reset
Resets the system.
RESET [-w [string]]
RESET [-s [string]]
-w
-s
string
- Performs a warm reset
- Performs a shutdown
- String to be passed to reset service
Note:
1. Not all systems implement '-w' flag. This may mean different
things
depending on which BIOS EFI is implemented.
2. Reset will be guaranteed to reset the chipset as well as the
processor
when cold reset is called.
3. This command does not support output redirection.
Shell>
5.5.28 rm
Summary
Deletes one or more files or directories.
EFI Versions
EFI 1.02 and above.
Usage
RM [-q] file/directory [file/directory ...]
-q
confirmation
file
directory
- Quiet mode; does not prompt user for a
- File name (wildcards are permitted)
- Directory name (wildcards are permitted)
Description
This command deletes one or more files or directories. If the target is a directory, it will delete the
directory, including all its subdirectories. It is not allowed to redirect a file whose parent directory
(or the file itself) is being deleted.
116
Commands
Examples
Shell> help rm
Deletes one or more files or directories.
RM [-q] file/directory [file/directory ...]
-q
confirmation
file
directory
- Quite mode; does not prompt user for a
- File name (wildcards are permitted)
- Directory name (wildcards are permitted)
Note:
1. Removing a read-only file/directory will result in a failure.
Removing a
directory containing read-only file(s) will result in a
failure.
2. If an error occurs, RM will exit immediately and later
files/directories
will not be removed.
3. You cannot remove a directory when the current directory is
itself or its
subdirectory.
4. If file contains wildcards, it will not ask user for
confirmation.
5. You cannot remove the root directory.
6. You cannot remove the current directory or its ancestor.
7. Redirecting output to a file that exists under the directory
that will
be removed is not allowed.
Examples:
* To remove multiple directories at a time:
fs0:\> ls test
Directory of: fs0:\test
06/18/01
06/18/01
06/19/01
06/19/01
01:01p <DIR>
01:01p <DIR>
12:59a <DIR>
12:59a <DIR>
0 File(s)
4 Dir(s)
512
0
512
512
0 bytes
.
..
temp1
temp2
* Error occurs and RM will exit:
fs0:\> rm test\temp11 temp2
rm/del: Cannot find 'fs0:\test\temp11' - Not Found
* To remove multiple directories with wildcards:
fs0:\> rm test\temp*
1.0to7thRvw
July, 2005
117
EFI Shell User's Guide
Commands
rm/del: Remove subtree 'fs0:\test\temp1' [y/n]? y
removing fs0:\test\temp1\temp1.txt
- [ok]
removing fs0:\test\temp1\boot\nshell.efi
- [ok]
removing fs0:\test\temp1\boot
- [ok]
removing fs0:\test\temp1
- [ok]
rm/del: Remove subtree 'fs0:\test\temp2' [y/n]? y
removing fs0:\test\temp2\temp2.txt
- [ok]
removing fs0:\test\temp2
- [ok]
* Removing a directory that contains a read-only file will
fail:
fs0:\> attrib +r test\temp1\readme.txt
A R fs0:\test\temp1\readme.txt
fs0:\> rm test\temp1
rm/del: Cannot open 'readme.txt' under 'fs0:\test\temp1' in
writable
mode
- [error] - Access Denied
Exit status code: Access Denied
Shell>
5.5.29 set
NOTE
This command is an internal-only command. It cannot be switched to an external command.
Summary
Used to maintain the environment variables that are available from the EFI environment.
EFI Versions
EFI 1.02 and above.
118
Commands
Usage
SET [-v] [sname [value]]
SET [-d <sname>]
-d
-v
sname
value
-
Deletes the environment variable
Volatile variable
Environment variable name
Environment variable value
Description
This command is used to maintain the environment variables that are available from the EFI
environment. This command can do the following:
• Display the environment variables.
• Create new environment variables.
• Change the value of existing environment variables.
• Delete environment variables.
The set command will set the environment variable that is specified by sname to value. This
command can be used to create a new environment variable or to modify an existing environment
variable. If the set command is used without any parameters, then all the environment variables
are displayed. If the set command is used with the -d option, then the environment variable that
is specified by sname will be deleted. The following examples show how this command can be
used to create, modify, and delete the environment variable DiagnosticPath.
1.0to7thRvw
July, 2005
119
EFI Shell User's Guide
Commands
Examples
Shell> help set
Displays, creates, changes, or deletes EFI environment variables.
SET [-v] [sname [value]]
SET [-d <sname>]
-d
-v
sname
value
-
Deletes the environment variable
Volatile variable
Environment variable name
Environment variable value
Notes:
1. Size of NVRAM for set command will depend on the system
implementation.
2. May send NVRAM variables to /efi/boot/bootstr.nvr on the file
system if
no NVRAM is implemented in the core EFI routines.
3. SET values are stored in EFI NVRAM and will be retained
between boots
unless the option -v is specified.
4. A * in front of sname means that this variable is a volatile
variable.
To make any changes to it, please use the command with the –
voption.
Examples:
* To add an environment variable:
Shell> set DiagnosticPath fs0:\efi\diag;fs1:\efi\diag
* To display environment variables:
Shell> set
* path
: .
diagnosticPath : fs0:\efi1.1\diag;fs1:\efi1.1\diag
* To delete an environment variable:
Shell> set -d diagnosticpath
Shell> set
* path
: .
* To change an environment variable:
fs0:\> set src efi
fs0:\> set
* path : .;fs0:\efi\tools;fs0:\efi\boot;fs0:\
src : efi
fs0:\> set src efi1.1
fs0:\> set
* path : .;fs0:\efi\tools;fs0:\efi\boot;fs0:\
120
Commands
src
: efi1.1
* To append an environment variable:
Shell> set
* path
: .
Shell> set path %path%;fs0:\efi\tools;fs0:\efi\boot;fs0:\
Shell> set
* path
: .;fs0:\efi\tools;fs0:\efi\boot;fs0:\
* To set a volatile variable that will disappear at the next
boot:
Shell> set -v EFI_SOURCE c:\project\EFI1.1
Shell> set
* path
: .;fs0:\efi\tools;fs0:\efi\boot;fs0:\
* EFI_SOURCE : c:\project\EFI1.1
Shell>
5.5.30 time
Summary
Displays or sets the current time for the system.
EFI Versions
EFI 1.02 and above.
Usage
TIME [hh:mm[:ss]]
hh
mm
ss
- Hour of time, Hour range: 0 - 23
- Minute of time, Minute range: 0 - 59
- Second of time, Second range: 0 - 59
Description
This command displays or sets the current time for the system. If no parameters are used, it shows
the current time. If valid hours, minutes, and seconds are provided, then the system's time will be
updated. Note the following rules:
1. Except for numeric characters and the : character, all other characters in the argument are
invalid. The Shell will report an error if the number is in the wrong hour/minute/second range.
2. Spaces before or after the numeric character are not allowed. Spaces inserted into the number are
not allowed either.
3. Repeated zeros are allowed before the number. For example:
1.0to7thRvw
July, 2005
121
EFI Shell User's Guide
Commands
Shell > time 00000017:000004:0000
Shell > time
17:04:00 (GMT+08:00)
Shell >
4. The seconds parameter is optional. If there is no seconds number, it will set to zero by default.
Shell > time 17:23
Shell > time
17:23:00(GMT+08:00)
Shell > time 17:23:
Shell > time
17:23:00(GMT+08:00)
Examples
Shell> help time
Displays the current time or sets the time of the system.
TIME [hh:mm[:ss]]
hh
mm
ss
- Hour of time, hour range: 0 - 23
- Minute of time, minute range: 0 - 59
- Second of time, second range: 0 - 59
Note:
1. Hour and minute are required to set the time.
2. If second is not specified, 0 will be used as default.
Examples:
* To display current time:
fs0:\> time
16:51:03 (GMT+08:00)
* To set the system time:
fs0:\> time 9:51:30
fs0:\> time
09:51:31 (GMT+08:00)
Shell>
5.5.31 touch
Summary
Updates the time and date on a file to the current time and date.
122
Commands
EFI Versions
EFI 1.02 and above.
Usage
TOUCH [-r] file [file …]
-r
file
can be
- Recursive to subdirectories
- The name or pattern of the file or directory. There
multiple files on the command line.
Description
This command updates the time and date on the file that is specified by the file parameter to the
current time and date.
Examples
Shell> help touch
Updates time and date with current time.
TOUCH [-r] file [file …]
-r
file
- Recursive to subdirectories
- The name or pattern of file or directory. There can
be
multiple files on the command line.
Notes:
1. If multiple files are specified on the command line, it will
continue
processing even fail to touch some of them.
2. Touch can not change the time and date of read-only files and
directories.
1.0to7thRvw
July, 2005
123
EFI Shell User's Guide
Commands
Examples:
* To touch a file (the time and date of file will be changed
after
TOUCH):
fs0:\> ls for.nsh
Directory of: fs0:\
06/18/01 09:32p
153 for.nsh
1 File(s)
153 bytes
0 Dir(s)
fs0:\> touch for.nsh
touch: fs0:\for.nsh [ok]
fs0:\> ls for.nsh
Directory of: fs0:\
06/19/01 09:54a
1 File(s)
0 Dir(s)
153
153 bytes
for.nsh
* To touch a directory recursively:
fs0:\> touch -r efi1.1
touch: fs0:\efi1.1 [ok]
touch: fs0:\efi1.1\boot [ok]
touch: fs0:\efi1.1\boot\nshell.efi [ok]
5.5.32 type
Summary
Sends the contents of a file to the standard output device.
EFI Versions
EFI 1.02 and above.
Usage
TYPE [-a|-u] file [file...]
-a
-u
file
- Displays the file as ASCII characters
- Displays the file as Unicode characters
- Name of file to display
Description
This command sends the contents of a file to the standard output device. If no options are used, then
the file type is automatically detected and sent to the standard output device. If the -a option is
124
Commands
specified, the file is sent to the standard output device as a stream of ASCII characters. If the -u
option is specified, the file is sent to the standard output device as a stream of Unicode characters.
The example below shows how to send the ASCII file README.TXT on the floppy drive to the
standard output device and the Unicode file READMEU.TXT on the floppy drive to the standard
output device.
Type redirection to the same file is not supported currently. Wildcards are permitted in the file
name. If the type command is used in conjunction with an ASCII file with the -u flag, this flag
will be ignored and the contents of the file will be sent to the standard output device as ASCII
characters. If the type command is used in conjunction with a Unicode file with the -a flag, the
file will be sent as ASCII characters but with an additional space between each character.
1.0to7thRvw
July, 2005
125
EFI Shell User's Guide
Commands
Examples
Shell> help type
Displays the contents of a file on the standard output device.
TYPE [-a|-u] file [file...]
-a
-u
file
- Displays the file as ASCII characters
- Displays the file as Unicode characters
- Name of file to display
Examples:
* To display the file as Unicode characters:
fs0:\> type -u pause.nsh
File: fs0:\pause.nsh, Size 204
#
# Example script for 'pause' command
#
echo pause.nsh begin..
date
time
pause
echo pause.nsh done.
* To display the file as ASCII characters:
fs0:\> type -a pause.nsh
File: fs0:\pause.nsh, Size 204
#
#
E x a m p l e
s c r i p t
f o r
' p a u s e '
c o m m a n d
#
e c h o
p a u s e . n s h
b e g i n . .
d a t e
t i m e
p a u s e
e c h o
p a u s e . n s h
d o n e .
* To type multiple files at a time:
fs0:\> type test.*
File: fs0:\test.txt, Size 23
How to Install?
File: fs0:\test.nsh, Size 48
time
stall 3000000
time
Shell>
126
Commands
5.5.33 unload
Summary
Unloads a driver image that was already loaded.
EFI Versions
EFI 1.10 and above.
Usage
UNLOAD [-n] [-v] Handle
-n
-v
Handle
- Without prompt
- Dump Verbose information
- Handle of driver to unload, always taken as
hexadecimal number
Description
This command unloads a driver image that was already loaded.
1.0to7thRvw
July, 2005
127
EFI Shell User's Guide
Commands
Examples
Shell> help unload
Unloads a driver image.
UNLOAD [-n] [-v] Handle
-n
-v
Handle
- Without prompt
- Dump Verbose information
- Handle of driver to unload, always taken as
hexadecimal number
Note:
1. Option '-n' can be used to skip all the prompts during the
unloading so
that it can be used in a batch file.
2. If option '-v' is specified, the verbose information on the
image will
be displayed before the image is unloaded.
3. Only those images that can support the unloading operation can
be unloaded
successfully.
4. The 'LOAD' is the opposite.
Examples:
* To find the handle index driver image to unload:
Shell> dh -b
Handle dump
1: Image(DXE Foundation)
2: FwVol FwFileSys FwVolBlk DevPath(MemMap(11:1760000189FFC8))
...
27: Image(Reset)
28: Image(WinNtBlockIo) DriverBinding
29: Image(Timer)
...
* To unload the driver image of 'Reset':
Shell> unload 27
27: Image(Reset)
Unload driver image (y/n)? n
Exit status code: Aborted
128
Commands
5.5.34 ver
Summary
Displays the version information for this EFI firmware.
EFI Versions
EFI 1.02 and above.
Usage
VER [-s]
-s
- Displays only the EFI Shell version
Description
This command displays the version information for this EFI Firmware or the version information
for the EFI Shell itself. The information is retrieved through the EFI System Table or the Shell
image.
1.0to7thRvw
July, 2005
129
EFI Shell User's Guide
Commands
Examples
Shell> help ver
Displays the version information for this EFI Firmware.
VER [-s]
-s
- Displays the EFI Shell version
Examples:
* To display the version information of a platform:
fs0:\> ver
EFI Specification Revision : 1.10
EFI Vendor
: INTEL
EFI Revision
: 14.5
* To display the version information of another platform:
Note that the version information may vary from different
platforms
due to some platform-specific information.
fs0:\> ver
EFI Specification Revision : 1.02
EFI Vendor
: INTEL
EFI Revision
: 12.38
SAL Specification Revision
SAL_A Revision
= 1. 1
SAL_B Revision
= 1. 1
PAL_A Revision
PAL_B Revision
3. 0
66.23
66.23
Other modules mentioned in FIT (Firmware Interface Table)
FIT_Entry Type
0, Revision
2.60
FIT_Entry Type 15, Revision
66.23
FIT_Entry Type 16, Revision
0.90
FIT_Entry Type 32, Revision
0.30
FIT_Entry Type 30, Revision
1. 0
FIT_Entry Type 17, Revision
0.90
FIT_Entry Type 18, Revision
6. 0
FIT_Entry Type 20, Revision
0.80
SalProc Entry 000000003FE3F720 and GP 000000003FF22480
PalProc Entry 000000003FF48010 IO Port Base 00000FFFFC000000
Cache Enabled
* To display the version information of the EFI Shell
Shell> ver -s
EFI Shell Revision 1.0
130
Commands
EFI Shell Signature: D2C18636-40E5-4EB5-A31B-36695FD42C87
Shell>
5.5.35 vol
Summary
Displays the volume information for the file system that is specified by fs.
EFI Versions
EFI 1.02 and above.
Usage
VOL [fs] [-n <Volume Label>]
VOL [fs] [-d]
fs
Volume Label
-d
- The name of the file system
- New volume label
- Empty volume label
Description
This command displays the volume information for the file system that is specified by fs. If fs is
not specified, the current file system will be taken as the correct fs. If Volume Label is
specified, then the volume label for fs will be set to Volume Label. The maximum length for
Volume Label is 11 characters.
1.0to7thRvw
July, 2005
131
EFI Shell User's Guide
Commands
Examples
Shell> help vol
Displays volume information for the file system specified by fs.
VOL [fs] [-n <Volume Label>]
VOL [fs] [-d]
fs
Volume Label
-d
- The name of the file system
- New volume label
- Empty volume label
Notes:
1. The following characters cannot be used in Volume Label:
% ^ * + = [ ] | : ; “ < > ? / ..
2. No space is allowed in Volume Label.
3. If fs is not specified, the current file system will be taken
as fs.
Examples:
* To display the volume of the current fs:
fs0:\> vol
Volume has no label (rw)
1,457,664 bytes total disk space
1,149,440 bytes available on disk
512 bytes in each allocation unit
* To change the label of fs0:
shell> vol fs0 –n help_test
Volume HELP_TEST (rw)
1,457,664 bytes total disk space
1,149,440 bytes available on disk
512 bytes in each allocation unit
* To get rid of the label of fs0:
fs0:\> vol fs0 -d
Volume has no label (rw)
1,457,664 bytes total disk space
220,160 bytes available on disk
512 bytes in each allocation unit
Shell>
132
6
Shell How To's
6.1
Introduction
This section provides instructions on how to perform various tasks in the EFI Shell. These tasks
include the following:
• How to Switch an External Command to an Internal Command
• How to Switch an Internal Command to an External Command
• How to Understand Consistent Mapping
• How to Switch the Running Modes of the EFI Shell
• How to Correctly Write Scripts in the New EFI Shell
• How to Start a Specific startup.nsh File When Launching EFI
• How to Understand the Use of Quotation Marks
• How to Understand the Use of the Escaping Character '^'
• How to Alias
• How to Map a File System to a User-Specific Mapping Name
• How to Set/Modify/Delete Environment Variables
• How to Launch and Exit the EFI Shell
• How to Determine the Version of the EFI Shell
• How to Get Help Information
• How to Terminate the Execution of Commands
• How to Pause the Screen Output
• How to View the Screen History
• How to Redirect the Output of Commands to Files
• How to View the Contents of a Text File
• How to Edit a Text File
• How to Edit a Binary File
• How to Edit Disk Blocks
• How to Edit Memory
• How to Connect a Driver to a Device
6.2
How to Switch an External Command to an Internal Command
The following steps explain how to switch an external command to an internal command:
1. You should put all the files of your external command (or application) under a subdirectory of the
EFI Shell source root directory in the release package. For example, if the EDK root directory is
C:\EDK, you should put your source code directory under
C:\EDK\Other\Maintained\Application\Shell (e.g.,
C:\EDK\Other\Maintained\Application\Shell\Hello)
133
EFI Shell User's Guide
Shell How-To’s
2. Add lines into the sources.common section of shell.inf, which is located under the EFI
Shell source root directory, to include all the source files of your external command. If your
external command uses any .uni files, they should be included here and must be put ahead of
any .c files of your command. For example:
Hello\HelloString.uni
Hello\Hello.c
If your external command (or application) uses any .h files, please add lines into the
includes.common section to indicate where the .h files can be found (e.g., the file
Hello.h is under C:\EDK\Other\Maintained\Application\Shell\Hello).
$(EDK_SOURCE)\Other\Maintained\Application\Shell\Hello
The macro EDK_SOURCE represents the EDK root directory. It should be followed by the
relative path from the root where the .h files can be found.
3. In the file shell\shellenv\cmddisp.c, declare the entry point function and line help
function of your external command ahead of the SEnvInternalCommands table. Add an
entry for your external command into the SEnvInternalCommands table using the following
values in the order listed:
• Entry point function
• Internal command name
• Line help function
You must add the entry inside the #ifdef EFI_MONOSHELL...#endif block.
4.
6.3
Build the EFI Shell. Your external command should then have been added as an internal
command.
How to Switch an Internal Command to an External Command
The following steps explain how to switch an internal command to an external command (or
application):
1. You will need to write an .inf file for your external command (or application). See the EFI
Shell Developer’s Guide for instructions on how to write an .inf file for external commands (or
applications).
2. Remove the lines for the previous internal command from the shell.inf file, which is located
under the EFI Shell source root directory.
3. Remove the declarations of the entry point function and line help function from
shell\shellenv\cmddisp.c.
4. Remove the entry for the previous internal command from the SEnvInternalCommands
table.
134
Shell How-To’s
NOTE
Changing an "internal-only" command to an external command is not permitted. See the
Commands chapter for the list of internal-only commands.
6.4
How to Understand Consistent Mapping
Consistent mapping was introduced in this version of the EFI Shell to provide the ability to map file
systems to consistent mapping names that will change only if the system’s hardware configuration
changes. Because what constitutes a hardware configuration change can be defined in several ways,
this document uses the following rules to determine if the hardware configuration has changed:
• The number of buses or controllers in a system has changed.
• The physical connections of buses or controllers in a system have changed.
• The physical connection of a device to the system has changed.
In general, use the following as the definition of a hardware configuration change: A hardware
configuration change is any change in the number of or physical connections of a device that
has the capability to produce child devices.
Hardware configuration changes have global scope effects. Any hardware configuration change
could possibly nullify the existing consistent mapping names.
If the hardware configuration remains consistent, all the consistent mapping names will remain
consistent. This constancy reflects two characteristics of consistent mapping:
• Outside of hardware configuration changes, all the consistent mapping names will be kept the
same.
• Systems that have exactly the same hardware configuration should have exactly the same
consistent mapping names.
The second characteristic is very useful for users to write scripts that will be executed across
multiple systems that have exactly the same hardware configuration. It guarantees consistent access
to file systems in the scripts.
Consistent mapping names are different and typically a little longer than traditional fsx-style file
system names. A GUIDed file system may have a consistent mapping name that may have more
than 64 characters. For users who work with the command prompt, traditional fsx-style mapping
names are still the norm. Keep in mind that if you are using the fsx-style map names on the
command prompt, they do not have consistent mapping characteristics.
6.5
How to Switch the Running Modes of the EFI Shell
To be backward compatible to older versions of the EFI Shell (for example, the EFI Shell that was
included in the EFI 1.10.14.62 Sample Implementation), the new EFI Shell provides two running
modes:
• Backward-compatible mode
• Enhanced Shell mode
1.0to7thRvw
July, 2005
135
EFI Shell User's Guide
Shell How-To’s
See Running Modes and Backward-Compatibility Support in the Features chapter for more
information on these running modes. Enhanced Shell mode is the default running mode in this
release of the EFI Shell.
To change the current running mode, execute the following command at the Shell prompt:
set -v efishellmode xxx
In the above command, efishellmode is the reserved volatile variable that the EFI Shell uses to
control the current running mode (see Special Shell Variables in the Syntax chapter for more
information on this variable). xxx is the value for the running mode. 1.1.1 is for backwardcompatible mode and 1.1.2 is for enhanced Shell mode. Any other values are invalid in the
current version.
6.6
How to Correctly Write Scripts in the New EFI Shell
Two running modes are introduced in this version of the EFI Shell (see Running Modes and
Backward Compatibility in the Features chapter for more information):
• Backward-compatible mode
• Enhanced Shell mode
When a batch script is started, the default running mode is set to backward-compatible mode. This
mode is different from the default running mode when you are at the command prompt. As a result,
you must place a statement at the beginning of the script to set the running mode to the desired
setting. This statement must be the first command in a script.
Note that scripts can be called inside scripts (a feature that is referred to as nested batch scripts; see
Nesting Batch Scripts in the Batch Scripts chapter for more information). Nested scripts should set
and maintain the running mode for themselves. However, child scripts cannot change the running
mode in the parent script.
To determine the current running mode, scripts can read the reserved variable efishellmode,
the same as if they are reading a normal environment variable. See Special Shell Variables in the
Syntax chapter for more information on this variable.
6.7
How to Start a Specific startup.nsh File When Launching EFI
Shell
The following steps explain how to start a specific start-up batch script file startup.nsh when
you are launching the EFI Shell:
1. Ensure that the EFI Shell will be launched from a file system. Currently, the EFI Shell does not
support starting a specific startup.nsh file if the EFI Shell is launched from firmware.
2. Put the specific startup.nsh file that you want to run in the same directory with the EFI Shell
image that will be launched. Note that the file name must be startup.nsh (case insensitive).
3. Load and execute the EFI Shell image. The specified startup.nsh file will then be executed
unless the user cancels its execution.
136
Shell How-To’s
6.8
How to Understand the Use of Quotation Marks
The quotation mark character is one of the special functional characters in the EFI Shell. A single
quotation mark character that is not paired with another closing quotation mark will be discarded
after the command line is processed and will not cause any consequences. The quotation mark pair
has the following three main functions:
• Makes the input on the command line literal
• Helps to group arguments on the command line
• Specifies the boundaries for variable substitution
Making the Input Literal
Making the input literal means that none of the characters in the input will be treated as a special
functional character. In the EFI Shell, any strings that start with a - or +character will be
interpreted as flags to a command. If you want to prevent them from being interpreted as flags, you
can use quotation marks to make them literal. For example, if you want to display the string 'dump,' you can use the following at the command prompt:
echo "-dump"
Here the quotation marks will prevent the string '-dump' from being interpreted as a flag to the
command echo.
NOTE
You can also use the escaping character ^ to make the input literal. See How to Understand the
Use of the Escaping Character '^' for more information.
Grouping Arguments on the Command Line
Because the EFI Shell interprets blank spaces as the splitting character to separate arguments on
the command line, you need to use quotation marks to help pass arguments that contain blank
spaces to commands. For example, if you want to list a directory named 'good news,' type the
following at the command prompt:
dir "good news"
If you type the following at the command prompt instead, the EFI Shell will think that you want to
list two directories, 'good' and 'news':
dir good news
Specifying the Boundaries for Variable Substitution
In this version of the EFI Shell, users can specify the boundary inside which variable substitution
will be performed. In a single argument, quotation marks can define the boundaries that divide the
argument into multiple parts; variable substitution will then be performed in each part.
For example, say we have an environment variable 1a whose content is xyz and a script a.nsh,
as follows:
1.0to7thRvw
July, 2005
137
EFI Shell User's Guide
Shell How-To’s
for %a in 1 2 3
echo %1a%a
endfor
If we execute the command a.nsh abc (the string abc will be taken as the first positional
argument %1 to this script), the output will be the following:
xyza
xyza
xyza
The substitution of environment variables has higher priority than that of positional arguments. So
if we want the result to be the following:
abca1
abca2
abca3
The script should be written like the following:
for %a in 1 2 3
echo "%1"a%a
endfor
6.9
How to Understand the Use of the Escaping Character '^'
The character ^ is defined as the escaping character in the EFI Shell. It can unconditionally make
any character that immediately follows it a literal character and thus prevents that following
character from being interpreted as having special meaning. However, if a ^ character is
immediately followed by another ^ character, the second ^ character becomes a literal character
and cannot escape the immediately following character; in other words, the character that
immediately follows the second ^ character is not made literal and will still be interpreted as having
special meaning.
In the EFI Shell, flags (or switches) on a command line all start with - or + character, so the side
effect is that all arguments that start with - or + will be interpreted as flags by default. For example,
typing echo -Title at the command prompt will give you the following error message
echo: Unknown flag - '-Title'
The escaping character ^ can be very useful in this case. Putting an escaping character before the or +, as shown in the following example, will stop the EFI Shell from interpreting the following
string as a flag:
echo ^-Title
You can also use a pair of quotation marks to do the same thing. However, a pair of quotation
marks cannot make the escaping character literal, and they also cannot make quotation marks
literal. If you want to pass quotation marks to a command as part of the argument, you must use the
escaping character ^ to transfer the meaning of the quotation marks.
Escaping characters will be discarded after a command line has been processed, assuming the
escaping character was not escaped by another escaping character.
138
Shell How-To’s
6.10 How to Alias
Users can set aliases to commands. Use the alias command to view, set up, and delete aliases.
See the following topics or chapters for more information on the following:
• The Aliases topic in the Features chapter for general information on aliases
• The Commands chapter for the detailed help information for the alias command
The following table gives examples of custom (i.e., not predefined) aliases. It shows what to type at
the command prompt to set the alias and then describes the result of that command.
Table 6-1 Examples of Custom Aliases
Command to Type at Shell Prompt
Result
alias ll "ls -b"
alias -v rmdir "rm -q"
Sets ll as the alias to the command ls
-b.
Sets rmdir as the alias to the command rm -q.
6.11 How to Map a File System to a User-Specific Mapping Name
Use the map command to map a file system to a user-specific mapping name. For example, you can
map a file system that is represented by hd0a1 to a user-specific name hdisk1 by typing the
following at the command prompt:
map hdisk1 hd0a1:
Note that the last colon is required because the map command also supports mapping a userspecific mapping name to a file system handle. The colon eliminates the ambiguity of two usages.
If you want to specify a name for a certain file system by handle, you can do so by typing the
following at the command prompt:
map name handle
See the Commands chapter for the detailed help information for the map command.
6.12 How to Set/Modify/Delete Environment Variables
Use the set command to set, modify, and delete environment variables. Environment variables are
variables that can be accessed at the command prompt or in batch scripts. The EFI Shell currently
only supports a string data type for all the environment variables. See Valid Characters for Variable
Names in the Syntax chapter for the characters that can be used to make variable names.
There is no limitation on the contents of variables. To delimit an environment variable, put the
variable name inside a pair of percentage signs and the entire expression will be replaced by the
content of the environment variable. See the Syntax and Batch Scripts chapters for the detailed
variable substitution rules.
To set a environment variable test whose content is hello, type the following at the command
prompt:
1.0to7thRvw
July, 2005
139
EFI Shell User's Guide
Shell How-To’s
set test hello
The EFI Shell also supports volatile environment variables. For example, to set a volatile
environment variable GUI, type the following at the command prompt:
set -v GUI "graphic world"
See the Commands chapter for the detailed help information for the set command.
6.13 How to Launch and Exit the EFI Shell
Launching (or Invoking) the EFI Shell
The EFI Shell can be launched in the following three ways:
• Launched as a default boot option
• Loaded and launched from the boot option maintenance menu as an application
• Loaded and launched from the EFI Shell command prompt as an application
The EFI Shell can be built as part of the firmware and will be added as a default boot option at boot
time.
Exiting the EFI Shell
The exit command is provided to let users exit the EFI Shell. Because the EFI Shell supports
nesting the Shell, the exit command will exit the current instance of the EFI Shell and return to its
parent. If there is no parent EFI Shell, it should go back to the EFI boot manager or the boot option
maintenance menu.
In batch scripts, the exit command will terminate the entire EFI Shell, not only the scripts.
6.14 How to Determine the Version of the EFI Shell
Use the ver command to display the version information of the firmware and the EFI Shell. To
display the version of the firmware, type the following at the command prompt:
ver
To display the version of the EFI Shell, type the following at the command prompt:
ver -s
See the Commands chapter for the detailed help information for the ver command.
140
Shell How-To’s
6.15 How to Get Help Information
For Internal Commands
Use the help command to display the line help and the verbose help information of internal Shell
commands. Line help is a one-sentence description of the Shell command usage, and verbose help
is a detailed description of the usage of a Shell command, including explanations of each switch
and examples.
To display the verbose help information of an internal command, type either of the following at the
command prompt, where cmd is the name of the internal command:
help cmd
cmd -?
NOTE
The help cmd form can only be used with internal Shell commands.
To display all the line help information of all the internal Shell commands, type the following at the
command prompt:
help
The help command supports wildcards in internal command names. For example, help d* will
display the line help information of all the internal commands whose names start with the character
d.
See the Commands chapter for the detailed information for the help command.
For External Commands
To display the verbose help information of an external Shell command, type the following at the
command prompt, where cmd is the name of the external command. This form does the same thing
as help cmd.
cmd -?
6.16 How to Terminate the Execution of Commands
Press the ESC key to terminate the execution of internal commands and batch scripts.
6.17 How to Pause the Screen Output
Press the Tab key to pause and resume the streaming of output characters to the console.
1.0to7thRvw
July, 2005
141
EFI Shell User's Guide
Shell How-To’s
6.18 How to View the Screen History
The EFI Shell will store the output of commands that have been executed. Press the Page Up and
Page Down buttons to browse through the screen history, which is also called the scroll back buffer.
You can view a maximum of three screens of output history.
6.19 How to Redirect the Output of Commands to Files
The EFI Shell supports redirecting the standard output and the standard error output of commands
to files. See Output Redirection in the Syntax chapter for the redirection flags that you can use to
perform output redirection.
When performing a redirection, put the command and all of its arguments on the left side of the
redirection flags. You can redirect one standard output and one error output on the command line at
a time, but the redirection files should be different. You cannot put multiple standard output flags
and multiple error output flags on the command line either.
6.20 How to View the Contents of a Text File
Use the type command to view the contents of a text file. This command is similar to the MSDOS* command type and the Unix* command cat.
See the Commands chapter for the detailed help information for the type command.
6.21 How to Edit a Text File
An edit application is provided along with the EFI Shell to allow users to edit text files. This
application provides a simple editor environment to create and edit text files. To launch the edit
application, type the following at the command prompt:
edit
6.22 How to Edit a Binary File
An application hexedit is provided along with the EFI Shell to allow users to edit binary files.
To launch the hexedit application, type the following at the command prompt:
hexedit
Type the following at the command prompt for detailed help information for the hexedit
command:
142
Shell How-To’s
hexedit -?
6.23 How to Edit Disk Blocks
There are two applications that can be used to view and edit disk blocks:
• dblk
• hexedit
Type the following at the command prompt for the detailed help information for these two
applications:
dblk -?
hexedit -?
6.24 How to Edit Memory
Use the external mm command to edit bytes in specific memory locations. Type the following at the
command prompt to get the detailed help information for the mm command:
mm -?
6.25 How to Connect a Driver to a Device
Use the connect command to connect a single driver to a specific device or to connect all the
drivers to all the devices. See the Commands chapter for detailed help information for the
connect command.
1.0to7thRvw
July, 2005
143