1
Operating Instructions
HD Visual Communication-MPCS
Thank you for purchasing this Panasonic product.
Please read this manual carefully before using this product and save this manual for future use.
HD Visual Communication-MPCS (hereafter abbreviated as “HDVC-MPCS”): Software Version 2.00 or later
Introduction
Introduction
About this Manual
This manual describes how to operate the HDVC-MPCS from the HDVC-MPCS Console. By using the
HDVC-MPCS Console, you can perform operations such as starting a conference, changing the screen layout,
changing address book settings etc.
The HDVC-MPCS Console can be used by simply accessing a server that has the HDVC-MPCS software
installed from your computer’s browser. Special software is not required.
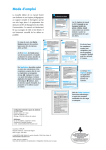
Feature Highlights
Image
HD Visual Communication Mobile
HDVC-MPCS
Console
HDVC-MPCS
KX-VC Series
NAT Traversal Service
HD Visual
Communication
Mobile
HDVC-MPCS is multi-point conference software that enables setting up a flexible SIP communication system
with 6 to 16 participants for the HD Visual Communication Unit or the HD Visual Communication Mobile.
It is possible to separate the conference screen into a maximum of 16 parts, and customise the screen layout
or display position of the participants.
Sites that can be Connected
•
•
•
•
•
2
To connect to the HDVC-MPCS, the software version of the HD Visual Communication Unit must be
2.20 or later.
To connect to the HDVC-MPCS, the software version of the HD Visual Communication Mobile for
Android™ must be 2.0 or later.
To connect to the HDVC-MPCS, the software version of the HD Visual Communication Mobile for
Windows® must be 2.0 or later.
When using encryption and KX-VC series NAT Traversal Service with the HD Visual Communication Unit,
it is necessary to update the software to version 3.00 or later.
When using the KX-VC500 to connect to the HDVC-MPCS, it is necessary to activate the Connection
Enhancement feature with an activation key card (sold separately). For details about this feature, refer to
the Operating Manual or User Manual of the HD Visual Communication Unit.
Operating Instructions
Introduction
Notations
Windows® refers to the Microsoft® Windows operating system.
Trademarks
•
•
•
•
•
•
Microsoft, Windows and Internet Explorer are either registered trademarks or trademarks of Microsoft
Corporation in the United States and/or other countries.
Mozilla and Firefox are registered trademarks of the Mozilla Foundation.
Android is a trademark of Google Inc.
Linux is a registered trademark of Linus Torvalds in the United States, other countries, or both.
Polycom® is a trademark owned by Polycom, Inc. in the US and other countries.
All other trademarks identified herein are the property of their respective owners.
Open Source Software
Parts of this product use Open Source Software supplied based on the conditions of the ITU-T and other
conditions. Therefore, please refer to the information display screen for HDVC-MPCS using the HDVC-MPCS
Console.
For Open Source Software released by ITU-T, within a period of at least three (3) years from delivery of the
product, Panasonic will give to any third party who contacts us at the contact information provided below, for
a charge of no more than the cost of physically distributing source code, a complete machine-readable copy
of the corresponding source code and the copyright notices covered under ITU-T. Please note that software
licensed under ITU-T is not under warranty.
Contact Information
http://www.panasonic.net/corporate/global_network/
Licenses
•
•
THIS PRODUCT IS LICENSED UNDER THE AVC PATENT PORTFOLIO LICENSE FOR PERSONAL
AND NON-COMMERCIAL USE TO
(i) ENCODE VIDEO IN COMPLIANCE WITH THE AVC STANDARD ("AVC VIDEO") AND/OR (ii) DECODE
AVC VIDEO THAT WAS ENCODED BY A CONSUMER ENGAGED IN A PERSONAL ACTIVITY AND/
OR WAS OBTAINED FROM A VIDEO PROVIDER LICENSED TO PROVIDE AVC VIDEO. NO LICENSE
IS GRANTED OR SHALL BE IMPLIED FOR ANY OTHER USE. ADDITIONAL INFORMATION MAY BE
OBTAINED FROM MPEG LA, L.L.C. SEE HTTP://WWW.MPEGLA.COM
THIS PRODUCT INCORPORATES G.722.1 ANNEX C LICENSED BY POLYCOM®.
Operating Instructions
3
Table of Contents
Table of Contents
Before Operation ......................................................................................6
Data Security .....................................................................................................................6
Privacy and Right of Publicity .........................................................................................6
Preparation ...............................................................................................7
System Requirements ......................................................................................................7
Authorised Users ..............................................................................................................7
Screen Display ..................................................................................................................8
Login Screen ....................................................................................................................8
Home Screen ...................................................................................................................9
Setting Screen ................................................................................................................10
Maintenance Screen ......................................................................................................11
Profiles .............................................................................................................................11
Conference Mode ............................................................................................................11
Dial in/Dial out .................................................................................................................12
Switching the Display .....................................................................................................12
Screen Layout Pattern ....................................................................................................12
Changing Screen Layout ................................................................................................13
Changing the Display Position of the Site Image ...........................................................13
Presentation Mode .........................................................................................................14
Settings for HD/SD Video ...............................................................................................14
KX-VC Series NAT Traversal Service ............................................................................14
Message from KX-VC Series NAT Traversal Service ....................................................14
Basic Operation ......................................................................................15
Log in/Log out .................................................................................................................15
Log in ..............................................................................................................................15
Log out ...........................................................................................................................15
Starting a Conference .....................................................................................................16
Making a Conference In Normal Mode ...........................................................................16
Making a Conference In Ad-Hoc Mode ..........................................................................18
Operation During a Conference .....................................................................................19
Changing Display Position of Site Images (Normal Mode Only) ....................................19
Muting/Unmuting the Audio (Normal Mode only) ...........................................................20
Changing Screen Layout (Normal Mode Only) ..............................................................21
Displaying/Hiding the Site’s Name .................................................................................21
Adding Sites during a Conference ..................................................................................22
Disconnecting a Site from the Conference .....................................................................24
Checking the Status of the Conference ........................................................................25
Checking the Traffic ........................................................................................................25
Ending a Conference ......................................................................................................26
Joining a Conference (Dial In) (On-Site Operation) .....................................................27
Disconnecting from a Conference (On-Site Operation) ..............................................27
Selectable Video Source (Presentation Mode) (On-Site Operation) ...........................27
Dialling out to Sites (Ad-Hoc Mode) (On-Site Operation) ............................................28
Settings and Registration ......................................................................29
Basic Settings .................................................................................................................29
Profile Settings ................................................................................................................31
Registering/Editing Profiles ............................................................................................31
Deleting Profile ...............................................................................................................35
Address Book Settings ...................................................................................................36
4
Operating Instructions
Table of Contents
Registering/Editing the Address Book ............................................................................36
Deleting a Site ................................................................................................................38
Maintenance ...........................................................................................39
Activation .........................................................................................................................39
Network Status ................................................................................................................39
Port Setting ......................................................................................................................41
Language Setting ............................................................................................................43
Account Setting ...............................................................................................................43
Adding Accounts ............................................................................................................43
Deleting Accounts ..........................................................................................................44
Changing the Account Password ...................................................................................45
Log ....................................................................................................................................46
Configuration Data ..........................................................................................................46
Making a Backup of the Configuration Data ...................................................................47
Restoring the Configuration Data ...................................................................................47
Shutdown .........................................................................................................................48
About HDVC-MPCS .........................................................................................................48
Additional Information ...........................................................................50
Troubleshooting ..............................................................................................................50
Basic Operation ..............................................................................................................50
If These Messages Appear ............................................................................................51
Specifications .........................................................................................52
System Specifications ....................................................................................................52
Index..............................................................................................................53
Operating Instructions
5
Before Operation
Before Operation
Data Security
We recommend observing the security precautions
described in this section, in order to prevent the
disclosure of sensitive information.
Panasonic is not responsible for any damages
caused by improper use of this device.
Preventing Data Loss
Keep a separate record of all information stored in the
address book, or make a backup using the
HDVC-MPCS Console.
Preventing Data Disclosure
•
Do not place the computer in a location that can be
accessed or removed without authorisation.
• If important information is saved on the computer,
store it in an appropriate location.
• Do not store sensitive personal information in the
product.
• In the following situations, make a record of the
information stored in the address book and uninstall
the HDVC-MPCS.
– Before lending or disposing of the computer
– Before handing the computer over to a third
party
– Before having the computer serviced
• Make sure the product is serviced by only a certified
technician.
This product can register and store personal data (the
address book, history log, etc.). In order to prevent the
disclosure of data stored on this product, make sure to
delete all data that is registered and stored on this
product prior to disposing of, lending, or returning the
computer.
Preventing Data Disclosure over the
Network
•
•
•
•
•
•
6
To ensure the security of private conversations,
only connect the product to a secure network.
To prevent unauthorised access, only connect the
product to a network that is properly managed.
Make sure all computers connected to the product
employ up-to-date security measures.
Keep a separate record of the log-in user name and
password and store it in a safe place.
Use a password that cannot be easily guessed by
a third party.
Change the password periodically.
Operating Instructions
Privacy and Right of
Publicity
By installing and using this product, you are responsible
for maintaining the privacy and usage rights of images
and other data (including sound picked up by the
microphone). Use this product accordingly.
•
Privacy is generally said to be, "A legal guarantee
and right not to have the details of one’s personal
life unreasonably publicised, and the right to be able
to control information about oneself. In addition,
right of publicity is a right not to have a likeness of
one’s face or figure photographed and publicised
without consent".
Preparation
P
r
e
p
System Requirements
a
r
Supported Operating System and Browsers
a
t
i
o
Microsoft Windows 7
– Microsoft Windows Internet Explorer® 8
– Windows Internet Explorer 10
n
Microsoft Windows 8
– Windows Internet Explorer 10
– Mozilla® Firefox®
Linux®
• Mozilla Firefox
Authorised Users
Two types of users with different user authorities can log in to the HDVC-MPCS Console.
User Authority
Maximum Number of
Registrations
User
Can make a conference using the HDVC-MPCS
16
Administrator
Can configure and maintain the HDVC-MPCS,
in addition to making a conference.
3
Type of User
Operating Instructions
7
Preparation
Screen Display
Login Screen
When starting up the HDVC-MPCS Console, the following screen is displayed.
A
B
Language Setting Menu
Select "English" from the pull-down menu.
Login Button
Clicking the button displays a dialogue box to enter the user name and password.
8
Operating Instructions
Preparation
Home Screen
A
B
C
D
Screen Selecting Tab
Click a tab to jump to the designated screen.
Help Button
Click the button to display Help.
Message Button
Click this button to display messages from the KX-VC Series NAT Traversal Service. The button will
become active (its colour turns from grey to blue) when a message from the KX-VC Series NAT Traversal
Service is received.
Operation Area
Perform operations such as displaying the status of a conference, starting/ending a conference, or
performing operations during a conference.
Operating Instructions
9
Preparation
Setting Screen
A
B
Setting Menu List
Setting menus are displayed.
Setting Area
Used for making settings such as the bandwidth setting, profile settings for conferences, or registering/
editing the address book.
10
Operating Instructions
Preparation
Maintenance Screen
A
B
Maintenance Menu List
Maintenance menus are displayed.
Maintenance Area
Used to set up enhanced features or user accounts.
Profiles
You can register settings such as the sites that can participate in a conference, bandwidth, and screen layout,
to a profile before starting a conference. In Normal Mode, it is necessary to specify a profile to start a
conference. Once a profile is registered, you can start a conference with the same settings by simply specifying
the profile. For details about how to make profile settings, refer to "Profile Settings".
Conference Mode
When making a conference, there are 2 conference modes, as follows. For details, refer to "Making a
Conference In Normal Mode " or "Making a Conference In Ad-Hoc Mode".
Conference Mode
Description
Normal Mode
A conference is performed by specifying a profile that has settings such as
the sites and bandwidth registered.
In Normal Mode, you cannot be connected to sites that are not registered in
the profile. Therefore, this mode is recommended for highly-confidential
conferences.
Ad-Hoc Mode
A conference is performed without specifying a profile. It is necessary to set
the sites to participate in a conference when starting the conference.
In Ad-Hoc Mode, any sites can participate in a conference because a profile
is not specified.
Operating Instructions
11
Preparation
Dial in/Dial out
There are 2 types of connection methods to make a conference using HDVC-MPCS, as follows:
Connection Methods
Description
Dial out
Call sites to participate in the conference from the HDVC-MPCS.
Dial in
Have participants in the conference call the HDVC-MPCS.
Switching the Display
Screen Layout Pattern
You can select the screen layout during a conference from the following 7 patterns. The number in the layout
configuration shows the display priority of the sites’ images.
Layout number
Layout configuration
CP1
1
CP4
1
2
3
4
2
3
6
1
CP6
4
5
CP8
5
6
7
1
CP10
2
3
4
8
1
3
7
2
4
8
5
9
6
10
CP13
2 3
4 5
6 7 8 9
10 11 12 13
CP16
1 2 3 4
5 6 7 8
9 10 11 12
13 14 15 16
1
12
Operating Instructions
Preparation
Changing Screen Layout
There are 3 methods to change screen layout, as follows:
Automated Layout
The screen layout changes automatically depending on the number of sites in the conference.
Number of sites
Layout number
1
CP1
2-4
CP4
5-6
CP6
7-8
CP8
9-10
CP10
11-13
CP13
14-16
CP16
Note
•
To have the screen layout change automatically, the setting must be configured in Basic Settings (in
Ad-Hoc Mode) or in a profile (in Normal Mode). For details, refer to "Basic Settings" (in Ad-Hoc Mode)
or "Profile Settings" (in Normal Mode).
Manual Layout (Normal Mode Only)
The screen layout can be changed manually during the conference. For details, refer to "Changing Screen
Layout (Normal Mode Only)".
Fixed Layout
The sites’ images are displayed according to the screen layout configured before the conference. Screen layout
cannot be changed during the conference. For details, refer to "Basic Settings" (in Ad-Hoc Mode) or "Profile
Settings" (in Normal Mode).
Changing the Display Position of the Site Image
You can change the display position of site images within the screen layout using one of the following 3
methods.
Voice Activated Switching
The site with the highest volume (speaker) is displayed in the first priority position automatically. For details,
refer to "Basic Settings" (in Ad-Hoc Mode) or "Profile Settings" (in Normal Mode).
Note
•
After the Voice Activated Switching feature is performed, it cannot be performed again for
approximately 5 seconds (default).
Operating Instructions
13
Preparation
Manual Switching (Normal Mode Only)
You can change the display position of site images during a conference to one of the following 3 positions. For
details, refer to "Changing Display Position of Site Images (Normal Mode Only)".
• The first priority position
• The last priority position (e.g., The eighth priority position for CP8)
• Hide
Fixed Display Position (Normal Mode Only)
The display position of site images can be preconfigured by profile. For details, refer to "Profile Settings".
Note
•
The order of registration corresponds with the display priority.
Presentation Mode
A site’s image can be displayed in full screen display. This is useful for sharing images from the computer or
the sub video camera among conference participants. For details, refer to "Selectable Video Source
(Presentation Mode) (On-Site Operation)".
Settings for HD/SD Video
The HDVC-MPCS sends either HD or SD video, depending on the bandwidth setting in the HD/SD video
settings, the types of connected devices, and available bandwidth. It is possible to configure the screen layout
to use during a conference and set the site name display for each video type. For details, refer to "Settings
and Registration".
KX-VC Series NAT Traversal Service
"KX-VC Series NAT Traversal Service" is a service that allows you to easily set up and operate an affordable
communication environment for the HD Visual Communications System. Also, you can assign a unique number
(Terminal ID) to the unit, which allows the unit to be called with a unique, 7-digit number instead of the IP
address. This means communication can be initiated as if calling a telephone. To use this service, registration
is necessary. For details, contact your dealer.
Message from KX-VC Series NAT Traversal Service
When you receive a message from KX-VC Series NAT Traversal Service, the message "Please check a
message by Web console" is displayed on the site’s screen when you join a conference. Also, the
Message button on the screen of the HDVC-MPCS Console becomes active (changes from grey to blue). By
clicking the button, messages about the failure state and information about the service period of KX-VC Series
NAT Traversal Service is displayed. Be sure to check these messages.
14
Operating Instructions
Basic Operation
B
a
s
i
Log in/Log out
c
O
p
e
r
a
Log in
1. From a computer, access the HDVC-MPCS Console log in page (http://[IP address for the HDVC-MPCS
Console]/hdvc_mpcs/index.cgi).
t
i
Note
•
o
n
•
The IP address for the HDVC-MPCS Console is the IP address of the server that has the
HDVC-MPCS installed. If the server has 2 IP addresses, use either IP address.
Select "English" from the drop-down list in the upper right corner of the screen. The screens are
displayed in the selected language after clicking "OK" in step 4.
2. Click "Login".
•
The authentication screen is displayed.
3. Enter user name and password.
4. Click "OK".
• The Home screen is displayed.
Note
•
If the terms of use screen is displayed, perform the following procedure:
1. Read the license agreement thoroughly, and if you agree to the terms, select "I agree".
2. Check the "Do not ask me again" check box, and then click "OK".
You can confirm the license agreement on the information display screen. For details, refer to
"About HDVC-MPCS".
Log out
1. Close all the displayed browsers.
• You are logged out from the HDVC-MPCS Console.
Operating Instructions
15
Basic Operation
Starting a Conference
Making a Conference In Normal Mode
A conference is made with the sites registered in a profile. You can select which sites participate in the
conference and which sites to not dial out to, from the registered sites.
1. Click the "Home" screen selecting tab.
• The Home screen is displayed.
2. Click the "Conference Start/End" tab in the operation area.
• The select conference mode screen is displayed.
3. Set the following items:
"Conference Mode": Select "Normal Mode".
"Profile": Select the profile to use from the drop-down list.
Note
•
To select a profile, it is necessary to configure the profile in advance (Page 31).
4. Click "Next".
• The conference start screen is displayed.
16
Operating Instructions
Basic Operation
5. In "Screen Layout", select the screen layouts to use for HD video and SD video.
Note
•
•
For details about the types of screen layout, refer to "Screen Layout Pattern (Page 12)".
This operation cannot be performed if "Auto" is set to "Screen Layout Switching" in the profile
selected in step 3.
6. Select the sites to not participate in the conference.
1. Select the sites to not participate in the conference from the "Participant" list.
2. Click "<<Remove".
• Selected sites are moved to the "Non Participant" list.
Note
•
•
•
•
This operation is not necessary if all the sites registered in the profile will participate in the
conference.
Once the conference starts, the sites in the "Non Participant" list cannot participate in the
conference.
To start a conference, it is necessary to have 2 or more sites included in the "Participant" list.
Therefore, it is not possible to move sites to the "Non Participant" list when only 2 sites are
included in the "Participant" list.
In the "Participant" list, you cannot include more sites than the number of registered license ports.
7. Select sites to not dial out to.
1. Uncheck the "Dial Out" check box for sites to not dial out to, from the "Participant" list.
Note
•
•
This operation is not necessary if you will dial out to all sites in the "Participant" list.
If you uncheck the "Dial Out" check box, all sites will be unchecked.
8. Click "Start Conference".
• The sites in the "Participant" list with the "Dial Out" check box checked are dialled. The conference
starts when the sites answer.
Operating Instructions
17
Basic Operation
Making a Conference In Ad-Hoc Mode
1. Click the "Home" screen selecting tab.
• The Home screen is displayed.
2. Click the "Conference Start/End" tab in the operation area.
• The select conference mode screen is displayed.
3. Select "Ad-Hoc Mode" in "Conference Mode".
4. Click "Next".
• The conference start screen is displayed.
5. Select sites to dial out to by following one of the following instructions.
Select from the address book:
1. Click "Address Book".
2. Select sites to dial out to.
3. Click "OK".
Select from the profile:
1. Click "Profile".
2. Enter the ID number of the profile to dial out to.
3. Click "OK".
Enter the address directly:
18
Operating Instructions
Basic Operation
1. Click "Add".
2. Enter the site's IP address or the Terminal ID of the KX-VC Series NAT Traversal Service to dial out
to.
3. Click "OK".
•
The sites that will be dialled are displayed in the "Dial Out Endpoint List".
Note
•
•
•
You cannot select more sites than the number of registered license ports.
You cannot add sites which have the same IP address or the same Terminal ID for the KX-VC
Series NAT Traversal Service.
Perform the following operation if you want to delete sites from the "Dial Out Endpoint List".
1. Select the sites you want to delete.
2. Click "Delete".
3. Click "OK".
6. Click "Start Conference".
• The sites in the "Dial Out Endpoint List" are dialled out to. The conference starts when the sites
answer.
Operation During a Conference
Changing Display Position of Site Images (Normal Mode Only)
Note
•
To perform this operation, "Display Position Switching" in the profile must be set to "Manual". For
details, refer to "Profile Settings".
1. Click the "Home" screen selecting tab.
• The Home screen is displayed.
2. Click the "Conference Operation" tab in the operation area.
• The conference operation screen is displayed.
3. Select the sites for which you want to change the display position, from the "Active Participant List".
Operating Instructions
19
Basic Operation
4. Select the display position from the "Display Position Switching" drop-down list.
"Top": The first priority position
"Bottom": The last priority position
"Hide": Not displayed
5. Click "Execute".
• A dialogue box to confirm the change of the display position is displayed.
6. Click "OK".
• The display position of the site is changed.
Muting/Unmuting the Audio (Normal Mode only)
Note
•
To perform this operation, "Manual Control" in the profile must be set to "Enable". For details, refer
to "Profile Settings".
1. Click the "Home" screen selecting tab.
• The Home screen is displayed.
2. Click the "Conference Operation" tab in the operation area.
• The conference operation screen is displayed.
3. Select the site you want to mute/unmute from the "Active Participant List".
4. Select "ON" (mute) or "OFF" (unmute) for "Mute/Unmute Switching".
5. Click "Execute".
• A dialogue box to confirm the muting/unmuting is displayed.
6. Click "OK".
• The selected site is muted/unmuted.
20
Operating Instructions
Basic Operation
Changing Screen Layout (Normal Mode Only)
Note
•
To perform this operation, "Screen Layout Switching" in the profile must be set to "Manual". For
details, refer to "Profile Settings".
1. Click the "Home" screen selecting tab.
• The Home screen is displayed.
2. Click the "Conference Operation" tab in the operation area.
• The conference operation screen is displayed.
3. Select the screen layout you want to use for HD or SD video from the "Screen Layout Switching"
drop-down list.
4. Click "Execute".
• A dialogue box to confirm the change of the screen layout is displayed.
5. Click "OK".
• The screen layout during a conference is changed.
Displaying/Hiding the Site’s Name
You can select whether to display the site’s name on each site image displayed on the site’s screens.
Note
•
•
The setting for displaying/hiding the site’s name is applied to all sites. Individual settings for each site
cannot be made.
When displaying the site’s name, hide the guides and icons for the site. For details, refer to the
Operating Manual or User Manual of the HD Visual Communication Unit.
1. Click the "Home" screen selecting tab.
• The Home screen is displayed.
2. Click the "Conference Operation" tab in the operation area.
• The conference operation screen is displayed.
Operating Instructions
21
Basic Operation
3. Select "Show" or "Hide" for "Site Name Display Switching".
When in Normal Mode:
When in Ad-Hoc Mode:
4. Click "Execute".
• A dialogue box to confirm the displaying/hiding of the site name is displayed.
5. Click "OK".
• The site’s name is displayed/hidden.
Adding Sites during a Conference
Note
•
You cannot add more sites than the number of registered license ports.
1. Click the "Home" screen selecting tab.
• The Home screen is displayed.
2. Click the "Conference Operation" tab in the operation area.
• The conference operation screen is displayed.
22
Operating Instructions
Basic Operation
3. Select the sites you want to add.
When in Normal Mode:
1. Click "Add".
• Sites in the "Participant" list are displayed.
2. Select the sites you want to add.
3. Click "OK".
• The selected sites are dialled out to.
When in Ad-Hoc Mode:
1. Select the sites you want to add by performing one of the following procedures:
Select from the address book:
a. Click "Address Book".
b. Select the sites you want to add.
c. Click "OK".
Enter the address directly:
a. Click "Add".
b. Enter the IP address or the Terminal ID of the KX-VC Series NAT Traversal Service of the site you
want to add.
c. Click "OK".
•
The selected sites are dialled out to.
Operating Instructions
23
Basic Operation
Note
•
If the site has been added, the site’s name (or IP address) and "joined" will be displayed on the
site’s screen for approximately 5 seconds. To check the addition of the site on the site’s screen,
hide the guides and icons for the site. For details, refer to the Operating Manual or User Manual of
the HD Visual Communication Unit.
Disconnecting a Site from the Conference
1. Click the "Home" screen selecting tab.
• The Home screen is displayed.
2. Click the "Conference Operation" tab in the operation area.
• The conference operation screen is displayed.
3. Select the site you want to disconnect by performing one of the following procedures:
Select from the "Active Participant List":
1. Select the site you want to disconnect from "Site".
When in Normal Mode:
When in Ad-Hoc Mode:
2. Click "Disconnect".
• A dialogue box to confirm the disconnection is displayed.
24
Operating Instructions
Basic Operation
3. Click "OK".
• The selected site is disconnected from the conference.
Disconnect all sites:
1. Click "Disconnect All".
• A dialogue box to confirm the disconnection is displayed.
2. Click "OK".
• All sites are disconnected from the conference.
Note
•
If the site has been disconnected, the site’s name (or IP address//Terminal ID of the KX-VC Series
NAT Traversal Service) and "left" will be displayed on the site’s screen for approximately 5 seconds.
To check the disconnection of the site on the site’s screen, hide the guides and icons for the site. For
details, refer to the Operating Manual or User Manual of the HD Visual Communication Unit.
Checking the Status of the Conference
1. Click the "Home" screen selecting tab.
• The Home screen is displayed.
2. Click the "Conference Status" tab in the operation area.
• The conference status screen is displayed.
Note
•
Click "Refresh", and the latest status will be shown on the screen.
Checking the Traffic
The status of the traffic for the sites in a conference is displayed.
1. Click the "Home" screen selecting tab.
• The Home screen is displayed.
Operating Instructions
25
Basic Operation
2. Click the "Traffic" tab in the operation area.
• The traffic status screen is displayed.
Note
•
•
When a site in a conference is using "NAT Traversal Service", the Terminal ID is displayed in
"Terminal Address".
Click "Refresh", and the latest status will be shown on the screen.
Ending a Conference
1. Click the "Home" screen selecting tab.
• The Home screen is displayed.
2. Click the "Conference Start/End" tab in the operation area.
3. Click "End Conference".
•
26
The conference ends with all the sites in the conference disconnected, and then the select conference
mode screen is displayed.
Operating Instructions
Basic Operation
Joining a Conference (Dial In) (On-Site Operation)
If you call the IP address of the HDVC-MPCS for a conference or Terminal ID of the KX-VC Series NAT
Traversal Service (dial in) from the HD Visual Communication Unit or the HD Visual Communication Mobile,
you can join a conference. For details, refer to the Operating Manual or User Manual of the HD Visual
Communication Unit or the Help of the HD Visual Communication Mobile.
Note
•
•
When in Normal Mode, you cannot join a conference if you call from a site that is not in the
"Participant" list.
The IP address of the HDVC-MPCS for a conference is specified in "Network Status" in the
maintenance menu list.
Disconnecting from a Conference (On-Site
Operation)
If you end a conference using the HD Visual Communication Unit or the HD Visual Communication Mobile,
you can disconnect from the HDVC-MPCS conference. For details, refer to the Operating Manual or User
Manual of the HD Visual Communication Unit or the Help of the HD Visual Communication Mobile.
Selectable Video Source (Presentation Mode)
(On-Site Operation)
By connecting your computer or sub video camera to the HD Visual Communication Unit, you can show your
computer’s screen or video camera image to other sites in a conference. Remote control operation from the
site you want to show is required.
1. Select the image you want to display.
Computer’s screen:
1. Press [PC].
• The computer’s screen is displayed. The same screen is displayed on other sites’ displays.
Sub video camera’s image:
1. Press [Camera Sub].
• The sub video camera’s image is displayed. The same image is displayed on other sites’ displays.
2. Press [Camera Main] to restore the original image.
Note
•
When using software version 3.00 or earlier for the HD Visual Communication Unit, it is necessary
to perform the following procedure for displaying the site's image in full screen.
1. Press [ ][1][0].
• The site’s image is displayed in full screen.
2. Select the image you want to display.
3. Press [Camera Main] to restore the original image.
4. Press [ ][1][1].
• The screen layout returns to the layout pattern in use before step 1 was performed.
Operating Instructions
27
Basic Operation
Dialling out to Sites (Ad-Hoc Mode) (On-Site
Operation)
You can dial out to sites using the remote control of the HD Visual Communication Unit. After connecting to
the HDVC-MPCS, you can dial out to a registered site by entering the ID number of its profile using the remote
control.
Note
•
To use this feature, an Ad-Hoc conference must be in progress.
Dialling out to Sites
1. Join a conference using dial in.
2. Press [#][X][X][X].
• The HDVC-MPCS starts to dial out to the sites assigned to the conference number [X][X][X].
Note
•
•
The conference number [X][X][X] should correspond to the ID number of the profile (101-110) set
in the profile settings.
You can dial out any number of times during a conference. Therefore, it is possible to dial out again
to an unconnected site.
Disconnecting Other Sites from the Conference
1. Press [#][1][9][9].
• All sites are disconnected from the conference except for the site that performed this operation.
28
Operating Instructions
Settings and Registration
S
e
t
t
Basic Settings
i
n
g
1. Click the "Settings" screen selecting tab.
• The Basic settings screen is displayed.
s
a
2. Click "Basic Settings" in the setting menu list.
n
d
3. Set the following items in the setting area.
R
e
g
i
s
t
r
a
t
i
o
n
Item
Description
Value range
Default
Total Bandwidth
Set the total bandwidth that the
HDVC-MPCS can use for
performing a conference with the
sites.
1 Mbps-100 Mbps (Unit:
1 Mbps)
100 Mbps
NAT Traversal
service server SIP
port
Selects the SIP port to use
depending on the connected
network.
Default, Alternate
(Default: 5060, Alternate:
15060)
Default
Interval for VA
Switching
Specifies the time interval after
which the Voice Activated
Switching feature is enabled
again after the feature has been
performed. The Voice Activated
Switching feature is disabled until
the specified time passes.
1 to 30 seconds (per
second)
5 seconds
Screen Layout
Switching*1
Set whether to change the screen
layout in the conference
automatically.
Auto, Fixed
Auto
Operating Instructions
29
Settings and Registration
Item
Description
Value range
Default
Voice Activated(VA)
Switching*1
Specifies whether to use the
Voice Activated Switching feature
(The site with the highest volume
[speaker] is displayed in the first
priority position automatically).
Enable, Disable
Enable
Auto conference
start*1
Set whether to start an Ad-Hoc
conference automatically when
the HDVC-MPCS restarts.
Yes, No
No
Encryption*1*2
Set whether to enable encryption
or not.
Enable, Disable
Disable
Encryption Key*1*2
Set the encryption key when the
encryption setting is enabled.
4-256 characters
Bandwidth*1
Set the maximum bandwidth per
site connected with HD video.
Individual settings for each site
cannot be made.
512 kbps, 768 kbps,
1.0 Mbps, 1.5 Mbps,
2.0 Mbps
1.0 Mbps
Screen Layout*1
Set the screen layout in a
conference connected with HD
video.
CP1, CP4, CP6, CP8,
CP10, CP13, CP16
CP8
Site Name Display*1
Specifies whether to display the
site's name on each site image
during a conference connected
with HD video.
Show, Hide
Show
Bandwidth*1
Set the maximum bandwidth per
site connected with SD video.
Individual settings for each site
cannot be made.
384 kbps, 512 kbps,
768 kbps, 1.0 Mbps,
1.5 Mbps
512 kbps
Screen Layout*1
Set the screen layout in a
conference connected with SD
video.
CP1, CP4, CP6, CP8,
CP10, CP13, CP16
CP4
Site Name Display*1
Specifies whether to display the
site's name on each site image
during a conference connected
with SD video.
Show, Hide
Show
―
Settings for HD Video
Settings for SD Video
Note
•
•
30
Make sure to set the value of "Bandwidth" for the HD video settings higher than that for the SD
video settings.
If the value of "Bandwidth" for the SD video settings is lower than the participants' bandwidth, a
conference is established with HD video and the HDVC-MPCS sends HD video image. However,
for the participants incapable of receiving HD video image, SD video image is sent. Also, if the
Operating Instructions
Settings and Registration
value of "Bandwidth" for the SD video settings is higher than the bandwidth of the participants, a
conference is established with SD video and the HDVC-MPCS sends SD video image.
*1
*2
The items are for Ad-Hoc Mode only. For Normal Mode, it is possible to configure the items in a profile.
If you configure the encryption settings, you will only be able to establish video conference calls with a party that has the same
encryption key, so you can prevent making calls to, or receiving calls from, unknown parties unintentionally.
4. Click "Set".
• Settings are saved and a message showing that saving is complete is displayed.
5. Click "OK".
• The settings screen is displayed.
Profile Settings
Registering/Editing Profiles
Note
•
•
The range of ID numbers you can register to profiles for Normal Mode is from 1 to 10.
The range of ID numbers you can register to dial-out profiles for Ad-Hoc Mode is from 101 to 110.
1. Click the "Settings" screen selecting tab.
• The Basic settings screen is displayed.
2. Click "Profile" in the setting menu list.
• The profile list screen is displayed.
3. Click the ID number of the profile you want to register or edit.
•
The profile edit screen is displayed.
Operating Instructions
31
Settings and Registration
4. Set the following items in the setting area.
Item
Value range
Default
Profile Name*1
Set the profile name.
Up to 50 characters
―
Description*1
Set the description of the profile.
Up to 200 characters
―
Encryption
Set whether to enable encryption
or not.
Enable, Disable
Set the encryption key when the
encryption setting is enabled.
4-256 characters
*2
Encryption Key*3
32
Description
Operating Instructions
Disable
―
Settings and Registration
Item
Endpoint List*1
Description
Set the sites that can participate in
the conference.
Value range
Default
2 to 32 sites*4
Note
•
The order of registration
corresponds with the
display priority.
Select from the address book:
1. Click "Address Book".
2. Select the site you want to set,
and click "OK".
Enter the address directly:
1. Click "Add".
2. Enter the IP address or the
KX-VC Series NAT Traversal
Service Terminal ID of the site
in "IP Address", and then click
"OK".
―
Note
•
•
Enter the IP address
within the following
range:
Class A: 1.0.0.0–
126.255.255.255
Class B: 128.0.0.0–
191.255.255.255
Class C: 192.0.0.0–
223.255.255.255
You cannot add sites
that have the same IP
address or Terminal ID
for the KX-VC Series
NAT Traversal Service.
Manual Control
Set whether to change the screen
layout or display position of the site
image manually during a
conference. When this setting is
disabled, the order of registration in
"Endpoint List" corresponds to
the display priority.
Enable, Disable
Enable
Screen Layout
Switching
Set whether to change the screen
layout automatically according to
the number of sites in the
conference or manually.
Auto, Manual
Manual
Operating Instructions
33
Settings and Registration
Item
Description
Value range
Default
Set whether to display the site with
the highest volume (speaker) in the
first priority position automatically
or to change the display position of
the site image manually.
Voice Activation, Manual
Manual
Bandwidth
Set the maximum bandwidth per
site connected with HD video.
Individual settings for each site
cannot be made.
512 kbps, 768 kbps,
1.0 Mbps, 1.5 Mbps,
2.0 Mbps
1.0 Mbps
Site Name Display
Specifies whether to display the
site's name on each site image
during a conference connected
with HD video.
Show, Hide
Show
Bandwidth
Set the maximum bandwidth per
site connected with SD video.
Individual settings for each site
cannot be made.
384 kbps, 512 kbps,
768 kbps, 1.0 Mbps,
1.5 Mbps
512 kbps
Site Name Display
Specifies whether to display the
site's name on each site image
during a conference connected
with SD video.
Show, Hide
Hide
Display Position
Switching
Settings for HD Video
Settings for SD Video
Note
•
•
*1
*2
*3
*4
Make sure to set the value of "Bandwidth" for the HD video settings higher than that for the SD
video settings.
If the value of "Bandwidth" for the SD video settings is lower than the participants' bandwidth, a
conference is established with HD video and the HDVC-MPCS sends HD video image. However,
for the participants incapable of receiving HD video image, SD video image is sent. Also, if the
value of "Bandwidth" for the SD video settings is higher than the bandwidth of the participants, a
conference is established with SD video and the HDVC-MPCS sends SD video image.
These settings are available for profiles for dial out in Ad-Hoc Mode. These settings are used when configuring a profile with an
ID number from 101 to 110.
If you configure the encryption settings, you will only be able to establish video conference calls with a party that has the same
encryption key, so you can prevent making calls to, or receiving calls from, unknown parties unintentionally.
While being entered, the characters of the encryption key are displayed, but once the settings are saved, all the characters will
be displayed as asterisks (*), and you will no longer be able to check the encryption key on the screen. Record the encryption
key beforehand, and store it in a safe location.
The maximum number of sites that can join a conference at the same time is 16 (depending on the number of license ports).
You can select which sites to join a conference from the sites that are registered in the profile at the start of the conference.
5. Click "Set".
• The setting of the profile is saved, and the profile list screen is displayed.
34
Operating Instructions
Settings and Registration
Deleting Profile
1. Click the "Settings" screen selecting tab.
• The Basic settings screen is displayed.
2. Click "Profile" in the setting menu list.
• The profile list screen is displayed.
3. Click the ID number of the profile you want to delete.
•
The profile edit screen is displayed.
Operating Instructions
35
Settings and Registration
4. Click "Delete This Profile".
•
A message to confirm deletion is displayed.
5. Click "OK".
• The profile is deleted, and the profile list screen is displayed.
Address Book Settings
Registering/Editing the Address Book
Note
•
You can register up to 200 sites in the address book.
1. Click the "Settings" screen selecting tab.
• The Basic settings screen is displayed.
2. Click "Address Book" in the setting menu list.
• The address list screen is displayed.
36
Operating Instructions
Settings and Registration
3. Register or edit sites in the address book.
To add a new site:
1. Click "Add".
To edit a registered site:
1. Select the site you want to edit.
2. Click "Edit".
4. Set the following items:
Item
Description
Value range
Site Name
Set the site name.
Up to 50 characters
IP Address/Terminal
ID
Set the IP address or Terminal ID
of the KX-VC Series NAT
Traversal Service.
IP Address (within the
following ranges):
Class A: 1.0.0.0–
126.255.255.255
Class B: 128.0.0.0–
191.255.255.255
Class C: 192.0.0.0–
223.255.255.255
Default
―
―
Terminal ID: 7 digits
Description
Set the description of the site.
Up to 200 characters
―
Operating Instructions
37
Settings and Registration
5. To add a new site:
Click "OK".
To edit a registered site:
Click "Update".
•
The address book settings are saved, and the address list screen is displayed.
Note
•
If you click "Reset", the settings will be returned to their original state before being edited in step
4.
Deleting a Site
1. Click the "Settings" screen selecting tab.
• The Basic settings screen is displayed.
2. Click "Address Book" in the setting menu list.
• The address list screen is displayed.
3. Select the sites you want to delete.
4. Click "Delete".
• A message to confirm deletion is displayed.
5. Click "OK".
• The site is deleted and the address list screen is displayed.
38
Operating Instructions
Maintenance
M
a
i
n
Activation
t
e
n
a
n
c
e
By performing activation (license registration), you can increase the number of sites that can participate in a
conference and use the KX-VC Series NAT Traversal Service.
To perform the activation, you must obtain a Registration Key from your dealer and make a registration. First,
provide your dealer with the License No. and Registration ID on the Software License Card. The dealer will
enter this information into the Key Management System and then issue you with the Registration Key.
1. Click the "Maintenance" screen selecting tab.
• The maintenance screen is displayed.
2. Click "Activation" in the maintenance menu list.
• The activation screen is displayed.
3. Enter the Registration Key for the HDVC-MPCS or KX-VC Series NAT Traversal Service.
4. Click "Register".
• A message to confirm the performing of activation is displayed.
5. Click "OK".
• Activation is performed, and a message to show the completion of license registration is displayed.
6. Click "OK".
• The activation screen is displayed.
Note
•
The features corresponding to the entered Registration Key of the HDVC-MPCS or KX-VC Series NAT
Traversal Service are activated.
Network Status
You can check the network status of the HDVC-MPCS.
1. Click the "Maintenance" screen selecting tab.
• The maintenance screen is displayed.
Operating Instructions
39
Maintenance
2. Click "Network Status" in the maintenance menu list.
• The network status screen is displayed.
Note
•
•
Perform the following operation if you want to change the IP address of the HDVC-MPCS for a
conference. In this case, it is also necessary to change the IP address of the server. For details,
contact your dealer.
1. Click "Change".
• The IP address entering screen is displayed.
2. Enter the IP address, and click "OK".
• The IP address is changed, and the network status screen is displayed.
Use the following procedure to perform the connection test with the KX-VC Series NAT Traversal
Service.
1. Click "Connection Test".
• The connection test with the KX-VC Series NAT Traversal Service begins.
2. Click "Refresh".
•
The result of the connection test is displayed.
Note
•
If some items are still being tested, click "Refresh" again after a few seconds.
3. Click "Show Results".
40
Operating Instructions
Maintenance
•
•
The detailed result screen is displayed.
After the KX-VC Series NAT Traversal Service period expires, clicking "Disable NAT
Traversal Service" will stop the service expiration message from appearing.
Port Setting
You can configure the ports for connecting the HDVC-MPCS using the KC-VC Series NAT Traversal Service.
Note
•
You cannot configure the ports if activation of the KX-VC Series NAT Traversal Service is not complete.
1. Click the "Maintenance" screen selecting tab.
• The maintenance screen is displayed.
2. Click "Port Settings" in the maintenance menu list.
• The port setting screen is displayed.
3. Perform one of the following procedures to configure the settings:
Automatic entry:
1. Enter the first port number for Site 1’s WAN side.
2. Click "Auto Input for WAN".
• The WAN-side port numbers for other sites are assigned automatically.
1. Click "Same port on WAN and LAN".
• The port numbers for the LAN side are copied to the WAN side.
Entering manually:
• Set the following items in the setting area.
Operating Instructions
41
Maintenance
Item
Description
Value range
Default
RTP for Audio
(LAN)
Set the port number for the
audio RTP port for the LAN
side.
5100 to 5194
Site1: 5100, Site2: 5102, Site3:
5104, Site4: 5106, Site5: 5108,
Site6: 5110, Site7: 5112, Site8:
5114, Site9: 5116, Site10: 5118,
Site11: 5120, Site12: 5122, Site13:
5124, Site14: 5126, Site15: 5128,
Site16: 5130
RTP for Audio
(WAN)
Set the port number for the
audio RTP port for the WAN
side.
1 to 65535
―
RTCP for Audio
(LAN)
Set the port number for the
audio RTCP port for the LAN
side.
5100 to 5194
Site1: 5101, Site2: 5103, Site3:
5105, Site4: 5107, Site5: 5109,
Site6: 5111, Site7: 5113, Site8:
5115, Site9: 5117, Site10: 5119,
Site11: 5121, Site12: 5123, Site13:
5125, Site14: 5127, Site15: 5129,
Site16: 5131
RTCP for Audio
(WAN)
Set the port number for the
audio RTCP port for the WAN
side.
1 to 65535
―
RTP for Video
(LAN)
Set the port number for the
video RTP port for the LAN
side.
5200 to 5294
Site1: 5200, Site2: 5202, Site3:
5204, Site4: 5206, Site5: 5208,
Site6: 5210, Site7: 5212, Site8:
5214, Site9: 5216, Site10: 5218,
Site11: 5220, Site12: 5222, Site13:
5224, Site14: 5226, Site15: 5228,
Site16: 5230
RTP for Video
(WAN)
Set the port number for the
video RTP port for the WAN
side.
1 to 65535
―
RTCP for Video
(LAN)
Set the port number for the
video RTCP port for the LAN
side.
5200 to 5294
Site1: 5201, Site2: 5203, Site3:
5205, Site4: 5207, Site5: 5209,
Site6: 5211, Site7: 5213, Site8:
5215, Site9: 5217, Site10: 5219,
Site11: 5221, Site12: 5223, Site13:
5225, Site14: 5227, Site15: 5229,
Site16: 5231
RTCP for Video
(WAN)
Set the port number for the
video RTCP port for the WAN
side.
1 to 65535
―
4. Click "Set".
• Settings are saved and a message showing that saving is complete is displayed.
5. Click "OK".
• A message to confirm the change of the port settings is displayed.
42
Operating Instructions
Maintenance
6. Click "OK".
• The port settings are changed, and the port setting screen is displayed.
Note
•
It is necessary to configure the port settings for sites up to the number of registered licenses.
Language Setting
You can specify the language used to display messages from the KX-VC Series NAT Traversal Service.
1. Click the "Maintenance" screen selecting tab.
• The maintenance screen is displayed.
2. Click "Language Setting" in the maintenance menu list.
• The language setting screen is displayed.
3. Select the desired language from the "Language" pull-down menu.
4. Click "Set".
• Settings are saved and a message showing that saving is complete is displayed.
5. Click "OK".
• The language setting is saved, and the language setting screen is displayed.
Account Setting
You can add/delete user accounts or change the password of the user account for logging in to the
HDVC-MPCS Console.
Adding Accounts
1. Click the "Maintenance" screen selecting tab.
• The maintenance screen is displayed.
2. Click "Account Settings" in the maintenance menu list.
• The account setting screen is displayed.
Operating Instructions
43
Maintenance
3. Click "Add".
•
The new account screen is displayed.
4. Set the following items:
"User Name": Enter a user name (4 to 16 characters).
"Password": Enter a password (6 to 16 characters).
"Retype Password": Re-enter the password.
"Login Level": Select "Administrator" or "User" from the drop-down list.
Note
•
•
The characters that can be input for the user name/password are as follows:
User name: alphanumeric characters and symbols _ Password: alphanumeric characters and symbols ! # $ % () - = * _
The fields are case sensitive.
5. Click "OK".
• The configured account is added, and the account setting screen is displayed.
Deleting Accounts
1. Click the "Maintenance" screen selecting tab.
• The maintenance screen is displayed.
2. Click "Account Settings" in the maintenance menu list.
• The account setting screen is displayed.
44
Operating Instructions
Maintenance
3. Select the account you want to delete.
Note
•
You cannot delete accounts that are being used.
4. Click "Delete".
• A message to confirm the deletion of the account is displayed.
5. Click "OK".
• The account is deleted, and the account setting screen is displayed.
Changing the Account Password
1. Click the "Maintenance" screen selecting tab.
• The maintenance screen is displayed.
2. Click "Account Settings" in the maintenance menu list.
• The account setting screen is displayed.
3. Click "Change Password" for the account whose password you want to change.
•
The password change screen is displayed.
Operating Instructions
45
Maintenance
4. Set the following items:
"Password": Enter a new password.
"Retype Password": Re-enter the new password.
5. Click "OK".
• The password is changed, and the account setting screen is displayed.
Log
You can confirm or obtain the history log.
1. Click the "Maintenance" screen selecting tab.
• The maintenance screen is displayed.
2. Click "Log" in the maintenance menu list.
• The log screen is displayed.
3. Click "Download" to obtain the history log.
•
The screen to confirm the saving of the history log is displayed.
4. Save the file.
• The history log file is downloaded, and the log screen is displayed.
Configuration Data
You can make a backup of or restore configuration data.
46
Operating Instructions
Maintenance
Making a Backup of the Configuration Data
1. Click the "Maintenance" screen selecting tab.
• The maintenance screen is displayed.
2. Click "Configuration Data" in the maintenance menu list.
• The configuration data screen is displayed.
3. Click "Back-Up".
•
The screen to confirm the saving of the file is displayed.
4. Save the file.
• The backup file is downloaded, and the configuration data screen is displayed.
Restoring the Configuration Data
Note
•
This operation cannot be performed during a conference.
1. Click the "Maintenance" screen selecting tab.
• The maintenance screen is displayed.
2. Click "Configuration Data" in the maintenance menu list.
• The configuration data screen is displayed.
3. Click "Browse…", and select the backup file you want to restore.
4. Click "Restore".
• A message to confirm the restoration is displayed.
5. Click "OK".
• The configuration data is restored, and a message indicating the end of the restoration is displayed.
Operating Instructions
47
Maintenance
6. Click "OK".
• The configuration data screen is displayed.
Shutdown
1. Click the "Maintenance" screen selecting tab.
• The maintenance screen is displayed.
2. Click "Shutdown" in the maintenance menu list.
• The exit screen is displayed.
3. Select "End HDVC-MPCS" or "Shutdown PC".
4. Click "Execute".
• A message to confirm performing the selected operation is displayed.
5. Click "OK".
• The selected operation is performed.
About HDVC-MPCS
Information such as the software version of the HDVC-MPCS and license information is displayed.
1. Click the "Maintenance" screen selecting tab.
• The maintenance screen is displayed.
48
Operating Instructions
Maintenance
2. Click "About" in the maintenance menu list.
• The information display screen about the HDVC-MPCS is displayed.
Operating Instructions
49
Additional Information
A
d
d
i
Troubleshooting
t
When a problem occurs, please refer to the following:
i
o
n
a
Basic Operation
l
Problem
I
Cause and Solution
n
You cannot log in to the
HDVC-MPCS Console.
f
o
• The user name and/or password is incorrect.
→ Check that the capitalisation of characters is correct, and then try
entering them again.
r
m
a
t
i
A site registered in the profile
cannot participate in the
conference.
•
You cannot start a
conference.
• The previous conference is not terminated.
→ Start a conference after terminating the previous conference
o
n
The site was moved to the "Non Participant" list at the start of the
conference.
→ Before starting the conference, do not move sites from the
"Participant" list if they might participate during the conference
(Page 16).
(Page 26).
The latest status of the
conference is not displayed.
• The status changed after the conference status screen was displayed.
→ Click "Refresh" to update the screen (Page 25).
The image and the sound are
distorted.
• The settings of the hub or router are different to those of the server.
→ The settings should be the same.
• The bandwidth (the value of the "Bandwidth" ´ the number of sites in
the conference) exceeds the maximum bandwidth of the HDVC-MPCS.
→ Adjust the configuration of the "Total Bandwidth" and "Bandwidth"
so that the bandwidth does not exceed the maximum bandwidth
(Page 29, Page 31).
• There may be a problem with your communication lines.
→ Contact your network administrator.
Cannot connect with other
sites.
• The encryption key does not match the ones at other sites.
→ Ask the other sites to have the same encryption key with the
•
→
•
→
•
→
•
→
50
Operating Instructions
HDVC-MPCS.
The sites use a KX-VC500 without the Connection Enhancement
feature.
Ask the sites to activate the Connection Enhancement feature.
When "Other Side Busy." is displayed on the site’s display, more sites
than the number of registered license ports are trying to participate in
a conference.
A conference cannot be made with more sites than the number of the
registered ports. The number of ports can be increased up to 16. For
details, please contact your dealer.
The software version of the HD Visual Communication Unit at the sites
is 2.10 or earlier.
Ask the sites to update the software.
The site is not using the HD Visual Communications System.
Ask the site to use the HD Visual Communications System.
Additional Information
Problem
Cause and Solution
Cannot hear sound.
•
→
•
→
The image is less visible.
• Guides and icons are displayed on the image.
→ Hide the guides and icons for the site. For details, refer to the Operating
The sound is set to mute.
Unmute the sound (Page 20).
The microphone at the site is set to mute.
Ask the site to unmute the microphone.
Manual or User Manual of the HD Visual Communication Unit.
If These Messages Appear
Message
Cause and Solution
Hardware information and
Registration Key unmatched.
• The server is damaged, or the server or parts may have been replaced.
→ Contact your dealer.
Operating Instructions
51
Specifications
S
p
e
c
System Specifications
i
f
Number of Simultaneous Conferences
1 Conference
Number of Sites
Up to 16 Sites (Depending on the number of the license ports)
Connection Mode
IP Mode, NAT Traversal Service Mode
Maximum Bandwidth
2.0 Mbps (IP Rate)
Call Control
Standard
SIP (TCP/UDP)
Connection
Dial In, Dial Out Based On the Web Operation, Dial Out Using
External Control I/F
i
c
a
t
i
o
n
s
Video
Transmission
Capacity
Reception
Capacity
Audio
Profile
H.264 Baseline Profile Level 3.1, H.264 High Profile Level 3.1
Video
Resolution
720p, w 432p
Computer
Resolution
VGA, SVGA, XGA, 720p
Profile
H.264 Baseline Profile Level 1.3-3.1, H.264 High Profile Level
3.1
RTP/MTU Size
1240 byte
RTP Type
RTP Standard (Single NAL/Non-Interleaved)
QoS
Bandwidth Control, ARQ (Automatic Repeat-reQuest)
Number of
Screens
CPn
Codec
Profile
52
G.722, G.722.1C
RTP/Transmission Interval
20 milliseconds
QoS
ARQ (Automatic Repeat-reQuest)
Encryption
Screen
Display
CP1, CP4, CP6, CP8, CP10, CP13, CP16
AES128
Number of Screens
CP1, CP4, CP6, CP8, CP10, CP13, CP16
Description
Combined Screen Mode
(Displaying a combined screen of sites' image)
Presentation Mode
(Displaying a full screen of the site sharing a computer screen/
sub video camera image)
Conference Mode
Normal Mode, Ad-Hoc Mode
Operating Instructions
Index
Index
U
User
7
A
Account 43
Address Book 36
Ad-Hoc Mode 11, 18
B
Browser
7
C
Conference Mode
11
D
Displaying Other Video Sources
14, 27
E
End Conference
26
K
KX-VC Series NAT Traversal Service
14
M
Mute
20
N
Normal Mode
11, 16
P
Presentation Mode 14, 27
Privacy 6
Profile 11, 31
Protecting Information 6
R
Right of Publicity
6
S
Screen Display 8
Screen Layout
Layout Change 13, 21
Pattern 12
Security 6
Software Version 48
Specifications 52
Start Conference 16
T
Troubleshooting
50
Operating Instructions
53
1-62, 4-chome, Minoshima, Hakata-ku, Fukuoka 812-8531, Japan
Web Site: http://www.panasonic.net/
Two Riverfront Plaza, Newark, NJ 07102-5490
Web Site: http://www.panasonic.com/bts
5770 Ambler Drive, Mississauga, Ontario, L4W 2T3
Web Site: http://www.panasonic.ca
Copyright:
This material is copyrighted by Panasonic System Networks Co., Ltd., and may be reproduced for internal
use only. All other reproduction, in whole or in part, is prohibited without the written consent of Panasonic
System Networks Co., Ltd.
© Panasonic System Networks Co., Ltd. 2012
PNQX5918XA DD1012KK2113