1
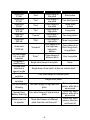
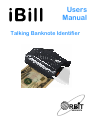
iBill
Users
Manual
Talking Banknote Identifier
RBIT
RESEARCH
1. Introduction
This manual is designed to guide you in the use and care of the iBill
Talking Banknote Identifier. This specially designed unit identifies and
announces the denomination of U.S. banknotes.
2. Getting familiar with the iBill
2.1
Orientation of the unit and its Controls
This section will familiarize you with the location and functions of the
controls.
Place the unit on a desk or hold it in your hand so that the ridge on one of
the two large flat sides of the unit is on the top side and towards you. This
is the TOP side of the unit. The ridge forms the opening of the slot for
inserting the bill. You will find two identical pushbuttons with small ridges
on the right and left sides of the unit.
Now turn the unit over so that the BOTTOM side of the unit is facing
upwards. You will feel several short ridges about half inch in length.
These identify the cover of the battery compartment and allow you to open
it easily.
2.2
Replacing the battery
The iBill uses a single AAA alkaline battery for operation and is shipped
to you with a battery installed.
To replace the battery, first open the battery compartment cover on the
bottom of the unit. The cover can be identified by a ridged pattern. Open
the cover, by pushing it outwards, gently but firmly. The battery cover is
held securely to the unit by a rubber string so that it does not separate
from the unit and get misplaced. Care should be taken to avoid applying
undue force which may tear the rubber strings.
-2-
Once the battery cover is open, you will find a silk cloth strip which aids in
removal of the battery. The old battery can be extracted by pulling on this
silk strip. When inserting a battery, this strip should go around the
underside of the battery.
To insert the new battery, hold the unit so that the battery compartment is
open and facing upwards and towards you. First, push in the negative
terminal (the flat end of the battery) into the left side of the battery
compartment. Then push the other end (positive terminal, with a bump),
into the compartment and ensure that the battery is secure. You may now
close the cover by sliding it and begin use.
For reliable operation of the product, the use of AAA alkaline batteries
from reputable manufacturers is strongly recommended.
2.3
Announcement Modes
The unit can be operated in one of three modes – Speech, Tone or
Vibration.
In Speech Mode, the unit announces the denomination of the bill in a
female voice. In Tone Mode, the unit announces denominations by a
pattern of tones of different pitch and duration.
In both Speech and Tone Modes, other indications, such as turn-on or
low-battery warnings are in the form of unique tone sequences.
In Vibration Mode, the unit announces denominations by a pattern of
vibrating pulses of different durations. Other indications are also in the
form of vibratory patterns.
2.4
Announcements and Indications
The following table describes the announcements and indications the unit
provides for various events in each of the Announcement Modes.
Event
Turning on the
unit
Speech Mode
Tone Output
Single short beep
-3-
Vibration Mode
Very short pulse
Event
Announce
$1 bill
Announce
$2 bill
Announce
$5 bill
Announce
$10 bill
Announce
$20 bill
Announce
$50 bill
Announce
$100 bill
Un-identifiable
bill or no bill
inserted
Progress of
identification
Volume level
selection in
speech mode
Tone mode
selection
Vibration mode
selection
Speech Mode
”One”
”Two”
”Five”
”Ten”
“Twenty”
“Fifty”
“Hundred”
“Error”
Tone Output
Single beep of
low pitch
Two beeps of
low pitch
Three beeps of
low pitch
Single beep of
high pitch
Two beeps of
high pitch
Three beeps of
high pitch
Four beeps in a
low-high-lowhigh pitch
pattern
Three beeps of
different pitch
Single short beep of low pitch
Vibration Mode
Short pulse
Two short pulses
Three short
pulses
Long pulse
Two long pulses
Three long pulses
Four pulses in a
Short-long-shortlong pattern
Very long pulse
None
Single beep of low pitch, at the set volume level
Two short beeps of different pitch
Single short pulse
First Low Battery
Warning
Two short beeps of high and low
pitch
Second Low
Battery Warning
Four short beeps of high and low
pitch
Battery too low
to operate
Three short beeps of different
pitch, then the unit turns off
-4-
Three very short
pulses, after bill is
announced
Three very short
pulses, after bill is
announced
Three very short
pulses, then the
unit turns off
3. Using the iBill
3.1
Identifying a Bill
To switch on the unit, press either of the two push-button switches. Turnon is indicated by a short beep or vibration pulse. The unit begins the
identification process and when complete, announces the denomination of
the bill (or indicates an un-identifiable bill). The button may be released
any time after the turn-on beep (or pulse), or may be kept pressed to
change the mode or volume as described later in this manual.
Once turned on, the unit immediately begins the identification process.
The bill should therefore be fully and properly inserted into the slot
before pressing one of the buttons to turn on the unit. The bill should
be inserted so that the short side of the bill is parallel to the slot. Proper
insertion is achieved when the bill cannot be pushed inwards further with a
light force. The inserted bill should be held firmly in the slot when the
button is pressed. The bill may be removed once the unit acknowledges
the button press with a beep or vibration pulse.
If there is no beep or vibration indication upon pressing one of the buttons,
it is likely that the battery is too weak and should be replaced.
The unit will identify most bills within one second. However, if the bill is in
poor condition, it may require more time for identification. The unit
indicates the progress of the identification process by means of a short,
low-pitched beep. In Vibration Mode, the unit does not provide indication
of the progress to avoid confusion.
If a bill is in poor condition and cannot be identified within one second, a
beep is emitted after one second and the unit continues the identification
process. If the unit fails to identify the bill, it announces an Error after 3
seconds. In this event, the bill should be inserted in a different orientation.
If you choose, you may remove the bill and insert it in a different
orientation at any time, and identification can be restarted by pressing
either one of the buttons.
If either of the buttons is held continually pressed, identification progress
tones are suppressed. If a volume or mode change operation is
-5-
performed, the denomination of the bill is announced when both buttons
are released. The unit turns itself off automatically after completion of bill
identification or a volume or mode change.
3.2
Canceling the current identification cycle
Once the identification cycle has begun, you may wish to cancel the
current cycle and restart it due to several reasons, for instance, realizing
that the bill was not properly inserted, or if the identification is taking long
due to poor condition of the bill. The bill can simply be re-inserted and
identification re-started by pressing one of the buttons.
Upon pressing the button, the unit indicates the start of identification just
as in the case of normal turn-on, by providing a beep or vibration pulse.
3.3 Changing the Output Mode and Volume Level
The unit provides three output modes: Speech, Tone and Vibration.
Three volume levels are available in the Speech output mode. The
modes and volume levels are selected by using both push-buttons
together. The loudness of the tones in tone mode is fixed and cannot be
increased or decreased.
It will decrease at low battery levels
automatically to extend the life of the battery.
Pressing and holding any one button, and then pressing and releasing the
other button changes the volume or mode. Each time the second button
is pressed and released, the Output Mode setting cycles between Speech
Mode volume levels 1, 2, 3, Vibration Mode and Tone Mode, and then
back to Speech Mode volume level 1.
A tone of appropriate volume is emitted at each volume setting to indicate
the level chosen. For the Tone Mode, a double-tone of different pitch is
emitted. For the vibration setting, a short vibration pulse is emitted.
The Output Mode and volume level can be changed at any time while the
device is turned on, even while the unit is in the identification process. The
unit continues the identification process upon completion of the mode or
volume change.
If either one of the buttons continues to remain pressed after the mode or
volume change, the unit will wait until it is released before continuing
operation and announcing the denomination.
-6-
3.4
Low Battery Indication
The unit continually monitors the battery level during use. A warning is
provided when the remaining capacity of the battery reaches
approximately 10% of the full capacity. The warning is in the form of two
short beeps of high and low pitch in Speech and Tone Modes or three
very short vibration pulses and is provided at the end of each
denomination announcement.
When the remaining capacity of the battery reaches approximately 5% of
the full capacity, the warning tone changes to four short beeps of high and
low pitch at the end of each denomination announcement. In Vibration
Mode, this warning is in the form of three very short vibration pulses. The
5% and 10% warnings are the same in vibration mode.
If the battery level is deemed to be critically low and insufficient to permit
accurate operation, the unit emits 3 short beeps of different pitch or three
short vibration pulses and shuts itself off. This can happen when the unit
is first switched on or when the volume or output modes are changed. If
one of the buttons is kept pressed when the battery is critically low, the
unit will emit an intermittent series of beeps. You should not attempt to
operate the unit once it starts giving critical low-battery warnings and
should immediately replace the battery with a fresh one.
Battery Warning and Volume Level
Battery life and low battery warning signals are highly dependent on the
output mode and volume level at which the device is being operated. You
may therefore get low-battery warnings at volume level 3 for instance, but
if the volume level is adjusted to lower levels, the warnings may stop.
This is because higher volume levels and Vibration Mode consume more
power
When the battery weakens, the unit will automatically reduce the volume
level in Speech Mode to allow continued use and to extend the life of the
battery. Therefore, even if you attempt to set a higher volume level, the
unit will limit the volume to the maximum level possible with the weak
battery. To restore full volume, the battery must be replaced.
-7-
4. Care of the device
The unit should be protected from dust and liquids. When not in use, keep
the unit in a protective water and dust-proof case.
Periodically wipe the unit with a slightly damp, soft, lint free cloth to
remove accumulated dust, especially from the area near the bill insertion
slot.
5. Troubleshooting
If you encounter difficulty in using the device, it might be due to one of the
following reasons.
5.1
The unit does not turn on
If you are not able to turn on the unit by pressing one of the buttons, the
battery should be replaced. You should also check and confirm that the
battery is inserted correctly.
5.2 After turning on, the unit turns off without announcing the
result
If the unit turns off abruptly without announcing the result, the battery is
weak and should be replaced. If the unit gives progress beeps but doesn’t
announce the result within 3 seconds after turning on, this also indicates
that the unit turned off due to a weak battery.
5.3
The unit is not able to identify the bill
1. Try inserting the bill in a different orientation. Often one corner of
the bill may be damaged but other corners might be fine.
2. Try inserting the bill in a slightly different position in the slot, by
pushing it a little bit towards one of the two sides of the slot
3. Check to make sure that the corners of the bill are not folded during
insertion. If the corner being inserted does have a fold, unfold it and
try again, or insert a different corner.
4. Ensure that the bill is not moved during the identification process.
-8-
5.4
The unit does not announce the denomination
The denomination is not announced by the unit if either of the buttons is
kept pressed after a volume or mode change operation. Once both
buttons are released, the unit will announce the denomination.
6. Warranty and Repair
Orbit Research provides a one-year limited warranty for the iBill Talking
Banknote Identifier from the original date of purchase. The warranty
covers all manufacturing defects as well as all parts and related
workmanship. During this period Orbit Research will repair or, at its
discretion, replace the unit at no cost to the customer. The customer will
be responsible for shipping the unit and all accessories to Orbit Research
and bear the cost of shipping. Proper insurance during shipment is
strongly recommended.
For valid warranty claims, Orbit Research will pay the return shipping
charges.
It is incumbent upon the customer to provide proof of the purchase date
(in the form of the original receipt) at the time when a warranty claim is
made. Please contact Orbit Research for a Return Authorization Number
prior to sending the unit for repairs.
The warranty is void if the unit has been damaged by accident, misuse,
neglect or improper service and does not apply in cases where the unit
has been opened or in any way altered by an unauthorized person.
Repair After Expiration of Warranty
Following the warranty period or in case of damage not covered by the
limited warranty, Orbit Research will make reasonable efforts to repair the
unit. Shipping charges, both ways, will be borne by the customer in this
case.
Disclaimers:
Orbit Research will not be responsible for any direct or indirect
consequences following the utilization of the iBill Talking Banknote
Identifier.
-9-
Orbit Research reserves the right to change product specifications without
notice. Any modifications or upgrades to products previously sold will be
performed solely at the discretion of Orbit Research.
The latest version of this user guide can be found at the Orbit
Research website www.orbitresearch.com.
- 10 -
iBill User Manual Version B
© Orbit Research
Orbit Research
3422 Old Capitol Trail, Suite 585
Wilmington, DE 19808
1-888-606-7248
www.orbitresearch.com
RBIT
RESEARCH
- 11 -