1
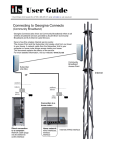
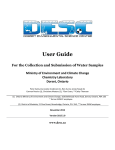
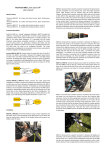
Lake Simcoe Telecom
"YOUR LOCAL ALTERNATIVE”
Lake Simcoe Telecom
“Your Local Alternative”
www.LakeSimcoeTel.com
700 - 213 The Queensway S.
Keswick, ON L4P 2A7
Phone: 289-575-0202
Toll Free: 1-866-661-2079
Fax: 289-575-0203
E-mail: [email protected]
Digital Phone Service
User’s Guide
Version1.0
April 2008
2
Figure 1 Connecting to an Empty Router Port
WELCOME
Thank you for joining us at Lake Simcoe Telecom and giving us the opportunity
to provide you with excellent quality phone services at discount prices. We look
forward to being of service to you. If you need to contact us, please email
[email protected] or call 289-575-0202 or 866-661-2079. We will be
updating our website www.lakesimcoetel.com to continuously improve our
support capabilities and to provide you with new FREE phone services that are
not listed in the current version of this manual.
Power
GETTING STARTED
We have configured your telephone adapter for you in advance, in order to make
set up as easy as possible. The only situation that will require you to change any
settings before using your device is when you connect directly to a DSL Modem
(such as those from Sympatico). When connecting directly to a DSL Modem,
you will need your login information for your Internet Service Provider. We will
discuss this part of the set up later.
Making the Connection
1. Connect any touch-tone telephone to the adapter’s “Phone 1” port with a
standard phone line. (farthest port from “Power”)
2. Use the included blue Ethernet cable to connect the blue “Internet” port on
your adapter to an empty port on your router, as in FIGURE 1 on the next page.
(Skip to step 4)
3. If you are connecting directly to a modem, remove the Ethernet line from
the modem and place it in the yellow “Ethernet” port of the adapter. Your
computer is now connected to the adapter’s “Ethernet” port. Use the included
blue Ethernet cable to connect the now empty port in the modem to the blue
“Internet” port of the adapter, as in FIGURE 2.
4. Plug the power cable into the adapter and into a power outlet.
5. Allow a minute for the adapter to register and you’re done.
Figure 2 Connecting Directly to a Modem
Power
There should be 3 solid green lights on the adapter if all is well. You are now
ready to use your phone. Make and receive calls as you normally would. If you
have connected directly to a DSL modem or are waiting for your phone number
to be transferred, there will NOT be 3 solid green lights at this stage.
If you have a router but no empty port, you can follow the connection
diagram in Figure 2, replacing the modem with the router.
3
4
Set Up for Direct Connection to a DSL Modem
1. The physical connections are the same as already described and shown in
Figure 2.
Router Voice
2. Log into the phone adapter from a web browser (Internet Explorer, Firefox,
etc.) Open a web page and type into the “address bar” (where you see
http://www.....etc) 192.168.0.1
Status
Wan SetupAdmin Login
basic | advanced
Internet Connection Settings
Connection Type:
3.
Your browser should now display the Linksys adapter information:
PPPOE
Static IP Settings
Static IP:
NetMask:
Gateway:
Router
Voice
Status Wan Setup
PPPoE Settings
Admin Login
PPPOE
[email protected] Login
Password:
PPPOE Login
Name:
basic | advanced
************
Optional Settings
Product Information
Product Name:
Software Version:
MAC Address:
Customization:
SPA-2102
5.2.3
000E08 etc
Open
Serial Number:
Hardware Version:
Client Certificate:
FM500G etc
1.2.5(a)
Installed
HostName:
Domain:
Primary DNS:
Secondary
DNS:
Undo All Changes
Submit All Changes
Select the “Wan Setup” tab.
4.
Waiting for Phone Number Transfer
Choose “PPPOE” as your “Connection Type.”
5. Type the username and password that your Internet Service Provider has
assigned to you. In the example on the following page it is [email protected].
The password is blocked out as you type.
6. Click the “Submit All Changes” button at the bottom of the page. The
adapter will reboot itself. Once it has finished this, you can exit out of the
browser. (You can hit the X in the upper right to close it.)
6.
Allow a minute for the adapter to register and you’re done.
There should be 3 solid green lights on the adapter if all is well. You are now
ready to use your phone. Make and receive calls as you normally would. If you
are waiting for your phone number to be transferred, there will NOT be 3 solid
green lights at this stage.
5
Telephone number transfers typically take less than 2 weeks for Bell and Rogers
clients. However, they can take up to six weeks with some other providers. You
can have a temporary phone number from us in the interim if you so desire. If
you choose to have a temporary phone number, you will be required to log into
the adapter to change this number to the number being transferred, in order to
complete the transfer process.
There is nothing that you need to do. PLEASE DO NOT CALL THEM TO
CANCEL YOUR SERVICE. Your number must be active to be transferred.
They will close the account and issue a final bill after we transfer the number for
you.
You will receive an email from us indicating the date the change is set to take
place. We will make every effort to coordinate a mutually agreeable time. Once
the time has come, the third green light on your adapter will become solid. You
6
can now make calls on our service as you normally would. You will want to
make sure you have a phone plugged into the adapter at this point.
Connection Troubleshooting
The most common problem with making the connection is crossing up the
Ethernet cables going into the adapter. If you only have 2 solid green lights, this
would be the place to start. Double-check the wires.
If you have a service other than DSL, there could be a bad wire or connection.
Check the connections again. Try switching up the wires to see if there might be
a bad one.
If you have DSL, you may have entered your login information incorrectly.
Please check the settings once again to ensure they are correct.
If none of the above resolves your issue, it is best to check our website for
further information or contact us for support. We will be glad to assist.
USING YOUR PHONE FEATURES
Voice Mail – There is a visual guide on Page 12.
The voice mail system for your new phone service is a very powerful tool. A full
mail box is a rarity as there is plenty of space to store messages. In this section,
we will first explain how you how to set up your voice mail in the basic manner
so you can get it running right away. We will leave the more advanced
explanations for later.
1. To get into the voice mail system, you can dial *98 from your phone. You can
also call your phone number from an outside line and press the star key (*) when
your message begins. When calling from an outside line you will be prompted
for your mailbox number, which is your 10 digit telephone number.
2. A prompt will ask you for your password. It is your full 10 digit telephone
number, until you change it to something else.
3. A prompt will inform you that it will take you through a setup.
The first thing it will ask you to do is to change your password. If you do not
change your password, you will be prompted to set up your mailbox, every time
you call your voice mail, until you do. Please enter a password that you will
remember and press the pound key (#). It will prompt you to re-enter your
password to confirm. Enter it again, and then press the pound key (#.)
7
The basic set up is now complete. If you want to use standard system greetings,
just hang up. If you want to record your name and personal greeting, please
proceed to the next step. Without a recorded name or greeting, the system will
say “The person at extension (your telephone number) is unavailable.” It then
beeps for the caller to leave a message.
Recording your name and greeting:
4. In the next step of the setup, the system prompts you to record your name.
Say your name after the tone and press the pound key. You can then either press
1 to accept the recording, 2 to listen to it or 3 to re-record it.
5. If you do not want to record a personal greeting, just hang up. If you want
to record a personal greeting please proceed to the next step. Without a personal
greeting, the system will inform callers “(your recorded name) is unavailable.” It
then beeps for the caller to leave a message
6. You will now be prompted to record your unavailable message. This is the
important one as this is the one people hear when they get your voice mail.
Record your message and press the pound key when you are done. You can then
either press 1 to accept the recording, 2 to listen to it or 3 to re-record it. When
you are satisfied with your unavailable message, you can proceed to record a
“busy” message or just hang up.
7. You will be prompted to record a busy message. This message will only be
played to a caller if both of your lines are busy (as you have call waiting.) If you
choose not to accept a call on the second line while already engaged in a
conversation, the caller will still hear your “unavailable” message. If you are on
a call, have a caller on the other line, and a third call comes in, this “busy”
message is played. As such, this is not an important message to record. A
standard system greeting will say “(your recorded name) is busy,” then play a
beep for the caller to leave a voice mail, if you do not record this “busy”
message. Record your message after the tone and press the pound key when you
are done. You can then either press 1 to accept the recording, 2 to listen to it or 3
to re-record it. When you are satisfied with your unavailable message, you will
be forwarded to the main menu.
Temporary Greeting:
There may be times when you may want a special message to play instead of
your standard “unavailable” message. You can set up a “temporary greeting” to
override the unavailable message for any amount of time you desire. It will play
to callers until such time as you erase this “temporary greeting.”
Go into the voice mail system (see Step 1.) From the main menu, select option 4.
You will be prompted to record a temporary message after the tone. Press the
pound key when you are done recording. You can then either press 1 to accept
8
the recording, 2 to listen to it or 3 to re-record it. When you are satisfied with
your temporary message, you will be forwarded to the main menu. You can
hang up.
To delete the temporary greeting and return to your standard “unavailable”
message, go into the voice mail system (see Step 1.) From the main menu, select
option 4. You will be given 2 options. Option 1 is to record a new temporary
greeting. Option 2 is to erase your temporary greeting. Select Option 2 to erase
the temporary greeting and go back to the standard “unavailable” message.
The Voice Mail Menu:
When you call in to your voice mail (Step 1,) you will be informed whether or
not you have any messages of any kind. If you don’t have any messages you will
be forwarded to the main menu.
Main Menu
Press 1 to hear your messages
Press 2 to change folders
Press 3 for advanced options
Press 0 for mailbox options
Press * for help
Press # to exit
The highlighted options are most common and will be detailed. We will deal
with item 2, changing folders, in a discussion of the folder sub-menu. There are
no advanced options to access from this menu at this time so that option 3 will
direct you back to the main menu. The * key causes the main menu options to be
read back to you again. Instead of pressing # it is more likely you will hang up.
Listening to messages - So, let’s pretend we have a new message. Press 1 and
the first new message will be announced, beginning with the date and time of
the message, followed by the phone number it was received from.
You may press 1, at any time, to skip this announcement and go right to the
message. You may instead choose to listen to the announcement and message
playback will begin immediately afterwards. During a message you can select #
to fast forward or * to rewind.
At the end of the message you will hear the message sub-menu. You may make
a selection from this sub-menu or just hang up. If you hang up, the message will
be moved from your “new” message folder to your “old” message folder. You
may select an item from the message sub-menu at any time during a message to
skip the rest of the message and perform the action you have selected. After all
new messages have been played back; old messages will be played back for you.
9
Message Sub-Menu
- 1 listen to first message
- 2 change folders
- 3 advanced options
- 4 previous message
- 5 repeat message
- 6 next message
- 7 delete message
- 8 forward the message to another Lake Simcoe Telecom subscriber
- 9 save message
- 0 mailbox options
- * help
- # exit
Option 1 will begin playback from the first message in the folder.
Option 2 will be addressed in the next section.
Option 3 – Another sub-menu: Press 1 to reply to the message. Record a
message to be returned to the caller. Press 3 to hear the message envelope,
which is the date and time the message was left. Press * key for the main menu.
Option 4 – Option 7 are pretty straightforward.
Option 8 – You can forward the message to another Lake Simcoe Telecom
subscriber. For example, if you have our service at home and at work, you can
forward your messages between the two.
Option 9 – See next section on folder sub-menu.
Option * re-reads the menu options to you.
Option # hangs up.
Folder Sub-Menu
If you choose to “save” a message after listening to it, you will be prompted to
indicate which folder you would like to save it in. If you select Option 2 to
“change folders” from any other menu, you will be asked which folder you
would like to change to. If you wish to retrieve a message that you have saved to
a folder other than “new” or “old,” you will need to know which folder it was
saved to. This is because you have a folder sub-menu that allows you to store
your messages into categories:
0 new messages
1 old messages
2 work messages
3 family messages
4 friends messages
5 through 9 are custom message folders
When a message is left, it is placed in your “new” message folder. After you
have listened to it, it is moved to the “old” messages folder. Any messages, in
10
either the new or old message folders, will be announced to you when you call
in to the voice mail system. The system will indicate how many messages are in
each of these folders.
You do not need to use any of the other folders. They are optional and provided
for convenience. You can use the categories or you can use the numbers 5
through 9. If there are messages in any of the category or 5 through 9 mailboxes,
they are NOT announced when you call in as they are “private” folders. For
added privacy, folders 5 through 9 are NOT announced as part of the folder submenu. To hear these messages, select “change folders” and enter the number of
the folder you want to check.
Saving a Message – After playback, messages are saved automatically to your
“old” message folder if you do not choose to delete them (Option 7 in the
message sub-menu.) If you choose to save a message by selecting Option 9 in
the messages sub-menu, you are required to indicate which folder you want it
saved to. You can choose any of the above listed folders, including 0 for new
and 1 for old. If you save your messages in the new or old folders, they will be
announced to you the next time you call in to check your voice mail. This will
reduce time looking for a saved message.
Mailbox Options – Selecting Option 0 for mailbox options from another menu
will take you to the Mailbox Options Sub-Menu. Here, you can change you
recorded name, greetings and password.
1 unavailable message – select this to change the main greeting
2 busy message – select this to change your busy greeting
3 name – select to change your recorded name
4 temporary greeting – select to add, change or erase a temporary
greeting that will override your standard unavailable message
5 password – select to change your voice mail password
Main Menu – (*98)
1. Listen to Messages
2. Change Folders
3. Advanced Options (Empty)
0. Mailbox Options
* Repeat Choices
# Hang Up
Messages Sub-Menu
1 First Message
2 Change Folders
3 Advanced Options
4 Previous Message
5 Repeat Message
6 Next Message
7 Delete Message
8 Forward Message
9 Save Message
0 Mailbox Options
* Repeat Choice
# Hang Up
3. Advanced Options
1. Reply
3. Message Envelope (date/time)
* Main Menu
The Voice Mail Menu System is summarized in the diagram on the next
page.
Mailbox Options
1 Unavailable Message
2 Busy Message
3 Recorded Name
4 Temporary Greeting
5 Change Password
* Main Menu
4. Temporary Greeting
1. Add/Change Temp. Greeting
2. Erase Temporary Greeting
Folders Sub-Menu
0 New Messages
1 Old Messages
2 Work Messages
3 Family Messages
4 Friends Messages
5 through 9 - Custom Folders
Voice Mail Flow Chart
11
12
Call Display
Call Return
Incoming caller ID, both name and telephone number, will automatically display
on your phone if it is able to display this information.
Lift the receiver and press *69. The phone number of the last call received
will be announced and you will have the option of returning the call. If the
line is busy, hang up and the line will be monitored for 30 minutes. A shortshort-long ring will let you know when the line is free. Once you hear the
ring, lift the receiver and the call will be made automatically. To turn off
this feature, dial *89.
Outgoing caller ID will be displayed unless you use one of the Caller ID
Blocking features explained later. By default, your caller ID is your first initial
and last name. Please inform us if you would like it to be different and we will
gladly change it for you. If you feel particularly creative, we can teach you how
to change your displayed name from your computer. That way, you can change
your caller ID as you desire.
Call Waiting & Visual Call Waiting
Call waiting is enabled on your line so that you can receive a second call while
already on the phone. The second caller’s ID, both name and telephone number,
will automatically display on your phone if it is able to display this information.
You can choose to accept the call with the appropriate button on your phone
(often called “flash, link or switch hook” or the phone may display “accept.” See
your telephone user manual for details.) If you do not accept the call, they will
be forwarded to your voice mail. If you accept a call, the original caller will hear
music while they are waiting. At this time, the music is not selectable.
To disable call waiting for a single call, so you won’t be interrupted by
somebody trying to get through, dial *70. You can choose to activate the feature
during a call by placing the caller on hold (flash, link) and dialling *70 when
you hear the dial tone. You can then press flash or link to return to the call. To
disable call waiting for all calls, pick up the phone receiver and dial *57. To reenable call waiting for all calls, dial *57.
Call Forward – All Calls, Busy, No Answer, Busy & No Answer
You can choose to forward all or some of your calls to another phone, such as
your cell phone.
All Calls - *72 followed by the10 digit number. *73 to turn this off.
When your calls are being forwarded, your phone will have an intermittent dial
tone for the first few seconds after you pick it up.
Only when busy - *90 To turn it off - *91
Only when No Answer - *92 To turn it off - *93
13
Call Hold
Press flash or link. Caller will hear music and you will have a dial tone for a
period, then a fast busy sound. Caller can remain on hold as long as you
want.
Call Back Service
If you don’t want to wait to get through to that constantly busy number, use this
handy feature. If the line is busy and there is no voice message, hang up. Lift the
receiver and press *66. The line will be monitored for 30 minutes. A short-shortlong ring will let you know when the line is free. Once you hear the ring, lift the
receiver and the call will be made automatically. If the line is not free in that
time you can try this again. To disable this feature after it has been set, press
*86.
Three-way Conference Calling and Call Transfer
- While on a call (or after placing the first call) put the party
on hold briefly by pressing the Link or Flash button.
- Dial the number of the second party you wish to call. When
the third person answers you can either briefly press the Link
or Flash button to connect all three parties immediately or
consult privately and press the Link or Flash button when
finished to return to the original call.
- If the number of the third party is busy or does not answer,
or if you dial the wrong number, press the Link or Flash
button twice to return to the original call.
- If you want to allow the other parties to continue the conversation and
leave the call, you can hang up without disconnecting them. This is known
as call transfer.
14
Do Not Disturb
If you want some quiet time, this feature insures the phone will not bother you
as it will not ring. All calls will be forwarded to voice mail during the time this
feature is active, without making your telephone ring. Dial *78 to activate the
feature. When you are ready to take calls again, dial *79 to deactivate it.
Call Back Service
If you don’t want to wait to get through to that constantly busy number, use this
handy feature. If the line is busy and there is no voice message, hang up. Lift the
receiver and press *66. The line will be monitored for 30 minutes. A short-shortlong ring will let you know when the line is free. Once you hear the ring, lift the
receiver and the call will be made automatically. If the line is not free in that
time you can try this again. To disable this feature after it has been set, press
*86.
Another variation of this is the automatic call back. By pressing *07 you will
redial the last number. If it is free, the call is completed. If it is busy, the system
will monitor the line for 30 minutes and let you know if becomes free during
that time.
Remote Message Retrieval
This allows you to check your messages from any other phone. Dial your
phone number. When your voice mail picks up the call and you hear the
beginning of your greeting, press *. You will be asked for your mailbox
number, which is your 10 digit telephone number. You will then be asked
for your password. Once you are in, you have full access to your voice mail
as if you were dialling *98 from your regular phone.
Anonymous Call Blocking
you want to temporarily display your caller ID for a single call, dial *68 before
making the call. If you want to disable the caller ID blocking and return to
normal caller ID display on ALL outgoing calls, dial *82. If you would like to
disable the caller ID for one call only, dial *67 before making the call.
Travelling with Your Phone Number
The adapter is portable. You can plug it in wherever there is high speed internet.
You just need power and a regular phone to plug in. This allows you the
freedom to take your phone with you on holidays, business trips, cottage
weekends and more. People can call you as if you were at your regular location.
You call out from your regular number so nobody sees a difference. You get to
use the long distance capabilities of your phone plan wherever you go, and
nobody even knows that you are away.
UPDATING YOUR 911 ADDRESS
You should keep your 911 address up to date with us at all times. This
includes times when you will be moving the adapter temporarily.
Hopefully, you will never require 911 services. In the event that you do, we
want to make sure they have the correct information to respond to.
Simply call or email us to provide us with the updated information and a
contact phone number for confirmation. We will email you a confirmation
of the update or call you if there is a concern.
In the near future, you will be able to log into our self-service portal under
the My Account tab and update your 911 address online, in real time &
directly into the 911 database.
CONCLUDING NOTE
By activating this feature, you will block incoming calls that do not reveal
the Caller ID of the caller. Instead, they will hear a busy signal when
calling. Pick up the receiver, listen for the dial tone, press *77 to activate.
To deactivate the feature, dial *87.
Outgoing Caller ID Blocking
We hope you enjoy our service and the significant savings associated with it. If
you suspect that there is anything wrong with your service in any way, please do
not hesitate to give us a call or send us an email. We look forward to resolving
any concerns you may have. If you like our services, we hope you will
recommend us to your friends.
By activating this feature, you will block your caller ID from being displayed to
the party you are calling. Dial *81 to block your ID for ALL outgoing calls. If
15
16