1
Developing Penlets
Livescribe™ Platform SDK
Version 1.0.1
i
Developing Penlets
Copyright and Trademarks
LIVESCRIBE, PULSE, and PAPER REPLAY are trademarks or registered
trademarks of Livescribe, Inc. Anoto is a trademark of Anoto Group AB.
Microsoft and Microsoft Word are either registered trademarks or
trademarks of Microsoft Corporation in the United States or other
countries. MyScript is a registered trademark of Vision Objects, Inc. All
other brand and product names are trademarks of their respective
owners.
Copyright © 2007-2009 Livescribe, Inc. All rights reserved.
DevPenlets-1.0.1-SDK-1.0.1-REV-A
8/31/2009 3:59 PM
ii
Contents
Preface ........................................................................................10
About this Document ..................................................................10
About the Platform SDK Documentation Set...................................10
End-User Documentation ............................................................11
Livescribe Platform SDK .................................................................14
Developing Different Application Types .............................................15
Developing Open Paper Penlets ....................................................15
Developing Fixed Print Penlets .....................................................16
Livescribe Paper Designer ........................................................17
Developing a Penlet .......................................................................19
Main Penlet Class .......................................................................19
One Penlet Active at a Time.........................................................19
Penlet Life Cycle ........................................................................20
Developer Tasks in each Life Cycle Method ....................................20
Constructor of the Main Penlet Class..........................................20
The Four Life Cycle Callbacks....................................................20
The initApp method.................................................................21
The activateApp Method ..........................................................22
iii
Developing Penlets
The deactivateApp Method .......................................................23
The destroyApp Method ...........................................................25
Livescribe Platform Java API ........................................................25
Handling Smartpen Events..............................................................27
Creating Event Listeners ..........................................................27
handleMenuEvent in MenuEventListener.....................................28
penDown in PenTipListener ......................................................28
strokeCreated in StrokeListener ................................................29
Regions and Areas.........................................................................30
Regions ....................................................................................30
Static Regions ........................................................................30
Dynamic Regions ....................................................................30
Overlapping Regions ...............................................................30
Areas .......................................................................................31
Region Ids and Area Ids..............................................................31
Associating a Penlet and a Region ................................................32
Dynamic Regions and Instance Ids ............................................32
Static Regions and Instance Ids ................................................32
An Example ...........................................................................33
Accessing Standard Livescribe Controls .........................................34
iv
Developing Penlets
Uniqueness of a Region ID ..........................................................34
Working with Static Regions............................................................36
Working with Dynamic Regions .......................................................37
Creating a Dynamic Region .........................................................37
Get a Bounding Box ................................................................37
New Dynamic Region: Assigning Area Id and Adding Region to
Collection ..............................................................................39
Responding to User Taps on Regions.............................................40
Displaying on the Smartpen OLED ...................................................41
Application Menu and RIGHT_MENU Items .....................................41
Displaying in Response to a User Tap on a Region ..........................42
Displaying a Message to the User ..............................................43
Displaying Text or Image or Both ..............................................43
Playing Sounds .............................................................................44
Using Bitmap Images.....................................................................45
Converting to ARW Format ..........................................................45
Using and Converting Audio Formats................................................47
Sampling Rate ...........................................................................47
Bitrate......................................................................................47
Gaplessness ..............................................................................48
v
Developing Penlets
Summary of Supported Audio Formats ..........................................48
WAV Format..............................................................................48
Generating Files in WAV Format ................................................49
WavPack Format ........................................................................49
Generating Files in WavPack Format ..........................................49
Using the wavpack.exe Tool .....................................................49
AAC-LC ADTS Format .................................................................50
Generating Files in AAC-LC ADTS Format ...................................50
Using the ls_aacence.exe Tool ..................................................51
Using Configuration Files ................................................................52
The menu.txt File.......................................................................52
The config.txt File ......................................................................52
Saving Data to the Smartpen ..........................................................54
Serializing via the PropertyCollection Class ....................................54
Saving to the Smartpen File System .............................................54
Getting Ready for Internationalization ..............................................55
Text Resources ..........................................................................56
Using Internationalized Text Resources ......................................56
Assigning Property Names to Constants .....................................57
Audio Resources ........................................................................58
vi
Developing Penlets
Using Internationalized Audio Resources ....................................58
Image Resources .......................................................................58
Using Internationalized Image Resources ...................................59
Converting BMP & TIFF Images to ARW .........................................59
Handwriting Recognition.................................................................61
Paper-Based Input Recognition ....................................................61
ICR vs. HWR ..........................................................................61
Digital Text vs. Digital Ink........................................................62
Overview of Handwriting Recognition Process.................................63
Tuning for Performance ..................................................................64
Sample Translator .........................................................................66
Sample Translator: User’s Perspective...........................................66
Launching the Sample Translator Penlet.....................................67
Translating a Source Word .......................................................67
Tapping a Previously Written Word ............................................68
Returning to Application Menu List ............................................69
Sample Translator: Developer’s Perspective ......................................70
Domain-Specific Code.................................................................70
User Writes a Word .................................................................71
vii
Developing Penlets
User Taps a Written Word ........................................................71
Constructor and Life Cycle...........................................................71
initApp method.......................................................................72
activateApp ...........................................................................72
deactivateApp ........................................................................73
destroyApp ............................................................................73
canProcessOpenPaperEvents........................................................73
Displaying a BrowseList ..............................................................74
isSelectable ...........................................................................74
Displaying a ScrollLabel ..............................................................75
Registering Listeners ..................................................................75
The Handwriting Recognition Engine .............................................76
Event Handling ..........................................................................77
handleMenuEvent.......................................................................78
Up, Down, Center, and Left Menu Events ...................................78
Right Menu Event ...................................................................79
Navigating Up and Down in a BrowseList ....................................80
Tapping Back From a Right Menu Event .....................................80
strokeCreated............................................................................81
HWR Events: hwrUserPause and hwrResult ....................................82
viii
Developing Penlets
hwrUserPause ........................................................................82
hwrResult ..............................................................................83
penDown ..................................................................................84
Glossary ......................................................................................86
ix
Preface
About this Document
This document describes how to use the Livescribe Platform SDK to
develop penlets for the Pulse™ smartpen.
About the Platform SDK Documentation Set
The Livescribe Platform SDK documentation set includes the following
documents.
Introductory Documentation:
•
Read Me First: introduces the components of the Livescribe
Platform, lists system requirements, and provides download
instructions.
•
Livescribe Developer License Agreement: The Livescribe license
agreement for third-party developers, in TXT and PDF formats. All
developers must accept this agreement before downloading the
Platform SDK.
•
Introduction to the Livescribe Platform: describes the Livescribe
Platform, the Pulse smartpen and Livescribe dot paper, and Pulse
smartpen applications.
•
README.txt: provides a quick overview of how to set up your
development environment. It is aimed at experienced developers
and presents information with minimal context. For full
instructions, see Getting Started with the Livescribe Platform SDK
instead.
•
Getting Started with Livescribe Platform SDK. describes the
contents of the SDK, how to set up your IDE (Integrated
Development Environment), and how to create some simple Hello
World penlets. It also provides a reference for the wizards, views,
and dialogs of the Penlet perspective within the IDE.
10
Developing Penlets
•
Eclipse Help: basic coverage of the Livescribe IDE plug-in with
Eclipse.
•
Release Notes: covers late-breaking information, fixed bugs, and
known issues.
•
Glossary: terms and definitions (located in Getting Started with
the Livescribe Platform SDK).
Penlet Development Documentation:
•
(This document) Developing Penlets
•
Livescribe Platform API javadoc: API reference for packages,
classes, and methods.
•
User Experience Guidelines: presents user interface guidelines for
creating penlets to ensure a consistent user experience across all
smartpen applications.
•
Development Guidelines: presents guidelines for creating penlets
and paper products that conform to Livescribe standards and legal
requirements.
Paper Product Development Documentation:
•
Developing Paper Products: introduces the Livescribe Paper
Designer and processes for designing paper products for the Pulse
smartpen.
End-User Documentation
To learn about the Pulse Smartpen and Livescribe Desktop from a user’s
perspective, please consult their user guides. They are available at
http://www.livescribe.com. Click on the Support button and locate the
Documents list in the right-hand column. Links to the following
documents in PDF format are available:
•
Getting Started: introduces the Pulse Smartpen. A dot-enabled
version of this document is included in the Pulse Smartpen box.
11
Developing Penlets
•
Pulse Smartpen User Manual: explains Pulse Smartpen features
and use.
•
Livescribe Desktop User Manuals for Mac OS X and Windows:
explain Livescribe Desktop features and use.
12
Part I:
Developer Guide
13
Livescribe Platform SDK
The Livescribe Platform SDK is a set of development tools enabling the
creation of Java applications that run on the Pulse™ Smartpen J2ME
platform and dot paper products that work with the smartpen.
14
Developing Penlets
Developing Different Application
Types
Smartpen applications are known as penlets. Penlets can operate on
Open Paper, Fixed Print Paper, or a combination of both. For a conceptual
discussion of Livescribe dot paper, see Introduction to the Livescribe
Platform.
This section discusses the difference between developing Open-Paper
Penlets and Fixed-Print Penlets.
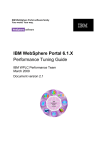
Developing Open Paper Penlets
Open Paper applications can use any existing paper product that has
Open Paper regions, including Livescribe notebooks and journals. The
Piano, which ships with the Pulse smartpen, is an example of an Open
Paper application. It issues instructions to the user via the display and
the audio speakers, creates the dynamic regions based on what the user
draws, and captures Pulse smartpen events on Open Paper as the user
plays the piano. No pre-printed, Fixed Paper controls are involved.
The figure below shows the basic development process for penlet-only
applications.
15
Developing Penlets
To develop Open Paper penlets, follow these general steps:
1. Install Eclipse and the Eclipse plugins from Livescribe. The plugins
are packaged in a single Eclipse feature. For details, consult the
manual titled Getting Started with the Livescribe Platform SDK.
2. Code your penlet against the Livescribe Platform Java API. The
current manual describes how to use the classes and methods
exposed in the API.
3. Eclipse automatically builds your penlet. This process compiles the
penlet code, pre-verifies the classes, and packages the penlet files
into a JAR file.
4. When your penlet is complete, deploy (install) the penlet JAR to
the Pulse smartpen from within Eclipse.
5. Test the penlet code installed on the Pulse smartpen against an
Open Paper region of a Livescribe notebook.
6. Iterate through steps above until your Pulse smartpen application
is complete and tested.
Developing Fixed Print Penlets
A Fixed Print penlet uses dot paper that Livescribe has licensed to you,
often including an association with your penlet. This Fixed Print paper is
known as the paper product for your penlet. It contains the static regions
that you define and to which you assign specific functionality in your
penlet. Users of your penlet cannot access these static regions on the
generic Open Paper notebooks and journals from Livescribe. Printed
images normally indicate the location of static regions on your paper
product.
In addition to static regions, your paper product can also support
dynamic regions—that is, areas that are defined at run-time as the user
interacts with the paper. A powerful paper product often combines static
and dynamic regions. As an example, consider a generic Livescribe
notebook as a paper product for Livescribe's Paper Replay application.
The controls along the bottom are static regions defined and shaped by
the Livescribe engineers during development of Paper Replay. The blank
space in the middle allows users to create dynamic regions as they take
16
Developing Penlets
notes while Paper Replay is running. Similarly, your paper products may
consist of a combination of static and dynamic regions.
Note: Your penlet can create dynamic regions on any portion of licensed
dot paper that does not have static regions defined by a particular penlet.
The dynamic regions will belong to the current penlet. When a user taps
on one of those regions in the future, that penlet will be activated and will
receive notification of region tap via the penDown event.
Livescribe Paper Designer
Fixed Print penlet development uses the same Livescribe IDE as Open
Paper penlets: Eclipse with a custom Eclipse feature developed by
Livescribe. In addition to the Livescribe IDE, you will need to use the
Livescribe Paper Designer to create the paper product for your Fixed Print
penlet. This tool allows you to define static regions, define the pages
including artwork and Livescribe dots, produce test pages containing
development-only dots, and request the production dots for your paper
product from the Livescribe Pattern Server. The final output of the tool is
a Postscript that you can print out. The result will be your paper product,
complete with your licensed dots.
To develop Fixed Print penlets, follow these general steps:
1. Use the Livescribe IDE to develop Fixed Print penlets. For details,
see the manual titled Getting Started with the Livescribe Platform
SDK.
2. Define a paper product for your Fixed Print penlet, using the
Livescribe Paper Designer. Define one or more static areas on the
page(s) of your paper product. For details, see the manual titled
XYZYXZ.
3. Code your penlet against the Livescribe Platform Java API. This
manual describes how to use the classes and methods exposed in
the API.
4. Eclipse automatically builds your penlet. This process compiles the
penlet code, pre-verifies the classes, and packages the penlet files
into a JAR file.
17
Developing Penlets
5. When your penlet is complete, deploy (install) the penlet JAR to
the Pulse smartpen from within Eclipse.
6. Print out one or more test pages, using the Livescribe Paper
Designer. Test pages contain developer dots, which can be used
for the development process only.
7. Test the penlet code installed on the Pulse smartpen against the
test pages.
8. Iterate through steps above until your Fixed Print penlet is
complete and tested. Do not continue until you are certain your
penlet operates as you wish.
9. Request production pages from the Livescribe Pattern Server,
using the Livescribe Paper Designer. The dots on these pages are
licensed to you and will work with your penlet only.
10. Test the production pages with your penlet on your Pulse
smartpen.
18
Developing a Penlet
Although many kinds of penlets can be written for the Livescribe
Platform, the basic anatomy of all penlets is the same. This section
examines the Penlet class, details the penlet lifecycle management, and
lists the packages included in the Livescribe Java API.
Main Penlet Class
The first step to create a penlet is to extend
com.livescribe.penlet.Penlet . The smartpen runtime will only
instantiate classes that derive from Penlet. The life cycle of these objects
is managed by the smarpten runtime.
From this point onward, we refer to the class you write that directly
extends com.livescribe.penlet.Penlet as your Penlet subclass. The
term merely alludes to the importance of this class. You should not infer
that the class has a main method. . There is no public static void
main method in a penlet. Penlets are like MIDlets: they are launched by
the runtime system, which manages their life cycle by calling specific
methods.
One Penlet Active at a Time
Only one penlet can be active on the Pulse smartpen at a time. Keep that
in mind while you read about the penlet’s life cycle. When the user
selects another penlet, the runtime deactivates the current penlet and
switches to the requested penlet. When the runtime switches to the first
penlet, the second one becomes inactive and the first one becomes active
again. Once started, all penlets remain initialized regardless of their
current state of activation until the runtime system unloads them, which
happens at shutdown and at certain system thresholds.
You should be aware that certain globally-accessible static regions are
able to call Livescribe system functionality without deactivating your
penlet. These static regions are the standard controls defined by
Livescribe. For further details, see "Standard Livescribe Controls" in
Developing Paper Products.
19
Developing Penlets
Penlet Life Cycle
The Livescribe system runtime manages the life cycle of a penlet in the
following manner:
1. Instantiates the constructor of your Penlet subclass.
2. Calls initApp.
3. Calls activateApp.
4. Calls appropriate event handlers in registered listeners as various
smartpen events arrive.
5. Calls deactivateApp when an event causes the runtime to move
your penlet from the active state, due to activation of another
penlet.
6. Calls activateApp, if the penlet becomes active again.
7. Calls appropriate event handlers in registered listeners as Pulse
smartpen events arrive.
8. Calls destroyApp if the Pulse smartpen is shut down.
Developer Tasks in each Life Cycle Method
Following is a list of the life cycle methods and the tasks that developers
should perform in each.
Constructor of the Main Penlet Class
Developers can create any application-specific resources that they may
need in their penlet. These resources should relate to the specific domain
of your penlet. If any of your objects are part of the penlet profile and
require a PenletContext, you must instantiate them in the initApp
method instead.
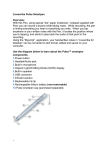
The Four Life Cycle Callbacks
There are four callback methods for which your Penlet subclass must
provide the method bodies. At the appropriate moment in the application
life cycle, the runtime system calls these methods, sometimes passing
20
Developing Penlets
back a value to your penlet. The four life cycle callback methods are:
initApp, activateApp, deactivateApp, and destroyApp.
The following diagram highlights state transition during the life cycle of
the penlet.
The initApp method
Before calling initApp, the runtime creates a PenletContext object and
makes it accessible from the context field of your Penlet subclass. A
penlet has only one penletContext object, which encapsulates various
runtime characteristics of the currently executing penlet.
Factory methods that you call on this PenletContext object instantiate
and return references to key objects such as event listeners, the
Handwriting Recognition engine context, and the collection of regions for
the current page. We will return to these objects as we discuss the other
life cycle callback methods.
21
Developing Penlets
The code in this method will be executed just once, so you should include
tasks that need to be done only once—at the beginning of your penlet’s
life cycle.
The canProcessOpenPaperEvents Method
If your penlet works on Livescribe Open Paper, you must override the
default behavior of canProcessOpenPaperEvents method. By default, the
method returns false. To enable your penlet to work on Open Paper,
override this method and return true. If you neglect this step, every time
your user taps on Open Paper, the runtime system will deactivate your
penlet and switch to Notes Mode. If you intend on supporting Open Paper
functionality and do not override this method, your penlet will be
unusable.
The activateApp Method
The runtime system calls activateApp immediately after initApp and
whenever the penlet becomes active after having been inactive. You
should use this method to restore application state that the newly
activated penlet needs to run.
The runtime passes the reason for the activation to the activateApp
method. Constants identifying the various activation reasons are defined
in the com.livescribe.penlet.Penlet class. The ones of immediate
concern for the new developer are:
This event is sent to the penlet when the
Penlet.ACTIVATED_BY_MENU
user launches the penlet via the Main Menu.
This event is sent to the penlet when the
Penlet.ACTIVATED_BY_EVENT
user taps on an area.
Your penlet can call eventId on the Event passed to this method by the
system and compare it to these constants.
Symmetrical Method Calls
One approach to coding this method is to make it symmetrical with the
deactivateApp method. Do tasks here that you will undo in
deactivateApp. For instance, this is the recommended time to do the
following:
22
Developing Penlets
•
Add your event listeners, by calling the appropriate add*Listener
methods on the PenletContext object. In your first penlets, these
will probably include:
•
addMenuEventListener is required for your penlet to display an
application menu and receive events when the user selects a
menu item.
•
addPenTipListener is required for your penlet to receive such
events as PenDown.
•
addStrokeListener to receive strokes from the system as the
user draws and writes on dot paper.
•
addHWRListener is required for your penlet to receive
intermediate results or “guesses” as the user writes a word and
the final result delivered by the Handwriting Recognition engine.
When adding any of these event listeners, pass in the object
implementing the corresponding listener interface. For example, you will
need the object that implements the MenuEventListener to pass to
addMenuEventListener. In simple penlets that have one monolithic
class, you will pass a reference to your Penlet subclass, using the this
reference.
Keep in mind that you will “undo” these actions in the deactivateApp by
calling remove*Listener methods.
Asymmetrical Method Calls
On the other hand, some method calls in activateApp do not have a
symmetrical call in deactivateApp. For example, you may decide to get
a Display object here so that you can display the application menu. To
do this, call getDisplay on the PenletContext object. However, there is
no corresponding call to “release” this object.
The deactivateApp Method
The runtime system calls deactivateApp immediately before switching
away from your penlet in order to make a different penlet active. The
body of this method should store any relevant application data that could
23
Developing Penlets
be lost in the application switch. You can use the PropertyCollection
class or the PenletStorage class for these purposes. A
PropertyCollection object allows the developer to set and get
developer-defined properties that the system saves on the Pulse
smartpen. The PenletStorage class provides developers access to
storage on the Pulse smartpen file system.
The runtime passes a constant to this method that describes the reason
for the deactivation. Your code can test for the reasons that matter to
your penlet. In your first penlets, it is usually okay not to worry about
these constants and provide a single response to your penlet’s being
deactivated. As you develop more expertise in penlet development, you
may be interested in some of the following deactivation reasons:
•
Penlet.DEACTIVATED_BY_SHUTDOWN
•
Penlet.DEACTIVATED_BY_APPSWITCH
•
Penlet.DEACTIVATED_BY_NOTESMODE
You should release resources that you have retrieved during the
execution of your penlet so that the memory they occupy can be used by
the next activated penlet. There are some symmetrical calls in this
method which undo some of the calls you made in activateApp. Some of
the event listeners fall into this category. For instance, you call
removeHWRListener and pass in the object implementing the HWR
Listener. This balances the addHWRListener call in activateApp.
Asymmetrical Calls in deactivateApp
There are some calls you make in deactivateApp that do not have a
symmetrical call in activateApp.
For instance, consider the Handwriting Recognition engine. It uses many
resources to do the work of analyzing user strokes and producing a word.
You should release these resources in the deactivateApp method. There
are special methods to do this, including calling clearStrokes and
dispose on the engine context object. However, the instantiation of the
engine probably did not take place in the activateApp method. Because
HWR resources are relatively large, you may have decided not to
instantiate the HWR engine until some user event occasioned the need
for it.
24
Developing Penlets
The destroyApp Method
The runtime system calls destroyApp immediately before destroying your
penlet. Your penlet’s initialized state will be lost and its Java classes
unloaded. Any state that you didn’t save in deactivateApp can be saved
in this method. The destroyApp method is called primarily during
shutdown of the Pulse smartpen.
When the Pulse smartpen shuts down an active penlet, the system first
calls deactivateApp and then proceeds to call destroyApp.
Livescribe Platform Java API
Penlets are Java applications that use the Livescribe Platform Java API
(Application Programming Interface). It is based on the Java Platform,
Micro Edition (Java ME) and CLDC (Connected Limited Device
Configuration). The platform is a Java ME stack for with the following
components:
MMAPI 1.2 (JSR 135)
Livescribe Smartpen Profile
CLDC 1.1 (JSR 139)
The Smartpen Profile, created by Livescribe, consists of the following
packages:
•
com.livescribe.afp
•
com.livescribe.configuration
•
com.livescribe.display
•
com.livescribe.event
•
com.livescribe.geom
•
com.livescribe.icr
•
com.livescribe.penlet
•
com.livescribe.storage
•
com.livescribe.ui
25
Developing Penlets
•
com.livescribe.util
For technical details on these packages, their classes and methods,
please consult, Livescribe’s Javadoc in the SDK.
26
Handling Smartpen Events
Penlets are event-driven applications. Events can be actions that occur in
response to a user manipulating the Pulse smartpen on dot paper. Or
events can be various system activities that are of interest to the penlet.
The smartpen system accepts input from the hardware or from the user
and notifies the penlet by calling appropriate event handlers. In some
cases, such as menu actions and system-generated activities, these
events are encapsulated as descendants of the Event class. Thus, there
are menu event objects and system event objects, which the system
passes to the event handler. In other cases, there are no Event
subclasses to encapsulate the events. The system calls the appropriate
event handler and passes in other useful parameters instead, such as
Region objects and time stamps of user strokes.
The major kinds of user actions and system activities include:
Menu Events
Sent by the system when the user taps on a Nav Plus symbol.
Strokes
Sent by the system when the user draws or writes on
Livescribe dot paper. A stroke is the unbroken line (or “curve”)
traced between the time the user puts the pen tip down on dot
paper and the time they pick it up.
Pen Down Events
Sent by the system when the user puts the Pulse smartpen tip
down on Livescribe paper.
HWR Results
Sent by the system when the Handwriting Recognition (HWR)
engine has an intermediate or final result (i.e., a string
containing the word or pattern that the engine produced as its
best analysis of the word the user just wrote).
Area Entering and
Sent by the system when a user is in the middle of creating a
Exiting Notification
stroke with the Pulse smartpen on dot paper and the stroke
enters or leaves a region. We will not discuss this topic in the
present book.
System Events and
Sent by the system to communicate system occurrences (such
Hardware Events
as the user just muted the speaker) or hardware state (battery
level, available flash memory for storage, etc.)
Creating Event Listeners
The developer implements the appropriate listener interface, providing
functionality for the event-handling method(s). Then, the developer adds
the listener to the PenletContext object. In simple penlets, the Penlet
subclass generally implements the various listeners. In more complex
27
Developing Penlets
penlets, a particular listener may be implemented by a helper or manager
class.
Although there are a variety of listener interfaces and the event handler
methods they specify, the most important event handlers for beginning
penlet developers are:
handleMenuEvent in MenuEventListener
The handleMenuEvent method in
com.livescribe.events.MenuEventListener is called by the system
when the user taps up, down, right, left or center on a Nav Plus. The
system passes a MenuEvent object to the method. You can check what
kind of menu event occurred by calling the getID method on the
MenuEvent object and comparing the return value with the constants
defined in the MenuEvent class: MENU_UP, MENU_DOWN, MENU_RIGHT,
MENU_LEFT, and MENU_SELECT.
To select the currently visible menu item in the OLED display, the user
clicks on the right arrow of the Nav Plus. Thus, developers should pay
close attention that they handle the MENU_RIGHT events appropriately.
Note that, despite the name, MENU_SELECT events have nothing to do
with selecting menu items. Instead, they are sent when the user taps the
center of a Nav Plus.
penDown in PenTipListener
The penDown method in PenTipListener is called by the system when
the user places the pen tip down on dot paper. You will be handling this
event even in your first penlets. There is no Event class that
encapsulates this user action. Instead, the system passes in the following
parameters:
time
region
This is a long integer value that indicates when the pen down occurred.
This is a
Region object that identifies the unique rectangle on a page
of dot paper on which the pen down occurred. If there are no regions
where the pen down occurred, the system sets the
pageInstance
A
regionId to 0.
PageInstance object that identifies the particular page of dot
paper on which the pen down occurred. The system instantiates all
PageInstance objects for you and passes the appropriate one to
certain event handlers in which you might need the page instance. For
example, when coding the
penDown or strokeCreated event
28
Developing Penlets
PageInstance object in order
StrokeStorage object and retrieve individual strokes
handlers, you would need the current
to create a
made by the user.
There are other event handlers in PenTipListener that the basic penlets
leave as no-ops, including:
•
penUp
•
doubleTap
•
singleTap
These can be very useful in more sophisticated penlets.
strokeCreated in StrokeListener
The strokeCreated method in StrokeListener is called by the system
when the user completes a stroke on dot paper. There is a Stroke class
to encapsulate strokes, although the strokeCreated does not pass a
Stroke object to this method. Instead, it passes the same parameters as
does the penDown event handler.
Note that when a user creates a stroke, the system calls penDown, penUp,
and strokeCreated. Since strokeCreated encompasses both a pen up
and a pen down, you should think carefully about what happens when a
stroke occurs on an existing region.
For instance, your region may be designed for tapping. But users will
sometimes jerk the smartpen slightly when attempting a tap. This
movement will probably cause a stroke event to be sent to your penlet.
In that case, you should implement the strokeCreated method the same
as the penDown method.
29
Regions and Areas
Regions
An active region is an active expanse of contiguous dots on Livescribe
dot paper. A user can tap on a region and get a response from the penlet
that owns the region. If the penlet is not running, the runtime system will
launch it. If the penlet is just deactivated, the system will activate it.
An active region is often simply referred to as a region. Active region
and region are synonymous.
Static Regions
A static region is a region specified by the developer in the paper
product definition (called an AFD). The dot paper usually has a printed
graphic to indicate the location, shape, and usage of a static region. For
example, the Paper Replay control bar at the bottom of each page in a
Livescribe notebook is a group of static regions. Static regions are
sometimes called Fixed Print regions.
Dynamic Regions
A dynamic region is a region created during run time when a user taps
on unclaimed dot space. (Unclaimed dot space is known as Open Paper.)
The penlet creates dynamic regions that encompass the written input and
can be tapped on to trigger behavior in the penlet. For example, in Piano,
the user creates dynamic regions when drawing piano keys and rhythm
and instrument buttons. In Paper Replay, the user creates dynamic
regions as the user takes notes during a recording. Later, the user taps
on a note and the associated point in the audio starts to play.
Overlapping Regions
Regions may overlap. In that case, the z-order of regions determines in
which order the events are delivered. The region with highest z-order
receives the events first. Then the region with next highest z-order. And
so on. If a region has the occlusive bit set, then regions with lower zorders do not receive events.
30
Developing Penlets
Developers assign z-order to static regions during penlet development.
Dynamic regions often receive a z-order at run time such that the most
recently drawn region is "on top"—that is gets a higher z-order than older
regions. However, this behavior is up to the developer to implement and
is not required.
Areas
While a region is a physical entity on dot paper, an area is a logical
concept. An area defines functionality that should occur when a user taps
on (otherwise interacts with) a region. Best practice dictates that each
area trigger only one such action.
The developer assigns an area to each region. The same area can be
assigned to multiple regions. For example, all the Record buttons in Paper
Replay control bars have the same area, because they all perform the
same action.
Region Ids and Area Ids
A Region Id is an internal 64-bit number that uniquely identifies an
region to a smartpen. The Region Id encodes: Area Id, Instance Id,
Occlusiveness, and Z-order, among other things.
An Area Id is a 16-bit positive integer that is a subset of the Region Id.
An Area Id must be unique within a penlet, but one Area Id can be
assigned to multiple regions. All regions that are owned by the same
penlet and have the same Area Id will have the same functionality.
Developers are responsible for assigning Area Ids to their regions. Static
regions are assigned Area Ids when the paper product is defined.
Dynamic regions are usually assigned Area Ids in event handlers such as
penDown.
The system reserves Area Id of 0 to denote Open Paper—that is, dot
space that has not been claimed by a region. Thus, a developer starts
assigning Area Ids at 1.
31
Developing Penlets
Another way of thinking of an area is as a collection of regions that have
the same area Id.
Associating a Penlet and a Region
A region must be associated with the penlet that should be activated
when a user taps on the region. The Instance Id identifies the penlet
thus associated. Since some penlets may be instantiated multiple times,
each running instance of a penlet has its own Instance Id. For instance,
the Piano application is instantiated separately every time a user draws a
new piano. Thus, several Piano instances may exist simultaneously.
An instance Id is a 16-bit positive integer and is encoded as part of the
Region Id.
Dynamic Regions and Instance Ids
Dynamic regions are assigned an Instance Id by the system when the
region is created. The system encodes the Instance Id in the Region Id.
Static Regions and Instance Ids
Static regions are assigned an Instance Id in a slightly more complex
way.
Application Class Name and Application Id
Each penlet is uniquely identified by its Java class name, such as
com.livescribe.paperreplay. Such class names, however, can be
rather unwieldy, so a more efficient identifier has been devised.
The Application Id is a 16-bit positive integer that the developer must
create and assign to the penlet. The AFD for a paper product maps these
Application Ids to Application Class Names.
When defining static regions, the developer associates an Application Id
with one or more static regions. The Application Id is coded into the
Region Id at development time. Only static regions have Application Ids.
32
Developing Penlets
Application Ids and Instance Ids.
At runtime, a user taps a region. Here's how the smartpen system
responds:
1. Reads the Application Id.
2. Looks up the Application Class Name in the AFD for the paper
product.
3. Looks up the Instance Id for that Application Class Name.
4. Modifies the Region Id, replacing the Application Id with the
Instance Id.
5. Activates (or launches and activates) the appropriate instance of
the appropriate penlet.
The developer deals with these identifiers at different points in his
development process. When defining a region in your paper product, you
associate an Application Id and Application Class Name with the region.
When your code accesses the Region Id in an event handler, however,
only the Instance Id is retrievable.
An Example
To clarify things a little, let's consider an example. Assume a smartpen
has two applications, Paper Replay and Timer, with the following Instance
Ids at run time. (The Instance Ids likely vary from one smartpen to
another.)
Application Class Name
Instance Id
com.livescribe.paperreplay
10
com.livescribe.timer
11
During application development, our developers mapped the following
Application Ids and Application Class Names in the AFDs for the Livescribe
notebooks. They could have chosen any numbers for the Application Ids,
as long as each was unique within an AFD.
33
Developing Penlets
Application Class Name
Application Id
com.livescribe.paperreplay
2
com.livescribe.timer
1
A static region, like the Stop button for Paper Replay, has
Area Id = 4,which is a global value defined by Livescribe for standard
controls. Looking at the second table, you can see that region must have
an Application Id = 2. At run time, the Static Region is tapped by the
user; the event thrown will have Area Id= 4 and Instance Id = 10 (In
the first table, you can see that the Instance Id for Paper Replay is 10.)
For more details on associating Application Ids with penlets and assigning
them to static regions, please read Developing Paper Products.
Accessing Standard Livescribe Controls
Some functionality provided by the smartpen system and by the bundled
applications (such as Paper Replay) is accessible from within your penlet.
You access this functionality by using the Standard Livescribe Controls in
your paper product.
Livescribe publishes a list of the standard Area Id for each such control,
as well as the Application Class Name of the associated system module or
bundled application. Use of Standard Livescribe Controls does not require
Application Ids.
For details, please read "Standard Livescribe Controls" in Developing
Paper Products.
Uniqueness of a Region ID
You may be wondering how Regions Ids can be kept unique in the
following situation:
•
Two regions are defined in the same page of a paper product.
•
The regions are associated with the same penlet.
•
The regions are not distinguished by a z-order value. (They do not
occupy the same dots on the same page.)
34
Developing Penlets
In this case, the smartpen system ensures that each Region object has a
unique region ID. It uses the z-order value for this purpose, since the zorder is otherwise unused. Normally, this is all a matter of system
“bookkeeping” and need not concern you.
35
Developing Penlets
Working with Static Regions
If your application has static regions, it also has a paper product. The
best tool for developing paper products is the Livescribe Paper Designer.
For a detailed discussion of paper creation, including static regions,
please see Developing Paper Products.
For information on handling events, see Handling Smartpen Events in this
manual.
36
Developing Penlets
Working with Dynamic Regions
This section discusses how to create a dynamic region and how to
respond to user taps on a region
Creating a Dynamic Region
There are three main steps to creating a dynamic region.
1. Get a bounding box (which is a Rectangle object). See Get a
Bounding Box.
2. Assign an Area Id and create a Region object. See New Dynamic
Region: Assigning Area Id and Adding Region to Collection
3. Attach the Region to the RegionCollection for that page. See
New Dynamic Region: Assigning Area Id and Adding Region to
Collection
Get a Bounding Box
The location of a region on dot paper is defined by a bounding box.
Whatever actual shape the user writes or draws, the resulting bounding
box is a Rectangle object. There are three ways to get a bounding box
for user input.
•
Get a bounding box for a stroke from the ICR engine.
•
Get a bounding box for a stroke from a StrokeStorage object.
•
Get a bounding box for a group of strokes, using the
StrokeStorage and Stroke classes.
The ICR Engine: When you are using the ICR engine to analyze user
writing, the engine determines a bounding box that encompasses the
user’s written word. You can get that bounding box by calling the
getTextBoundingBox method on the ICRContext object. The method
returns a Rectangle object, which is the bounding box containing the
written word. You normally make that call in the Handwriting Recognition
event handler hwrUserPause.
37
Developing Penlets
The StrokeStorage Class: When you are not using the ICR engine to
analyze user writing, you must instantiate the StrokeStorage class. A
StrokeStorage object contains all strokes that meet two conditions: (1)
the strokes were made on the current page of dot paper and (2) the
strokes belong to the current penlet.
The StrokeStorage object has a getStrokeBoundingBox method that
returns a Rectangle object representing the stroke’s bounding box. You
normally call that method in the strokeCreated event handler.
Getting Bounding Box for Several Strokes: The bounding box
returned by getStrokeBoundingBox is the smallest rectangle in which the
stroke will fit. If you wish to create a bounding box that encompasses
several strokes, proceed in the following manner: Get a bounding box for
the current stroke. Then get the next stroke and get its bounding box.
Create the union of those two bounding boxes. Continue until you reach
the last stroke. You normally determine the union of several bounding
boxes in the strokeCreated event handler.
The following code snippet will captures written strokes and creates a
Shape union which represents the smallest possible rectangle containing
all strokes:
public void strokeCreated(long startTime, Region areaID
PageInstance pageInstance) {
this.currentStroke = strokeStorage.getStroke(startTime);
// Initialize the container Shape
if (null==this.currentRect) {
this.currentRect = this.currentStroke.getBoundingBox();
}
// Add the stroke to the container Shape
else {
this.currentRect = Shape.getUnion(this.currentRect, this.currentStroke);
this.currentRect = this.currentRect.getBoundingBox();
}
Both the Stroke and Rectangle classes extend the Shape class. All
shapes have getBoundingBox and getUnion methods. You can learn
about these classes in the Javadoc for the com.livescribe.geom
package.
38
Developing Penlets
New Dynamic Region: Assigning Area Id and
Adding Region to Collection
The Area ID of a region determines how a penlet responds to a user tap.
When the user taps on Open Paper (unclaimed dot space), the area ID
that the system passes to strokeCreated is 0. The developer must
create an area ID and assign it to the new dynamic region. That dot
space is now claimed by your penlet and will have the Area Id you
specified. Regions that have the same area ID will have the same
behavior.
A RegionCollection object contains all the regions belonging to the
current page of dot paper. When a user creates a stroke on Open Paper,
the event handler must create a new Region for the current stroke and
add the Region to the RegionCollection. The region is now “active.”
When the user taps on that region in future, the penlet will respond as
designed by the developer.
The following code snippet from the Translator Demo sample project
demonstrates creating a unique Area ID for a new dynamic area and
adding a new Region to the RegionCollection. Note that you must pass
in the bounding box of the region when calling the addRegion method.
Rectangle rect = this.hwrEngine.getTextBoundingBox();
RegionCollection rc = this.context.getCurrentRegionCollection();
int wordAID = getAreaIdForWord(...);
addDynamicArea(rect,workAID,ac);
private static void addDynamicArea(Rectangle rect, int aid,
RegionCollection rc) {
int centerX = (rect.getX() + (rect.getWidth() >> 1));
int centerY = (rect.getY() + (rect.getHeight() >> 1));
int areaId = (aid & AREA_ID_MASK)
| ((centerY & AREA_ID_CENTER_Y_MASK)
<< AREA_ID_BITS);
Region regionID=new Region(areaId, centerX, false, false);
rc.addRegion(rect, regionID, false);
}
39
Developing Penlets
Responding to User Taps on Regions
A penlet responds to a user tap on a region by implementing the penDown
event handler. The system passes the following parameters: time,
region, and pageInstance. These are a long value representing the time
stamp of the tap, the Region object in which it occurred, and the
PageInstance object representing the current page of dot paper.
Developers generally implement the penDown event handler in the
following manner:
1. Check if the penDown occurred on Open Paper. If so, simply return.
The strokeCreated event handler should create the region for a
stroke on Open Paper.
A developer can determine if the event is on Open Paper by calling
the getInstance method on the Region object passed to penDown.
The instance ID is a unique integer created by the system to
manage penlets that are installed on a smartpen. If the value is 0,
no penlet owns that dot space; it is Open Paper.
2. If getInstance returns a non-zero value, the current penlet owns
the region on which the penDown occurred. The developer retrieves
the area ID and calls appropriate functionality. Often, the
response is a sound on the smartpen speaker or a display on the
smartpen OLED.
40
Displaying on the Smartpen OLED
The penlet can display on the Pulse smartpen OLED in the following ways:
Application Menu and RIGHT_MENU Items
Many penlets have an application menu that displays available items, one
item at a time. The user scrolls through the menu by tapping the up and
down arrows on the Nav Plus. When the desired menu item appears, the
user selects it by tapping on the right arrow. The penlet then responds
with a submenu, a sound and display, or other functionality.
The responsibilities for implementing the application menu are shared by
the system and the penlet. The system handles display of the current
menu item and display transitions (the “upward/downward scrolling
effect”) from item to item. The developer codes the movement of the
focus through the application menu and, of course, the response to a
MENU_RIGHT event.
Creating an Application Menu: Developers enable an application menu
for their penlets as follows:
1. Implement the BrowseList.Item interface as a static member
class of the Penlet subclass.
2. Instantiate that static member class, once for each item in the
application menu.
3. Instantiate the BrowseList class, passing in a vector of
BrowseList.Item objects.
4. Call the setCurrent method on the current Display object,
passing the BrowseList object as a parameter.
Moving Focus Through the Application Menu: The system displays
the menu items, but the developer must handle moving the current focus
to items in the BrowseList object in response to MENU_UP and MENU_DOWN
events.
1. Call the focusToNext or focusToPrevious methods, as
appropriate.
41
Developing Penlets
2. Call the setCurrent method on the current Display object,
passing the BrowseList object as a parameter. (Not required, if
current Display is already set to the BrowseList object.)
Handling MENU_RIGHT Event: When the application menu is
displaying in the smartpen OLED, the user can tap the right arrow of a
Nav Plus. The penlet must handle the MENU_RIGHT event. One response
is to play a sound and display text to the smartpen OLED. For the method
calls to make, see Displaying a Message to the User.
Displaying in Response to a User Tap on a
Region
When a user taps on a region, the penDown, penUp, singleTap, and
doubleTap event handlers are called by the system. Generally, all penlets
implement penDown. The other handlers are implemented fully or as noops, according to the design of the penlet developer. Many useful penlets
handle user taps on regions by implementing penDown only.
One response to a user tap is to display text and/or images to the
smartpen OLED. Such “tap and display” functionality is very common in a
penlet. The code looks like this:
The following code snippet sets a ScrollLabel as the current
Displayable and draws the specified text to the Display.
if (this.display.getCurrent() != this.labelUI) {
this.display.setCurrent(this.labelUI);
}
this.labelUI.draw(textToDraw, true);
The current display will remain on the smartpen OLED until the penlet
calls setCurrent again (or the system switches to another penlet in
response to user actions.)
42
Developing Penlets
Displaying a Message to the User
Penlets also use a ScrollLabel object whenever they need to display a
message to the user, whether in response to a user tap or not. The calls
are identical to the preceding section.
Displaying Text or Image or Both
The draw method of the ScrollLabel supports the display of text, image,
or both. Penlets call the appropriate version of the overloaded draw
method.
•
void draw(java.lang.String text, Image img, boolean scroll)
•
void draw(Image img, java.lang.String text, boolean scroll)
You can read more about the ScrollLabel class in the Javadoc for
com.livescribe.ui package.
43
Playing Sounds
Sounds that a penlet plays are resources packed in the penlet’s JAR file.
If you place the sound files in your penlet project in the res\audio\
folder, the Ant build system will automatically put them in the JAR at that
same path. The supported file formats are WAV and AAC.
The following code snippet initializes a MediaPlayer object and plays an
audio resource that is specified via usage of the I18N Resource Bundle.
MediaPlayer mediaPlayerUI;
. . .
this.mediaPlayerUI = MediaPlayer.newInstance(this);
. . .
String audioFile=bundle.getSoundResource(I18NResources.ID_SOUND_WRITE_WORD);
this.mediaPlayerUI.play(audioFile);
44
Using Bitmap Images
Like sounds, small bitmap images are resources that are stored in the
penlet’s JAR file. To access these resources at runtime, there is no special
method in the Pulse Smartpen Java API. Instead, you should use
standard Java APIs to get a resource as a stream, as demonstrated in
this code snippet:
Class myPenletClass = this.getClass()
myPenletClass.getResourceAsStream(“images/myImage.arw”)
Bitmaps for display on the smartpen OLED are small. Developers should
verify that their bitmaps are discernable and communicate effectively
with the user. The dimensions of the OLED are as follows:
Full Dimensions of Smartpen OLED Dislplay
Height
18 pixels
Width
96 pixels
The penlet does not always have the full dimensions of the smartpen
OLED display at its disposable. At certain system thresholds, the system
uses a small portion at the right of the display to show the System Tray.
System Tray Dimensions
Height
18 pixels
Width
6 pixels
Converting to ARW Format
A penlet uses image resources in the ARW (Anoto RaW image) file format
only. The SDK’s build system provides a way for developers to convert
images to ARW.
1. Create bitmap images in the TIFF or BMP format.
2. Convert the images to ARW by simply placing them in the
src/images in the penlet project.
45
Developing Penlets
3. The images will be automatically converted to ARW and put in the
JAR in the /images/ folder.
46
Using and Converting Audio Formats
The Livescribe Platform supports three audio playback formats natively:
•
Microsoft WAV
•
WavPack
•
AAC-LC (with ADTS headers)
You should choose one of these formats based on audio quality, playback
features supported, and storage requirements. For all formats, only mono
and stereo are supported. For WAV and WavPack formats, the bit depth
must be 16-bit (AAC has no concept of bit depth).
Sampling Rate
The sampling rate at which the smartpen plays audio files is 16 kHz.
Consequently, 16 kHz is the ideal sampling rate to use when creating
audio. Higher sampling rates are generally usable; however, they should
be avoided whenever possible because:
•
They require additional CPU cycle to play
•
The smartpen's resampling algorithm does not provide high quality
for "down-sampling", since it is designed for "up-sampling."
•
They are a waste of storage space on the smartpen.
Sampling rates lower than 16 kHz are allowed, but they result in a
tradeoff: audio files occupy less storage space, but have lower sound
quality.
Bitrate
A very important measurement of any audio file is bitrate. This refers to
the amount of data consumed by the file each second. It is generally
measured in bits per second (bps) or kilobits per second (kbps).
47
Developing Penlets
Gaplessness
Audio formats can be either gapless or not gapless. A format is gapless if
audio playback can blend seamlessly from one clip to another (or have a
clip loop back to its own beginning in a seamless manner). Because of the
encoder- and decoder-delay inherent in AAC, that format is not gapless.
The other two formats (WAV and WavPack) are inherently gapless
because there is a one-to-one correspondence between input and output
samples.
Summary of Supported Audio Formats
The following table describes characteristics for each of the audio formats
supported by the Livescribe Platform.
Format
Extensi
Min
HQ
Min
HQ
Gaples
CPU
s?
Usag
Mono
Mono
Stereo
Stereo
Bitrate
Bitate
Bitrat
Bitrate
.WAV
256
256
512
kbps
kbps
kbps
kbps
.WV
36 kbps
56 kbps
72
.AAC
16 kbps
40 kbps
on
License
e
e
MS
WAV
WavPac
k
AAC-LC
512
yes
low
free
96 kbps
yes
mediu
free
80 kbps
no
high
kbps
32
m
proprieta
kbps
WAV Format
As the Microsoft audio standard, WAV is probably the most common
audio format in the world. Although the WAV container supports
compressed formats (commonly, ADPCM) WAV files intended for the
smartpen must be 16-bit uncompressed PCM (either mono or stereo).
This format provides perfect quality (within the limits of our 16 kHz
sampling rate), sample-accurate seeking, gapless playback, and minimal
use of the CPU during encoding. However, being uncompressed, it is
very wasteful of the flash storage space on the smartpen and should only
be used when absolutely needed or when the clips are of very short
duration.
48
ry
Developing Penlets
Generating Files in WAV Format
Nearly all audio editing programs can generate WAV files compatible with
the Livescribe Platform. Simply bear in mind the requirements: 16 kHz,
16-bit, stereo or mono.
WavPack Format
The WavPack format is an open-source audio codec that provides both
lossless and lossy compression of WAV files. Like WAV (but unlike AAC),
WavPack is sample-accurate and gapless. The Livescribe Platform does
not currently support WavPack seeking.
The lossless mode allows WavPack to store the exact audio data provided
by the WAV files, but in about half the space. The lossy mode is similar to
AAC, but much simpler. To provide the same quality as AAC, WavPack
requires about a 1/3 higher bitrate, but also uses fewer CPU cycle(s) for
both decoding and encoding, because all processing is done in the time
domain.
Generating Files in WavPack Format
You have two options for creating WavPack files: generate them using a
WavPack-aware audio editor or convert WAV files to WavPack, using the
WavPack tool in Livescribe Platform SDK.
Some audio editing programs support WavPack natively (such as Reaper
and Traverso). There are WavPack plugins for the popular Adobe audio
editor Audition (which also works with CoolEdit) and Steinberg's
WaveLab.
Using the wavpack.exe Tool
If your audio creation program does not export to Wav Pack, you can
simply export to WAV and then convert using the command-line WavPack
encoding tool called wavpack.exe, found in the Livescribe Platform SDK.
Source files must be 16-bit,16 kHz files.
49
Developing Penlets
Lossless WavPack Files
To create lossless WavPack files, use the following syntax at the Windows
command-line:
wavpack filename.wav –x6
The destination file automatically receives the same name a the source
file, but with the .WV extension.
Lossy WavPack Files
To create lossy WavPack files, use the following syntax at the Windows
command-line:
wavpack filename.wav –x6 -bxx
where xx is the desired bitrate in kbps. For example, to generate a highquality stereo file, use –b96.
AAC-LC ADTS Format
The AAC-LC format is a standard lossy compression scheme adopted by
MPEG in 1997. The AAC audio codec is generally considered as the
successor to the MP3 format and is used by iTunes and in the iPod, where
it is identified by the MP4 extension.
The Livescribe Platform uses an AAC variant called ADTS, which is less
ubiquitous than the MP4 format. The AAC-LC ADTS format has no
provisions for adding metadata (sometimes called "tags") and also does
not generally support accurate seeking by time. However, by using only
constant bitrate files (CBR) and by appending a special footer at the end
of each file to indicate the exact duration, we can seek with about a 1/4
second accuracy.
Generating Files in AAC-LC ADTS Format
AAC Content for the smartpen must be generated as specified below:
Otherwise, your files may encounter playback issues.
Use the ls_aacenc.exe tool in the Livescribe Platform SDK Due to
limitations in the Faunhoffer AAC encoder used by this tool, mono files
50
Developing Penlets
are limited to a bitrate between 24 and 32 kbps and stereo files are
limited to a bitrate between 32 kbps and 40 kbps. Source files must be
16-bit, 16 kHz WAV files, mono or stereo only.
Using the ls_aacence.exe Tool
To convert WAV files to AAC-LC ADTS format, use the following syntax at
the Windows command-line:
ls_aacence filename.wav filename.acc [bitrate]
Note that the bitrate is optional and will be clipped to the range
available with the encoder. If no bitrate value is specified, the default is
the maximum bitrate supported by the encoder.
51
Using Configuration Files
A penlet project can include two configuration files: menu.txt and
config.txt. The PropertyCollection class can be used for serialization.
The menu.txt File
The menu.txt configuration file enables a penlet to participate in the
smartpen’s Main Menu. The penlet build process places this file in the
penlet JAR as a resource.
In the penlet’s source code project, the menu.txt file lives in the res
folder. It is a plain text file in which you enter properties using
name=value syntax. The properties are:
Required. Name of the
appclassname=Livescribe.foo.
application class name
Foo
Type
Required. Set to APP
type=APP
Name
Required. Name of the penlet
name=Foo
appclassname
as it should appear in the
Main Menu.
sound
Optional. Name of sound file
sound=NP_Foo.wav
that is played when your
penlet’s name rolls into view
on Main Menu. This file should
also be listed in the
resources property.
The config.txt File
The config.txt configuration file specifies application properties that can
be read by the penlet at run time. The penlet build process places this file
in the penlet JAR as a resource. The properties in config.txt are not
currently writable at run time.
In the penlet’s source code project, the contig.txt lives in the res folder.
It is a plain text file in which you enter properties using name=value
syntax. Examples area:
52
Developing Penlets
foo=bar
foo2=123
You can access your penlet’s configuration properties from your code by
calling getAppConfiguration on the PenletContext object. The method
returns a Config object. To retrieve a property, call one of the following
methods on that Config object:
•
getStringValue
•
getBooleanValue
•
getDoubleValue
•
getLongValue
Note: Since property values are specified in the config.txt file as
strings, you need to know what type each value should be and call the
appropriate method.
Here is a code snippet:
Config config = context.getAppConfiguration();
String value = config.getStringValue(“foo”);
String value = config.getLong(“foo2”);
53
Saving Data to the Smartpen
You can save runtime data from your penlet to the smartpen in two
ways:
•
serializing data using the PropertyCollection class.
•
saving data directly to the file system of the Pulse smartpen.
Serializing via the PropertyCollection Class
The PropertyCollection class allows you to create properties at
runtime. The properties for your penlet are stored in a properties file on
the smartpen’s file system. Since you can set property values to any Java
object, this is a convenient way to achieve object serialization and
deserialization in your penlet. (Of course, very large objects might
degrade your penlet’s performance.)
The steps to use a property collection are:
1. Call the static method PropertyCollection.getInstance,
passing in the PenletContext object.
2. Set properties by calling the setProperty method.
3. Get properties by calling the getProperty method.
For an example of the PropertyCollection class in use, see the
HelloWorld sample penlet in the Livescribe. Its fully qualified name is:
com.livescribe.samples.helloworld.SampleHelloWorld.
You can read more about the PropertyCollection class in the
com.livescribe.afp package.
Saving to the Smartpen File System
You can save data to the file system of the smartpen by using the
com.livescribe.storage package.
54
Getting Ready for
Internationalization
Currently, Livescribe's smartpens ship with support for one locale. In the
near future, the platform will support the use of different locales, allowing
the user to select from a pre-determined set. You can take steps now to
ensure that your penlet will be ready to for the upcoming support of
multiple locales.
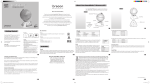
Making your penlets internationalization-ready involves two steps:
1. In your source code, place internationalized resources in the
correct directory trees underneath the res directory.
2. Access these resources using methods in the
com.livescribe.i18n package.
Following is a sample res directory tree:
55
Developing Penlets
res
en_U
messages.propert
menu.text
fr_FR
messages.propert
menu.text
audio
en_U
welcome.wav
goodbye.wav
fr_FR
welcome.wav
goodbye.wav
image
en_U
image.arw
anotherImage.ar
fr_FR
image.arw
anotherImage.ar
Text Resources
Internationalized strings are stored in a file called message.properties,
which is located in a directory bearing the name of a locale. Thus, in the
sample res tree, English strings are in res\en_US\message.properties
and French strings are in res\fr_FR\message.properties.
Using Internationalized Text Resources
Using internationalized text resources in your penlet involves these steps:
56
Developing Penlets
1. Enter the strings in the message.properties file in the following
format: property.name=value
2. Get a reference to the ResourceBundle object. You’ll need the
penlet context for this step.
3. Call the getTextResource method on the ResourceBundle object,
passing the property name of the desired string.
4. Call the getText method on the TextResource object returned by
the previous call.
In the above description of the property name format:
•
By “property.name,” we mean the dotted property names
common to Ant and Java. For example, you might use
greeting.formal as the name of a property that holds the text of
a formal greeting (such as “Good morning, sir or madam.”). And
you might use greeting.friendly as the name of a property that
holds the text of a friendly greeting (such as “Hi, there.”).
•
By “value,” we mean the string in the language you wish displayed
on the smartpen. In the above example: "Good morning, sir" or
"Bonjour, monsieur" And "Hi, there!" or "Salut!".
Here’s a very basic code snippet:.
ResourceBundle bundle = this.context.getResourceBundle();
String strGreeting = bundle.getTextResource(greeting.formal).getText()
Assigning Property Names to Constants
In accordance with good coding practice, you’ll probably decide to assign
the property names to constants and then pass the constant to getText
call. In that case, you would define constants such as:
public static final String I18N_STR_GREET_ADULTS = "greeting.formal"
public static final String I18N_STR_GREET_KIDS = "greeting.friendly"
And the code would look like this instead:
57
Developing Penlets
ResourceBundle bundle = this.context.getResourceBundle();
String strGreeting = bundle.getTextResource(I18N_STR_GREET_FORMAL).getText()
Audio Resources
Internationalized audio files are stored in a directory path including audio
and then the locale name. In the sample res tree, you can find English
audio files at res\audio\en_US and French audio files at
res\audio\fr_FR.
Using Internationalized Audio Resources
Using internationalized audio resources in your penlet involves these
steps:
1. Place your internationalized audio resources in the appropriate
directory under res\audio .
2. Get a reference to the ResourceBundle object. You’ll need the
penlet context for this step:
ResourceBundle bundle = this.context.getResourceBundle()
3. Call the getSoundResource method on the ResourceBundle
object.
4. Call the getInputStream method on the SoundResource object
returned by the previous call.
Image Resources
Internationalized image files are stored in a directory path including
images and then the locale name. In the sample res tree, you can find
English audio files at res\images\en_US and French audio files at
res\images\fr_FR.
58
Developing Penlets
Using Internationalized Image Resources
Using internationalized audio resources in your penlet involves these
steps:
1. Place your internationalized image resources in the appropriate
directory under res\images .
2. Get a reference to the ResourceBundle object. You’ll need the
penlet context for this step:
ResourceBundle bundle = this.context.getResourceBundle()
3. Call the getImageResource method on the ResourceBundle
object.
4. Call the getImage method on the ImageResource object returned
by the previous call.
Converting BMP & TIFF Images to ARW
The smartpen uses image files with an ARW extension, which indicates a
simple 1-bit file format designed for the smartpen. This format has
nothing to do with the Sony image format that uses the same extension.
To create ARW images for your penlet project, do the following:
1. Create BMP or TIFF images with a depth of 1 bit. (Each pixel is
either on or off.)
2. Restrict your image size to 96 x 18 pixels, which is the sized of the
smartpen display. For more details on size requirements for
images, see Using Bitmap Images
3. Place the images in src\images\<locale name> . Thus, place
English BMP images in src\images\en_US and French BMP images
in src\images\fr_FR .
59
Developing Penlets
4. When you build your penlet project, the images will be
automatically converted and placed in the JAR at the following
path: res\images\en_US or res\images\fr_FR, etc .
Note: If you are using Eclipse with Livescribe plugins, you can also
convert images to ARW format by using a visual conversion tool For
more information, see SDK Dialogs: Converting and Adding Project
Resources.
60
Handwriting Recognition
The Livescribe Platform provides support for recognizing users’
handwriting. As a user writes, a handwriting recognition engine
embedded in the smartpen firmware analyzes strokes and delivers
characters, words, and phrases to the current smartpen application.
Paper-Based Input Recognition
Computer recognition of paper-based input is a fascinating and
complicated field, full of acronyms such as OCR, HWR, ICR. This section
briefly describes the differences in these technologies as they apply to the
Livescribe platform. If you are content with knowing that the Livescribe
smartpen performs true online handwriting recognition, you may skip this
section. Otherwise, please read on.
ICR vs. HWR
HWR comes in two varieties, depending on whether written characters
are considered "offline" or "online" data. We will start with the official
names of these technologies, and then say a word about their informal
use.
ICR (Intelligent Character Recognition.) is a technology that analyzes
offline data. It recognizes hand-printed characters that have been
captured by a scanner or camera. ICR can take into account the shapes
and proximity of characters, but has little other information to aid its
interpretation effort. The Livescribe smartpen does not use ICR, in the
strict sense of the term.
Online HWR analyzes online written input. It incorporates some ICR
techniques, but solves an additional challenge—input in real time. From
Livescribe's standpoint, Online HWR is a real-time technology that
accepts strokes from digital pens and determines the characters being
written. Recognition of written input on the Livescribe platform is true
Online HWR.
For Livescribe, strokes are paths traced on dot paper by the smartpen.
The paths are captured and stored as a series of points (x,y pairs) in
2-dimensional space, ordered by time. A single handwritten character is
61
Developing Penlets
made up of one or more strokes. A stroke starts when the pentip touches
down on the paper and ends when the pentip lifts up again. Stroke
characteristics include:
•
the stroke’s start time
•
the stroke's beginning and end points
•
the sequence of points—sampled at equal intervals—which
compose the stroke’s path.
A quick way of describing the handwriting recognition engine? The
engine receives strokes made by the pen on dot paper, and delivers
digital text that a penlet can use.
Used Interchangeably
As often happens, the sharp distinctions between ICR and HWR are rarely
observed in everyday usage. ICR is the older technology, and, indeed,
some ICR techniques persist in HWR. For these reasons, the term ICR is
sometimes applied to any analysis of written input, whether online or
offline. Thus, the smartpen's handwriting recognition engine is called the
ICR engine, and the Java API for handwriting recognition is found in the
com.livescribe.icr package.
In the Livescribe API and documentation, you can treat ICR and HWR as
synonyms.
Digital Text vs. Digital Ink
With the foregoing explanation in mind, we can clarify two other terms
that you may see in the Livescribe platform: digital text vs. digital ink.
Digital text refers to electronic sequences of characters that are
digitally-encoded according to an industry standard, such as ASCII. The
ICR engine takes written input and delivers digital text to the current
penlet.
Digital ink is a term that refers collectively to the strokes captured by a
digital pen. Livescribe's handwriting recognition engine can translate
digital ink into digital text. Not all penlets use HWR.
62
Developing Penlets
Overview of Handwriting Recognition Process
The handwriting recognition process can be described as follows:
•
Once the digital ink is captured by the pen and sent to the
recognition engine, the recognition cycle begins.
•
The recognition engine uses files called resources that give it
information about alphabets, segmentation, character subsets,
language contents and so on.
•
The recognition result is returned to the smartpen application as
digital text.
The handwriting recognition engine used by the Livescribe Platform is the
central element in the recognition process: it uses powerful handwriting
recognition algorithms combined with information about each language
being recognized to yield optimal recognition results.
63
Tuning for Performance
Your smartpen applications will achieve the best performance if you
follow these guidelines:
•
Limit the number of files that your application creates on the file
system. This number should not exceed 500 files.
•
Limit the number of files in the application’s JAR. This number
should not exceed 1000 files. The JAR includes class files and
resource files. Audio resource files, in particular, can become quite
numerous.
If your application needs more than 1000 individual audio
resources, you should consider bundling them into a few, larger
files that will reside either in the JAR or on the file system. You
can then access individual audio resources by calling API methods
that enable direct seeking into the files.
Note: Files in the JAR must NOT be stored with zip compression.
64
Part II:
Sample Translator
65
Sample Translator
Many developers learn most effectively from working samples. This
section examines the Sample Translator penlet, an Open Paper penlet. It
exercises the fundamental functionality of the Livescribe Java API.
This overview will cover the highlights only. If you wish more detail,
please consult the Javadoc in the Livescribe Platform SDK.
Please browse to livescribe.com and log on to the Developer Forums.
Download the com.livescribe.samples.translator project from the
Developer Forum titled Sample Code & Docs & FAQs. Open the
SampleTranslator.java file and follow along as you read. To further
assist you, the source code is amply commented throughout.
We approach the topic of programming penlets in three stages:
1. Sample Translator: User’s Perspective will describe the
Translator penlet in operation, from a user’s perspective. Since
Livescribe’s Pulse smartpen is a new platform and its input and
output models not yet widely known, we will spend a little time
examining the user features of this penlet.
2. Sample Translator: Developer’s Perspective looks at the
source code for Sample Translator. It very briefly describes the
methods that provide the domain-specific functionality of Sample
Translator (that is, how this penlet matches an English source
word to the written word and spokeju4c 9in audio in the target
language). We then jump into the heart of the sample, examining
how it exercises the Livescribe Java API.
Sample Translator: User’s Perspective
The Sample Translator penlet translates individual words from English to
one of four target languages: Spanish, Swedish, Mandarin, and Arabic.
The equivalent word appears on the OLED display of the Pulse smartpen
at the same time an audio clip plays, demonstrating the pronunciation of
the word by a native speaker.
66
Developing Penlets
Following is a quick examination of the Sample Translator penlet from the
user’s perspective. You may wish to follow along on your smartpen by
building the com.livescribe.samples.translator project and
deploying (installing) on your Pulse smartpen. For information on using
the Livescribe IDE, consult the manual titled Getting Started with the
Livescribe Platform SDK.
Launching the Sample Translator Penlet
The user launches the application from the smartpen’s Main Menu as
follows:
1. The user taps on any Nav Plus on Livescribe dot paper, which
launches the smartpen’s Main Menu. The words “Main Menu”
appear on the Pulse smartpen display and the corresponding audio
plays.
2. The user taps on the down arrow of Nav Plus to view the list of
available applications, displayed one at a time.
3. When “Sample Translator” appears on the Pulse smartpen display,
the user taps on the right arrow of Nav Plus to launch the
Translator application.
Translating a Source Word
1. As soon as the application starts, a menu list of available target
languages appears on the Pulse smartpen display. This is the
application menu for Translator.
Note: Not every penlet will have an application menu. Upon
starting, some penlets will display a message or communicate with
the user by playing audio.
2. The user taps the up or down arrow of any Nav Plus until the
desired language appears.
On the Pulse smartpen display, there may be a small triangle at
the upper, lower, or right edge. These triangles mean that a user
can “move” in that direction. When the up triangle is visible, the
user can tap the up arrow on a Nav Plus to see another menu item
67
Developing Penlets
in the browse list. A down triangle indicates that the user can tap
the down arrow. A right triangle means that the user can select
the current menu item and an action will occur. Usually, this will
have one of the following results:
•
Some text and/or an image will display.
•
An audio will play.
•
Display and audio will occur simultaneously.
3. The user taps on the Nav Plus right arrow to start the
corresponding translation engine. The smartpen produces a
message, instructing the user to write a word. This message is
multimedia: the text displays and the appropriate audio plays.
4. On a page of Livescribe Open Paper, the user writes a word from
the list of English source words.
5. The translation engine finds the match in the target language, and
the Pulse smartpen displays the target word and plays an audio
recording of the word, pronounced by a native speaker.
The format of the display is: source word – target word
For instance, if the user writes the word one while the
application is in Spanish mode, the display shows: one – uno .
For Spanish and Swedish, the output consists of Latin
characters. In the case of Arabic and Mandarin, the target
word is displayed as an image that represents the appropriate
non-Latin characters.
Tapping a Previously Written Word
After users write word on the page, they can later return to the word and
tap it. The correct translation will be displayed and the accompanying
audio played. The application will use the current target language when
performing a translation.
Consider our previous example in which the user wrote one:
68
Developing Penlets
1. The user returns to the application’s menu list of target languages
and selects Arabic.
2. The user finds the same page of dot paper and clicks the word one
that they wrote earlier.
3. This time the Arabic word will be displayed and the Arabic audio
played.
4. The user taps on a different word or write a new word.
5. Please remember that this is a sample application, and the word
list is short, consisting of the numbers 0-10, hello, goodbye,
please, thank you, thanks, coffee, chocolate, banana, beer, and
water. If the user writes a word not on that list, the application
displays a message: “Try writing:” followed by the list of English
source words.
Returning to Application Menu List
When users get the “Write or Tap a Word” message, they can tap the up,
left, down arrow or center of a Nav Plus. This action causes the
application menu list to re-appear. In the case of Sample Translator, that
is the target language menu list. Similarly, if a translation is still visible
on the display and the user taps up, left, down or center on Nav Plus, the
target language menu list re-appears.
69
Sample Translator: Developer’s
Perspective
Now that we have examined the Sample Translator application from the
end-user's perspective, you are in a better position to understand
individual classes and method calls. It's time to look at the actual code.
Domain-Specific Code
The purpose of this penlet is to translate individual English words to one
of four target languages: Spanish, Swedish, Arabic, and Mandarin. The
domain-specific logic in this penlet is not our primary focus. A few words
of explanation, however, will help you orient yourself.
The code creates an array called ENGLISH_SOURCE_WORDS to hold the
words that the user can write and the penlet will translate. It also creates
an array of target words (i.e., translations) for Spanish and Swedish. The
target display for Mandarin and Arabic is a little more complicated, since
they do not use the Latin alphabet. The characters for those words are
stored as images. All four target languages have audio resources that
contain the pronunciation of the target word by a native speaker.
The set up work for the translation “lists” depends on the
createDictionary and createImages methods:
•
The createDictionary method creates a hash table for each
target language: the English source word is the key and the target
word (a string or an image, as appropriate) is the value.
•
The createImages method locates each image resource from the
/images/ directory in the penlet JAR, gets a stream, and
creates an Image object. It then returns an array of these images
for the target language (Mandarin or Arabic).
The createEngines method calls both the createDictionary and
createImages methods to implement a translation “engine” for each
target language. In the case of Spanish and Swedish, the images are not
required, so createEngines just retrieves the target words from the
appropriate target word array.
70
Developing Penlets
To get everything started, the SampleTranslator constructor calls
createEngines.
User Writes a Word
When the user writes a word, the code (ultimately) calls processText,
which in turn calls:
•
showTranslation
•
addDynamicArea
The showTranslation method, as you might guess, displays the English
word, a dash, and the translated target word. It also plays the
pronunciation audio file. The addDynamicArea method creates a region
for the word and adds it to the region collection for the page of dot paper
that the user tapped on.
User Taps a Written Word
When users tap on a word they wrote, the region for that word already
exists. The code calls processDynamicAreaId, which retrieves the English
source word and the target word or image and then calls
showTranslation.
And that’s it. Now we can look at how to implement the code that uses
the Livescribe Smartpen Java API.
Constructor and Life Cycle
The SampleTranslator constructor and life cycle methods are pretty
straightforward.
The constructor creates the translation engines, as already mentioned. It
also creates a ScrollLabel object, as well as the Vector object that will
hold the BrowseList.Item objects required for the application menu
(that is, the scrolling list of target languages). In addition, it initializes the
mode field, which will be used by the Handwriting Recognition engine. The
complete code of the constructor looks like this:
71
Developing Penlets
public SampleTranslator() {
this.labelUI = new ScrollLabel();
this.createEngines();
this.vectorMenuItems = new Vector();
for (int i = 0; i < ENGINES.length; i++) {
this.vectorMenuItems.addElement(ENGINES[i]);
}
this.mediaPlayerUI = MediaPlayer.newInstance(this);
this.mode = MODE_READY;
this.setEngine((byte) ENGLISH_TO_SPANISH);
}
initApp method
The initApp method gets the Display object required for output to the
smartpen OLED. It also adds a PenTipListener to handle penDown
events. Since the SampleTranslator class implements the
PenTipListener interface, we pass a this reference to the
PenTipListener. The appropriate snippet is:
this.display = this.context.getDisplay();
this.context.addPenTipListener(this);
Note: The other event handlers in the PenTipListener interface (penUp,
singleTap, and doubleTap) are of no interest to this penlet and are
implemented as no-ops.
activateApp
Of the various things that happen in activateApp, the most important to
us are the following three:
this.menuView = new BrowseList(this.vectorMenuItems, null);
This line creates a BrowseList object, passing in the vectorMenuItems
created in the constructor. The application menu of target languages is a
BrowseList object. Each entry in the menu is a BrowseList.Item object.
this.display.setCurrent(this.menuView);
This line sets the current Display object to the BrowseList object called
menuView, which is the application menu. The current Display object
must be set, or no display to the OLED will occur. We will be resetting
this object when we are finished with the application menu and wish to
display other objects, such as a ScrollLabel object.
this.switchToMode(MODE_TEXT_INPUT);
72
Developing Penlets
This calls a non-API method—that is, one particular to this penlet and not
part of the Livescribe Java API. The switchToMode method initializes the
Handwriting Recognition engine for use in our penlet. It also registers the
StrokeListener, passing in a reference to the SampleTranslator
instance, which implements the StrokeListener interface.
deactivateApp
The deactivateApp consists of one line:
this.switchToMode(MODE_READY);
This is the same method we show in activateApp, except that this time
it is called with the MODE_READY constant. Ultimately, this code clears the
Handwriting Recognition engine of strokes, disposes of its associated
resources, and sets the ICRContext to null. It also removes the
StrokeListener.
Note the symmetry between activateApp and deactivateApp: first we
add the StrokeListener and then we remove it. If the system switches
away from the Sample Translator penlet and later switches back to it, the
activateApp will be called again and the StrokeListener added.
destroyApp
This penlet does nothing in destroyApp. Large resources, such as the
Handwriting Recognition engine resources, were already released in
deactivateApp.
canProcessOpenPaperEvents
This method is inherited from the penlet class, where its implementation
returns false. The SampleTranslator class overrides it and returns true.
This is a simple but essential step for any penlet that wishes to receive
events such as penDown when the user taps on Open Paper.
public boolean canProcessOpenPaperEvents() {
return true;
}
73
Developing Penlets
Displaying a BrowseList
This penlet creates BrowseList.Item objects by implementing the
BrowseList.Item interface in the static member class Engine. The
Engine class serves a double purpose:
•
It provides getTargetLangContent and getTargetLangAudio
methods to return the appropriate target word and audio. They
are called every time a source word must be translated.
•
As implementer of BrowseList.Item, it also provides the language
name (English, Spanish, Mandarin, and Arabic) and accompanying
menu audio for each item on the application menu. It does this by
implementing getAudioMimeType, getAudioStream, getText, and
isSelectable.
The application menu is affected only by the BrowseList.Item section of
the Engine class. Let’s review the code involved:
•
In its constructor, the penlet instantiates the Engine class once for
each target language and assigns the engines to
vectorMenuItems.
•
In activateApp, it creates a BrowseList object, passes in the
vector, and returns menuView.
•
Also in activateApp, it calls
this.display.setCurrent(this.menuView)
This last call hands the initialized BrowseList object to the system, which
uses it to display the current item of the application menu. (We must,
however, handle changing the focus of the BrowseList object, as you will
see in the handleMenuEvent discussion in a moment.)
isSelectable
This method is specified in the BrowseList.Item interface. The Engine
class implements it and returns true for each engine created, ensuring
that on the OLED, that item in the menu application has a small triangle
displayed to the right. The triangle means that the user can tap the right
74
Developing Penlets
arrow of the Nav Plus and get a response from the penlet. In the case of
Sample Translator, the response is the visual and audio message urging
the user to write a word.
In the menuHandleEvent method, a penlet can call isSelectable when it
receives a MENU_RIGHT event. If the return is false, the penlet can choose
not to respond and let the system process the event. The Sample
Translator penlet does not make this test, however, since it knows that
each language on the application menu should have a triangle pointing to
the right.
Displaying a ScrollLabel
BrowseList objects are not the only kind of display available. This penlet
uses ScrollLabel objects to display messages to the user. For instance,
the “Write a word” message and the results of the Handwriting
Recognition engine are both displayed to the smartpen OLED by using a
ScrollLabel object.
You may remember that in the penlet constructor, we created a
ScrollLabel object called LabelUI. This object is used throughout the
code for displaying messages and results. The required sequence of calls
is:
•
labelUI.draw
•
display.setCurrent
You can see actual calls, for example, in the section of handleMenuEvent
that begins with:
if (event == MenuEvent.MENU_RIGHT). The lines
are:
this.labelUI.draw(INPUT_PROMPT, true);
this.display.setCurrent(this.labelUI);
Registering Listeners
Sample Translator implements four listeners: StrokeListener,
PenTipListener, HWRListener, and MenuEventListener. Listeners fall
75
Developing Penlets
into two categories when it comes to registration. Some must be
registered with the PenletContext object and some do not. Of these
listeners, the two that do not need to be registered are:
•
MenuEventListener
•
HWRListener
In this penlet, the listeners that must be registered and unregistered are:
•
StrokeListener
•
PenTipListener
This last group of listeners must be explicitly added by calling
context.addStrokeListener(this) and
context.addPenTipListener(this). The this reference, of course, is
the penlet class that implements the respective interfaces. Also, these
listeners should generally be unregistered by calling
context.removeStrokeListener(this) and
context.removePenTipListener(this).
The Sample Translator source follows this model in the case of the
StrokeListener, which is added by activateApp and removed
(indirectly) by deactivateApp. In both cases, the switchToMode method
is called directly, and it calls the appropriate add or remove method. We
could have done the same for the PenTipListener.
The Handwriting Recognition Engine
This penlet uses the Handwriting Recognition engine to analyze users’
handwriting and return a best-guess at the word written. It uses
intelligent character recognition to accomplish this feat. In fact, we use
the terms HWR (Handwriting Recognition) and ICR (Intelligent Character
Recognition) interchangeably for the present version of the Java API.
This code creates the ICR engine context when activateApp is called and
destroys it when deactivateApp is called. Let’s look at the method that
activateApp calls to perform the initialization of the ICR engine:
switchToTextInputMode. Note that this is not an API call. The code gets
an ICRContext object, specifying what timeout determines the end of a
word. When this time has passed with no more user input, the ICR engine
76
Developing Penlets
returns its best-guess to the penlet. A usable timeout is 1000
milliseconds.
The code then proceeds to add language and handwriting resources
needed by the ICR engine. These are part of the Livescribe Smartpen
Java API., Finally, it registers the StrokeListener.
private void switchToTextInputMode() {
if (this.hwrEngine == null) {
// Obtain an ICR Engine with a (1) second user pause timeout
this.hwrEngine = this.context.getICRContext(1000, this);
this.hwrEngine.addResource(ICRContext.HPR_AK_DEFAULT);
this.hwrEngine.addResource(ICRContext.SK_ALPHA);
this.hwrEngine.addResource("lex_translatordemo.res");
this.hwrEngine.addResource(ICRContext.LK_WORDLIST_30K);
}
// Enable Penlet to obtain Stroke events from the system
this.context.addStrokeListener(this);
}
The deactivateApp releases these same resources and destroys the ICR
engine when it calls the switchToReadyMode method (also not an API
call). It unregisters the StrokeListener at the same time. The calls are:
this.context.removeStrokeListener(this);
this.hwrEngine.clearStrokes();
this.hwrEngine.dispose();
this.hwrEngine = null;
Event Handling
There are five types of events that SampleTranslator handles. They
provide the heart of its functionality. The event handlers are:
•
handleMenuEvent
•
strokeCreated
•
ICR engine events, which includes these event handlers:
a. hwrResult
b. hwrUserPause
•
penDown
77
Developing Penlets
handleMenuEvent
The system calls this event handler whenever it has a new menu event.
The penlet can handle the event and return true—to indicate that the
event is fully handled and need not be further processed by the system.
If the penlet returns false, then the system handles the menu event in a
generic way.
This penlet handles menu events in two ways:
•
It sets the current focus of the BrowseList object (the application
men) and passes it to the setCurrent method on the Display
object.
OR
•
It displays a user input prompt such as “Write a word.” or “Try
writing: (Hello Goodbye Please Thank you Thanks Zero One Two
Three Four Five Six Seven Eight Nine Ten Coffee Chocolate
Banana Beer Water)”
The CurrentMenu field is not an API field. It simply keeps track of what
“mode” the application menu is in: TRANS_MENU_LANGUAGE,
TRANS_MENU_WRITE_TAP, and TRANS_MENU_ACTIVE. You need not worry
about the details, unless they interest you.
The event-handling logic that exercises the API involves the MenuEvent
class constants: MENU_UP, MENU_DOWN, MENU_SELECT, MENU_LEFT, and
MENU_RIGHT. Recall that MENU_SELECT stands for tapping on the center of
the Nav Plus.
Up, Down, Center, and Left Menu Events
The up, down, center, and left menu events may arrive when the Sample
Translator user has written or tapped or word or has just received the
“Write a Word” message. In that case, we set the focus of the
BrowseList object (i.e., menuView) and pass it to the Display object for
display on the Pulse smartpen OLED. The code is:
78
Developing Penlets
if ((event==MenuEvent.MENU_UP)||
(event==MenuEvent.MENU_DOWN)||
(event==MenuEvent.MENU_SELECT)||
(event==MenuEvent.MENU_LEFT)) {
this.menuView.setFocusItem(this.currentEngine);
this.display.setCurrent(this.menuView);
setCurrentMenuMarker(TRANS_MENU_LANGUAGE);
return true;
}
Note that we set the focus of the menuView object to a number
representing the current target language (currentEngine is a byte that
stands for the current translation engine). Then we pass this.menuView
to display.setCurrent so that menuView will be displayed.
Right Menu Event
The RIGHT_MENU event is key to any penlet. This is the event that the
system sends when the user taps on the right arrow of a Nav Plus. It
means “select the current item” or “display a submenu.” In Sample
Translator, it displays the “Write a word” message.
The relevant code is:
if (event == MenuEvent.MENU_RIGHT) {
// Obtain the single prompt string and play associated APM
this.playCommandAPM();
// Draw the single prompt string
this.labelUI.draw(INPUT_PROMPT,true);
this.display.setCurrent(this.labelUI);
setCurrentMenuMarker(TRANS_MENU_WRITE_TAP);
return true;
}
Note that this case handles the event by playing a sound and displaying
text. The term APM means “Audio Punctuation Mark”. In this case, it is
the audio command to the user: “Write a word.” When users tap the right
arrow, they are leaving the application menu. In order to display to the
OLED, we need a ScrollLabel object such as labelUI. We call draw on
that object and then pass it to display.setCurrent. Don’t’ forget this
last step; if you do, your ScrollLabel object will not be displayed.
79
Developing Penlets
Navigating Up and Down in a BrowseList
Consider the state of Sample Translator when the OLED is currently
displaying the application menu and the user taps the up and down
arrows to sequentially access the four choices for target language. In that
situation, handleMenuEvent must implement the browse up and browse
down response of the BrowseList object. Here’s the code:
int selection
if (event == MenuEvent.MENU_DOWN) {
selection = this.menuView.focusToNext();
}
else if (event == MenuEvent.MENU_UP) {
selection = this.menuView.focusToPrevious();
}
else {
selection = this.menuview.getfocusIndex();
}
this.setEngine((byte)selection);
return true;
}
The focusToNext and focusToPrevious methods are defined in the
BrowseList class. Note setEngine, which is not part of the API. It
updates the currentEngine field of Sample Translator, based on the
whether the user browsed up or down. Thus, the currentEngine field
always reflects the current focus item (or, translation engine) of the
BrowseList. Keep this fact in mind for the next section.
Tapping Back From a Right Menu Event
When the user taps the right arrow of a Nav Plus, Sample Translator
abandons the application menu and displays the “Write a word” message,
followed by the English word and translation (if the user’s writing is
successfully read by the ICR engine and the source word is contained in
the English source word array.)
In that state, the penlet may wish to respond to an up, down, left, or
center tap As we saw above, Sample Translator causes the application
menu to be displayed. But at that point, how does the penlet know which
language on the menu to display. If you look at the code in the section
titled “Up, Down, Center, and Left Menu Events” you will quickly identify
the line of code:
this.menuView.setFocusItem(this.currentEngine);
80
Developing Penlets
We set the current focus of menuView by passing the number that
represents the current translation engine. When the user was tapping up
and down, we preserved that number by calling
this.setEngine((byte)selection)
Remember: If “tapping back” after a right menu event makes sense in
your penlet, you must preserve the current focus of the application
menu’s BrowseList object when you handle the MENU_RIGHT event.
strokeCreated
This event handler is called by the system when the user makes a stroke
on dot paper. The system passes as parameters the start time of the
stroke, the region on which it occurred, and the page of dot paper (i.e.,
the PageInstance object).
The system knows which penlet owns the region by calling the
getInstance method on the region. The value returned is the penlet
instance ID, which is assigned by the system. If the stroke occurs on
Open Paper, the region ID is 0. Consequently, the instance ID is also 0,
since the area ID is a 16-bit subset of the region ID.
Sample Translator tests for the instance ID associated with the region
that strokeCreated passes in. If it is 0, then the stroke occurred on
Open Paper and the penlet calls addStroke to send the stroke to the
current ICR engine for analysis into a character. Otherwise, the stroke
should be ignored. The code looks like this:
if (OPEN_PAPER_INSTANCE_ID==region.getInstance()){
if (this.engine != null) {
this.hwrEngine.addStroke(pageInstance, startTime);
}
}
For the sake of convenience, this penlet defined the constant
OPEN_PAPER_INSTANCE_ID = 0.
81
Developing Penlets
HWR Events: hwrUserPause and hwrResult
When the ICR engine (also known as: the HWR engine) receives strokes
via the addStroke method call, the engine tries to assemble strokes into
likely characters. It then compares the growing character string with the
words in its lexicon.
hwrUserPause
When the user stops writing for 1000 milliseconds, the ICR engine posts
an hwrUserPause event, which causes the system to call the
hwrUserPause event handler for the current penlet. It passes as
parameters the time the word was written and the result that the ICR
engine produced. The result is a String.
In Sample Translator, the hwrUserPause handler calls the non-API
method processText, which gets the translated word and audio and then
calls showTranslation to display the translation and play the audio. Then
processText proceeds to:
1. Get the bounding box of the ICR result by calling
getTextBoundingBox on the ICRContext object.
2. Determine an areaId, based on the string passed by the result
parameter. Sample Translator simply uses that string to find the
index of the ENGLISH_SOURCE_WORDS array and uses that index as
the areaId. (See the non-API method getAreaId for details.)
3. Get the region collection for the current page instance and call the
non-API method addDynamicArea to perform these tasks:
a. create a new Region object with the areaId that you found n
the previous step.
b. add the region to the region collection.
4. Finally, processText calls clearStrokes on the ICRContext
object.
82
Developing Penlets
The code in processText that pertains to creating a new region includes
the following snippets. Please note that hwrEngine is an ICRContext
object:
...
Rectangle wordBox = this.hwrEngine.getTetBoundingBox()
...
RegionCollection rc=this.context.getCurrentRegionCollection();
Rectangle wordbox = this.hwrEngine.getTextBoundingBox();
...
if (!rc.isOverlappingEsxistingArea(wordBox) && wordAID >=0){
addDynamicArea (wordBox, wordAID, ac);
The code in addDynamicArea actually creates the region and adds it to
the region collection:
Region tempRegion = new Region (areaID, false, false);
ac.addRegion(rect, tempRegion, false);
When processText has completed, an area ID is now associated with the
new region. When a user taps on that region, areaId can be used to
determine what behavior the penlet should exhibit. For details, see
penDown.
Always call clearStrokes
At the very end of processText you see this call:
this.hwrEngine.clearStrokes();
Remember to clear the strokes from the ICR engine when you have
finished processing hwrUserPause event handler. If you do not, the ICR
engine will give unpredictable results.
hwrResult
The hwrResult event handler is called whenever the ICR engine analyzes
a character and then tries out various words in its lexicon that would fit.
A penlet can display these intermediate steps, process them in some
way, or ignore them. If the penlet ignores them, users will see no
feedback on the smartpen OLED while they are writing a word.
Sample Translator chooses to display each intermediate “guess” of the
ICR engine as comforting feedback to the user that the penlet is still
83
Developing Penlets
operating. In addition, an inaccurate result lets the user know that they
will have to re-write the current word.
The code for displaying the ICR engine’s results in real time is:
this.labelUI.draw(result();
if (this.display.getCurrent() != this.labelUI) {
this.display.setCurrent(this.labelUI);
}
penDown
The system calls the penDown handler when a user taps the pen tip down
on dot paper. Like strokeCreated, the system passes as parameters the
time of the event, the region it occurred on, and the page instance.
In Sample Translator, the code first checks to see if the penDown is on
Open Paper. It does this by calling getInstance on the region. This
returns the instanceId of the penlet. An instanceId of 0 indicates that
the event occurred on no region—that is, on Open Paper. Our code simply
returns:
if (OPEN_PAPER_INSTANCE_ID==region.getInstance() {
return;
}
If the penDown was on a region, then we know that it belongs to Sample
Translator. When an event occurs on a region, the system sends the
event just to the owner of the region. The pertinent code is:
int areaID = region.getAreaId();
// Log AreaIDs that translator handles
// If AreaID is between 0 and source word array length
if((areaID >= 0) && (areaID < (ENGLISH_SOURCE_WORDS.length)) )
{
// If the source word is supported, request engine processing
processDynamicAreaId(areaID);
}
The non-API method processDynamicAreaId uses the areaID to retrieve
the English word from the ENGLISH_SOURCE_WORDS array, the word or
image from the correct target language hash table, and then call the non-
84
Developing Penlets
API method showTranslation, which displays the translation and plays
the pronunciation.
85
Developing Paper Products
Glossary
This section lists terms and definitions important to developing applications for Pulse
smartpens.
This section lists terms and definitions important to developing applications for Pulse
smartpens.
3D Recording Headset: Earphones with embedded microphones that capture
multi-directional, far-field audio and place objects in the sound landscape
surrounding you.
Active Area: See Active Region.
Active Ink: Digitized writing/drawing that can be viewed in Livescribe Desktop—in
normal mode or in animation mode. Clicking on a note starts playing the audio at the
associated point in the audio stream. Related concepts: Animation
Active Region: A portion of paper defined such that when a user taps on it, the
associated penlet responds. You can think of an Active Region like a paper button or
control. Active Regions may overlap in which case their Z-order defines the ordering
of events delivered and their occlusive property defines whether active regions with
lower Z-orders are processed at all. Active Regions can be dynamic (created at
runtime – like the Livescribe Piano) or static (pre-defined in a paper product’s AFD
and established at penlet installation time – like standard Paper Replay controls).
See Dynamic Regions and Static Regions.
Active Verb: Small applications that can be activated on the Pulse smartpen by
writing a single word. The user must first enter the Active Verb mode by performing
a defined action. At present, that action consists of the user double-tapping the
center of a Nav Plus.
AFD: The persistent electronic representation of a paper product. It is used for
communication between the Livescribe system components (that is: the Pulse
smartpen, Livescribe Desktop, Livescribe Online, and Livescribe Developer Tools). A
ZIP-like archive that can hold arbitrary content, it is accessed via the Anoto
Functionality Platform Document API. Each step in the application and UGC lifecycle
adds or removes items in an AFD. The components of an AFD include: Anoto License,
GFX File, Regions File, Info File, Java JAR, Resources, and Tools Data.
AFP: Anoto Functionality Platform. Software modules created by Anoto and licensed
by Livescribe. Contains the functionality for creating AFDs, printing paper products,
86
Developing Paper Products
and licensing Anoto dots. All AFP services are abstracted by Livescribe’s Java
Abstraction Layer.
Animation: A mode for displaying Paper Replay notes in Livescribe Desktop. Normal
mode reveals all the notes when the page is first displayed. Animation mode initially
hides (or grays out) the notes. As the audio plays, notes are revealed onscreen in
sequence with the audio stream. To the user, the notes look like they are writing
themselves on the screen as the audio plays.
Anoto License: License for Anoto pattern page(s). A component of an AFD (Anoto
Functionality Document).
Anoto pattern: consists of small dots (100 micrometers in diameter) arranged with
a spacing of approximately 0.3 mm on an imaginary square grid.
Anoto Units: An Anoto Unit (AU) is the native resolution of the smartpen. One AU =
0.3/8 mm or roughly 677 DPI. This unit is the maximum precision of the Pulse
smartpen and also the maximum precision that, for example a paper product’s page
size or an active region can be set to.
APM: Audio Punctuation Mark. The sounds the Pulse smartpen makes that give the
user audio feedback.
Application Id: A locally-unique identifier within an AFD that specifies what penlet
class name to link the Active Region to. The Application Id is a part of the Region Id.
For Static Active Regions, it occupies the same location in the Region Id as the
Instance Id. The application Id is only relevant when creating paper products and will
be translated in the smartpen to the Instance Id of the application. See Area Id,
Region Id, and Instance Id.
Application Mapping: A key-value pair table that resides in the AFD. The table has
one entry for each application used on each paper product, and each key-value pair
contains the Application Id and the class name.
At run time, when a Static Active Region is tapped by the user, the system takes the
Application Id from the Active Region and fetches the class from the current
document’s Application Mapping table. With the class name, the system looks up the
Instance Id for the current smartpen. It then modifies the event Region Id and
exchanges the Application Id with the Instance Id. Therefore, Static Regions (drawn
using the Paper Designer) use an Application Id that will be translated at run time to
the Instance Id.
In contrast, Dynamic Regions (drawn at runtime and generated by penlet code), use
the Instance Id of the application that created it.
87
Developing Paper Products
For example, assume a smartpen has two applications, Paper Replay and Timer, with
the following Instance Ids at run time:
Class = com.livescribe.paperreplay Instance Id = 10
Class = com.livescribe.timer Instance Id = 11
The Application Mapping Table for the smartpen is:
Application Id = 1 Class = com.livescribe.timer
Application Id = 2 Class = com.livescribe.paperreplay
Here, a Static Region, like the Record button for Paper Replay, would have Area Id =
2 and Application Id = 2. At run time, when the Static Region is tapped by the user,
the event that is thrown will have Area Id = 2 and Instance Id = 10 (since Paper
Replay has Instance Id = 10 in this particular smartpen)
Area: A collection of regions, possibly in multiple AFDs, with the same Area Id and
that thus provide the same functionality.
Area Id: A 16-bit number that is a subset of the Region Id. It represents a smartpen
behavior or action triggered when a user interacts with an Active Region. It is up to
the developer to define which Area Id maps to which behavior, and implement the
corresponding code. Multiple Active Regions on the same page or multiple pages, can
share the same Area Id. In this case, each region will map to the same behavior in
the penlet. For example, the mute button on each page of a Livescribe notebook is
represented by multiple Active Regions (one per notebook page), but each share the
same Area Id. Therefore, when a user taps on the Mute button on any page, the
same Area Id is generated, which triggers the penlet code that activates the mute
function. AreaId starts on 1 since the AreaId 0 is reserved for the system Crop
region. See Application Id, Region Id, and Instance Id.
Claimed Open Paper: an expanse of dot paper that a penlet has claimed at run
time by means of a Dynamic Region.
Claiming: The process by which a penlet associates a user Active Region with an
expanse of dots in a paper product. When claimed, the dots become “active.”
Claiming can happen at penlet installation (for Static Regions) or during penlet
runtime (for Dynamic Regions).
Class Name: The base class in a penlet that subclasses
com.livescribe.penlet.Penlet. The class name links an Active Region in a paper
product to the penlet.
88
Developing Paper Products
Custom Paper Product: A paper product that contains pre-printed graphics (other
than lines) on more than 15% of its surface Region.
Data On Display: The state of an application indicating it has some data to display
to the user when the Pulse smartpen goes into Notes Mode. This state allows the
system to delay showing the Default Screen. For example, a calculator application
might have some result (such as data on the display). The Data On Display state
allows the system to write out the result without activating Notes Mode.
Default Screen: This is the screen that is shown on the display when no application
owns the display.
DFU: Device Firmware Upgrade. The process of upgrading the Pulse smartpen
firmware. This process is also known as flashing the Pulse smartpen.
Dot Paper: Physical paper with predefined Livescribe dot pattern printed on it.
Dots: Navigation points printed on dot paper that allow the Pulse smartpen to know
its own location on the paper. Developed by Anoto, Inc.
DRM: Digital Rights Management.
Dynamic Region: An Active Region created during run time on Open Paper in
response to user interaction with the Pulse smartpen. The penlet creates dynamic
regions that encompass the written input and can be tapped on like a “paper button”
to trigger behavior in the penlet. For example, in Piano, the user creates dynamic
regions when drawing piano keys and rhythm and instrument buttons. In Paper
Replay, the user creates dynamic regions as the user takes notes during a recording.
Later, the user taps on a note and the associated point in the audio starts to play.
See Open Paper, Active Region, Static Region, Claiming, Linking, and Fixed
Print.
Fixed Print (FP): Refers to a region of dot space on a Livescribe page that is preclaimed by a Pulse smartpen application during application development. No other
application can claim these Regions dynamically at runtime. Usually, printed graphics
on the page identify these Regions to the Pulse smartpen user as “paper controls” for
operating the application. Fixed Print regions can also pre-claim Active Regions for
interpreting strokes. Open Paper, Active Region, Static Region, Claiming,
Linking, and Fixed Print.
Fixed Print Application: An application that owns one or more Fixed Print (static)
regions. The region is defined during the development of the application. Tapping on
one of the static regions activates the application. An FP application can also be
89
Developing Paper Products
activated from the Main Menu system. All FP applications must be bound to a Paper
Product via its AFD file.
Flashing a Pulse smartpen: See DFU.
FP: See Fixed Print.
GFX File: Anoto dots for page(s) and reference to background image in Resources. A
component of an AFD (Anoto Functionality Document).
ICR: Intelligent character recognition (handwriting recognition).
Info File: Creator, version info, and so on. A component of an AFD (Anoto
Functionality Document).
Instance Id: A 16-bit number to specify locally in a smartpen which application is
running, and which instance of that application is running. The Instance Ids are
assigned by the system either on installation of an application or when that
application is started. The Instance Id for a specific application varies between
different smartpens depending on user actions and what order the applications are
installed. There may be multiple Instance Ids for the same application. For example,
each Piano drawn on paper is a new instance. See Application Id and Region Id.
JAR: Archive file of Java classes for a Pulse smartpen penlet. A component of an AFD
(Anoto Functionality Document).
Linking: The process by which a paper product’s AFD is associated to one or more.
Linking is done by the developer in the Paper Designer by adding applications to the
paper product’s application list.
Livescribe Desktop: The computer component of the Livescribe Platform.
Livescribe Desktop that allows you to transfer, store, search, and replay notes from
your computer. You can also upload your content to the Web, and manage
applications and content on your Pulse smartpen.
Livescribe Online: The web community of Livescribe Pulse smartpen users who
post and share Pulse smartpen content.
MIDlet: A Java application conforming to the Mobile Information Device profile.
myLivescribe profile: 250MB of personal space a Livescribe Pulse smartpen user is
allotted at Livescribe Online to store and share notes.
90
Developing Paper Products
Nav Plus: A pre-printed or hand-drawn plus sign that lets you navigate your Pulse
smartpen applications and files via the Menu system. Nav Plus controls are preprinted on Livescribe paper products, on the USB mobile charging cradle, and
elsewhere. Users can create these dynamically on any unclaimed dot space by
drawing a cross and double tapping on the center of the cross.
Note Pad: A collection of sheets of Open Paper, in which each sheet may have preprinted graphical materials on no more than 15% of its surface Region (such as
controls and tool bars), excluding ruled lines, grids, and page numbers which may
appear on all or any part of the surface Region.
Notebook: Either a dot paper notebook or a Digitized version of one that the Pulse
smartpen can interact with and that Livescribe Desktop can recognize and interact
with.
Notes Mode: The state of the Pulse smartpen system in which no applications are
running and the system is just capturing strokes written by the user on dot paper.
The Pulse smartpen shows the Default Screen when the smartpen is in Notes Mode.
OLED: Organic Light-Emitting Diode. A display technology that requires no backlight
and draws far less power than LCDs. The Pulse smartpen has an OLED display that is
18 x 96 pixels.
OP: See Open Paper.
Open Paper (OP) Application: An application that can dynamically claim Open
Paper regions during runtime. OP applications are not bound to any Paper Product’s
AFD file, allowing the application to use any unclaimed dot space. Once OP
applications are launched (by the Main Menu or through some other gesture) the
application may create dynamic regions for input UI controls.
Open Paper (OP): Sections of a Livescribe dot page that are not currently claimed
by a Pulse smartpen application, but are available to be claimed at runtime. When a
user runs an application and writes on the dots, the currently active application can
claim them. In general, a surface, or a portion of surface that is printed with parts of
the dot pattern and on which no pre-printed materials other than ruled lines, grids,
or page numbers appear. Open Paper has an Area Id of 0. When the system detects
actions on Open Paper such as penDown, a Region Id with an Area Id of 0 is passed
to the appropriate event handlers.
Page Viewer: Livescribe Desktop mode that allows users to view individual pages or
sets of thumbnails of pages from their Paper Sources.
91
Developing Paper Products
Page: Single piece of either dot paper (loose-leaf or bound), or the digitized version
of one that Livescribe Desktop can recognize and interact with.
Paper Button: So called because it resembles an onscreen button in a standard
computer application. A Pulse smartpen user can tap on a paper button to trigger
particular functionality of the penlet.
Paper Product Developers: A team of developers that typically create one or more
Livescribe dot enabled files used to print active paper. Typically, this team includes:
graphic/production artists to create the layout and art for the paper and a Java
developer who maps the paper art to static regions associated with the penlet
application – a process called “shaping”.
Paper Product Only Application: Consists of paper definitions and the physical
paper created by printing with these definitions. Paper products are installed on a
Pulse smartpen (without penlet code). This paper is designed to interact with preexisting penlet code on the Pulse smartpen. For example, a publishing company
might want to create new notebooks for Livescribe, branded with a special
background image.
Paper Product: Any open paper or note pad printed with any part of the dot pattern
and that are used along with a penlet in an application. In general, the definitions
and resources required to identify and print dot paper. Paper Products are
represented electronically to penlets and Livescribe Desktop as Anoto Functionality
Documents (AFDs). See also Custom Paper Product.
Paper Replay: Pulse smartpen application that records audio (such as a lecture) at
the same time that the user takes notes on Open Paper. Paper Replay synchronizes
the notes with the recorded audio. Later, the user can tap on a note and play the
audio that was recorded while that note was being written. The notes are considered
indexes into the audio stream.
Paper Source: Any of the real-world or virtual paper sources that Livescribe
Desktop can recognize and work with, including notebooks and journals.
Pattern Page: Identified by a page address: segment.shelf.book.page. For example,
1.2.3.4 denotes pattern page 4 in book 3, which is located on shelf 2 in segment 1.
Pencast: A type of content sharing via the web.
Penlet Developers: Java programmers who create the penlet application using the
Livescribe Platform Java API and an IDE.
92
Developing Paper Products
Penlet: Java application installed on the Pulse smartpen. Penlets are created using
the Livescribe Platform Java API and are based on the Java Platform, Micro Edition
(Java ME) and CLDC (Connected Limited Device Configuration). When a user taps (a
penDown event) on an active region of a penlet, it will de-active the current running
penlet and activate the new one. See Syslet.
Quick Commands: A series of commands you can write on dotted paper to quickly
learn the current status of your Pulse smartpen.
Quick Record: A method of quickly recording with your Pulse smartpen. Activate
Quick Record by pressing and holding your Pulse smartpen power button for two
seconds.
Region Collection: A collection of regions on a single page of dot paper.
Region Id: An internal 64-bit number that uniquely identifies an Active Region to a
smartpen. The Region Id encodes: Area Id, Instance Id, Occlusiveness, and Z-order,
among other things.
Region Id: An internal 64-bit number that uniquely identifies an Active Region to a
smartpen. The Region Id encodes: Area Id, Instance Id, Occlusiveness, and Z-order,
amongst other things. An Active Region is a portion of paper. Active Regions may
overlap in which case their Z-order defines the ordering of events delivered and their
occlusive property defines whether active regions with lower Z-orders are processed
at all.
Region: See Active Region.
Resources: Images and audio files used by a penlet. They are included in the
project and are packed into the JAR when the penlet is built.
Session: (in Paper Replay). The audio (with or without linked notes) that is recorded
between the time the user taps Start and Stop on the Paper Replay paper controls.
Also known as a Paper Replay Recording.
Share: Upload file(s) to online account (myLivescribe), presumably for sharing with
others.
Smartpen Application: The combination of a penlet and Paper Product that enables
a Pulse smartpen to interact with dot paper.
Smartpen Movie: An animation that plays on the Pulse smartpen’s OLED.
93
Developing Paper Products
Smartpen: The Pulse™ smartpen, and subsequent generations of smartpens, sold
by Livescribe.
Static Region: An Active Region specified by the developer in the paper product
definition (see AFD). The dot paper usually has a printed graphic to indicate the
location and usage of the static Region. For example, the Paper Replay control bar at
the bottom of each page in a Livescribe notebook is implemented as a group of static
regions. See Active Region, Dynamic Region, Claiming, Linking, and Fixed
Print.
Syslet: A special kind of system-level penlet that provides system-level functionality
for menuing and volume control. Unlike normal penlets, when a penDown occurs on
a Region ID of a syslet, the currently active penlet does not lose focus. See Penlet.
TTS: Text to Speech.
UGC: User Generated Content. Data generated by a Pulse smartpen user. This
information can be shared with the Livescribe Online community.
USB Mobile Charging Cradle: The included cradle that charges and connects your
Pulse smartpen to your computer.
User Input: The most common way for users to enter commands and data to a
penlet is by writing or tapping on paper. User input is captured through smartpen
events (such as penDown and strokeCreated) which are handled by a penlet.
Virtual Notebook: Collection of digitized pages gathered into a notebook that does
not necessarily have a physical paper counterpart.
Virtual Page: Collection of ink or audio or both, gathered from other pages,
collected into a digitized page that does not necessarily have a physical paper
counterpart.
Web Services: A comprehensive set of on-line services to support users,
developers, and Pulse smartpen partners.
94